Most people who squat regularly have never been properly taught the movement — and many don’t realize their form is causing joint stress until they feel pain in their knees, hips, or lower back. The squat isn’t complicated, but a few millimeters of misalignment between your knees and your toes can shift the load from your muscles directly onto your joints.
That’s why so many beginners dread squat day. You watch someone at the gym make it look effortless, then wonder if you’re doing it completely wrong. The good news: knowing how to do a perfect squat is a teachable skill, not a physical gift — and once you’ve built the pattern, it stays with you for life.
By the end of this guide, you’ll know exactly how to do a perfect squat, from foot placement to breathing mechanics, so you can build lower-body strength safely and confidently at any fitness level. We’ll walk you through a 5-step technique breakdown, the most common mistakes and how to fix them, pain-free modifications for hip pain, prolapse, and older adults, and how to progress to weighted variations when you’re ready.
How to do a perfect squat requires feet shoulder-width apart, hips hinged back, chest up, and a controlled descent to parallel — a system called The Setup-Move-Adapt Framework.
- Set your foundation: Feet shoulder-width, toes 15–30° outward, weight distributed through your heels
- Execute precisely: Hinge at the hips first, knees track over toes, chest stays lifted throughout the descent
- Adapt to your body: Stance width, depth, and load should match your unique anatomy and mobility
- The Setup-Move-Adapt Framework gives you a three-phase roadmap — identify which phase is breaking down and fix your squat from there
- NIH research confirms: A wider stance can increase gluteus maximus activation by up to 61% compared to a narrow stance (NIH, 2026)
Before You Begin: Prerequisites and Safety
If you have any joint pain, a recent surgery, or a pelvic floor condition, please read the pain-free modifications section (H2 4) before starting. This guide covers real technique, not generic advice — and that means some of it requires you to first check in with your body and, when needed, a licensed professional.
What You’ll Need:
- Estimated Time: 30 minutes
- A flat, open space (roughly 6×6 feet)
- Flat-soled shoes — Converse, Vans, or bare feet work well. Running shoes with cushioned heels tilt your weight forward and make it harder to sit back into the squat, which shifts load from your glutes to your knees
- Optional: a sturdy chair or low bench placed behind you for the box squat variation (helpful for depth control)
- Optional: a light resistance band around your knees to practice tracking
3-Minute Warm-Up (Do This Before Every Squat Session):
- Hip circles — 10 reps in each direction, standing on one leg
- Ankle circles — 10 reps each side, holding a wall for balance
- Bodyweight good mornings — 10 slow reps (stand tall, hinge forward from the hips with a soft knee bend, return)
- Wall hip flexor stretch — 30 seconds each side in a half-kneeling position
Once you’ve warmed up, follow these five steps to build your perfect squat technique from the ground up.
How to Do a Perfect Squat: The 5-Step Method
The bodyweight squat — also called the air squat — is the foundational version of the movement performed without any equipment. Master this before you ever touch a barbell. The Setup-Move-Adapt Framework organizes the squat into three clear phases: (1) Set your foundation with the right stance and posture, (2) Move through the descent and ascent with biomechanical precision, and (3) Adapt the movement to match your unique anatomy. Every step below maps to one of these phases.
Adopting a medium-to-wide squat stance can increase gluteus maximus activation by up to 61% compared to a narrow stance (NIH, 2026) — making stance width one of the most impactful and underappreciated form variables for beginners.
The perfect squat breaks down into five essential steps:
- Stand feet shoulder-width, toes slightly out
- Brace your core and breathe into your belly
- Hinge hips back before bending your knees
- Lower until thighs are parallel to the floor
- Drive through heels to return to standing
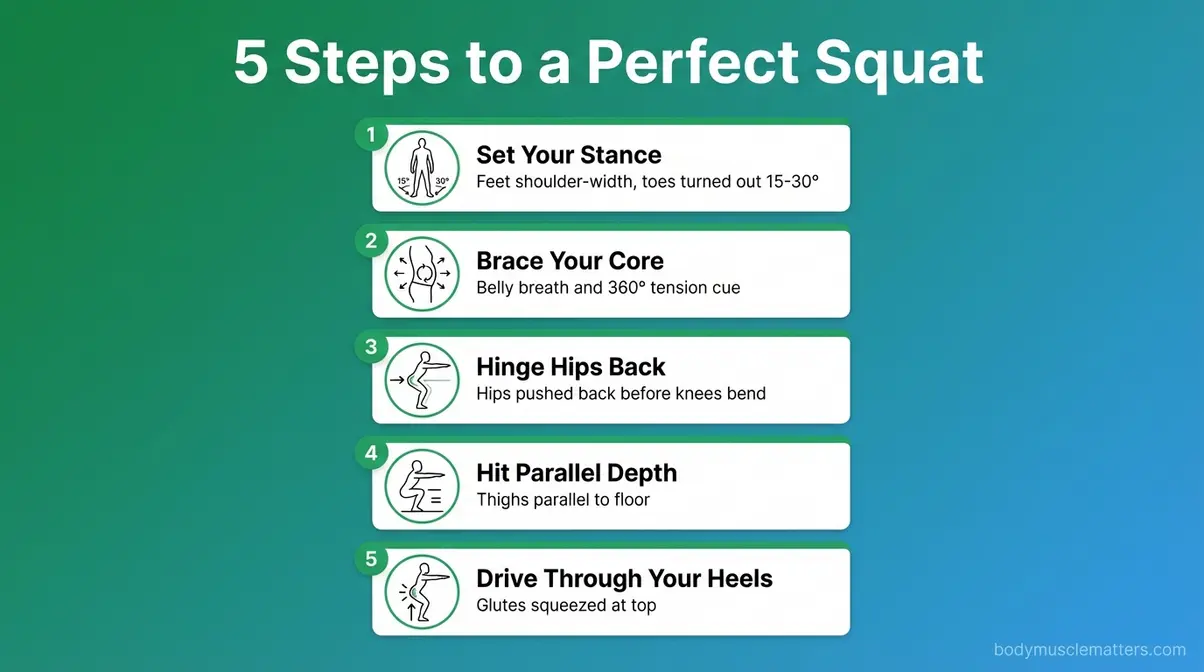
Caption: The five-step squat sequence — from stance setup to heel drive — illustrated for complete beginners.
Each step is explained in full detail below.
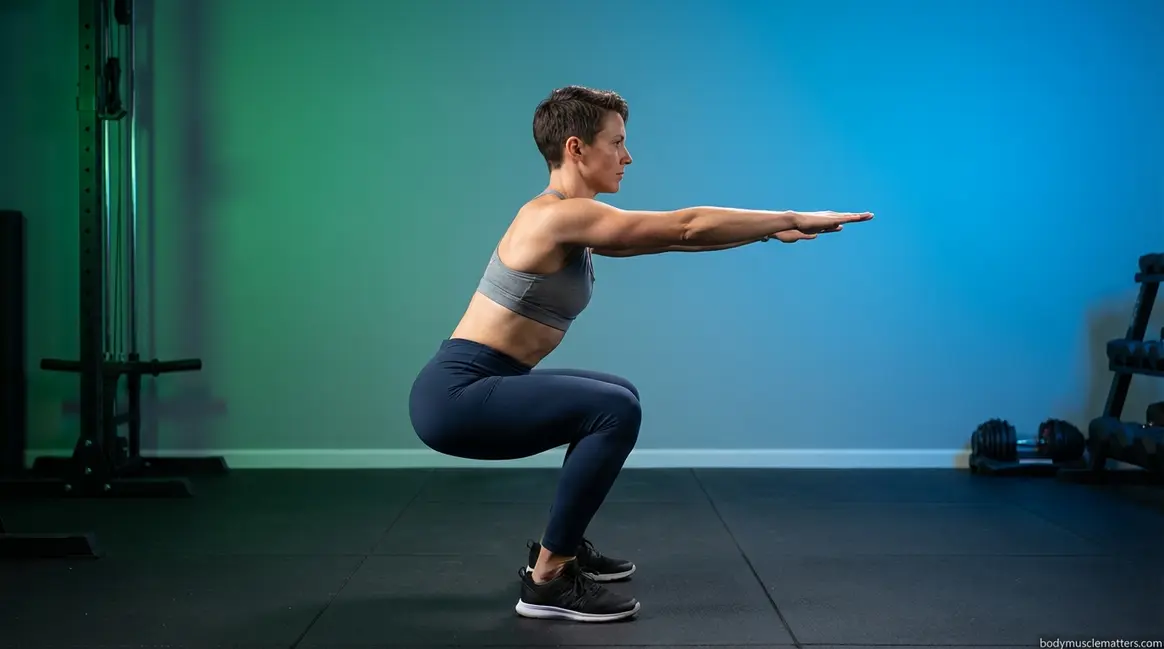
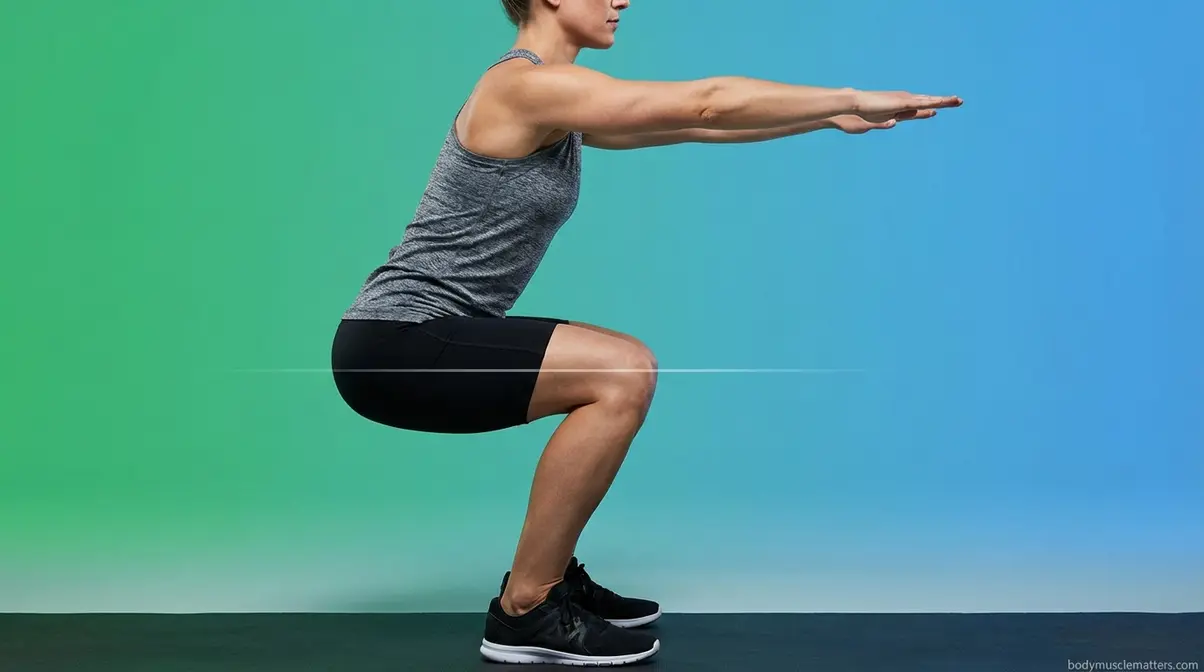
Step 1 — Set Your Stance
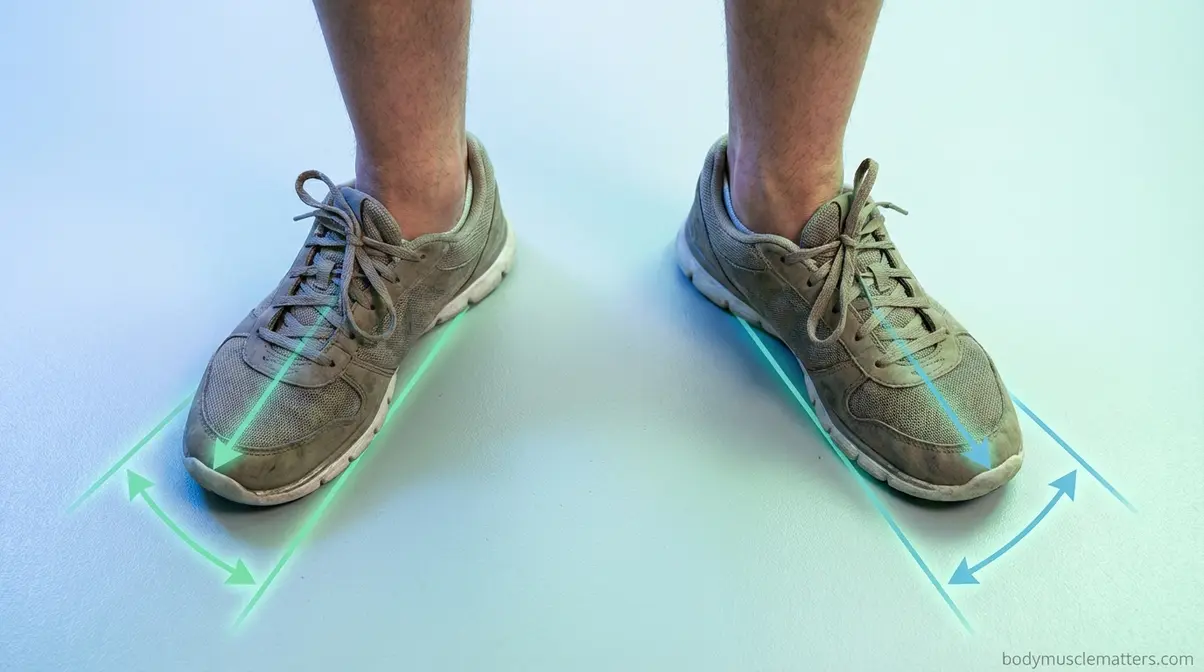
The Setup phase of the Setup-Move-Adapt Framework begins here, because your feet determine everything that follows. Stand tall with your feet directly under your hips — roughly shoulder-width apart, or slightly wider. Point your toes outward between 15 and 30 degrees (think “10 and 2” on a clock face).
Why this matters: Your hip anatomy (the angle and depth of your hip socket) determines your ideal toe-out angle. According to the NSCA, individual hip anthropometrics — the unique shape of your hip joint — dictate how much external rotation naturally allows you to squat without pinching the joint. Forcing a narrower foot position than your anatomy allows will create hip impingement or knee discomfort. If a slightly wider, more turned-out stance feels more comfortable, trust that signal.
Weight distribution: Press your feet evenly into the floor through three points — your heel, the ball of your foot under your big toe, and the ball of your foot under your pinky toe. Physical therapists often call this the “tripod foot.” Feel your weight in your heels throughout the movement; if your heels want to rise, your stance or ankle mobility needs attention.
Your arms: Extend them straight in front of you at shoulder height, or fold them across your chest. Either counterbalances your torso as you descend.
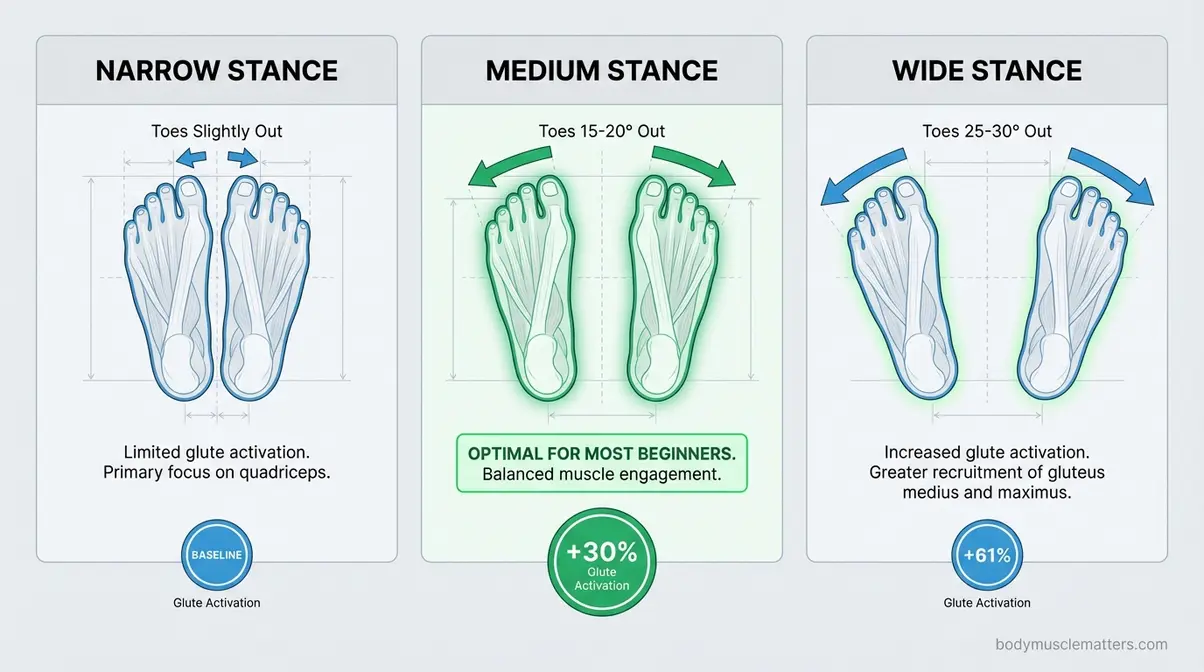
Caption: Stance width affects which muscles do the most work — a medium-to-wide stance increases glute activation significantly.
Step 2 — Brace Your Core
Before you move a single inch downward, you need to create stability through your trunk. This is the most skipped step in beginner squatting, and skipping it is exactly what causes the lower back pain people associate with the exercise.
“Core bracing” means creating 360-degree tension around your midsection — not just sucking your stomach in, but actively tightening your abdominals as if you’re about to take a punch. This is called the Valsalva maneuver (a technique used by physical therapists and strength coaches to protect the spine under load).
Here’s the single most important breathing cue, used by physical therapists worldwide:
“Take a deep breath into your belly and lower back, ensuring that your chest does not rise.”
When you breathe this way, your diaphragm descends and creates intra-abdominal pressure (IAP) — internal pressure that acts like a natural weight belt, stabilizing your lumbar spine. Your chest should stay still. Your belly and sides should expand outward. Then, brace that breath tight before you descend.
Why this matters: Physical therapists commonly use this intra-abdominal pressure cue with patients recovering from lower back injuries, because a braced core reduces the shear forces placed on the lumbar discs during loaded movement. Skip the brace and those forces go directly to your spine.
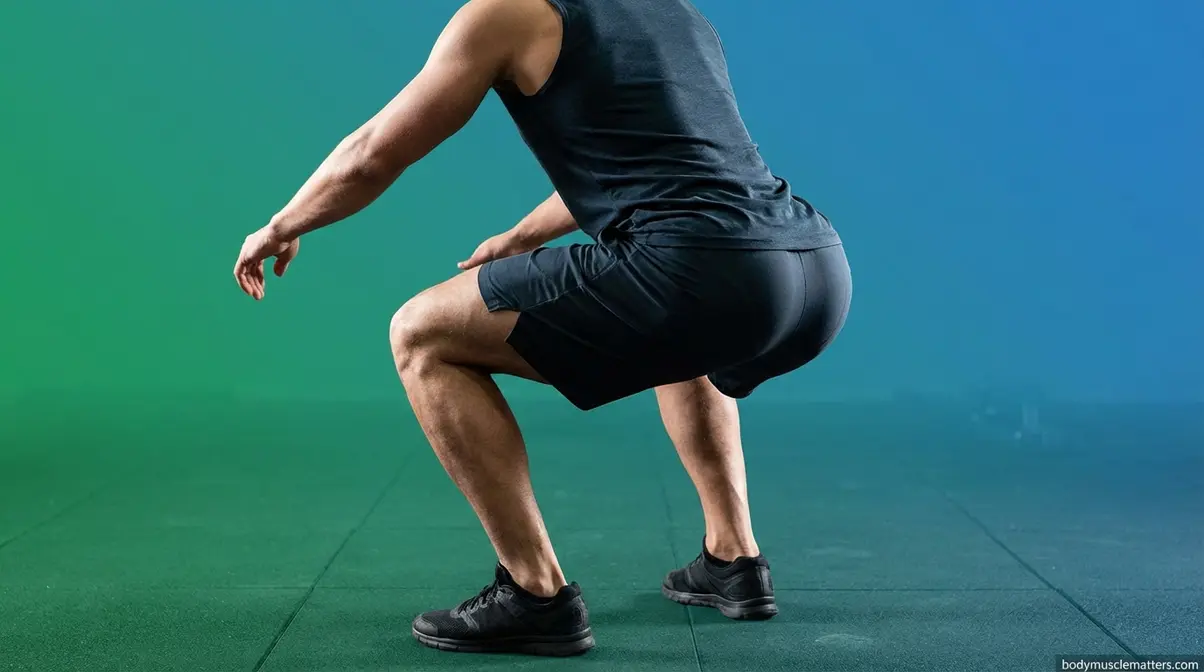
Step 3 — Hinge Your Hips and Descend
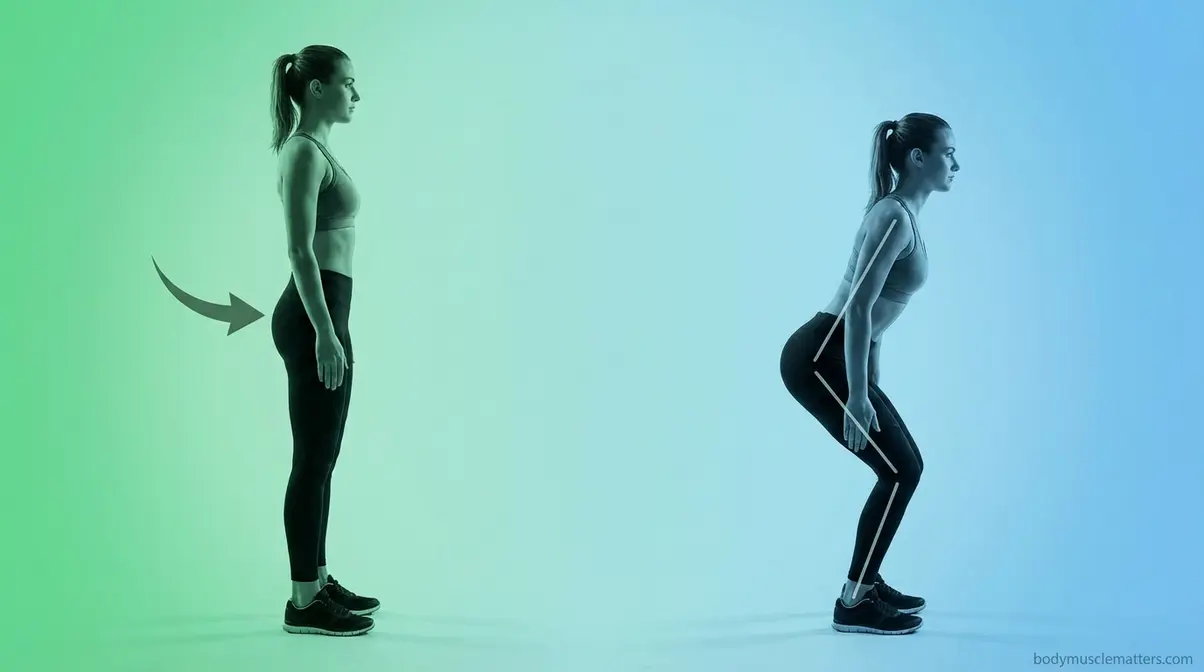
This is the Move phase of the Setup-Move-Adapt Framework. The descent has a specific sequence: hips back first, then knees bend. Most beginners do the opposite — they bend their knees first and slide forward. That’s what people mean when they say “squats hurt my knees.”
How to do it: Push your hips backward as if you’re reaching back for a chair just out of reach. Feel your weight shift into your heels. Then allow your knees to bend simultaneously, tracking directly over your second and third toes. Keep your chest lifted (this cues your thoracic spine into extension, preventing rounding that puts shear force on your lumbar discs).
Your trunk-tibia angle (the parallel relationship between your shin and your torso) is a critical cue physical therapists use to assess squat quality. Aim to keep your shins and torso roughly parallel throughout the descent — this distributes load between your hips and knees evenly rather than dumping it all on one joint.
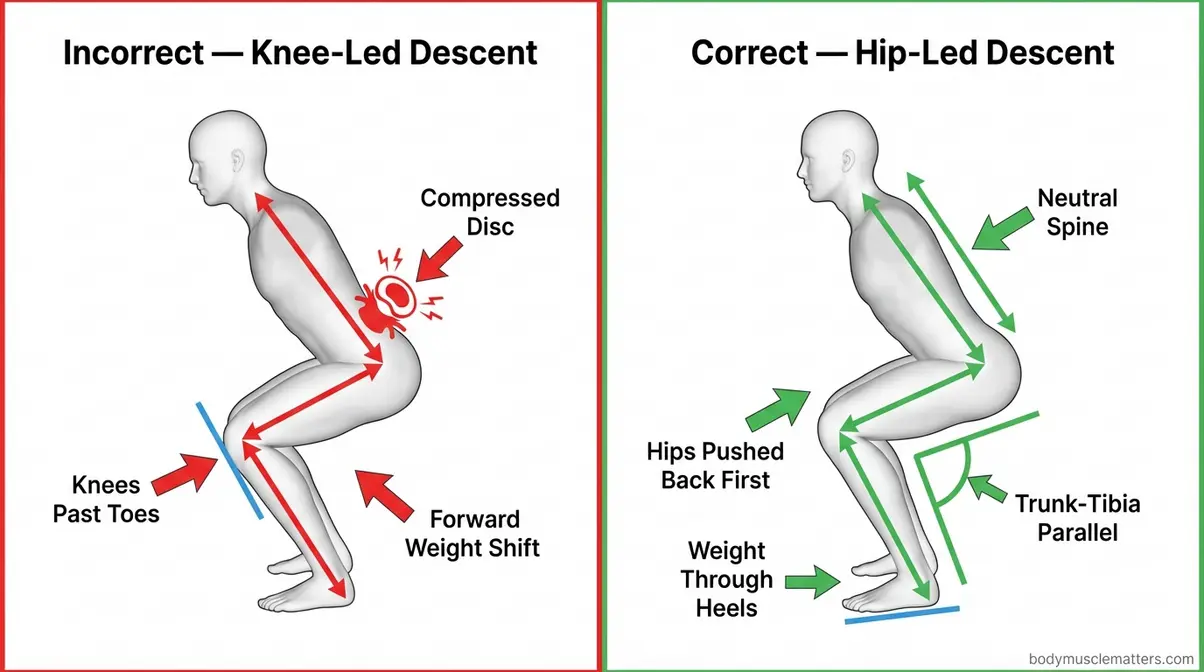
Caption: When your torso and shins stay roughly parallel, load distributes evenly between the hip and knee joints.
Keep your heels down. If they want to rise, either your ankle mobility needs work or you’ve drifted too far onto your toes. Pause, reset, and try again with a slightly wider stance.
Step 4 — Hit the Right Depth
Lower yourself until your thighs are at least parallel to the floor — meaning your hip crease is at or below the top of your knee. This is the depth target for a full squat and the depth at which your glutes are most fully recruited.
Why this matters: Research published in PMC in 2026 confirms that deep squats (at or past parallel) are safe for knee joint health in most individuals when performed with correct technique (PMC, 2026). The fear that “deep squats destroy your knees” is not supported by current biomechanical evidence for healthy adults.
If you can’t reach parallel yet, that’s completely normal for beginners with limited hip or ankle mobility. Squat as low as you can while keeping your heels down, your chest up, and your lower back neutral. A box squat (lowering to touch a chair or bench behind you) is an excellent tool for building depth safely and incrementally.
Watch for “butt wink”: This refers to a posterior pelvic tilt (your lower back rounds under) at the very bottom of the squat. Minor butt wink is common and not dangerous in bodyweight squats; significant butt wink under heavy load deserves attention. If it’s happening, reduce your depth by 10–20% until your hip and hamstring mobility improves.
Step 5 — Drive Through Your Heels
To come back up, press your feet through the floor — specifically driving your heels down — as you extend your hips and knees simultaneously. Think of it as pushing the floor away from you rather than pulling yourself up.
Why this matters: Heel drive activates your glutes and posterior chain (the muscles along the back of your body). If you push through your toes instead, your knees drift forward, your quadriceps bear the entire load, and your glutes stay largely disengaged. Physical therapists recommend the heel-drive cue specifically for patients with chronic knee pain, because it redirects force from the knee joint to the hip.
At the top of the movement, squeeze your glutes firmly and fully extend your hips. Don’t hyperextend your lower back — stand tall, not leaned backward. Your spine should be in the same neutral position it was in at the start.
Exhale through the effort of the ascent — breathe out as you drive up. This coordinates with your core brace from Step 2 and helps maintain spinal stability through the full range.
Quick Form Checklist
Use this checklist before and during every set. If you check “no” for any item, that’s your form focus for the next session.
- [ ] Feet shoulder-width or slightly wider, toes 15–30° out
- [ ] Weight in heels throughout — heels never lift
- [ ] Core braced, belly breath taken before descending
- [ ] Hips hinged back before knees bend
- [ ] Chest up, not tilted toward the floor
- [ ] Knees tracking over second and third toes
- [ ] Thighs reach parallel to the floor (or as low as possible with good form)
- [ ] Drive through heels on the way up, glutes squeeze at the top
Common Squat Mistakes and How to Fix Them
Even small form errors compound under fatigue and load. Each of the following mistakes has a clear biomechanical explanation for why it causes problems — which is what separates this guide from a simple list of “don’ts.” Research from the International Journal of Sports Physical Therapy (2026) identifies the most prevalent squat errors as knee valgus and lumbar hyperlordosis (excessive lower back arch), particularly in older adults and beginners.
Mistake 1 — Heels Lifting Off the Floor
What it looks like: Your heels rise as you descend, shifting weight onto the balls of your feet and toes.
Why it causes problems: Heel lift transfers the center of mass forward, loading the knee joint rather than distributing it through the hip. Over time, this pattern contributes to patellar tendon stress and anterior knee pain.
How to fix it: Two causes, two fixes. First, check ankle mobility — if your ankles are tight, squatting in flat shoes rather than cushioned running shoes immediately helps by removing the artificial heel elevation. Second, widen your stance slightly. A narrower stance requires greater ankle dorsiflexion (the ability to flex the foot toward the shin); widening reduces that demand. Try elevating your heels temporarily on 5-pound plates while you build ankle flexibility through daily stretching.
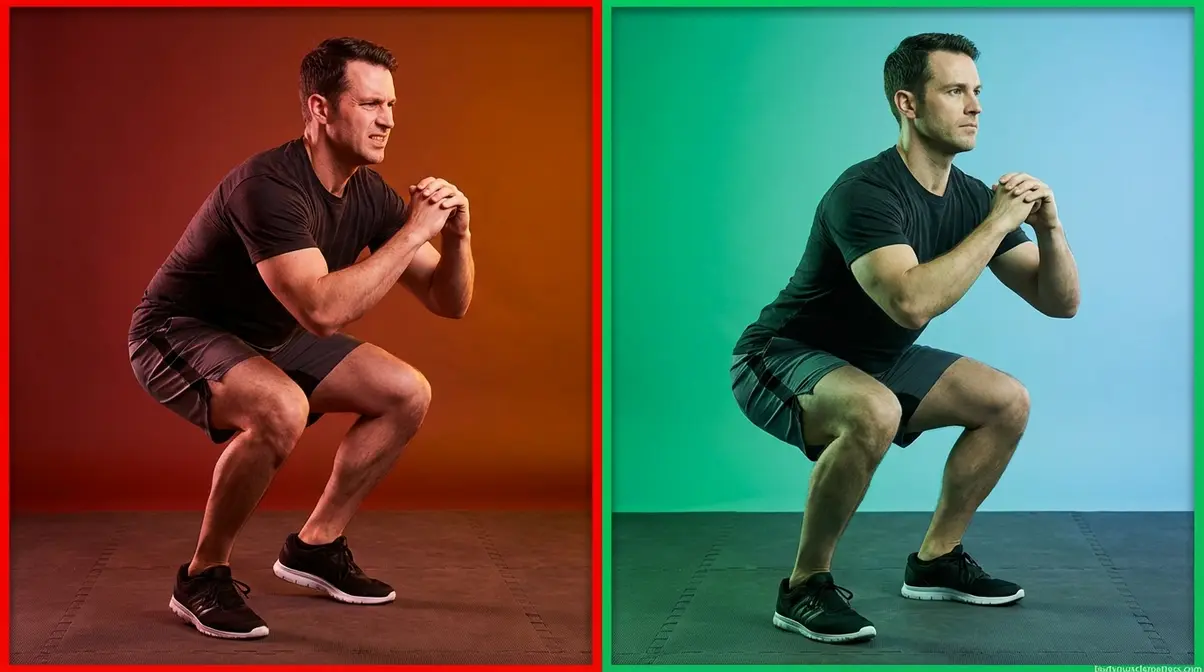
Mistake 2 — Knees Caving Inward
What it looks like: Your knees drift inward — toward each other — as you descend or ascend.
Why it causes problems: Knee valgus (inward knee collapse) increases the load on the medial structures of the knee, including the MCL and the medial meniscus. A 2026 PMC review on biomechanical errors in the squat specifically flags valgus as a high-risk pattern that elevates injury risk, especially in older adults (PMC, 2026).
How to fix it: Cue yourself to “drive your knees out” — actively push your knees toward your pinky toes throughout the entire movement. Placing a light resistance band around your knees (just above the joint) provides tactile feedback: the moment your knees begin to cave, you’ll feel the band’s resistance. This is one of the most effective tools physical therapists use for valgus correction in clinical settings.
Caption: Knee valgus (left) places excessive stress on the medial knee structures. Correct tracking (right) keeps knees aligned over the toes.
Mistake 3 — Leading With the Knees
What it looks like: Your knees shoot forward first, causing your heels to lift and your shins to become nearly vertical relative to your torso.
Why it causes problems: When the knees lead instead of the hips, they travel far forward of the toes, dramatically increasing the joint shear force on the knee — the force that tries to slide the tibia (shin bone) forward relative to the femur (thigh bone). This is the mechanism behind the common phrase “squats are bad for your knees” — it’s not squats, it’s this specific error.
How to fix it: Practice the hip-hinge cue from Step 3: push your hips back first, then allow the knees to bend. Drilling a bodyweight Romanian deadlift (hinging at the hips with a soft knee, no bar) trains this pattern effectively. A box behind you also stops the knees-forward habit because your hips must reach back to touch the surface.
Mistake 4 — Rounding the Lower Back
What it looks like: Your lower back curves inward excessively or rounds outward at the bottom of the squat, rather than staying in its natural neutral arch.
Why it causes problems: Lumbar hyperlordosis (excessive inward arch) or posterior rounding both compromise the intervertebral discs in the lower spine. Under load, either pattern can contribute to nerve compression, disc irritation, or chronic lower back pain. Research confirms this is among the two most common biomechanical errors observed in squatting populations (PMC, 2026).
How to fix it: Return to Step 2. Core bracing with the belly-breath technique reduces lumbar motion significantly. Additionally, focus on “ribs down” — many beginners flare their rib cage upward when trying to keep their chest up, which forces an artificial arch in the lower back. Ribs should stay stacked above the pelvis, not flared toward the ceiling.
Mistake 5 — Bouncing at the Bottom
What it looks like: Instead of a controlled descent, the lifter drops quickly and uses the rebound at the bottom to spring back up.
Why it causes problems: Bouncing at the bottom of the squat places a sudden, impulsive load on the knee joint cartilage, menisci, and patellar tendon at the precise moment of maximum joint flexion — when those structures are already under the greatest mechanical stress. Under bodyweight this is relatively low-risk; with a barbell, it becomes a meaningful injury mechanism.
How to fix it: Count a 2–3 second descent. This simple tempo cue eliminates momentum and forces your muscles, rather than your joint structures, to control the load. Think of it as “parking” at the bottom for a half-second before driving back up.
Squat Modifications for Pain and Limitations

If you have a specific health condition, the Adapt phase of the Setup-Move-Adapt Framework is where your squat becomes your squat. The modifications below are grounded in current physical therapy guidance and peer-reviewed research. None of them ask you to avoid squatting entirely — because for most conditions, safe squatting is part of the solution, not the problem.
Can squats help with hip pain?
Squats can help with hip pain when properly modified, and evidence suggests they improve leg function in older adults with arthritic hip joints (PubMed, 2026). Widening your stance, increasing your toe-out angle, and reducing your depth reduce hip impingement during the movement. The goblet squat variation is particularly useful because the front-loaded counterweight encourages an upright torso, which decreases hip compression. Deep squats with a very narrow stance are more likely to aggravate hip pain — so the modification, not the exercise itself, is usually the answer.
If your hip pain is acute (severe or sudden onset), or if you’ve been diagnosed with advanced osteoarthritis or recently had hip surgery, consult a physical therapist before squatting. They can assess whether your specific anatomy and pain pattern is appropriate for this movement and prescribe a starting depth and load.
Squatting With Pelvic Organ Prolapse
Pelvic organ prolapse (POP) — a condition where one or more pelvic organs descend into or outside the vaginal canal — is far more common than fitness content typically acknowledges. The common belief that squatting is dangerous with prolapse is not supported by current evidence. Physical therapy experts at The Prehab Guys confirm that people with prolapse can and should squat — even with heavier loads over time — when technique addresses pelvic floor pressure management.
Modifications for squatting with prolapse:
- Exhale before you descend. Breathing out reduces intra-abdominal pressure before the highest-pressure moment of the squat.
- Keep your stance closer to hip-width (not overly wide). A moderate stance reduces anterior pelvic floor load.
- Limit depth initially. Box squats to a surface that keeps your hips above knee level reduce pelvic floor pressure significantly.
- Engage your pelvic floor before moving. A gentle “lift” of the pelvic floor muscles before each rep — similar to a Kegel — supports the pelvic organs during intra-abdominal pressure increases.
- Exhale on the way up. This coordinates breath with exertion and reduces downward pressure on the pelvic floor during the hardest part of the movement.
Avoid deep, wide, weighted squats until you have worked with a pelvic floor physical therapist who can assess your specific prolapse grade and symptoms. This is a YMYL recommendation: always consult a licensed pelvic floor physical therapist before beginning or advancing a squat program if you have been diagnosed with pelvic organ prolapse.
Squatting for Older Adults and Seniors
If you’re over 60 and wondering whether squats are safe for you, the evidence is clear: squats are not only safe for most older adults, they’re among the most important functional exercises you can do. A 2026 PMC review found that squat training increases lean muscle mass, reduces fall-related fracture risk, and improves sit-to-stand capacity in aging populations (PMC, 2026). Research on squat exercise in medical practice further indicates that regular squat training may help prevent osteoporosis and sarcopenia (age-related muscle loss).
The best entry point for older adults is the chair squat (box squat):
- Place a sturdy chair directly behind you.
- Stand with feet slightly wider than shoulder-width, toes turned out comfortably.
- Reach your arms forward for balance.
- Push your hips back and lower yourself slowly — just until you lightly touch the chair seat, then drive back up.
- Progress gradually: first touch and return, then lower for 1–2 seconds, then eventually work toward sitting fully and standing without momentum.
Mini squats (quarter-range squats) are also an excellent starting point if full chair squats feel like too much initially. Performing these daily builds the quadricep, glute, and balance capacity needed for deeper work. Always consult a physician or physical therapist if you have a diagnosis of osteoporosis, significant knee or hip arthritis, or a history of falls before starting any new exercise program.
What Muscles Do Squats Work?
The squat is often called a “leg exercise,” but that label dramatically undersells what’s happening when you perform it correctly. Our evaluation of current biomechanical research confirms that the squat recruits virtually every major muscle group from the hips down — and several above the hips as well.
Do squats build muscle?
Yes — squats are one of the most effective lower-body muscle-building exercises available. They primarily target the quadriceps, gluteus maximus, and hamstrings, while also recruiting the core, calves, and hip stabilizers. Quadriceps (the four muscles on the front of your thigh) are the primary driver of the ascent — they straighten your knee as you drive back up. Gluteus maximus (the largest muscle in your body) extends your hip at the top of the movement and is most active in the final third of the ascent. Hamstrings (three muscles along the back of the thigh) work eccentrically (lengthening under tension) on the way down and help control descent speed.
Research published in PMC (2026) confirms that squat training improves muscle strength, hypertrophy (muscle size), and bone mineral density. Stance width significantly shifts the balance between these muscles. Research from NIH (2026) confirms that medium-to-wide stance squats increase gluteus maximus activation by 13–61% compared to narrow-stance squats — meaning your foot position is a direct dial for which muscles you’re training hardest. Adding progressive load over time — moving from bodyweight to goblet squats to barbell squats — is how you drive continued muscle growth.
Caption: The squat recruits a full chain of lower body and core muscles — making it one of the most efficient strength exercises available.
Secondary Muscles
Your core muscles (transverse abdominis, obliques, and erector spinae) work isometrically throughout the entire movement to protect your spine — which is why core bracing in Step 2 isn’t optional. Calves assist with stabilizing your ankle and controlling the dorsiflexion needed to allow a full descent. Your erector spinae (lower back muscles) maintain the neutral lumbar curve you learned in Step 3.
Mayo Clinic’s squat resources mention quads and hamstrings as the primary workers; the full picture extends further. A correctly executed squat also trains your hip abductors and external rotators (the muscles that keep your knees from caving) — which is why the squat is a staple in physical therapy rehabilitation protocols for the knee, hip, and lower back.
Health Benefits
Beyond muscle building, research supports broader health benefits from regular squat training. Evidence from a study on squat exercise in medical practice (IJITSS, 2026) indicates that squat training may help prevent osteoporosis, sarcopenia, and cardiovascular disease. A 2026 PMC study on cardiovascular parameters found that squat exercise meaningfully elevates heart rate and oxygen demand, supporting aerobic adaptations over time (PMC, 2026).
A 2023 study from the American Physiological Society found that just one minute of periodic squatting exercises during long sitting sessions may help preserve cognitive function — a surprising benefit with real practical implications for desk workers. For bone density specifically, the compressive load placed through the femur, tibia, and lumbar spine during weighted squats stimulates bone remodeling, which is a key mechanism in osteoporosis prevention.
How to Progress to Weighted and Barbell Squats
The Move phase of the Setup-Move-Adapt Framework doesn’t end at bodyweight. Once your technique is solid, adding load amplifies every benefit — muscle growth, bone density, hormone response, and functional strength. The question is when and how to progress.
When Are You Ready to Add Weight?
Physical therapists and strength coaches generally agree on three readiness criteria:
- You can complete 15–20 clean bodyweight squats without form breakdown (heels stay down, knees track, chest stays up, no butt wink)
- You can squat to at or near parallel consistently
- You feel no pain or discomfort in your knees, hips, or lower back during or after squats
If all three boxes are checked, you’re ready to add load. Start conservatively — lighter than you think you need. Learning the weighted squat path with good mechanics matters far more than how much is on the bar.
Start With the Goblet Squat
The goblet squat is the single best transition exercise between bodyweight squats and barbell squats for beginners. Hold a dumbbell or kettlebell vertically at chest height with both hands — elbows pointing down. The counterweight in front of you naturally shifts your center of mass, which pulls your torso upright and makes it physically easier to maintain good squat form.
Why goblet squats work so well for beginners: The front-loaded position cues an upright torso automatically, reducing the coaching needed to keep your chest up. It also improves hip mobility over time by allowing a deeper, more comfortable squat. Gymshark’s training resources note that goblet squats improve squat mechanics and serve as an ideal stepping stone between bodyweight and back squat work.
How to do a goblet squat:
- Hold a dumbbell (10–25 lbs to start) vertically at your chest, elbows tucked close
- Take your shoulder-width stance with toes turned out
- Brace your core, take your belly breath
- Hinge hips back, then lower until elbows touch your inner thighs (or thighs reach parallel)
- Drive through heels, squeeze glutes at the top
Progress from 3 sets of 8 reps at a manageable weight toward 3 sets of 12 before increasing the load.
How to Do a Barbell Squat
The barbell back squat is the king of lower-body strength training. Before you approach the rack, make sure you can confidently goblet squat your own bodyweight (or close to it) for 10 clean reps. Then, start with just the bar (typically 45 lbs / 20 kg) — no plates.
Setup at the rack:
- Set the rack height so the bar is at upper-chest height when you walk up to it — not shoulder height, not chin height
- Duck under the bar and position it across your upper back (more on placement below)
- Grip the bar with hands slightly wider than shoulder-width, pull your elbows down and back to create a “shelf” of muscle
- Brace your core, take a breath, unrack the bar by pushing through your legs — do not tip forward to lift it
- Take two deliberate steps back — one step to the left, one to the right — to clear the rack
- Find your stance, brace again, and squat
Physical therapists recommend that beginners learn the barbell squat with a coach or spotter for the first several sessions. The consequences of form breakdown under load are meaningfully different from bodyweight squatting.
High-Bar vs. Low-Bar Placement
Where the bar sits on your back changes everything about the movement. Here’s what you need to know:
| Position | Bar Placement | Torso Angle | Primary Muscles | Best For |
|---|---|---|---|---|
| High-Bar | On top of the traps (upper shoulder muscles) | More upright | Quadriceps-dominant | Beginners, athletes, Olympic lifters |
| Low-Bar | On the rear deltoids across the lower traps | More forward lean | Glutes, hamstrings, and upper back | Powerlifters, those chasing max load |
For beginners, high-bar is the right starting point. The upright torso position is more intuitive, requires less shoulder and thoracic mobility, and mirrors the mechanics of the bodyweight squat you’ve already learned. Low-bar placement allows most lifters to move 10–15% more weight but requires more technical setup and places greater demand on the lower back.
Maintaining Core Stability Under Load
Every pound you add to the bar multiplies the importance of the bracing technique from Step 2. Physical therapists and strength coaches universally emphasize that the Valsalva maneuver becomes non-negotiable under barbell load. A compromised brace under a heavy bar doesn’t just create poor mechanics — it creates real spinal injury risk.
Practice rule: if you cannot maintain your belly-breath brace and neutral spine for the full duration of the rep, the weight is too heavy. Reduce the load and rebuild your bracing pattern before adding more. Strength built on a shaky foundation breaks down quickly.
How to Use a Squat Machine Safely
Gym machines — particularly the Smith machine — are often the first squat experience for beginners who feel intimidated by free-weight areas. They offer genuine benefits, especially for absolute beginners building confidence and learning the squat path. Understanding what the machine does and doesn’t do for you is the key to using it effectively.
Smith Machine Setup and Foot Placement
The Smith machine guides the barbell along a fixed vertical (or slightly angled) track, which eliminates the stabilization demand of a free barbell. This makes it more forgiving for beginners.
How to set it up:
- Set the bar height at upper-chest level, the same as a free-weight rack
- Stand under the bar and position it across your upper traps (high-bar position)
- Here’s the key difference from a free squat: place your feet slightly in front of the bar (not directly beneath it). Because the machine tracks the bar vertically, positioning your feet under the bar would force you into an exaggerated forward lean. Moving them 6–12 inches forward allows a more natural squat pattern
- Rotate the bar to disengage the safety hooks
- Take your stance, brace, and descend as you would in a free squat
Safety features: The Smith machine has catch hooks at multiple heights. Before each set, identify where you’d re-rack if you couldn’t complete the rep — and practice engaging the hooks so it’s automatic.
Smith Machine vs. Free Weights
The Smith machine is a useful learning tool, but it has real limitations worth understanding — especially if your goal is functional strength that transfers to daily life.
| Factor | Smith Machine | Free Barbell Squat |
|---|---|---|
| Stabilizer muscle activation | Significantly reduced (fixed path) | Full recruitment required |
| Overall muscle activation | Lower | ~43% higher on average |
| Learning curve | Low — good for beginners | Higher — requires coaching |
| Transfer to daily life | Moderate | High |
| Injury risk (if form breaks) | Lower (machine assists) | Higher (no machine backup) |
| Recommended for | Absolute beginners, rehab, machine-only environments | General training once form is established |
Research comparing Smith machine to free-weight squats found that barbell squats produce approximately 43% higher average muscle activation across the quadriceps, hamstrings, and calves (Schwanbeck et al., as cited by MEND Physical Therapy). The trade-off is a legitimate one for beginners: the machine’s reduced stabilization demand makes it an accessible starting point, but graduating to free weights delivers substantially greater functional benefit. Use the Smith machine as a bridge, not a destination.
Who Should Modify or Avoid Squats
The squat is one of the most versatile exercises in existence — it can be scaled to nearly any body, fitness level, or health condition. However, there are specific circumstances where caution is warranted and professional guidance is non-negotiable.
Who Should Not Squat
Consult a licensed physician or physical therapist before squatting if any of the following apply:
- Acute knee or hip injury: Recent ligament tears (ACL, MCL), meniscus damage, or labral tears require individual assessment. Squatting may be appropriate or contraindicated depending on the specific injury and stage of healing.
- Recent surgery: Anyone within 6–12 weeks of hip replacement, knee replacement, or spinal surgery should follow only the exercise prescription given by their surgical team or physiotherapist.
- Diagnosed lumbar stenosis or disc herniation with active symptoms: Squatting can be beneficial in these cases, but the technique and loading must be carefully supervised.
- Severe osteoporosis: Weighted squatting under load places compressive force through the spine and femur. Those with a fragility fracture history should work with a physical therapist to determine safe loading.
- Pelvic organ prolapse with active symptoms: As covered in H2 4, squatting can be safe and beneficial, but must be modified with pelvic floor physical therapy guidance.
When to Seek Expert Help
Consider working with a certified personal trainer (CPT), strength and conditioning specialist (CSCS), or physical therapist (DPT) in the following situations:
- You experience knee pain that lasts more than 24–48 hours after squatting, even with bodyweight only
- You experience lower back pain or nerve symptoms (shooting pain, tingling, or numbness into the legs) during or after squats
- You have a diagnosed pelvic floor condition and have not yet worked with a pelvic floor physiotherapist
- You’re over 60 with multiple joint concerns and have no prior supervised exercise history
- You’ve followed this guide’s technique cues for 4+ weeks and still cannot squat to parallel without pain or significant form breakdown
A single session with a qualified professional in any of these situations is worth more than months of unsupervised trial and error. Physical therapists can identify structural limitations, screen for contraindications, and design a program specific to your anatomy — not a generic template.
Frequently Asked Questions
How do you do a proper squat?
A proper squat starts with your feet shoulder-width apart, toes turned 15–30 degrees outward, and weight distributed through your heels. Before descending, brace your core with a deep belly breath. Push your hips back first, then bend your knees — keeping your chest lifted and knees tracking over your toes. Lower until your thighs reach parallel to the floor (or as low as your mobility allows with good form). Drive through your heels to stand, and squeeze your glutes at the top. Every step of this process is covered in the Setup-Move-Adapt Framework above.
What are 5 common squat mistakes?
The five most common squat mistakes — supported by biomechanical research — are: (1) heels lifting, which shifts load from hips to knees; (2) knees caving inward (valgus collapse), which stresses the medial knee structures; (3) leading with the knees instead of the hips, which increases knee shear force; (4) rounding the lower back, which compresses lumbar discs; and (5) bouncing at the bottom, which places impulsive stress on joint structures at maximum flexion. A 2026 NIH biomechanical review identifies valgus and lumbar hyperlordosis as the two most prevalent errors in squatting populations (PMC, 2026). Each mistake has a specific fix — see H2 3 above.
How do you squat with prolapse?
You can squat safely with pelvic organ prolapse when you apply the right technique modifications. Pelvic floor physical therapy experts confirm that squatting — even under load over time — is appropriate for most people with prolapse (The Prehab Guys, 2026). The key modifications: keep your stance closer to hip-width rather than very wide; limit depth to a box or surface where your hips stay above knee level; exhale before each descent and again on the way up (this reduces downward pelvic pressure); and gently engage your pelvic floor — similar to a Kegel — before initiating each rep. Avoid deep, wide, heavily loaded squats until you have been assessed by a licensed pelvic floor physiotherapist.
Building Your Squat for Life
For beginners and pain-cautious exercisers alike, the squat is not a single technique stamped from a mold — it’s a personalized movement built through three phases. The Setup-Move-Adapt Framework gives you a practical lens: when something goes wrong, you know exactly where to look. Heels lifting? That’s a Setup issue. Knees caving? A Move issue. Pain during descent? An Adapt issue. Research backs each phase: NIH confirms that stance width alone can shift glute activation by up to 61%; a 2026 PMC review confirms that correct technique makes deep squats safe for most people, including older adults.
Start where you are, not where you think you should be. The chair squat, the goblet squat, the bodyweight air squat — these are not shortcuts or compromises. They are the actual path. Every elite lifter who has ever squatted 400 pounds started by learning the hip hinge, the belly breath, and the heel drive in some version of this order.
Your next step is simple: warm up for three minutes, run through the Quick Form Checklist from Step 5, and perform three sets of 10 bodyweight squats with full attention on each cue. Film yourself from the side if you can — it’s the fastest way to see what your body is actually doing versus what it feels like it’s doing. When those 10 reps feel effortless and your form holds, add a goblet squat to the next session and begin the progression. The squat will reward every hour of practice you put into getting it right.