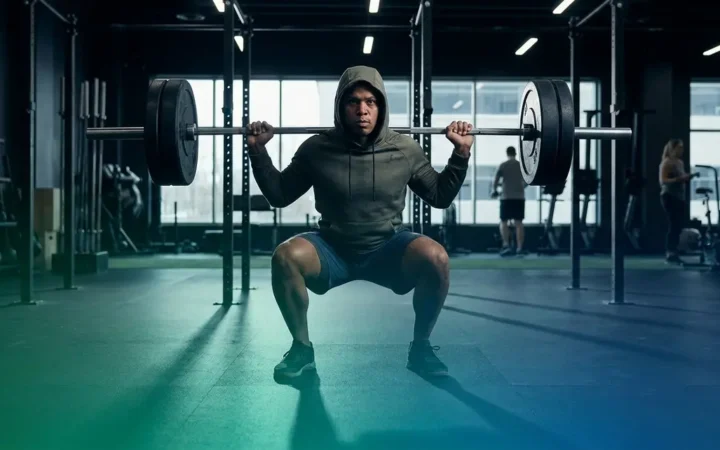
Hang Clean Muscles Worked, and How to Do It Right
The hang clean muscles worked include your glutes, hamstrings, quads, trapezius, and core — all in a single explosive rep. Yet most beginners step up to the bar with no idea which muscles should actually be firing, which means they’re leaving serious strength and power gains on the table.
Without understanding the anatomy of the lift, you risk defaulting to quad-dominant mechanics — a pattern where your knees do most of the work while your glutes and hamstrings barely engage. That’s not just inefficient; it’s a setup for stalled progress and potential injury.
By the end of this guide, you’ll know exactly which muscles the hang clean works in each phase of the movement, how to feel those muscles engage with 6 targeted coaching cues, and how the lift compares to alternatives like the deadlift and power clean. We’ll cover the full muscle anatomy, benefits for strength and hypertrophy, equipment variations, advanced progressions, and common mistakes — all backed by peer-reviewed EMG research.
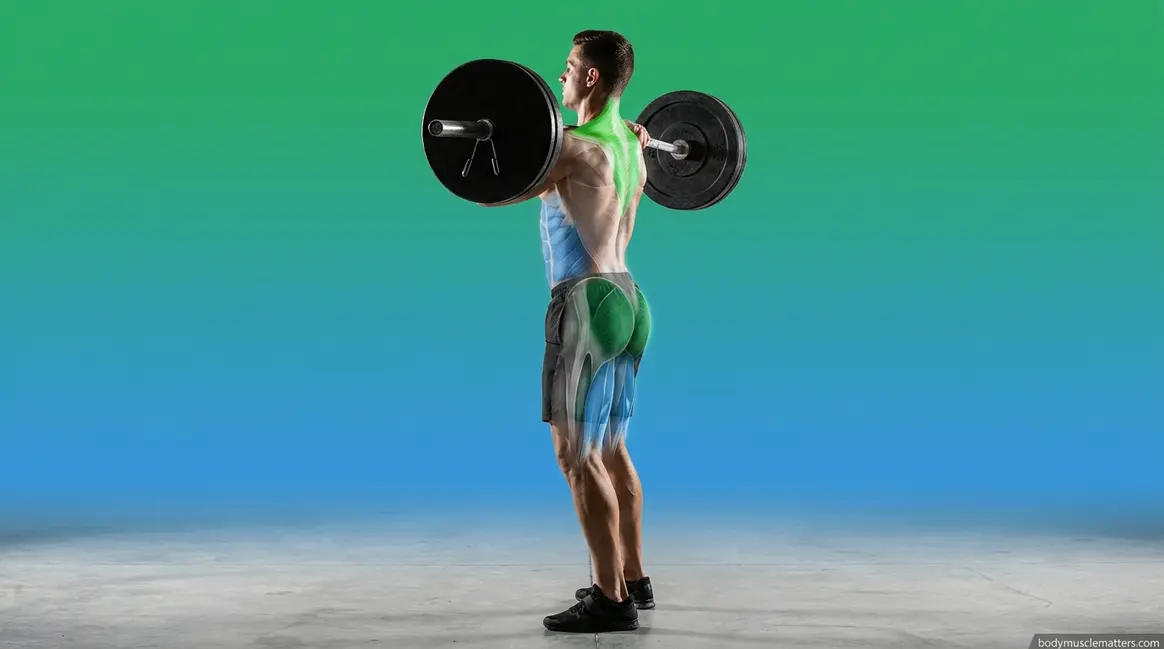
The hang clean muscles worked span your entire posterior chain, upper back, and core — making it one of the most complete full-body power exercises available to strength athletes.
- Primary movers: Glutes and hamstrings drive explosive hip extension; quads extend the knee during the pull
- Upper body: The trapezius shrugs the bar upward; shoulders and forearms stabilize the catch
- Hidden flaw: “The Quad-Dominant Trap” causes most beginners to underload their glutes — 6 coaching cues fix this
- Research-backed: A 2023 EMG study (PMC10690512) confirms gluteus maximus, vastus lateralis, and trapezius are the primary muscles activated across all hang clean variations
No products found.

Yes4All Powder Coated Cast Iron Kettlebell Strength Training Kettlebells Weight Set for Full Body Workout, Home Gym

What Muscles Does the Hang Clean Work?
The hang clean is a full-body compound movement that recruits more muscle groups simultaneously than almost any other barbell exercise. Based on peer-reviewed EMG analysis and established coaching protocols, the hang clean muscles worked fall into three clear categories: primary movers, upper body contributors, and core stabilizers. Understanding which muscles fire — and when they fire — is the key to making the lift actually work for you.

Primary Movers: Glutes, Hams, Quads
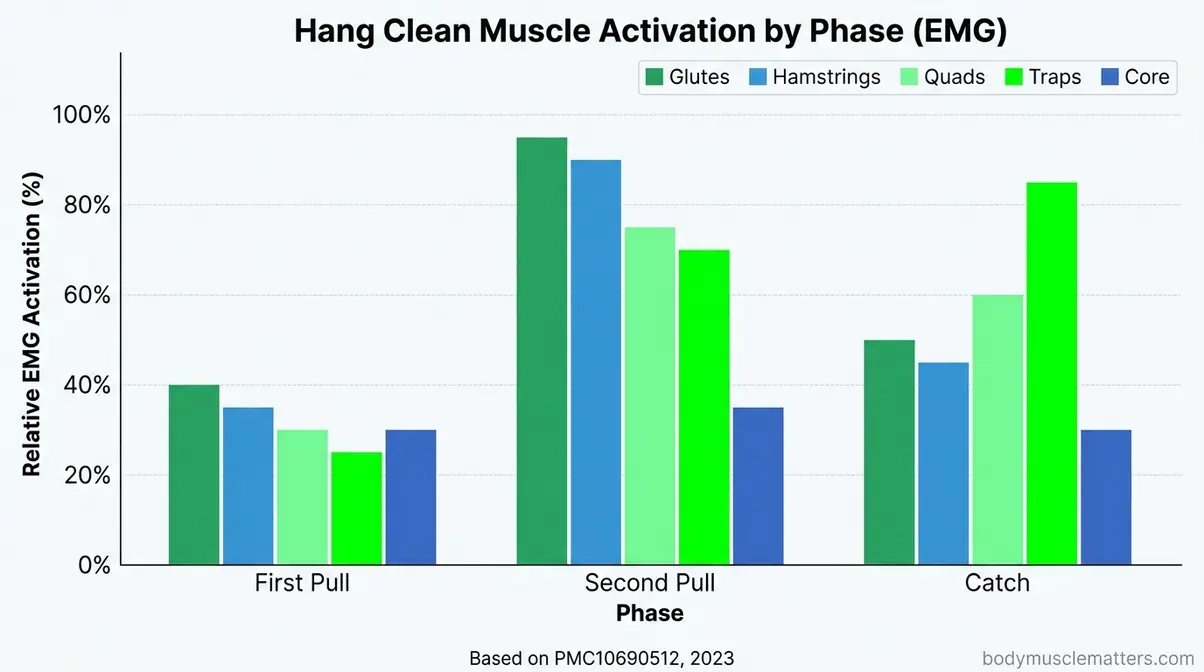
Your glutes (gluteus maximus) and hamstrings are the true engines of the hang clean. The hip hinge — the movement of pushing your hips back and loading a stretch in those muscles — creates the stored elastic energy that powers every explosive rep. When you drive your hips forward aggressively, your glutes fire because that loaded hip hinge creates a rapid stretch-shortening response, triggering a powerful contraction. Research published in Applied Sciences (PMC10690512, 2023) confirmed that gluteus maximus activation is consistently high during the hang power clean at intensities above 70% of your one-rep max.
Your quadriceps (the four muscles on the front of your thigh) assist during knee extension as you drive the bar upward. However, they are secondary to the glutes and hamstrings — a critical distinction that most beginners miss entirely. Your calves and ankle plantarflexors contribute during the final rise onto the toes, completing what coaches call triple extension (the simultaneous extension of the ankles, knees, and hips at peak power).
Upper Body: Traps, Shoulders, Forearms
Your trapezius — the large diamond-shaped muscle spanning your upper back and neck — is the primary upper-body mover in the hang clean. It fires hard during the shrug at the top of the second pull, driving the bar upward so you can get your elbows under it. The upper traps, in particular, generate the elevation and retraction that distinguishes the hang clean from a simple deadlift.
Your deltoids (shoulders) work as stabilizers during the catch, bracing the front rack position where the bar rests across your shoulders. Your forearms and grip muscles are also under constant tension throughout the lift, controlling the bar during both the pull and the catch. A 2023 EMG comparison study confirmed that upper trapezius and stabilizing muscle activation — including the erector spinae (the muscles running along your spine) and rectus abdominis (your central core muscle) — was significantly higher in full hang clean variations compared to pull-only derivatives (PMC10690512, 2023).
Core and Back Stabilizers
Your core is not a passive bystander in the hang clean — it is an active stabilizer working throughout every phase. The erector spinae (the muscles along your lower back) maintain a neutral spine during the hip hinge and through the pull. Your lats (latissimus dorsi) keep the bar close to your body and resist it swinging forward. The rectus abdominis and obliques create intra-abdominal pressure, protecting your spine under load.
Research confirms that core stabilizer activation is notably higher in hang clean variations compared to isolated pulling movements (PMC10690512, 2023). This means the hang clean simultaneously trains your posterior chain and builds functional core strength — a combination that makes it uniquely efficient for athletes.
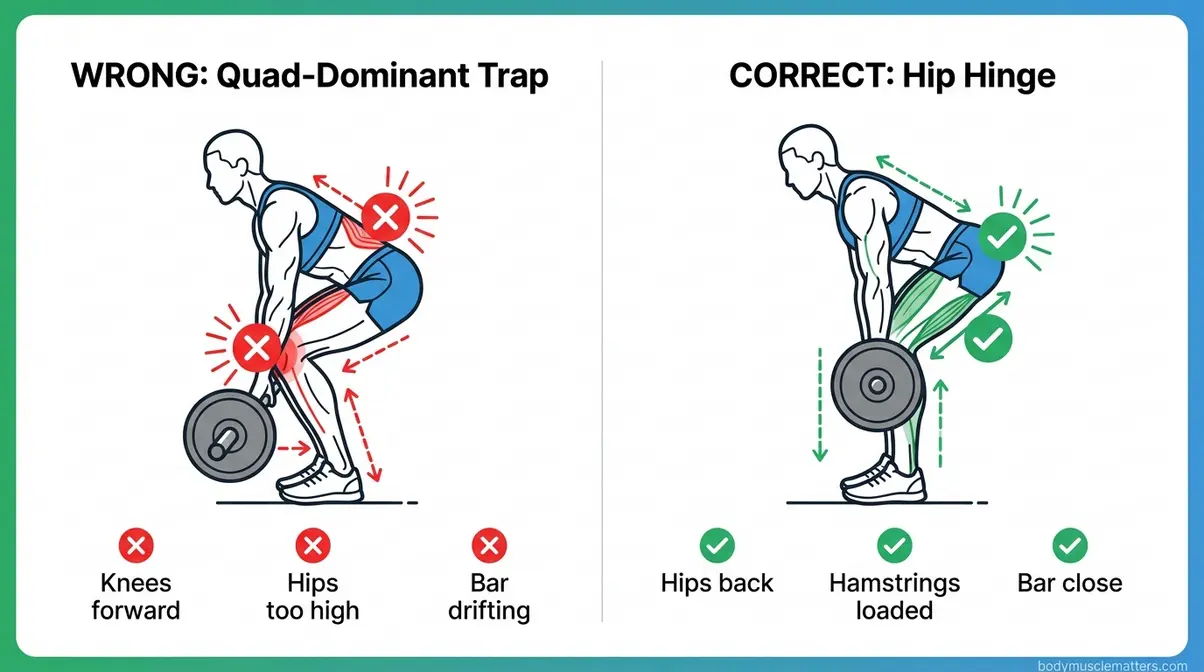
Fixing the Quad-Dominant Trap
Estimated Time: 15-20 minutes
Tools/Materials: Barbell, Bumper Plates, Lifting Shoes (optional)
The Quad-Dominant Trap is the most common — and most damaging — error beginners make in the hang clean. It happens when you initiate the lift by bending your knees first (like a squat) rather than pushing your hips back (like a hip hinge). The result: your quads do the majority of the work, your glutes and hamstrings barely engage, and you lose the explosive power the lift is designed to build.
Here are 6 specific coaching cues to break out of the Quad-Dominant Trap and properly load your posterior chain:
- Phase 1: Setup and First Pull
- “Push the floor away with your hips, not your knees.” Before you pull, hinge at the hip until you feel a loaded stretch in your hamstrings. If your shins are vertical, you’re hinging correctly.
- “Soft knees, long arms.” Your knees should be slightly bent — not deeply flexed — at the start. Long arms means no early elbow bend, which forces your legs and hips to do the work.
- “Bar drags up the thigh.” Keep the bar in contact with your thighs throughout the first pull. This cue keeps you from leaning back and forces hip engagement.
- Phase 2: Second Pull and Extension
- “Jump through your hips, not your toes.” Visualize your power coming from hip extension, not from rising onto your toes first. Toe-rise is the result of hip extension, not the cause.
- “Squeeze your glutes before you shrug.” The order matters: hip extension first, then shrug. Reversing this sequence is what creates quad dominance.
- “Load the hamstring stretch.” At the top of your hinge, pause for one second and feel the tension in the back of your thigh. If you can’t feel it, your hips haven’t pushed back far enough.
Hang Clean Benefits: Power and Strength
“Is the hang clean a good lift for strength building? Or is it mostly for athletic conditioning and to teach explosiveness?”
That’s the exact question most beginners ask — and the answer is: both, but through different mechanisms. The hang clean is one of the few exercises that trains the entire neuromuscular system, building power, strength, and muscle simultaneously. Here’s how each benefit works.
Explosive Power and Athletic Performance
Explosive power is your ability to produce maximum force in minimum time — and the hang clean trains it more directly than almost any other barbell lift. The explosive hip extension required in the second pull develops rate of force development (RFD), which is the neuromuscular quality that makes athletes faster, jump higher, and change direction more effectively.
Research published in PLOS ONE (PMC4993140, 2016) found that short-term hang clean training produced significant improvements in power, strength, and speed in collegiate female athletes — comparable to hang snatch training. This makes the hang clean a legitimate tool to teach explosiveness as a motor pattern, not just build muscle mass. For performance-oriented athletes, that distinction matters enormously.
The posterior oblique sling — the functional connection between your glutes, hamstrings, and contralateral (opposite-side) lats — is also heavily recruited during the hang clean’s explosive phase. Training this sling improves rotational power, sprint mechanics, and change-of-direction speed.
Will hang cleans build muscle?
Hypertrophy (muscle growth) requires mechanical tension and metabolic stress — and the hang clean delivers both, particularly for the glutes, hamstrings, upper traps, and erector spinae. However, the hang clean is primarily a power exercise, not a hypertrophy exercise. This is an important distinction for progressive overload: you’ll build muscle as a byproduct of training explosively, but you shouldn’t treat it as a substitute for dedicated hypertrophy work.
Hang cleans can build muscle, primarily in the glutes, hamstrings, upper trapezius, and erector spinae. A 2024 study (PubMed 39374924) comparing different hang power clean training intensities found that 7 weeks of training produced measurable improvements in maximum dynamic strength, confirming a genuine strength building adaptation — not just athletic conditioning. For maximum muscle growth, pair hang cleans with posterior chain isolation work like Romanian deadlifts or hip thrusts. For lifters asking whether the hang clean belongs alongside squats and deadlifts in a strength program, the answer is yes — with the understanding that it develops power-based strength rather than slow-grind maximal force.
Hang Clean vs. Power Clean vs. Deadlift
Choosing the right lift depends on your goal — and understanding what changes between variations prevents you from training the wrong quality for months. Here’s a direct comparison of the three most commonly confused movements.
| Exercise | Primary Quality | Key Muscles | Starting Position | Catch Required? |
|---|---|---|---|---|
| Hang Clean | Explosive power + posterior chain | Glutes, hamstrings, traps | Above knee (standing) | Yes — front rack |
| Power Clean | Power + full pull mechanics | Same + more lat involvement | Floor | Yes — power position |
| Deadlift | Maximal strength | Glutes, hamstrings, quads, erectors | Floor | No |
Hang Clean vs. Power Clean
The power clean starts from the floor, adding a longer first pull that demands more lat and lower-back engagement to maintain a neutral spine through a greater range of motion. The hang clean begins from above the knee, eliminating the floor pull and focusing the movement’s demand on the second pull — the explosive hip extension phase. This shorter range of motion makes the hang clean more beginner-accessible and lets you accumulate more explosive reps per set without the technical complexity of the floor pull.
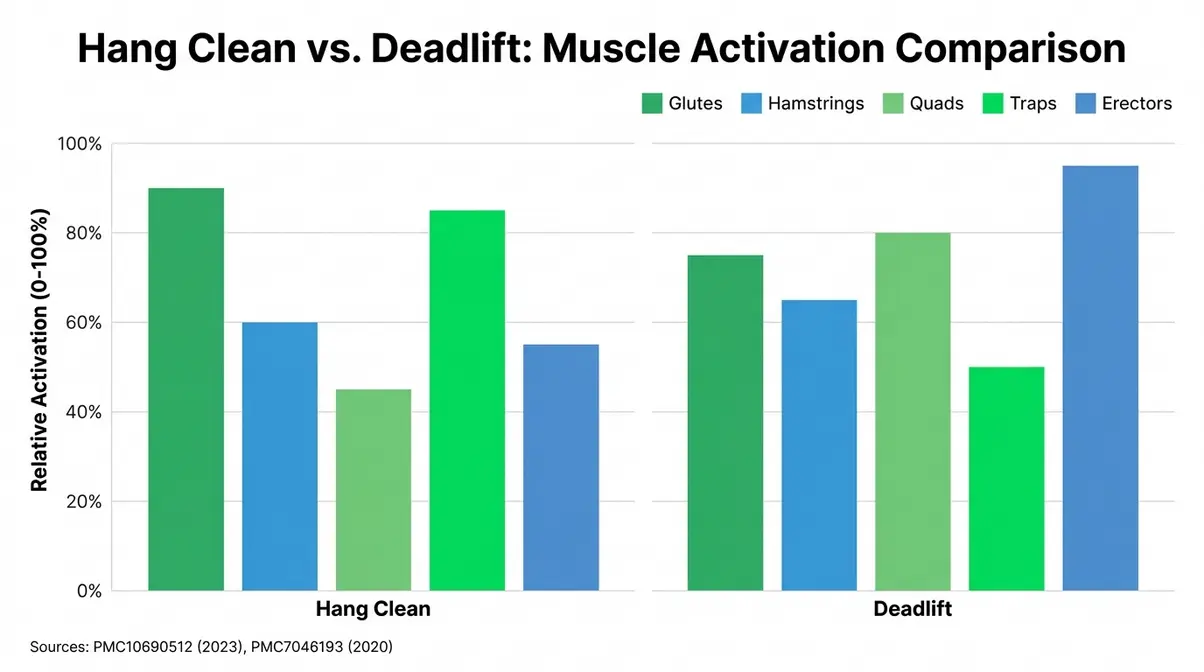
Muscle activation research (PMC10690512, 2023) shows no significant difference in gluteus maximus, vastus lateralis, or trapezius activation between the two variations at intensities above 70% 1RM. The practical difference is specificity: the power clean builds the full-length posterior chain pull, while the hang clean drills the highest-power segment of that pull. For beginners, start with the hang clean — it’s the smarter entry point.
Is the hang clean better than the deadlift?
The deadlift and the hang clean work many of the same muscles — but through completely different mechanisms. The deadlift trains maximal strength through a slow, controlled grind where your goal is to move the maximum possible load. The hang clean trains explosive power through a rapid, coordinated movement where your goal is to move a moderate load as fast as possible.
Neither is universally better — they train different qualities. EMG analysis of the deadlift (PMC7046193, 2020) found that it produces greater quadriceps activation relative to the gluteus maximus compared to explosive Olympic lifting derivatives. In contrast, the hang clean’s hip-hinge emphasis creates proportionally higher glute and hamstring activation relative to the quads — provided you avoid the Quad-Dominant Trap.
The practical conclusion: deadlifts build maximum strength; hang cleans build explosive power. Athletes benefit from training both. If you must choose one, pick the hang clean for speed and power goals, the deadlift for raw strength and muscle mass goals. Both belong in a complete program, and they complement rather than replace each other.
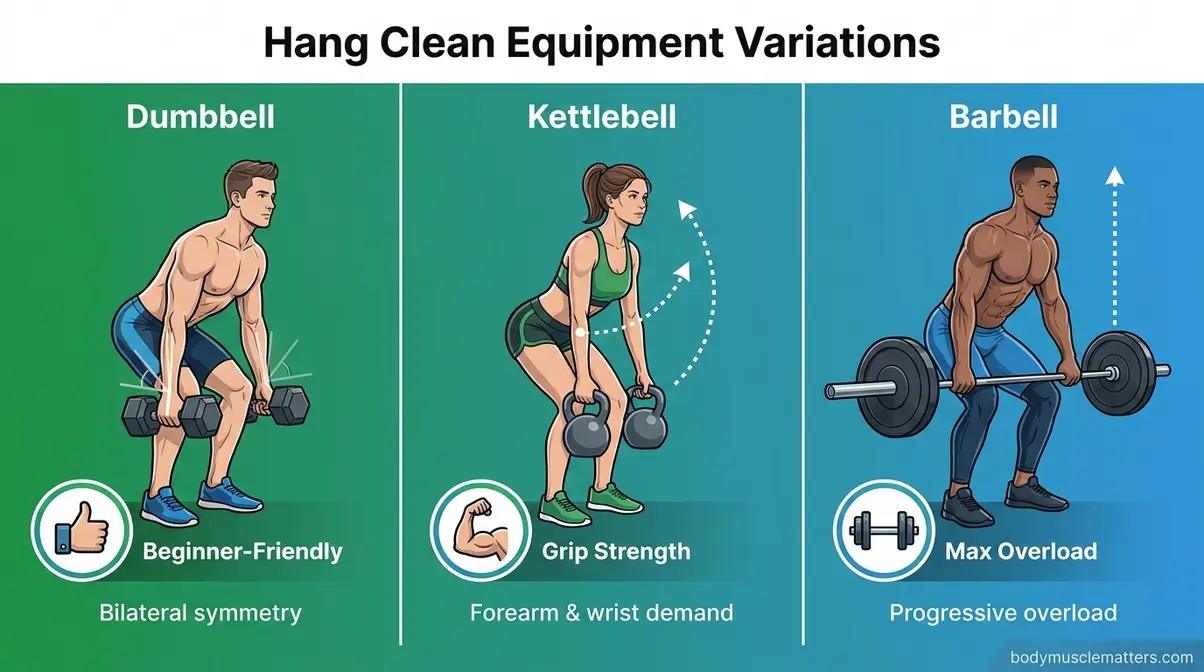
Equipment Variations: Muscles Worked
Not every lifter has access to a barbell — and even those who do can benefit from exploring equipment variations. Each implement changes the stability demands, the grip mechanics, and the degree to which individual muscles are challenged. The hang clean exercise muscles targeted are broadly similar across all three, but the nuances matter.
Dumbbell Hang Clean Benefits
The dumbbell hang clean is the most accessible entry point for beginners learning the movement pattern. Because each hand holds an independent implement, you can’t compensate for a weaker side — both limbs are forced to work equally. This bilateral symmetry demand helps correct muscle imbalances before they become ingrained movement habits.
The primary dumbbell hang clean muscles worked are identical to the barbell version: glutes, hamstrings, quads, trapezius, and core. However, the reduced load and more natural wrist position make the catch phase less technically demanding, allowing beginners to focus on hip hinge mechanics without managing wrist and elbow positioning simultaneously. CrossFit’s dumbbell hang clean guide confirms that the hips, quads, glutes, and hamstrings are the prime movers — consistent with barbell EMG data.
Kettlebell Hang Clean: Unique Advantages
The kettlebell hang clean introduces a unique challenge: the bell’s offset center of mass requires your forearms and grip to work harder throughout the movement to control the arc of the implement. This makes it a superior tool for developing grip strength, forearm endurance, and wrist stability compared to the barbell version.
The kettlebell hang clean muscles worked include the same posterior chain emphasis — glutes, hamstrings, upper traps — with additional demand on the lats to control the bell’s path and prevent it from swinging away from the body. The unilateral version (one bell per hand) also trains anti-rotation core stability more aggressively than the bilateral barbell lift.
Barbell Hang Clean: The Gold Standard
The barbell hang clean remains the most effective variation for developing raw explosive power and loading the posterior chain with the heaviest possible stimulus. The fixed bar path, bilateral loading, and ability to progressively add weight in small increments make it the standard for progressive overload in athletic training programs.
The barbell version demands the most technical precision — particularly in the front rack position, where the bar must rest across the front deltoids with elbows high. This technical demand is a feature, not a bug: mastering it builds upper-back strength, wrist mobility, and coordination that transfers to other barbell lifts.
Advanced Hang Clean Variations
Once you’ve built a solid foundation in the standard hang clean, these variations allow you to target specific qualities — more power output, upper-body strength, or a greater range of motion challenge.
Hang Power Clean for Beginners
The hang power clean catches the bar in a partial squat (above parallel) rather than a full front squat position. This reduces the mobility demands on your hips and ankles, making it more accessible for beginners who haven’t yet developed the flexibility for a full catch. The hang power clean muscles worked are nearly identical to the hang clean — glutes, hamstrings, traps, and core — with slightly less quad demand in the catch phase.
This variation is also useful for athletes who want to accumulate more explosive hip extension reps per session without the fatigue of a full squat catch. Use it as your primary variation when learning the lift, then progress to the full hang clean as your mobility improves.
Hang Clean and Press
The hang clean and press adds an overhead press immediately after the catch, turning a lower-body power exercise into a full-body strength builder. The hang clean and press muscles worked add the anterior deltoids (front shoulders), triceps, and upper chest to the standard hang clean muscle list.
This combination is particularly effective for athletes who want to train full body muscle and power in a time-efficient format. The sequencing — lower body explosion followed by upper body press — also trains the kinetic chain transfer that’s central to throwing, striking, and jumping sports.
Hang Clean High Pull and Squat Clean
The hang clean high pull removes the catch entirely, focusing the movement on the pull phase. You drive through triple extension and pull the bar to chin height — training the traps, rear deltoids, and upper back with higher rep capacity. The hang clean high pull muscles worked emphasize the upper trapezius and posterior deltoids more than any other variation.
The hang squat clean is the most technically demanding progression: you catch the bar in a full front squat, requiring maximum hip and ankle mobility and significant quad strength to stand up from the bottom. This variation develops the greatest total-body strength but demands the most coaching investment to execute safely.
Safety Precautions and Common Mistakes
⚠️ Safety Disclaimer: Always consult a certified strength and conditioning coach (C.S.C.S.) before attempting Olympic lifting derivatives. Improper form can cause serious injury, particularly to the wrists, lower back, and knees. Prioritize form over weight at all times.
The hang clean is a technically complex lift. Most injuries occur not from the weight being too heavy, but from poor movement patterns ingrained through repetition. The NSCA recommends mastering the hip hinge pattern with light loads before adding any meaningful resistance to Olympic lifting derivatives.
Common Mistakes and How to Avoid Them
Mistake 1: Early arm pull. Bending your elbows before full triple extension reduces the power transferred from your legs to the bar and puts unnecessary strain on your biceps tendons. Fix: Keep arms straight and elbows locked until your hips are fully extended. Think “long arms” until you feel yourself rise onto your toes.
Mistake 2: Bar swinging away from the body. If the bar drifts forward during the pull, your lower back absorbs the lever-arm force. Fix: Keep the bar dragging up your thighs throughout the first pull. Use the “bar scrapes the shirt” cue.
Mistake 3: Catching with bent wrists. Catching the bar with your wrists extended backward rather than neutral places excessive stress on the wrist joints. Fix: Practice front rack position with an empty bar until your elbows are consistently high and wrists neutral before adding load.
Mistake 4: Squatting the descent instead of hinging. Returning to the hang position by bending the knees rather than pushing the hips back resets you into quad-dominant mechanics. Fix: On every rep, actively think “push hips back” on the descent.
Mistake 5: Rushing the setup. Starting each rep without resetting your hip hinge and core bracing leads to cumulative technique breakdown. Fix: Pause for one full breath between reps, especially when fatigued.
When to Choose an Alternative Exercise
The hang clean is not the right tool for every situation. Consider these alternatives when the hang clean may not serve your goals:
- Mobility restrictions (wrists, hips, ankles): The front rack position requires significant wrist and lat flexibility. If you cannot achieve a high-elbow front rack without wrist pain, substitute Romanian deadlifts (for posterior chain loading) or dumbbell hang cleans until mobility improves.
- Primary goal is maximum hypertrophy: The hang clean builds muscle as a byproduct of power training. If your sole goal is muscle size, hip thrusts, Romanian deadlifts, and leg press provide greater volume and time-under-tension for the glutes and hamstrings specifically.
- Lower back pain or acute injury: The spinal loading during the hang clean is significant. If you have an active lower back injury, consult a sports medicine professional before including any Olympic lifting derivative in your program.
When to Seek Professional Coaching
Seek in-person coaching from a C.S.C.S. or certified Olympic lifting coach if:
- You cannot feel your glutes and hamstrings working after 3+ weeks of practice with the coaching cues above
- You experience wrist, elbow, or shoulder pain during the catch phase
- You are ready to train above 70% of your estimated 1RM
The hang clean has a higher technical skill floor than most barbell exercises. One or two sessions with a qualified coach can save months of reinforcing incorrect patterns.
Frequently Asked Questions
What are the benefits of a hang clean?
The hang clean develops explosive power, posterior chain strength, and full-body coordination simultaneously. Key benefits include improved rate of force development (RFD), which translates to faster sprinting and higher jumps; increased glute and hamstring strength through loaded hip extension; upper trap and core development; and improved athletic coordination. A 2016 study (PMC4993140) found that hang clean training produced significant gains in power, strength, and speed in collegiate athletes within a short training period.
Are hang cleans better than deadlifts?
Hang cleans are better than deadlifts for developing explosive power and athletic performance; deadlifts are better for building maximum strength and muscle mass. The two lifts complement each other rather than compete. The Garage Gym Reviews hang clean guide notes that the hang clean’s hip extension emphasis makes it uniquely effective for training the posterior chain explosively — a quality deadlifts, by design, don’t prioritize. Most complete strength programs include both movements for this reason.
Primary Muscles Worked in a Hang Clean?
The primary muscles worked in a hang clean are the gluteus maximus, hamstrings, quadriceps, and upper trapezius. These are supported by secondary muscles including the erector spinae, rectus abdominis, deltoids, and forearms. A 2023 EMG study confirmed that gluteus maximus, vastus lateralis (quad), and trapezius show consistently high activation during the hang power clean at intensities above 70% 1RM, with erector spinae and core muscles showing significantly higher activation in full catch variations compared to pull-only derivatives.
Hang Clean in Athletic Training?
The hang clean is used in athletic training to develop explosive hip extension, rate of force development, and full-body power coordination — qualities that transfer directly to sprinting, jumping, and change-of-direction performance. The NSCA’s power clean from hang resource identifies it as a foundational movement for developing athletic power. It’s also used as a teaching tool for the full clean, allowing athletes to master the second pull — the highest-power segment — before adding the complexity of a floor start.
Complete Hang Clean Anatomy Picture
For strength athletes and lifters who want real results, understanding the hang clean muscles worked — glutes, hamstrings, quads, trapezius, and core — is the foundation for training it effectively. Research consistently confirms that the posterior chain drives the movement, that core activation is significantly higher than in pull-only derivatives, and that 7 weeks of training produces measurable strength and power adaptations (PubMed 39374924, 2024). The hang clean earns its place in your program not as a novelty, but as a scientifically validated power builder.
The Quad-Dominant Trap is the single most important concept to internalize from this guide. When you default to knee-dominant mechanics, you’re not just missing out on glute and hamstring development — you’re training the wrong motor pattern at the wrong time, compounding the problem with every rep. The 6 coaching cues above are your corrective blueprint.
Start with the hang power clean variation using 40–50% of your estimated 1RM. Drill the hip hinge for two to three weeks before adding load. If you can feel your glutes and hamstrings loading during the descent and firing explosively through the second pull, you’re executing the lift correctly. If you’re unsure, one session with a certified strength coach will confirm your mechanics faster than months of self-correction.
Ready to put this anatomy knowledge into practice? Grab an empty barbell, set up your smartphone to record your form from a side angle, and start drilling the hip hinge today to build your ultimate posterior chain.
Related posts:
Progressive Overload Guide: 7 Methods to Build Muscle
Muscle Atrophy: Causes, Symptoms & How to Reverse It
What Is Muscle Memory? The Complete Science Guide
Muscle Hypertrophy Explained: The Science of Muscle Growth
Strength Training vs Hypertrophy: The Complete 2026 Guide
Muscle Building Transformation Stories: What Actually Worked
Callum
Hi, I'm Callum, the founder of Body Muscle Matters. I'm not a certified trainer, I'm a self taught lifter who started this site to share what I've learned from my own training and a lot of trial and error. Everything here comes from real experience and honest research, written the way I'd explain it to a friend who is just getting started. My goal is simple: practical, no hype fitness advice you can actually use.