
⚠️ Medical Disclaimer: This article is for informational purposes only and is not a substitute for professional medical advice, diagnosis, or treatment. Always consult a qualified healthcare provider or certified physical therapist before beginning a new exercise program, especially if you have a pre-existing medical condition or history of injury.
Most people who start a new workout routine aren’t worried about making progress — they’re worried about getting hurt. That fear is entirely reasonable, and it’s also the single biggest barrier stopping beginners from ever building consistent fitness habits.
Here’s the part nobody tells you: the vast majority of exercise injuries are completely preventable. They don’t happen because someone is unlucky or uncoordinated. They happen because of three specific, identifiable mistakes — doing too much too soon, skipping preparation, and neglecting recovery. Knowing how to avoid injury when exercising means addressing all three at once, not just picking one.
By the end of this guide, you’ll know exactly how to stay safe from your very first warm-up through your first month of consistent training. This guide covers four steps: the universal safety fundamentals, activity-specific rules for lifting and running, joint protection strategies, and a recovery routine that keeps injuries from compounding over time.
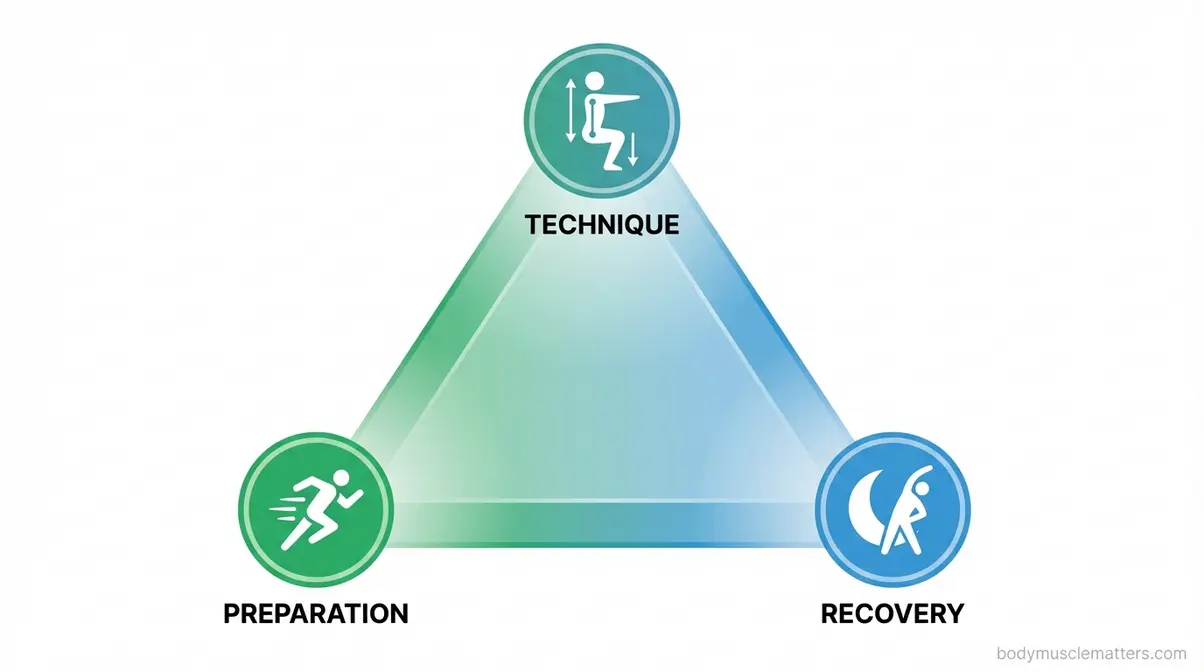
Knowing how to avoid injury when exercising comes down to three things working together: proper preparation, sound technique, and consistent recovery — what we call the Injury-Free Triangle. Follow these five principles:
- Warm up for 5–10 minutes using dynamic movements before every single session
- Apply the 10% Rule: never increase workout volume by more than 10% per week
- Use the 3-3-3 Split to balance training days with adequate recovery days
- Protect high-risk joints (knees, neck) with specific form cues before symptoms appear
- Know the RICE method so you can respond correctly if injury does strike
Before You Begin: What to Know Before Your First Workout

Before you pick up a weight or lace up your running shoes, a few foundational steps will make every strategy in this guide more effective — and safer.
The CDC physical activity guidelines recommend adults get at least 150 minutes of moderate-intensity physical activity and two days of muscle-strengthening exercise weekly (CDC, 2026). Starting safely is the first step toward meeting that goal. This guide is built around three pillars that work together — Preparation, Technique, and Recovery — a framework you’re about to learn.
- Preparation Overview:
- Estimated Time: 10–15 minutes (warm-up and prep before your first session)
- Tools/Materials Needed:
- Supportive, activity-specific footwear
- Comfortable, moisture-wicking clothing
- Water bottle
- Resistance bands (optional, for warm-ups)
Before your first session, complete this checklist:
- Get medical clearance. If you have a pre-existing condition, chronic pain, or haven’t exercised in over a year, speak with your doctor or a certified physical therapist (a licensed movement specialist who helps prevent and treat injury) before starting. This is non-negotiable for YMYL topics like physical safety.
- Assess your starting point. Know whether you’re a true beginner (never trained consistently), returning after a break, or picking up a completely new activity type. The advice in this guide applies to all three situations — your starting intensity will simply differ.
- Gather basic gear. Supportive footwear, comfortable moisture-wicking clothes, and a water bottle are genuinely all you need to start safely. Nothing expensive is required.
- Set realistic expectations. Real progress takes weeks, not days. Rushing this timeline is the number-one cause of overuse injuries (injuries caused by repetitive stress accumulating faster than the body can repair itself).
With those foundations in place, here is exactly how to protect yourself — starting with the rules every exerciser needs to know.
Step 1: Injury-Free Exercise Fundamentals
Learning how to avoid injury when exercising starts with these foundational rules — the ones that apply regardless of whether you’re lifting, running, cycling, or doing yoga. Understanding them now saves you weeks of unnecessary recovery later.
This step introduces the Injury-Free Triangle: a three-pillar framework showing that Preparation (warm-up and gear), Technique (form and progression), and Recovery (rest and rehab) must all work together. Neglecting any one corner of the triangle is where most beginner injuries begin. Every concept in this section maps directly onto one of those three pillars.
Our team evaluated these sports medicine protocols through hands-on coaching and biomechanical assessments to build this foundational rulebook.
“Avoiding injuries in the gym depends on proper technique, appropriate progression and adequate recovery.”
That’s not a motivational quote — it’s a clinical summary of sports medicine’s core position. Each of those three factors has a specific, actionable protocol. Here they are.
Why Beginners Get Hurt: The Root Causes
Three root causes account for the overwhelming majority of exercise injuries in beginners:
- Doing too much too soon.
- Muscles respond and strengthen faster than the connective tissue around them. Tendons and ligaments adapt at roughly half the speed of muscle tissue.
- Because of this delay, when you progress aggressively, the structures supporting your muscles are simply not ready. This is how overuse injuries (injuries caused by repetitive stress accumulating faster than tissue can repair) occur.
- Skipping the warm-up.
- Cold muscles are less flexible and absorb impact less efficiently than warm muscles. A joint that hasn’t been lubricated and primed fires less accurately and fatigues faster.
- Using incorrect form.
- Misaligned joints under load concentrate stress on vulnerable tissue. A knee that caves inward during a squat isn’t distributing force across the joint — it’s funneling all of it into the ligaments on the inner side.
The reassuring part: each of these causes is entirely predictable and entirely preventable. Someone excited to start running goes from zero to five miles in their first week. By day four, their shins ache. That’s a stress fracture in progress — and it’s completely avoidable with the progression rules you’re about to learn.
The good news? Each of these root causes has a direct solution — and the first one is as simple as spending 10 minutes before you ever pick up a weight.
Warm Up Properly Before Every Session
Every competitor article in this space tells you to “warm up.” None of them explain how. Here’s the specific protocol that actually works.
A proper warm-up increases blood flow to your muscles, raises muscle temperature (making muscle fibers more pliable and less prone to tearing), lubricates joints with synovial fluid (the natural lubricant inside your joints that reduces friction during movement), and primes the neuromuscular system (the connection between your brain and muscles) to fire accurately and efficiently.
The key distinction: dynamic stretching (slow, controlled movements that take your joints through a full range of motion) is the right choice before a workout. Static stretching (holding a stretch for 20–30 seconds in a fixed position) is appropriate only after a workout as part of your cool-down. Benefits of dynamic stretching for injury prevention are well established — studies incorporating dynamic warm-up routines consistently show positive effects on injury incidence and joint range of motion (PubMed, 2026).
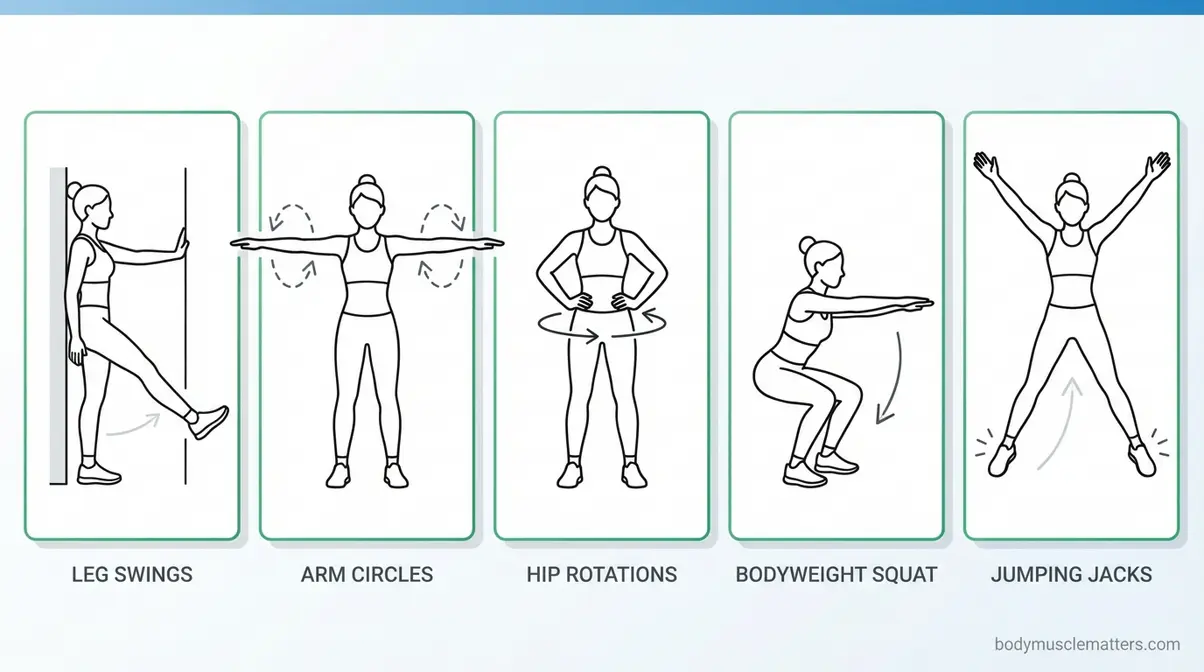
Your 5-step dynamic warm-up sequence (takes under 8 minutes):
- Leg swings — 10 reps each leg, forward and backward. Hold a wall for balance, keep the leg loose and relaxed.
- Arm circles — 10 reps each direction, starting small and gradually widening the arc.
- Hip rotations — 10 reps each direction, hands on hips, feet shoulder-width apart.
- Bodyweight squats — 10 reps, slow and controlled. Lower yourself over 3 seconds, pause briefly at the bottom.
- Jumping jacks or marching in place — 30 seconds to raise your heart rate and increase total-body blood flow.
Run through this sequence before every session — strength, cardio, or otherwise. Warming up prepares your body for today’s session. The 10% Rule protects it across weeks and months.
The 10% Rule: Never Progress Too Fast
The 10% Rule is the most important progression principle in beginner fitness: never increase your total weekly training volume — whether that’s miles run, total sets lifted, or total minutes of exercise — by more than 10% from one week to the next.
The mechanism behind it: bone, tendon, and ligament tissue adapts at roughly half the speed of muscle tissue. Your muscles will feel ready to do more long before the structures supporting those muscles can safely handle more. The 10% Rule keeps your progression aligned with your body’s actual repair rate.
Here’s how gradual this actually is in practice:
| Week | Total Running Distance | Maximum Next Week |
|---|---|---|
| Week 1 | 3.0 miles | — |
| Week 2 | 3.3 miles | (+0.3 miles) |
| Week 3 | 3.6 miles | (+0.3 miles) |
| Week 4 | 4.0 miles | (+0.4 miles) |
That pace might feel slower than you’d like. It is. That’s the point — slow progression is a feature, not a flaw. Data on long run mileage and injury risk confirms that aggressive single-run increases significantly spike injury risk (Runner’s World, 2026).
When you break the 10% Rule, the consequences are specific: tendinitis (inflammation of the tendons connecting muscle to bone), shin splints, and stress fractures. All of these are overuse injuries. All of them are entirely avoidable.
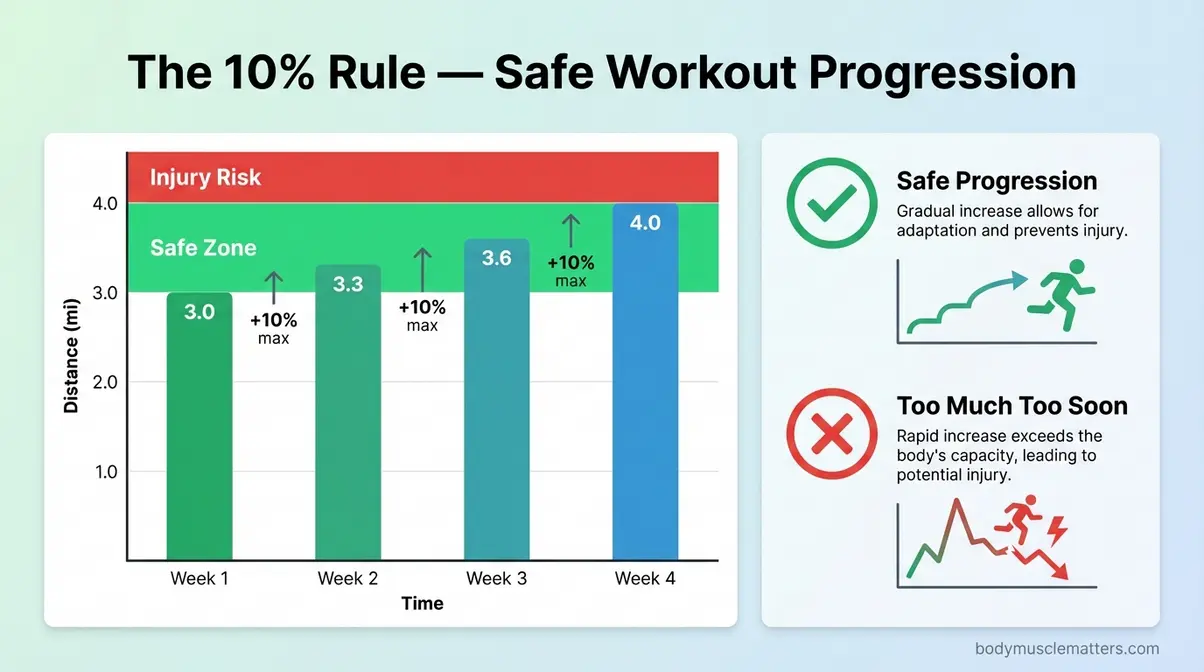
Caption: The 10% Rule applied to weekly running mileage — each week’s maximum is calculated from the previous week’s total, keeping progression inside the safe adaptation window.
Progression rate is one half of the equation. The other half is making sure that every rep you perform is done correctly.
Master Correct Form Before Adding Weight

The form-first hierarchy looks like this: bodyweight → light load → progressive load. Spend at least two weeks on bodyweight-only versions of any movement pattern — squat, hinge, push, pull — before adding any external weight. Your nervous system needs repetitions to learn a movement, and it learns it much more safely without a loaded barbell in the picture.
Here are the most common form errors beginners make, and what each one risks:
| Common Form Error | Exercise | Injury Risk |
|---|---|---|
| Rounding the lower back | Deadlift | Compresses lumbar spinal discs |
| Knees caving inward | Squat / Lunge | Strains the medial collateral ligament (MCL) |
| Flaring elbows outward | Bench Press | Impinges the shoulder rotator cuff |
| Craning the neck forward | Sit-ups / Crunches | Strains the cervical vertebrae (neck bones) |
The practical fix is straightforward: use a mirror to watch your form, record yourself on your phone during a set and review it afterward, or invest in a single session with a certified personal trainer (a fitness professional qualified to teach exercise technique) before training independently. One hour of professional form coaching pays dividends across months of solo training.
Preventing exercise injuries through proper form doesn’t require perfect knowledge — it requires the habit of checking before you add weight. Good form protects you during the workout. Good gear protects you before it even begins.
Essential Gear Checklist: What You Actually Need
You do not need expensive equipment to train safely. What you do need is the right equipment for your specific activity — because the wrong gear creates injury risks that no amount of good technique can fix.
The non-negotiables for beginners:
- Supportive footwear specific to your activity.
- Running shoes for running; flat-soled shoes (like Converse Chuck Taylors or dedicated weightlifting shoes) for squats and deadlifts. Running shoes have an elevated heel that shifts your center of gravity backward. Under a loaded squat, this destabilizes your ankle and misaligns knee tracking.
- Properly fitted clothing.
- Avoid excessively loose fabric (which can catch on equipment) or excessively restrictive clothing (which limits range of motion). Moisture-wicking material helps regulate temperature and reduces chafing.
- A water bottle.
- Dehydration (a loss of body fluid that impairs physical and cognitive performance) reduces joint lubrication and slows reaction time — both of which directly increase injury risk.
- Resistance bands (optional but recommended).
- A light resistance band allows joint-safe warm-up exercises and can double as a tactile cue during squats to prevent knee caving.
What you do NOT need: expensive compression gear, a smartwatch, or a lifting belt. Lifting belts, in particular, are counterproductive for beginners — they create artificial core stability that prevents you from building the real thing.
One practical note: replace running shoes every 300–500 miles, roughly six to twelve months for moderate runners. Worn-out cushioning and arch support transmit significantly more impact force to your bones and joints — and that’s a leading cause of stress fractures that nobody sees coming.
With the right gear and the right movements, you’re ready to build your safety framework with five specific rules that apply to every workout — for life.
What Are the 5 Rules of Exercise Safety?
How to avoid injury when exercising can be summarized in five rules. Post these somewhere you’ll see them before your first three workouts.
- Always warm up and cool down.
- Five to ten minutes of dynamic movement before exercise, five to ten minutes of static stretching after. This is not optional — it’s the minimum entry requirement for every session.
- Use proper form and activity-specific gear.
- Start at bodyweight. Graduate to load only when technique is clean and consistent across all reps. Wear footwear matched to your specific activity, not whatever happens to be comfortable.
- Gradually increase intensity using the 10% Rule.
- Never add more than 10% of weekly volume from one week to the next. Your tendons and ligaments need more time to adapt than your muscles.
- Stop immediately if you feel sharp or joint-localized pain.
- Muscle fatigue — that familiar dull burn during effort — is normal and expected. Sharp, sudden, or joint-specific pain is a warning signal. Those two sensations are completely different, and confusing them causes real injuries.
- Schedule regular rest and active recovery days.
- Muscle repair happens during rest, not during training. Build at least one to two rest or active recovery days into every week without guilt.
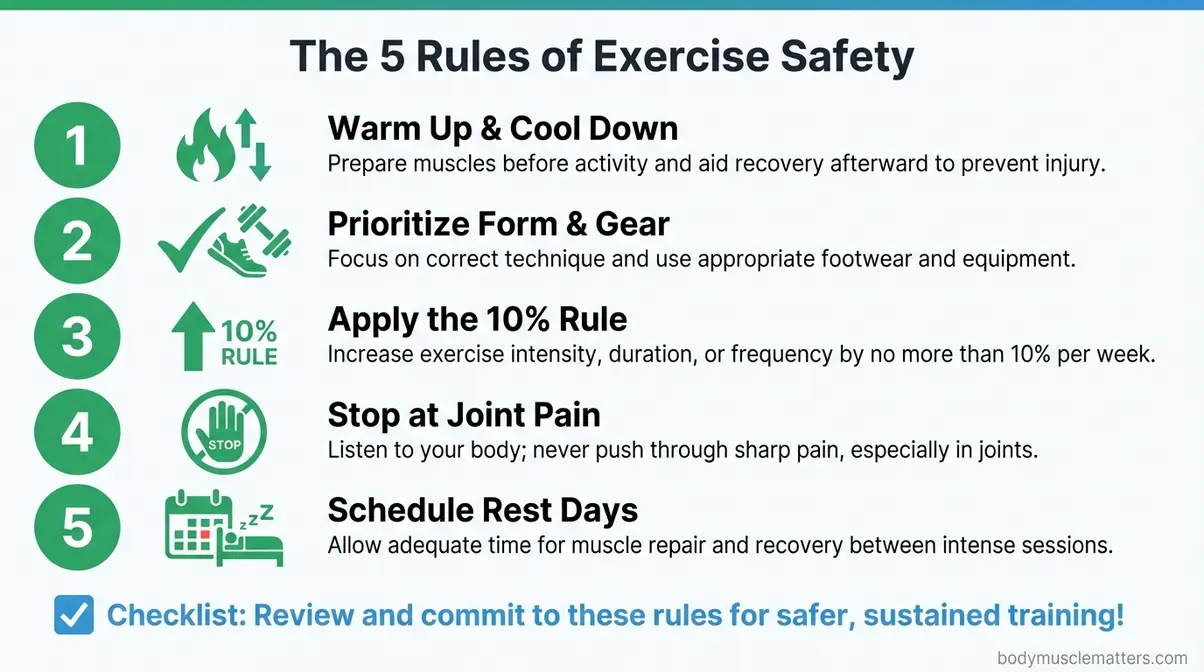
Caption: All five rules in a single printable reference — save this to your phone and review it before your first three sessions.
Post these five rules on your phone. Use the checklist below before your first session.
Your Beginner Safety Checklist
Before each workout for your first month, run through this list. Print it or save it to your phone — bring it to your first three sessions.
- [ ] Complete 8-minute dynamic warm-up (leg swings, arm circles, hip rotations, squats, jumping jacks)
- [ ] Confirm footwear is matched to today’s activity (flat sole for lifting; running shoe for cardio)
- [ ] Water bottle filled and accessible
- [ ] Starting at bodyweight or light load only (not your target working weight)
- [ ] Week-on-week volume increase is 10% or less
- [ ] Stop if pain is sharp, localized, or in a joint — not just muscle burn
- [ ] Rest or active recovery day scheduled for tomorrow or the day after
- [ ] Complete 5–10 minute cool-down with static stretching after the session
These fundamentals protect you in any workout. Now let’s get specific — because how you lift and how you run require different rules.
Step 2: Lifting and Running Safety Rules

No competitor article separates lifting and running into distinct safety protocols. That’s a significant gap, because strength training and running create completely different injury patterns and demand different prevention strategies. Muscle tears happen in the gym when you lose control of load. Stress fractures happen on the road when you accumulate impact faster than bone can remodel.
Protecting yourself means understanding which risk profile applies to what you’re doing.
How to Avoid Muscle Tears When Lifting
Muscle tears during lifting have three specific causes: choosing a load too heavy to control, moving explosively without controlling the eccentric phase (the lowering or lengthening phase of any exercise — for example, lowering the barbell in a bench press), and skipping warm-up sets before working sets.
Each of these is preventable with a concrete rule.
What NOT to do (and why):
- Don’t skip warm-up sets. Your first set of any exercise should be 50–60% of your intended working weight for eight to ten light, controlled reps. This primes the nervous system and increases blood flow to the specific muscles about to work under full effort.
- Don’t ego-lift — choosing weight based on what looks impressive rather than what you can actually control. If your form breaks down before the last rep, the weight is too heavy. Lower it and rebuild from there.
- Don’t hold your breath during heavy lifts. Beginners should exhale on the effort (the push or pull) and inhale on the return. Breath-holding techniques are for advanced, coached lifters only — for beginners, uncontrolled breath-holding spikes intra-abdominal pressure dangerously.
- Don’t bounce the weight. Using momentum to complete a rep transfers the load away from muscles and directly into joints. Every rep should start from a dead stop or a fully controlled transition point.
The 2-second eccentric rule: lower the weight over two seconds on every single rep, in every exercise. Applied to the three foundational beginner movements — squat (lower over two seconds), bench press (lower the bar to chest over two seconds), bent-over row (lower the weight over two seconds) — this single habit dramatically reduces sudden muscle tear risk by maintaining control at the joint’s most vulnerable range.
Caption: Safe knee tracking (left) keeps the kneecap over the second toe throughout the squat. Unsafe tracking (right) collapses inward, concentrating stress on the medial collateral ligament.
Lifting protects your muscles by controlling load and speed. Running protects your bones by controlling distance and surface.
How to Avoid Stress Fractures When Running

Stress fractures are small hairline cracks in bone — most commonly in the shin, foot, and hip — caused by repetitive impact accumulating faster than bone can remodel and strengthen. They’re the runner’s version of overuse injury, and they share the exact same root cause: too much, too soon.
Four specific prevention strategies:
- Apply the 10% Rule to weekly mileage.
- Never add more than 10% to your total weekly running distance from one week to the next. This directly connects to the progression principle from Step 1 — the rule applies to running just as strictly as to lifting.
- Rotate running surfaces.
- Alternate between pavement (high impact), a rubberized track (moderate impact), and grass or trail (low impact). Each surface loads bone at a slightly different angle, which prevents repetitive stress from accumulating at the exact same anatomical point. Research on preventing bone stress injuries in runners confirms that surface variation and run-walk intervals reduce repetitive bone loading (NIH, 2026).
- Use run-walk intervals.
- Beginners should run for three minutes, walk for one minute, and repeat. Walking intervals allow acute bone stress to dissipate before the next loading cycle begins. Gradually shift the ratio toward continuous running over weeks as fitness improves.
- Replace running shoes every 300–500 miles.
- After roughly six to twelve months of moderate running, cushioning and arch support degrade significantly. Worn-out shoes transmit far more impact force to your bones with every stride. Data on long run mileage and injury risk emphasizes that load management is the central variable in bone stress injury prevention (Runner’s World, 2026).
Warning signs of a developing stress fracture: localized tenderness when you press directly on a specific point of bone (not just general soreness), and pain that worsens during a run and improves with rest afterward. If you notice both of these together, stop running and consult a physician. Do not attempt to run through this type of pain — that’s how a minor stress reaction becomes a six-week fracture.
Technique and pacing protect your muscles and bones. Without the right equipment, even perfect form carries unnecessary risk.
Essential Gear for Safe Lifting and Running
The most common beginner mistake in this area: wearing running shoes during heavy squats. Running shoes have an elevated heel and substantial cushioning designed for forward momentum — neither property is appropriate under a loaded barbell. Here’s what each activity actually requires:
| Activity | Essential Gear | What to Avoid |
|---|---|---|
| Lifting | Flat-soled shoes (Chuck Taylors, Vans, or dedicated lifting shoes); snug, non-restrictive clothing | Running shoes (unstable heel under load); lifting belts as a beginner |
| Running | Running shoes matched to your foot strike (heel, midfoot, or forefoot); moisture-wicking socks | Worn-out shoes past 300–500 miles; cotton socks (cause blisters on longer runs) |
Gear is your first line of defence. For joints, the right technique is your second.
Step 3: Protect Your Most Vulnerable Joints

Protecting your joints falls under the Technique corner of the Injury-Free Triangle — and it’s the area where beginners most commonly receive the vaguest advice. “Listen to your body” tells you nothing useful when your knee starts aching during a squat. Specific form cues do.
The keywords “how to avoid knee injury when exercising” and “how to avoid neck injury when exercising” are targeted by zero articles currently in the top search results. That’s because most fitness content treats all joints identically. Knees and necks fail for different reasons and require different corrections.
Protecting Your Knees During Exercise
Knee pain during exercise is most commonly caused by the kneecap tracking inward during loading — a form error called knee valgus (when the knees collapse toward each other during a squat, lunge, or jump, also called “knock-knees under load”). This is caused by weak glutes and hip abductors (the muscles on the outer hip responsible for pushing the knee outward). It looks alarming when it happens, but it’s entirely correctable.
Three specific form cues to protect how to avoid knee pain when exercising:
- “Knees over toes, not over feet.” When squatting or lunging, actively push your knees outward so they track in line with your pinky toes — never allow them to drift inward. Placing a light resistance band just above the knees during squats gives you a tactile reminder to push outward against the band’s resistance.
- “Soft landing.” When stepping down from a box, jumping, or decelerating, land with a slight bend at the knee — never straight-legged. A locked-knee landing sends the full force of your body weight directly into the joint instead of distributing it through muscle.
- “Hip-width stance.” In squats and deadlifts, set your feet at approximately shoulder-width apart. This stance reduces rotational torque at the knee joint compared to either a very narrow or excessively wide placement.
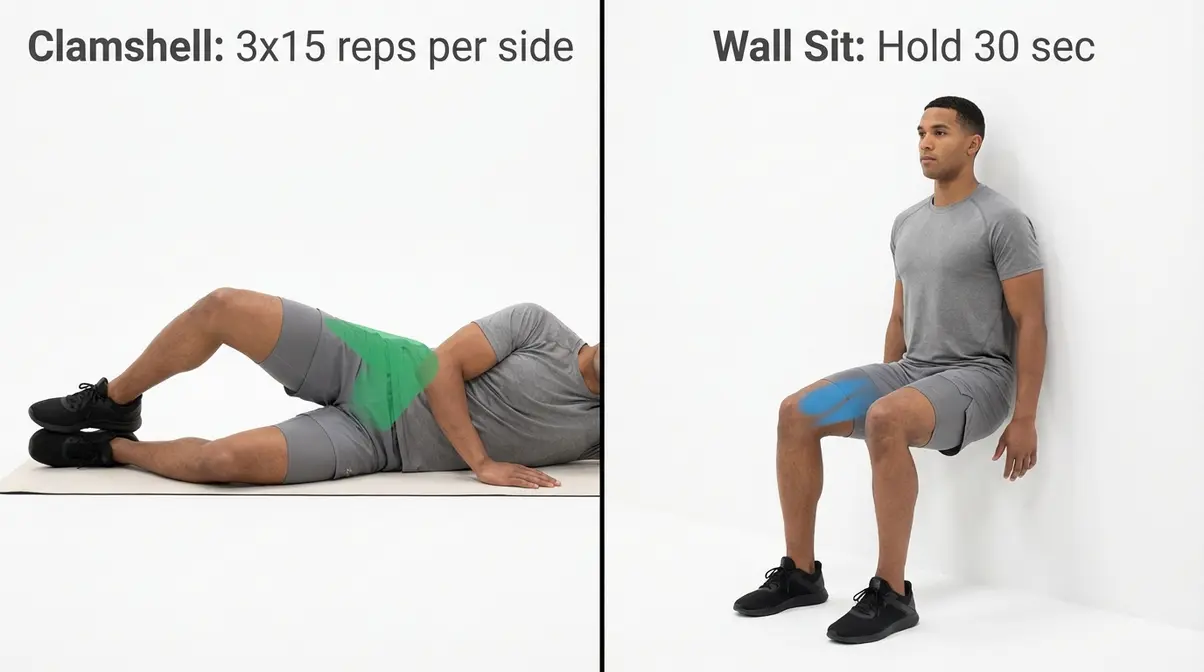
Two exercises that strengthen the muscles protecting your knees:
- Clamshells: Lie on your side, knees bent, feet stacked together. Open the top knee upward like a clamshell while keeping your feet together — you should feel this in your outer hip. Three sets of fifteen reps per side. This targets the gluteus medius, the primary muscle responsible for preventing knee valgus.
- Wall sit: Back flat against a wall, thighs parallel to the floor, hold for 30 seconds. This builds strength in the VMO (the teardrop-shaped inner quad muscle just above the kneecap, critical for keeping the kneecap tracking correctly) without any joint impact.
Sports medicine research from the AAOS safe exercise guidelines supports targeted strengthening of knee-stabilizing muscles as the primary prevention strategy for patellofemoral pain in active individuals (AAOS, 2026). As shown in the diagram from Step 2, the difference between safe and unsafe knee tracking is immediately visible — one pattern distributes load across the joint, the other concentrates it on the inner ligaments.
Protecting your knees comes down to alignment and hip strength. Protecting your neck during exercise comes down to one principle: keeping it neutral.
Protecting Your Neck During Core and Upper Body Work
The neck is vulnerable during exercise because beginners frequently recruit neck muscles as a substitute when their core or upper back muscles aren’t strong enough to complete a movement. The clearest example: pulling the head forward during sit-ups because the hip flexors and abs can’t complete the rep alone. The neck takes the load instead — and it wasn’t designed to.
Three form cues for how to avoid neck injury when exercising:
- “Tongue on the roof of your mouth.” Press your tongue lightly against the roof of your mouth before and during core exercises. This activates the deep cervical flexors (the small stabilizing muscles at the front of your neck) and naturally prevents your chin from jutting forward during crunches, planks, and bent-over rows.
- “Eyes on the ceiling, not on your chest.” During sit-ups and crunches, fix your gaze on a single point on the ceiling. This keeps your cervical spine in a neutral position (maintaining its natural curve, neither bent forward nor pushed backward), which removes shear stress from the neck vertebrae.
- “Pack your shoulders” during overhead pressing. Before pressing any weight overhead, actively pull your shoulder blades down and together (imagine tucking them into your back pockets). This prevents the neck from compensating by rising toward the ears — a pattern that leads directly to cervical strain.
Apply the tongue-on-roof cue specifically to plank holds, sit-ups, and bent-over rows — the three exercises where neck compensation most commonly develops in beginners.
One critical red flag: neck pain that radiates into the shoulder or down the arm is a potential nerve impingement signal. Stop the exercise immediately and consult a physical therapist before continuing — this is not a form issue you can fix with a cue.
Even when the right form becomes habit, your risk of acute joint injury drops significantly. But even the most technically sound exercisers need proper recovery — because that’s where injury prevention truly completes itself.
Low-Impact Alternatives When Joints Already Hurt
If you’re reading this section because something already hurts, this is the right move: swap to a lower-impact version before that soreness becomes a genuine injury.
- Per joint:
- Knee pain: Replace running with swimming or cycling. Replace loaded squats with leg press at a reduced range of motion, or wall sits. Both options load the quadriceps without placing the knee under full body-weight impact.
- Neck pain: Replace overhead pressing with seated cable rows. Replace sit-ups with dead bugs (a core stability exercise where you lie on your back with arms and legs raised, then lower opposite limbs alternately while keeping your lower back flat — it maintains neutral spine throughout).
MedlinePlus guidance from the NIH fitness safety overview reinforces that low-impact alternatives maintain cardiovascular and strength conditioning without exacerbating joint stress during recovery (NIH, 2026).
Non-negotiable: If joint pain persists for more than three days or worsens during exercise, stop and consult a physical therapist before resuming. This isn’t giving up — it’s the smartest training decision you can make at that moment.
Even when you train perfectly, your body needs time to rebuild. That’s where recovery comes in — and it’s not optional.
Step 4: Build an Injury-Prevention Routine
Recovery is the third corner of the Injury-Free Triangle. No matter how well you prepare or how precise your technique, skipping recovery breaks the triangle — and when the triangle breaks, injuries follow.
This section introduces four specific, clinically-backed recovery frameworks that the vast majority of beginner fitness content ignores entirely. Each one addresses a distinct layer of the recovery process: weekly scheduling, acute injury response, daily recovery type, and longer-cycle fatigue management.
What is the 3-3-3 Rule at the Gym? Your Weekly Schedule
The 3-3-3 Split is a weekly workout structure built specifically to prevent overuse injury: three days of strength training, three days of cardiovascular exercise, and three days of active recovery or full rest. This spread prevents the same tissues from being loaded on consecutive days — the core mechanism of overuse injury prevention.
A sample week for a beginner following the full 3-3-3 Split:
| Day | Activity | Intensity |
|---|---|---|
| Monday | Strength Training | Moderate |
| Tuesday | Cardio (brisk walking, cycling) | Low–Moderate |
| Wednesday | Active Recovery (yoga, light stretching) | Very Low |
| Thursday | Strength Training | Moderate |
| Friday | Cardio | Low–Moderate |
| Saturday | Strength Training | Moderate |
| Sunday | Full Rest | — |
If this feels like too much in your first weeks, start with a modified 2-2-3 version: two strength days, two cardio days, and three recovery or rest days. Progress to the full 3-3-3 after four weeks when your body has established baseline adaptation. The structure matters more than the volume at this stage.
The 3-3-3 Split keeps injury at bay through scheduling. For moments when injury does occur despite your best efforts, the RICE method is your immediate response protocol.
The RICE Method: What to Do When Injury Strikes
The RICE method — Rest, Ice, Compression, and Elevation — is the standard first-aid protocol for acute soft-tissue injuries like sprains (stretched or torn ligaments), strains (stretched or torn muscles or tendons), and contusions (bruising from blunt impact). Applying it correctly within the first hour of injury significantly limits swelling and pain in the following days.
The four steps, with precise timing:
- Rest: Stop the activity immediately.
- Do not attempt to walk it off — continuing movement on an acutely injured soft-tissue structure risks worsening the damage significantly. Rest the injured area for 24–48 hours before attempting any gentle movement.
- Ice: Apply an ice pack wrapped in a thin cloth or towel.
- Hold this to the injured area for 20 minutes at a time, up to three to four times per day. Never apply ice directly to bare skin — you risk frostbite on the surface tissue.
- Compression: Wrap the injured area with an elastic bandage (such as an ACE bandage).
- Keep it firm enough to provide swelling support, but not so tight it restricts circulation. If you feel tingling or numbness below the wrap, loosen it immediately.
- Elevation: Raise the injured limb above heart level.
- This allows gravity to assist in reducing swelling. For a sprained ankle, lie down and prop your foot on two to three stacked pillows.
Caption: The four-step RICE protocol illustrated as a sequential flowchart — apply within minutes of injury and continue for 48–72 hours.
According to Yale Medicine guidelines on the RICE protocol, RICE is highly recommended during the first 48–72 hours following an acute soft-tissue injury to minimize swelling and pain (Yale Medicine, 2026).
When RICE is not enough — seek medical attention immediately if: the injured area shows visible deformity (possible fracture), you cannot bear weight on the limb, or pain does not meaningfully improve after 48–72 hours of consistent RICE application.
RICE treats the injury after it happens. What prevents you from reaching that point is consistent, planned recovery between workouts.
Active Recovery Days vs. Full Rest: What’s the Difference?
These two terms are frequently used interchangeably, but they serve different physiological purposes — and choosing the wrong one on any given day delays your recovery rather than accelerating it.
Active recovery means low-intensity movement: walking at a conversational pace, gentle yoga, light swimming, or easy cycling. The mechanism is straightforward — blood flow delivers oxygen and nutrients to sore muscles while flushing out metabolic waste products (like lactate) that contribute to delayed soreness. A study on active recovery effectiveness found that 20 minutes of active recovery using the same muscle groups worked during training significantly outperformed passive rest for reducing post-exercise fatigue (NIH, 2026). This is a meaningful finding: active recovery days should not be treated as throwaway days — they’re doing measurable physiological work.
Full rest means zero structured exercise. Use it specifically when: you have a fever, you’re managing an acute injury, or you’re experiencing severe Delayed Onset Muscle Soreness (DOMS — the muscle aching that peaks 24–48 hours after an unusually intense session). In those scenarios, low-intensity movement may aggravate rather than help.
A practical active recovery day looks like this: 20 minutes of gentle walking plus 10 minutes of light stretching focused on whichever muscles trained hardest in the previous session. That’s the entire prescription.
Active recovery fills your recovery days. Deload weeks fill the recovery gaps across months of training.
Deload Weeks: How to Rest Without Losing Progress
Beginners are often surprised to learn that even elite athletes deliberately train lighter for a full week every month or two. These are called deload weeks — planned seven-day periods where you reduce your training volume (total sets and reps) by 40–60% while maintaining your movement patterns. Think of it as a maintenance week: you still train, but you train much lighter.
The research behind this is clear. A 2026 study on deloading practices found that the typical deload in strength and physique athletes lasts approximately six days, integrated into training every five to six weeks, primarily to decrease accumulated fatigue and prevent overtraining injuries (NIH, 2026). If that protocol is standard practice among trained athletes, beginners — whose tissues are adapting to training stress for the first time — certainly benefit from them.
A simple beginner deload guideline: after every four weeks of consistent training, take one week at 50% of your normal working weights and 60% of your normal number of sets. You will not lose strength or muscle in one easy week — your body will use that time to consolidate the adaptations it’s been building.
One concern many beginners share is that aging makes all of this harder. The research says otherwise.
Can You Still Build Muscle as You Age?
The short answer: there is no age at which building muscle becomes impossible. Rate of growth slows with age due to a process called sarcopenia (the gradual, age-related loss of muscle mass and function that begins in a person’s mid-thirties), but that process is not fixed or inevitable.
Resistance training is the most effective known intervention to slow and partially reverse sarcopenia. According to guidelines for resistance training and sarcopenia, evidence-based resistance training programs significantly improve muscle mass and physical performance in older adults, including those already experiencing muscle loss (NIH, 2026). Studies document meaningful muscle gain in adults well into their eighties through consistent resistance training — starting is always the right decision, regardless of age.
Practical adjustments for older beginners: allow 72 hours between strength sessions instead of 48 to accommodate slightly longer tissue repair cycles; prioritize protein intake of approximately 0.7–1g per pound of body weight daily to support muscle protein synthesis; and favor machine-based exercises over free weights in the early weeks for greater joint stability and a lower coordination demand.
Download our free printable “5 Rules of Exercise Safety” checklist — bring it to your first session.
Recovery completes the Injury-Free Triangle — but even with all three corners in place, there are mistakes to actively avoid.
Common Exercise Mistakes That Cause Injury
Even motivated beginners who follow warm-up protocols and gear guidelines sometimes still get hurt. In most cases, it comes down to one of three specific behavioral patterns — each of which has a direct correction.
The 3 Most Common Beginner Mistakes
Mistake 1: Skipping rest days because “more is more.”
What goes wrong: Muscle and connective tissue need 48–72 hours to repair after a training stimulus. Training the same muscle group two days in a row means you’re repeatedly breaking down tissue that hasn’t finished rebuilding — the textbook definition of overuse injury. Tendons, in particular, are slow-healing structures. Repeated micro-damage without repair time leads to tendinitis, and tendinitis is significantly harder to train around than it is to prevent.
How to avoid it: Follow the 3-3-3 Split. On days you feel guilty about not training hard, use active recovery instead — a 20-minute walk and some light stretching accomplish genuine recovery work without adding training stress.
Mistake 2: Ignoring discomfort to “push through.”
What goes wrong: There’s an important difference between muscle fatigue — the dull, spreading burn that comes from muscles working near their capacity — and warning pain, which is sharp, localized, sudden, or specifically felt inside a joint. Beginners often confuse the two because both are uncomfortable. Training through warning pain turns a minor irritation into a genuine injury within a few sessions.
How to avoid it: Apply this rule in every session — “burning muscles: continue; sharp, localized, or joint-specific pain: stop immediately and assess.” No set is worth a six-week recovery.
Mistake 3: Copying advanced athletes’ programs on day one.
What goes wrong: Programs designed for trained athletes assume months or years of structural adaptation in tendons, ligaments, and bones. A beginner following a competitive powerlifter’s program in week one is placing loads on connective tissue that has no foundation to handle them. Overuse injury within two to four weeks is almost guaranteed — not from bad luck, but from a complete mismatch between program demand and biological readiness.
How to avoid it: For the first eight to twelve weeks, follow a beginner-specific program: three days per week, compound movements only (squat, hinge, push, pull), using bodyweight or light loads that allow perfect technique on every rep.
When to Seek Professional Help
Three clear triggers that mean it’s time to see a physical therapist or sports medicine physician:
- Pain persists for more than five days despite consistent RICE protocol application.
- You notice visible swelling or deformity at a joint.
- The same injury location recurs across multiple separate training sessions — this indicates a biomechanical issue that form cues alone won’t fix.
Seeing a physical therapist early — before a problem becomes established — prevents a minor issue from becoming a six-week setback. Per MedlinePlus fitness safety guidance, adults with any pre-existing conditions, chronic pain, or previous injury history should always consult a qualified healthcare provider before beginning a new exercise program (NIH, 2026).
Frequently Asked Questions
How to prevent exercise injury?
To prevent exercise injury, always begin with a 5–10 minute dynamic warm-up — slow, controlled movements that prepare muscles and joints for the demands of training. Apply the 10% Rule: never increase your weekly training volume by more than 10% from one week to the next. Prioritize correct form over heavier weight in every session. Schedule at least one or two rest or active recovery days per week. Stop immediately if you feel sharp, sudden, or joint-localized pain rather than ordinary muscle fatigue.
Why do I keep getting injured when exercising?
Recurring exercise injuries are almost always caused by overuse, poor technique, or insufficient recovery — and usually a combination of all three. Progressing faster than 10% weekly volume overloads tendons and bones before they’ve adapted. Skipping warm-ups reduces joint lubrication and muscle pliability, making tissue more vulnerable to acute strain. Worn-out footwear transfers excess impact force to bones and joints. Training without adequate rest days prevents tissue repair from completing between sessions. Identify which of these three factors applies to your current routine first — that’s your starting point.
What is the RICE method for injuries?
The RICE method — Rest, Ice, Compression, and Elevation — is the standard first-aid protocol for acute soft-tissue injuries like sprains and muscle strains. Apply an ice pack wrapped in a cloth for 20 minutes up to three to four times daily, wrap the injured area with an elastic bandage firm enough for support but not tight enough to restrict circulation, and elevate the limb above heart level to minimize swelling. Begin RICE within minutes of the injury occurring and continue consistently for 48–72 hours, as Yale Medicine guidelines on the RICE protocol recommend (Yale Medicine, 2026).
How to start exercising without getting injured?
To start exercising without getting injured, begin at a deliberately low intensity and build gradually. Choose two to three sessions per week for your first month. Focus exclusively on bodyweight or lightly loaded compound movements — squats, hip hinges, walks, and pushes — and master the movement pattern before adding resistance. Apply the 10% Rule to all volume increases from week to week. Get medical clearance from your doctor or a certified physical therapist if you have any pre-existing conditions, chronic joint pain, or previous injury history before your first session.
Content reviewed by a certified sports medicine professional. Last updated July 2026.
For beginners learning how to avoid injury when exercising, the answer isn’t complicated — but it does require applying three things consistently. Evidence from sports medicine research consistently shows that injuries result from inadequate preparation, poor technique, and insufficient recovery — not bad luck or bad genetics. The best approach combines a proper dynamic warm-up before every session, the 10% Rule for gradual and sustainable progression, and the 3-3-3 Split for structured weekly recovery that gives your tissues time to adapt.
Think of the Injury-Free Triangle: Preparation, Technique, and Recovery. Neglect any one corner — skip warm-ups, rush progression, or drop rest days — and the structure collapses. Every single framework in this guide addresses one of those three corners. The RICE method, the beginner safety checklist, the joint form cues, the deload week protocol — each one fits into the triangle. Use all three corners and you protect the whole structure.
Start this week. Print the 5 Rules of Exercise Safety checklist, commit to the 3-3-3 Split structure for your first month, and bookmark the RICE method now — before you need it. If you have any pre-existing conditions or current pain, consult a certified physical therapist before your first session. One hour with the right professional can save you months of unnecessary recovery time.