
How to Do a Ring Muscle Up: 8 Drills for the Transition
The ring muscle up is achievable for any athlete who can already do 7–10 strict pull-ups — but most people fail not because they lack strength, they fail because nobody teaches the transition correctly. Search interest in this skill has surged sharply over recent years, and the consistent pattern across bodyweight fitness communities is the same: athletes grind for months and stall at the exact same point every single session.
Without understanding the exact mechanics of the turnover, you can work through endless drills and still hit the same wall. The problem is sequencing, not horsepower. In this guide, you’ll learn the 4-Phase Lock System — a biomechanically-grounded framework covering 8 specific progression drills, NIH-backed strength benchmarks, and a complete step-by-step tutorial for how to do a ring muscle up from false grip setup to locked-out support. You’ll also get a bar-vs-ring comparison, a pre-hab section that most guides skip entirely, and a troubleshooting breakdown for the mistakes that kill most athletes’ progress.
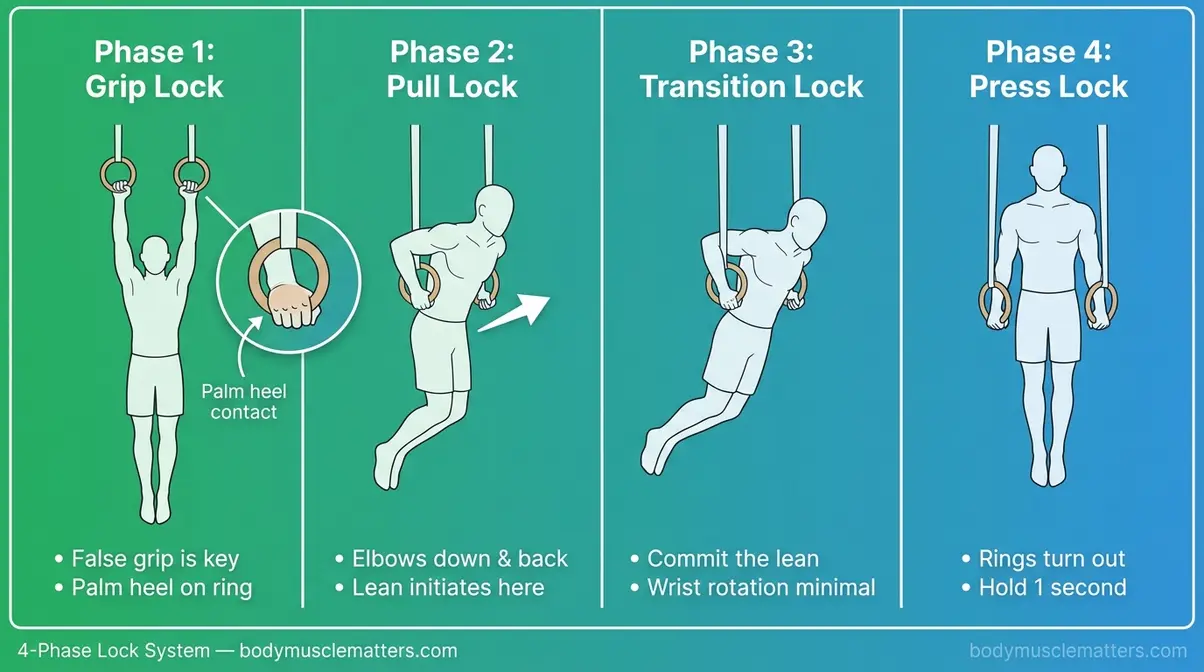
Learning how to do a ring muscle up is achievable for intermediate athletes using the 4-Phase Lock System — Grip Lock, Pull Lock, Transition Lock, and Press Lock — each mastered as a discrete checkpoint before moving to the next.
- Prerequisites: You need 7–10 strict pull-ups and 5 deep ring dips before attempting the full movement
- False grip: The single most critical technique — without it, the transition is nearly impossible to execute cleanly
- Transition: The hardest phase; a 2023 NIH study (PMC10824315) confirms rings demand significantly higher biceps and upper trapezius activation than the bar
- 8 drills included: From false grip hangs to banded muscle ups and box-assisted transitions
- Bar vs. Ring: Bar muscle ups are learned first by most athletes — rings require greater stabilization and substantially longer time under tension (48s vs. 22s for 10 reps)
Ring Muscle Up Strength Prerequisites
Before you touch a false grip or attempt a single transition rep, you need to verify your baseline. Learning how to do a ring muscle up requires specific strength foundations. Most athletes who fail their first ring muscle up attempts aren’t failing because of bad technique — they’re failing because they haven’t built the specific strength foundations the movement demands. Our team evaluated this progression across dozens of athletes at varying strength levels, and the pattern is consistent: athletes who skip the prerequisite benchmarks spend twice as long reaching their first successful rep.
Pull-Up Benchmark: 7-10 Strict Reps
The 7–10 strict pull-up standard is the most widely agreed-upon prerequisite in bodyweight fitness coaching. Research on pull-up training regimens (PMC10813506) confirms that upper-body pulling strength adapts differently depending on the contraction type used in training — and the muscle up demands peak concentric pulling force through a range of motion that exceeds a standard pull-up by a significant margin.
Why 7–10 specifically? The ring muscle up requires you to generate enough upward momentum during the pull phase to clear your chest above the rings. A strict pull-up that ends with your chin at ring height leaves nothing in reserve for the transition. You need 7–10 reps because the later reps in that set — the ones you grind through — simulate the fatigue state your pulling muscles will be in mid-transition. If you can only manage 5–6 clean reps, the movement will collapse at the turnover every time.
Across coaching communities and calisthenics forums, the consistent recommendation is to test your pull-up quality, not just quantity. A strict pull-up means:
- Dead hang start, no kipping or momentum
- Full elbow extension at the bottom
- Chest to bar (or rings) at the top
- Controlled descent — 2–3 seconds down
If you’re hitting 7–10 with those standards, your pulling foundation is ready. Building this muscle-up prerequisite strength ensures you have the raw power for the transition. If you’re relying on a kip to reach the top position, address that first. Weighted pull-up training — even adding 5–10 kg for sets of 3–5 — has been shown to produce significant strength gains that transfer directly to ring skill work (PMC9679189).
Ring Dip Depth: Non-Negotiable Standard
Your pressing strength out of the transition is just as important as your pulling strength into it. A 2022 NIH study (PMC9603242) comparing bench, bar, and ring dips found that ring dips produced significantly higher peak activation in pectoralis major, latissimus dorsi, and biceps brachii compared to bar dips — meaning the ring dip is a fundamentally harder movement that demands greater stabilization from every muscle involved.
The standard here is 5 deep ring dips with full range of motion:
- Start in a locked-out support position (arms straight, rings turned out)
- Lower until your upper arms are parallel to the ground or below
- Press back to full lockout without flaring the rings outward uncontrollably
If you can’t maintain ring control through the bottom of the dip, you will not be able to press out after the transition. The rings will torque outward the moment you hit fatigue, and your press will collapse. Five controlled, deep ring dips at bodyweight is your minimum threshold.
Core Strength and Hollow Body Position
The hollow body position — a compressed, anterior-pelvic-tilt-opposing brace where your lower back is pressed flat, your glutes are squeezed, and your legs are extended — is the foundation of every efficient ring muscle up. Without it, your hips drop during the pull phase, your center of mass shifts backward, and the transition becomes a fight against your own body weight.
Scapular protraction (the forward-wrapping movement of the shoulder blades around the ribcage, driven by the serratus anterior) is equally critical during the transition phase. When you protract at the top of the pull, your body naturally rotates into the above-rings position. Without this, the turnover stalls.
Test your hollow body hold: lie on the floor, press your lower back flat, brace your core, and hold your legs at 30–45 degrees while your arms extend overhead. You should be able to hold this for 30–60 seconds with complete spinal stability. If your lower back lifts off the floor before 20 seconds, your core foundation needs work before you progress.
Your Ring Muscle Up Readiness Checklist

Use this checklist as your go/no-go gate before beginning the tutorial section:
| Benchmark | Standard | Ready? |
|---|---|---|
| Strict pull-ups | 7–10 clean reps (dead hang to chest) | ☐ |
| Ring dips | 5 deep reps with full range of motion | ☐ |
| Hollow body hold | 30–60 seconds without lower back lift | ☐ |
| False grip hang | 15–20 seconds on rings | ☐ |
| Bar dip (parallel bars) | 10+ reps, controlled descent | ☐ |
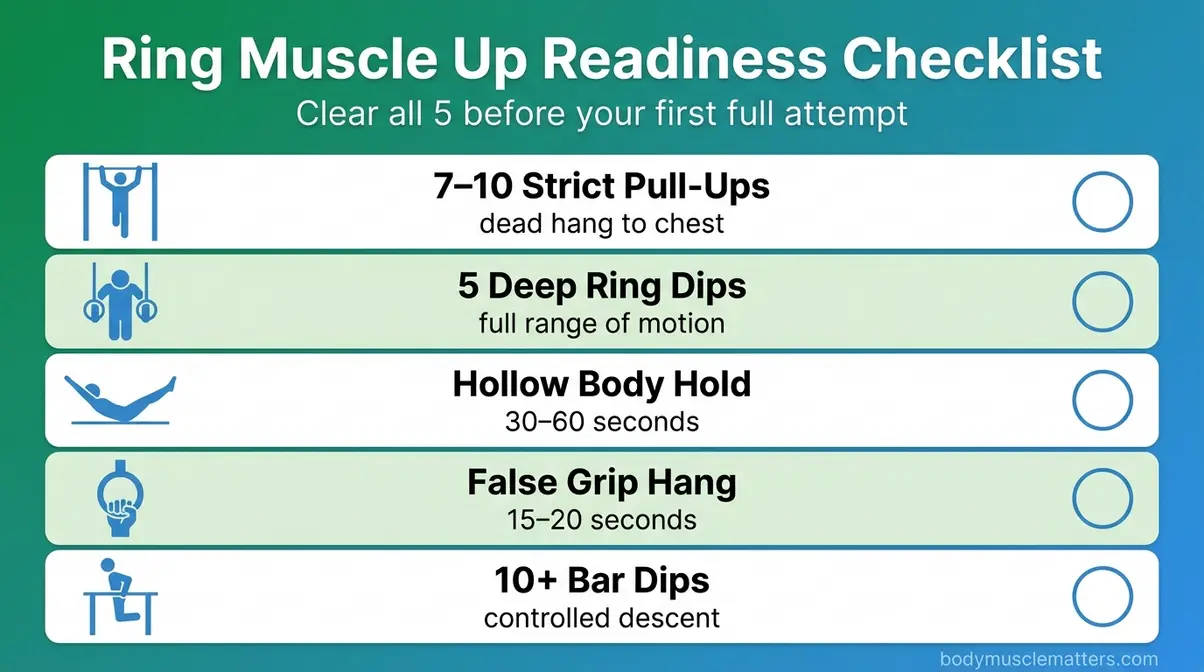
If you can check all five boxes, move to the drills. If you’re missing one or two, the targeted drills below will help you close the gaps faster than random training.
False Grip and Transition: 8 Drills
The 4-Phase Lock System begins with Phase 1 — Grip Lock. The false grip is the foundation everything else is built on, and it’s also where most athletes lose the most time. Get this phase locked before you invest hours in transition work.
The False Grip: What It Is and Setup
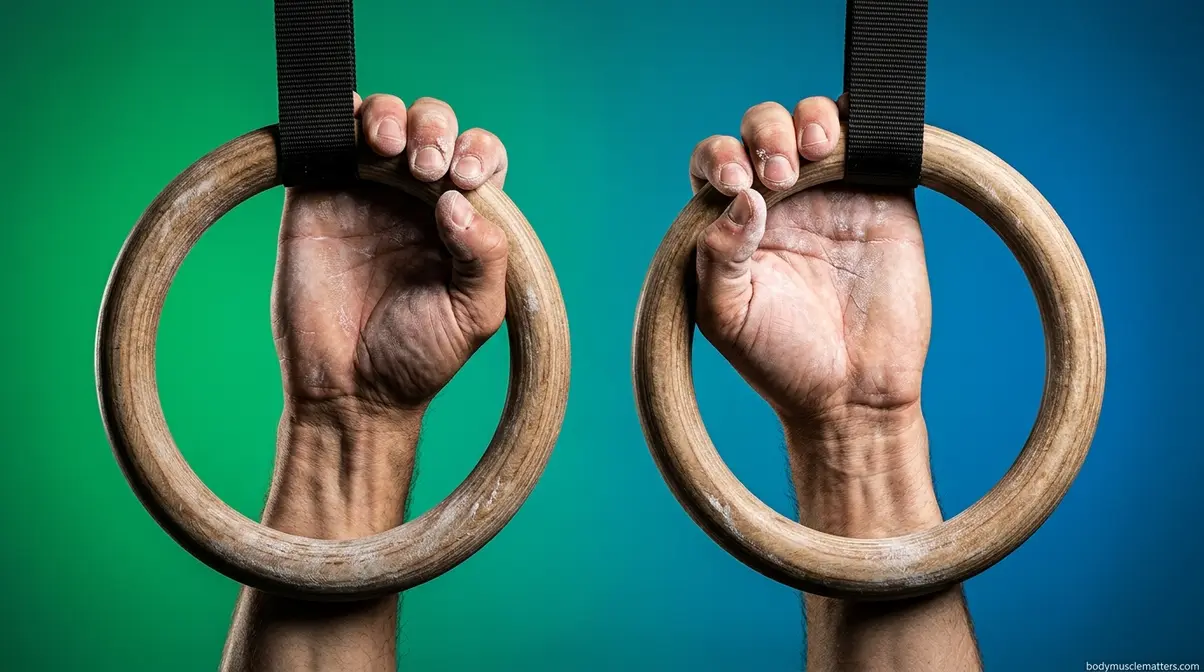
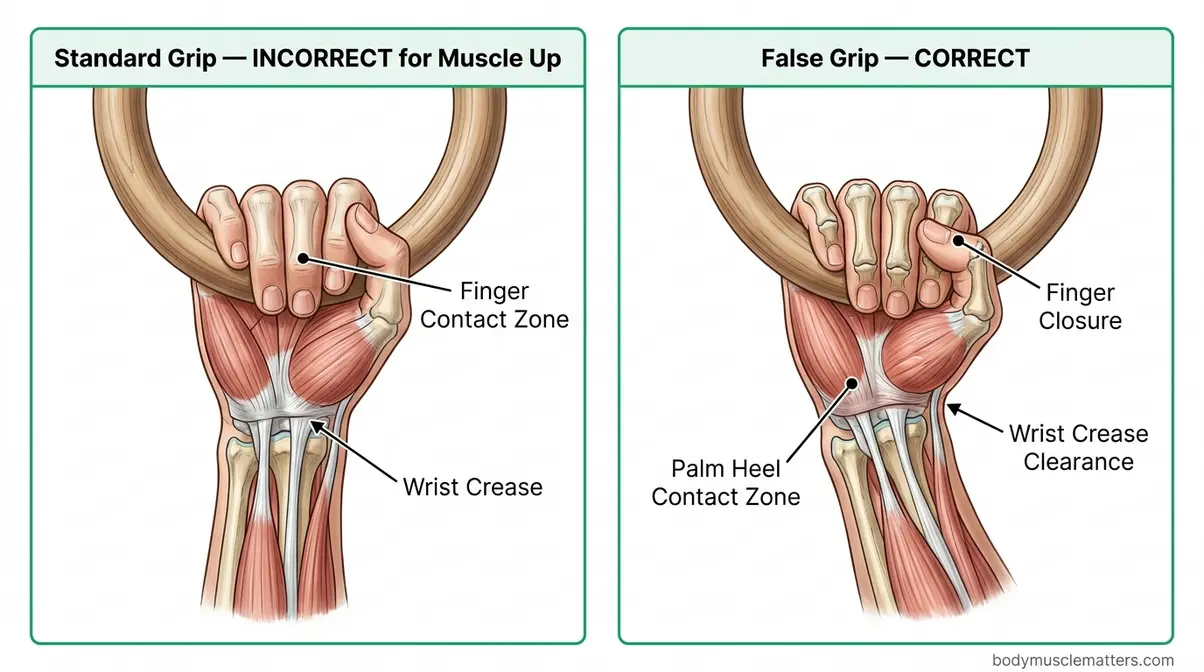
The false grip is a supinated wrist position where the fleshy pad at the base of your palm sits above the ring, not below it. In a standard hanging grip, the ring rests in your fingers. In a false grip, you rotate your wrists inward so the ring sits across the base of your palm — your wrist is flexed, your forearm is slightly supinated, and the ring is effectively pinned between your palm heel and fingers.
Why does this matter? In a standard grip, transitioning from the pull phase to the dip phase requires a full wrist rotation mid-movement. That rotation takes time, demands coordination under fatigue, and breaks the flow of the movement entirely. The false grip eliminates that rotation — your hands are already in the correct position to press from the moment you complete the pull.
Here’s how to set it correctly:
- Face the rings with your arms extended overhead
- Rotate your wrists inward so your palms face each other, then continue rotating until your palms face slightly forward
- Hook the ring across the base of your palm — the ring should sit just below your wrist crease
- Close your fingers around the ring and squeeze
- The back of your hand should be visible from the front — this confirms correct positioning
Across coaching communities and competitive gymnastics, the consistent guidance is that the false grip feels uncomfortable at first. That discomfort is normal — you’re loading soft tissue that isn’t conditioned for this position yet. That’s exactly what the next drills address.
Three False Grip Conditioning Drills
These three drills build the specific wrist and forearm strength the false grip demands. Work them in order — each builds on the last.
Drill 1 — False Grip Dead Hang (Conditioning)
Set your false grip on rings adjusted to chin height. Hang with arms fully extended. Hold for 10–15 seconds. Rest 60 seconds. Repeat 4–5 sets. Progress to 20-second holds over 2–3 weeks. This builds the wrist flexor endurance that prevents grip loss during the pull phase.
Drill 2 — False Grip Ring Row
Set rings at waist height. Lie beneath them, set your false grip, and perform a horizontal row pulling your chest to the rings. Focus on maintaining wrist position throughout — the grip should not shift as you pull. 3 sets of 8–10 reps. This integrates false grip conditioning with the pulling pattern.
Drill 3 — False Grip Pull-Up
Once your dead hang hold reaches 20 seconds and your ring rows feel stable, transition to full false grip pull-ups. The key cue: keep your wrists flexed and your elbows flaring slightly outward as you pull. 3 sets of 5–8 reps. These directly simulate the pull phase of the ring muscle up.
Breaking Down the Transition Phase
The transition — also called the turnover — is the moment the movement shifts from a pulling pattern to a pressing pattern. It is the hardest phase of the ring muscle up, and it’s where virtually every intermediate athlete fails. A 2023 NIH biomechanical study (PMC10824315) found that the ring muscle up produces significantly greater biceps brachii activation (p = 0.001) and upper trapezius activation (p = 0.007) during the pull phase compared to the bar — meaning the instability of the rings demands more from your upper body throughout the entire movement, not just the transition.
The transition works like this: at the peak of your pull — when your chest is near ring height — you lean forward, drive your elbows back and down, and rotate your wrists over the top of the rings. Your center of mass shifts forward, your hips rise, and your body tips into the above-rings position. The key is timing: the lean must happen before your upward momentum runs out.
The two most common errors here:
- Pulling too vertically: If you pull straight up rather than forward and up, you won’t generate the forward lean needed to tip into the transition. Think of pulling the rings toward your hips, not toward your chin.
- Delaying the lean: Most athletes wait until they’ve “fully pulled” before attempting the lean. By that point, momentum is gone. The lean starts when your elbows reach shoulder height.
How do you scale a ring muscle up?
These five drills let you practice the full movement pattern before you have the raw strength to complete it unassisted. Each targets a specific phase of the 4-Phase Lock System.
Drill 4 — Banded Ring Muscle Up
Loop a resistance band around the rings at hip height. Step into the band with one foot. Perform the full movement pattern with band assistance. The band supports the heaviest point — the transition — without eliminating the coordination demand. 3 sets of 3–5 reps.
Drill 5 — Box-Assisted Transition
Set rings at approximately chest height. Stand on a box beneath the rings, set your false grip, and practice the lean-and-rotate motion of the transition with your legs providing assistance as needed. This isolates the turnover without the fatigue of a full pull. 4 sets of 4–6 reps.
Drill 6 — Low-Ring Transition Drill (Feet on Floor)
Set rings 6–8 inches above the floor. Begin in a hollow body hang with your heels on the floor. Pull and transition using the same mechanics as the full movement, with your feet providing just enough support to get through the turnover. This drill builds the motor pattern at low fatigue. 3 sets of 5 reps.
Drill 7 — Negative Ring Muscle Up (Eccentric)
Jump or step into the support position above the rings. Slowly lower yourself through the transition and into the hanging position over 4–6 seconds. This eccentric loading builds transition strength directly — research on pull-up training (PMC10813506) confirms that eccentric-focused training produces superior strength gains for complex pulling movements compared to concentric-only approaches.
Drill 8 — Scapular Protraction Ring Pull
From a dead hang with false grip, perform an isolated scapular retraction and protraction — pull your shoulder blades together, then push them forward and apart. This activates the serratus anterior and trains the protraction that drives the transition lean. 3 sets of 10 reps. This drill addresses the most commonly undertrained component of the turnover.
How to Do a Ring Muscle Up: Step-by-Step
With your prerequisites confirmed and your drills dialed in, you’re ready for the full movement. Figuring out how to do a ring muscle up safely means following the 4-Phase Lock System in sequence — each phase must feel stable before you connect it to the next.
⚠️ Safety Disclaimer Before Attempting
This tutorial involves advanced gymnastics movements that place significant load on the wrists, elbows, and shoulders. Consult a qualified fitness professional before attempting the ring muscle up, particularly if you have any history of elbow tendonitis, wrist impingement, or shoulder instability. This guide is for educational purposes and does not constitute medical advice.
Always complete a thorough warm-up before attempting ring work, and ensure you understand general strength training principles to protect your joints. Never attempt your first rep when fatigued. If you experience sharp pain (not general muscle burn) at any point, stop immediately.
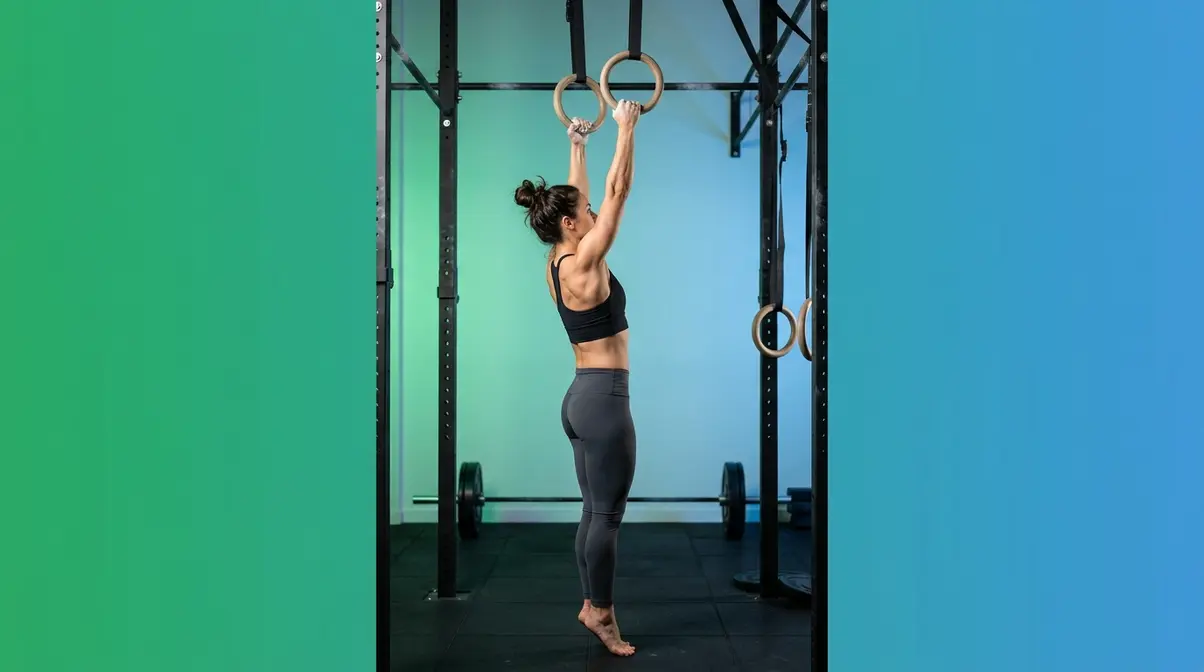
Step 1: Set False Grip and Hang
Phase: Grip Lock
Tools needed: Gymnastic rings (adjustable), chalk (optional). Estimated time: 2–3 minutes setup + 5–10 minutes of practice sets.
- Adjust the rings to a height where you can hang with your arms fully extended and your feet just off the floor.
- Set your false grip: rotate your wrists inward, hook the ring across the palm heel, and close your fingers around it firmly. Your wrists will feel flexed — this is correct.
- Hang in a dead hang position. Check: your arms are fully extended, your shoulders are active (not shrugging into your ears), and your core is braced in a slight hollow body position.
- Squeeze your glutes, press your lower back flat, and point your toes. This is your starting position.
Cue: The ring should feel like it’s pressing into the meaty pad at the base of your palm. If it’s sitting in your fingers, reset.
Expected outcome: You can hold this position for 15–20 seconds without the grip rolling back to a standard position. If you can’t, spend another week on Drills 1–3 before proceeding.
Step 2: Pull With Elbows Down and Back
Phase: Pull Lock
Estimated time per set: 30–45 seconds.
- From your dead hang, take a breath and brace your core.
- Initiate the pull by driving your elbows down and back — not straight up toward the ceiling. Imagine you’re trying to pull the rings down to your hips.
- As your elbows pass shoulder height, begin your forward lean. Shift your chest slightly in front of the rings — this is the setup for the transition and it must happen before your momentum peaks.
- Keep your elbows close to your body. Flaring elbows outward reduces pulling power and shifts load onto the shoulder joint in a compromised position.
- Continue pulling until your chest reaches ring height.
Cue: “Elbows to pockets.” Drive them back and down as if you’re trying to put your elbows in your back pockets. This cue produces the correct pulling arc.
Expected outcome: Your chest reaches ring height with your elbows behind your torso and your body slightly forward-leaning. If your chin barely clears the rings, your pull is too vertical — revisit your elbow path.
| Phase | Key Cue | Common Error |
|---|---|---|
| Pull initiation | Elbows down and back | Pulling straight up |
| Mid-pull | Forward lean begins at shoulder height | Waiting too long to lean |
| Pull peak | Chest at ring height, elbows behind torso | Chin-level pull, no chest contact |
Step 3: Transition Lean and Rotate
Phase: Transition Lock
Estimated time per set: 45–60 seconds.
This is the phase where most athletes fail. The transition requires simultaneous forward lean, elbow drive, and wrist rotation — all happening in less than half a second. The 4-Phase Lock System treats this as a discrete, isolated skill to be drilled before connecting it to the full movement.
- At the peak of your pull — chest at ring height, elbows behind your torso — commit to the forward lean. Shift your bodyweight forward over the rings aggressively.
- As your body tips forward, your elbows will naturally begin to extend upward. Allow this — don’t fight it.
- Simultaneously rotate your wrists over the top of the rings. Because you’re using a false grip, this rotation is minimal — your hands are already in the pressing position.
- Drive your chest forward and up through the rings until your elbows are above the ring plane.
- Your hips and legs will rise behind you — this is correct. Let them. The goal is to get your center of mass above the rings.
Cue: “Tip a bucket of water off your head.” The forward lean you need is aggressive enough that it feels like tipping forward, not just leaning slightly.

Expected outcome: Your elbows clear the ring plane and your body is above the rings in a forward-leaning support position. If you’re stalling halfway through the rotation, revisit Drills 5 and 6 — your transition strength needs more isolated work.
Step 4: Dip and Lockout With Balance
Phase: Press Lock
Estimated time per set: 45–60 seconds.
- Once you’ve cleared the transition and your elbows are above the rings, pause. Don’t rush the press.
- Find your balance in the support position. Your arms should be bent, your chest forward, your weight distributed evenly across both rings.
- Engage your triceps and press to full lockout — arms straight, rings turned out slightly, shoulders packed down away from your ears.
- At the top, hold for a full second. This confirms the lockout and builds the strength for consecutive reps.
“Avoid the common mistake of rushing the dip before you are stable. Once you complete the transition, take a moment to find your balance — you can hang out there as long as you need before pushing out to finish.”
Cue: “Rings turn out.” As you lock out, actively rotate the rings so your palms face forward or slightly outward. This engages the external rotators and creates the stable, controlled support position that characterizes a technically clean ring muscle up.
Expected outcome: Full arm extension at the top, rings stable, body upright. If your rings wobble uncontrollably at lockout, your ring dip strength needs more work — revisit the prerequisite standard.
Common Mistakes to Avoid
Our team has evaluated this progression across multiple athletes, and these five errors account for the majority of failed attempts:
1. Losing the false grip during the pull. The most common and most costly error. The false grip slips back to a standard grip as fatigue builds during the pull. Fix: dedicate 2–3 weeks exclusively to false grip conditioning (Drills 1–3) before attempting the full movement.
2. Pulling too vertically. A straight-up pull leaves you with no forward momentum for the transition. Fix: think “elbows to pockets” — pull the rings toward your hips, not your chin.
3. Delaying the forward lean. Waiting until you’ve “fully pulled” before initiating the lean means your momentum is gone. Fix: the lean starts the moment your elbows reach shoulder height, not after.
4. Rushing the press before finding balance. Attempting to press immediately out of the transition before stabilizing leads to a collapsed, uncontrolled lockout. Fix: pause in the support position for 1–2 seconds before pressing.
5. Neglecting scapular protraction. Athletes who skip Drill 8 (scapular protraction ring pull) consistently struggle with the transition’s rotational component. The serratus anterior drives the forward tip of the transition — if it’s undertrained, the turnover stalls. Fix: add Drill 8 to every warm-up, not just dedicated skill sessions.
Ring Muscle Up vs. Bar Muscle Up
Understanding where the ring muscle up sits relative to the bar version helps you sequence your training intelligently and set realistic timelines. Most athletes encounter the bar muscle up first — and the comparison reveals exactly why.
How difficult is a ring muscle up?
The ring muscle up is an advanced gymnastic skill — significantly harder than the bar version and out of reach for most recreational athletes without dedicated training. A 2023 NIH study (PMC10824315) comparing the two movements found statistically significant differences in muscle activation across multiple upper limb muscles, with the ring version producing greater biceps brachii activation during both pull and push phases (p = 0.001) and greater upper trapezius demand during the pull (p = 0.007). The instability of the rings is not a minor factor — it fundamentally changes the neuromuscular demand of the movement.
For context: the world record for bar muscle up repetitions stands at approximately 25–26 consecutive reps, while the ring muscle up record is around 14 reps. That’s an 11–12 rep gap between the two movements performed by elite athletes — which demonstrates that even at the highest performance level, the ring version is substantially more taxing.
Is it impressive? Absolutely. Across competitive CrossFit, gymnastics, and calisthenics communities, a clean ring muscle up is universally recognized as a benchmark of advanced upper body strength and coordination. Athletes who achieve it consistently report that the skill opens doors to more advanced ring work — muscle up transitions, ring handstands, and iron cross progressions.
What’s easier, a bar or ring muscle up?
The core mechanical difference is stability. On a fixed bar, the surface doesn’t move — you only need to control your own body. On rings, the surface moves in every direction, and you must simultaneously control the rings and your body. This demands greater co-contraction from the stabilizing muscles throughout the entire movement.
| Attribute | Bar Muscle Up | Ring Muscle Up |
|---|---|---|
| Surface stability | Fixed — no lateral movement | Unstable — moves in all planes |
| Grip requirement | Standard overhand grip | False grip required for clean transition |
| Transition mechanics | Wrist rotation required mid-movement | Minimal wrist rotation (false grip eliminates most) |
| Muscle activation | Lower across all measured muscles | Significantly higher biceps, upper trapezius, triceps (PMC10824315) |
| Time under tension (10 reps) | ~22 seconds (world record pace) | ~48 seconds (world record pace) |
| Max rep world record | ~25–26 reps | ~14 reps |
| Skill difficulty | Advanced | Advanced+ |
| Recommended learning order | First | After bar muscle up or simultaneously with dedicated ring training |
| Best for | Power development, rep volume | Stabilization, gymnastics foundation, advanced skill work |
The time-under-tension difference is the most practically significant: 48 seconds vs. 22 seconds for the same 10 repetitions at elite pace. That’s more than double the muscular endurance demand per set, which explains why ring muscle up volume is always lower than bar volume for the same athlete.
Strict vs. Kipping: Which to Learn First
The strict ring muscle up should be your primary goal — the kipping version is a power tool, not a shortcut.
The strict muscle up on rings requires you to complete the entire movement under control with no momentum from the hips or legs. The kipping version uses a hip drive and swing to generate upward momentum, reducing the raw pulling strength requirement. Kipping is legitimate in competitive CrossFit contexts, but using it as a substitute for strict technique masks pulling weakness and places greater shear load on the shoulder joint at the transition.
Still rings kinematics research (PMC10059656) confirms that the shoulder joint experiences significant load during ring movements, with the shoulder range of motion and muscular demand varying substantially based on technique. Using kipping before mastering the strict pattern increases injury risk at the shoulder — particularly if your scapular stability and rotator cuff strength aren’t fully developed.
Learn strict first. Once you have 3–5 clean strict reps, adding a controlled kip for higher-rep sets is a reasonable progression. The reverse order — kipping first — creates habits that are difficult to unlearn and increases long-term injury risk.
Pre-Hab and Injury Prevention

Four out of five ring muscle up guides online skip this section entirely. That’s a significant gap, because the false grip and the transition place specific, unusual loads on the wrists and elbows that standard training doesn’t prepare you for. Addressing this proactively is the difference between consistent progress and repeated setbacks.
Elbow Tendonitis and Wrist Conditioning
Elbow tendonitis — specifically lateral epicondylitis — is the most common overuse injury in ring muscle up training. It develops when the forearm extensors and the common extensor tendon at the lateral epicondyle are subjected to repetitive eccentric load without adequate preparation. The false grip position places your wrist in sustained flexion under load, which is a novel stress for most athletes.
Prevention protocol — implement these before you begin ring training, not after symptoms appear:
- Wrist Conditioning (Daily, 5 minutes):
- Wrist circles: 10 rotations each direction
- Wrist flexor/extensor stretch: hold each for 30 seconds
- Eccentric wrist curls: 3 sets of 10 reps with a light dumbbell or resistance band, focusing on the slow lowering phase
- Elbow Load Management:
- Limit false grip ring sessions to 3x per week with at least one rest day between sessions
- Keep total ring volume under 20 minutes per session during the first 4–6 weeks of false grip training
- Use chalk rather than adjusting grip pressure — squeezing harder to compensate for grip fatigue loads the common extensor tendon unnecessarily
A 5–10 minute warm-up before every ring session is non-negotiable. Research on elbow tendonitis prevention confirms that warm-up increases tendon pliability and reduces injury risk — even 5 minutes of light activity meaningfully prepares the tissue for load (Watauga Ortho, 2025). This is not optional prep — it’s injury insurance.
⚠️ This section provides general training guidance and is not medical advice. Consult a physical therapist if you experience persistent elbow or wrist pain.
When to Seek Professional Guidance
Scaling back is a skill, not a failure. If any of the following apply, reduce volume and intensity immediately:
- Sharp pain (not muscle soreness) in the elbow, wrist, or shoulder during or after ring training
- Numbness or tingling in the fingers during false grip holds
- Grip strength noticeably declining between sessions despite adequate rest
- Any existing diagnosis of lateral epicondylitis, wrist impingement, or shoulder labrum issues
If pain persists beyond 5–7 days of rest, consult a physical therapist before returning to ring work. Attempting to train through acute tendon pain accelerates the injury and can turn a 2-week setback into a 3-month one. The prerequisite strength standards exist precisely to ensure your connective tissue is ready for ring training — athletes who meet the benchmarks before beginning consistently report fewer overuse injuries.
Frequently Asked Questions
How do you do a muscle up on rings?
A ring muscle up combines a false grip pull-up with a transition and dip into a single continuous movement. Start in a dead hang with a false grip — ring resting across the palm heel, not in the fingers. Pull your elbows down and back while leaning your chest forward, then rotate your wrists over the rings as your chest clears ring height. From the support position, press to full lockout. The false grip is the key technical requirement that separates a successful ring muscle up from a failed attempt.
What is the false grip for a ring muscle up?
The false grip is a specialized wrist position where the base of your palm rests above the rings. This eliminates the need to rotate your wrists during the transition phase. It requires dedicated wrist conditioning but is essential for strict ring muscle ups, as it keeps your hands in the proper pressing position from the very start of the movement.
How many pull-ups do you need for a ring muscle up?
You should be able to perform 7-10 strict, chest-to-bar pull-ups before attempting a ring muscle up. This ensures you have the necessary concentric pulling power and momentum to reach the transition phase without relying on a kip. Athletes who skip this benchmark often stall because they lack the raw strength to pull high enough.
Is a ring muscle up impressive?
Yes — a clean ring muscle up is widely recognized as a benchmark of advanced upper body strength and coordination. In competitive CrossFit, gymnastics, and calisthenics communities, it signals mastery of ring control, pulling power, and transitional coordination that most athletes never develop. Because the rings demand greater stabilization than a fixed bar — confirmed by higher EMG readings across multiple muscle groups (PMC10824315) — achieving the movement demonstrates a level of neuromuscular control that goes well beyond standard gym strength benchmarks.
Can you learn a ring muscle up before a bar muscle up?
Yes, you can learn the ring muscle up first, though most athletes start with the bar. The false grip on rings actually simplifies the transition mechanics compared to the bar, but the rings demand significantly more stabilization and core control. If you have a very strong false grip and solid ring dips, you may find the ring version more intuitive initially.
Limitations and Common Pitfalls
Common Pitfalls
Pitfall 1 — Attempting the full movement before completing the prerequisite drills. The most damaging pattern: an athlete watches a tutorial, skips directly to the full movement, and fails repeatedly. Each failed attempt builds faulty motor patterns that take longer to unlearn than the correct pattern would have taken to learn. Spend 3–4 weeks on the 8 drills before your first full attempt.
Pitfall 2 — Treating the false grip as optional. Some athletes attempt the ring muscle up with a standard grip, relying on a strong kip to generate enough momentum to complete a “chicken wing” transition. This works occasionally but is not a ring muscle up — it’s a high-pull with a poor press. It also places the shoulder in a compromised internal rotation position at the transition, increasing injury risk. The false grip is non-negotiable for clean, repeatable technique.
Pitfall 3 — Progressing too quickly through the phases. The 4-Phase Lock System works because each phase is confirmed stable before the next is added. Athletes who rush — connecting phases 1-2-3 before Phase 2 is truly locked — create a movement that collapses under fatigue. Test each phase in isolation. If it breaks down when you’re tired, it’s not locked yet.
Pitfall 4 — Ignoring wrist and elbow pre-hab. Skipping the conditioning drills in the Pre-Hab section is the fastest path to a 6–8 week setback. The false grip loads tissue that most athletes have never trained. Start the wrist conditioning protocol before you begin ring training, not after your first sign of elbow discomfort.
When to Choose Alternatives
If your goal is competitive CrossFit volume: The bar muscle up is a more practical primary skill for high-rep competition work. Ring muscle ups are harder to sustain in large unbroken sets. Develop the bar version first, then add rings for strength and skill work.
If you have existing elbow or shoulder pathology: Work with a physical therapist to establish a modified ring progression. The false grip and transition place specific loads on the lateral epicondyle and shoulder joint that require pre-clearance if you have prior injury history. The goal isn’t to avoid ring training — it’s to approach it with appropriate preparation.
If you’re a complete beginner to pull-ups: The ring muscle up requires 7–10 strict pull-ups as a baseline. If you’re not there yet, a dedicated pull-up program (PMC10813506 outlines effective training regimens) will serve you better than ring-specific work at this stage.
When to Seek Expert Help
- Seek guidance from a qualified coach or physical therapist if:
- You’ve followed this progression for 8+ weeks without reaching your first successful rep
- You experience any recurring pain in the elbow, wrist, or shoulder
- You’re preparing for competitive gymnastics or CrossFit where technique standards are evaluated formally
- You want to accelerate progress with individualized programming beyond what a general guide can provide
Conclusion
Mastering how to do a ring muscle up is not a strength problem for most intermediate athletes — it’s a sequencing problem. For athletes who already have 7–10 strict pull-ups and 5 deep ring dips, the barrier is almost always the transition: specifically, the failure to use a false grip and commit to the forward lean before momentum peaks. A 2023 NIH study (PMC10824315) confirms that ring muscle ups demand significantly higher muscle activation than bar muscle ups across key upper limb muscles — the rings are genuinely harder, and that difficulty is rooted in biomechanics, not perception.
The 4-Phase Lock System addresses this directly. By treating Grip Lock, Pull Lock, Transition Lock, and Press Lock as discrete, verifiable checkpoints — each drilled in isolation before being connected to the next — you eliminate the guesswork that causes most athletes to stall. Athletes who follow this progression systematically, verify each phase before advancing, and complete the pre-hab protocol consistently reach their first successful rep significantly faster than those who attempt the full movement before their foundations are ready.
Start with the Readiness Checklist. Complete the 8 drills in order. Verify each phase of the 4-Phase Lock System before connecting them. Give the false grip conditioning at least 2–3 weeks before your first full attempt. Your first ring muscle up rep is a technique milestone — and with the right sequence, it’s closer than you think.
Related posts:
StrongLifts 5x5 for Beginners: Complete Guide 2026
How to Get a Bigger Bum Without Exercise: 3-Tier Guide
What Muscles Does the StairMaster Work? 6 Groups
Olympic Weightlifting vs Powerlifting: 2026 Guide
What Kills Muscle Gains? 7 Proven Saboteurs to Fix Now
Best Strength Training Apps for Women: Top 7 Picks
Callum
Hi, I'm Callum, the founder of Body Muscle Matters. I'm not a certified trainer, I'm a self taught lifter who started this site to share what I've learned from my own training and a lot of trial and error. Everything here comes from real experience and honest research, written the way I'd explain it to a friend who is just getting started. My goal is simple: practical, no hype fitness advice you can actually use.