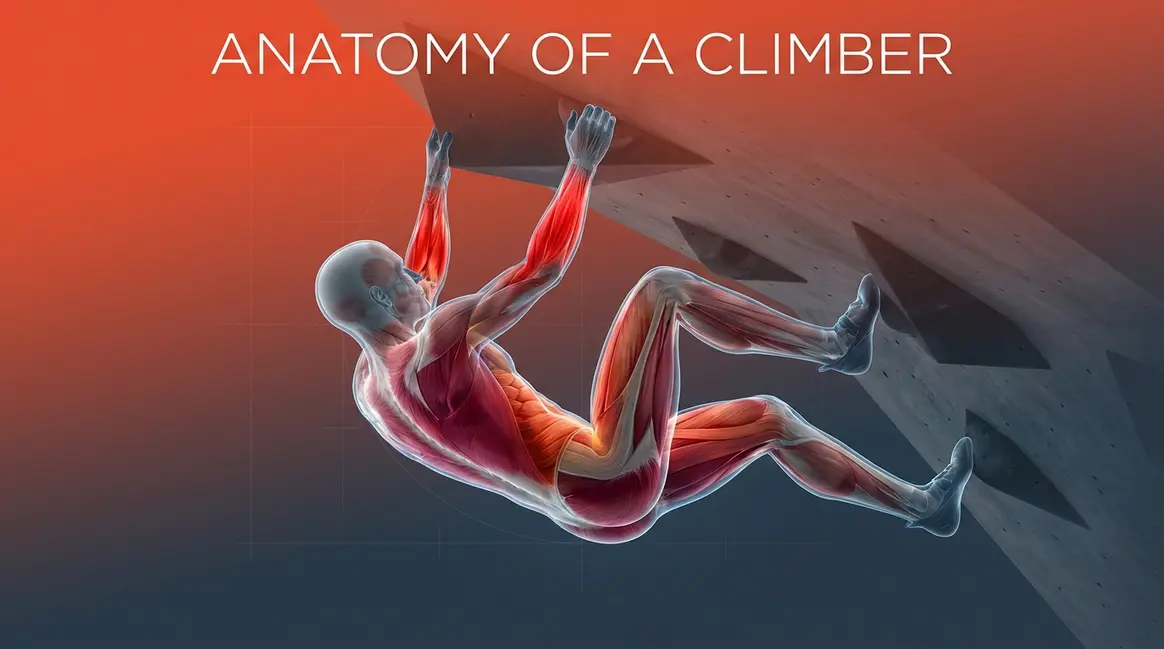
Muscles Used in Rock Climbing: All 20+, Not Just Forearms
Most new climbers assume rock climbing is an upper-body sport — just forearms and a strong pull. But the muscles used in rock climbing span from your fingertips to your glutes, and the ones most climbers ignore are often the ones holding them back. Rock climbing engages more than 20 distinct muscle groups in a single session, making it one of the most comprehensive resistance workouts available without traditional gym equipment.
If you only train your arms and back, you’re leaving real strength on the table. Worse, you’re setting yourself up for the finger and elbow injuries that sideline thousands of climbers every year. Sports medicine research confirms that finger pulley tears — the most common serious climbing injury — occur most often in climbers whose training is lopsided.
In this guide, you’ll learn exactly which muscles rock climbing works, why each one matters for your performance, and the 8 best off-wall exercises to train them. We cover the upper body engine, the underestimated core and lower body, a targeted 8-exercise training plan, and how to structure your climbing week for maximum progress.
Understanding the muscles used in rock climbing reveals it works more than 20 muscle groups simultaneously, making it one of the most complete full-body workouts available — but most climbers only train half of them.
- Forearm flexors and lats are the most heavily engaged muscles in every climb, fatiguing first and setting your performance ceiling
- Core tension is what stops your feet from cutting loose on overhanging routes — not arm strength
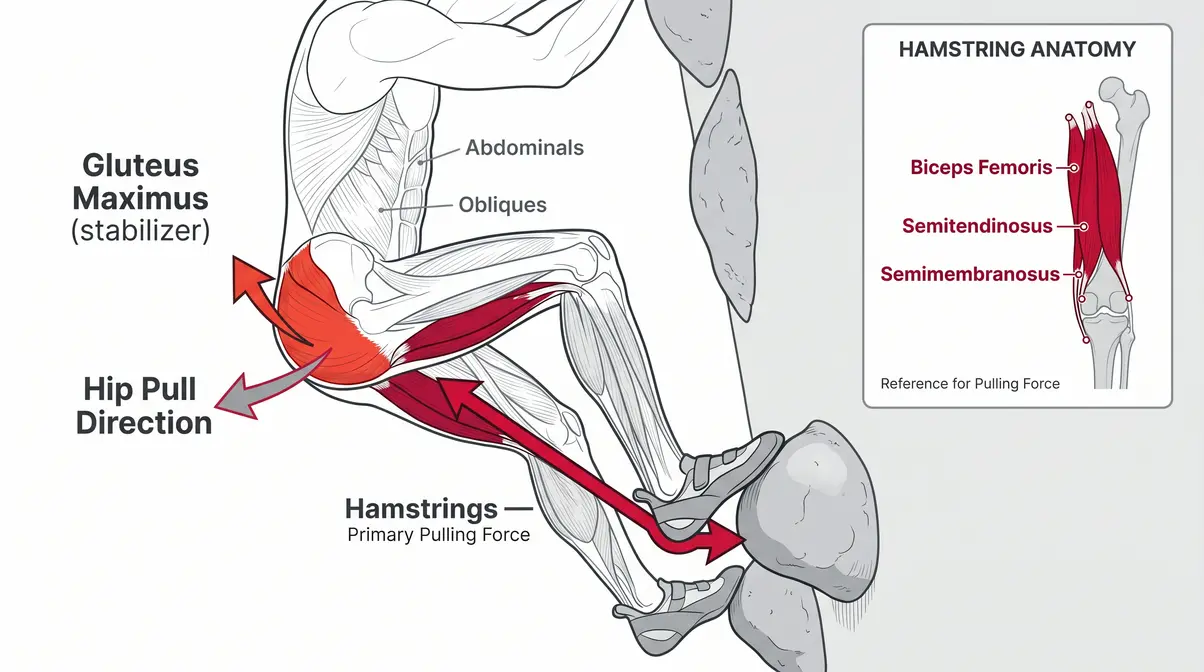
- Glutes and hamstrings drive power in advanced techniques like heel hooks — the “Climber’s Load Map” Lower Power Center most beginners never train
- Antagonist muscles (triceps, finger extensors) must be trained off-wall to prevent the imbalances that cause pulley tears and elbow injuries
- Climbing 2–3 times per week with dedicated rest days builds strength without risking tendon damage


What Muscles Does Rock Climbing Work?

Rock climbing works more than 20 distinct muscle groups simultaneously, making it a genuine full-body workout. Unlike isolated gym exercises, every climb recruits your upper body, core, and lower body at the same time. This is why regular climbers develop the lean, balanced physique known as the “climber’s build” — without ever touching a barbell.
Academic analysis of rock climbing’s physiological demands confirms full-body muscle recruitment across upper, core, and lower body zones (WVU Sports Science analysis).
The muscles used in rock climbing don’t work in isolation — they form an interconnected system. Understanding that system is the first step to training it deliberately.
Is It Really a Full-Body Workout?
Rock climbing muscles respond to resistance training the same way they respond to weights — because climbing is resistance training. Every time you pull yourself up a wall, you’re performing a compound movement that rivals weighted pull-ups, rows, and leg presses performed simultaneously. The resistance is your own bodyweight, and the demands are substantial.
WVU Sports Science academic analysis confirms that rock climbing drives lean muscle development across the forearms, back, shoulders, and core — and that this recruitment spans both upper and lower body in a single session. Think about your first week at the gym: forearms burning, back aching the next morning. That soreness isn’t random. It’s your forearm flexors (the muscles that control your grip), your lats, and your rhomboids breaking down and rebuilding — which is exactly how the “climber’s physique” develops over time.
For beginners, this means climbing isn’t just skill practice. It’s resistance training disguised as movement. You can build principles of muscle growth through consistent climbing alone — though deliberate off-wall training accelerates the process significantly.
Now that you know climbing builds real muscle, let’s map out exactly which muscles are working — and where.
Can you get muscles from rock climbing?
Yes — rock climbing builds lean muscle mass across more than 20 muscle groups, functioning as a genuine resistance training modality. WVU Sports Science analysis confirms that regular climbing develops the forearms, back, shoulders, and core through compound bodyweight resistance. Most beginners notice forearm and back development within 4–8 weeks of consistent climbing. The “climber’s physique” — lean, proportional upper body with visible forearm and back definition — develops naturally from 2–3 sessions per week over several months.
The 5 Major Muscle Zones
What muscles does rock climbing work? Here’s the complete picture, organized into five zones that cover every structure engaged on the wall:
- Forearms and Grip — Forearm flexors control every hold you grab. They fatigue first and set your climbing ceiling. This is your grip factory.
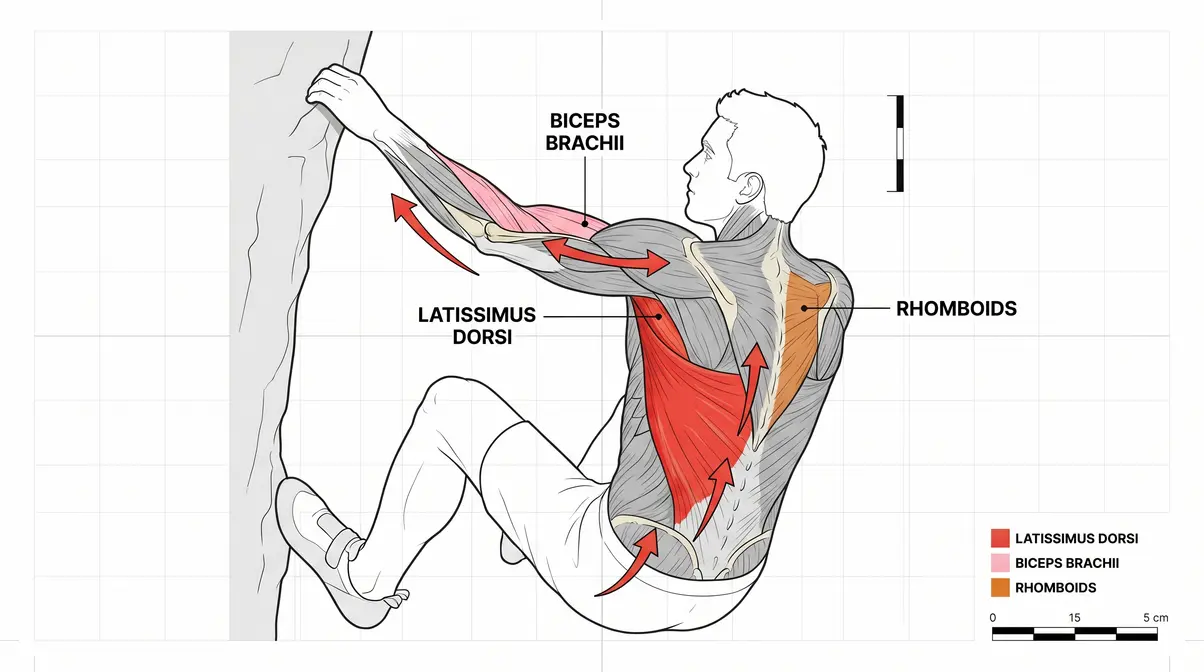
- Upper Back and Shoulders — Latissimus dorsi (lats — the large wing-shaped muscles that run down each side of your back), rhomboids, and traps generate the pulling power that moves you up the wall.
- Arms — Biceps assist every pull. Triceps and finger extensors are the antagonists (opposing muscles) you must train off-wall to prevent injury.
- Core — Your midsection creates the body tension that keeps your feet on the wall during overhanging routes (routes that angle past vertical).
- Lower Body — Quads, glutes, and hamstrings provide pushing power and drive advanced techniques like heel hooks (where you hook the back of your heel over a hold to pull your hips toward the wall).
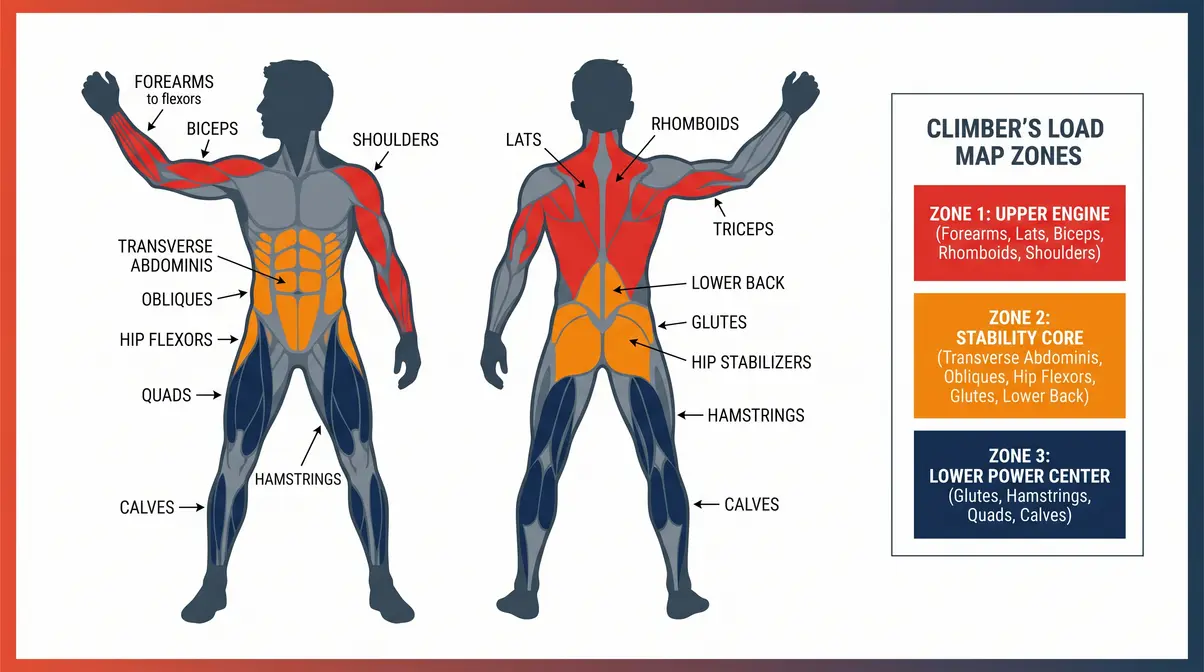
Think of these five zones as a system — the Climber’s Load Map. When one zone is weak, the others compensate and eventually break down.
The Climber’s Load Map System
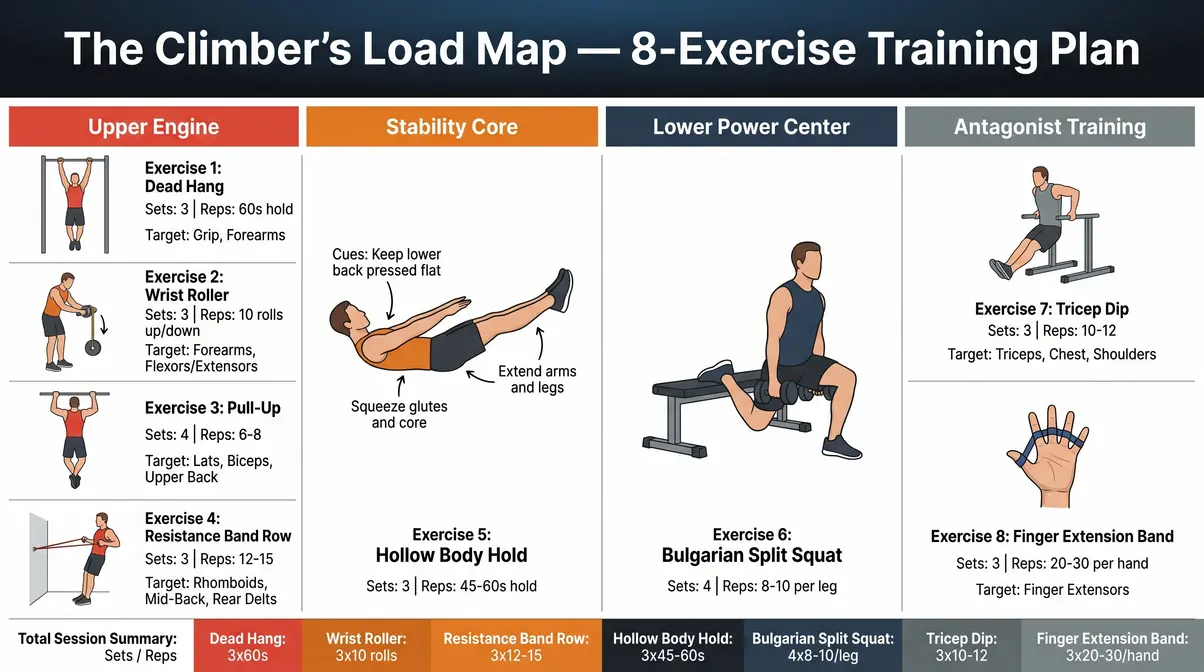
The Climber’s Load Map is a 3-zone framework that organizes all 20+ climbing muscles into three functional groups: the Upper Engine (pulling and gripping), the Stability Core (body tension and force transfer), and the Lower Power Center (pushing and positioning).
Most beginner training plans focus exclusively on the Upper Engine — lats and forearms. This leaves the Stability Core and Lower Power Center underdeveloped, which is exactly why beginners pump out on overhangs and struggle with footwork on tiny footholds. The arms take on work the legs and core should be sharing.
Every exercise and training recommendation in this guide is organized by zone. When you identify your weakest zone, you know exactly where to direct your energy. The Climber’s Load Map turns a scattered list of muscles into an actionable training system — and that’s the difference between guessing at the gym and actually getting stronger on the wall.
Let’s break down each zone in detail, starting with the Upper Engine — the muscles that do the heavy pulling on every route.
Upper Body Engine: Back, Shoulders, and Arms

The upper body is the “Upper Engine” of the Climber’s Load Map — and within it, two muscles dominate every route: the latissimus dorsi (lats) for pulling power and the forearm flexors for grip. Together, these muscles bear the greatest physiological demand of any climb (physiological demands on pulling muscles, NIH/PubMed, 2004). Understanding how they work helps you train them — and protect them from injury.
Research confirms the finger flexors, latissimus dorsi, and biceps brachii act as primary pulling muscles during ascents. But understanding the full Upper Engine — including the supporting stabilizers and the critical antagonists — is what separates climbers who plateau from climbers who progress.
What is the most used climbing muscle?
The latissimus dorsi (lats) and forearm flexors are the most heavily used muscles in rock climbing. The lats generate the pulling force that moves your body upward on every route, while the forearm flexors control your grip on every hold. Research published in NIH/PubMed (2004) confirms these two muscle groups bear the greatest physiological demand during ascents. The forearm flexors are notable because they also fatigue first — they’re the primary reason for “forearm pump,” the burning sensation that ends most beginner climbing sessions.
Lats: Your Primary Pulling Powerhouse
Your lats are the primary pulling muscles in rock climbing — and they’re the largest muscle group in your upper body. The latissimus dorsi spans from your lower back all the way to your upper arm bone (humerus). Every time you pull a hold from above your head toward your hip to move your body upward, your lats are the primary mover — the muscle doing most of the work.
On overhanging routes, lats work even harder. They must fight gravity at an angle, pulling your body weight toward a wall that’s leaning over you. This is why overhanging routes feel exponentially harder than vertical ones for beginners — your lats are working at a mechanical disadvantage.
Here’s a concrete benchmark: climbers who can perform 10 controlled pull-ups typically climb noticeably harder grades than those who can manage only 3. The movement of pulling a hold from above your head to your hip is nearly identical to a pull-up — same muscle, same mechanics. Weak lats mean early pump-out and falling off routes you should be able to finish. Strengthen your back muscles and your ceiling on the wall rises with them.
Your lats do the heavy pulling — but your forearms decide whether you can hold on long enough to use them.
Forearms: Where Grip Strength Lives
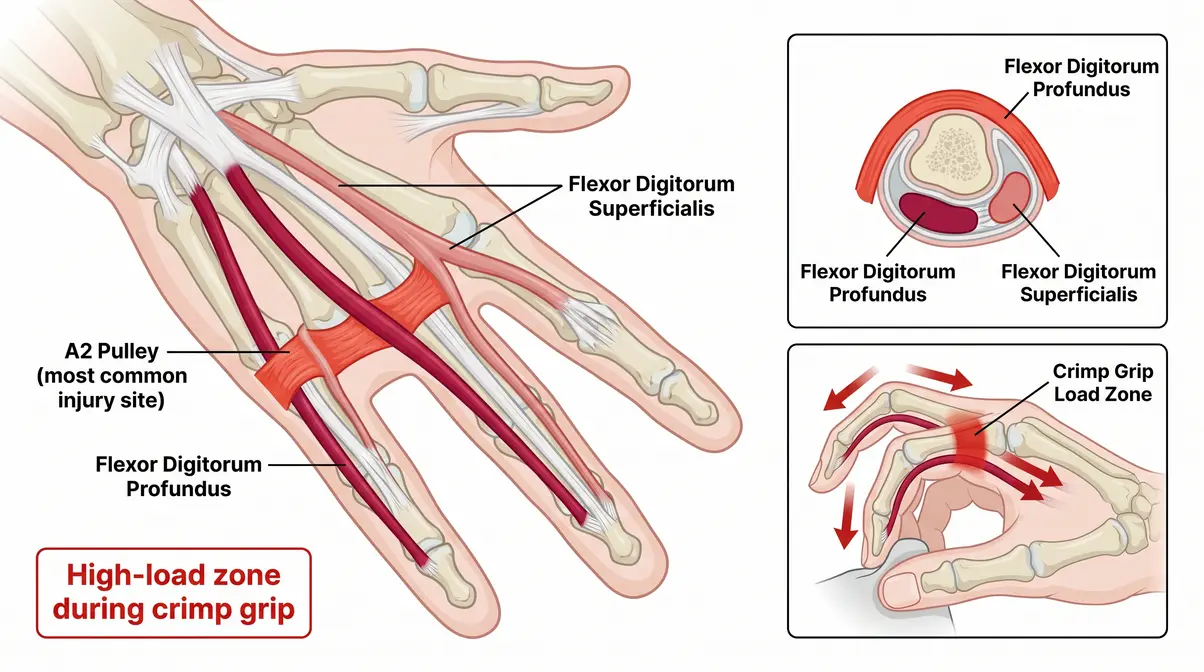
Two forearm muscles control every grip you make on the wall. The flexor digitorum profundus (the deeper of two forearm muscles that curl your fingers onto holds, specifically the last two joints of each finger) and the flexor digitorum superficialis (which curls the middle joints) work together constantly. During the “crimp grip” — the most common grip in climbing, where your fingers are bent at roughly 90° at the first joint — both muscles contract at or near maximum capacity.
Between these muscles and your finger bones sit small tendon sheaths called pulleys. The A2 pulley, a small but critical tendon sheath located at the base of your ring and middle finger, is the most commonly torn structure in rock climbing. NCBI research on extreme loads on forearm flexor muscles confirms the crimp grip places extreme loads on the A2 pulley — making it the most frequently injured structure in rock climbers (2010). The flexor digitorum profundus and superficialis bear those extreme loads during the crimp grip, making them the most heavily utilized and most frequently injured muscles in rock climbing.
“Forearm pump” — the burning, swollen, forearm-locking feeling every climber knows — happens when lactic acid accumulates faster than blood flow can clear it. It’s a reliable sign your forearm flexors are working at or near maximum capacity. As you build climbing-specific endurance, pump arrives later and clears faster.
⚠️ Safety: If you feel a sharp pop in your finger followed by immediate pain, stop climbing immediately. Rest 48–72 hours and consult a physical therapist. A2 pulley tears heal slowly — attempting to climb through them extends recovery from weeks to months.
Improve grip strength and forearms off the wall, and you’ll stay on holds longer before pump forces you off.
Grip strength keeps you on the wall — but the muscles between your shoulder blades determine how efficiently you move across it.
Rhomboids and Traps: The Stability Trio
Your rhomboids — the muscles between your shoulder blades that retract and stabilize your scapula (shoulder blade) — create the stable base every pulling movement depends on. When you pull a hold, your scapula needs to be anchored. Weak rhomboids produce an unstable, winging shoulder blade, which transfers force poorly and increases impingement risk.
The lower trapezius (the lower portion of the large diamond-shaped trapezius muscle of your upper back) depresses the scapula during overhead movements. Research from physical therapists at HoopersBeta identifies this as one of the most undertrained muscles in recreational climbers — it’s chronically overpowered by the upper trapezius, which creates forward head posture and rounded shoulders over time. Climbers who train lats and biceps without addressing lower trap balance are building a structure with a weak foundation.
The anterior deltoid (front shoulder) engages on underclings (holds gripped from below) and sidepull holds (holds gripped from the side). It’s not a primary mover, but it’s a frequent source of overuse injury when the rhomboids and lower traps aren’t doing their stabilizing job properly.
⚠️ Note: Shoulder pain that persists after a session — especially a dull ache at the front of the joint — warrants evaluation by a physical therapist. Do not climb through shoulder impingement.
Once you understand the stability muscles, the role of your arms — both the pulling biceps and the often-ignored triceps — becomes clearer.
Biceps and Triceps: Supporting Roles
Your biceps assist the lats on every pull, especially when your elbow bends past 90°. They’re not the primary mover, but they fatigue alongside your forearms on sustained routes. Beginners often feel bicep soreness after their first few sessions — that’s normal, and it fades as the muscle adapts.
The triceps are the direct antagonist to the biceps — they extend the elbow, which is the opposite of every pulling movement in climbing. Because climbing never trains them, they become chronically weak relative to the biceps. ACSM guidelines on training antagonist muscles identify this imbalance as a leading contributor to elbow overuse injuries in climbers — specifically medial epicondylitis (climber’s elbow).
The finger extensors — the muscles that open your fingers — are similarly undertrained. Climbing closes your hand constantly but never opens it against resistance. Chronic weakness in the finger extensors reduces the balanced tension across the finger joint, which increases pulley injury risk. These are the classic undertrained muscles that most beginner programs completely ignore.
The key message here: triceps and finger extensors don’t make you climb harder. They keep you climbing by preventing the injuries that would otherwise shut you down.
The Upper Engine powers your climbing — but it’s the Stability Core and Lower Power Center that determine whether you can actually use that power on the wall.
Core & Lower Body: Stability and Power

When considering the muscles used in rock climbing, your legs and core are the Stability Core and Lower Power Center of the Climber’s Load Map — and they matter more than most beginners realize. Core stability and lower limb power generation are essential for transferring force through the body, significantly reducing strain on upper body muscles (biomechanical importance of core and leg power, NCBI, 2016). Neglecting them doesn’t just limit your climbing — it accelerates upper body injury by forcing your arms to do work your legs and core should be sharing.
Advanced climbing biomechanics demonstrate that core stability and lower limb power generation are essential for transferring force from the legs through the trunk, significantly reducing strain on upper body muscles. This is the zone most beginner training plans skip entirely.
Core: Creating Body Tension
“I’ve heard legs aren’t that important which makes sense but what parts should I try to keep a priority on?”
— r/bouldering community
The short answer: your core is arguably more important than your arms for climbing on overhanging routes. And your legs matter far more than this common misconception suggests.
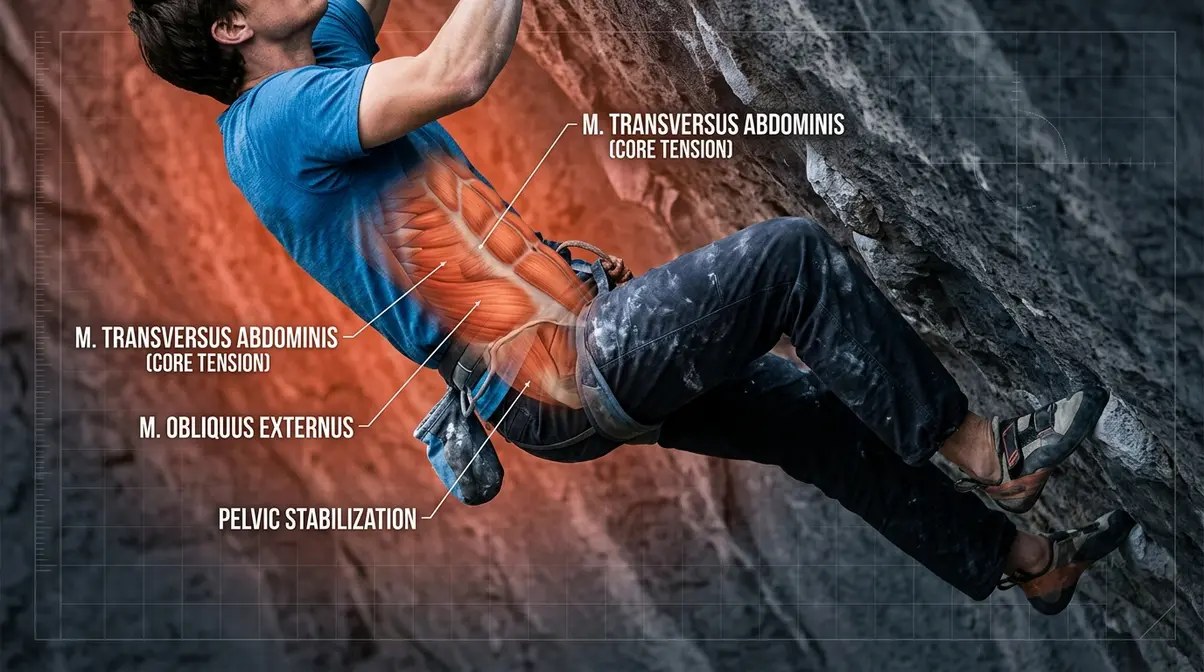
The transverse abdominis — the deep corset-like muscle that wraps around your midsection — creates intra-abdominal pressure that stiffens your entire torso. When it’s engaged, your body moves as one rigid unit. Think of it like a chain: force can only travel through a taut chain, not a loose one. When your transverse abdominis is activated, force from your legs transfers efficiently through your core to your arms. When it’s weak, your hips sag, your feet cut loose on anything steeper than vertical, and your arms suddenly bear 100% of your body weight instead of 60–70%.
Your obliques and hip flexors drive the hip-turn technique climbers call “flagging” — rotating your hips toward the wall to maintain balance on slab and vertical routes. Without oblique strength, hip turns feel awkward and inefficient, and you default to muscling moves with your arms instead.
Here’s a practical test: if your feet cut loose on any wall angle steeper than vertical, your core is your limiting factor — not your arms. Training your core off the wall is the fastest way to stop falling off overhangs.
If core is the stability system, the glutes and hamstrings are the power generators — especially on advanced moves like heel hooks.
Glutes and the Posterior Chain
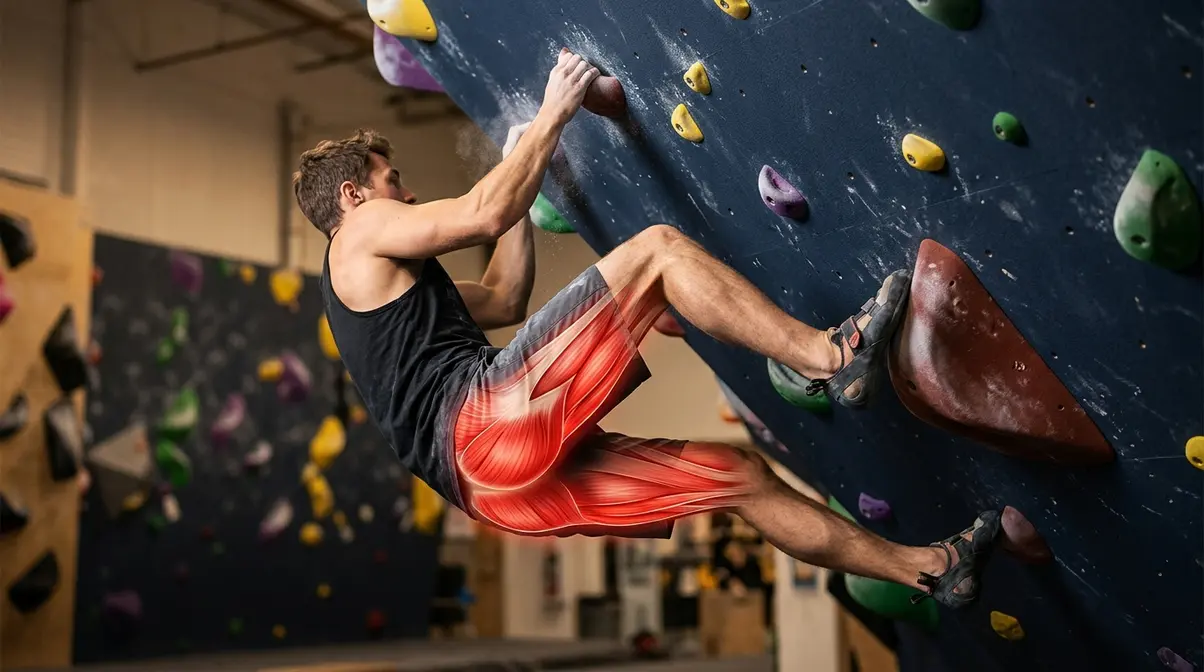
Your gluteus maximus — your largest muscle and one of the most underused in climbing — fires powerfully during high steps (moves where you place your foot above your hip and push down to stand up). This movement is biomechanically identical to a single-leg squat. Climbers who can’t generate power from the glutes rely on their arms to haul themselves up instead — which is exhausting, slow, and burns through forearm endurance unnecessarily.
The heel hook is where hamstring strength becomes unmistakably important. A heel hook involves hooking the back of your heel over a hold and using your hamstrings to pull your hips toward the wall — essentially a leg curl performed at an angle on vertical terrain. Without hamstring strength, heel hooks feel unstable and slip off. With it, they become one of the most powerful resting and movement tools in your arsenal.
Physical therapist Jared Vagy (The Climbing Doctor) specifically identifies the posterior chain as the most undertrained muscle group in recreational climbers. Most beginner climbers do zero lower body strength training — and it shows on the wall. Master squat technique and you’ll immediately notice your high steps becoming more powerful and controlled.
Strong glutes and hamstrings let your legs do more work so your arms can do less — which is the core principle of efficient climbing movement.
Heel hooks use the big power muscles. But the muscles that let you stand on a tiny foothold with precision are smaller and just as important.
Quads and Calves: Footwork Power
Every time you step onto a foothold and push yourself upward, your quadriceps (the four muscles on the front of your thigh) are the engine. On slab routes — walls angled less than vertical — quads do the majority of the work. Strong quads allow you to use tiny footholds without shaking, because the muscle can generate controlled force through a small range of motion.
Your calves — specifically the gastrocnemius (the large visible calf muscle) and the soleus (the deeper, flatter muscle beneath it) — are essential for “smearing,” which means pressing the rubber sole of your climbing shoe against a featureless wall surface to create friction. Smearing is a foundational technique on slab, and calf endurance determines how long you can sustain it. Calf fatigue is a commonly overlooked cause of footwork failure: your feet don’t slip because your shoes are bad — they slip because your calves gave out.
If your calves burn during a slab session, that’s a sign they’re working — and that they need more dedicated training off the wall. Calf raises, single-leg variations, and extended balance work all transfer directly to footwork precision on the wall.
Now that you know every muscle in the Climber’s Load Map, let’s build a targeted off-wall training plan to strengthen each zone.
8 Exercises for Climbing Muscles
⚠️ Disclaimer: The exercises below are for general fitness education only. Consult a qualified physical therapist or physician before starting any new exercise program, especially if you have a history of climbing injuries, tendon issues, or joint pain. Stop any exercise immediately if you experience sharp pain. Tendon injuries heal slowly — prevention is critical.
Knowing which muscles rock climbing works is step one. Step two is training them deliberately off the wall. The 8 exercises below are organized by the Climber’s Load Map zones — Upper Engine, Stability Core, and Lower Power — so you know exactly what you’re targeting with each movement and why it makes you a better climber. Incorporating these movements ensures the muscles used in rock climbing are fully conditioned to handle intense loads.
Exercises for Forearm and Grip Strength
These two exercises target the forearm flexors and grip endurance that determine how long you stay on the wall before pump forces you off. Foundational strength training exercises for these muscle groups pay dividends on every route you climb.
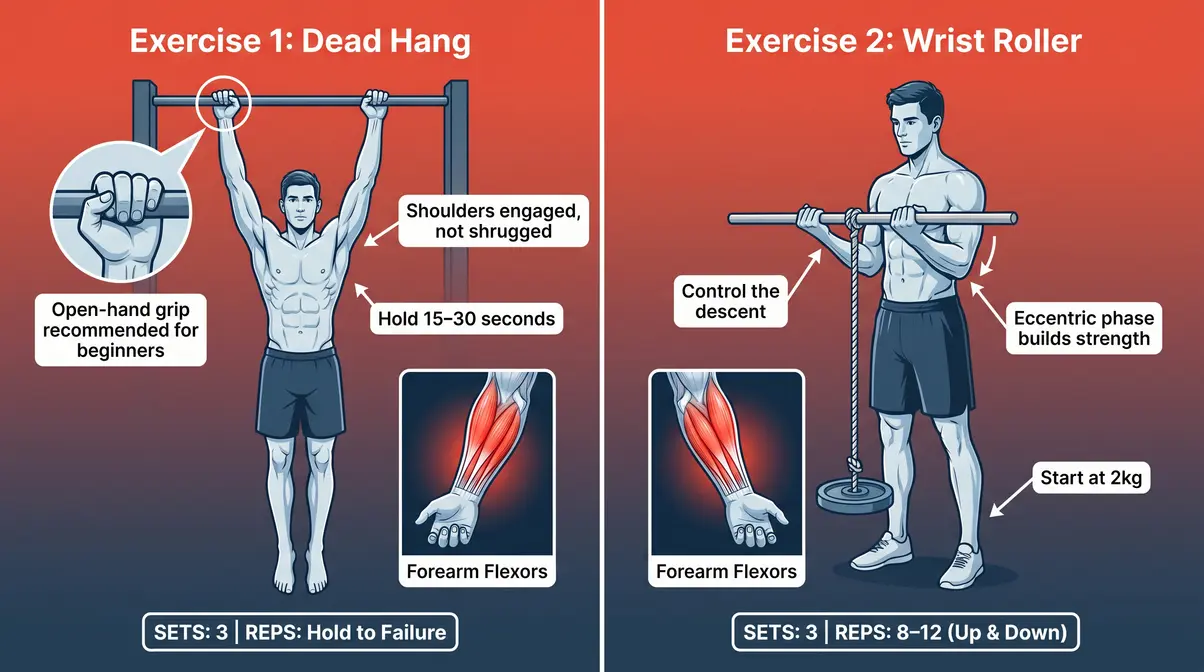
Exercise 1: Dead Hang
- What it trains: Forearm flexors, grip endurance, A2 pulley conditioning
- How: Hang from a pull-up bar or hangboard (a textured wooden or plastic board mounted at finger height for grip training) using both hands. Hold for 10–30 seconds with shoulders engaged.
- Sets/Reps: 3 sets × 15–30 second holds, 90 seconds rest between sets
- Form tip: Keep your shoulders actively engaged — don’t let them shrug up toward your ears
- Common mistake: Starting with a half-crimp grip before your tendons are conditioned. Begin with an open-hand grip (fingers straight, not bent at 90°) to reduce pulley stress.
Exercise 2: Wrist Roller
- What it trains: Forearm flexors and extensors — both sides, which is essential for injury prevention
- How: Hold a dowel with a rope and weight attached. Roll the weight upward, then lower it slowly and with control.
- Sets/Reps: 2 sets rolling up, 2 sets rolling down; start with 2 kg
- Form tip: Control the descent — the eccentric (lowering) phase builds more strength than the lift
With grip strength addressed, let’s build the pulling power that moves you up the wall.
Exercises for Back and Pulling Power
What muscles to strengthen for rock climbing? The pull-up and resistance band row are the two most direct answers for your back and Upper Engine zone. These exercises build the lats, rhomboids, and biceps that power every upward movement on the wall.
Exercise 3: Pull-Up (or Assisted Pull-Up)
- What it trains: Latissimus dorsi (primary mover), biceps, rhomboids
- How: Hang from a bar with an overhand grip. Pull until your chin clears the bar, then lower slowly over 3 seconds.
- Sets/Reps: 3 sets × maximum controlled reps. Beginners: loop a resistance band around the bar and place one knee in it for assistance.
- Form tip: Lead with your elbows pulling toward your hips — not your chin straining upward. This ensures lat activation.
- Common mistake: Kipping (using a swinging motion to generate momentum). Kipping removes lat activation and significantly increases shoulder injury risk.
Exercise 4: Resistance Band Row
- What it trains: Rhomboids, lower trapezius, rear deltoids — the stability muscles most climbers never directly train
- How: Anchor a resistance band at chest height. Hold both ends and pull toward your chest, squeezing your shoulder blades together and down.
- Sets/Reps: 3 sets × 12–15 reps
- Form tip: Pause for 1 full second at maximum contraction. This pause activates the lower trapezius more effectively than a fast, bouncing row.
- Why it matters: This exercise directly addresses the lower trapezius — which HoopersBeta DPT research identifies as the single most undertrained muscle in recreational climbers.
Structure workouts for balanced development to ensure these pulling exercises don’t create their own imbalances over time.
The Upper Engine is now covered. Let’s train the Stability Core and Lower Power zones.
Core Stability and Lower Body Exercises
These two exercises target the exact muscles that create body tension on overhangs and generate power through high steps — the Stability Core and Lower Power Center of the Climber’s Load Map.
Exercise 5: Hollow Body Hold
- What it trains: Transverse abdominis, obliques, hip flexors — the precise muscles that create body tension on overhanging routes
- How: Lie on your back on the floor. Press your lower back firmly into the ground. Extend your arms overhead and lift your legs to 45°. Hold this position without letting your lower back arch away from the floor.
- Sets/Reps: 3 sets × 15–30 second holds
- Form tip: If your lower back lifts off the floor, raise your legs higher (closer to 90°) until it doesn’t. Master the easier version before lowering your legs.
- Why it matters: The hollow body hold is the closest off-wall simulation of the body tension required to keep your feet on overhanging routes. It directly trains the “tight core” feeling that prevents your feet from cutting loose.
Exercise 6: Bulgarian Split Squat
- What it trains: Gluteus maximus, quadriceps, hamstrings — the full Lower Power Center
- How: Place your rear foot on a bench or box behind you. Lower your front leg until your thigh is parallel to the floor. Drive through the heel of your front foot to return to standing.
- Sets/Reps: 3 sets × 8–10 reps per leg
- Form tip: Keep your front knee tracking directly over your second toe throughout the movement
- Why it matters: This exercise directly mimics the single-leg push mechanics of a high step on the wall — the same gluteus maximus recruitment pattern, the same quad demand, the same balance requirement.
Primary movers trained. Now the most important set of exercises most climbers skip entirely: antagonist training.
Antagonist Training: Injury Prevention
These two exercises target the muscles that climbing never trains — and that imbalance is exactly what causes the most common climbing injuries. ACSM guidelines specifically identify antagonist muscle training as essential for climbers’ joint health.
Exercise 7: Tricep Dip (Bench Dip)
- What it trains: Triceps — the direct antagonist to the biceps and elbow flexors
- How: Place your hands on a bench behind you with fingers pointing forward. Lower your body by bending your elbows to 90°, then press back up.
- Sets/Reps: 3 sets × 10–12 reps
- Form tip: Keep your elbows pointing straight back, not flaring outward. Flared elbows shift load to your shoulders rather than your triceps.
Exercise 8: Finger Extension with Rubber Band
- What it trains: Finger extensors — the direct antagonist to the forearm flexors, and the muscle most responsible for balanced finger joint health
- How: Place a thick rubber band around all five fingers of one hand. Spread your fingers apart against the band’s resistance, then bring them back together slowly.
- Sets/Reps: 3 sets × 15–20 reps per hand
- Why it matters: ACSM guidelines specifically identify this exercise as essential for preventing pulley injuries in climbers. It takes 60 seconds per hand and could be the difference between a healthy climbing season and a 3-month pulley tear recovery.
With your training exercises mapped, the final question is: how often should you actually climb and train to see results?
Training Cadence: How Often to Climb
Training the right muscles matters. Training them at the right frequency matters just as much. Sports medicine research recommends 3–4 climbing days per week as the optimal frequency for strength building — but only with adequate rest between sessions (sports medicine recommendations for climbing recovery, University of Utah Health, 2016). Without rest, tendons — which recover far slower than muscles — accumulate damage until they tear.
Sports medicine experts recommend climbing 3–4 days per week as the optimal frequency for building strength, provided adequate rest days allow tendon and muscle tissue to repair. This isn’t a conservative estimate — it’s what the injury data supports.
Climbing Frequency by Experience Level
The right frequency depends on where you are in your climbing journey. Here’s a clear framework:
| Experience Level | Climbing Days/Week | Off-Wall Training Days | Rest Days |
|---|---|---|---|
| Beginner (0–6 months) | 2 | 1 | 4 |
| Intermediate (6 months–2 years) | 3 | 1–2 | 2–3 |
| Advanced (2+ years) | 4 | 2 | 1–2 |
Beginner (0–6 months): Two climbing days per week sounds conservative, but it’s evidence-based. Your forearm muscles may feel recovered after 24 hours, but your A2 pulleys take 48–72 hours to repair micro-damage. Climbing before tendons recover is the primary mechanism behind pulley tears. Two days gives you the stimulus you need and the recovery time your connective tissue requires.
Intermediate (6 months–2 years): Three climbing days per week is the sweet spot for most climbers at this stage — which directly answers the common question: Is climbing 3 times a week enough? For most intermediates, yes. Three sessions provide sufficient volume for strength adaptation, and 1–2 off-wall training days let you address the Climber’s Load Map zones you’re neglecting on the wall.
Advanced (2+ years): Four days becomes sustainable once tendons have adapted to climbing loads. Even at this level, 1–2 full rest days remain non-negotiable for injury prevention. Upper body strength for climbing continues to develop during rest — not just during sessions.
How Rest Days Build Climbing Strength
Here’s the counterintuitive truth most beginners miss: your muscles don’t grow on the wall. They grow during rest. Climbing creates the stimulus — microscopic muscle fiber damage and metabolic stress. Rest is when your body repairs and reinforces those fibers to handle the load next time.
This process is especially important for tendons and pulleys. Muscle tissue has a rich blood supply and repairs relatively quickly. Tendons and ligaments have much poorer blood supply — the A2 pulley, for example, can take 6–12 weeks to fully repair after a partial tear. Rest days aren’t passive. They’re when the structural adaptations that make you a stronger climber actually occur.
A practical rule: if your forearms still feel stiff or swollen at the start of a planned climbing session, take another rest day. Stiffness is a reliable signal that tissue repair isn’t complete. Climbing on unrecovered tendons is the fastest path to a month off the wall.
Balancing Off-Wall Training
The most effective approach treats climbing and off-wall training as complementary, not competing. On climbing days, climb first — then do a short 15–20 minute antagonist routine (finger extensions, tricep dips, band rows) afterward. On off-wall days, focus on the Climber’s Load Map zones your climbing sessions can’t reach: Bulgarian split squats for Lower Power, hollow body holds for Stability Core, pull-up progressions for Upper Engine volume.
How to build every muscle rock climbing works through a structured combination of on-wall sessions and targeted gym work is the most efficient path to grade progression. Avoid scheduling heavy lower body gym work the day before a climbing session — fatigued quads and glutes compromise footwork precision and increase fall risk.
A sample week for an intermediate climber: Monday climb, Tuesday rest, Wednesday climb + antagonist training, Thursday off-wall (core + lower body), Friday climb, Saturday–Sunday rest. Adjust based on how your tendons feel — the schedule serves you, not the other way around.
Injury Risks and Training Limitations
Common Pitfalls
Crimping before your tendons are ready is the leading cause of A2 pulley tears in beginner climbers. The crimp grip feels natural and strong — but it places maximum load on the A2 pulley before the tendon has adapted to climbing stress. Beginners should default to open-hand grip for at least the first 3–6 months.
Skipping antagonist training entirely creates the muscle imbalance that leads to medial epicondylitis (climber’s elbow) and chronic shoulder impingement. Tricep dips and finger extensions take less than 10 minutes — there’s no legitimate reason to skip them.
Training through finger pain is a common and costly mistake. A dull ache in your pulley region after a session is a warning. Sharp pain during climbing is a stop signal. Climbers who push through pulley discomfort routinely extend a 2-week recovery into a 3-month one.
When to Choose Alternatives
If you have an existing shoulder impingement, heavy pull-up volume may aggravate the condition. In that case, prioritize resistance band rows and lower trap work while the impingement resolves — and get a physical therapist’s clearance before returning to overhead pulling.
If you’re recovering from a pulley tear, hangboard training and crimping are off-limits until your physical therapist clears you. Open-hand traversing on low-angle terrain is typically the first approved activity during pulley rehab.
When to Seek Expert Help
Consult a qualified physical therapist if you experience: a popping sensation in a finger joint, pain that persists more than 48 hours after a session, shoulder pain that worsens with overhead movement, or elbow pain on the inner side (medial epicondyle). These are not “push through it” signals. Climbing-specialist physical therapists — many of whom climb themselves — can distinguish between normal training soreness and structural damage that requires rest.
Frequently Asked Questions
What muscles should I strengthen?
Prioritize the full Climber’s Load Map: forearm flexors, lats, core, glutes, and antagonist muscles. Most beginners focus only on forearms and back — but core tension is what keeps your feet on overhanging routes, and glutes drive heel hooks and high steps. Equally important are the antagonist muscles climbing never trains: triceps and finger extensors. ACSM guidelines specifically recommend training these antagonists to prevent the elbow and pulley injuries that affect a significant portion of regular climbers.
Is climbing 3 times a week enough?
For intermediate climbers (6 months–2 years of experience), climbing 3 times per week is the optimal frequency for building strength. University of Utah Health sports medicine research (2016) supports 3–4 sessions per week with adequate rest days for tendon and muscle repair. For beginners in their first 6 months, 2 sessions per week is recommended — tendons adapt more slowly than muscles, and climbing before pulleys have recovered is the primary cause of A2 tears. Three days becomes appropriate once your fingers feel fully recovered between sessions.
How long to build climbing muscles?
Most beginners notice initial muscle development and increased grip strength within 4 to 8 weeks of consistent climbing. The muscles used in rock climbing adapt quickly to the new stimulus, especially the forearms and lats. However, tendon and pulley adaptations take significantly longer, often requiring 3 to 6 months to fully condition. This is why beginners must pace themselves even if their muscles feel strong enough to progress.
Do you need to lift weights to climb?
You do not need to lift weights to become a proficient rock climber, but targeted resistance training accelerates progress and prevents injuries. Climbing itself provides intense bodyweight resistance that builds the primary pulling muscles. However, lifting weights is highly recommended for training antagonist muscles—like the triceps and chest—that climbing neglects. Incorporating off-wall exercises ensures balanced muscle development and protects your joints from overuse.
Closing Thoughts
Rock climbing works more than 20 muscle groups simultaneously — from your finger flexors and lats in the Upper Engine to your transverse abdominis in the Stability Core and your glutes and hamstrings in the Lower Power Center. That’s the full picture the muscles used in rock climbing present: not an upper-body sport, but one of the most complete full-body resistance workouts available. WVU Sports Science confirms this full-body recruitment, and sports medicine research from NCBI and University of Utah Health supports the training and recovery guidelines in this guide.
The Climber’s Load Map is your framework for turning that knowledge into action. When you know which zone is your weakest link — Upper Engine, Stability Core, or Lower Power Center — you know exactly where to direct your training energy. Most climbers who plateau aren’t weak overall; they have one underdeveloped zone that’s limiting the whole system.
Ready to get started? Pick two exercises from the zone you’ve been neglecting most and add them to your next off-wall day. If your feet cut loose on overhangs, that’s your Stability Core. If heel hooks feel unstable, that’s your Lower Power Center. If you pump out before you expect to, that’s your Upper Engine. The wall tells you what to train — the Climber’s Load Map tells you how.
Related posts:
Progressive Overload Guide: 7 Methods to Build Muscle
Muscle Atrophy: Causes, Symptoms & How to Reverse It
What Is Muscle Memory? The Complete Science Guide
Muscle Hypertrophy Explained: The Science of Muscle Growth
Strength Training vs Hypertrophy: The Complete 2026 Guide
Muscle Building Transformation Stories: What Actually Worked
Callum
Hi, I'm Callum, the founder of Body Muscle Matters. I'm not a certified trainer, I'm a self taught lifter who started this site to share what I've learned from my own training and a lot of trial and error. Everything here comes from real experience and honest research, written the way I'd explain it to a friend who is just getting started. My goal is simple: practical, no hype fitness advice you can actually use.