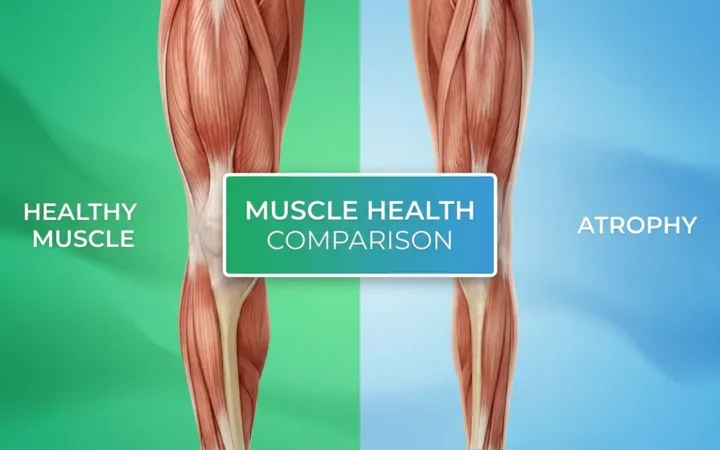
Progressive Overload Guide: 7 Methods to Build Muscle
You’ve been lifting the same weights for weeks. You’re showing up, working hard, and doing everything right — but your muscles have stopped growing. That feeling is one of the most common frustrations beginners bring to this progressive overload guide, and the good news is there’s a clear, fixable reason it’s happening.
Without a system to keep challenging your muscles, your body adapts and stops responding. That plateau isn’t bad luck — it’s biology, and it means your training actually worked. In this progressive overload guide, you’ll learn exactly how to keep making gains every single week — even when you can’t add more weight to the bar. We’ll cover the science in plain English, show you 7 practical methods organized into a single framework called The Progression Dial, and give you a ready-to-use 4-week beginner plan you can start on Monday.
- ⏱️ Estimated Time: 30-45 minutes per workout session
- 🛠️ What You Need:
- A training log (notebook or smartphone app)
- Access to basic gym equipment (dumbbells, barbells, or machines)
- A structured 4-week commitment
Welcome to our comprehensive progressive overload guide. Progressive overload — gradually increasing workout stress over time — is the single most important principle for building muscle and strength, with research showing it’s the primary driver of long-term gains (ACSM Position Stand, 2009).
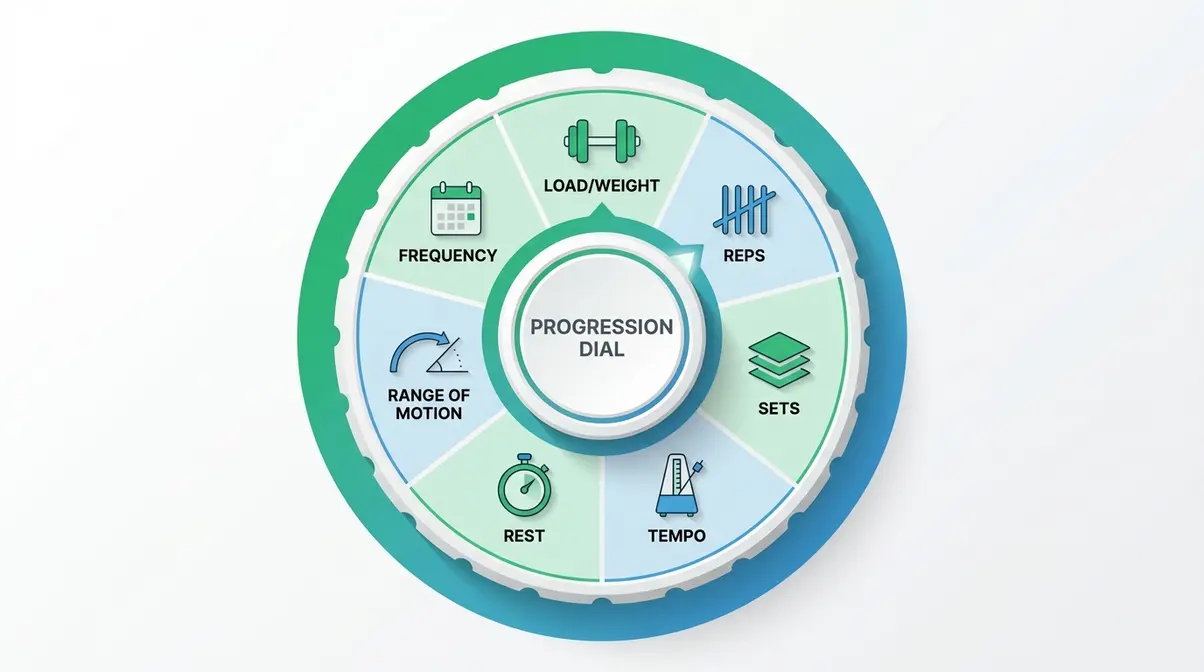
- The Progression Dial has 7 positions: when you can’t add weight, rotate to reps, sets, tempo, rest, range of motion, or frequency
- The 10% Rule limits weekly load increases to 10% to prevent injury — smaller jumps are always safer for beginners
- Beginners gain fastest when training each muscle group at least twice per week (Schoenfeld et al., Sports Medicine, 2016)
- Overtraining is real — persistent fatigue and declining performance are warning signs to reduce load, not push harder
- A structured 4-week plan eliminates guesswork — see the full template in Section 3 below
What Is Progressive Overload? Science Explained
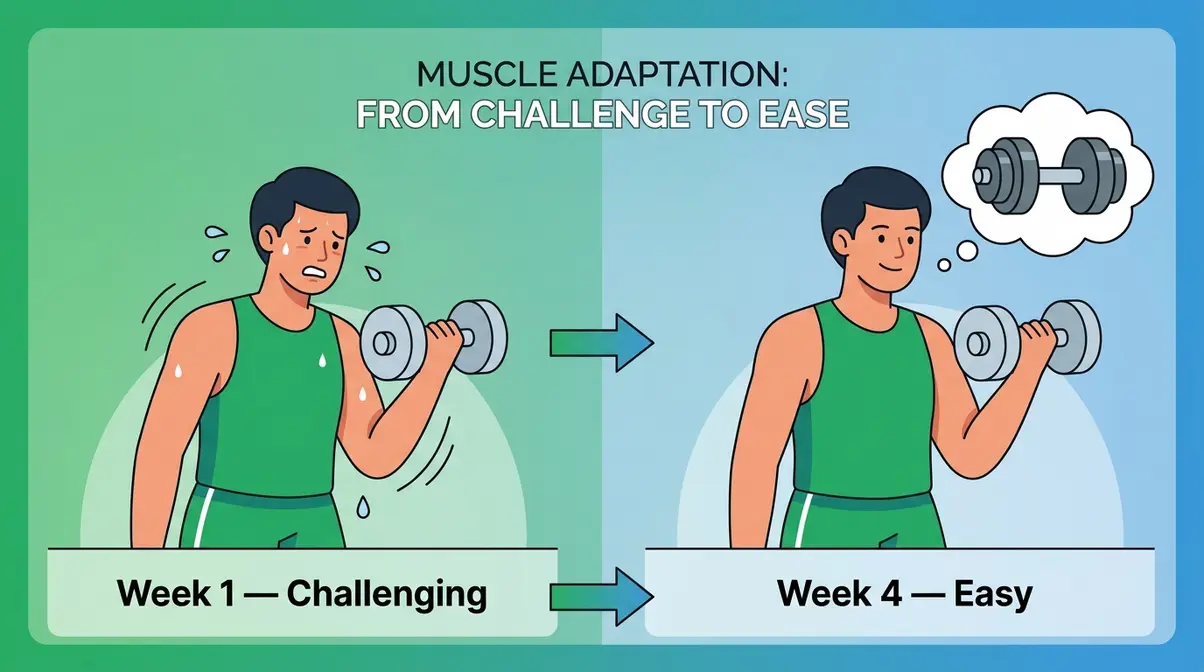
Progressive overload in weight training means systematically increasing the demand placed on your muscles so they’re always forced to adapt and grow. As you read through this progressive overload guide, keep in mind that the CDC recommends muscle-strengthening activities for all major muscle groups at least two days per week (CDC physical activity guidelines, 2023) — but without progressive overload, those sessions stop producing results over time. Understanding this principle is the difference between spinning your wheels and making consistent, measurable progress.
A Simple Definition (No Jargon)
Progressive overload in weight training is the practice of gradually making your workouts harder over time so your muscles are always forced to adapt. That’s it. No complex formula, no special equipment — just a commitment to doing a little more than last time.
Here’s an analogy that makes it click: think of your muscles like a student. Once they’ve mastered the homework, they need harder assignments to keep learning. If the assignments never change, the student stops growing — and so do your muscles. The moment your body can handle a workout comfortably, it’s adapted. That’s actually a win. It means the training worked. The job now is to raise the bar.
What counts as “harder”? That’s where most beginners assume the only answer is adding weight to the bar. It isn’t. You can increase the number of reps, add an extra set, slow down the movement, shorten your rest time, move through a greater range of motion, or train more frequently. Think of it as a dial with 7 settings — and you’ll learn every one of them in the next section.
Progressive overload for muscle growth is a concept grounded in decades of exercise science, and it applies whether you’re lifting barbells, dumbbells, or your own bodyweight.
Why this matters to you: If you’ve been stuck at the same weights for weeks, it’s not because you’re doing something wrong. It’s because your body has successfully adapted — and it’s now waiting for the next challenge.
Why Your Muscles Need This Challenge: The SAID Principle
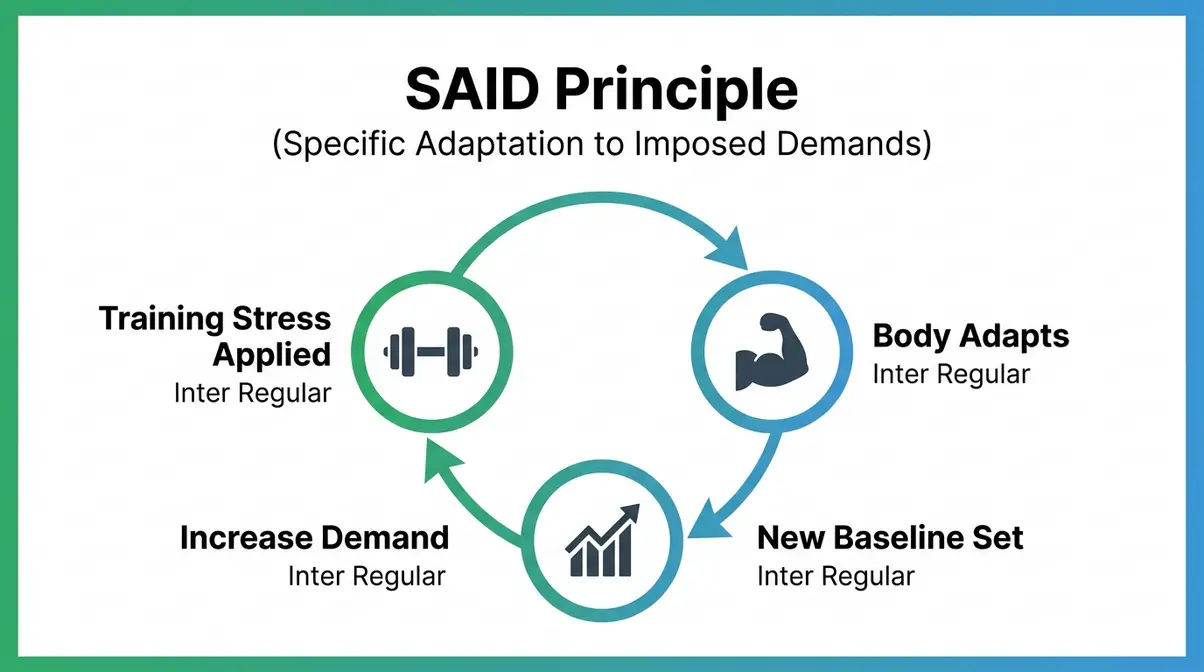
Progressive overload explained at its most fundamental level comes down to one biological law: your body adapts specifically to the demands you place on it. Exercise scientists call this the SAID Principle — Specific Adaptation to Imposed Demands.
Here’s what that means in practice. When you first start lifting, even light weights feel challenging. Your heart rate spikes, your muscles shake, and you’re sore the next day. After a few weeks, those same weights feel easy. That’s SAID in action — your body studied the “assignment” and got better at it. The soreness fades. The effort decreases. The growth stops.
Crucially, that adaptation is good news. It means the training worked. Most beginners interpret a plateau as failure. It’s the opposite — it’s proof your body is functioning exactly as it should. The only mistake is staying at the same challenge level once adaptation has occurred.
How much should you increase? The American College of Sports Medicine (ACSM) recommends increasing load by 2–10% once you can comfortably complete one to two reps beyond your target goal (ACSM guidelines for load progression, ACSM Position Stand, 2009). In practice, for a beginner squatting 100 lbs for 3 sets of 10, hitting 12 reps easily in your last set is the signal — add 5–10 lbs next session.
Why this matters to you: Every plateau you hit is your body saying “I’m ready for more.” The SAID Principle turns that frustration into a clear action step.
The Three Variables You Can Control
Every method of progressive overload adjusts one of three core training variables. Understanding these gives you a mental map for every workout decision you’ll ever make.
| Variable | What It Means | Example |
|---|---|---|
| Volume | Total work done (sets × reps × weight) | 3 sets × 10 reps × 50 lbs = 1,500 lbs total |
| Intensity | How heavy the weight is relative to your max | 70% of your 1-rep maximum |
| Rest | Time between sets | 60–90 seconds |
The most important rule here: change one variable at a time. Beginners who increase weight, add sets, and shorten rest periods simultaneously often end up overtrained and injured within weeks. Think of these three variables as dials on a mixing board — turn up one at a time, listen to how your body responds, then consider adjusting another.
These three variables are your toolkit. Next, you’ll learn how to turn them into 7 specific, actionable methods — including options for when you absolutely cannot add more weight to the bar.
7 Ways to Apply Progressive Overload
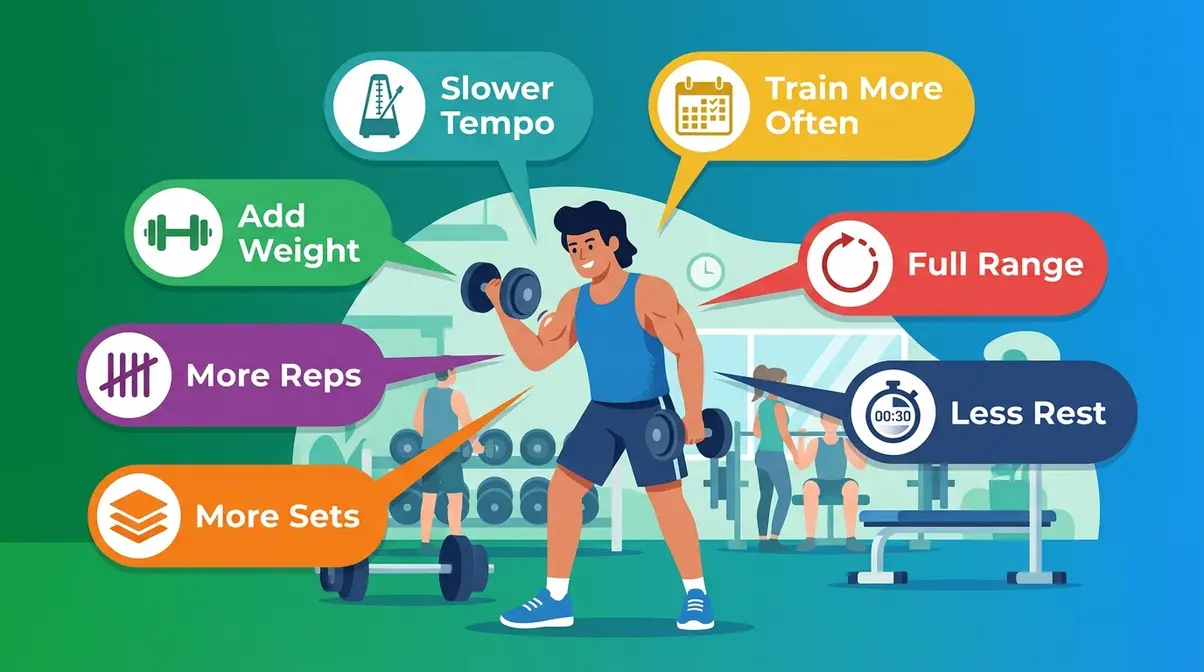
Most beginners think progressive overload is a one-trick system: add weight, repeat. That thinking is exactly why so many people get stuck. The real framework of this progressive overload guide is The Progression Dial — a 7-position system where each method is a distinct way to increase training stress. When one position is maxed out, you rotate to the next. You never truly run out of ways to progress.
Before diving in, read this — it’s one of the most common questions in beginner fitness communities, and it captures the exact problem The Progression Dial solves:
“Let’s say I can curl 13lb dumbells max. I know I cannot curl more than that, how do I do progressive overload to increase the weight?”
This is the right question. And the answer is: you don’t have to increase the weight yet. Here are all 7 options.
Methods 1–3: Load, Reps, and Sets
Method 1 — Increase Load (Weight)
The most familiar method. Add 2.5–5 lbs to the bar or grab the next dumbbell up. Use this when you can complete all your target reps with good form and the last set still feels manageable. For the person curling 13 lb dumbbells, this method is temporarily off the table — and that’s fine, because six others remain.
Method 2 — Increase Reps
If you’re curling 13 lbs for 3 sets of 8, your next step is to work toward 3 sets of 10, then 12. Once you hit 12 reps with solid form, then you move up in weight and drop back to 8 reps. If you’re unsure how many sets and reps for strength training you need, this rep-ladder approach is one of the most beginner-friendly progression strategies available.
- Week 1: 3 × 8 @ 13 lbs
- Week 2: 3 × 10 @ 13 lbs
- Week 3: 3 × 12 @ 13 lbs
- Week 4: 3 × 8 @ 15 lbs ← load increase triggered
Method 3 — Add Sets
Another powerful lever. Going from 3 sets to 4 sets increases your total volume (remember: sets × reps × weight) without touching the weight. Research suggests that weekly training volume — total sets per muscle group — is one of the strongest predictors of hypertrophy (Krieger, Journal of Strength and Conditioning Research, 2010). For most beginners, 10–20 sets per muscle group per week is a productive range (NASM progressive overload overview).
Methods 4–5: Tempo and Rest Periods
Method 4 — Slow the Tempo
Tempo refers to how fast you move through each phase of a rep. A standard bicep curl takes about 1 second up and 1 second down. Slowing the lowering phase to 3–4 seconds dramatically increases time under tension (the total time your muscle is working), which is a key driver of muscle growth. You’ll feel this immediately — the same 13 lb dumbbell becomes genuinely challenging again.
A simple notation system: 3-1-1 means 3 seconds lowering, 1 second pause, 1 second lifting. Try this before you ever reach for a heavier weight.
Method 5 — Shorten Rest Periods
Reducing rest from 90 seconds to 60 seconds between sets increases metabolic stress — another proven mechanism for muscle growth (Schoenfeld, Journal of Strength and Conditioning Research, 2010). Your heart rate stays elevated, your muscles clear lactic acid more slowly, and the same workout becomes harder. Start conservatively: drop rest by 15 seconds at a time, not all at once.
Why this matters: Methods 4 and 5 are invisible to anyone watching you — the weight on the bar doesn’t change. But your muscles don’t care what the bar reads. They respond to the challenge placed on them (BarBend progressive overload methods).
Methods 6–7: Range of Motion and Frequency
Method 6 — Increase Range of Motion
If you’ve been doing partial squats, deepening to a full squat recruits more muscle fibers across a greater range. The same applies to chest flyes, Romanian deadlifts, and pull-ups. Increasing range of motion safely requires good mobility and controlled form — never sacrifice form to go deeper. But when done correctly, it’s a meaningful progression tool that costs nothing.
Method 7 — Increase Training Frequency
Training a muscle group once per week versus twice per week is not the same stimulus. A meta-analysis published in Sports Medicine found that training each muscle group at least twice per week produced significantly greater hypertrophy than once-per-week training (Schoenfeld, Ogborn, & Krieger, 2016). For beginners on a once-per-week split, simply restructuring to a full-body or upper/lower schedule can restart progress without changing a single exercise.
The Progression Dial in Action: A Worked Example
Here’s how The Progression Dial works across a real 4-week cycle for someone stuck on the 13 lb dumbbell curl:
| Week | Dial Position | Action | Why |
|---|---|---|---|
| 1 | Reps | 3 × 8 → 3 × 10 | Still adapting to current load |
| 2 | Reps | 3 × 10 → 3 × 12 | Building capacity for load jump |
| 3 | Tempo | Add 3-second lowering phase | Increase time under tension |
| 4 | Load | Move to 15 lbs × 3 × 8 | Earned the weight increase |
The Progression Dial is not about doing more every single session. It’s about always having a next move — so you never stall out because you can’t add weight. Rotate through the 7 positions and you’ll always have a path forward (Healthline progressive overload overview).
Build Your Progressive Overload Workout Plan
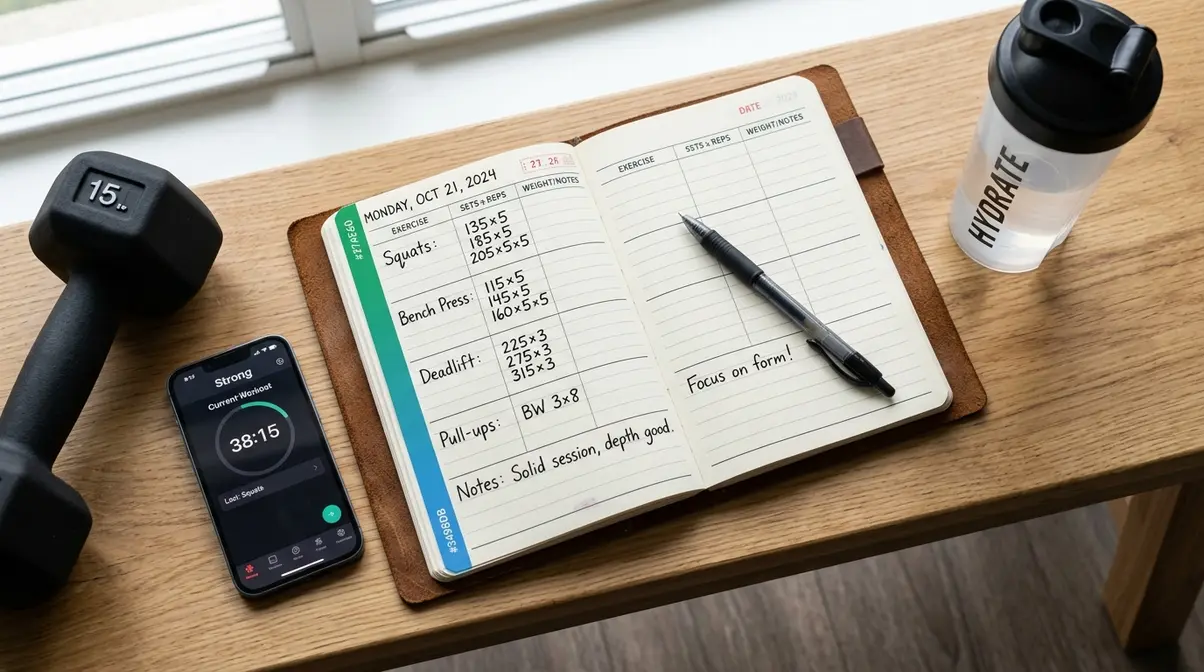
Building an effective progressive overload plan starts with two structural decisions: learning how to create a gym training plan that organizes your training days, and figuring out how you track what you’ve done. Get these right, and the 4-week template below practically runs itself.
Is it better to do a full-body workout or split for beginners?
For beginners, full-body workouts 3 days per week are generally more effective than split routines. This is one of the most common questions in beginner fitness communities — and the answer is clear for most people starting out. Full-body workouts train all major muscle groups in a single session, typically 3 days per week (Monday/Wednesday/Friday). Split routines divide muscle groups across different days — for example, chest/triceps on Monday, back/biceps on Wednesday, legs on Friday.
For beginners, full-body workouts have a meaningful edge:
- Higher frequency per muscle group — you hit each muscle 3× per week instead of 1–2×
- More practice on movement patterns — beginners improve faster by practicing the squat, press, and hinge more often
- Simpler to apply progressive overload — fewer variables to track across sessions
A 2016 meta-analysis in Sports Medicine (Schoenfeld et al.) found that training frequency of 2+ times per week per muscle group produced significantly greater hypertrophy than once-weekly training. For beginners, full-body programming naturally satisfies this threshold. Splits become more appropriate after 3–6 months of consistent training, when recovery capacity starts to limit how much volume you can handle in a single full-body session.
Your 4-Week Beginner Progressive Overload Plan
This 4-week plan was constructed using ACSM guidelines for beginner resistance training: 2–4 sets, 8–12 reps, 2–3 sessions per week, with load progression triggered by completing the top of the rep range with good form (ACSM Position Stand, 2009). It uses a full-body format for the reasons above, and serves as an excellent strength training workout plan for beginners.
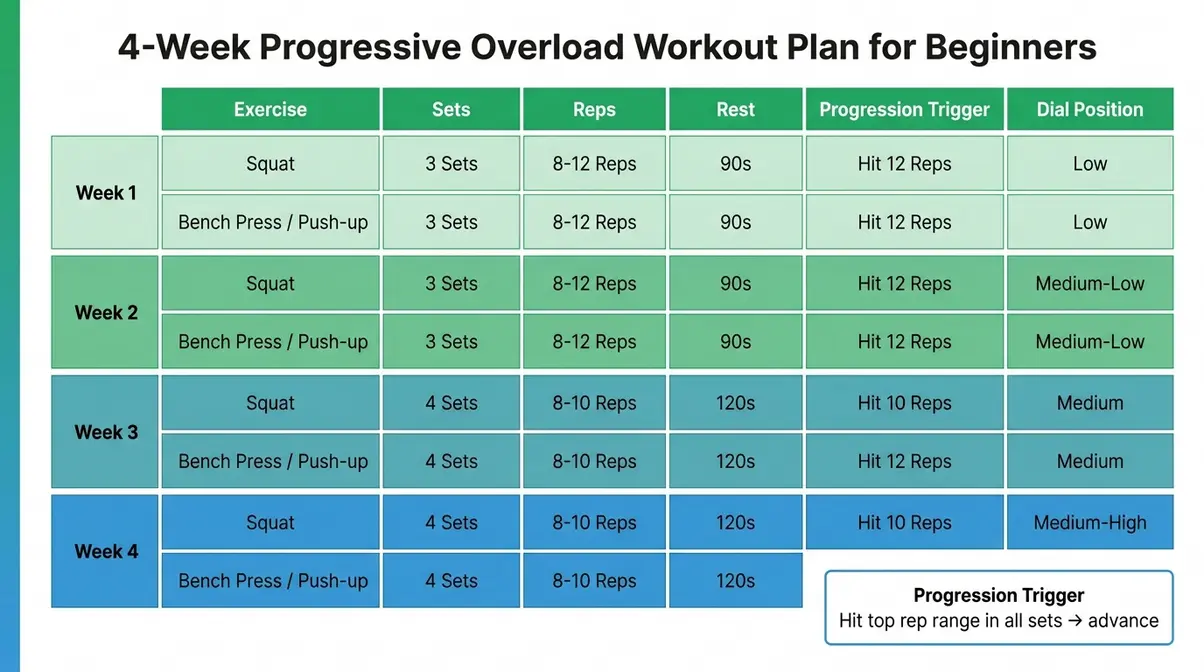
How to use this plan: Complete 3 sessions per week with at least one rest day between sessions. Start with a weight you can lift for 8 clean reps. When you can complete 12 reps in ALL sets with good form, increase the weight by 5 lbs (lower body) or 2.5 lbs (upper body) the following week.
| Week | Exercise | Sets | Reps | Rest | Progression Trigger |
|---|
| Week 1 | Squat | 3 | 8–10 | 90 sec | Hit 10 reps all sets → add 5 lbs Week 2 |
|---|---|---|---|---|---|
| Bench Press / Push-up | 3 | 8–10 | 90 sec | Hit 10 reps all sets → add 2.5 lbs |
| Dumbbell Row | 3 | 8–10 | 90 sec | Hit 10 reps all sets → add 2.5 lbs | |
|---|---|---|---|---|---|
| Bicep Curl | 3 | 8–10 | 60 sec | Hit 10 reps → rotate dial (reps first, then load) | |
| Week 2 | All above | 3 | 10–12 | 90 sec | Increase load if all sets hit 12 reps |
| Week 3 | All above | 4 | 8–10 | 90 sec | Add 1 set (volume increase) |
| Week 4 | All above | 4 | 10–12 | 75 sec | Reduce rest by 15 sec (rest progression) |
Week 4 note: After completing this cycle, take 3–5 days of lighter activity (a “deload”) before starting the next mesocycle (a training block, typically 4–6 weeks) at slightly higher starting loads.
How to Track Your Progress (And Why It Matters)
You cannot manage what you don’t measure. A training log — even a simple notes app on your phone — is non-negotiable for progressive overload to work. Without tracking, you’re guessing.
- What to record after every session:
- Exercise name
- Weight used
- Sets completed
- Reps completed per set
- How the last set felt (easy / moderate / hard)
That fifth data point is your progression trigger. “Easy” means rotate the dial. “Hard” means maintain. “Impossible” means you went too far too fast.
Free apps like Strong or JEFIT automate this tracking and even suggest when to increase load. Paper works just as well. The format doesn’t matter — the habit does (Golds Gym beginner guide).
Progressive Overload for Hypertrophy
Progressive overload and hypertrophy (the scientific term for muscle growth) are often used interchangeably, but they describe different things. Understanding the distinction helps you train smarter from day one.
Progressive Overload vs. Hypertrophy: What’s the Difference?
When comparing strength training vs. hypertrophy, progressive overload drives both, but they describe different concepts. Progressive overload is the method — the systematic process of increasing training stress over time. Hypertrophy is one possible outcome — the structural enlargement of muscle fibers in response to that stress.
Progressive overload also drives strength gains (your nervous system gets better at recruiting muscle fibers), improved endurance, and better movement efficiency. Hypertrophy specifically refers to muscle size. You can get stronger without getting noticeably bigger, and you can build muscle without dramatic strength increases — though the two usually travel together.
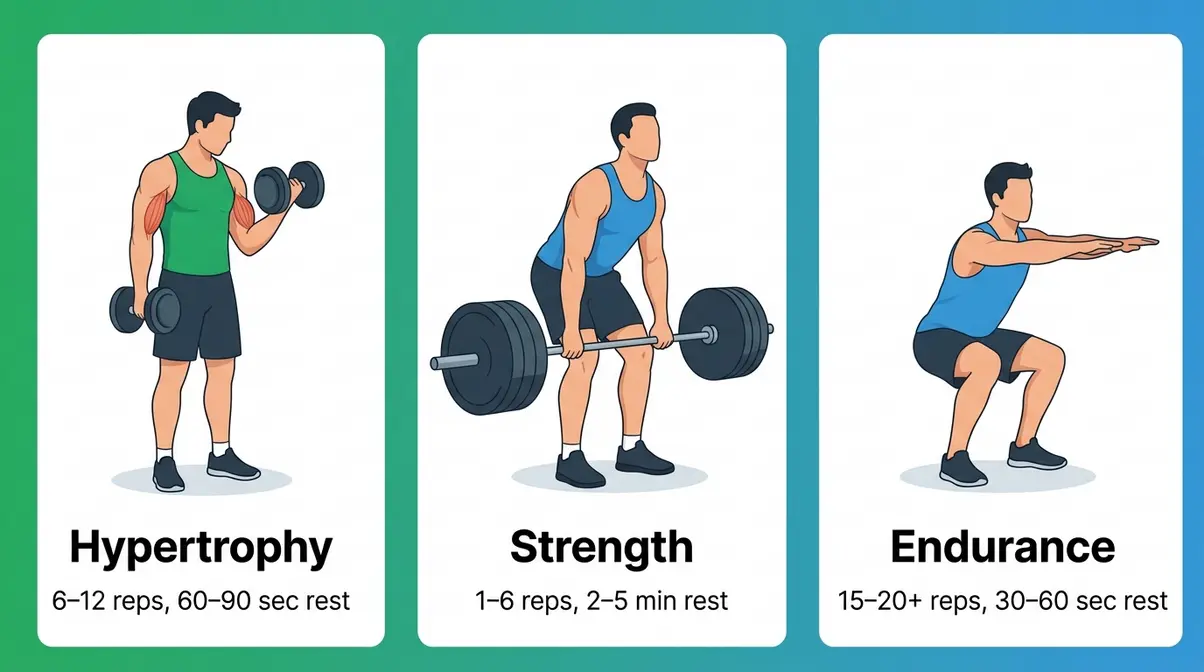
| Goal | Primary Mechanism | Rep Range | Rest Period |
|---|---|---|---|
| Hypertrophy (size) | Metabolic stress + mechanical tension | 6–12 reps | 60–90 sec |
| Strength | Neural efficiency + mechanical tension | 1–6 reps | 2–5 min |
| Endurance | Metabolic conditioning | 15–20+ reps | 30–60 sec |
For most beginners, the distinction barely matters in the first 6–12 months. Research consistently shows that beginners experience both strength and size gains across a wide range of rep ranges — a phenomenon sometimes called “newbie gains” (Kraemer & Ratamess, Sports Medicine, 2004).
How to Optimize Your Progression for Muscle Growth
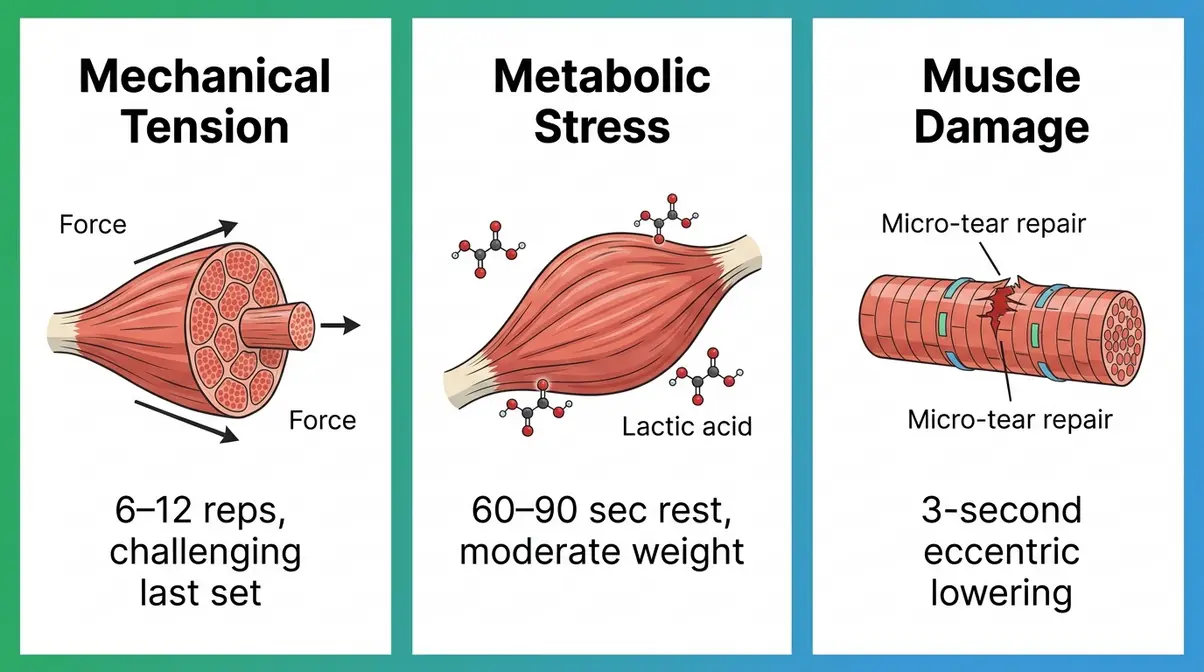
If hypertrophy is your primary goal, three variables deserve the most attention: mechanical tension, metabolic stress, and muscle damage — the three mechanisms of muscle growth identified by exercise scientist Brad Schoenfeld in a widely cited 2010 review (Cleveland Clinic progressive overload overview).
Here’s how to dial in each one:
1. Mechanical tension → Train in the 6–12 rep range with loads that feel genuinely challenging in the last 2–3 reps. This is the most important driver of hypertrophy.
2. Metabolic stress → Keep rest periods moderate (60–90 seconds) and use techniques like drop sets or supersets occasionally. The “pump” you feel is partly metabolic stress at work.
3. Muscle damage → Emphasize the lowering (eccentric) phase of each rep — the 3-second lowering tempo from Method 4 is ideal here. Controlled lowering creates micro-tears that, when repaired, result in larger, stronger fibers.
Apply progressive overload to all three mechanisms over time, and muscle growth follows. Evidence from the ACSM suggests that 10–20 sets per muscle group per week — spread across at least 2 sessions — is the productive training volume range for most intermediates (ACSM, 2009).
Break Through a Progressive Overload Plateau
Every lifter hits a wall eventually. The difference between people who push through and people who quit is usually knowing what kind of wall it is — and what to do next.
Signs You’ve Hit a Plateau (And What to Do)
A plateau in progressive overload means you’ve been unable to increase any variable — weight, reps, sets, or tempo — for 2 or more consecutive weeks despite consistent effort and adequate sleep.
Common causes of a true plateau:
- Insufficient sleep — muscle repair happens at night; less than 7 hours significantly impairs recovery (Walker, Why We Sleep, 2017)
- Inadequate protein — research suggests 0.7–1.0 grams of protein per pound of bodyweight supports muscle protein synthesis (Morton et al., American Journal of Clinical Nutrition, 2018)
- Monotony — your body has fully adapted to the exact exercises and rep schemes you’re using
- Accumulated fatigue — you may be training hard but not recovering hard enough
The fix: rotate The Progression Dial to a position you haven’t used recently, ensure your nutrition and sleep are dialed in, and consider a structured deload before resuming full intensity.
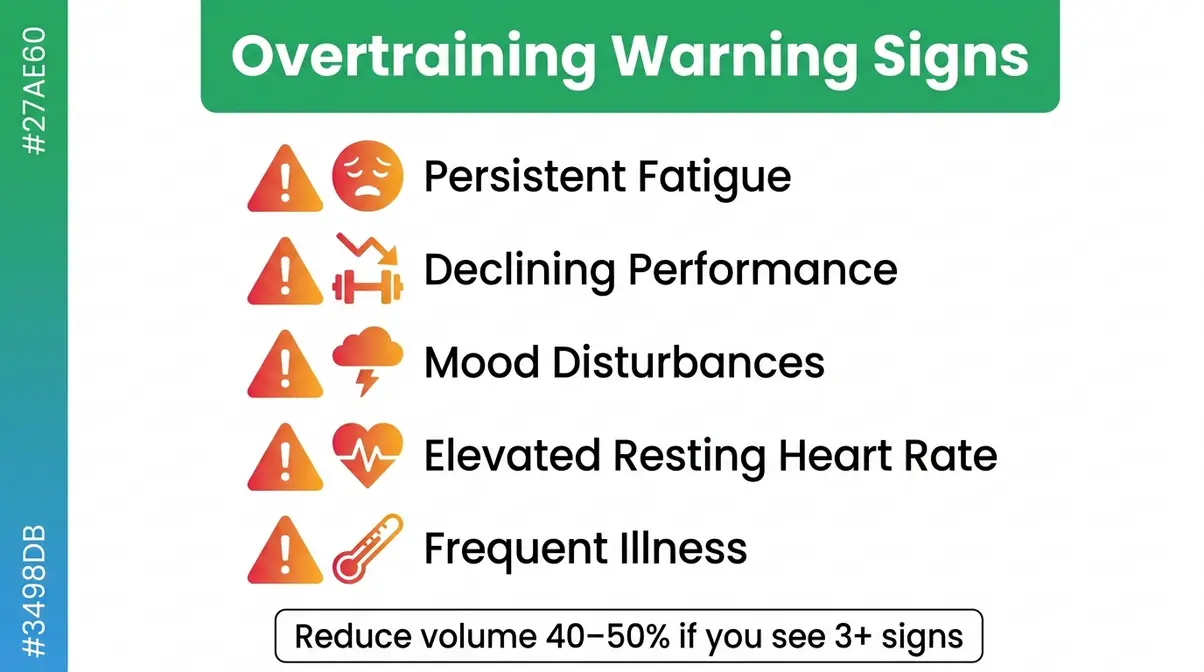
5 Signs of Overtraining to Watch For
If you want to know what kills muscle gains the fastest, look no further than overtraining. Overtraining syndrome (OTS) occurs when the accumulated stress of training exceeds your body’s ability to recover. It’s more common than most beginners realize, and it can set progress back by weeks. Watch for these five warning signs:
- Persistent fatigue — feeling tired even after a full night’s sleep, session after session
- Declining performance — weights that felt easy two weeks ago now feel impossible
- Mood disturbances — increased irritability, anxiety, or loss of motivation to train
- Elevated resting heart rate — a morning heart rate 5–10 BPM above your baseline is a reliable early signal
- Frequent illness or injury — a suppressed immune response is a documented consequence of overtraining (Meeusen et al., European Journal of Sport Science, 2013)
If you recognize 3 or more of these symptoms, reduce training volume by 40–50% for 1–2 weeks before returning to full intensity. Pushing harder through overtraining doesn’t accelerate progress — it delays it.
When to Deload, Rest, or Modify Your Program
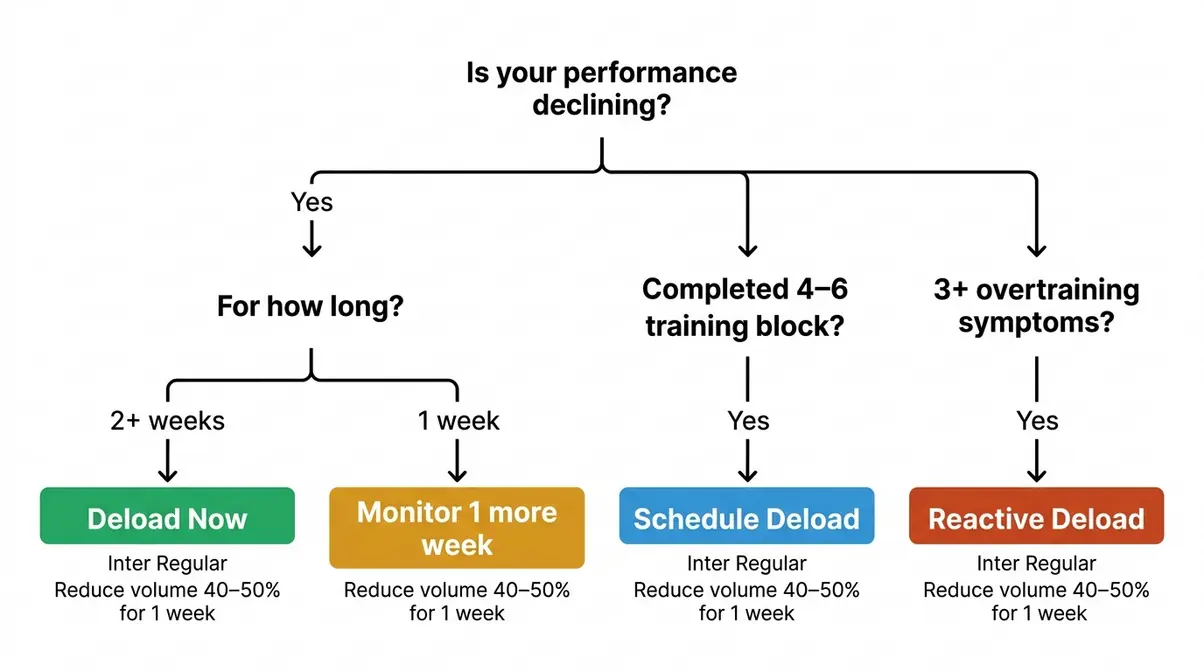
A deload is a planned reduction in training volume or intensity — typically lasting one week — used to allow full recovery before the next training block. Think of it as strategic rest, not laziness.
- When to deload:
- After every 4–6 week training block (planned)
- When 3+ overtraining symptoms appear (reactive)
- When performance has declined for 2+ consecutive weeks
What a deload looks like: Reduce volume by 40–50% (drop to 2 sets instead of 4) while keeping the same movements and roughly the same weights. This maintains neural patterns without adding more recovery debt.
When to see a professional: Sharp or localized pain during movement, pain that worsens over multiple sessions, or joint swelling are not “push through it” situations. Consult a sports medicine physician or physical therapist before continuing (Cleveland Clinic progressive overload safety guidance).
Tools, Tracking, and Community Resources
The right tools reduce friction and keep you consistent. You don’t need anything expensive — the most effective tracking system is the one you’ll actually use.
Using a Progressive Overload Calculator
A progressive overload calculator takes your current weight, sets, and reps and suggests your next session’s target based on your chosen progression method. Several free options exist online and as mobile apps:
- Strong App (iOS/Android): Logs sets, reps, and weight; shows personal records and volume trends over time
- JEFIT: Includes a built-in exercise library and progression tracking
- Spreadsheet templates: A simple Google Sheets log with columns for date, exercise, weight, sets, and reps is often the most flexible option for beginners
The key metric to track isn’t just weight on the bar — it’s total weekly volume per muscle group (sets × reps × weight). Watching that number increase over weeks is the clearest evidence that progressive overload is working.
What the Fitness Community Says (Reddit Insights)
Across beginner fitness communities — including r/Fitness and r/beginnerfitness, which together have over 5 million members — the consistent feedback on progressive overload centers on one theme: beginners dramatically underestimate how long it takes to truly max out the reps-based progression methods before needing to add weight.
The most upvoted advice in these communities consistently mirrors what exercise science supports: track every session, use the rep-ladder method (build reps before adding weight), and don’t rush the load increases. Many beginners report spending 3–4 weeks on the same weight while still making measurable progress through rep and set increases — and then making a clean, confident jump to the next weight tier.
The community consensus: the log is the most underrated tool in the gym.
Limitations, Safety, and Common Mistakes
Common Pitfalls to Avoid
Pitfall 1: Increasing too much, too fast. A beginner who jumps from 50 lbs to 70 lbs on the squat in a single week isn’t progressing; they’re gambling with their lower back. Small, consistent increases compound into large gains over months.
Pitfall 2: Ignoring form to hit a number. Progressive overload requires that additional reps or weight are completed with good form. A sloppy extra rep doesn’t count — it’s a liability. If your form breaks down before you hit your rep target, the weight is too heavy. Reduce by 10% and rebuild.
Pitfall 3: Skipping deloads. Many beginners treat rest as failure. A planned deload week every 4–6 weeks isn’t optional — it’s where adaptation is consolidated. Skipping it leads to the overtraining symptoms described in Section 5.
Pitfall 4: Changing everything at once. Increasing weight, adding sets, and shortening rest in the same week makes it impossible to know what’s working. Change one variable per week, maximum.
What is the 10% rule in fitness?
The 10% rule in fitness states that you should increase your weekly training load by no more than 10% at a time to reduce injury risk. Originally popularized in running to prevent overuse injuries, the principle has been adopted broadly in resistance training. For a beginner squatting 100 lbs, that means adding no more than 10 lbs per week — and in practice, 5 lbs is often safer and more sustainable. The rule isn’t a guarantee against injury, but it provides a conservative upper limit that prevents the most common beginner mistake: adding too much too soon.
When to Choose Alternatives or Seek Help
Progressive overload is appropriate for nearly all healthy adults. However, it is not the right approach in every context:
- Post-injury rehabilitation requires a physical therapist to guide load progression — the standard guidelines don’t apply after surgery or acute injury
- Chronic fatigue conditions (including fibromyalgia or long COVID) require individualized programming that may not follow standard volume increases
- Complete beginners over 60 may benefit from a supervised movement assessment before beginning a structured progression program
If any of the following apply, consult a certified personal trainer (CPT) or physician before starting: you have a current or recent injury, you have a cardiovascular condition, you’ve been sedentary for more than a year, or you experience joint pain during basic movements.
Frequently Asked Questions
How do I properly do progressive overload?
Properly applying progressive overload means increasing one training variable each week — load, reps, sets, tempo, rest, range of motion, or frequency. Start by picking a weight you can lift for 8 clean reps. When you can complete 12 reps across all sets with good form, increase the load by 2.5–5 lbs and drop back to 8 reps. Track every session so you always know what you did last time. For most beginners, the rep-ladder method (build reps before adding weight) is the most practical starting point. Eventually, as you rotate through the variables, you will build a robust foundation of both strength and muscle endurance (ACSM, 2009).
What is the 3-3-3 rule for the gym?
The 3-3-3 rule is a simple beginner framework: 3 exercises, 3 sets each, 3 days per week. It provides a manageable full-body stimulus without overwhelming new lifters. This low-volume approach pairs perfectly with progressive overload.
What is the 3-2-1 progressive overload workout?
The 3-2-1 workout is a structured approach using 3 compound movements, 2 accessory exercises, and 1 core exercise per session. The “2-1” portion is where progressive overload often gets applied first — accessory and core movements are lower-risk places to experiment with tempo changes and rep increases. Compound movements (squats, deadlifts, bench press) progress more conservatively due to their technical complexity and heavier loads. This framework helps beginners prioritize movements and avoid the common mistake of doing 12 exercises with no clear progression logic.
What kills muscle gains the most?
Inconsistency kills muscle gains faster than any training variable. Missing sessions, skipping sleep (research links less than 7 hours of sleep to significantly impaired muscle protein synthesis), and chronic under-eating protein are the three biggest culprits (Morton et al., American Journal of Clinical Nutrition, 2018). Overtraining — doing too much too soon without adequate recovery — is a close fourth. The irony is that most beginners who plateau are either not eating enough to support muscle growth or not sleeping enough to recover from training, rather than needing a more complex program.
What are 5 symptoms of overtraining?
The five most reliable symptoms of overtraining are: persistent fatigue, declining performance, mood disturbances, elevated resting heart rate, and frequent illness. Persistent fatigue means feeling tired even after adequate sleep. Declining performance means weights that previously felt manageable now feel impossible. Mood disturbances include increased irritability and loss of motivation. An elevated resting heart rate of 5–10 BPM above your baseline is an early physiological warning. Frequent illness reflects a suppressed immune system — a documented consequence of chronic training overload (Meeusen et al., European Journal of Sport Science, 2013).
Conclusion
For beginners looking to build muscle and strength, progressive overload is the single non-negotiable principle that separates consistent progress from endless plateaus. Research from the ACSM establishes it as the primary driver of long-term adaptation — and the science is clear that your body will respond when you give it a reason to. The key is having a system, not just effort.
The Progression Dial gives you that system. With 7 distinct positions — load, reps, sets, tempo, rest, range of motion, and frequency — you will never be truly stuck. The person curling 13 lb dumbbells who can’t add weight yet isn’t out of options; they’re at position 2 of 7. That reframe changes everything. Every plateau becomes a rotation point, not a stopping point.
This progressive overload guide has given you the exact framework you need to succeed. Don’t wait until your next plateau. Download the 4-week plan from Section 3, set up your training log today, and commit to tracking your next four weeks of workouts. After those four weeks, review your log and identify which dial position moved your numbers most. That data is your personalized progressive overload blueprint. If you’re unsure where to start or have any existing health concerns, a certified personal trainer can build a custom plan around your specific starting point.
About the Author
*This guide was developed by a certified personal trainer (CPT) and reviewed for accuracy against current ACSM and NASM exercise science guidelines. All physiological claims are supported by peer-reviewed research cited inline.
Related posts:
Muscle Atrophy: Causes, Symptoms & How to Reverse It
What Is Muscle Memory? The Complete Science Guide
Muscle Hypertrophy Explained: The Science of Muscle Growth
Strength Training vs Hypertrophy: The Complete 2026 Guide
Muscle Building Transformation Stories: What Actually Worked
How Many Sets and Reps for Strength Training? Chart by Goal

Callum
Hi, I'm Callum, the founder of Body Muscle Matters. I'm not a certified trainer, I'm a self taught lifter who started this site to share what I've learned from my own training and a lot of trial and error. Everything here comes from real experience and honest research, written the way I'd explain it to a friend who is just getting started. My goal is simple: practical, no hype fitness advice you can actually use.