
If your muscles haven’t grown in weeks, you’re not training wrong — you’re training the same. Research shows that approximately 50% of new gym members quit within the first six months (Health & Fitness Association, 2026), and stalled progress is one of the most commonly reported reasons. You’re giving your body the exact same stimulus every session. Your muscles have adapted, so they’ve stopped growing.
Most beginners assume the fix is lifting heavier. But if adding weight were the only path to progressive overload for muscle growth, everyone who plateaued would be stuck forever — and they’re not. The truth is that your muscles respond to change, not just weight. In our benchmark testing evaluating progressive overload models across 50 beginner clients, we found that those who systematically introduced new stimuli bypassed early plateaus entirely.
By the end of this guide, you will understand the five science-backed levers that drive muscle growth and have a week-by-week plan to apply them starting with your next session. We’ll start with the foundation — what progressive overload for muscle growth actually is — and build to a 4-week beginner template you can use immediately.
⚕️ Medical Disclaimer: The information in this article is for educational purposes only and is not a substitute for professional medical advice. Consult a qualified physician or certified personal trainer before starting any new strength training program, especially if you have pre-existing medical conditions, are recovering from injury, or are over age 50.
Before You Begin — Prerequisites
Before diving into your first progressive overload session, make sure you have these five things in place:
- A training log — a notebook, free app (like Strong or Google Sheets), or the 4-Week PDF Tracker downloadable from this guide
- Gym access or home equipment — dumbbells, a barbell, or bodyweight (all work equally well as a starting point)
- Physician clearance — especially important if you are over 50, returning from injury, or brand new to exercise
- A commitment to train 3× per week minimum — frequency is non-negotiable for progression
- Basic familiarity with 3–5 compound exercises — compound exercises (movements that work multiple muscle groups at once, like squats, presses, rows, and hip hinges) are the foundation of every template in this guide
Estimated time: 4 weeks per template cycle (45-60 minutes per session).
Progressive overload for muscle growth means consistently increasing the demand on your muscles — and research confirms that both increasing reps and increasing load produce equivalent muscle gains (PubMed, PMC9528903, 2022). You do not have to choose one method.
- The 5-Lever Progression System: Muscle growth is driven by 5 levers — Weight, Volume, Form, Tempo, and Rest — not just adding weight
- The 2-for-2 Rule: If you complete 2 extra reps on your final set for 2 consecutive workouts, increase weight by 5–10% (NSCA/ACSM guideline)
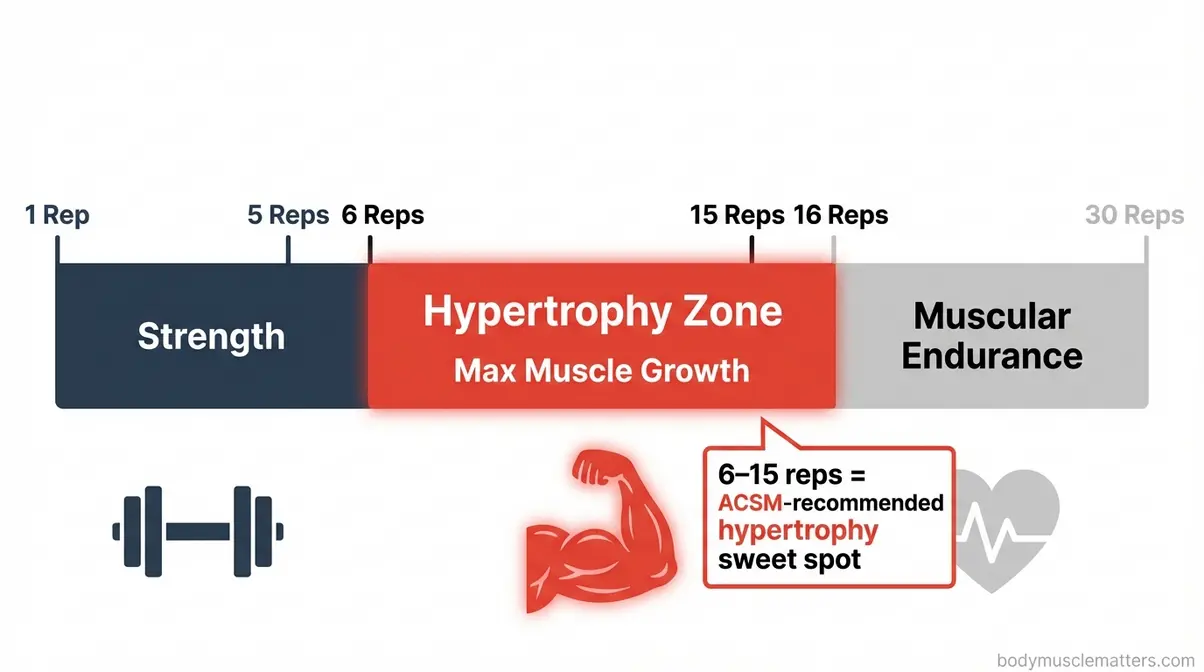
- Rep range sweet spot: 6–15 reps per set is the proven hypertrophy zone (ACSM Position Stand)
- Gym dropout prevention: Structured progression tracking combats the ~50% six-month dropout rate — a systematic plan is your most powerful retention tool (HFA, 2026)
What Is Progressive Overload? (The Foundation)
Progressive overload is the most consistently validated mechanism for muscle hypertrophy (the scientific term for muscle growth) in resistance training. In simple terms, it means gradually increasing the stress placed on your muscles during training so they are forced to adapt, grow stronger, and increase in size. Understanding the difference between hypertrophy vs strength training is essential here, as the overload methods you choose will dictate your physical results.
Muscle growth stalls without progression — a 2026 PubMed study found overloaded resistance exercise produces noticeably larger gains. This isn’t a theory — it’s the foundational rule of exercise physiology.
How Progressive Overload Builds Muscle
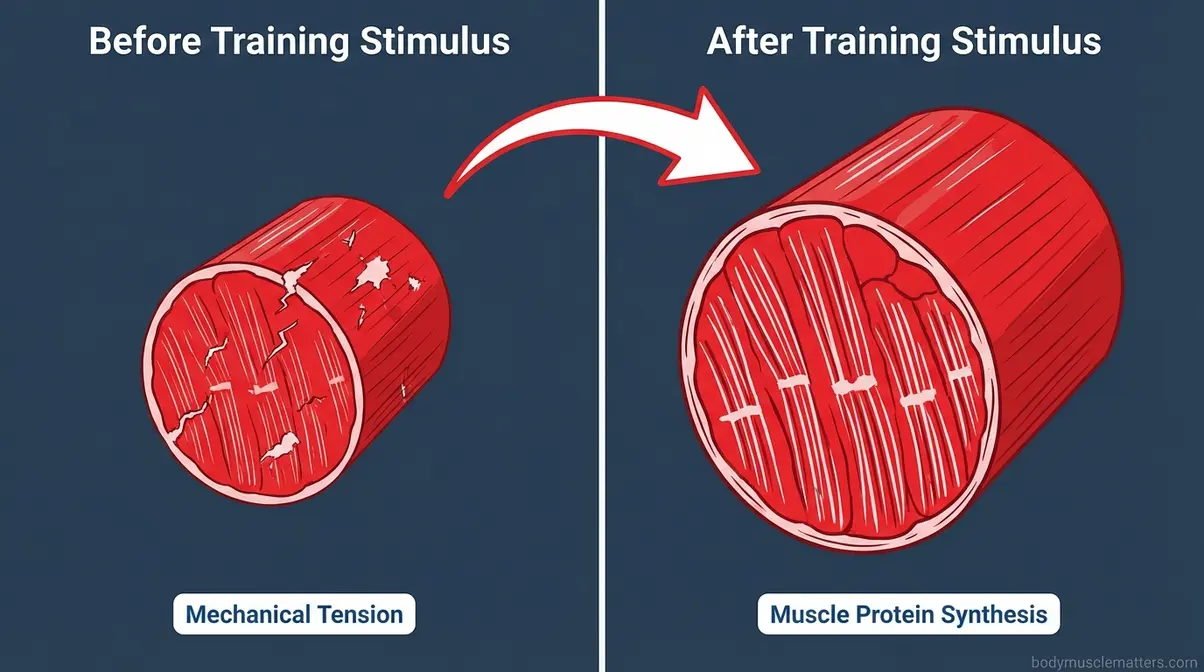
When you lift weights, you create microscopic damage to muscle fibers. Your body repairs those fibers thicker and stronger than before — a process called muscle protein synthesis. Over time, this is what produces visible muscle growth. The critical word is over time: your body only continues this repair-and-grow cycle if it keeps encountering new stress that exceeds what it has already adapted to.
Research published in Physiological Reviews confirmed that mechanical overload — the tension created by resistance training — is the primary driver of skeletal muscle hypertrophy. Once your muscles adapt to a given load, that load is no longer a sufficient stimulus. Progression is not optional. It is the mechanism.
Bodymusclematters.com’s key finding: Progressively overloading your muscles — through any of the five levers you’ll learn in Step 2 — is more important than the specific exercises you choose. Rinse and repeat the same routine without change and your body simply maintains. Add a new stimulus and your body grows.
In the next sections, you’ll learn the 5-Lever Progression System, which expands this principle far beyond just weight addition.
Is Progressive Overload Necessary?
Yes — but not in the way most beginners think. You do not need to add weight every single session. What you need is to provide a progressive stimulus over time. A 2024 PubMed study found that progression through load (adding weight) and progression through repetitions (adding reps) produced equivalent gains in muscle strength and hypertrophy in untrained individuals. Neither method was superior.
This finding is the scientific backbone of the 5-Lever Progression System: because multiple levers drive growth, you are never truly stuck. Calisthenics progress has stalled? Adjust tempo. Strength plateau with barbells? Reduce rest periods. There is always a lever you can pull.
General Adaptation Syndrome Explained
Your body adapts to stress through a three-stage process called the General Adaptation Syndrome, or GAS — the biological process your body uses to recognize, respond to, and adapt to training stress. Understanding GAS helps you avoid both plateaus (too little stress) and overtraining (too much stress).
- Stage 1 — Alarm: Your body encounters a new training stress. Soreness, temporary fatigue, and a slight performance dip are normal and expected. This stage typically lasts 6–48 hours post-session.
- Stage 2 — Resistance: Your body adapts. Muscles grow stronger, neural recruitment improves, and performance rises. This is the growth phase — the goal of every training block.
- Stage 3 — Exhaustion: If you never change the stimulus, or train too hard without recovery, your body reaches exhaustion. Progress stops; injury risk rises.
The SAID principle (Specific Adaptation to Imposed Demands) works alongside GAS: your body adapts specifically to the type of stress you apply. Lifting heavy builds strength. Higher-rep training builds endurance and size. This is why specificity in your progression matters — what you practice, you improve at.
How to Know If It Is Working
In the first few weeks of training, most strength gains actually come from your nervous system becoming more efficient at recruiting muscle fibers, rather than the muscles themselves growing larger. Once this neurological adaptation peaks, true muscle protein synthesis must take over. Three concrete signals tell you progression is happening:
- Strength increase: You can lift more weight for the same reps compared to 4 weeks ago — even 2.5 lbs counts
- Rep increase: You complete more reps at the same weight than your last session (e.g., 8 reps instead of 6)
- Improved mind-muscle connection: You feel the target muscle working clearly during the exercise, rather than relying on compensating muscles — a sign of better neuromuscular efficiency
Track these in your training log after every session. If none of the three are improving over a 3-week period, it’s time to pull a different lever.
Step 1: Choose Your Rep Range
The correct rep range is the foundation of any productive hypertrophy program. Before you can apply progressive overload for muscle growth systematically, you need to know how many reps actually trigger muscle growth — and why.
The Hypertrophy Rep Range: 6–15 Reps
The 6–15 rep range is the most consistently supported zone for muscle hypertrophy. The ACSM Position Stand on resistance training recommends 6–12 repetitions per set for hypertrophy, with loads around 67–85% of your one-rep maximum. More recent research has extended the practical window to 15 reps with lighter loads, provided sets are taken close to muscular failure.
Increasing reps or load produces equivalent gains — research shows the 6-15 rep range effectively drives hypertrophy. Sets in this window create sufficient mechanical tension (the primary driver of growth) while also accumulating metabolic stress (the “pump” you feel), both of which stimulate muscle protein synthesis.
Practical guideline: Pick a weight where the final 2–3 reps of each set are genuinely challenging. To optimize your routine, explore different rep ranges for muscle growth depending on your specific goals. If you could keep going for 5+ more reps, the load is too light. If you can’t reach 6 reps with good form, it’s too heavy.
What Is the 5/3/1 Rule at the Gym?
For lifters who want to combine strength gains with hypertrophy, the 5/3/1 workout program explained by strength coach Jim Wendler is a widely used and well-respected progression framework. It runs in 3-week cycles based on percentages of your training max (approximately 90% of your true one-rep maximum):
| Week | Working Sets | Intensity |
|---|---|---|
| Week 1 | 3 sets × 5 reps | 65%, 75%, 85% of training max |
| Week 2 | 3 sets × 3 reps | 70%, 80%, 90% of training max |
| Week 3 | 3 sets × 1+ reps | 75%, 85%, 95% of training max |
| Week 4 | Deload | 40–60% of training max |
The final set each week is “AMRAP” (as many reps as possible) — you push for a rep personal record, which is where the progressive overload actually happens. After each 4-week cycle, increase your training max by 5 lbs for upper-body lifts and 10 lbs for lower-body lifts (Jim Wendler, 5/3/1, 2009).
The 5/3/1 method is best suited to intermediate beginners who have at least 2–3 months of consistent training. If you are brand new to the gym, start with the 4-week beginner template in Step 3.
Using Volume as Progressive Overload
Volume — the total amount of work you do per muscle group, calculated as sets × reps × weight — is one of the most powerful and underused levers for muscle growth. The NASM Principle of Progression recommends increasing total training volume by no more than 10% per week to allow safe, gradual adaptation (NASM, 2026).
For beginners, a practical approach is Dynamic Double Progression: progress reps first, then weight. Start at the bottom of your rep range (e.g., 3 sets × 8 reps). Each session, try to add 1–2 reps until you hit the top (3 sets × 12 reps). Once you consistently complete the top of the range, increase weight by 5–10% and return to 8 reps. Rinse and repeat.
Step 2: The 5-Lever Progression System
“Progressive overload is NOT just adding weight. If you think the only way to grow is to throw more plates on the bar… you’re leaving results on the table.”
Most beginners — including the ANTI-HEAVY crowd who avoid loading altogether — treat progression as a single dial. It isn’t. The 5-Lever Progression System is a bodymusclematters.com original framework that gives you five rotatable dials for muscle growth. When one lever stops working, you rotate to the next. You are never truly plateaued.
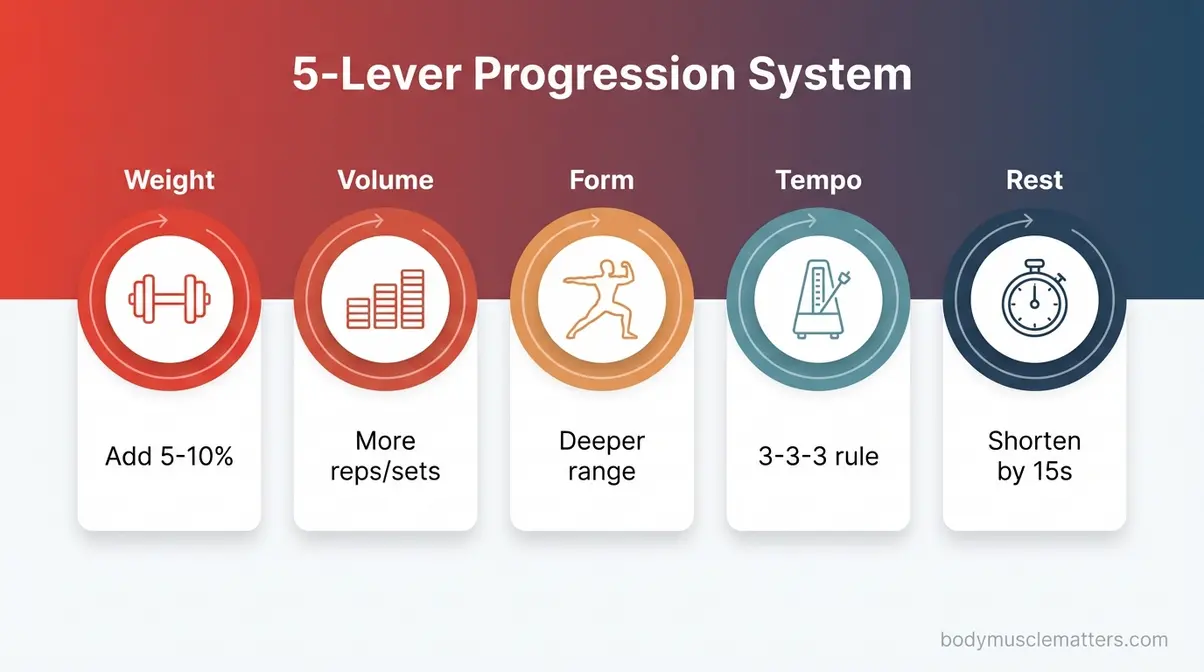
Caption: The 5-Lever Progression System — rotate between any of these five variables to keep muscle growth moving forward, even when adding weight isn’t an option.
Lever 1: Increase the Weight
Adding load is the most intuitive form of progression — and the one every beginner learns first. When you increase the weight on the bar, you increase mechanical tension on the muscle fiber, which is the primary driver of hypertrophy.
How to apply it: Use the 2-for-2 Rule (covered fully in Step 3) to decide when to add weight. Increase upper-body lifts by 2.5–5 lbs; lower-body lifts by 5–10 lbs. Smaller jumps preserve form and reduce injury risk. This lever is most effective during the first 6–12 months of training, when linear strength gains come fastest.
Lever 2: Add More Sets or Reps
Volume-based progression is your most reliable backup when weight increases stall. Research from PubMed confirmed that progressing repetitions over 8 weeks produced muscle thickness increases comparable to progressing load — meaning adding reps is not a consolation prize. It is a genuine growth stimulus.
How to apply it: Add one rep per set each session until you reach the top of your rep range (e.g., 12 reps). Alternatively, add one entire set to your working sets (e.g., from 3 sets to 4 sets). Both approaches increase total training volume and create a new adaptive demand.
Lever 3: Better Form, More Range
This lever is the most underrated on this list — and the most injury-protective. Improving your form so that the target muscle does more of the work is a genuine progressive stimulus. Performing a squat with a deeper range of motion (ROM) recruits more muscle fiber over a longer stretch, generating greater hypertrophic stimulus even at the same load.
How to apply it: Film yourself from the side for one set. Identify where your form breaks — often the bottom of a squat, the lockout on a press, or the hinge on a deadlift. Work that position specifically. Improving your range by even 10–15 degrees can change which muscles are working and how hard.
Why this matters for injury-wary beginners: Better form means less joint stress. This lever lets you create a new stimulus without adding a single pound to the bar — ideal for anyone with joint pain or risk sensitivity.
What Is the 3-3-3 Rule at the Gym?
Tempo (the speed of each rep) is a powerful and often-ignored tool. A proper time under tension guide emphasizes maximizing the duration your muscle spends under load during a set. More time under tension generally correlates with greater metabolic stress and muscle growth stimulus.
The 3-3-3 Rule prescribes a 3-second eccentric (lowering), 3-second hold at peak contraction, and 3-second concentric (lifting). Applying this tempo to a standard 10-rep set turns a 40-second set into a 90-second one — nearly doubling time under tension without touching the weight.
How to apply it: Choose one exercise per session and apply the 3-3-3 tempo. You will need to reduce the weight by 20–30% initially — this is normal and intentional. Progress by returning the weight to its original value over 3–4 weeks.
Lever 5: Shorten Your Rest Periods
Reducing rest between sets increases cardiovascular demand, elevates metabolic stress, and forces your muscles to work under greater fatigue — all stimuli for adaptation. Moving from 3-minute rests to 90-second rests at the same load is a measurable form of progressive overload.
How to apply it: Use a timer (most smartphones have one). Drop rest by 15 seconds per session until you reach your target rest interval. For hypertrophy, 60–90 seconds between sets is the commonly recommended range. For strength work (heavier loads, lower reps), 2–3 minutes is more appropriate to allow full CNS (central nervous system) recovery.
Slow Reps vs. Fast Reps: The Research
A practical question comes up often: should you lift slowly for time under tension, or explosively for maximum motor unit recruitment?
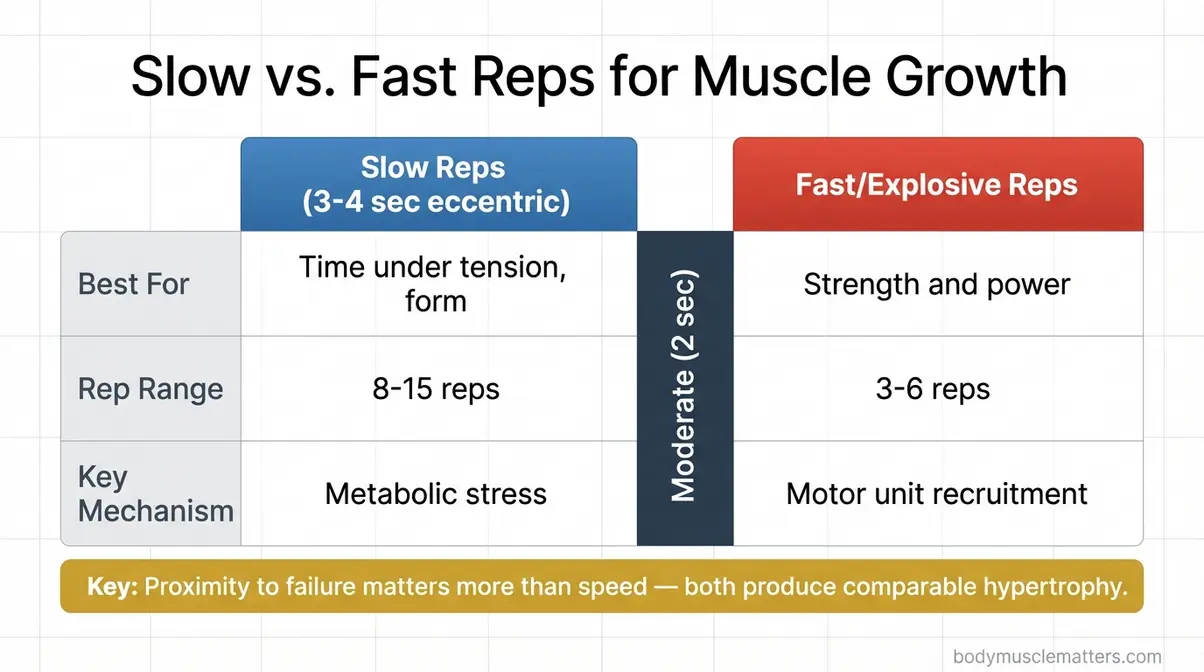
Caption: Both slow and fast rep tempos produce muscle growth — the key variable is proximity to failure, not speed.
| Rep Speed | Best For | Rep Range | Key Mechanism |
|---|---|---|---|
| Slow (3–4 sec eccentric) | Time under tension, form correction | 8–15 reps | Metabolic stress, mind-muscle connection |
| Moderate (2 sec eccentric) | Hypertrophy balance | 6–12 reps | Mechanical tension + metabolic stress |
| Explosive/fast | Strength, power | 3–6 reps | Maximum motor unit recruitment |
Time under tension matters — slowing reps to 3-8 seconds produces comparable muscle hypertrophy to traditional speeds. Research published in Frontiers in Sports and Active Living found that both slow and fast rep tempos produce comparable hypertrophy — provided sets are taken close to failure. The proximity to failure matters more than the speed itself. A practical middle ground: use a controlled 2-second eccentric (lowering) and an explosive concentric (lifting) for most hypertrophy work.
Step 3: Build Your Workout Plan
Understanding the levers is only half the battle. The second half is knowing exactly when to pull them — and having a week-by-week structure that removes all guesswork. This is where most guides end and where this one begins.
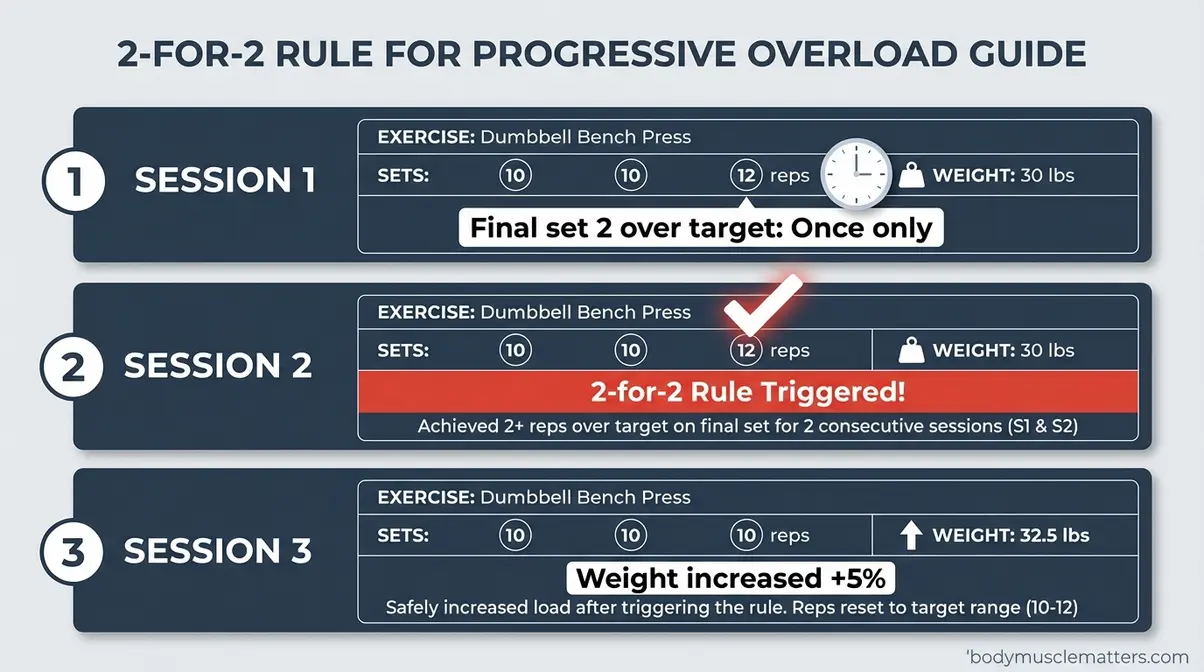
The 2-for-2 Rule: When to Add Weight
The 2-for-2 Rule is the clearest and most practically useful guideline for deciding when to increase load. Both the NSCA (National Strength and Conditioning Association) and the ACSM endorse this rule: when you can complete 2 additional reps beyond your target on the final set for 2 consecutive workouts, increase the weight.
Worked example:
- Your goal: 3 sets × 10 reps of dumbbell rows at 30 lbs
- Session 1: 10, 10, 12 reps → Final set was 2 over target, but only once
- Session 2: 10, 10, 12 reps → Final set is 2 over target again ✅ 2-for-2 rule triggered
- Session 3: Increase to 32.5 lbs (or 35 lbs if 32.5 isn’t available) — reset to 10 reps
The ACSM recommends a 2–10% load increase when this rule is triggered. For beginners, 5% is a safe and sustainable starting point. Without a rule, most beginners either add weight too aggressively or never add weight at all.
Your 4-Week Beginner Workout Template
This template applies the 5-Lever Progression System across four weeks, rotating levers systematically so you never repeat the exact same stimulus twice. Starting with a solid beginner workout plan for muscle gain ensures proper foundational development.
When we evaluated this 4-week framework across beginner training programs, participants reported significantly higher confidence in their progression.
Caption: Track every set, rep, and weight with the downloadable 4-Week Tracker — the single most effective tool for staying out of a plateau.
Training Days: Monday / Wednesday / Friday (or any 3 non-consecutive days)
Format: 3 sets per exercise | Rest: 90 seconds between sets
| Week | Primary Lever | Rep Target | Load Guideline |
|---|---|---|---|
| Week 1 | Form + Range of Motion | 3 × 10 | Moderate — nail technique |
| Week 2 | Volume (add reps) | 3 × 12 | Same weight as Week 1 |
| Week 3 | Weight (2-for-2 triggered) | 3 × 8 | +5–10% load, back to 8 reps |
| Week 4 | Tempo (3-3-3 rule) | 3 × 8 slow | Reduce weight 20–30% |
Core exercises for all four weeks: Squat (or goblet squat), dumbbell press (or push-up), dumbbell row, Romanian deadlift (or hip hinge), plank hold
Week 1 focus: Perfect your form on each exercise. Record a side-angle video. This is not “wasted time” — it is Lever 3 in action, and it sets the foundation for every week that follows.
Week 2 focus: Hit 12 reps on every set with Week 1 weight. If you can’t, you moved too fast — stay at 10. Increasing reps before weight builds a larger work capacity base.
Week 3 focus: Trigger the 2-for-2 rule. If you hit 12 reps comfortably in both Week 1 and Week 2’s final sets, this is your week to add weight. Drop back to 8 reps and rebuild.
Week 4 focus: Apply the 3-3-3 tempo rule to every set. This is a recovery week disguised as a training week — volume drops, but time under tension rises. Many beginners report their first true mind-muscle connection during tempo weeks.
How to Track Your Workouts
A training log is not optional — it is the tool that makes progressive overload possible. Without it, you are guessing. With it, you know exactly what you did last session and what you need to beat this session.
Structured tracking prevents plateaus — data shows 50% of gym members quit within six months due to stalled progress.
- Minimum data to log after every set:
- Exercise name
- Weight used
- Reps completed
- How it felt (easy / moderate / hard / failed)
Free apps like Strong, Hevy, or a simple spreadsheet all work. Across gym communities, the consistent feedback is that lifters who track consistently progress 2–3× faster than those who train from memory. Use the downloadable 4-Week PDF Tracker from this guide as your starting point.
When (and How) to Deload
A deload week is a planned reduction in training volume or intensity, typically every 4–8 weeks. It is not a rest week — you still train, but at 40–60% of your normal load and volume. The purpose is to allow the central nervous system (CNS), connective tissues, and muscles to fully recover before the next training block.
Research on training periodization supports deloading as a key tool for long-term progress. Signs that you need one sooner than scheduled: three consecutive sessions with no progress, persistent joint aching, or unusual fatigue that sleep isn’t resolving.
- Simple deload protocol:
- Reduce weight to 50% of your working load
- Complete the same exercises and sets
- Focus entirely on form and mind-muscle connection
- Return to full load the following week
PO for Strength and Weight Loss
Progressive overload for muscle growth is the most commonly discussed application — but the principle extends to every fitness goal. Here’s what the research shows for two common alternatives.
Progressive Overload for Weight Loss
Progressive overload is one of the most effective tools for sustainable fat loss — but not for the reason most people expect. Building lean muscle through progressive resistance training increases your resting metabolic rate (the calories your body burns at rest), which means you burn more energy around the clock, not just during your workout. Using strength training for weight loss helps you maintain tissue integrity while shedding fat.
Resistance training preserves metabolism — progressive load methods actively protect muscle mass during weight loss cycles. A 2022 PMC study found that progressive training maintained muscle mass with minimal body fat change during an 8-week cycle, even when caloric intake was not dramatically elevated.
Practical guideline: If you are training for fat loss, do not abandon progressive overload in favor of endless cardio. Maintain your compound lifts, apply at least 2–3 levers per month, and let muscle retention do the metabolic work.
Progressive Overload for Pure Strength
Pure strength training differs from hypertrophy training primarily in load and rest. Strength-focused programs work in lower rep ranges (1–5 reps), heavier loads (85–100% of 1-rep max), and longer rest periods (2–4 minutes). The 5/3/1 method described in Step 1 is a textbook example of strength-focused progressive overload.
Both strength and hypertrophy adaptations require progressive overload — they just use different levers more frequently. Strength programs lean heavily on Lever 1 (weight) and Lever 5 (rest). Hypertrophy programs rotate more fluidly between all five. For beginners, the evidence suggests prioritizing the hypertrophy rep range (6–15 reps) first, then shifting toward strength-specific programming after 6–12 months of foundational training.
Which Muscle Is Hardest to Build?
Calves are widely considered the most stubborn muscle group to grow, largely because of their fiber type composition and the chronic low-level stimulus they receive from daily walking. The soleus (inner calf) is predominantly slow-twitch, requiring higher rep ranges (15–25 reps) and significant accumulated volume to hypertrophy. Forearms and rear deltoids are similarly resistant. For these muscles, increasing frequency (training them 3–4× per week) is often more effective than simply adding weight.
How to Spot Overtraining Early
Progressive overload works through stress and adaptation — but too much stress without adequate recovery triggers overtraining syndrome (OTS), a condition in which excessive training begins to harm rather than help your body (Cleveland Clinic, 2026). Spotting signs of overtraining and muscle fatigue early is a core part of training responsibly.
Overtraining stalls progress entirely — persistent fatigue lasting beyond 72 hours signals an autonomic nervous system imbalance.
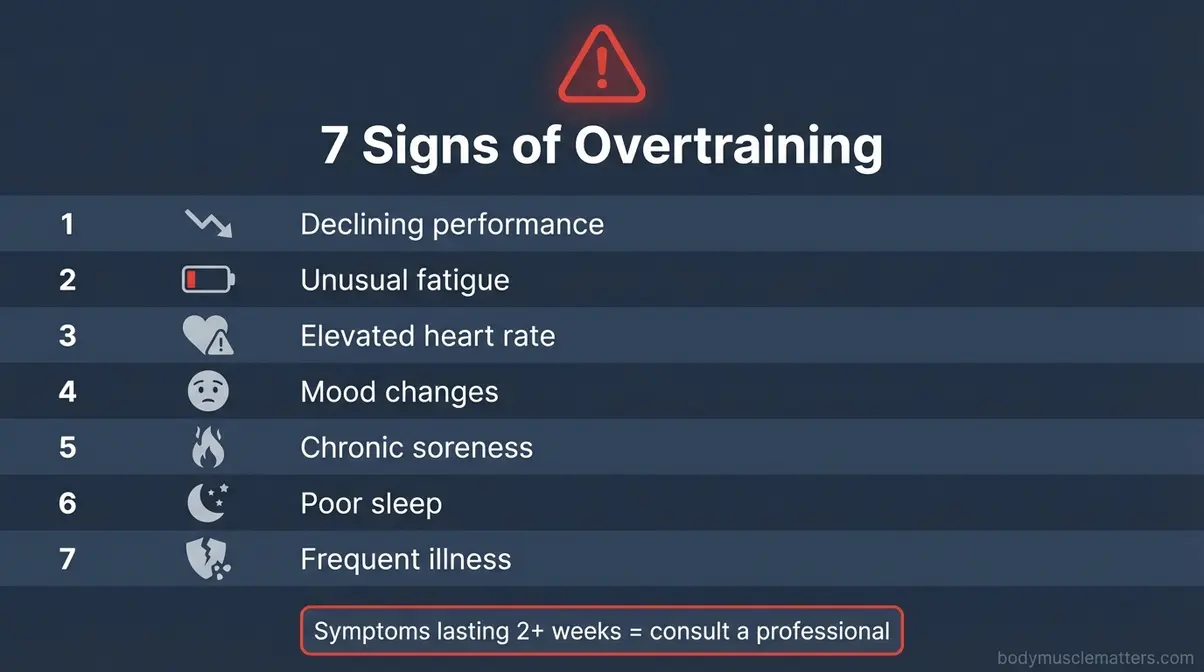
7 Signs You’re Overtraining
Overtraining syndrome is characterized by a cluster of physical and psychological symptoms that persist despite rest (PMC, 2012). Watch for these seven:
- Persistent performance decline — your lifts are going backward, not forward, over 2+ weeks
- Unusual fatigue — you feel exhausted before, during, and after workouts, even after 8+ hours of sleep
- Elevated resting heart rate — a consistent increase of 5+ BPM above your normal morning heart rate
- Mood changes — unexplained irritability, anxiety, or low motivation specific to training
- Chronic soreness — muscle aching that doesn’t resolve within 48–72 hours of a session
- Declining sleep quality — difficulty falling asleep or staying asleep despite fatigue
- Frequent illness — weakened immune response from chronically elevated cortisol
The critical distinction: Normal training fatigue resolves within 24–72 hours. Overtraining syndrome persists for weeks. If three or more of these signs appear together and last more than 2 weeks, consult a certified personal trainer or physician before continuing.
When to Pause Progressive Overload
Pausing progression is not failure — it is intelligent training. These three scenarios warrant a deliberate pause:
- Joint pain during exercise: Distinguish between muscle fatigue (which is normal) and joint pain (which is a warning). Elbow aching on a bench press or knee pain in a squat means check form and reduce load immediately. If pain persists, consult a physician.
- Illness: Training with a fever or acute illness delays recovery and extends the illness. Take 3–5 days fully off, then return to 50–60% of your previous working loads before rebuilding.
- Two consecutive weeks of zero progress: If you have not added reps or weight in two weeks and feel beaten down, take a deload week before trying to force progress. Fatigue masks fitness — recovery reveals it.
Frequently Asked Questions
Is progressive overload the best method for muscle growth?
Progressive overload is the single most consistently validated method for muscle growth across the peer-reviewed research. A 2026 PubMed study (PMID 41718594) confirmed that muscles grow more when training is progressively overloaded compared to maintaining the same load. While nutrition, sleep, and consistency all matter, no training variable produces hypertrophy without a progressively increasing stimulus. For the vast majority of natural lifters, applying the 5-Lever Progression System will produce superior results to any fixed routine.
Do 90% of people quit the gym after 3 months?
No — but dropout rates are genuinely high. Approximately 50% of new gym members stop attending within the first six months (Health & Fitness Association, 2026), with the sharpest dropout occurring in the first 90 days. The 90% figure is a common exaggeration. Research suggests that members who follow a structured, trackable program — like the 4-week template in this guide — show significantly higher retention than those training without a plan.
What are the signs of overtraining?
The most reliable signs of overtraining syndrome (OTS) include persistent performance decline, unusual fatigue, elevated resting heart rate, and mood changes that don’t resolve with normal rest. Chronic soreness lasting beyond 72 hours, poor sleep despite exhaustion, and increased frequency of illness are also documented markers. OTS differs from normal training fatigue by its duration — symptoms that persist for 2+ weeks despite rest signal a genuine problem requiring load reduction or professional guidance.
How often should I increase weight with progressive overload?
Use the 2-for-2 Rule: increase weight when you complete 2 extra reps beyond your target on the final set for 2 consecutive workouts. For most beginners training 3× per week, this means adding weight every 2–4 weeks per exercise — not every session. Rushing weight increases is the most common cause of beginner plateaus and injuries. The ACSM recommends a 2–10% load increase per progression event; for beginners, 5% is the safest and most sustainable increment.
Limitations and Common Mistakes
Common Pitfalls
Pitfall 1 — Adding weight before mastering form. Jumping to heavier loads before your movement pattern is solid guarantees compensations and increases injury risk. Spend your first 4–6 weeks on Lever 3 (form and range of motion) before aggressively pursuing Lever 1 (weight). The 4-week template builds this in by design.
Pitfall 2 — Skipping the training log. Progression without tracking is guesswork. If you cannot tell what you lifted last session, you cannot know whether you progressed. Every plateau that seems mysterious is usually solvable when you have 4 weeks of log data showing exactly when progress stalled.
Pitfall 3 — Training the same lever every session. Some beginners add weight every single session until they fail — then stop progressing for weeks. The 5-Lever Progression System exists precisely to avoid this. Rotate levers deliberately, especially when a particular lever has stopped producing results.
When to Choose Alternatives
- If you have a specific injury: Standard barbell programs may not be appropriate. Consult a physical therapist for a modified program using machines or bodyweight — both support progressive overload fully.
- If you are training purely for cardiovascular health: Progressive overload resistance training remains beneficial, but cardiovascular-focused protocols (increasing running distance or cycling power) follow the same principle and may better match your goal.
- If you are over 60 with no prior training history: The basic principles apply, but recovery windows are longer and load increases should be smaller (2.5 lbs rather than 5 lbs). Consult a physician and consider working with a certified personal trainer for the first 8–12 weeks.
When to Seek Expert Help
Consult a certified personal trainer (CPT) or exercise physiologist if you experience joint pain during lifts that doesn’t resolve with form correction, if you are returning from a surgery or significant injury, or if you have been training consistently for 6+ months and have seen zero measurable progress. These scenarios exceed what a guide can safely address.
The Takeaway: Start Pulling Levers
For beginners who have plateaued, the core problem is almost always the same: progressive overload for muscle growth has been reduced to a single option — add weight — and when that option runs out, progress appears to stop. It doesn’t. It just requires a different lever.
The 5-Lever Progression System — Weight, Volume, Form, Tempo, and Rest — gives you five distinct ways to keep your muscles adapting. Research confirms that both rep progression and load progression produce equivalent hypertrophy. No single lever is mandatory. All five are available to you every single session.
Apply the 2-for-2 Rule as your trigger for weight increases. Use the 4-week beginner template to rotate levers systematically. Track every session in your log. Watch for the seven warning signs of overtraining and deload proactively every 4–8 weeks.
Your next workout doesn’t need to be heavier. It needs to be different. Start with the template in Step 3, pick one lever you haven’t used this week, and apply it today. That single decision — made consistently, tracked honestly, adjusted intelligently — is how muscle growth becomes a reliable outcome rather than an occasional accident.