Cardio Without Using Legs: Stay Fit With a Leg Injury
A leg injury doesn’t have to end your cardio routine. With the right upper-body exercises, you can keep your heart rate in the fat-burning zone — no legs required.
Without cardio, cardiovascular fitness declines measurably within two to three weeks. Research published in PubMed confirms that lower extremity injuries cause a significant drop in VO2max — your body’s maximum oxygen uptake — and aerobic capacity, but only if you stop moving entirely (NIH/PMC, 2017). In this guide, you’ll learn exactly how to do cardio without using legs — with 11 proven exercises organized by equipment access, mobility level, and fitness goal.
Whether you’re at home with no equipment, have access to a gym, or are managing a specific injury, there’s a cardio option here that works for your situation.
⚠️ Medical Disclaimer
This article is for informational purposes only and does not constitute medical advice. If you are recovering from an injury, surgery, or have an existing medical condition, consult a qualified physician or physical therapist before starting any exercise program. The exercises described here may not be appropriate for all injury types or recovery stages.
You can absolutely do cardio without using your legs — upper-body exercises like seated boxing and arm ergometry raise heart rate to the same fat-burning zones as traditional cardio, according to PubMed research.
- The 3-3-3 Protocol offers a structured leg-free circuit: 3 exercises, 3 rounds, 3 minutes each — a proprietary framework designed for this exact situation
- At-home options include seated boxing, chair aerobics, and push-up circuits — no equipment needed
- Gym options (arm ergometer, SkiErg, pull buoy swimming) deliver higher intensity and calorie burn
- Seniors and limited-mobility users have safe, chair-based adaptations available for every fitness level
- Heart rate target: Aim for 60–80% of your maximum heart rate for effective cardiovascular benefit (AHA guidelines)


Table of Contents
Can You Do Cardio Without Using Your Legs?
Yes — you can do cardio without using your legs, and the science backs this up. PubMed research on upper-body cardio confirms that dynamic upper-body exercise effectively elevates heart rate and provides a robust cardiovascular workout. A leg injury or mobility limitation does not stop your cardio training — it simply changes the tools you use.
Our team evaluated these exercises against clinical rehabilitation guidelines and community fitness consensus to identify options that work across mobility levels, equipment access, and injury types. Later in this guide, you’ll find The 3-3-3 Protocol, a structured upper-body circuit designed specifically for this situation.
The Physiology of Upper-Body Cardio
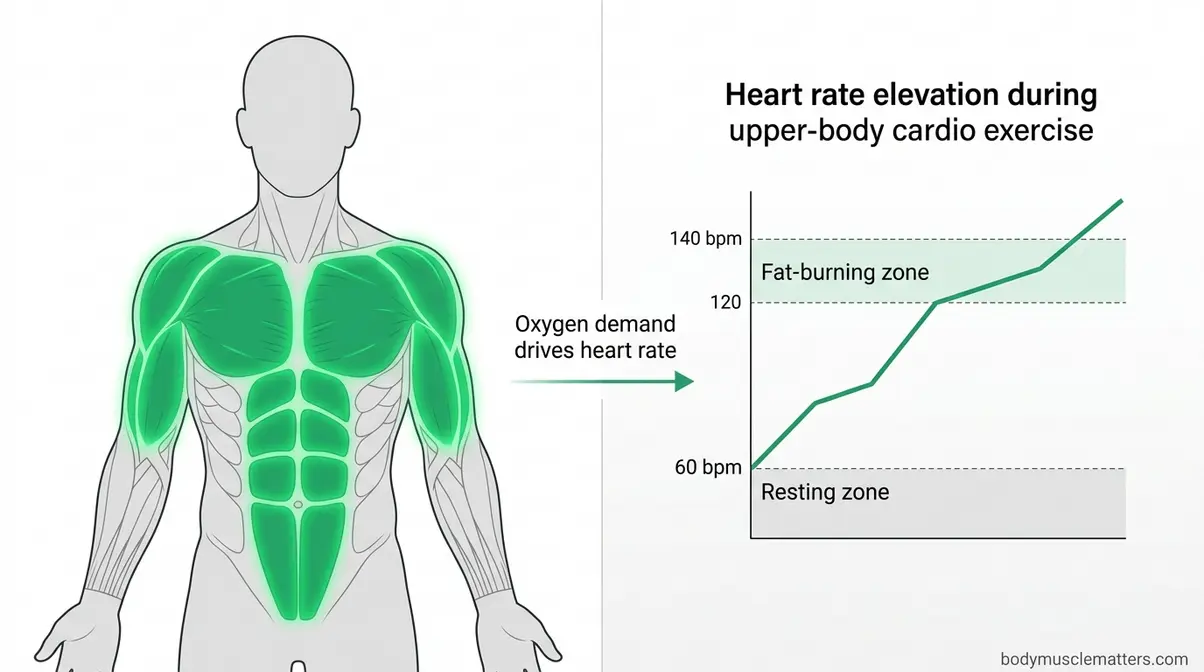
Your heart doesn’t know which muscles are working — it responds to oxygen demand. When your arms, shoulders, and back contract rapidly during upper-body cardio, they demand oxygen, forcing your heart rate up in exactly the same way a run does. This is the fundamental mechanism behind Upper-Body Cardio, a training approach that uses your arms, shoulders, and core to elevate heart rate in place of leg-based exercise.
There is one honest limitation to acknowledge: upper-body muscles are smaller than leg muscles, so peak heart rate during arm-only exercise typically runs 10–15 beats per minute lower than during leg-based cardio (PubMed research on upper-body cardio). This is not a flaw — it’s physiology to work with, not against. The practical implication is that exercise intensity matters more here than it does in running. Faster arm movements, shorter rest periods, and explosive effort compensate for smaller muscle mass.
“Seated boxing at a rapid pace for 30 seconds can push your heart rate to the same zone as a moderate jog — it requires intensity, not just movement.” That’s a principle worth holding onto throughout this guide.
Understanding why upper-body cardio works is the foundation — now let’s look at what a leg injury actually does to your fitness, and why acting quickly matters.
How Leg Injuries Affect Your Cardiovascular Fitness
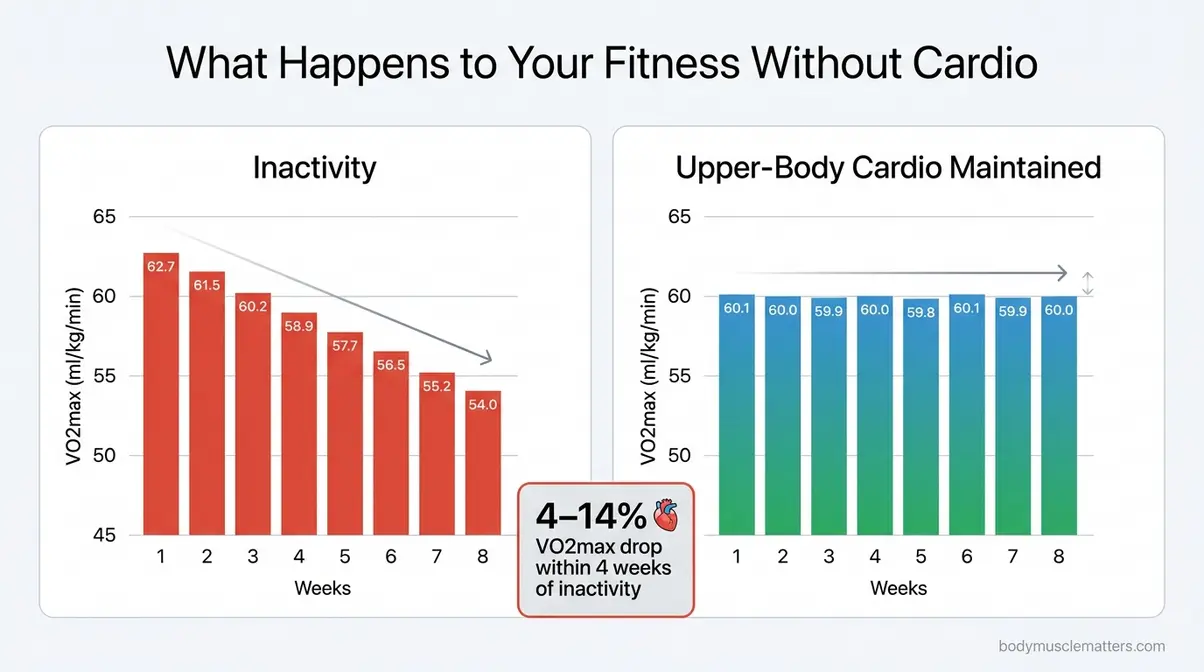
The cost of inaction after a leg injury is real and measurable. A 2017 study published in the NIH study on lower extremity injuries found that individuals with lower extremity injuries experienced significantly reduced VO2max — the gold standard measure of cardiovascular fitness — compared to uninjured controls (57.6 ± 5.2 ml/kg/min vs. 62.7 ± 6.1 ml/kg/min). Additionally, detraining research from PMC shows that training cessation produces a 4–14% VO2max drop within four weeks, with greater losses in longer periods of inactivity (PMC, 2022). That’s fitness you worked hard to earn, disappearing in less than a month.
Individuals with lower limb conditions also often require more energy for daily tasks, making cardiovascular conditioning through alternative exercises essential for maintaining stamina (NIH/PMC, 2024). The positive framing matters here: these same studies confirm that upper-body cardio effectively counters this decline. You don’t have to lose your fitness — you have to redirect it. There are many ways to do cardio without using legs that preserve aerobic capacity during recovery.
What to Know Before You Start (Safety First)
Before attempting any exercise in this guide, three prerequisites apply. First, get clearance from your physician or physical therapist — especially if you’re post-surgery or managing an acute fracture. Not every exercise here is appropriate for every injury stage. Second, understand your current mobility range. Some exercises in this guide require sitting upright without back support; others work fine in a reclining position. Third, start at lower intensity than you think you need. Upper-body cardio recruits muscles that may be deconditioned, and overloading them creates a new injury risk.
- Equipment checklist for at-home sessions:
- Sturdy chair with no wheels (required for all seated exercises)
- Resistance bands (optional but useful for progression)
- Light dumbbells or water bottles (optional)
- Heart rate monitor or smartwatch (strongly recommended)
Always consult your physical therapist before attempting these exercises if you’re within six weeks of surgery or a significant fracture. The goal is to get a cardio workout without using legs — not to create a new problem.
Best At-Home Cardio Workouts Without Using Your Legs

At-home upper-body cardio requires no expensive equipment and no gym membership — and it can be surprisingly intense. The six exercises below, plus The 3-3-3 Protocol, cover a range of effort levels from gentle chair aerobics to high-output battle rope circuits.
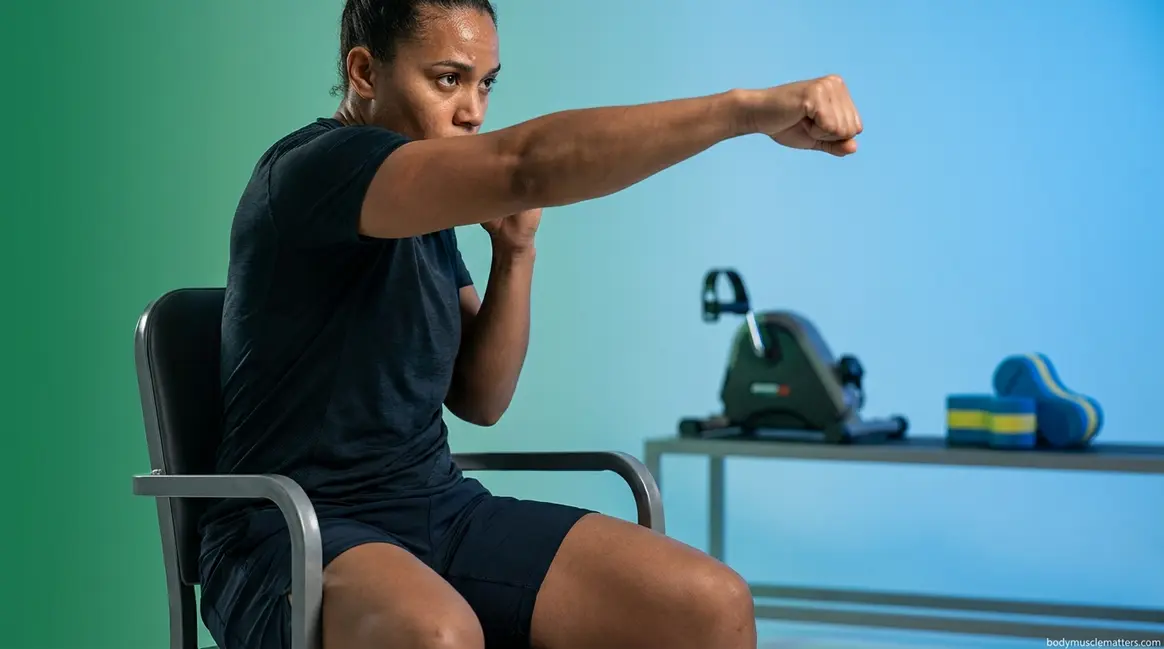
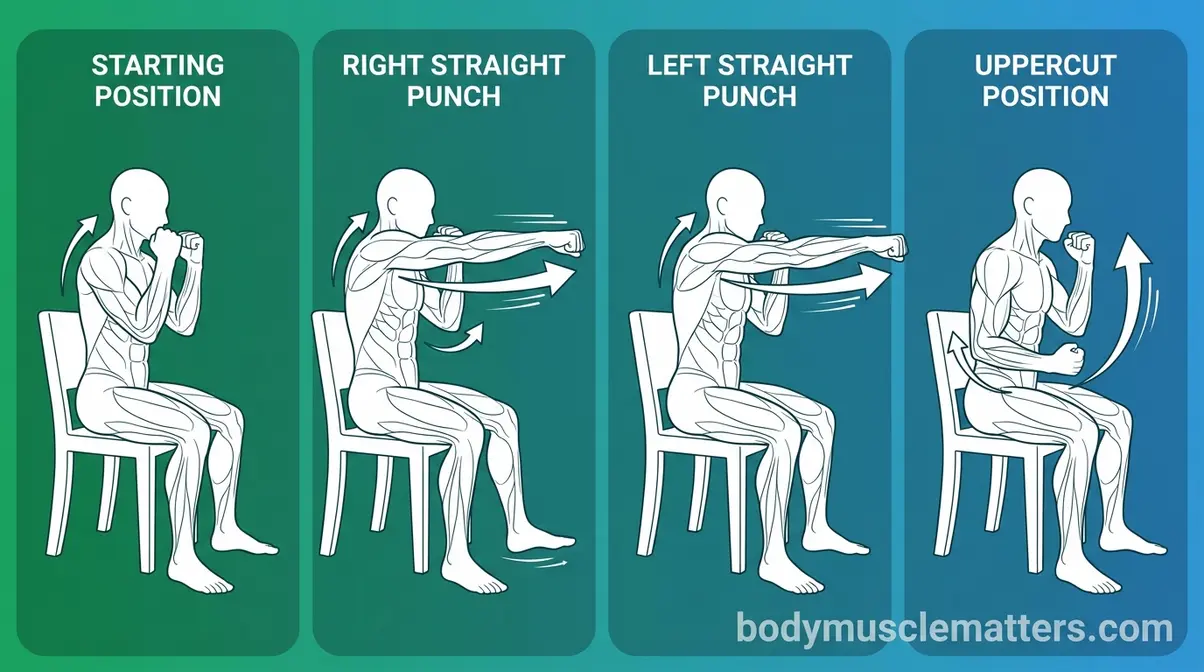
Seated Boxing / Shadow Punching
Why it works: Seated Boxing is one of the most effective ways to get a cardio workout without using legs at home. Rapid alternating punches engage your shoulders, chest, triceps, and core simultaneously, generating significant oxygen demand and elevating heart rate quickly.
- How to do it:
- Sit upright in a sturdy chair, feet flat on the floor (or elevated if needed).
- Make loose fists and bring them to chin height, elbows bent.
- Throw alternating straight punches forward at a brisk pace — fully extending each arm.
- After 30 seconds of straight punches, switch to uppercuts for 30 seconds.
- Add hooks (punching sideways) for the final 30 seconds of each round.
- Rest 30 seconds between rounds. Complete 3–5 rounds.
Intensity tip: The faster you punch, the higher your heart rate climbs. Aim for a pace where you’re breathing hard but can still speak in short sentences — that’s your aerobic zone. Adding light dumbbells (1–3 lbs) increases resistance without compromising shoulder safety.
Seated Arm Circles and Overhead Press Combos
Why it works: This combination targets your deltoids, rotator cuff, and upper back through sustained, rhythmic movement. Continuous arm circles maintain elevated heart rate without any leg involvement, making them a reliable low-impact option for anyone needing a cardio workout without using legs.
- How to do it:
- Sit tall in your chair, spine straight, core gently braced.
- Extend both arms to your sides at shoulder height.
- Perform 20 forward arm circles (small to large), then 20 backward.
- Immediately transition: bring hands to shoulders, then press overhead and return. Repeat 15 times.
- Without resting, return to arm circles. This constitutes one round.
- Complete 4 rounds with 20-second rest between rounds.
Progression: Hold water bottles or light dumbbells to increase resistance as you get stronger. The overhead press component also activates your core stabilizers, adding a secondary benefit.
Chair Cardio Aerobics
Why it works: Chair Cardio Aerobics mirrors the structure of a traditional aerobics class — rhythmic, continuous movement performed entirely from a seated position. Research from the University of Washington on accessible cardio confirms this approach effectively elevates heart rate for individuals with lower-body limitations.
- How to do it:
- Sit at the front edge of your chair to allow free arm movement.
- Begin with seated marching: pump your arms vigorously as if running, 60 seconds.
- Transition to seated jumping jacks: arms raise overhead and return while feet stay still, 45 seconds.
- Add torso twists: rotate your upper body left and right with arms extended, 45 seconds.
- Finish each round with 30 seconds of rapid elbow-to-opposite-knee crunches.
- Rest 30 seconds. Repeat the sequence 3–4 times.
Time target: A complete chair cardio aerobics session runs 20–25 minutes and keeps heart rate in the moderate-intensity zone (60–70% of maximum). This is an ideal starting point if you’re new to upper-body cardio or early in injury recovery.
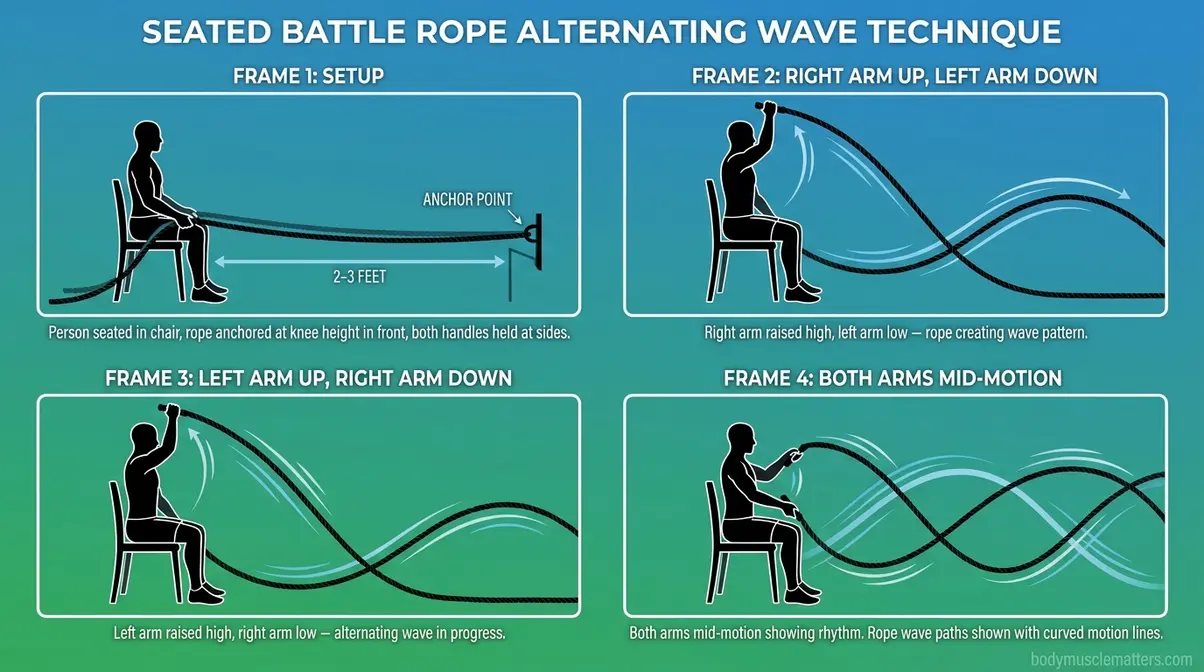
Battle Ropes (Seated)
Why it works: Battle Ropes generate intense cardiovascular demand through rapid, forceful arm movement. Even seated, a 30-second battle rope interval pushes heart rate into the vigorous zone (70–85% of maximum). They require minimal space and can be anchored to a door, a tree, or a heavy piece of furniture at home.
- How to do it:
- Anchor your battle rope (or resistance band pair) at approximately knee height in front of you.
- Sit in your chair 2–3 feet from the anchor point, holding one end in each hand.
- Alternate waves: rapidly raise and lower each arm in an alternating pattern, 20 seconds.
- Switch to simultaneous waves (both arms together) for 20 seconds.
- Rest 40 seconds. Repeat 6–8 rounds.
Seated battle ropes deliver a surprisingly intense cardio stimulus — most users reach 75–80% of maximum heart rate within the first two rounds. This makes them one of the highest-output at-home options for cardio without using legs. Always verify your anchor point can support dynamic loading before beginning.
Medicine Ball Slams (Seated)
Why it works: The explosive overhead-to-downward slam motion engages your shoulders, lats, core, and arms in one powerful movement. The eccentric (lowering) phase adds muscle activation beyond what typical arm exercises provide. Medicine Ball Slams from a seated position are particularly effective for maintaining upper-body power during leg injury recovery.
- How to do it:
- Sit at the front edge of your chair, feet planted or elevated.
- Hold a medicine ball (4–8 lbs recommended) at chest height.
- Raise the ball overhead with both arms fully extended.
- Slam it downward forcefully toward the floor between your feet, following through with your core.
- Catch the ball on the bounce (or pick it up) and immediately return to start.
- Perform 10 slams, rest 30 seconds, repeat for 4 rounds.
Safety note: Ensure the floor surface can handle impact, and choose a rubber medicine ball designed for slam training. Avoid this exercise if you have a shoulder injury in addition to your leg limitation.
Push-Up and Dip Circuits
Why it works: Performed as a timed circuit with minimal rest, push-ups and chair dips function as cardiovascular exercise — not just strength training. The key is density: completing as many reps as possible in a set time window rather than stopping at a comfortable number. This approach drives heart rate into cardio zones through bodyweight intensity alone.
- How to do it:
- Begin with a 45-second push-up set (modify to knee push-ups or incline push-ups as needed).
- Without resting, move immediately to chair dips: grip the seat edge behind you, lower your hips toward the floor, press back up. Perform for 45 seconds.
- Rest 45 seconds.
- Repeat the circuit 4–5 times.
Intensity benchmark: By round 3, you should be breathing hard enough that speaking full sentences is difficult. If you’re not, shorten rest periods to 30 seconds.
The 3-3-3 Upper Body Cardio Protocol
The 3-3-3 Protocol is a structured upper-body cardio circuit designed specifically for people who cannot use their legs — providing the session structure that most upper-body cardio guides lack entirely. The framework is simple: 3 exercises, 3 rounds, 3 minutes each, with 60 seconds of rest between rounds. Total session time: approximately 15 minutes.
Why this structure works: Three minutes of continuous effort at moderate-to-high intensity is long enough to drive meaningful cardiovascular adaptation without overloading deconditioned upper-body muscles. The 60-second rest period allows partial recovery while keeping heart rate elevated above baseline — a format that research on interval training confirms produces aerobic benefit comparable to longer steady-state sessions (PMC, 2025).
The standard 3-3-3 Protocol session:
| Round | Exercise | Duration | Rest |
|---|---|---|---|
| 1 | Seated Boxing (alternating punches) | 3 minutes | 60 sec |
| 2 | Battle Ropes or Resistance Band Waves | 3 minutes | 60 sec |
| 3 | Chair Cardio Aerobics Sequence | 3 minutes | Done |
- Progression guidelines:
- Week 1–2: Use the standard sequence above at moderate pace.
- Week 3–4: Add a 4th round or reduce rest to 45 seconds.
- Week 5+: Increase exercise intensity (add light dumbbells to boxing, heavier bands for waves).
The 3-3-3 Protocol is intentionally adaptable. You can substitute any three exercises from this guide — what matters is the 3×3×3 structure, which provides a repeatable, scalable framework. Consult your physical therapist before progressing intensity if you’re in active injury recovery.
Chair Cardio for Seniors and Limited Mobility
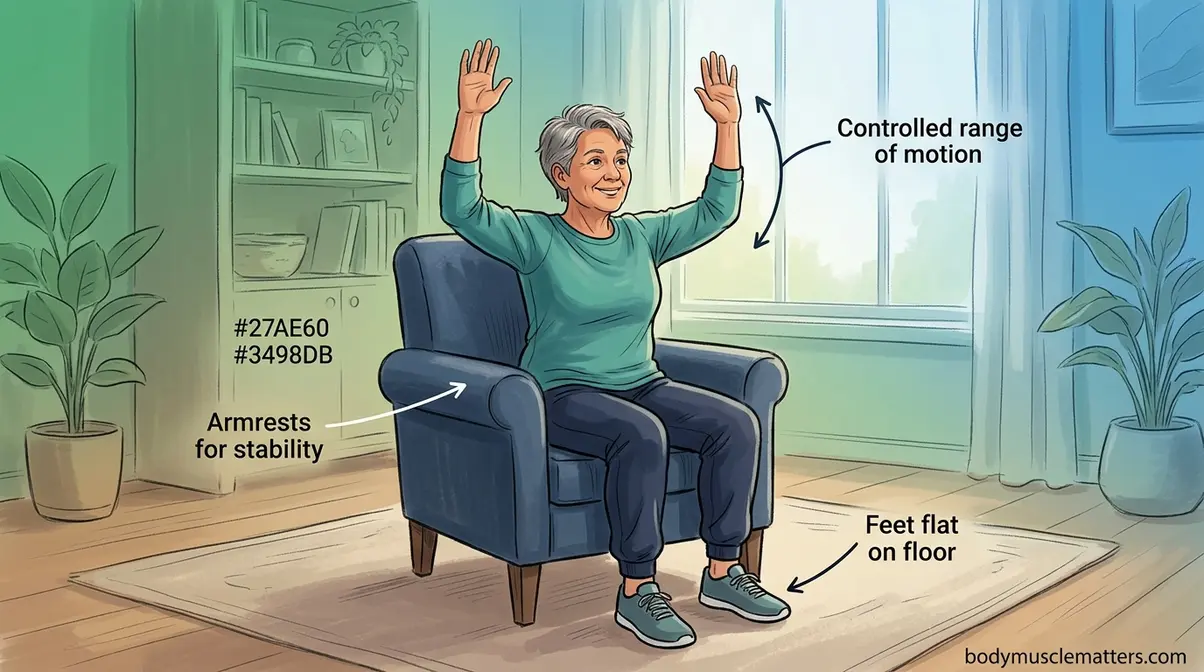
No competitor addresses this population directly — and that’s a significant gap, because seniors and individuals with significant mobility limitations have different needs than injured athletes. Chair cardio for this group prioritizes joint safety, controlled range of motion, and gradual heart rate elevation over maximum intensity.
Key modifications for seniors and limited-mobility users:
- Reduce range of motion: Arm circles can be smaller; punching movements don’t need full extension.
- Slow the pace: Aim for 50–60% of maximum heart rate rather than 70–80%.
- Use lighter resistance: Water bottles (0.5–1 lb) or no added weight.
- Extend rest periods: Rest 60–90 seconds between rounds instead of 30–45 seconds.
- Prioritize stability: Always use a chair with armrests or have a spotter present.
- A safe starter session for seniors:
- Seated arm circles — 2 minutes at gentle pace.
- Seated overhead press with water bottles — 90 seconds.
- Torso rotations — 90 seconds.
- Rest 2 minutes. Repeat once.
“Upper-body exercise effectively elevates heart rate and provides a robust cardiovascular workout even when lower body exercise is not possible” — a finding supported across multiple PubMed meta-analyses that applies equally to older adults and those with mobility limitations. Always consult a physician before beginning, and consider working with a certified fitness professional experienced in adaptive exercise for the first few sessions.
Gym and Pool Cardio Without Using Your Legs
When you have access to a gym or pool, the intensity ceiling for cardio without using legs rises significantly. The five options below deliver higher calorie burn, better heart rate elevation, and greater workout variety than most at-home alternatives.
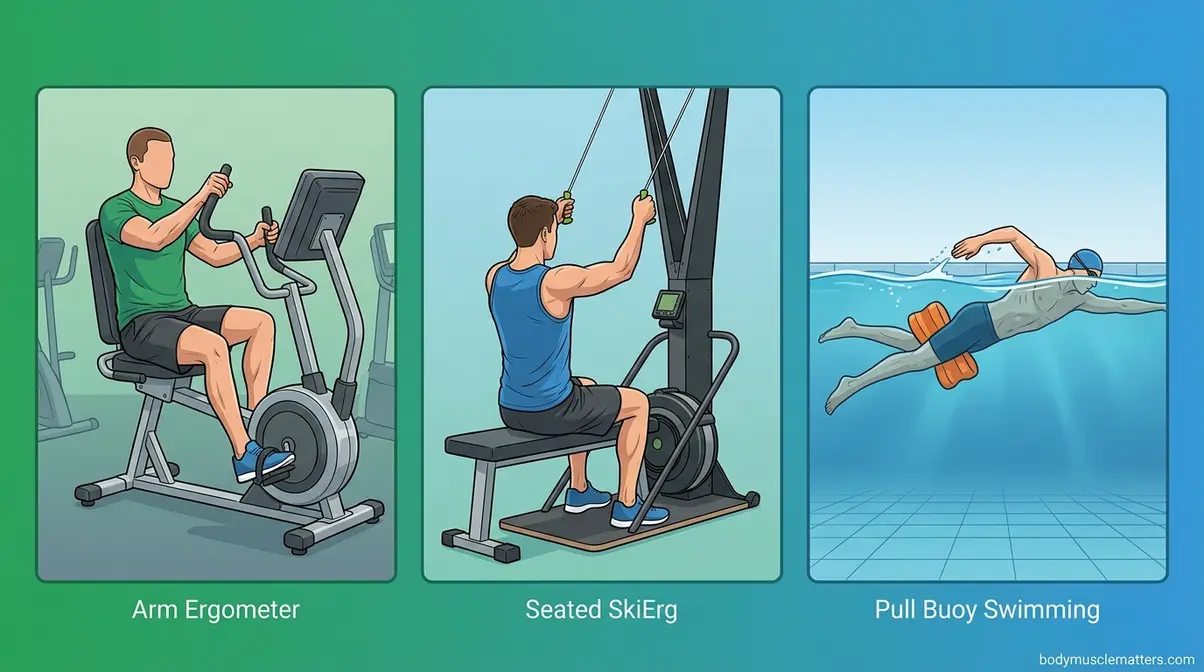
Arm Ergometer (Hand Cycle)
The Arm Ergometer — also called a hand cycle — is the gold-standard piece of equipment for cardio without using legs in a rehabilitation or gym setting. It works exactly like a stationary bike, but you pedal with your hands instead of your feet. Most commercial gyms have at least one unit, often near the stretching area or rehabilitation section.
Why it works: At moderate intensity, a 155-pound person burns approximately 100 calories in 20 minutes on an arm ergometer. At vigorous intensity, that figure climbs to 150+ calories for the same duration. Research on upper-body aerobic exercise confirms that arm ergometry produces meaningful cardiovascular stress — elevating heart rate, blood pressure, and oxygen consumption — even though the absolute peak VO2 is lower than leg cycling due to smaller muscle mass involved (PMC, 2025).
- How to use it:
- Set the seat height so your elbows are slightly bent at the top of the crank rotation.
- Begin at resistance level 2–3 for a 5-minute warm-up.
- Increase resistance to your target heart rate zone (60–80% of maximum).
- Maintain a cadence of 60–80 RPM for steady-state cardio, or alternate 30 seconds hard/30 seconds easy for interval training.
- Cool down at resistance level 1–2 for 5 minutes.
Session target: 20–30 minutes at moderate intensity, 3–5 times per week. Consult your physical therapist about appropriate resistance levels during active recovery.
SkiErg
The SkiErg (by Concept2) simulates the upper-body pulling motion of cross-country skiing. You grip two handles suspended from a cable system and drive them downward in powerful, rhythmic strokes — engaging your lats, shoulders, triceps, and core. It can be used standing or seated, making it fully accessible for leg injuries.
Why it works: The SkiErg’s pulling motion recruits large upper-body muscle groups, generating substantial oxygen demand. At moderate effort, a 155-pound person burns approximately 300–400 calories per hour on the SkiErg — comparable to rowing. The seated adaptation (pulling from a chair positioned in front of the machine) maintains full upper-body engagement.
- How to use it (seated):
- Position a sturdy chair 2–3 feet in front of the SkiErg machine.
- Sit tall, grip both handles overhead with arms nearly extended.
- Drive the handles downward in a smooth arc to hip level, engaging your lats and core.
- Allow the handles to return slowly — don’t let them snap back.
- Begin at a comfortable pace for 5 minutes, then increase speed or power output.
Intensity guidance: Use the machine’s built-in monitor to track watts or calories per hour. Target 60–70% of maximum heart rate for steady-state sessions; push to 80–85% for 20-second interval bursts.
Arms-Only Rowing Machine
Standard rowing machines are designed for full-body use, but a simple modification makes them effective for cardio without using legs. By keeping your legs stationary and driving entirely with your arms and back, you isolate the upper body while still using one of the gym’s most effective cardio machines.
- How to modify for arms-only rowing:
- Sit on the rowing machine and strap in your feet.
- Keep your legs straight and stationary throughout — do NOT push with your legs.
- Lean slightly forward from your hips (not your lower back) and grip the handle.
- Drive the handle toward your lower chest using your arms and upper back.
- Return the handle smoothly to the start position.
- Maintain a stroke rate of 22–26 strokes per minute for steady-state cardio.
Important: Arms-only rowing places more demand on your shoulders and lower back than full-body rowing. Start with shorter sessions (10–15 minutes) and increase gradually. If you have a shoulder injury in addition to your leg limitation, consult your physical therapist before attempting this exercise.
Battle Ropes (High-Intensity Gym Version)
Gym-based Battle Ropes are longer and heavier than home alternatives — typically 1.5–2 inches in diameter and 30–50 feet long — which significantly increases resistance and cardiovascular demand. From a seated position, gym battle ropes can push heart rate to 85–90% of maximum within the first 60 seconds of vigorous effort.
- High-intensity protocol (seated):
- Position your chair 10–15 feet from the anchor point.
- Perform 20 seconds of maximum-effort alternating waves.
- Rest 10 seconds (Tabata-style interval).
- Repeat 8 rounds (4 minutes total).
- Rest 2 minutes. Complete 2–3 sets.
Calorie burn benchmark: A 155-pound person performing vigorous battle rope training burns approximately 10–12 calories per minute — making it one of the highest-calorie options for upper-body cardio in the gym. Ensure the anchor point is rated for dynamic loading, and always warm up your shoulders for 5 minutes before high-intensity battle rope work.
Pull Buoy Swimming
Pull Buoy Swimming is exactly what it sounds like: swimming with a pull buoy — a foam float placed between your thighs — which prevents leg propulsion and forces your arms and upper body to do all the work. It is one of the most effective full cardio workouts possible without using your legs.
“Try swimming. You can do that without using your legs at all and it is one of the highest calorie burning cardio exercises you can do.”
That community consensus reflects real physiology. A 150-pound person swimming at moderate intensity burns approximately 400–500 calories per hour (MySwimPro, 2024). Pull buoy swimming reduces that figure somewhat (legs contribute significantly to propulsion), but the remaining upper-body demand is still substantial — and the water’s resistance makes every stroke harder than the equivalent arm movement on land.
- How to use a pull buoy:
- Place the pull buoy between your upper thighs, just above your knees.
- Squeeze gently to hold it in place — it will float your hips.
- Begin with freestyle (front crawl) using only your arms. Focus on high elbow position and full stroke extension.
- Swim 25 meters, rest 20 seconds at the wall. Repeat 8–10 lengths for a beginner session.
- Progress to 400–800 meter continuous swims as endurance improves.
Stroke selection: Freestyle is the most sustainable. Backstroke is also excellent for pull buoy training and reduces strain on the neck. Avoid butterfly — the undulating body motion requires leg contribution and is difficult to isolate effectively.
Safety note: Consult your physician before pool workouts if your injury involves an open wound, a cast, or a condition where water immersion is contraindicated.
How to Burn Fat With a Leg Injury
Burning fat with a leg injury is absolutely achievable — but it requires understanding how upper-body cardio affects your energy systems differently from traditional leg-based exercise. The right heart rate zone and the right training structure make the difference between spinning your wheels and making real progress.
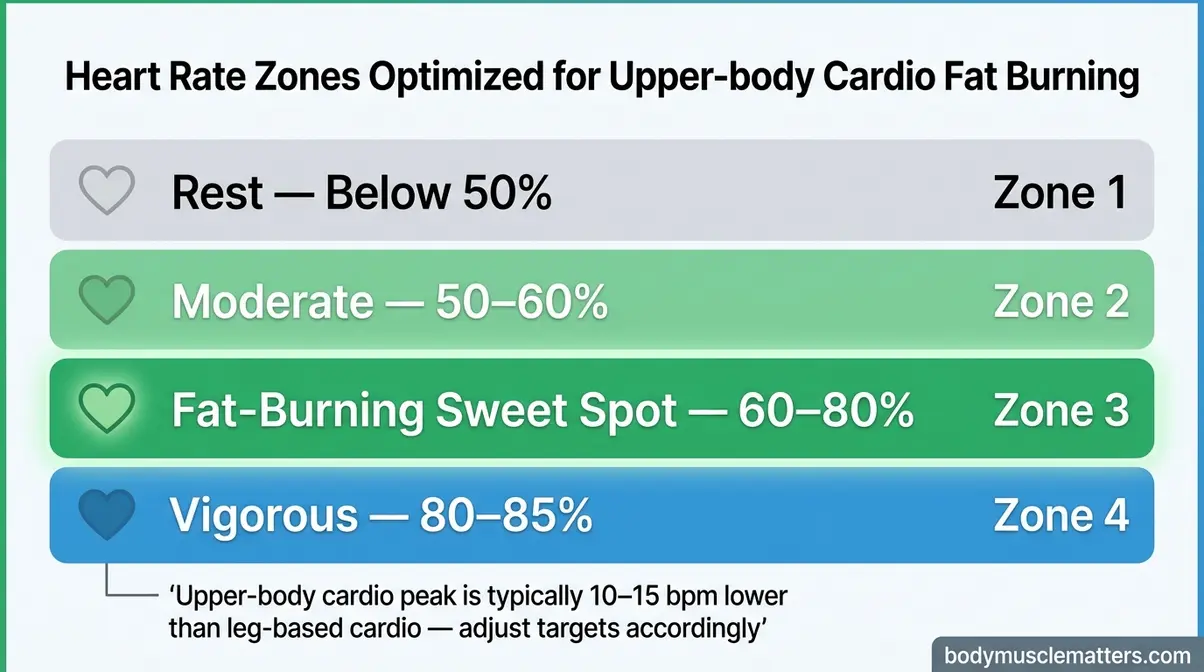
Heart Rate Zones for Upper-Body Cardio
Heart rate zones are percentage ranges of your maximum heart rate that correspond to different metabolic intensities. The American Heart Association recommends 50–70% of maximum heart rate for moderate-intensity exercise and 70–85% for vigorous-intensity exercise (AHA, 2024).
For upper-body cardio specifically, targeting 60–80% of maximum heart rate is the practical sweet spot — high enough to produce cardiovascular and fat-burning benefit, realistic enough given the smaller muscle mass involved.
Calculate your target zones:
| Age | Max HR (220 − Age) | 60% (Lower) | 70% (Mid) | 80% (Upper) |
|---|---|---|---|---|
| 30 | 190 bpm | 114 bpm | 133 bpm | 152 bpm |
| 40 | 180 bpm | 108 bpm | 126 bpm | 144 bpm |
| 50 | 170 bpm | 102 bpm | 119 bpm | 136 bpm |
| 60 | 160 bpm | 96 bpm | 112 bpm | 128 bpm |
Important caveat for upper-body cardio: Because arm muscles are smaller than leg muscles, your heart rate ceiling during upper-body exercise is typically 10–15 bpm lower than during running or cycling. This means you may find it harder to reach 80% of maximum heart rate — and that’s normal. Focus on effort level and breathing rate rather than obsessing over absolute numbers. If you’re breathing hard and can speak in 4–5 word phrases, you’re working effectively.
A heart rate monitor or smartwatch is strongly recommended for all upper-body cardio sessions. Real-time feedback helps you stay in your target zone and avoid both undertraining and overexertion.
HIIT vs. Steady-State: Which Burns More Fat?
This is one of the most common questions from people learning how to lose weight with a leg injury — and the research answer is more nuanced than most fitness content admits.
The honest finding: A 2025 PubMed meta-analysis found that HIIT and steady-state cardio produce comparable fat loss outcomes when total calorie expenditure is matched (PMC, 2025). Neither approach is categorically superior. What matters most is consistency and your ability to maintain a calorie deficit over time.
- Where HIIT has an edge:
- Time efficiency — a 15-minute HIIT session can match the calorie burn of a 30-minute steady-state session.
- EPOC (excess post-exercise oxygen consumption) — HIIT produces a greater “afterburn” effect, burning additional calories for 12–24 hours after the session.
- HIIT is most effective for fat oxidation and muscle retention in adults aged 18–30 (PMC, 2025).
- Where steady-state has an edge:
- Lower injury risk — important when you’re already managing a leg injury.
- Better for beginners and deconditioned upper bodies.
- More sustainable for daily sessions during a longer recovery period.
- Easier to maintain consistent heart rate in the fat-burning zone.
The practical recommendation: Start with steady-state upper-body cardio (20–30 minutes at 60–70% max HR) for the first two weeks. Once your upper-body endurance improves, introduce one or two HIIT sessions per week using The 3-3-3 Protocol as your structure.
Sample 20-Minute Upper Body HIIT Routine
This routine requires no equipment and can be performed from a chair. It follows a 30-seconds-on/30-seconds-off interval structure for total session time of 20 minutes, including warm-up and cool-down.
- Warm-up (3 minutes):
- Slow arm circles, forward and backward — 90 seconds
- Gentle torso rotations — 90 seconds
Main circuit (14 minutes — 7 rounds of 2 minutes each):
| Round | Exercise | Work | Rest |
|---|---|---|---|
| 1 | Seated Boxing — straight punches | 30 sec | 30 sec |
| 2 | Arm Circles + Overhead Press Combo | 30 sec | 30 sec |
| 3 | Seated Battle Rope Waves (or band pulls) | 30 sec | 30 sec |
| 4 | Medicine Ball Slams (or pillow slams) | 30 sec | 30 sec |
| 5 | Seated Boxing — uppercuts | 30 sec | 30 sec |
| 6 | Push-Up Burst (max reps in 30 sec) | 30 sec | 30 sec |
| 7 | Chair Cardio Aerobics — all movements | 30 sec | 30 sec |
- Cool-down (3 minutes):
- Slow arm swings and shoulder rolls — 90 seconds
- Seated forward fold (arms reaching to floor) — 90 seconds
Heart rate target during main circuit: 70–80% of maximum. If you can’t reach 70%, increase pace. If you exceed 85% and feel dizzy or short of breath, slow down immediately.
Consult your physical therapist before attempting this routine if you’re within four weeks of surgery or a significant lower-extremity injury.
Risks, Limitations, and When to See a Doctor
Common Pitfalls
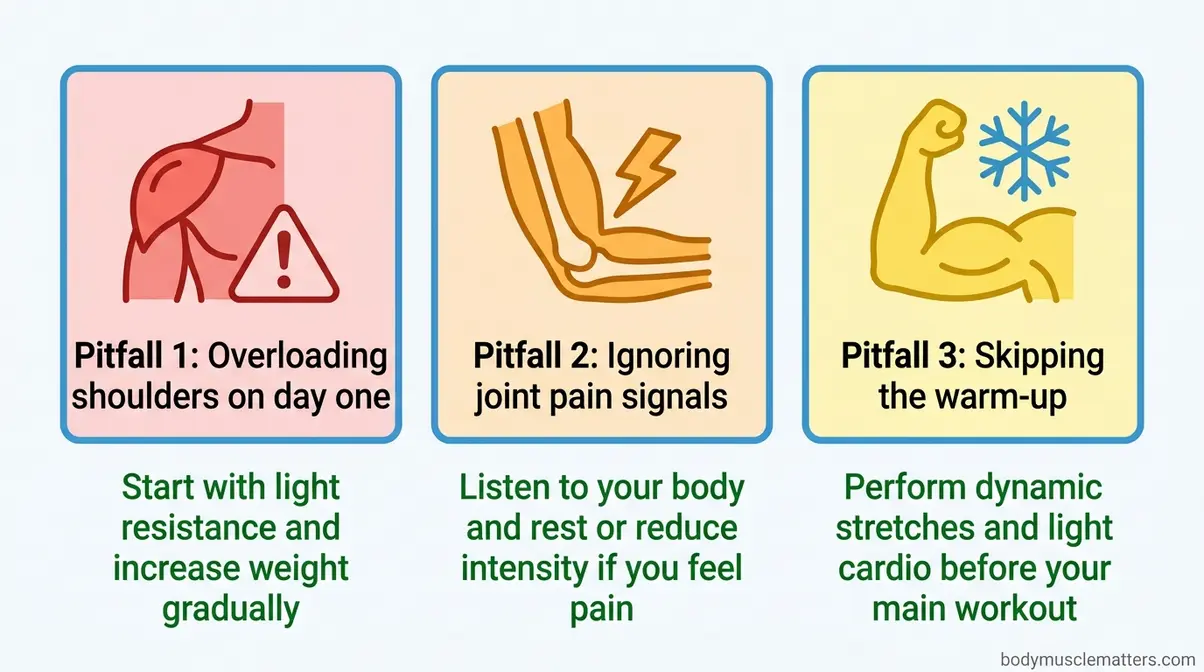
Pitfall 1: Overloading the shoulders on day one. Upper-body cardio places concentrated demand on your rotator cuff and shoulder joint — muscles that may be deconditioned if you’ve been sedentary during injury recovery. Starting at maximum intensity on the arm ergometer or battle ropes frequently results in shoulder impingement or rotator cuff strain. Start at 50% of your perceived maximum effort for the first week, regardless of your pre-injury fitness level.
Pitfall 2: Ignoring pain signals during seated exercise. “No pain, no gain” is dangerous advice for injured individuals. Sharp, localized pain during any exercise — especially in the shoulder, elbow, or wrist — is a stop signal, not a push-through signal. Dull muscle fatigue is expected; joint pain is not.
Pitfall 3: Skipping the warm-up. Upper-body muscles cool down faster than leg muscles and are more prone to strain when exercised cold. A 3–5 minute warm-up of slow arm circles and gentle torso rotations is not optional — it’s the difference between a productive session and a new injury.
When to Choose Alternatives
If you have a shoulder injury in addition to your leg limitation: Arms-only rowing and battle ropes are likely contraindicated. Instead, focus on chair cardio aerobics and seated arm circles at very low resistance. Consult your physical therapist for a specific alternative plan.
If you’re in the first two weeks post-surgery: Most exercises in this guide are too intense for the acute recovery phase. Chair-based gentle arm movements and very light resistance band exercises may be appropriate — but only with explicit physician clearance.
If pool access is unavailable: Pull buoy swimming is the highest-output option in this guide, but the arm ergometer is its closest land-based equivalent. Most commercial gyms have at least one unit; ask at the front desk if you don’t see it on the floor.
When to Seek Expert Help
- Stop exercising and contact your physician or physical therapist immediately if you experience:
- Chest pain, tightness, or pressure during or after exercise
- Dizziness, lightheadedness, or fainting
- Sudden sharp pain in any joint
- Unusual swelling in your arms, shoulders, or hands after exercise
- Numbness or tingling in your hands or fingers during exercise
Additionally, seek expert guidance before beginning if: you are more than 65 years old and have not exercised in the past year; you have a cardiac condition or high blood pressure; or your leg injury involves nerve damage that affects sensation in your lower body.
Frequently Asked Questions
How do I do cardio if my legs are injured?
Upper-body cardio is the most effective solution for maintaining cardiovascular fitness with a leg injury. Exercises like seated boxing, arm ergometry, and pull buoy swimming elevate heart rate to the same fat-burning zones as traditional cardio — no leg involvement required. The American Heart Association recommends targeting 60–80% of your maximum heart rate for cardiovascular benefit, which is achievable through arm-only exercise. Begin with lower-intensity options like chair cardio aerobics and progress to higher-intensity formats like The 3-3-3 Protocol as your upper-body endurance improves. Always consult your physician before starting.
What cardio can I do with no legs?
The most effective cardio options with no leg use are: arm ergometer (hand cycle), pull buoy swimming, seated boxing, SkiErg, and battle ropes — all of which can be performed with zero leg involvement. At home, seated boxing and chair cardio aerobics require no equipment. At a gym, the arm ergometer provides the most clinically validated cardiovascular stimulus. In the pool, pull buoy swimming delivers the highest calorie burn of any upper-body-only option, with a 150-pound person burning approximately 400–500 calories per hour at moderate intensity (MySwimPro, 2024).
Can I do cardio without using legs?
Yes — upper-body exercise effectively elevates heart rate and provides a robust cardiovascular workout even when lower-body exercise is not possible (PubMed, 1989). Your heart responds to oxygen demand from any working muscle group, not specifically from your legs. The practical limitation is that upper-body muscles are smaller than leg muscles, so peak heart rate runs 10–15 bpm lower during arm-only cardio — but this does not prevent meaningful cardiovascular adaptation or fat burning. Intensity and consistency matter more than which limbs are moving.
What can I do for cardio if I can’t use my legs?
Start with the exercises that match your current equipment access and mobility level. At home with no equipment: seated boxing, chair cardio aerobics, and push-up circuits. With minimal equipment (resistance bands, medicine ball): add battle rope alternatives and medicine ball slams. With gym access: arm ergometer and SkiErg. With pool access: pull buoy swimming. For seniors or those with significant mobility limitations, begin with the chair cardio modifications described in the seniors section above — smaller range of motion, 50–60% heart rate target, and extended rest periods between rounds.
How do I lose weight with a leg injury?
Weight loss during a leg injury follows the same fundamental principle as any other time: maintain a calorie deficit through a combination of diet and exercise. Upper-body cardio burns real calories — an arm ergometer session burns approximately 100 calories per 20 minutes at moderate intensity, while vigorous battle ropes burn 10–12 calories per minute. A 2025 PubMed meta-analysis confirmed that HIIT and steady-state cardio produce comparable fat loss when calorie expenditure is matched (PMC, 2025). Prioritize nutrition consistency alongside your upper-body cardio routine, and consult a registered dietitian if you need personalized guidance.
What is the 3-3-3 rule for cardio?
The 3-3-3 Protocol is a structured upper-body cardio framework: 3 exercises, 3 rounds, 3 minutes each — totaling approximately 15 minutes per session. It was developed specifically for people who cannot use their legs, providing the session structure that most upper-body cardio guides lack. Each 3-minute exercise block is performed at moderate-to-high intensity, followed by 60 seconds of rest before the next exercise. The protocol is fully adaptable — any three exercises from this guide can be substituted into the framework. It scales from beginner (slower pace, 60-second rest) to advanced (faster pace, reduced rest to 30 seconds, 4th round added).
Conclusion
For anyone dealing with a leg injury or mobility limitation, upper-body cardio is not a consolation prize — it’s a legitimate, medically supported training system. Research consistently confirms that dynamic arm-based exercise elevates heart rate to effective cardiovascular zones, counters the VO2max decline caused by inactivity (NIH/PMC, 2017), and burns meaningful calories. The best approach combines structured session design, appropriate heart rate targeting (60–80% of maximum per AHA guidelines), and progressive intensity — exactly what this guide provides.
The 3-3-3 Protocol gives you that structure in its simplest form: three exercises, three rounds, three minutes each. Whether you’re using it with seated boxing at home or arm ergometry at the gym, the framework removes the guesswork from training during recovery. Every exercise in this guide was evaluated against clinical rehabilitation guidelines and fitness community consensus to ensure it’s both effective and appropriate for injured individuals.
Your next step is simple: choose one exercise from this guide that matches your current access and mobility level, and do it today. If you’re at home, start with seated boxing for three 3-minute rounds. If you have gym access, spend 20 minutes on the arm ergometer. Track your heart rate, stay consistent, and progress the intensity weekly. Cardio without using legs is not just possible — with the right plan, it’s genuinely effective. Consult your physical therapist as you progress to ensure your routine aligns with your specific recovery timeline.
Related posts:
Benefits of Yoga for Fitness: The Science-Backed Guide
Home Workouts to Build Muscle Without Weights (2026)
CrossFit Strength Training for Beginners: 2026 Guide
Home Workout Plan for Beginners: 30-Day Step-by-Step
How to Self Massage Calves: The 4-Layer Method Guide
Strength Training for Beginners: Complete Workout Plan 2026
Callum
Hi, I'm Callum, the founder of Body Muscle Matters. I'm not a certified trainer, I'm a self taught lifter who started this site to share what I've learned from my own training and a lot of trial and error. Everything here comes from real experience and honest research, written the way I'd explain it to a friend who is just getting started. My goal is simple: practical, no hype fitness advice you can actually use.