How to Draw Muscles Step by Step: Beginner’s Guide
Home ›Fitness Accessories and Technology
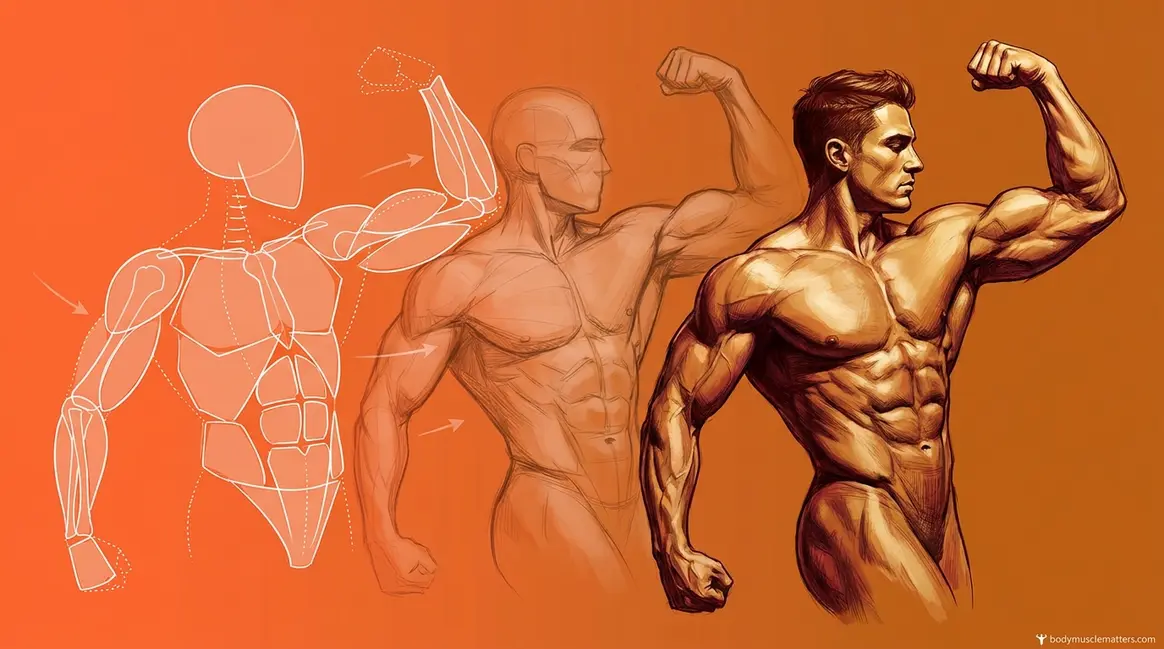
“If you’re an artist who wants to learn ANATOMY but all the art tutorials online just leave you with these BOX humans…”
You’re not alone — and you’re not the problem. Most figure drawing tutorials skip the single most important step: building a solid geometric foundation before touching anatomy. That’s why your drawings fall apart. You jump to complex muscle detail before the body’s proportions are locked in, and the whole thing collapses.
The truth is that learning how to draw muscles doesn’t require memorizing every anatomical term. It requires a repeatable system. This guide teaches you The Shape-to-Shading Pipeline — a 4-step framework used across formal art curricula that starts with simple ovals and S-curves, then layers in anatomy, and finally adds shading. You’ll work through base shapes, then the torso, arms, legs, male vs. female differences, stylization for anime and comics, and shading — in that exact order.
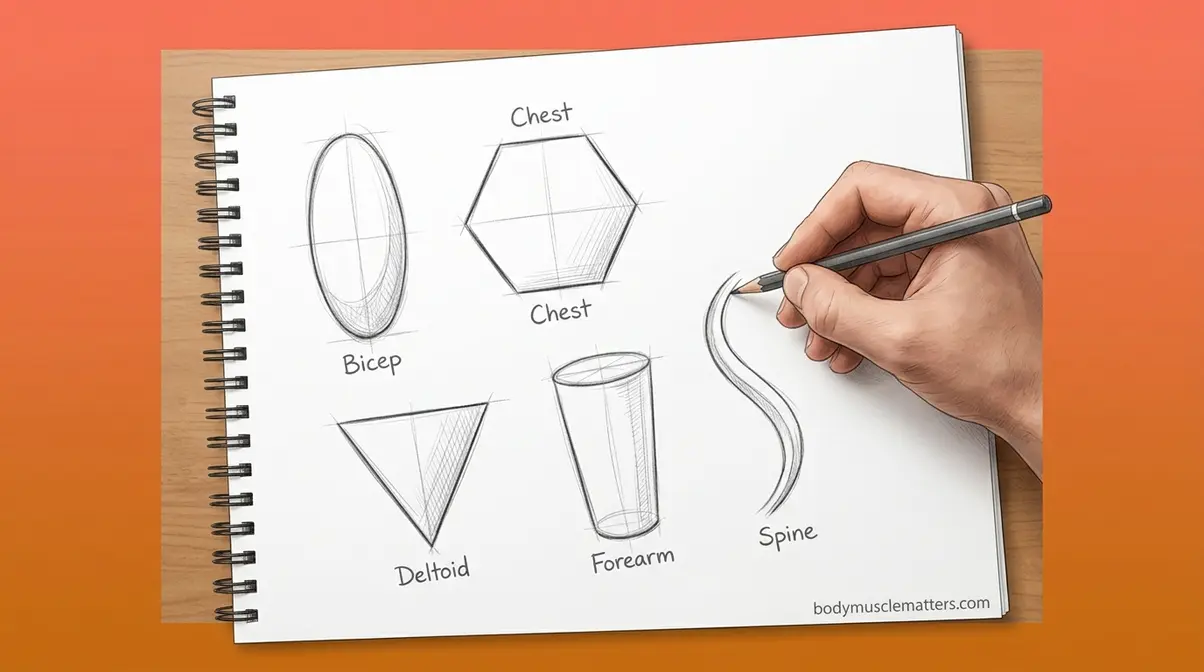
Learning how to draw muscles becomes manageable when you start with simple geometric shapes — ovals, hexagons, and S-curves — before adding any anatomical detail.
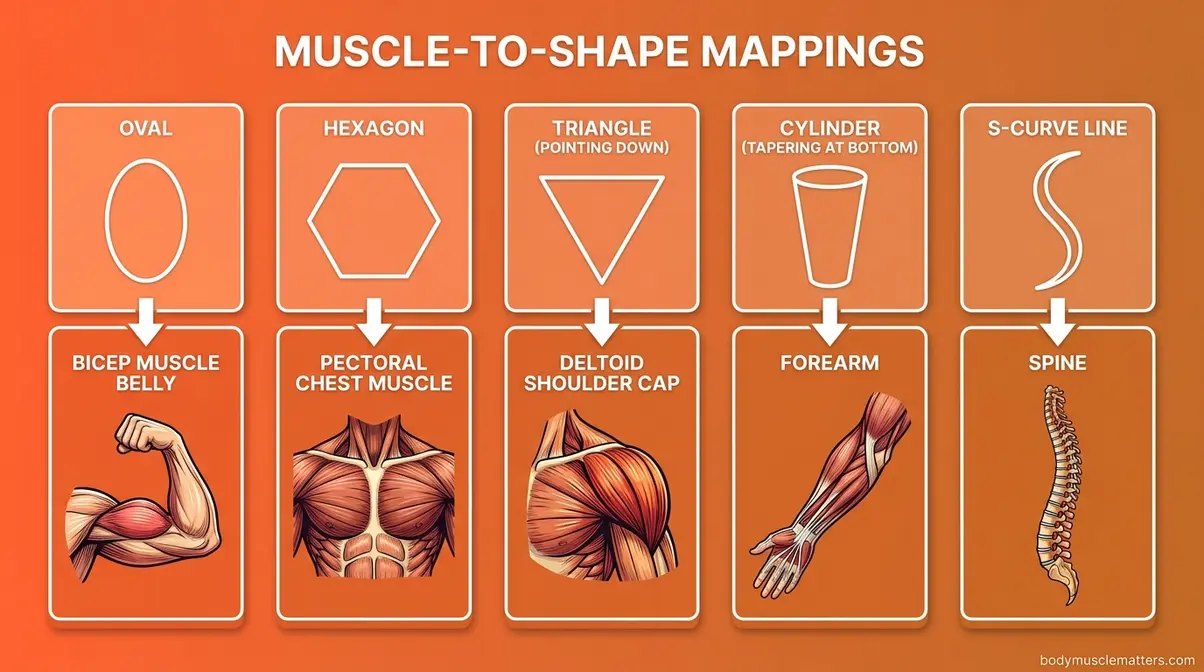
- Start with shapes: Every muscle group maps to a basic geometric form (oval = bicep, hexagon = chest, triangle = deltoid)
- Follow the pipeline: The Shape-to-Shading Pipeline — base shapes → connections → anatomy detail → shading — works for every body region, every time
- Style matters: The same pipeline applies to both realistic figures and anime/comic styles, with specific adjustments for each
- Skeleton landmarks matter: Placing the ribcage oval and pelvis trapezoid first prevents proportion errors that no amount of detail can fix
- Shading creates volume: Light source placement, not line weight, is what makes muscles look genuinely 3D
Before You Start: What You Need to Know
Most beginner muscle drawings look stiff because artists skip the foundational shape stage and jump straight into detailed anatomy. The Indiana University figure drawing curriculum (SOAD-S 201) emphasizes that visual interpretation of the human figure requires fundamental anatomical studies before detail work — a principle that applies directly to drawing muscles at any level (Indiana University, 2026).
Think of it like building a house. You pour the foundation before installing the windows. In figure drawing, that foundation is geometric shapes. Once the foundation is solid, the anatomy details have somewhere to live.
Why Most Beginner Drawings Look Stiff
Working general to specific — this phrase is the core principle of every successful figure drawing course. It means you establish the big picture first (proportions, gesture, major shapes) before committing to small details (individual muscle edges, shading, linework).
The specific mistake that creates “BOX humans” is adding muscle detail before the body’s proportions are locked in. You copy an anatomy diagram directly — full of lines, labels, and complex shapes — and your drawing becomes rigid and disconnected.
The Art Students League of New York notes that master instructor George Bridgman taught for over 30 years that understanding structural mechanics must precede anatomical detail — a foundational principle of figure drawing education. The most common beginner mistake is skipping the foundational shape stage and jumping straight into detailed anatomy — a method that formal art curricula explicitly warn against.
Common pain points reported by beginners include exactly this: anatomy studies feel overwhelming because there’s too much detail too soon. The fix isn’t studying harder. It’s starting simpler.
Once you understand why drawings fall apart, the fix becomes obvious — and it starts with gathering just three simple tools.
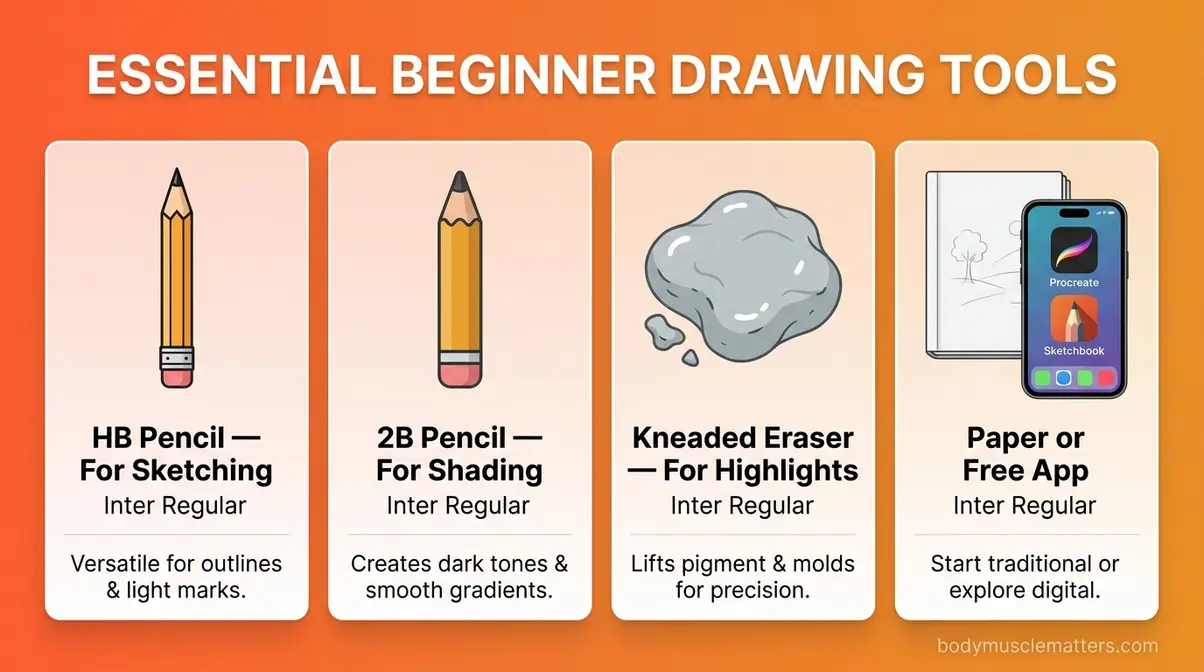
The 3 Tools You Need
You do not need a drawing tablet, expensive software, or art school supplies to follow this guide.
Estimated Time: 45 minutes
Here’s everything required:
- Pencil: An HB pencil for sketching (HB means medium hardness — it’s the standard yellow pencil), and a 2B for shading (softer, darker, and easier to blend)
- Eraser: A kneaded eraser is ideal — it’s a soft, putty-like eraser you can shape into a point, which lets you lift highlights and erase fine lines without smearing
- Paper or a free digital app: Any sketchpad works for traditional drawing. Digitally, Clip Studio Paint, Procreate, and even free phone apps like Sketchbook all support these techniques
With your tools ready, you’re set to learn the core of the Shape-to-Shading Pipeline — starting with the shapes that make every muscle group possible.
Step 1: Build the Body with Base Shapes
The fastest way to learn how to draw muscles is to forget about anatomy entirely — at first. Every muscle group in the human body maps to a simple geometric shape. Start there. The Instructables muscle drawing guide, one of the most-referenced beginner tutorials online, confirms that circles, ovals, and lines form the complete foundation for the entire male body structure.
Welcome to Step 1 of The Shape-to-Shading Pipeline. Every muscle group in the human body can be simplified into one of five geometric forms: ovals, hexagons, triangles, S-curves, and cylinders — making the foundation of figure drawing accessible to any beginner. This is where your drawing career changes.
Geometric Shapes Behind Every Muscle
Here’s the core muscle-to-shape mapping you’ll use throughout this guide. George Bridgman’s structural mechanics method, taught at the Art Students League of New York for over three decades, reduces human anatomy to structural blocks before adding detail — this list is that system made explicit for beginners.
- Oval = Bicep, tricep, and calf muscle belly. Muscle bellies (the fleshy middle section of a muscle) are spindle-shaped — they’re wide in the center and taper toward each end. An oval captures that shape perfectly. A rectangle does not.
- Hexagon = Chest (pectorals). The pectoral muscle has distinct inner and outer edges that meet at angles. A hexagon captures both the flat inner edge (at the sternum) and the curved outer edge (toward the armpit) better than any other shape.
- Triangle = Deltoid (shoulder cap). The deltoid points downward toward the elbow. A triangle with its apex pointing down is the most accurate simplified form.
- Cylinder = Forearm and lower leg. These limb segments are roughly tubular — thicker at the top, tapering slightly toward the joint below.
- S-curve = Spine. The backbone of every pose. No figure drawing works without it.
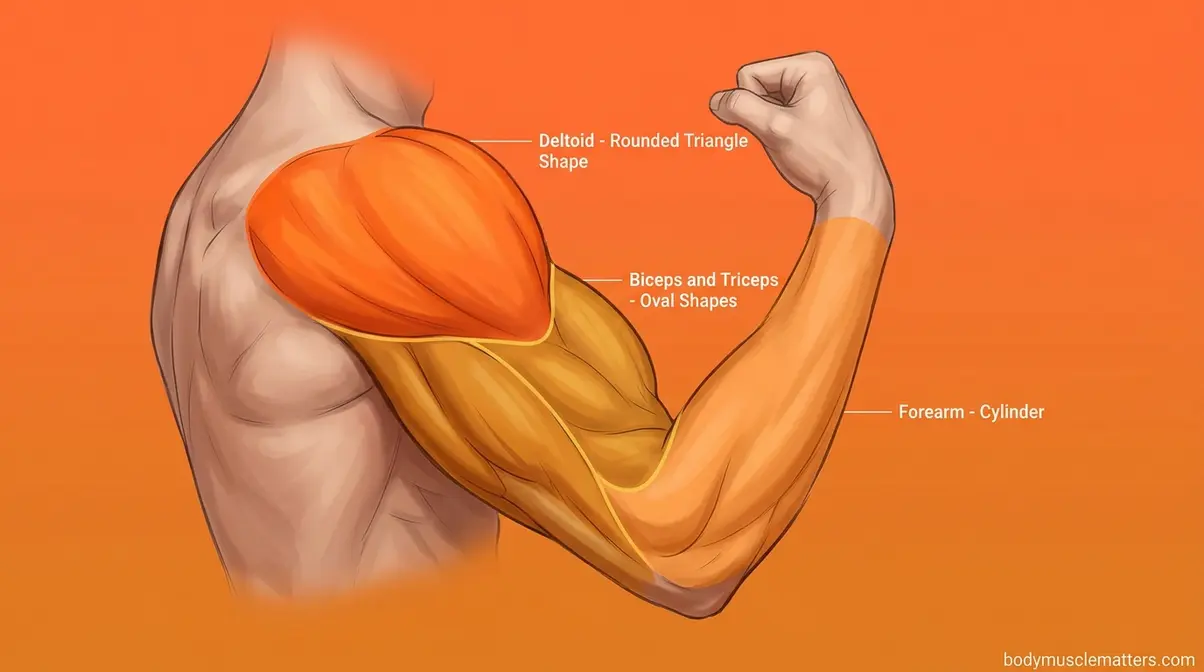
As a practical example: stack an oval (bicep) on a triangle (deltoid) on a cylinder (forearm), and you have a basic arm — before a single muscle line is drawn.
With your shape vocabulary ready, the next step is drawing the skeleton landmarks that tell you where to place those shapes on the body.
Do I need to learn the skeleton to draw muscles?
You don’t need to memorize the full skeleton, but you do need three skeleton landmarks: the spine (S-curve), the ribcage (oval), and the pelvis (trapezoid). These three forms determine where every muscle sits, how the figure balances, and what the pose’s gesture looks like. Without them, muscle shapes have no anchor and proportions collapse. You can draw convincing muscular figures knowing only these three landmarks — plus the geometric muscle shapes covered in this guide.
Drawing the Skeleton Landmark Line
These three landmarks are your “skeleton scaffold.” Every muscle shape hangs on them. Draw them lightly — they’re guides, not final lines. You’ll erase them later.
- Draw a light S-curve line from top to bottom of your page. This is the spine. It determines the pose’s gesture (the overall lean and weight of the figure). A straight vertical line makes a stiff pose; a slight S-curve makes it feel alive.
- At the top of the S-curve, draw an oval. This is the ribcage. It should be roughly egg-shaped, wider at the bottom than the top.
- At the bottom of the S-curve, draw a trapezoid (wider at the top, narrowing slightly at the bottom). This is the pelvis.
- These three landmarks anchor everything else. Every muscle shape you draw in the following steps attaches to one of these three forms.
Even professional artists sketch these three landmarks first in every figure drawing session. Love Life Drawing emphasizes that essential skeleton points are the prerequisite for understanding muscle placement and tension in figure drawing — you cannot know where a muscle belongs without knowing where the skeleton sits beneath it.
Learn foundational techniques for drawing muscles to reinforce these skeleton landmark principles with additional visual references.

Once your skeleton scaffold is in place, it’s time to connect your geometric shapes into a complete body frame.
Connecting the Shapes into a Body Frame
Now place all five shape types onto your skeleton scaffold. Work top to bottom:
- Place the hexagon (chest) over the ribcage oval. Center it, slightly overlapping the lower portion of the ribcage.
- Add triangles (deltoids) at the top corners of the chest hexagon, apex pointing downward toward where the elbow will be.
- Hang ovals (bicep/tricep) below each deltoid triangle. These sit in the upper arm zone.
- Add cylinders (forearms) below the arm ovals, tapering slightly toward the wrist.
- Place two large ovals (quads/thighs) below the pelvis trapezoid, one on each side.
- Add cylinders (lower legs/calves) below the thigh ovals, tapering toward the ankle.
At this stage, your drawing should look like a geometric robot — and that’s perfect. This is your foundation. How to draw a muscular person starts not with muscles, but with this frame. Every detail you add from here goes on top of this structure, not instead of it.
With your full body frame built from shapes, you’re ready to apply the Shape-to-Shading Pipeline to the most complex region first — the torso.
Step 2: Mastering the Torso — Chest, Back, and Abs
The torso is where most artists give up — and it’s easy to see why. The chest, abs, and back each have their own logic. But when you apply the Shape-to-Shading Pipeline to each region separately, the complexity disappears. Clip Studio’s muscle anatomy guide, a widely used reference for digital artists, confirms that breaking torso muscles into distinct regions is the key to clarity — with color-coded anatomical diagrams showing exactly how each muscle changes shape across different angles.
Explore how to draw torso and back muscles for additional reference diagrams supporting this section.
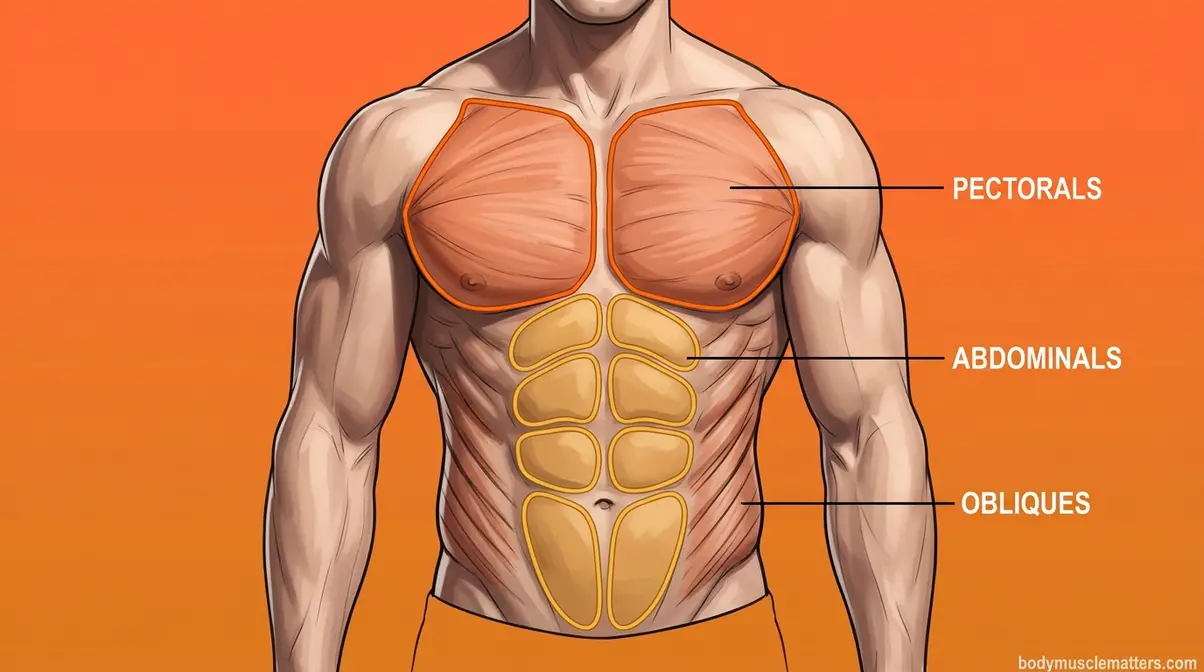
How to Draw Pectorals (Chest)
The pectorals (the large fan-shaped muscles that make up the chest) are the first torso muscles most artists attempt — and the first place the flat-chest problem appears. Follow these steps:
- Start with your chest hexagon from Step 1. This is your pectoral region.
- Divide the hexagon into two halves with a light center line. This is the sternum (the flat bone running down the center of your chest).
- Each half is one pectoral muscle. Left pec on the left, right pec on the right.
- Round the outer edge of each half. The pec curves toward the armpit (axilla), not toward the shoulder. This curve is what separates a believable chest from two flat rectangles.
- The inner edges meet at the sternum with a slight gap — do NOT draw them touching. A small shadow gap here reads as the sternum line.
- Connect the outer curve of each pec to the deltoid triangle from Step 1. The pec and deltoid slightly overlap — draw a subtle overlap line at the connection point.
If your chest looks like two rectangles side by side, your pecs are too angular. Soften those outer edges into a fan shape and the problem resolves immediately.
Once the chest is in place, move directly below to the abs — the area where beginner drawings most often look like a flat checkerboard instead of living anatomy.
How to Draw the Abs and Obliques
The abdominal muscles are not a uniform grid — they are staggered, organic shapes that overlap slightly, and drawing them as a flat checkerboard is the most common torso mistake beginners make.
Here’s how to fix it:
- Below the chest hexagon, draw a rectangle — this is the abdominal region.
- Divide it into 3 rows of 2 ovals each. This gives you the 6-pack (how to draw 6 pack abs starts here).
- Stagger the ovals slightly — the left side sits slightly higher than the right. This is the key fix. Real abs are offset, not perfectly aligned.
- The ovals are NOT squares. They’re rounded, slightly irregular, and vary in size (the top pair is often slightly wider than the bottom pair).
- Draw the obliques (the muscles on the sides of your torso that connect your ribs to your hips) as diagonal sweeping lines from the ribcage down and inward toward the pelvis.
- Shade the gaps between the ovals, not the ovals themselves. The muscle bulges catch light; the gaps fall into shadow. This single insight transforms flat ab drawings into 3D anatomy.
With the front of the torso complete, flip your reference — the back muscles are just as important for creating a convincing full figure.
How to Draw the Back (Lats and Traps)
The back has two dominant muscle groups that create the powerful silhouette artists aim for. Seen from behind, a muscular back looks like a cobra spreading its hood — the lats are the hood.
- The traps (trapezius — the large diamond-shaped muscle that runs from your neck down to your mid-back and out to your shoulders) form an inverted triangle shape. Draw this triangle from the base of the neck, spreading outward to each shoulder blade.
- Draw two large wing-shaped ovals on either side of the spine. These are the lats (latissimus dorsi — the broad, flat muscles that give the back its V-taper shape).
- The lats start at the armpit level and sweep down and inward toward the lower spine. They don’t end at the waist — they wrap slightly around to the front.
- The wider you draw the lats, the more pronounced the V-taper. This V-taper (wide shoulders, narrow waist) is the defining silhouette of an athletic or powerful figure seen from behind.
What is the hardest body part to draw?
The hands and the back are consistently rated the hardest body parts to draw by beginner and intermediate artists across figure drawing communities. The back is difficult because it has multiple overlapping muscle groups (traps, lats, rhomboids, erector spinae) that change dramatically with arm position. The hands are hard because of the complex joint structure and the number of visible tendons. For back muscles specifically, the lats-and-traps approach in this guide simplifies the region to its two most visually dominant shapes.
The back gives your figure power from behind. Now move to the arms — the body part most beginners search for help with first.
Step 3: How to Draw Arm and Shoulder Muscles
Arms are the most-searched body part for beginner artists — and the most frustrating to draw. The problem is treating the arm as one long tube. To draw muscular arms convincingly, think of the arm in three separate zones: the shoulder cap, the upper arm, and the forearm. Each zone has its own shape and its own logic.
Discover techniques for drawing arm and shoulder muscles to supplement the step-by-step method below with additional pose references.
Drawing the Deltoids (Shoulder Cap)
The deltoid (the rounded, three-headed muscle that wraps over the shoulder) is the connector between your torso and your arm. Get this shape right, and the whole arm reads as attached to the body.
- Return to your Step 1 deltoid triangle. The apex (point) of the triangle points toward the elbow.
- The deltoid has three sections: front, middle, and rear. For beginners, draw it as a single rounded triangle — you can divide it into three sub-ovals as your skills grow.
- The front edge of the deltoid overlaps the outer edge of the pectoral. Draw a slight overlap line where these two muscles meet. This overlap is what makes the shoulder look connected to the chest, not floating beside it.
- The rear edge of the deltoid connects to the trapezius at the back. Think of the deltoid as a shoulder pad — it caps the top of the arm and bridges the chest to the back.
- Avoid drawing the deltoid as a perfect circle. It’s more elongated than round, and the three sections create subtle ridges when the arm is raised.
With the shoulder cap in place, move into the upper arm — where the bicep and tricep work as a push-pull pair.
Biceps, Triceps, and Forearms
When the bicep contracts, the tricep stretches — understanding this opposing muscle mechanic is the single most important insight for drawing dynamic, believable arms. This stretch-and-contract rule applies to every opposing muscle pair in the body.
- Bicep (the muscle on the front of the upper arm that flexes the elbow): Draw a tall oval on the front of the upper arm. When the arm is flexed, the oval becomes rounder and higher. When relaxed, it flattens slightly and stretches longer.
- Tricep (the muscle on the back of the upper arm that straightens the elbow): Draw a wider, flatter oval on the back of the upper arm. In a flexed pose, the tricep stretches — draw it longer and flatter. In an extended pose, the tricep contracts — draw it rounder.
- Forearm: Draw a tapered cylinder — wider at the elbow, narrowing to the wrist. Add 2–3 light diagonal lines along the outer edge to suggest the rope-like forearm muscles (extensor muscles — the muscles that extend your fingers and wrist).
- Connect all three zones with smooth curved lines. No sharp corners between muscle groups. The transition from bicep to forearm, for example, should curve naturally around the elbow, not angle sharply.
In a bicep curl pose, the bicep oval is at its roundest while the tricep oval is at its flattest. Practice drawing both states — flexed and relaxed — to internalize the stretch-and-contract mechanic for how to draw arm muscles in any position.
The arms are complete. Now move to the body’s largest muscle groups — the legs — where most beginners draw simple cylinders when they need powerful, curved forms.
Step 4: Drawing Powerful Leg Muscles
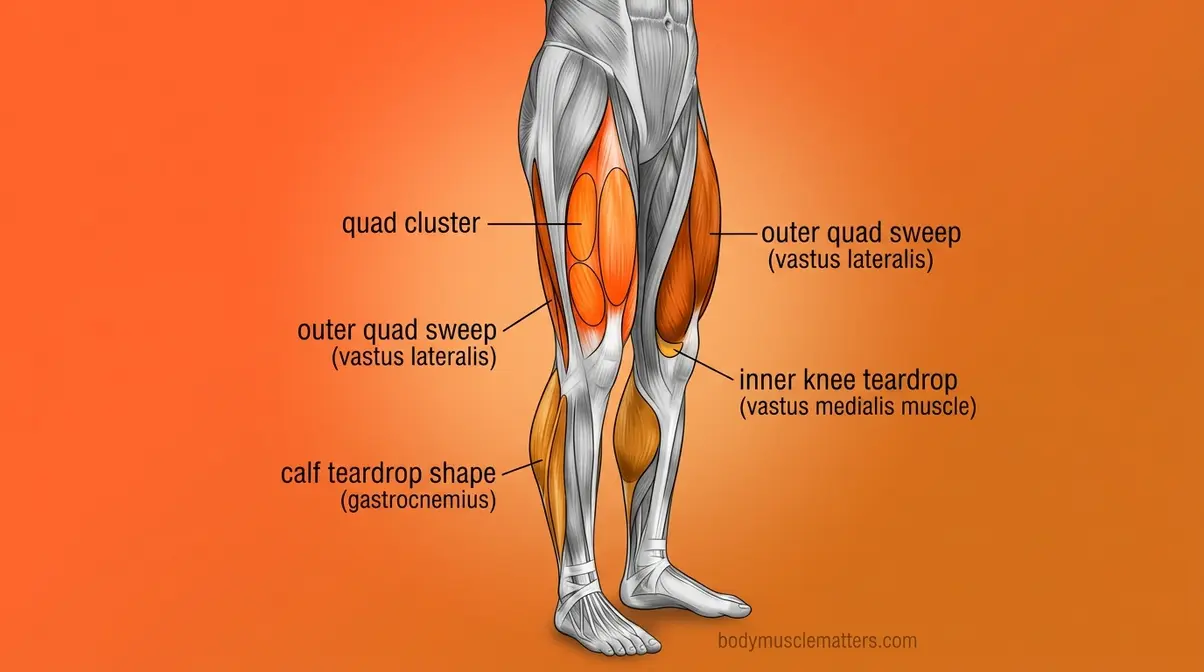
Most beginners draw legs as two simple cylinders — and that’s exactly why they look stiff. Muscular legs have three distinct shape zones: the thigh (dominated by the quads), the back of the thigh (hamstrings), and the lower leg (calves). Each zone has a characteristic curve that no cylinder can capture. The quadriceps are not one muscle — they are four, and the outer sweep of the vastus lateralis is the single shape that makes a leg look powerful rather than cylindrical.
Understand how to draw leg muscles with additional reference poses supporting the steps below.
The Quadriceps and Thigh Shape
The quadriceps (the four muscles on the front of the thigh that straighten the knee) are the dominant visual element of any leg drawing viewed from the front.
- Draw the quads as a cluster of 3–4 adjacent ovals on the front of the thigh, not as one uniform mass. Each oval represents a separate quad muscle head.
- The most important shape is the outer quad (vastus lateralis — the large muscle on the outer side of the thigh). Draw it as a wide, sweeping curve from the hip down to the outer knee. This outer sweep is the line that makes a leg look powerful.
- The inner thigh has a teardrop-shaped muscle (vastus medialis) just above the inner knee. Draw a distinct teardrop shape here — this is sometimes called the “teardrop” muscle and is a key visual detail for drawing muscular thighs.
- From the front, the thigh should look wider at the top and taper toward the knee — not like a cylinder. The widest point sits roughly one-third of the way down from the hip.
In a standing pose, the outer quad sweep is the single line that makes a leg look powerful. Get that curve right, and everything else follows.
The quads dominate the front. For a complete leg, you also need the hamstrings and calves — the muscles that define the back and lower leg.
Hamstrings, Calves, and Lower Legs
The stretch-and-contract rule from the arm section applies here too: when the quadriceps contract (straightening the knee), the hamstrings stretch — and vice versa.
- The hamstrings (the three muscles on the back of the thigh that bend the knee) are best seen from a side or back view. Draw two parallel ovals running down the back of the thigh from the glute to the knee.
- The hamstrings are thicker at the top and taper to tendons at the back of the knee. Show those tendons as two thin converging lines just above the knee crease — this detail alone adds significant realism.
- The calf muscle (gastrocnemius — the diamond-shaped muscle on the back of the lower leg) is NOT a cylinder. Draw it as a teardrop shape: wide at the top, tapering sharply down to the Achilles tendon.
- The inner calf head sits slightly higher than the outer head. This asymmetry is what makes calves look natural rather than mirrored and artificial.
The shape of the calf changes dramatically depending on pose: when the heel is raised (calf contracted), the teardrop shape becomes rounder and more prominent. When the foot is flat (calf stretched), it flattens and elongates. Practice both states to draw muscular legs convincingly in any position.
With the major muscle groups of the arms, torso, and legs covered, the next question most artists face is: does the same approach work for both male and female figures?
Male vs. Female Musculature: Key Differences
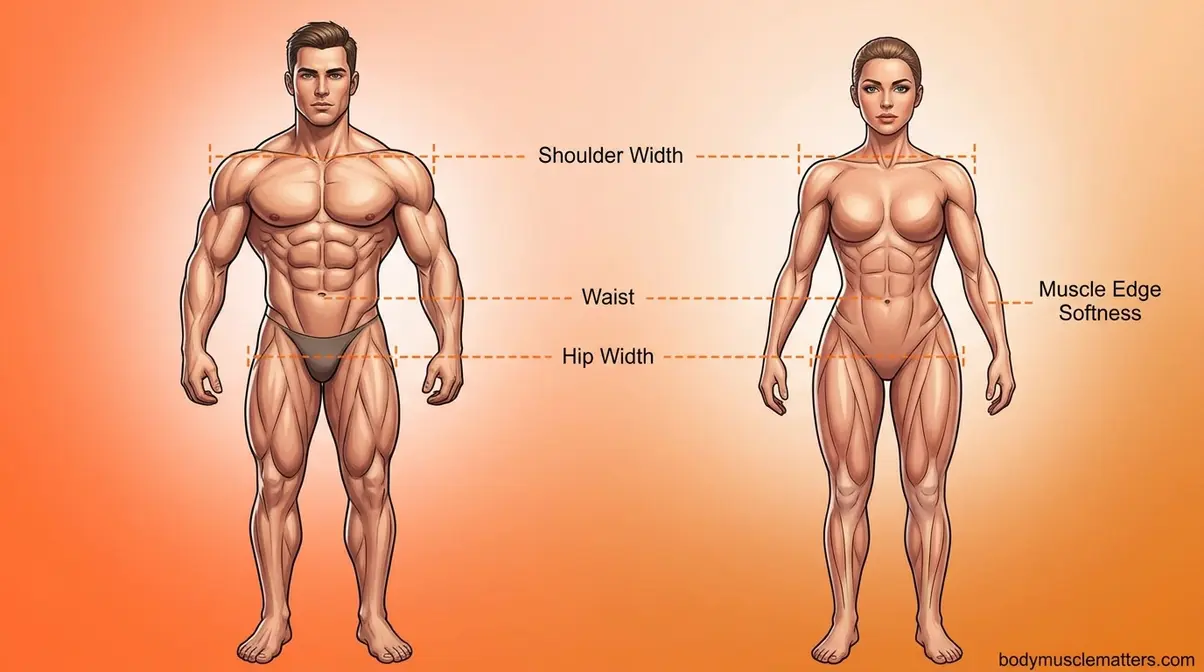
One of the most common figure drawing mistakes is giving every character the same body type — regardless of gender. The differences between male and female musculature are specific and learnable. Once you understand the three key variables — shoulder-to-hip ratio, muscle mass, and fat distribution — you can draw convincing figures of any gender.
The primary difference between male and female musculature in figure drawing is not muscle shape — it’s the shoulder-to-hip ratio and the thickness of the subcutaneous fat layer that softens muscle definition. Subcutaneous fat (the thin layer of fat just beneath the skin) sits over the muscles in all bodies, but its distribution differs significantly between male and female physiques.
According to MedlinePlus muscle tissue types, skeletal muscles are the primary voluntary muscle tissue — their visibility on the body surface depends directly on subcutaneous fat layer thickness (MedlinePlus, 2026).
| Feature | Male Figure | Female Figure |
|---|---|---|
| Shoulder-to-hip ratio | Shoulders wider than hips | Hips equal to or wider than shoulders |
| Muscle definition | High — muscles visible at rest | Lower — muscles softer at rest |
| Subcutaneous fat | Thinner layer — muscles more pronounced | Thicker layer — edges slightly rounded |
| Pectoral shape | Flat hexagon, pronounced edges | Rounded — transitions to breast tissue |
| Hip curve | Narrow, angular | Wide, pronounced |
Drawing a Muscular Male Figure
Male figures have a characteristic V-taper silhouette: wide shoulders, narrow waist, moderate hips. Draw the silhouette first, then fill in the muscle shapes within it.
- Shoulder width in a muscular male figure measures approximately 2.5 head-widths across. Draw your deltoid triangles noticeably wider than the pelvis trapezoid.
- Muscle group edges are sharper. When shading, use harder transitions between muscle groups — the valleys between the pecs, the separation between the bicep and tricep, the groove down the center of the abs. These harder edges read as higher muscle definition.
- The V-taper is the defining silhouette. Wide lats, narrow waist, moderate hips. If your male figure doesn’t have this taper, the muscularity won’t read — regardless of how detailed the individual muscles are.
Draw the torso silhouette first: wide shoulders, narrow waist, moderate hips. Then fill in the muscle shapes within that outer boundary. This outside-in approach prevents the common mistake of building muscle detail that fights against the proportions.
The same shape-first approach works for female figures — with specific adjustments to proportions and edge softness.
Drawing a Strong Female Figure
The analogy that helps most beginners: male muscles are like rocks just under the skin; female muscles are like rocks under a thin blanket — the shape is present, just slightly softer at the edges.
- Female hip width equals or slightly exceeds shoulder width. Draw the pelvis trapezoid wider than in the male figure. This single proportion change shifts the entire read of the figure’s gender.
- Muscle definition is present but with softer edges. When shading, use slightly more gradual transitions between muscle groups. Less contrast in the valleys between muscles — not absent, just gentler.
- The key to drawing muscular women: Keep the silhouette clearly feminine (wider hips, defined waist), then add muscle definition within that silhouette. The silhouette communicates gender; the interior detail communicates strength.
- Avoid masculinizing by widening the shoulders beyond the hips. Keep the hip-to-shoulder ratio consistently female, and the figure will read as strong and feminine simultaneously.
Common consensus among life drawing instructors and across figure drawing communities is that the most frequent error in drawing muscular women is widening the shoulders to match male proportions — which overrides the hip ratio that signals femininity.
Stylized Muscles: Anime, Comics, and Cartoons
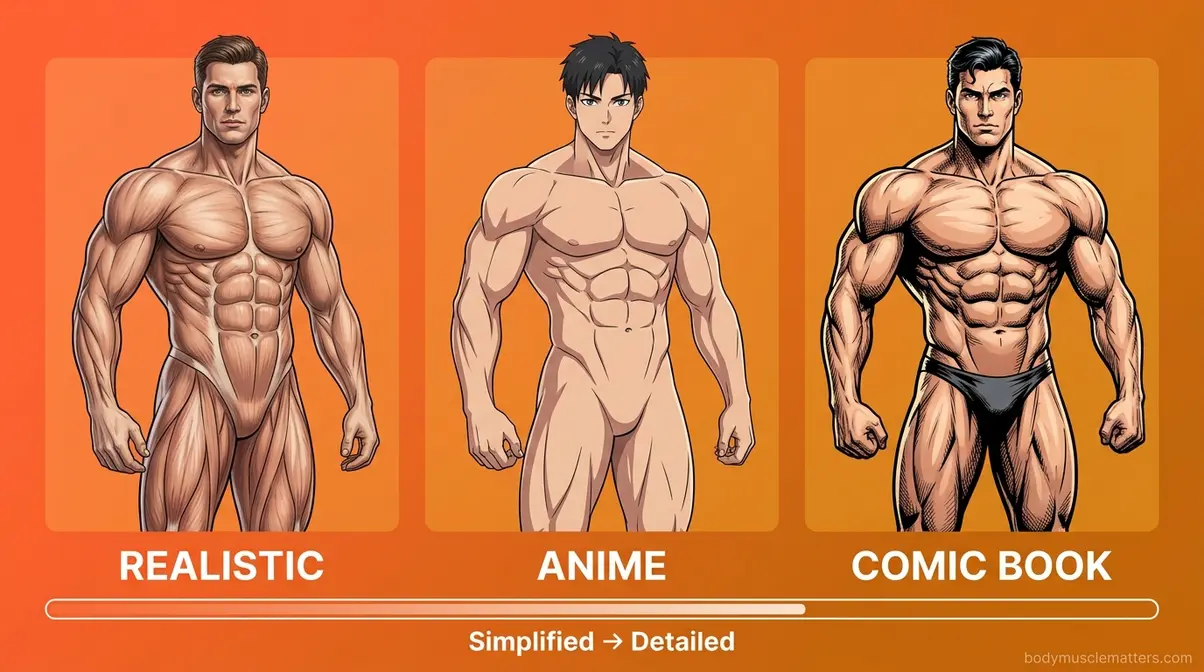
Not every artist wants photorealistic anatomy. Anime, comic, and cartoon styles each use the same foundational shapes from Step 1 — but apply different rules about what to exaggerate, what to simplify, and what to eliminate entirely.
Realistic vs. Anime Rules
This is the most-asked and least-answered question in beginner art communities. Across figure drawing forums and online art communities, the consistent request is for a side-by-side comparison of exactly which anatomical rules change between realistic and anime styles.
Here’s the breakdown:
| Rule | Realistic Style | Anime Style |
|---|---|---|
| Muscle edge definition | Hard, specific, individual | Simplified — groups merged into one shape |
| Muscle count shown | All major groups visible | 3–5 key groups only (pec, deltoid, bicep, quad, calf) |
| Body proportions | 7–8 head heights | 6–8 heads (varies by subgenre — shonen uses 8+) |
| Shading style | Gradual value transitions | Flat cel-shading with hard shadow edges |
| Linework | Varied line weight showing form | Consistent line weight, form implied by contour |
| Abs | Staggered, organic ovals | Simplified 3×2 grid, often stylized |
Which rules to keep in anime: The S-curve spine, the shoulder-to-hip ratio, and the stretch-and-contract mechanic for arms and legs. These rules produce believable anatomy regardless of style. Skip them and your anime figures will look as stiff as any realistic beginner drawing.
Which rules to break: Individual muscle separation, precise proportions, and gradual shading. Anime merges muscle groups into larger, cleaner shapes. A realistic bicep has a visible split between the two heads; an anime bicep is one smooth oval. A realistic torso shows 8+ individual muscles; an anime torso might show 4.
Superhero and Comic Book Muscles
Comic book anatomy sits between realistic and anime — more exaggerated than real life, but more detailed than anime.
Think Jack Kirby, Jim Lee, or modern superhero illustration. The key rules for comic-style muscles:
- Exaggerate the V-taper by 30–40%. Superhero shoulders are improbably wide; superhero waists are improbably narrow. Embrace the exaggeration — that’s the style.
- Keep individual muscle separation visible, unlike anime. The pec/deltoid overlap line, the bicep/tricep separation, and the outer quad sweep should all be drawn with clear, confident lines.
- Use hatching (parallel lines) for shading rather than smooth gradients. Comic shading is graphic and high-contrast — dark shadows, bright highlights, minimal midtones.
- Exaggerate muscle volume in the upper body. Superhero figures typically have upper arms, chests, and shoulders drawn at 120–150% of realistic proportions, while legs stay closer to realistic scale.
- Avoid the “lumpy” problem by keeping your base shapes visible underneath the exaggeration. If a muscle looks like a random bump, it’s because the underlying oval or triangle wasn’t established first. The Shape-to-Shading Pipeline prevents this — every exaggerated comic muscle still starts as a recognizable geometric form.
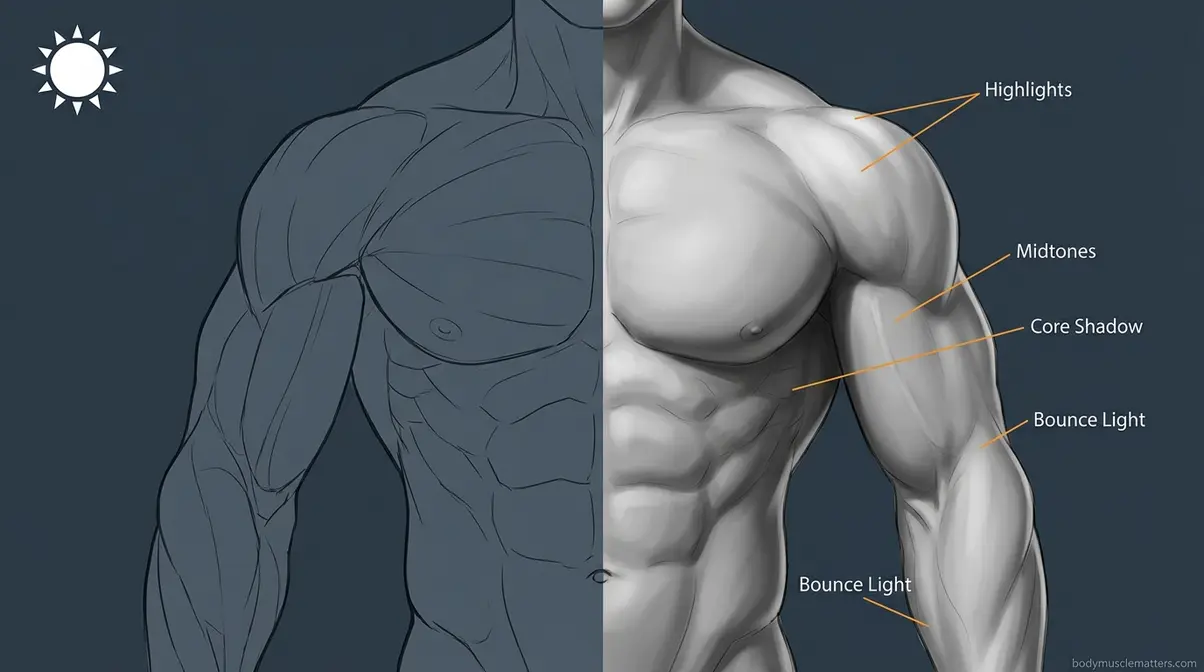
Step 5: Shading Muscles to Look 3D
Shading is where a flat drawing becomes a three-dimensional figure. It’s also where most beginners make the same mistake: adding shading randomly, without committing to a single light source first.
Light Source and Shadow Placement
Before applying a single shadow, make one decision: where is the light coming from? Everything else follows from that choice.
- Pick one light source and stick to it. The most common choice for figure drawing is light from above and slightly to one side (upper left or upper right). Mark it with a small arrow at the edge of your page.
- Surfaces facing the light source get lighter. The top of the bicep oval, the upper surface of the pectoral, the front of the quad — these catch light.
- Surfaces turning away from the light get darker. The underside of the pectoral, the back of the bicep, the inner thigh — these fall into shadow.
- The darkest area is the core shadow — the zone where the surface turns away most sharply from the light. On a bicep, this is the narrow band along the inner edge of the muscle, just before the tricep begins.
- Cast shadows occur when one muscle blocks light from reaching another. The bicep casts a shadow onto the forearm; the pec casts a shadow onto the upper ab region.
According to established shading principles documented by art educators at Will Kemp Art School guide, the single light source rule is the foundational principle of all realistic rendering — breaking it is the #1 cause of flat, unconvincing figure drawings.
Realistic vs. Anime Shading
The light source rule stays constant between styles. The technique for applying shadow changes significantly.
- Realistic shading:
- Use gradual value transitions (many tones from light to dark)
- Blend the core shadow edge softly — muscles have curved surfaces, not flat planes
- Add a subtle bounce light (a slight lightening) on the very darkest edge, where reflected light from the ground or environment hits the underside of the muscle
- Use your 2B pencil and blend with your finger or a blending stump
- Anime/cel shading:
- Use flat, hard-edged shadows — one light tone, one dark tone, no blending
- The shadow shape is a distinct, graphic form — often a simplified version of the muscle’s shape
- No bounce light — anime shadows are intentionally flat and graphic
- In digital work, create shadows on a separate layer set to Multiply mode for clean, non-destructive cel-shading
The Clip Studio Paint light and shadow guide recommends painting core shadows and highlights first to establish the light direction, then adding intermediate tones one step at a time — an approach that works for both realistic and cel-shading styles (Clip Studio, 2026).
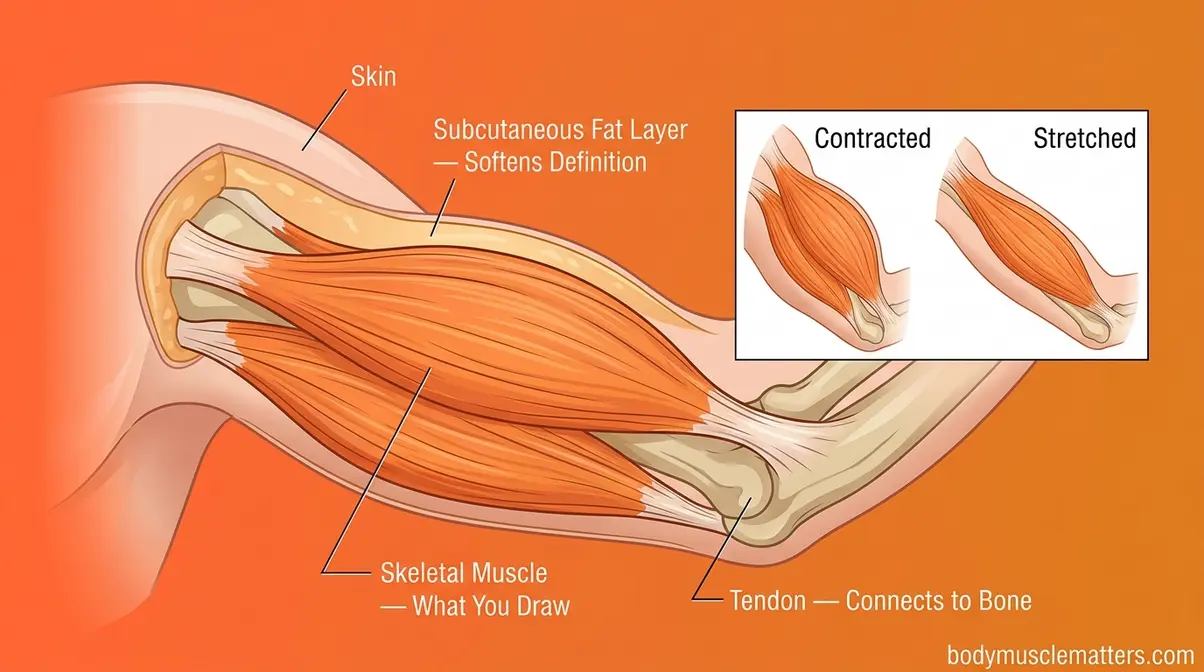
Anatomy for Artists: The Science Behind the Shapes
Understanding why muscles are shaped the way they are makes every drawing decision easier. If you want to master the art of drawing muscles, this isn’t a medical anatomy lesson — it’s the minimum science that transforms your intuition.
The Three Types of Muscle Tissue
There are three types of muscle tissue in the human body. As an artist, one type matters most:
- Skeletal muscle (also called striated or voluntary muscle): These are the muscles you draw. They attach to bones via tendons, and you control them consciously. They’re visible beneath the skin and create the surface forms that define a figure’s musculature.
- Smooth muscle: Found in organs and blood vessel walls. Involuntary, and not visible on the body surface. Not relevant to figure drawing.
- Cardiac muscle: The heart. Also involuntary and not visible on the surface.
Every muscle you’ve drawn in this guide — pectorals, biceps, quads, calves — is skeletal muscle. According to the MedlinePlus muscle tissue types classification, skeletal muscles are the primary voluntary muscle tissue whose visibility depends directly on the subcutaneous fat layer above them (MedlinePlus, 2026). This is why the same muscle looks more defined on a lean figure than on a heavier one — the muscle hasn’t changed; the fat layer above it has.
Muscle Stretch and Contract Mechanics
This is the kinesthetic insight — the “why” behind every muscle shape — that the Love Life Drawing curriculum describes as developing your “sense of kinesthesia” for figure drawing.
Every skeletal muscle has two states: contracted (shortened, rounder, more prominent) and stretched (elongated, flatter, less prominent).
- The principle:
- When a muscle contracts, it shortens and bulges. Draw it rounder and higher.
- When a muscle stretches, it elongates and flattens. Draw it longer and flatter.
- Opposing muscles always work in pairs: when one contracts, the other stretches.
Applied to poses: in a running figure, the leg pushing off the ground has contracted quads and a stretched hamstring. The leg swinging forward has a stretched quad and a contracted hamstring. Drawing these opposing states correctly — using the oval shapes from Step 1, just varied in roundness — is what makes a figure look like it’s actually moving.
The Shape-to-Shading Pipeline incorporates this mechanic naturally: because you started with ovals, you can make them rounder (contracted) or flatter (stretched) without redrawing your entire structure.
Common Mistakes to Avoid
Even with a solid pipeline, certain mistakes appear consistently across beginner figure drawings. Life drawing instructors and figure drawing communities consistently flag these as the most impactful errors to correct:
Common Pitfalls
Mistake 1: Drawing every muscle at maximum definition. Real muscles don’t all pop simultaneously. In a relaxed pose, most muscles are soft. Over-defining every muscle group makes a figure look like an anatomy diagram, not a person. Fix: Apply heavy definition only to the muscles that are actively contracting in the pose.
Mistake 2: Ignoring the overlap between muscle groups. Where the pec meets the deltoid, where the bicep meets the forearm — these transitions aren’t sharp lines. They overlap slightly, and the overlapping muscle casts a small shadow onto the one beneath it. Beginners draw clean separation lines instead. Fix: Add a subtle shadow at every muscle-to-muscle transition.
Mistake 3: Shading with multiple light sources. This is the #1 shading mistake. If the bicep shadow falls to the left but the pec shadow falls to the right, the figure looks internally inconsistent and flat. Fix: Decide on one light source before shading begins — and never change it mid-drawing.
Mistake 4: Skipping the skeleton scaffold. Jumping straight to muscle shapes without the S-curve, ribcage, and pelvis landmarks produces figures with incorrect proportions that no amount of muscle detail can rescue. Fix: Always draw the three skeleton landmarks first, even if it feels redundant.
Mistake 5: Symmetric figures. Real figures in motion are asymmetric — one shoulder higher, one hip dropped, the spine subtly curved. Perfect symmetry reads as stiff and artificial. Fix: Introduce a slight hip tilt or shoulder drop in every pose using the S-curve line.
When to Choose Alternatives
- If you want to draw realistic portraits rather than full figures: Focus on facial muscle anatomy specifically — a different study area with its own set of shape simplifications.
- If your goal is exclusively anime character design: The full realistic pipeline is still worth learning for the proportion and gesture principles, but you can skip the detailed individual muscle separation steps and focus on the simplified group shapes covered in the Stylized Muscles section.
When to Seek Expert Help
Consider enrolling in a structured figure drawing course if you want critique on your specific drawings — written guides cannot replace real-time feedback. Programs like the Art Students League of New York (online and in-person) or structured online curricula offer instructor review that accelerates progress significantly beyond self-study.
Frequently Asked Questions
How do I draw muscles easily?
Drawing muscles becomes easy when you start with geometric shapes instead of anatomy. Map each muscle group to its base form: oval for bicep, hexagon for chest, triangle for deltoid, cylinder for forearm. The Shape-to-Shading Pipeline makes this process manageable for any beginner.
What are the 4 C’s of muscle drawing?
The 4 C’s of muscle drawing are Construction, Connection, Contour, and Contrast. Construction means building the muscle from its base geometric shape. Connection means showing how each muscle attaches to and overlaps the muscles around it. Contour refers to the outer edge of the muscle — whether it’s round (contracted) or flat (stretched). Contrast is the shadow-to-light relationship that makes the muscle read as 3D rather than flat.
How do you shade muscles to make them look 3D?
Muscles look 3D when you commit to a single light source and apply shadow consistently across the entire figure. Choose your light source first (upper-left is the standard starting point). Surfaces facing the light get lighter; surfaces turning away get darker. The core shadow — the darkest band — appears where the surface turns most sharply away from the light. For realistic shading, blend the core shadow edge gradually. For anime/cel shading, keep the shadow edge hard and graphic. The key rule: never shade from two different light directions in the same drawing.
How long does it take to learn to draw muscles?
Learning to draw muscles takes varying amounts of time depending on your practice routine. By using the Shape-to-Shading Pipeline, most beginners can draw a convincing basic figure within a few weeks. Mastery of complex poses and lighting will take months or years of consistent practice. Focus on foundational shapes first to speed up your overall progress.
Can I draw muscles without reference?
Drawing muscles from imagination becomes possible only after you have internalized the base geometric shapes. Beginners should always use references to understand how muscles stretch and contract in different poses. Once you memorize the 3D forms and skeleton landmarks, you can begin constructing figures without looking at a photo. However, even professional artists use references for complex or unusual angles.
Putting It All Together
The Shape-to-Shading Pipeline works because it respects how the brain learns complex skills: start with the biggest, simplest forms, then add detail only after the foundation is solid. Every section of this guide follows that same sequence — and that’s not accidental.
Across figure drawing communities and formal art curricula alike, the consistent finding is that beginners who master the shape stage first progress to convincing anatomy significantly faster than those who attempt detail-first approaches. The pipeline isn’t a shortcut — it’s the correct order of operations.
Here’s your action plan: Start with a single figure using only the five geometric shapes from Step 1. Add the skeleton landmarks. Connect the shapes into a body frame. Then choose one body region — the torso, the arms, or the legs — and apply the numbered steps from that section. Shade it using a single light source. That first complete figure, however rough, proves the system works.
The goal isn’t a perfect drawing on your first attempt. The goal is understanding the system well enough to apply it again — and again — until the shapes become instinctive. That’s when how to draw muscles stops feeling like a problem and starts feeling like a skill you own.
Related posts:
Best Protein Tracker App: Tested & Compared for 2026
Best Muscle Building App 2026: 7 Expert-Tested Picks
How to Use Resistance Bands for Beginners: Full Guide
Best Food Tracking App for Beginners: Top 5 of 2026
Best Home Workout App 2026: Top 10 Tested & Ranked
Gym Equipment Names and Uses: A Beginner Guide
Callum
Hi, I'm Callum, the founder of Body Muscle Matters. I'm not a certified trainer, I'm a self taught lifter who started this site to share what I've learned from my own training and a lot of trial and error. Everything here comes from real experience and honest research, written the way I'd explain it to a friend who is just getting started. My goal is simple: practical, no hype fitness advice you can actually use.