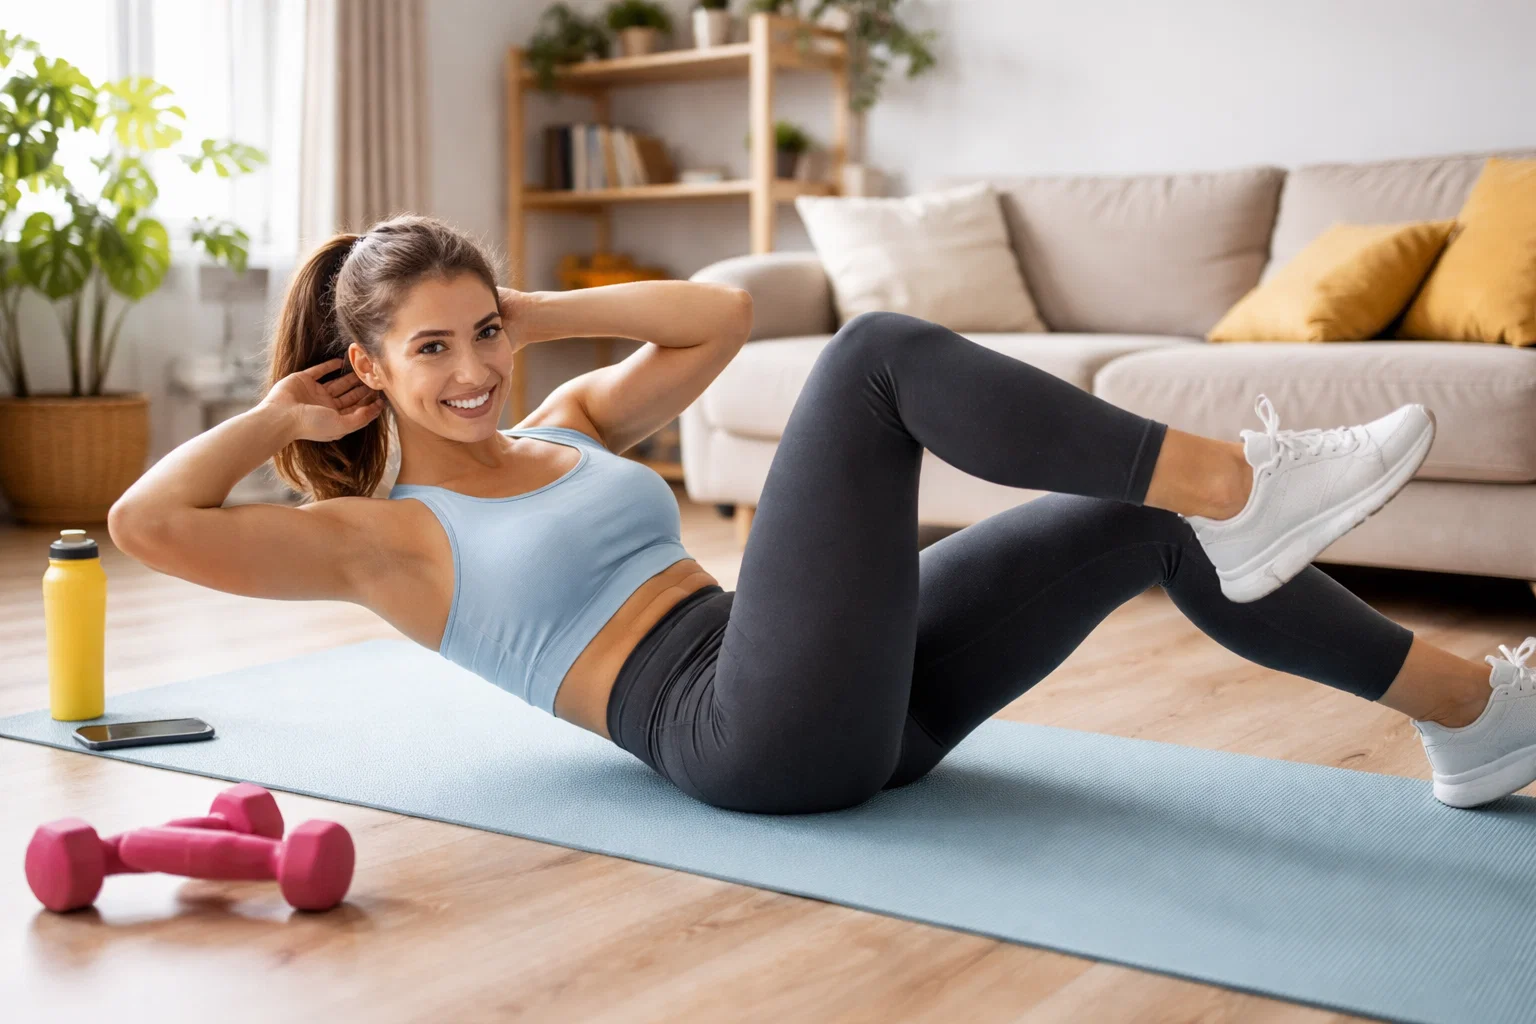
You want a stronger core but don’t know where to start. Every fitness site throws around terms like “engage your core” or shows off advanced moves that look impossible when you’re just beginning. You need something simple that works without gym equipment or confusing instructions. The challenge is finding a routine that builds real strength without overwhelming you or requiring fancy gear.
This guide gives you a complete beginner core workout routine with 12 bodyweight exercises you can do anywhere. Each move includes step by step instructions, breathing tips, modifications for different fitness levels, and exactly how many sets and reps to do. You’ll learn why each exercise matters, how to perform it safely, and when to progress to harder variations. By the end, you’ll have a clear weekly schedule that fits into your life and builds the foundation for a stronger, more stable core.

- [All-in-one] Get PEC fly/lat pulldown/low row/chest press/leg extension/leg press/preacher curl/core trainer/calf training/seated row/mid row machine once with only one machine, which supports over 90+ kinds of exercises. The home gym Station is enough for your whole-body training needs!
- [Sturdy and stable] This home gym workout station is made of 14-gauge steel with a sturdy structure, the counterweight block is protected by a steel sheet guaranteeing your training to the greatest extent and providing you with a long time of service.
- [150LBS weight stack] Ideal home gym partner for super and drop set. Completely ditch the time and expense of replacing weights. Placing the weight has always been a hassle, and we don’t want you to waste your time. Just find the right weight and begin your training!
- [Additional attachment] Readily replaceable or removable preacher curl pad and leg press accessories. Professional bearing on cable bar helps reduce stress on the wrist during use. More professional and thoughtful adjustments for you to try.
- [More than 3 options] Not only high/mid/low pulley system but also chest press/chest fly/back extension in the same machine. Works with multiple handles to target more precise muscle groups. Adapts to a wider range of heights. A movement guide has been added to provide you with inspiration for new strength training schedule.

- Reinforced Steel Frame: Built from heavy-duty steel engineered to withstand 1000 lbs. total weight capacity and 400 lbs. user load, delivering rock-solid stability for relentless daily training
- Smooth Pulley Motion: High and low 15-pulley system with nylon-coated aircraft cables tested to 1000 lbs. delivers fluid resistance, targeting arms, back, and core muscles with every rep
- Versatile Attachments: Includes Olympic lat pulldown bar and low row bar with foam grips; detachable design allows easy replacement with other lat machine accessories for varied training
- Weight Stack System: Features 160 lb. vinyl weight stack for progressive resistance; for beginners and advanced users looking to build strength, tone muscles, and improve endurance
- Full-Body Training: Built-in 4-roll leg developer and leg press station enhance lower body workouts; compact, multi-functional machine dimensions provide convenience for home fitness spaces

- 27° Ergonomic Angle for Maximum Power & Comfort: Built with a 27-degree ergonomic bend, arm twister exerciser allows your wrist, elbow, and shoulder to remain in a natural power position—reducing strain while maximizing strength output. Ideal for longer sessions and safer workouts.
- Adjustable Resistance for All Fitness Levels: Whether you’re a beginner or pro athlete, this adjustable power twister offers customizable tension for chest workout. Perfect for building forearm strength, biceps, wrists, chest, shoulders, and overall upper-body power.
- Heavy-Duty Steel Spring for Explosive Strength Gains: Made with premium carbon steel spring resistance, this gorilla bar for chest workout delivers smooth tension and long-lasting durability. Designed for strength training, bodybuilding, and everyday fitness.
- Non-Slip Grip & Reinforced Anti-Slip Handles: Engineered with soft rubber anti-slip handles, ensuring full control—even during sweaty workouts. The angled grip enhances wrist stability arm workout while preventing discomfort and improving posture.
- Compact, Portable & Ideal for Home or Office Workouts: The Zentrova arm exerciser fits easily in your gym bag and can be used anywhere—home, office, or outdoor training. Get a full upper-body chest workout device without heavy equipment or expensive machines.
- SET INCLUDES – A pair of 5-pound, 10-pound, 15-pound, 20-pound, and 25-pound rubber hex dumbbells with a black A-frame dumbbell rack to store the weights. E-commerge packaging. This set ships in multiple boxes.
- SPACE-SAVING DESIGN – The A-frame design of this rack maximizes floor space by storing dumbbells in an “A” shape, or vertical fashion. Easily access and store dumbbells. Rubber inserts prevent dumbbells and rack from scratches
- DURABLE AND RELIABLE – Rack is made with steel and finished with durable black powder coat. Heads are made from ASTM A48 Class 20 grey iron and joined together by a 1018 cold rolled solid steel handle (sizes 15-120lb) with an extreme durable rubber coating.
- VERSATILE – Dumbbells offer the ability to target specific muscle groups or perform a full body workout. Perfect for isolations, functional and HIIT workouts, and strength training routines
- FEATURES – The original hex shaped heads prevent rolling. The medium depth knurling on the handle provides essential grip and security during use. Rubber coating is a durable and effective finish
- 【Yoleo】is a fitness equipment brand that aims to provide affordable, durable and effective weight bench for the home
- 【Stable Structure】Heavy duty steel makes this weight bench a sturdy support for the toughest workouts. Mechanics construction based on the double-triangle structure and double supports create the best stability
- 【84 Adjustable Options& Fast Adjustment】 This workout bench offers 7 back adjustments, 4 seat adjustments and 3 leg adjustments. So this adjustable weight bench is also an incline, decline, or flat bench. It means you can perform movements on any of those planes. The ladder-style adjustment is fast and secure because a user can adjust it in a few seconds
- 【Portable&Compact Design】This bench press bench measures 31.5″L x 12.6″W x 13″ H when folded, making it highly portable and comfortably small. It weighs about 23.1 pounds. When unfolded, it stands at 41″ L x 12.6″ W x 42.5″ H —small enough to fit into tight workout spaces
- 【High-quality Materials】1.4″ thickness back pad and seat pad are made from high-density foam, composite board and PU leather cover. They can run smoothly to ensure a great exercise experience. And 2.4″ thickness leg foam also improves leg drive
1. Body Muscle Matters beginner core circuit
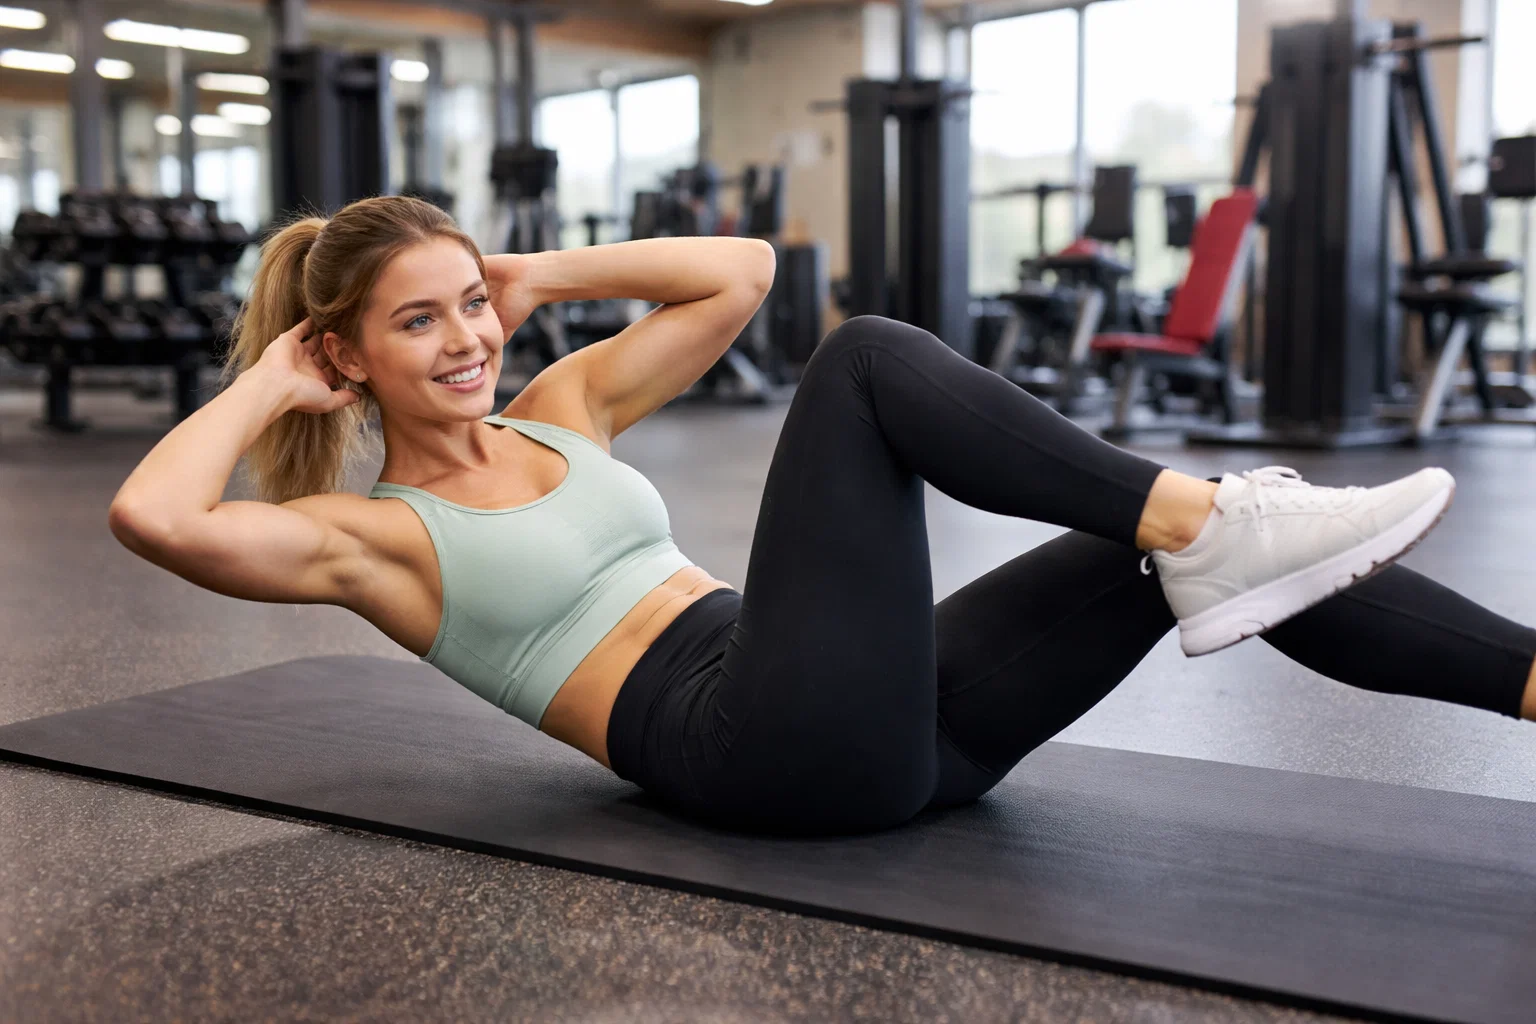
This beginner core workout routine combines 12 foundational exercises into a simple circuit you can do on your living room floor. You’ll work through each movement for specific reps or time intervals, building core strength and stability from the ground up without spending money on equipment or gym memberships. The circuit takes about 20 to 25 minutes once you include a warm-up, making it easy to fit into busy schedules.
Why a strong core matters for beginners
Your core does more than help you look good in a t-shirt. These muscles support your spine, stabilize your pelvis, and power nearly every movement you make throughout the day. When you lift groceries, bend down to tie your shoes, or play with your kids, your core muscles work together to protect your back and maintain balance. Starting with proper core training now sets the foundation for every other fitness goal you’ll pursue later.
How this no equipment circuit works
You’ll perform each of the 12 exercises in order, resting 30 to 60 seconds between movements. Complete one full round when you start out, then add a second round after two weeks of consistent training. Each exercise targets different core muscle groups, including your abs, obliques, lower back, and deep stabilizers. The variety keeps your muscles challenged and prevents boredom while building balanced strength.
Focus on performing each rep with control rather than rushing through the movements to hit a number.
Weekly schedule and rest days
Train this circuit three times per week on non-consecutive days like Monday, Wednesday, and Friday. Your core muscles need 48 hours of recovery between sessions to repair and grow stronger. On rest days, you can do light activities like walking or gentle stretching, but avoid intense core work. This schedule gives you consistent training while preventing overuse injuries.
Warm up ideas before you start
Spend five minutes loosening up before you tackle the circuit. March in place for 60 seconds, do 10 arm circles in each direction, and perform 8 to 10 cat-cow stretches on your hands and knees. Add some gentle torso twists while standing to wake up your obliques. These simple movements increase blood flow to your muscles and reduce injury risk.
Safety tips and when to talk to a pro
Stop immediately if you feel sharp pain, especially in your lower back or neck. Muscle burn is normal, but pain signals something is wrong. Talk to your doctor before starting this routine if you have existing back problems, are pregnant, recently gave birth, or recovered from abdominal surgery within the past six months. Listen to your body and modify movements as needed rather than pushing through discomfort.
2. Dead bug
The dead bug builds core stability and coordination by teaching you to control opposite arm and leg movements while keeping your lower back pressed into the floor. This exercise appears in nearly every beginner core workout routine because it’s safe, effective, and reveals any imbalances between your left and right sides. You’ll strengthen your deep core muscles without straining your neck or back.
Why this move belongs in a beginner core routine
Dead bugs train your core to resist unwanted movement in your spine, which is exactly how these muscles function in real life. The alternating arm and leg pattern challenges your coordination and forces both sides of your body to work independently. Most beginners find this movement easier to perform correctly than crunches, making it an ideal starting point.
Step by step how to do it
Lie on your back with your arms extended straight toward the ceiling above your shoulders. Bend your knees to 90 degrees and lift your feet so your shins are parallel to the floor. Press your lower back into the mat, then slowly extend your right arm overhead while straightening your left leg, hovering both a few inches off the ground. Return to the starting position and repeat on the opposite side.
Form tips and breathing
Keep your lower back glued to the floor throughout the entire movement. Exhale as you extend your arm and leg, inhale as you return to center. Move slowly and deliberately rather than racing through repetitions.
Control matters more than speed when building foundational core strength.
Easy modifications if you struggle
Lower your extended leg only halfway down instead of bringing it close to the floor. You can also perform arm-only or leg-only variations until you master the coordination.
Progressions when you get stronger
Add ankle weights or hold a light dumbbell in each hand. Slow down your tempo to spend 5 seconds on each extension. Another option is extending your limbs closer to the floor without losing your lower back contact.
Sets, reps, and where to put it in your workout
Perform 8 to 12 reps per side (16 to 24 total alternating movements) for 2 to 3 sets. Place this exercise early in your circuit when your core is fresh and your concentration is sharp.
3. Glute bridge
The glute bridge strengthens your posterior chain while teaching your core to maintain stability during hip movements. This exercise belongs in every beginner core workout routine because it targets your glutes, hamstrings, and lower back muscles that support proper posture and spinal alignment. You’ll build a stronger connection between your hips and core without placing stress on your neck.
Why this move belongs in a beginner core routine
Glute bridges activate the muscles along your backside that counterbalance the front-facing core work from other exercises. Your glutes function as part of your core system by stabilizing your pelvis and preventing your lower back from taking over during daily movements. Strengthening this area reduces lower back pain and improves your ability to perform compound exercises later.
Step by step how to do it
Lie on your back with your knees bent and feet flat on the floor, hip-width apart. Place your arms down by your sides with palms facing down. Press through your heels and squeeze your glutes to lift your hips toward the ceiling until your body forms a straight line from knees to shoulders. Hold at the top for 2 seconds, then lower back down with control.
Form tips and breathing
Avoid arching your back at the top of the movement. Exhale as you lift your hips, inhale as you lower them. Keep your core braced throughout the entire range of motion.
Your shoulders should stay planted on the ground while your glutes do the lifting work.
Easy modifications if you struggle
Place your feet closer to your glutes to reduce the range of motion. Perform smaller lifts until you build enough strength for full bridges.
Progressions when you get stronger
Hold the top position for 5 to 10 seconds. Try single-leg bridges by extending one leg straight. Add a resistance band around your thighs just above your knees to increase difficulty.
Sets, reps, and where to put it in your workout
Complete 12 to 15 reps for 2 to 3 sets. Place this exercise in the middle of your circuit after floor-based movements like dead bugs.
4. Bird dog
The bird dog teaches your core to maintain stability while your arms and legs move independently. This exercise challenges your balance and coordination more than static holds, making it a valuable addition to any beginner core workout routine. You’ll strengthen the muscles along your spine while improving posture and reducing the risk of lower back pain.
Why this move belongs in a beginner core routine
Bird dogs build anti-rotation strength by forcing your core to resist twisting as you extend opposite limbs. Your body wants to tip sideways when you lift an arm and leg, so your core muscles must fire hard to keep you steady. This translates directly to real-world movements like walking, running, or carrying uneven loads.
Step by step how to do it
Start on your hands and knees with your wrists under your shoulders and knees under your hips. Keep your back flat and gaze down at the floor. Extend your right arm straight forward while simultaneously extending your left leg straight back, reaching both away from your body. Hold for 2 seconds, then return to the starting position. Repeat with your left arm and right leg.
Form tips and breathing
Keep your hips level throughout the movement. Exhale as you extend your limbs, inhale as you return to center. Your spine should stay neutral without arching or rounding.
Focus on creating a straight line from your extended fingertips through your extended toes.
Easy modifications if you struggle
Practice lifting just your arm or leg separately until you master the balance. Place a folded towel under your knees for comfort.
Progressions when you get stronger
Hold each extension for 5 to 10 seconds. Add ankle weights or wrist weights to increase resistance. Try lifting your supporting knee slightly off the ground during the hold.
Sets, reps, and where to put it in your workout
Complete 8 to 10 reps per side for 2 to 3 sets. Place this exercise after glute bridges when your core is warmed up but still capable of controlled movement.
5. Forearm plank
The forearm plank stands as one of the most effective isometric holds in any beginner core workout routine because it engages your entire core simultaneously without movement. This exercise teaches you to brace your midsection while maintaining proper spinal alignment, a skill that carries over to every physical activity you do. You’ll build endurance in your abs, obliques, and lower back muscles through sustained muscle tension.
Why this move belongs in a beginner core routine
Planks train your core muscles to work together as a unified system rather than isolating individual muscle groups. This full-body tension mimics how your core functions during daily activities like lifting heavy objects or maintaining posture at your desk. The static nature of the hold makes it easier to focus on proper form without the coordination challenges of dynamic movements.
Step by step how to do it
Position yourself face-down on the floor with your forearms flat and elbows directly beneath your shoulders. Clasp your hands together or keep them parallel. Tuck your toes and lift your entire body off the ground, creating a straight line from your head through your heels. Pull your belly button toward your spine and squeeze your glutes.
Form tips and breathing
Keep your hips level with your shoulders. Breathe steadily throughout the hold rather than holding your breath. Your gaze should point straight down at the floor to maintain neutral neck alignment.
Quality holds for shorter durations beat sloppy form for longer times every single time.
Easy modifications if you struggle
Drop to your knees while keeping your body straight from knees to shoulders. Start with 10-second holds and gradually increase the duration.
Progressions when you get stronger
Add shoulder taps by lifting one hand to touch the opposite shoulder. Try walking planks by alternating between forearms and straight arms. Hold the position for 60 seconds or longer.
Sets, reps, and where to put it in your workout
Hold for 20 to 45 seconds and repeat for 2 to 3 sets. Place this exercise in the middle to late portion of your circuit after you’ve completed several dynamic movements.
6. Side plank
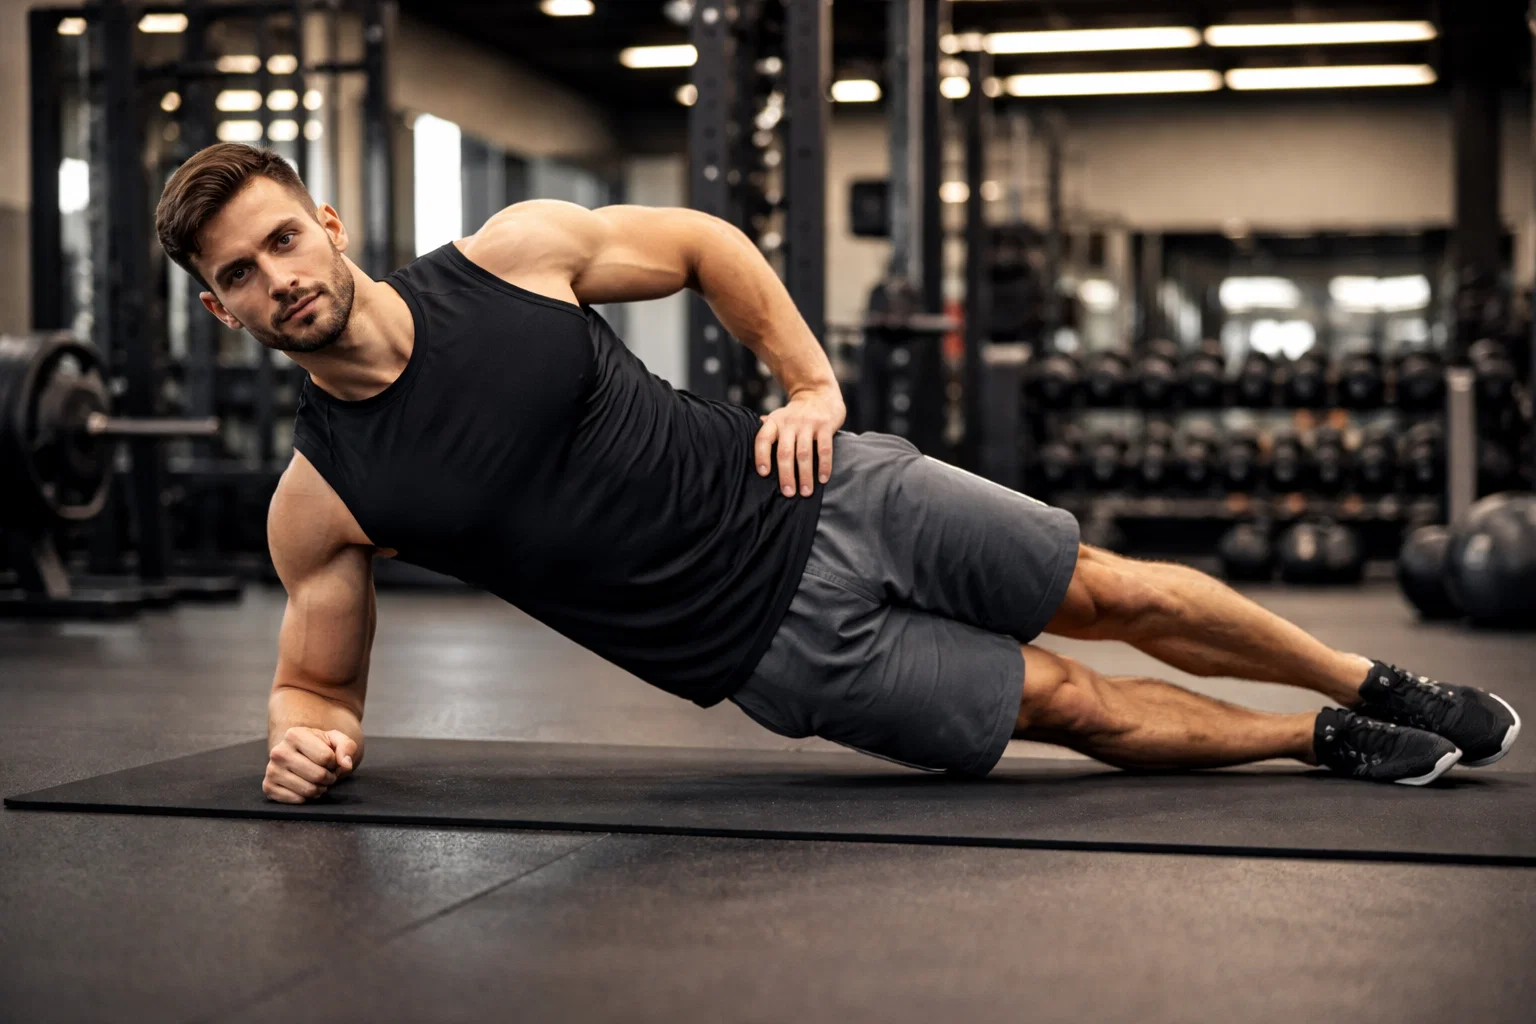
The side plank targets your obliques and builds lateral stability that other core exercises miss. This movement challenges your body to resist sideways bending while maintaining a straight line from head to feet. Adding side planks to your beginner core workout routine creates balanced core strength by working muscles along the sides of your torso that protect your spine during twisting and turning motions.
Why this move belongs in a beginner core routine
Side planks strengthen the muscles that stabilize your spine during lateral movements and rotational activities. Your obliques work overtime to prevent your hips from sagging while your shoulders, hips, and core learn to function as one rigid unit. This exercise improves your ability to maintain balance during single-leg activities and reduces strain on your lower back during everyday twisting motions.
Step by step how to do it
Lie on your right side with your right forearm flat on the ground and elbow directly under your shoulder. Stack your left foot on top of your right foot. Push through your forearm and lift your hips off the ground until your body forms a straight diagonal line. Place your left hand on your hip or extend it toward the ceiling.
Form tips and breathing
Keep your hips stacked vertically without letting them roll forward or backward. Breathe naturally throughout the hold rather than holding your breath. Your head should stay aligned with your spine.
Side planks reveal strength imbalances between your left and right sides faster than any other core exercise.
Easy modifications if you struggle
Bend your bottom knee and rest it on the ground for support. Start with 10-second holds on each side.
Progressions when you get stronger
Add hip dips by lowering and lifting your hips. Hold for 45 to 60 seconds per side. Try lifting your top leg during the hold.
Sets, reps, and where to put it in your workout
Hold for 20 to 30 seconds per side for 2 to 3 sets. Place this exercise after regular planks to work both frontal and lateral core stability back to back.
7. Bear plank with knee taps
The bear plank with knee taps adds dynamic movement to the static plank position by forcing your core to stabilize while your legs move independently. This exercise builds anti-rotation strength and challenges your balance more than traditional planks. You’ll feel this movement working your abs, obliques, and hip flexors simultaneously while teaching your body to maintain a rigid core during motion.
Why this move belongs in a beginner core routine
Bear planks train your core to resist unwanted movement while your body is in an unstable position. The alternating knee taps create instability that forces your abs and obliques to fire harder to keep you from rocking side to side. This movement pattern prepares you for more advanced exercises while building functional strength that transfers to everyday activities.
Step by step how to do it
Start on your hands and knees with your wrists under shoulders and knees under hips. Press your palms firmly into the floor and lift your knees about one inch off the ground. Keep your back flat and core tight. Tap your right knee to the floor, then lift it back up. Tap your left knee down and lift. Continue alternating knees while maintaining the hover position.
Form tips and breathing
Keep your hips level without letting them rotate as you tap each knee. Breathe steadily and avoid holding your breath during the movement. Your shoulders should stay stable directly over your wrists.
Bear planks expose weak points in your core stability faster than static holds because movement reveals compensation patterns.
Easy modifications if you struggle
Skip the knee taps and simply hold the bear position without moving. Reduce the hold time to 10 to 15 seconds per set.
Progressions when you get stronger
Increase your hover height to 2 to 3 inches. Add shoulder taps between knee taps. Hold each lifted position for 3 seconds before tapping down.
Sets, reps, and where to put it in your workout
Perform 8 to 12 taps per side for 2 to 3 sets. Place this exercise late in your circuit after you’ve completed planks and side planks to maximize core fatigue.
8. Reverse crunch
The reverse crunch targets your lower abdominal muscles by lifting your hips off the ground instead of your shoulders. This exercise builds strength in the often-neglected lower abs while teaching you to control your pelvis through a full range of motion. You’ll feel this movement working the area below your belly button without straining your neck or upper back.
Why this move belongs in a beginner core routine
Reverse crunches isolate your lower abs more effectively than regular crunches while placing less stress on your neck and spine. The movement pattern teaches you to control your pelvis and engage your deep core muscles to lift your hips rather than swinging your legs. This exercise balances out upper ab work from other movements and strengthens the muscles that support your lower back.
Step by step how to do it
Lie on your back with your knees bent and feet lifted so your thighs are perpendicular to the floor. Place your arms flat on the ground by your sides with palms down. Pull your knees toward your chest while lifting your hips and lower back off the floor. Hold for one second at the top, then lower your hips back down with control.
Form tips and breathing
Keep the movement small and controlled. Exhale as you lift your hips, inhale as you lower them. Avoid using momentum to swing your legs.
Focus on curling your pelvis up rather than just pulling your knees toward your face.
Easy modifications if you struggle
Lower your hips only halfway to reduce the range of motion. Place your hands under your glutes for extra support.
Progressions when you get stronger
Hold the top position for 3 to 5 seconds. Extend your legs straight up instead of keeping them bent. Add ankle weights to increase resistance.
Sets, reps, and where to put it in your workout
Complete 10 to 15 reps for 2 to 3 sets. Place this exercise late in your circuit after planks and dynamic movements to target any remaining energy in your lower abs.
9. Seated knee tuck
The seated knee tuck strengthens your lower abs and hip flexors while challenging your balance in a controlled seated position. This exercise builds core stability through a pulling motion that mimics functional movements like climbing stairs or getting out of a chair. You’ll develop better control over your lower abdominal muscles without lying flat on your back.
Why this move belongs in a beginner core routine
Seated knee tucks teach you to engage your core while maintaining an upright posture, a skill that transfers directly to everyday sitting and standing activities. The seated position reduces lower back strain compared to floor-based leg lifts while still targeting your lower abs effectively. This movement fits perfectly in any beginner core workout routine because it requires minimal coordination and space.
Step by step how to do it
Sit on the floor with your knees bent and feet flat. Place your hands on the ground behind your hips with fingers pointing forward. Lean back slightly and lift your feet a few inches off the floor. Pull your knees toward your chest while keeping your back straight, then extend your legs back out without touching the ground.
Form tips and breathing
Keep your chest lifted throughout the movement. Exhale as you pull your knees in, inhale as you extend them out.
Control the extension phase just as much as the contraction to maximize core engagement.
Easy modifications if you struggle
Keep your hands on the ground for support throughout the entire set. Reduce your range of motion by extending your legs only halfway.
Progressions when you get stronger
Lift your hands off the ground and hold them by your chest. Slow your tempo to 3 seconds in each direction. Add ankle weights for extra resistance.
Sets, reps, and where to put it in your workout
Perform 10 to 15 reps for 2 to 3 sets. Place this exercise late in your circuit alongside other lower ab movements like reverse crunches.
10. Standing march with twist
The standing march with twist adds rotational movement to your core training while keeping you upright and mobile. This exercise strengthens your obliques and improves coordination between your upper and lower body through a twisting motion that mimics natural walking patterns. You’ll build core stability in a standing position that directly translates to real-world activities.
Why this move belongs in a beginner core routine
Standing marches with twists work your core through functional rotation while improving balance and coordination. This movement teaches your obliques to control twisting motions without compensation from your lower back. The standing position makes this exercise accessible for anyone who struggles with floor-based movements and provides a cardiovascular element to your beginner core workout routine.
Step by step how to do it
Stand with your feet hip-width apart and place your hands behind your head with elbows wide. Lift your right knee toward your chest while rotating your torso to bring your left elbow toward your right knee. Return to the starting position and repeat on the opposite side, lifting your left knee and rotating your right elbow down.
Form tips and breathing
Keep your chest lifted throughout the movement. Exhale as you twist and lift your knee, inhale as you return to center. Your hips should stay facing forward while your upper body rotates.
Standing rotational exercises train your core to control movement in multiple planes simultaneously.
Easy modifications if you struggle
Reduce your knee height and rotation depth. Slow your tempo to focus on control rather than speed.
Progressions when you get stronger
Increase your pace to add a cardio challenge. Hold each twisted position for 2 seconds. Add light ankle weights to increase resistance.
Sets, reps, and where to put it in your workout
Complete 12 to 16 reps per side for 2 to 3 sets. Place this exercise late in your circuit as an active recovery movement between intense floor exercises.
11. Superman hold
The superman hold strengthens your lower back muscles and builds endurance along your entire posterior chain from your glutes through your upper back. This exercise counterbalances all the front-facing core work in your beginner core workout routine by targeting the muscles that support your spine from behind. You’ll improve your posture and reduce lower back pain risk without any equipment.
Why this move belongs in a beginner core routine
Superman holds develop back extensor strength that prevents your spine from rounding during daily activities like sitting at a desk or picking up objects. Your lower back muscles need just as much attention as your abs to create a balanced core that protects your spine from all angles. This movement teaches you to engage your entire backside while keeping your neck in a safe position.
Step by step how to do it
Lie face down on the floor with your arms extended overhead and legs straight. Keep your forehead down and gaze at the floor. Simultaneously lift your arms, chest, and legs off the ground by squeezing your glutes and lower back muscles. Hold this position with your limbs hovering a few inches off the floor.
Form tips and breathing
Keep your neck neutral by looking down at the floor. Breathe steadily throughout the hold rather than holding your breath. Squeeze your glutes to protect your lower back from hyperextension.
Lower back exercises feel different from ab work but deserve equal attention in building complete core strength.
Easy modifications if you struggle
Lift only your upper body or only your lower body separately until you build enough strength for the full hold.
Progressions when you get stronger
Hold the position for 30 to 45 seconds. Add small pulses by lifting higher for one second. Try alternating single-arm and single-leg lifts.
Sets, reps, and where to put it in your workout
Hold for 15 to 30 seconds for 2 to 3 sets. Place this exercise near the end of your circuit after you’ve completed all front-facing core movements.
12. Hollow body hold
The hollow body hold creates total body tension by teaching you to maintain a curved spine position while keeping your limbs extended. This advanced isometric exercise challenges your entire anterior core and builds the body awareness needed for more complex movements. Adding hollow holds to your beginner core workout routine develops the strength and control required for skills like handstands and advanced gymnastics movements down the road.
Why this move belongs in a beginner core routine
Hollow holds train your core to work as a complete unit while maintaining spinal flexion under tension. Your abs must fire continuously to keep your lower back pressed into the floor while your limbs extend away from your body. This position teaches you to create full-body tension that carries over to nearly every other exercise you’ll perform in the gym.
Step by step how to do it
Lie on your back with your arms extended overhead and legs straight. Press your lower back firmly into the floor by tilting your pelvis. Lift your shoulders and legs a few inches off the ground simultaneously. Your body should form a shallow curve with only your lower back and glutes touching the floor.
Form tips and breathing
Keep your lower back glued to the floor throughout the hold. Breathe shallowly and steadily rather than holding your breath. Your chin should tuck slightly toward your chest to maintain proper neck alignment.
Hollow holds demand perfect positioning because even small form breaks let your hip flexors take over from your abs.
Easy modifications if you struggle
Bend your knees to reduce the lever length. Keep your arms by your sides instead of overhead. Start with 10-second holds and gradually extend the duration.
Progressions when you get stronger
Hold for 45 to 60 seconds. Add small rocking motions forward and backward. Try the hollow hold with straight arms and legs fully extended.
Sets, reps, and where to put it in your workout
Hold for 20 to 40 seconds for 2 to 3 sets. Place this exercise at the very end of your circuit as a final challenge after you’ve completed all other movements.
Keep building your core

This beginner core workout routine gives you everything you need to build foundational strength without equipment or complicated gym routines. The 12 exercises work together to strengthen your abs, obliques, lower back, and deep stabilizers through controlled movements and proper breathing patterns. Start with one circuit three times per week and gradually add a second round as your endurance improves over the following weeks.
Consistency beats intensity when you’re building core strength from scratch. You’ll notice improvements in your balance, posture, and overall stability within four to six weeks of regular training. Track your progress by noting how long you can hold planks or how many reps you complete with good form each session.
Your core training doesn’t stop here. Explore more muscle building strategies and workout tips at Body Muscle Matters to continue your fitness journey beyond these foundational movements and discover new ways to challenge yourself.
