How to Use Resistance Bands for Beginners: Full Guide
Home ›Fitness Accessories and Technology
⚠️ Medical Disclaimer: The exercises and information in this article are for educational purposes only and are not a substitute for professional medical advice. Consult your doctor or a licensed physical therapist before starting any new exercise program, especially if you have a pre-existing health condition.
“Want to start strength training but don’t know where to start … Order a set of resistance bands and save this video.”
If that quote sounds like you, you’re in good company—and if you are learning how to use resistance bands for beginners, this tool may be the most beginner-friendly strength option you’ll ever pick up. A systematic review of 8 randomized controlled trials published in the National Center for Biotechnology Information found that elastic resistance bands produce similar strength gains to conventional weight machines—with significantly less stress on your joints. This makes them an ideal starting point for strength training for beginners.
Most beginners, however, pick the wrong band, let it snap back uncontrolled between reps, or skip progression entirely—and then wonder why nothing is changing. These three mistakes are exactly what this guide is designed to prevent.
Here you’ll learn how to use resistance bands for beginners step by step: from choosing your first band to completing a full 5-exercise routine at home. We also cover special modifications if you’re managing a joint condition, returning from injury, or starting later in life.
Learning how to use resistance bands for beginners works best when you follow The Tension Triangle—three simple principles: choose the right resistance, control every rep, and progress gradually. Research shows elastic bands produce equal strength gains to weight machines, with less joint stress.
- Start light: Choose a band that lets you complete 12–15 reps with good form before moving up
- Control the return: Never let the band snap back—the slow return phase builds just as much strength as the push
- Progress deliberately: Increase resistance only when you can complete 3 sets of 15 reps with perfect form
- Safe for joints: Bands are recommended by the CDC for people managing arthritis and joint conditions
- Works at home: All 5 exercises in this guide require only a band and a door anchor
Choosing the Right Resistance Band
- Estimated Time: 30-45 minutes
- Tools Needed:
- Resistance band set (loop or tube)
- Door anchor attachment
- Clear floor space
When discovering how to use resistance bands for beginners, choosing the right band before your first workout is one of the most important steps you can take. Elastic resistance bands produce strength gains equivalent to conventional weight machines, according to a systematic review of 8 randomized controlled trials (NCBI, 2019)—but only when you’re working with the right tension level for your current fitness. Understanding resistance bands for beginners is the first side of The Tension Triangle—choosing the right tension—and starts here, before you ever stretch a band. In our experience, mastering these fundamentals prevents months of frustrating plateaus.
Loop, Tube, and Mini-Bands Explained
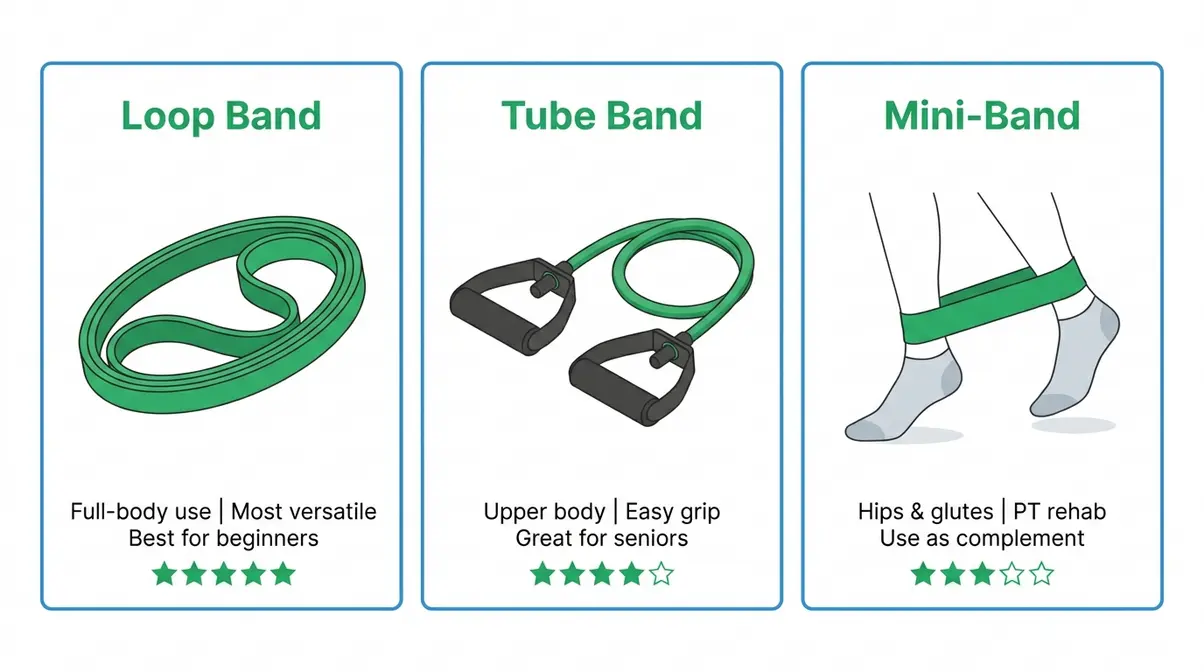
Most beginner sets include three distinct band types. Each has a specific purpose, and knowing which to reach for saves you frustration from the very first session.
Loop bands (flat, circular bands that form a continuous loop) are the most versatile option available. They work for lower body exercises like squats and glute bridges, and they double as pull-up assistance bands—which is why they’re the best starting point for most beginners. A standard loop band set typically includes 4–5 resistance levels, color-coded from lightest to heaviest (yellow or pink = lightest; black or red = heaviest—a standard industry convention across most major brands).
Tube bands (cylindrical bands with plastic or foam handles attached at each end) are ideal for upper body pulling and pushing movements. The handles make gripping significantly easier—an important advantage for seniors or anyone with reduced hand strength or arthritis. If you’re learning how to use resistance bands with handles, tube bands are your starting point.
Mini-bands (short, flat loops that sit around your thighs or ankles) target the hips, glutes, and outer thighs. They’re commonly used in physical therapy for hip stabilization and knee-tracking exercises. They are not a substitute for full loop bands—think of them as a complement once you’ve built a foundation.
Picking Your Starting Level
Our certified trainer team recommends a simple rule that cuts through all the noise: if you can’t complete 12 reps with good form, the band is too heavy; if you never feel any resistance, it’s too light. This rule applies whether you’re doing a squat or a bicep curl.
For most beginners, this means starting with a light or extra-light band—typically the yellow or pink band in a color-coded set. From there, you progress upward only when you can complete 3 full sets of 15 reps with controlled form and no joint discomfort.
A few practical guidelines to keep in mind:
- Shorter band length = more resistance. The closer your hands are to the anchor point, the harder the band pulls.
- Doubled-up bands increase resistance without buying a heavier band—useful when you’re between levels.
- Handles aren’t just for comfort. For older adults or those with limited grip strength, the added stability of a tube band handle meaningfully reduces wrist strain.
If you’re learning how to use resistance bands at home for beginners without a trainer, starting one level lighter than you think you need is always the safer choice.
Safe Home Resistance Band Setup
Setting up your band correctly is not optional—it’s a safety step. A band that snaps free mid-exercise can cause a real injury. This section walks you through two non-negotiable checks before every single session. According to Healthline’s resistance band safety guidance, inspecting your band before use and securing it to a stable anchor are the two most frequently skipped—and most important—setup steps for beginners.
Anchoring to a Door Safely
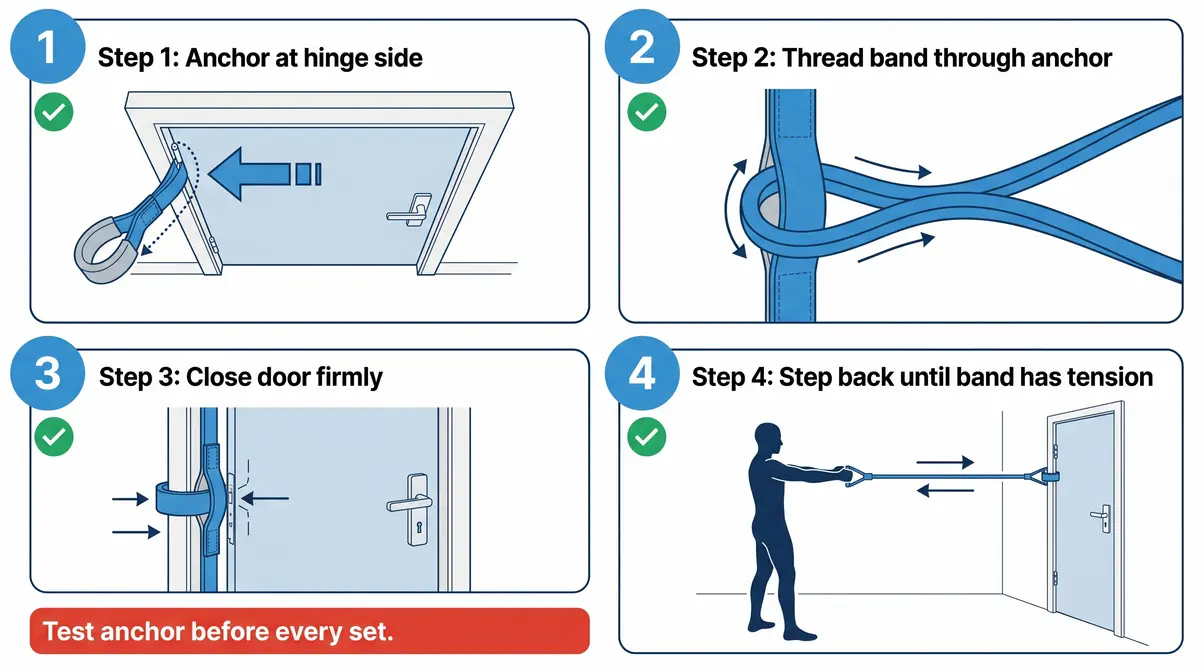
A door anchor is a small foam or rubber attachment that lets you thread a band through a door frame, creating a stable fixed point for rows, chest presses, and dozens of other exercises. Here’s how to set one up correctly:
Step 1: Choose a Solid Door
Select a solid interior door—not a hollow-core door, which can split under tension. A heavy exterior door or a door with a metal frame is ideal.
Step 2: Position the Anchor Height
Place the anchor at the correct height. For rows and chest presses, anchor at chest height. For pull-down movements, anchor at the top of the door frame.
Step 3: Thread the Band
Thread the band loop through the anchor loop, then close the door firmly with the anchor on the opposite side from you.
Step 4: Test the Anchor
Pull the door toward you to test. The anchor should hold without any slipping or movement. If the door opens even slightly under tension, find a different door.
Step 5: Establish Tension
Stand far enough back that the band has tension at the start of every rep—never begin a movement with a slack band.
Testing Your Band Before Use
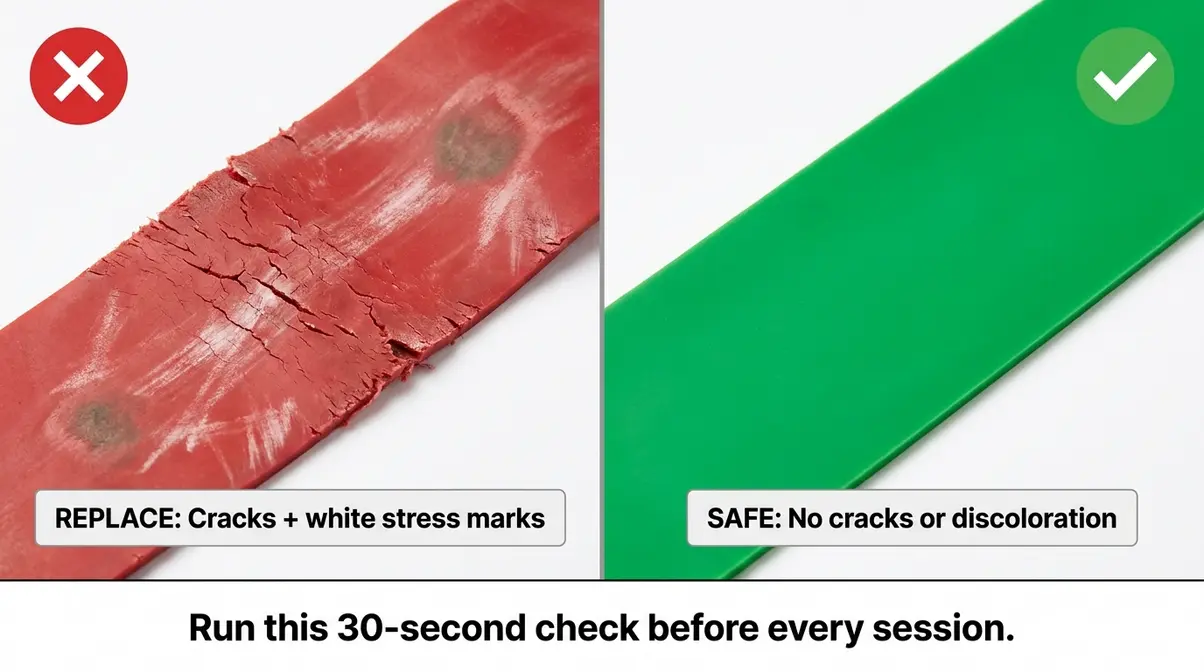
Bands degrade over time, especially with regular use. A cracked or weakened band that snaps mid-rep is a genuine injury risk. Before every session, run this 30-second check:
- Visual inspection: Hold the band up to a light source and stretch it gently. Look for cracks, discoloration, white stress marks, or thin spots.
- Stretch test: Pull the band to about twice its resting length and hold for 5 seconds. It should return to its original length without any distortion.
- Smell test: A strong rubber smell (beyond normal) can indicate material breakdown—retire the band.
- When in doubt, replace it. A new band costs less than a doctor’s visit.
Crucial Beginner Form Rules
Good form with resistance bands isn’t just about getting results—it’s about staying safe. Because bands provide variable resistance (meaning the tension increases as you stretch them further), they behave differently from dumbbells. Understanding this difference is what separates beginners who progress from those who plateau or get hurt. WebMD’s beginner resistance band guide consistently highlights controlled movement as the single most important form principle for new users.
The Three Form Principles
The Tension Triangle is the core framework of this guide—three principles that every beginner must understand before their first rep:
1. Choose the Right Tension.
The band should provide enough resistance to challenge your muscles, but not so much that your form breaks down. If your back arches, your knees cave, or you’re holding your breath, the band is too heavy. Drop down one level.
2. Control the Tension Through Every Rep.
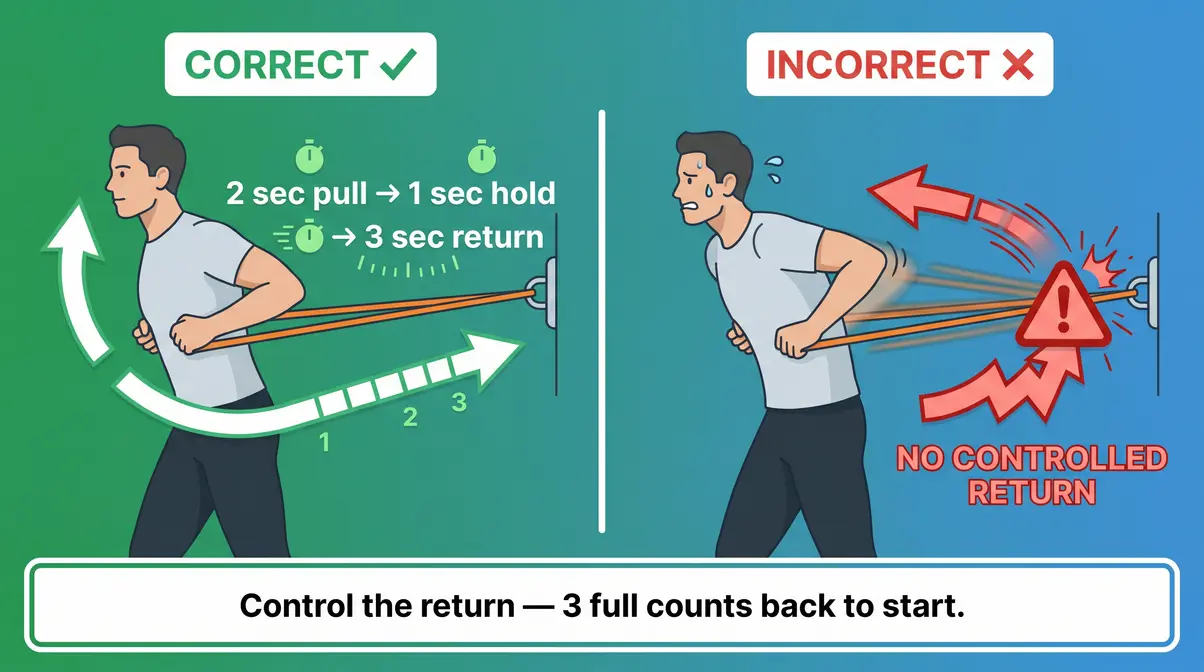
Resistance bands are not springs you pull and release. Every rep has two phases: the working phase (stretching the band) and the return phase (releasing it slowly). Both phases build muscle. Controlling the return is where most beginners lose form—and where most snap-back injuries happen.
3. Build the Tension Progressively Over Time.
Progressive overload (gradually making workouts harder over time) is the engine of all strength training. With bands, you progress by moving to a heavier band, shortening the band to increase starting tension, or adding more reps and sets—not by rushing through reps with poor form.
These three principles work together. Miss any one of them, and your results stall.
Controlling the Band Each Rep
Across physical therapy communities, the consistent guidance is that the eccentric (return) phase of a resistance band movement is where most beginners make their biggest mistake—they let go. Here’s what controlled form looks like in practice:
- Working phase (2 counts): Stretch the band with deliberate force, exhaling as you exert effort.
- Hold (1 count): Pause briefly at peak tension—this activates the target muscle most effectively.
- Return phase (3 counts): Release the tension slowly over 3 full seconds, inhaling as you return.
A 2-3-1 tempo (2 seconds out, 3 seconds back, 1-second hold) is the format our certified trainer team recommends for all beginner exercises. It eliminates snap-back, maximizes muscle activation, and keeps your joints safe throughout the movement.
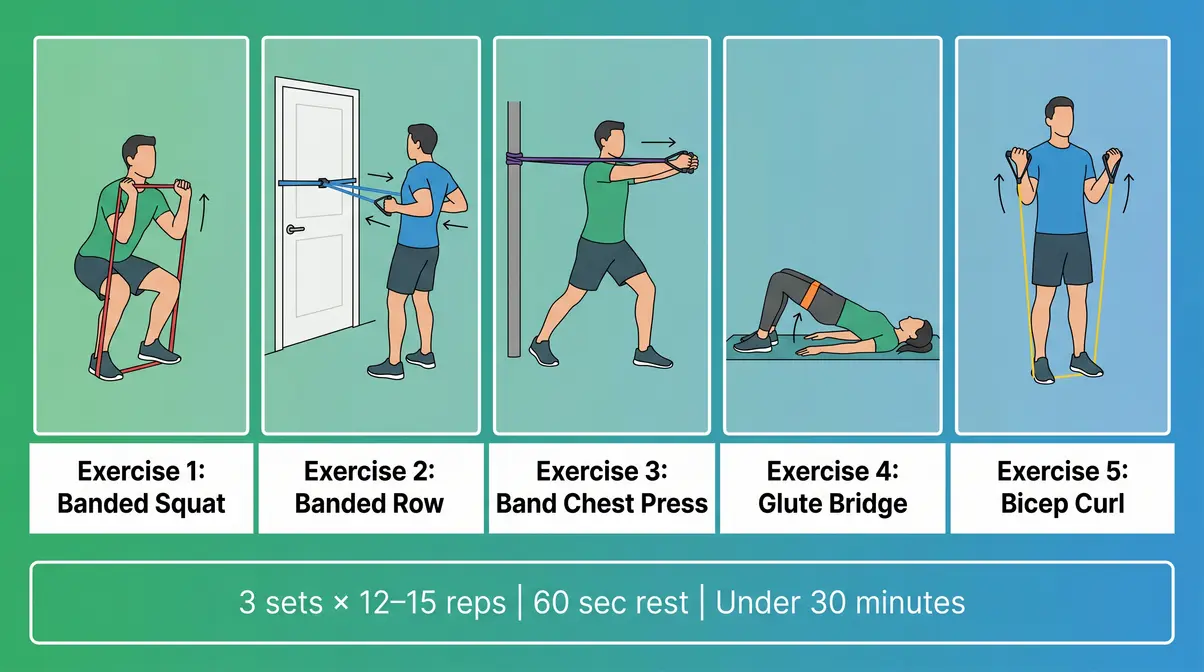
5-Exercise Full-Body Routine
This routine uses only a loop band and a door anchor, and it targets every major muscle group in your body. Our certified trainer team designed it specifically for complete beginners, prioritizing joint-friendly movement patterns and full-body coverage in under 30 minutes. Perform each exercise for 3 sets of 12–15 reps, resting 60 seconds between sets. Harvard Health’s resistance band training research confirms that full-body band routines performed 2–3 times per week produce measurable strength improvements within 6–8 weeks for untrained adults.
Exercise 1: Banded Squat
Target muscles: Quadriceps, glutes, hamstrings
Step 1: Position the Band
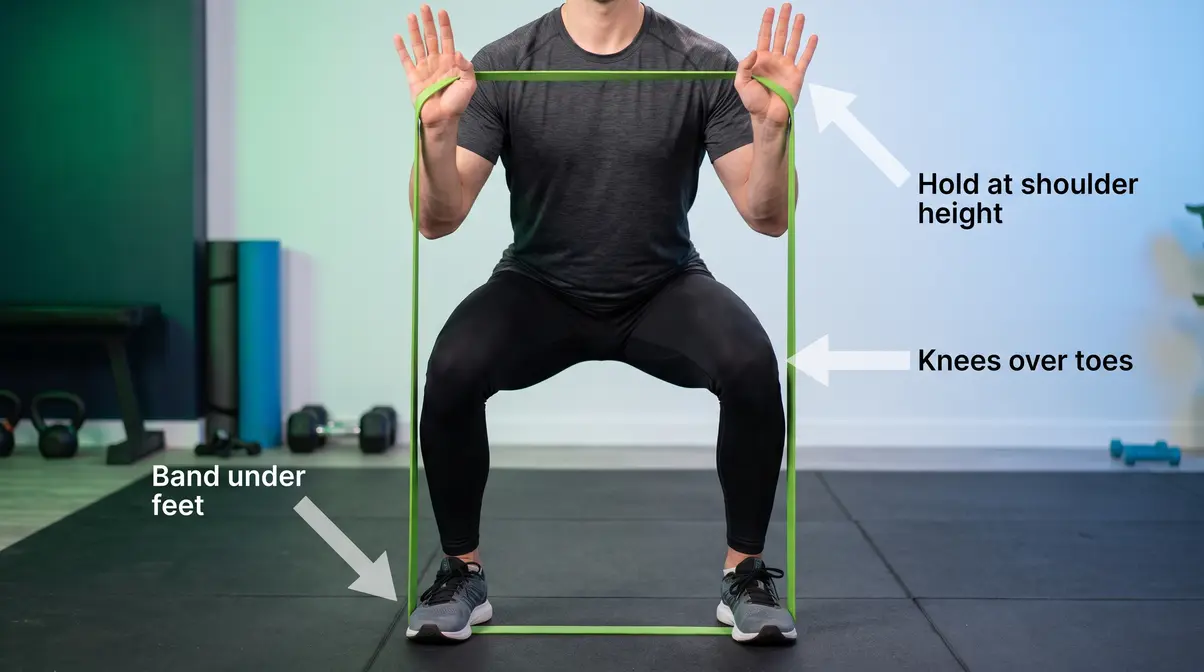
Stand with both feet shoulder-width apart, the band looped under both feet.
Step 2: Hold at Shoulder Height
Hold the band at shoulder height, palms facing forward.
Step 3: Lower into Squat
Push your hips back and bend your knees, lowering until your thighs are parallel to the floor. Utilizing proper squat form is essential here to protect your knees.
Step 4: Drive Upward
Drive through your heels to return to standing—this is the working phase.
Step 5: Control the Descent
Control the descent over 3 full counts on your next rep.
Why this matters: Squats build the foundational lower body strength needed for everyday activities like climbing stairs and getting up from a chair.
Exercise 2: Banded Row
Target muscles: Upper back, biceps, rear shoulders
Step 1: Anchor the Band
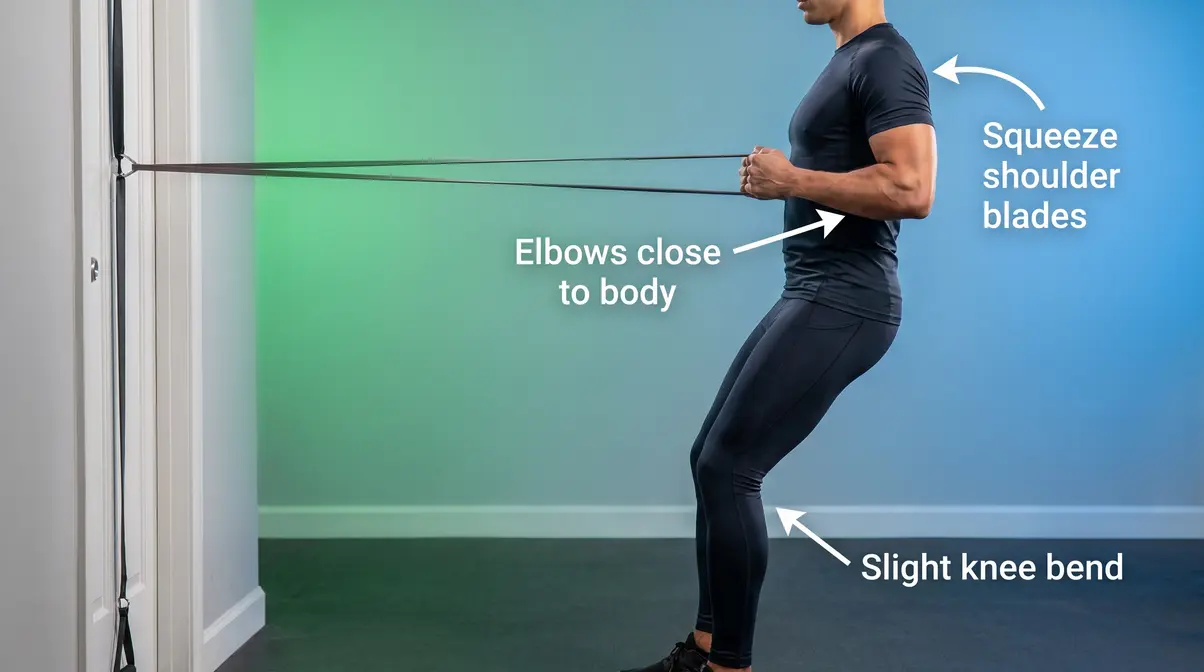
Anchor the band at chest height in the door.
Step 2: Step Back for Tension
Hold one end of the band in each hand, step back until there is tension in the band.
Step 3: Establish Posture
Stand tall with a slight bend in your knees, core engaged.
Step 4: Pull to Ribcage
Pull both hands toward your ribcage, squeezing your shoulder blades together at the end.
Step 5: Return Slowly
Return slowly over 3 counts—do not let the band pull your arms forward.
Why this matters: Rows counteract the forward-rounded posture most people develop from sitting at a desk, and they’re one of the safest upper back exercises for beginners.
Exercise 3: Band Chest Press
Target muscles: Chest, front shoulders, triceps
Step 1: Anchor Behind You
Anchor the band at chest height behind you.
Step 2: Step Forward
Hold one end in each hand, step forward until the band is taut.
Step 3: Stagger Your Stance
Stand in a staggered stance (one foot slightly ahead of the other) for balance.
Step 4: Press Forward
Press both hands forward until your arms are nearly straight—do not lock your elbows.
Step 5: Return with Control
Return slowly over 3 counts, keeping your elbows at shoulder height.
Why this matters: The chest press trains the pushing muscles of the upper body, which support posture and shoulder stability—without the joint compression of a barbell bench press.
Exercise 4: Band Glute Bridge
Target muscles: Glutes, hamstrings, core
Step 1: Lie Flat
Lie on your back with knees bent, feet flat on the floor, hip-width apart.
Step 2: Loop Across Hips
Loop the band across your hips, holding each end down against the floor beside you.
Step 3: Lift and Squeeze
Press your feet into the floor and lift your hips toward the ceiling, squeezing your glutes at the top.
Step 4: Hold the Peak
Hold for 1 count at the top, then lower slowly over 3 counts.
Step 5: Brace Your Core
Keep your core braced throughout—your lower back should not arch.
Why this matters: Glute bridges strengthen the posterior chain (the muscles running down the back of your body) without any spinal loading—making them ideal for people with lower back sensitivity.
Exercise 5: Band Bicep Curl
Target muscles: Biceps, forearms
Step 1: Stand on the Band
Stand with both feet on the band, shoulder-width apart.
Step 2: Grip the Ends
Hold one end of the band in each hand, palms facing forward.
Step 3: Pin Your Elbows
Keep your elbows pinned against your sides—they should not move during the curl.
Step 4: Curl Upward
Curl both hands toward your shoulders, squeezing your biceps at the top.
Step 5: Lower Slowly
Lower slowly over 3 counts, resisting the pull of the band on the way down.
Why this matters: The lowering phase of a bicep curl is where the eccentric strength gains happen—controlling it deliberately is what makes resistance band curls as effective as dumbbell curls for building arm strength.
Resistance Bands for Pull-Ups
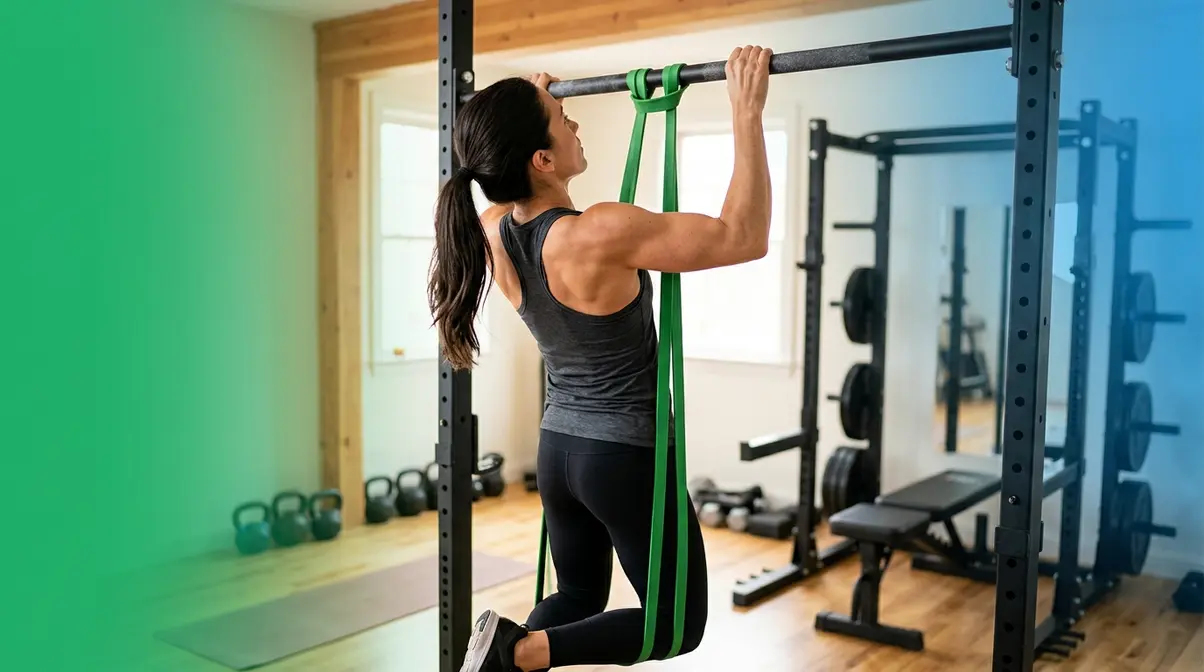
Pull-ups are one of the most effective upper body exercises—and one of the most intimidating for beginners. A resistance band looped over a pull-up bar acts as a counterweight, reducing the amount of bodyweight you need to lift on each rep. This makes pull-ups accessible even if you currently have zero upper body pulling strength. Common pain points reported by beginners include not knowing which band thickness to use and how to set the band up without it slipping off the bar.
Choosing a Pull-Up Assist Band
For pull-up assistance, you need a heavy loop band—not the light bands used for squats and rows. The band’s job is to support a portion of your bodyweight, so resistance matters here in a different way than in other exercises.
A practical starting guide based on bodyweight:
| Your Bodyweight | Suggested Band Resistance |
|---|---|
| Under 130 lbs | Light–Medium (15–35 lbs assistance) |
| 130–180 lbs | Medium–Heavy (35–50 lbs assistance) |
| Over 180 lbs | Heavy–Extra Heavy (50–80 lbs assistance) |
Start with more assistance than you think you need. The goal on your first session is to practice the full range of motion with controlled form—not to struggle through partial reps.
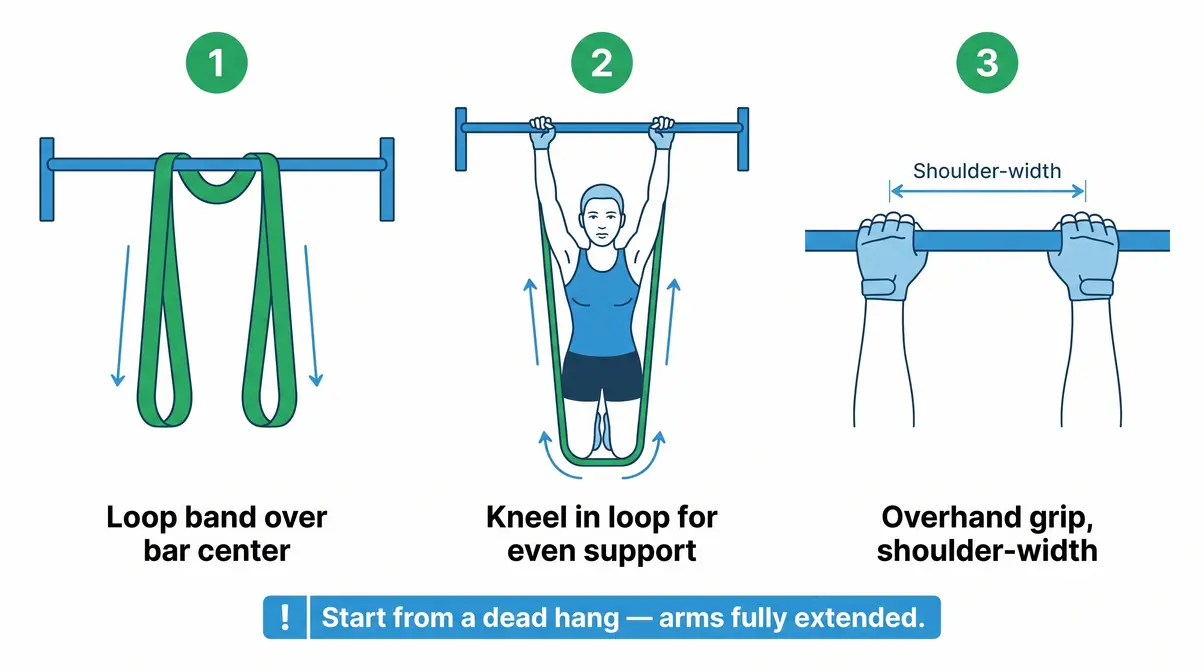
Setting Up a Band for Pull-Ups
Step 1: Loop Over the Bar
Loop the band over the pull-up bar—drape it over the center of the bar so both sides hang down equally.
Step 2: Create a Slip-Knot
Thread one end through the other to create a secure slip-knot style loop hanging from the bar. Pull firmly to tighten.
Step 3: Step Inside the Loop
Place one foot (or both knees) inside the hanging loop. Kneeling in the band distributes the assistance more evenly than a single foot.
Step 4: Grip the Bar
Grip the bar with hands shoulder-width apart, palms facing away from you (overhand grip).
Step 5: Start from a Dead Hang
Begin from a dead hang—arms fully extended—before pulling upward. This protects your shoulder joints and trains the full range of motion.
Step 6: Pull Upward
Pull your chest toward the bar, leading with your elbows. Avoid swinging your legs for momentum.
Step 7: Lower with Control
Lower slowly over 3 counts—the eccentric phase here is especially important for building the pulling strength you’ll need to eventually do unassisted pull-ups.
Bands for Seniors and Rehab
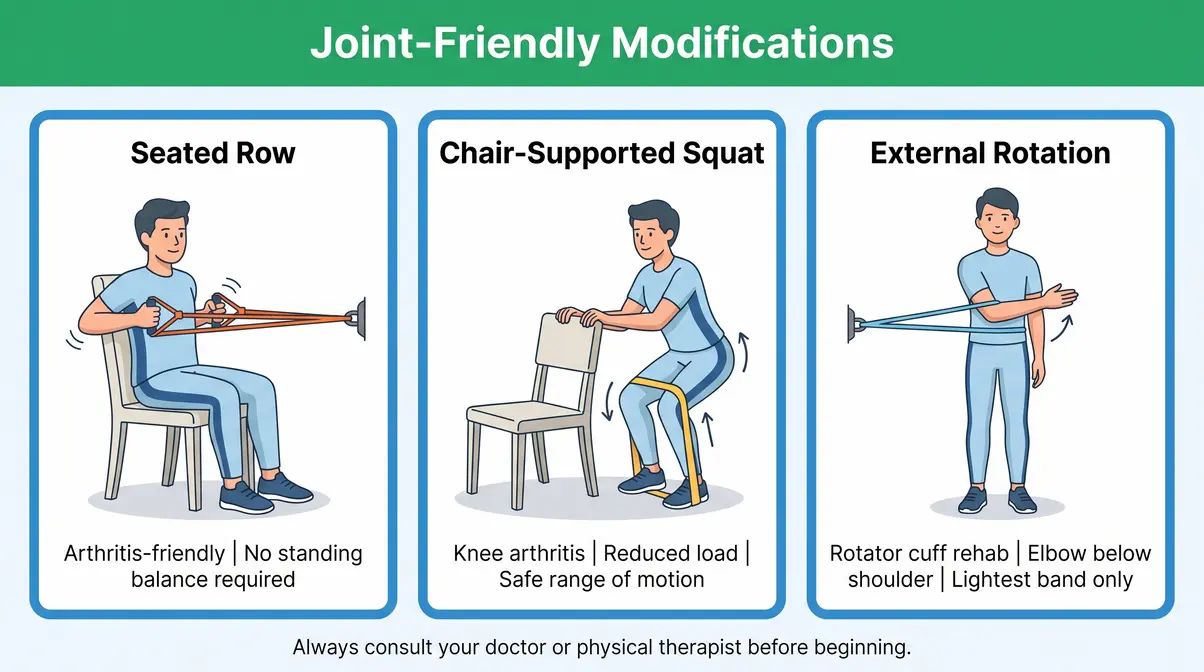
For older adults and people managing joint conditions, resistance bands are not just a convenient training tool—they may be among the safest strength training options available. This section addresses the questions most frequently left unanswered by competitor articles, and every health claim here is backed by Tier 1–2 medical sources. Always consult your doctor or physical therapist before starting any exercise program if you have a diagnosed health condition.
Why Bands Are Safe for Joints
Resistance bands provide variable resistance—meaning tension starts low and increases gradually as the band stretches. This is fundamentally different from free weights, which apply the same gravitational load throughout the range of motion. For joints that are inflamed, arthritic, or recovering from injury, this graduated tension profile is considerably gentler.
Key evidence from authoritative sources:
- Arthritis: The CDC’s physical activity guidelines for arthritis include resistance training as a recommended intervention, noting it can reduce pain and improve function in adults with arthritis. Elastic bands are specifically cited as a low-impact option.
- Osteoporosis: A historical 2020 study published in the Journal of Aging and Physical Activity found that progressive resistance band training improved bone mineral density markers in postmenopausal women over a 24-week program—an important finding given that weight-bearing exercise is one of the few non-pharmacological interventions shown to support bone health.
- Injury recovery: Elastic bands are a standard tool in physical therapy settings precisely because tension can be precisely controlled and gradually increased as healing progresses.
Quotable finding: “Elastic resistance training produced significant improvements in muscle strength and functional performance in older adults across multiple randomized controlled trials, with a low adverse event profile” (Journal of Human Kinetics, 2020).
Do bands help with arthritis?
Yes—the CDC recommends resistance training, including elastic band exercises, for adults managing arthritis. Regular resistance exercise can reduce joint pain, improve muscle strength around affected joints, and support overall functional independence.
For arthritis in the hands, use tube bands with foam handles to minimize grip compression. For knee arthritis, chair-supported squats and seated leg extensions with a mini-band reduce compressive load while still building the quadriceps strength that protects the knee joint. Start with the lightest band and consult your doctor before beginning. This makes them an excellent choice for strength training for seniors.
Arthritis and Joint Tweaks
For arthritis (especially in hands and knees):
Use tube bands with foam handles to reduce grip strain, as bare loop bands can compress arthritic finger joints. Reduce your range of motion slightly if end-range movement causes pain. A partial rep with zero pain is more productive than a full rep that triggers a flare. Avoid early morning sessions when joint stiffness is highest; mid-morning or early afternoon is typically when joints are most mobile.
For osteoporosis:
Prioritize weight-bearing exercises like the squat and standing row over floor-based exercises—ground reaction forces during standing movements support bone density maintenance. Avoid exercises that require significant spinal flexion (rounding the back), such as standing toe-touch stretches. Consult your physician before beginning any resistance program if you have been diagnosed with osteoporosis, as some exercises may be contraindicated depending on bone density scores.
For rotator cuff injuries or shoulder impingement:
Avoid overhead pressing movements entirely until cleared by a physical therapist. Focus on external rotation exercises (rotating the forearm outward against band resistance)—these directly strengthen the rotator cuff muscles and are a standard physical therapy protocol for impingement. Keep the elbow below shoulder height during all pulling and pushing movements. Start with the lightest possible band; the rotator cuff muscles are small stabilizers that respond to low resistance and high control, not heavy loads.
Common Mistakes to Avoid
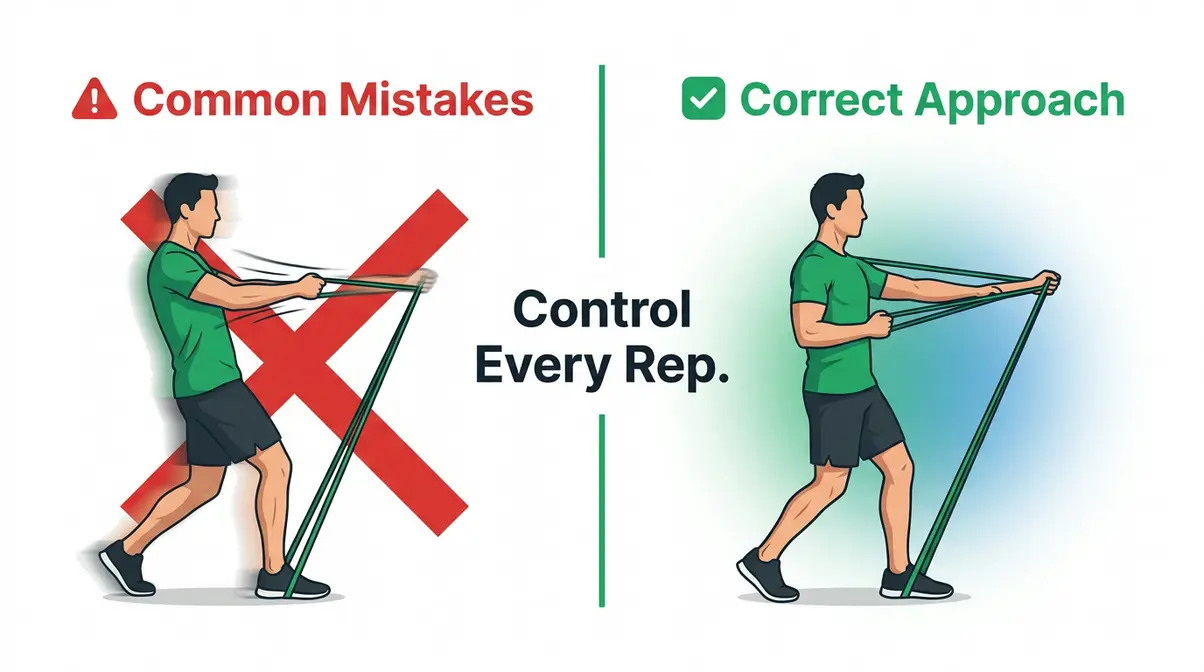
Even with the best intentions, beginners consistently repeat the same handful of errors. Here are the most common ones—and exactly how to fix them.
1. Letting the band snap back.
This is the single most common mistake. The return phase of every rep should take 3 full seconds. If the band is snapping back to its resting position, you’re losing half your workout and risking a snap-back injury to your face or joints. Slow it down deliberately.
2. Choosing a band that’s too heavy, too soon.
Ego is not your friend here. If your form breaks down before you hit 12 reps, you need a lighter band—not better willpower. Poor form under load is how beginners get hurt.
3. Skipping the band inspection.
Bands degrade with use, UV exposure, and sweat. A band with a crack or white stress mark can snap under tension with no warning. The 30-second pre-session check described in this guide takes less time than your warm-up.
4. Not anchoring the band properly.
A band that slips free from a door anchor mid-exercise can cause serious injury. Always use a purpose-built door anchor, test it before beginning, and never anchor a band around furniture that can tip or slide.
5. Skipping progressive overload.
Doing the same workout with the same band for months produces diminishing returns. Progressive overload (gradually making workouts harder) is the mechanism behind all strength gains. Move up a resistance level when you can complete 3 sets of 15 reps with perfect form and no discomfort.
What are common beginner mistakes?
The most common mistake is letting the band snap back during the return phase of every rep—this eliminates the eccentric muscle-building stimulus and risks injury. Other frequent errors include choosing a band that’s too heavy (causing form breakdown before 12 reps), skipping the pre-session band inspection, failing to anchor the band to a stable door anchor, and neglecting progressive overload by using the same resistance for months.
To avoid injury when exercising, always use a purpose-built door anchor and never anchor a band around furniture that can tip or slide. Following The Tension Triangle—choose the right tension, control every rep, and progress deliberately—addresses all five mistakes at once.
Frequently Asked Questions
Can bands help with injuries?
Yes—resistance bands are widely used in physical therapy for injury recovery because tension can be precisely controlled and gradually increased as healing progresses. Unlike free weights, bands apply minimal joint compression, making them suitable for early-stage rehabilitation. Many physical therapists introduce elastic band exercises within the first weeks of a recovery program. Always work with your physical therapist or doctor to select appropriate exercises and resistance levels during active recovery.
Do bands help osteoporosis?
Resistance bands can support bone health as part of a broader exercise program, according to published research in the Journal of Aging and Physical Activity. Progressive resistance training—including band-based exercises—has been shown to improve bone mineral density markers in postmenopausal women over 24 weeks. Standing, weight-bearing band exercises (like squats and rows) are preferable to floor-based movements for this purpose. Always consult your physician before starting a resistance program if you have been diagnosed with osteoporosis, as some exercises may be contraindicated.
Can bands help rotator cuffs?
Resistance bands are a standard physical therapy tool for rotator cuff rehabilitation. External rotation exercises using a light loop or tube band directly strengthen the four rotator cuff muscles (supraspinatus, infraspinatus, teres minor, subscapularis) that stabilize the shoulder joint. A historical 2021 review in the Journal of Shoulder and Elbow Surgery found that elastic resistance exercises improved pain and function in patients with rotator cuff-related shoulder pain. Keep the elbow below shoulder height and use the lightest band available until cleared for heavier loading by your physical therapist.
Best resistance band for seniors?
Tube bands with foam handles are generally the best resistance band for seniors because the handles eliminate grip strain and reduce wrist stress during pulling and pressing movements. A color-coded set with 4–5 resistance levels gives seniors the flexibility to start extremely light and progress gradually. For lower body work, a light-to-medium loop band is preferable. Seniors with limited mobility may also benefit from a door anchor that allows seated or standing exercises without floor work. Our certified trainer team recommends starting with a light or extra-light band regardless of perceived fitness level.
Your Next Step Starts Today
Figuring out how to use resistance bands for beginners is not a compromise—they are a complete strength training system backed by the same evidence base as conventional weight training. A systematic review of 8 randomized controlled trials confirmed that elastic resistance produces equivalent strength gains to weight machines (NCBI, 2019), and the CDC endorses them as a safe option for adults managing joint conditions.
The Tension Triangle gives you the framework to make it work: choose the right resistance, control every rep through both phases, and build tension progressively over time. These three principles are not advanced concepts—they’re the foundation every successful beginner builds on.
Start with the 5-exercise routine in this guide. Use the lightest band that still challenges you. Run the pre-session safety check before every workout. And when 3 sets of 15 reps feel easy—move up. That’s the whole system.
You don’t need a gym membership, a personal trainer on day one, or any previous fitness experience. You need a band, a door, and the willingness to begin.
Related posts:
Best Protein Tracker App: Tested & Compared for 2026
Best Muscle Building App 2026: 7 Expert-Tested Picks
Best Food Tracking App for Beginners: Top 5 of 2026
Best Home Workout App 2026: Top 10 Tested & Ranked
Gym Equipment Names and Uses: A Beginner Guide
Best Resistance Bands for Strength Training (2026 Picks)

Callum
Hi, I'm Callum, the founder of Body Muscle Matters. I'm not a certified trainer, I'm a self taught lifter who started this site to share what I've learned from my own training and a lot of trial and error. Everything here comes from real experience and honest research, written the way I'd explain it to a friend who is just getting started. My goal is simple: practical, no hype fitness advice you can actually use.