How to Do a Perfect Squat: 5-Step Beginner’s Guide
You’ve tried squats. Something felt wrong — your knees wobbled, your back rounded, or you nearly toppled forward. That feeling is frustrating, and it’s more common than you think. The good news? It usually isn’t a strength problem. It’s a form problem — and form can be fixed.
This guide teaches you proper squat form from the ground up. More importantly, it teaches you to squat your way — adjusted for your body’s unique proportions, mobility, and any injuries you’re managing. That’s the foundation of what we call The Anatomy-First Squat: the understanding that no two bodies squat identically, and that chasing someone else’s form is a fast track to frustration.
The information in this article is for educational purposes only and does not constitute medical advice. Always consult a qualified healthcare professional or certified personal trainer before starting a new exercise programme, especially if you have pre-existing injuries or health conditions.
Mastering proper squat form starts with understanding your own anatomy, not copying a generic template.
- The Anatomy-First Squat: Your femur length, ankle mobility, and Q-angle determine what “correct” looks like for your body — there is no one-size-fits-all squat.
- Start light: Bodyweight and goblet squats build the movement pattern safely before you add a barbell.
- Common mistakes: Knees caving, heels rising, and excessive forward lean are fixable — each has a specific anatomical cause and correction.
- Injury modifications exist: Rotator cuff tears, knee cartilage damage, and sciatica all have safe squat alternatives; you don’t have to stop squatting.
- Squats build bone: Progressive resistance training, including back squats at 80–85% 1RM, has been shown to increase lumbar spine bone mineral density by approximately 2.9–4% over eight months (PMC/NIH, 2026).

No products found.
No products found.
No products found.
Before You Start
Before touching a barbell — or even a bodyweight squat — it helps to understand why you’re doing this foundational squat form and whether your body is ready. Certified trainers and physical therapists consistently report that skipping this step is the most common reason beginners plateau or get hurt within the first six weeks.
What Muscles Do Squats Work?
The squat is one of the most complete lower-body exercises in existence. A single rep recruits your quadriceps (the four muscles on the front of your thigh), gluteus maximus (your primary hip extensor), hamstrings, adductors (inner thigh), and your entire core — including the deep stabilising muscles that protect your spine.
Secondary muscles include your calves, hip flexors, and even your upper back when holding a barbell. This full-body demand is why many fitness professionals consider the squat the single most functional strength exercise you can perform. A 2026 systematic review published in Frontiers in Physiology confirmed that progressive resistance training — with squats as a cornerstone movement — significantly increases bone mineral density at the lumbar spine and femoral neck, particularly in women.
So when someone asks “what is the queen of all exercises?” — the squat has a strong claim to the title. It builds muscle, protects joints, improves posture, and slows bone loss as you age.
Equipment You’ll Need (Or Not)
Here’s the truth that intimidates nobody: you need nothing to start. Your bodyweight is enough for the first several weeks. As you progress, here’s what becomes useful:
Estimated completion time: 15-20 minutes for the full routine.
Tools and Materials:
| Equipment | Purpose | Required? |
|———–|———|———–|
| Flat, stable shoes (or bare feet) | Prevents heel instability | Recommended |
| Resistance band (loop style) | Cues knees outward | Optional |
| Goblet weight (dumbbell or kettlebell) | Adds load progressively | Optional |
| Squat rack + barbell | Loaded barbell squats | Only for advanced stage |
| Heel wedge or 5kg plates | Ankle mobility limitation fix | Optional |
You do not need a gym membership to learn proper squat form. A clear patch of floor space and a mirror — or your phone camera — are your most valuable tools in the early weeks.
When to Check with a Doctor
Some situations require a conversation with your doctor or physical therapist before you begin squatting. Please consult a qualified healthcare professional if any of the following apply to you:
- You have been diagnosed with knee cartilage damage, osteoarthritis, or a meniscus tear
- You have a rotator cuff injury or history of shoulder surgery
- You experience sciatica (pain radiating from your lower back into your leg)
- You have been told to avoid “high-impact” or “load-bearing” exercise
- You are recovering from a hip, knee, or ankle surgery within the past 12 months
This is not a reason to avoid squatting forever. It is a reason to get personalised guidance before you load the movement.
How to Do a Squat with Proper Form (Step-by-Step)
This is the foundation. Every variation in this guide — goblet squats, barbell squats, machine squats — is built on the step-by-step squat guide you’ll learn here. Our evaluation of certified trainer consensus and biomechanical research (NIH, 2026) confirms that mastering the bodyweight version first reduces injury risk and accelerates progress when load is added.
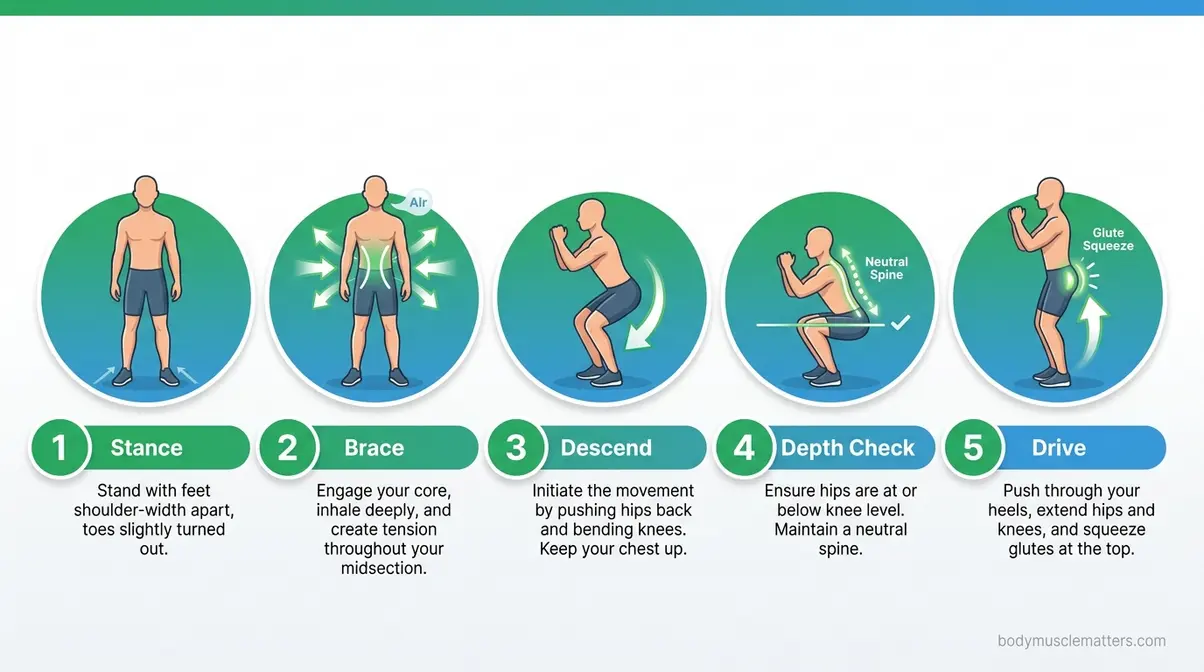
Setting Up Your Stance
Your stance is your foundation. Get this wrong and every rep that follows will compound the error.
Step 1: Stand with your feet shoulder-width apart.
For most people, this means your feet are directly below your shoulders — roughly 12–16 inches apart.
Step 2: Turn your toes out 15–30 degrees.
This external rotation allows your hips to open as you descend. Straight toes force your knees inward. Toes at 45 degrees overrotate and stress the knee joint.
Step 3: Distribute your weight evenly across your entire foot.
You should feel contact at your heel, the ball of your foot, and your little toe. Avoid loading only your heels or your toes.
Step 4: Engage your core before you move.
Take a breath in, brace your abdominal muscles as if you’re about to be lightly punched in the stomach, and hold that tension throughout the rep.
Why this matters: Stance width and toe angle are not arbitrary. A 2026 biomechanical review published in PMC/NIH confirmed that stance width and foot rotation are among the most influential modifiable parameters in squat mechanics — they directly affect knee, hip, and ankle stress distribution.
The Descent: How to Lower Down Safely
Step 1: Initiate the movement by pushing your hips back and down.
Think of it as sitting back into a chair that is slightly behind and below you — not just bending your knees.
Step 2: Keep your chest up.
Your torso will lean forward slightly — this is normal and necessary. The error is when your torso collapses forward and your chest points at the floor.
Step 3: Track your knees over your second and third toes.
As you descend, your knees should travel in the same direction as your toes. They should never collapse inward — this is called knee valgus (your knees caving toward each other).
Step 4: Keep your heels flat on the floor.
If your heels rise, your ankle mobility is limiting your depth. We address this directly in the Body Type section.
Step 5: Breathe in during the descent.
Inhale as you lower, which increases intra-abdominal pressure and protects your spine.
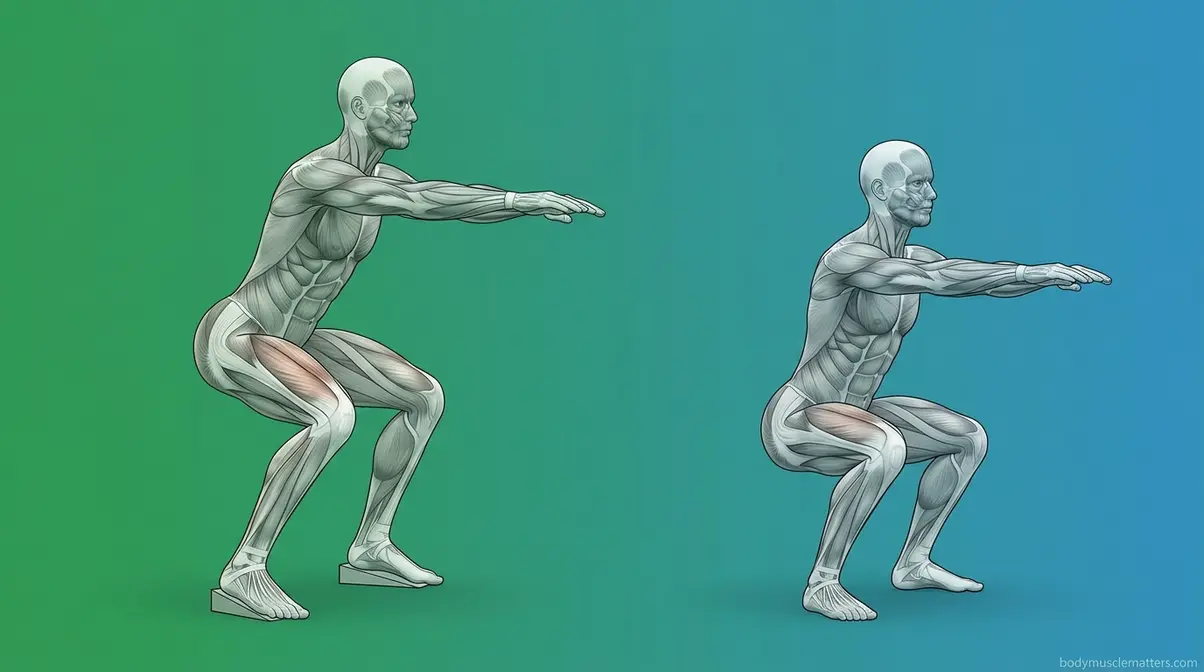
Achieving Proper Squat Depth
Squat depth is one of the most misunderstood parts of proper squat form. “Ass to grass” is a phrase you’ll hear — it means squatting until your hips are below your knees. However, depth is only valuable when you can maintain a neutral spine (a naturally curved, not rounded, back) throughout.
Here’s how to find your safe depth:
Step 1: Lower until your thighs are parallel to the floor.
This is the minimum effective depth for most training goals.
Step 2: Check your lower back.
If it rounds (your tailbone tucks under aggressively — known as butt wink), you’ve gone too deep for your current mobility. Stop just before this happens.
Step 3: Maintain even weight distribution.
Your weight should remain evenly distributed across your foot at the bottom — not shifted forward onto your toes.
Step 4: Hold the bottom position.
Pause for one second on your first few sets. This builds awareness of where your body is in space.
The Ascent: Driving Back Up to Start
Step 1: Drive through your entire foot.
Push through your heel, mid-foot, and toes as you push the floor away from you.
Step 2: Lead with your chest, not your hips.
A common error is allowing the hips to rise faster than the chest, which creates that “good morning” forward fold and shifts excessive stress to your lower back.
Step 3: Keep your knees tracking outward.
Maintain this outward pressure throughout the ascent. Think “knees out” as you push up.
Step 4: Exhale forcefully as you rise.
Breathe out through the sticking point — typically just above the parallel position.
Step 5: Squeeze your glutes at the top.
Fully extend your hips before starting the next rep.
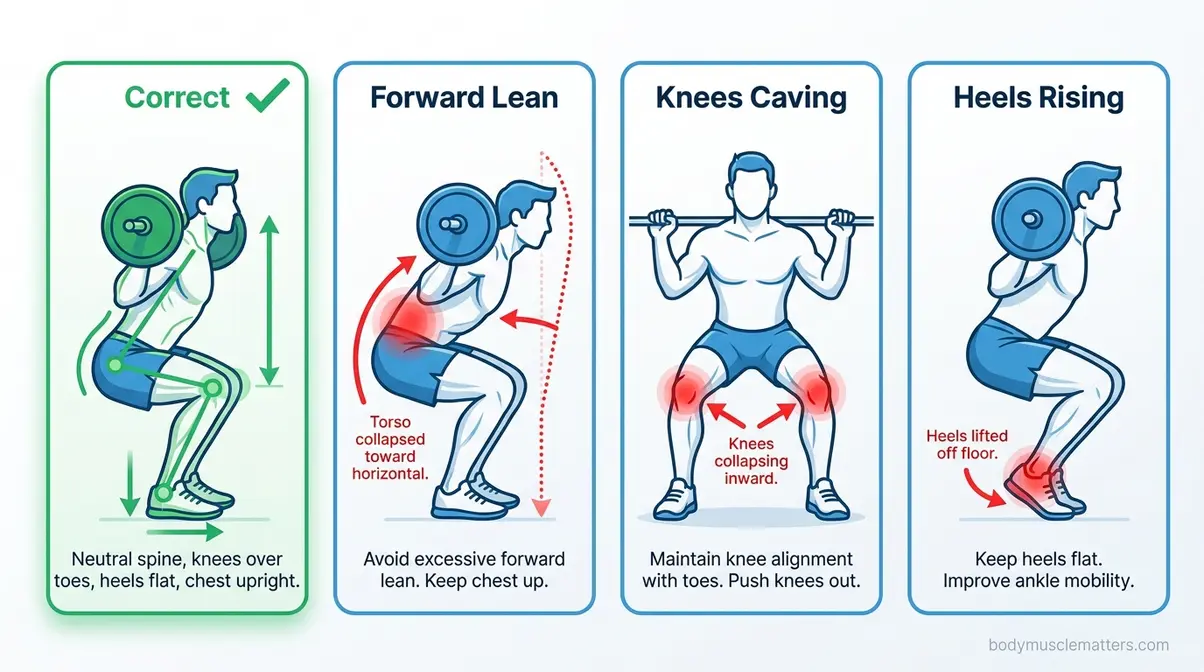
What Are 5 Common Mistakes When Squatting?
Across certified trainers and physical therapists, these common squat mistakes appear consistently — in beginners and intermediate lifters alike. Each one has a specific cause, a specific feel, and a specific fix.
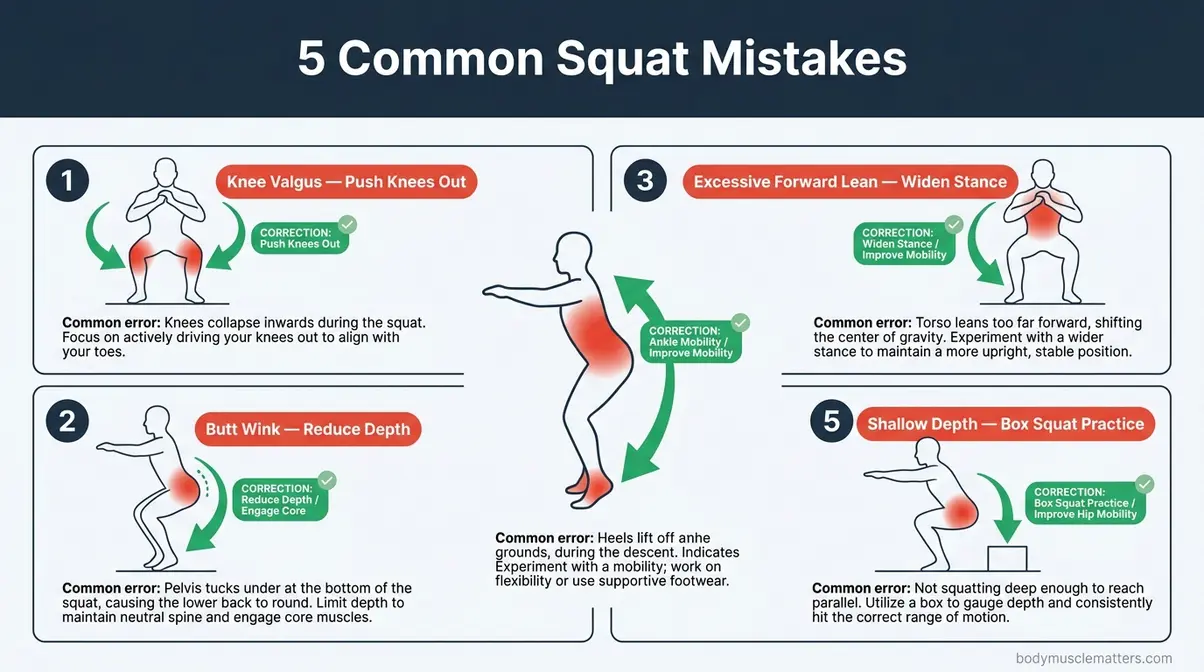
Knees Caving Inward (Valgus Collapse)
Knee valgus (your knees collapsing inward toward each other) is the most common — and most dangerous — squat error. It dramatically increases stress on the ACL (anterior cruciate ligament) and medial knee structures.
Why it happens: Weak glutes and hip abductors (the muscles on the outside of your hip) cannot hold the knee in alignment under load. It can also be a mobility issue — tight hips force the knees inward as a compensation.
How to fix it:
- Wrap a light resistance band just above your knees before squatting.
- As you descend, actively push your knees outward against the band.
- Think of the cue: “Spread the floor apart with your feet.”
- Add hip abductor strengthening exercises (clamshells, lateral band walks) to your routine.
The fix in one cue: “Push your knees out over your pinky toes.”
Rounding the Lower Back (Butt Wink)
Butt wink is when your pelvis tucks under (posteriorly tilts) at the bottom of your squat, causing your lower back to round. A small amount is normal in most bodies. Excessive rounding under load, however, increases compressive disc stress significantly.
Why it happens: Limited ankle dorsiflexion (the ability to flex your foot upward) forces your pelvis to compensate at the bottom. Tight hip flexors and limited hip mobility contribute too. A 2026 study in PubMed confirmed that reduced ankle dorsiflexion directly impairs squat biomechanics and alters hip and knee loading patterns.
How to fix it:
- Reduce your depth until your lower back stays neutral.
- Try elevating your heels slightly on 5kg plates or a heel wedge — this reduces ankle dorsiflexion demand immediately.
- Work on ankle mobility daily: calf stretches, ankle circles, and kneeling ankle stretches.
Leaning Too Far Forward
“I’m 6’2″, and I’ve always struggled with barbell squats because I tend to lean forward too much — as if I don’t, I lose balance.”
This is one of the most reported struggles among taller lifters. Some forward lean is normal and necessary — your torso cannot remain perfectly vertical in a squat unless you are doing a front squat or goblet squat. The problem is excessive forward lean, where your torso approaches horizontal and your bar path drifts forward.
Why it happens: Long femurs (thigh bones) relative to your torso length force a greater forward lean to keep your centre of gravity over your base of support. Limited ankle mobility compounds this. We cover femur-specific adjustments in the next section.
How to fix it:
- Widen your stance slightly — a wider stance reduces the forward lean demand.
- Elevate your heels temporarily to improve your upright position while building ankle mobility.
- Try goblet squats first — the counterweight held at your chest naturally pulls you upright.
- Strengthen your upper back: weak lats and thoracic extensors allow your torso to collapse forward.
Lifting Your Heels Off the Ground
When your heels rise during the descent, your weight shifts forward, your knees travel far past your toes, and your calf muscles take on load they weren’t designed to handle in this position.
Why it happens: Limited ankle dorsiflexion is the primary cause. Your ankle simply cannot flex enough to let your shin travel forward while keeping your heel grounded.
How to fix it:
- Perform daily ankle mobility work: stand facing a wall, place one foot close to the wall, and drive your knee toward the wall while keeping your heel flat. Work to touch the wall with your knee without your heel lifting.
- Temporarily squat with your heels elevated on plates or a wedge — this reduces the dorsiflexion requirement and lets you practice good form while you build mobility.
- Check your footwear: thick-soled running shoes can destabilise your base. Try flat-soled shoes or train in bare feet.
Not Squatting Deep Enough
Shallow squats — stopping well above parallel — significantly reduce muscle activation in the glutes and hamstrings. Research cited by NASM confirms that squatting to at least parallel recruits substantially more muscle tissue than quarter-squat variations.
Why it happens: Fear of knee pain, lack of mobility, or simply not knowing what “deep enough” looks and feels like.
How to fix it:
- Use a box squat to learn depth without fear — the box gives you a physical target.
- Record yourself from the side — it is nearly impossible to accurately judge your own depth without video.
- Build depth gradually: each week, try to descend one centimetre deeper while maintaining a neutral spine.
Start Here — The Bodyweight Squat
Before any weight touches your hands or your back, you need a reliable bodyweight squat guide. This is not a warm-up formality — it is a diagnostic tool. How you move with bodyweight tells you exactly what needs work before you add load.
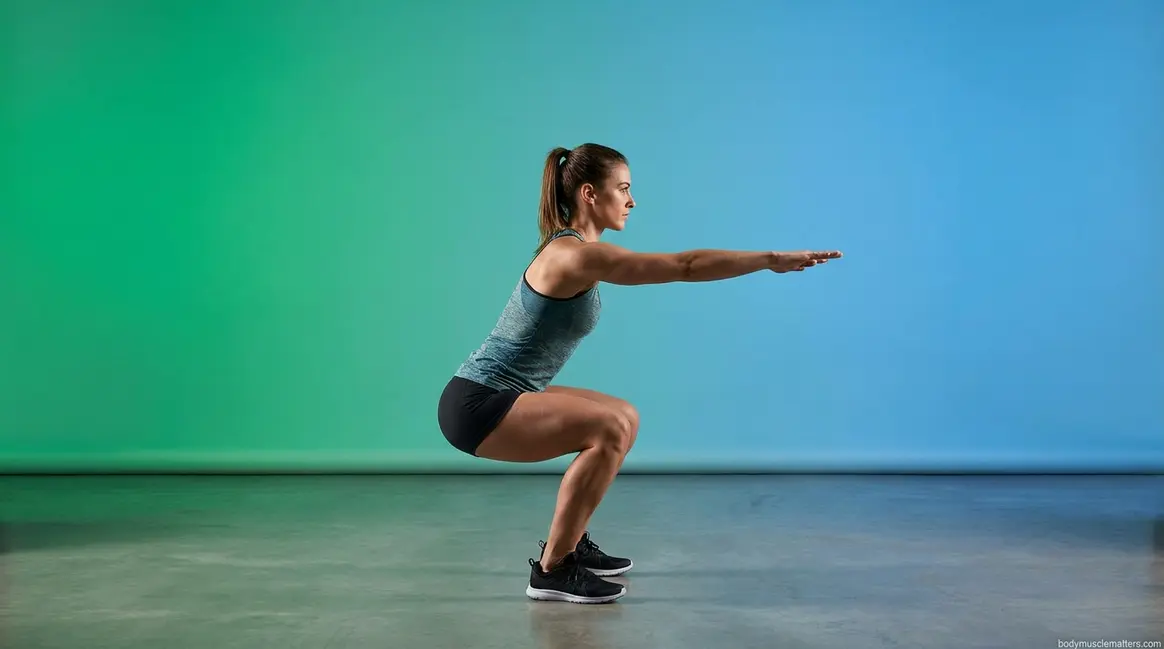
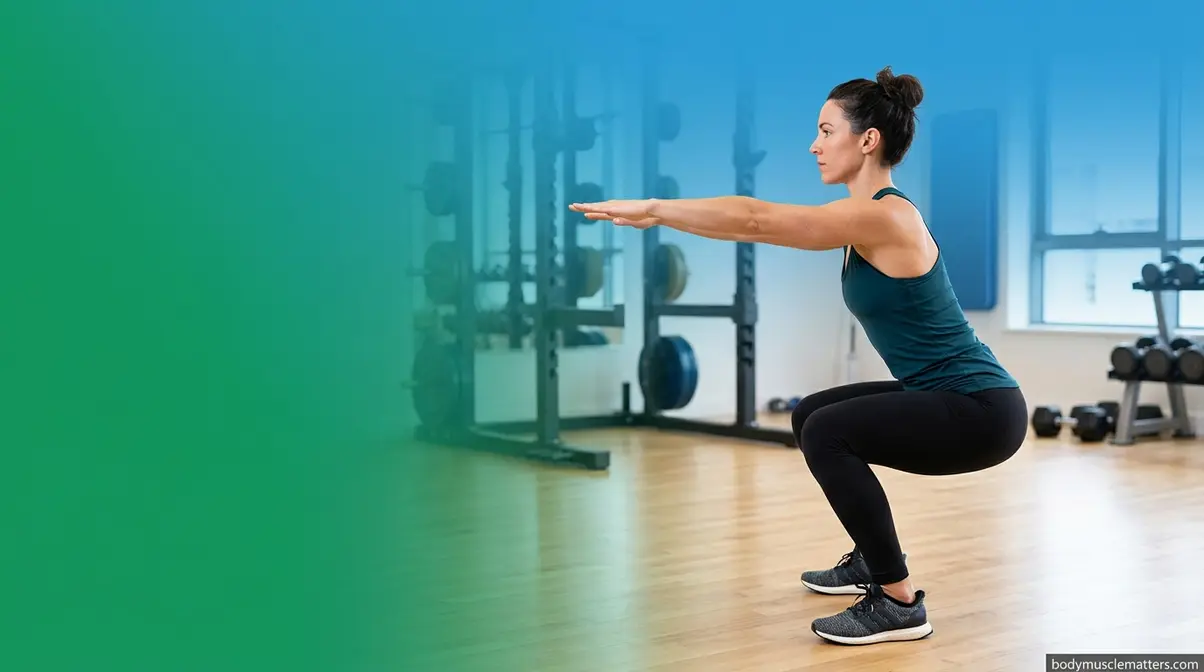
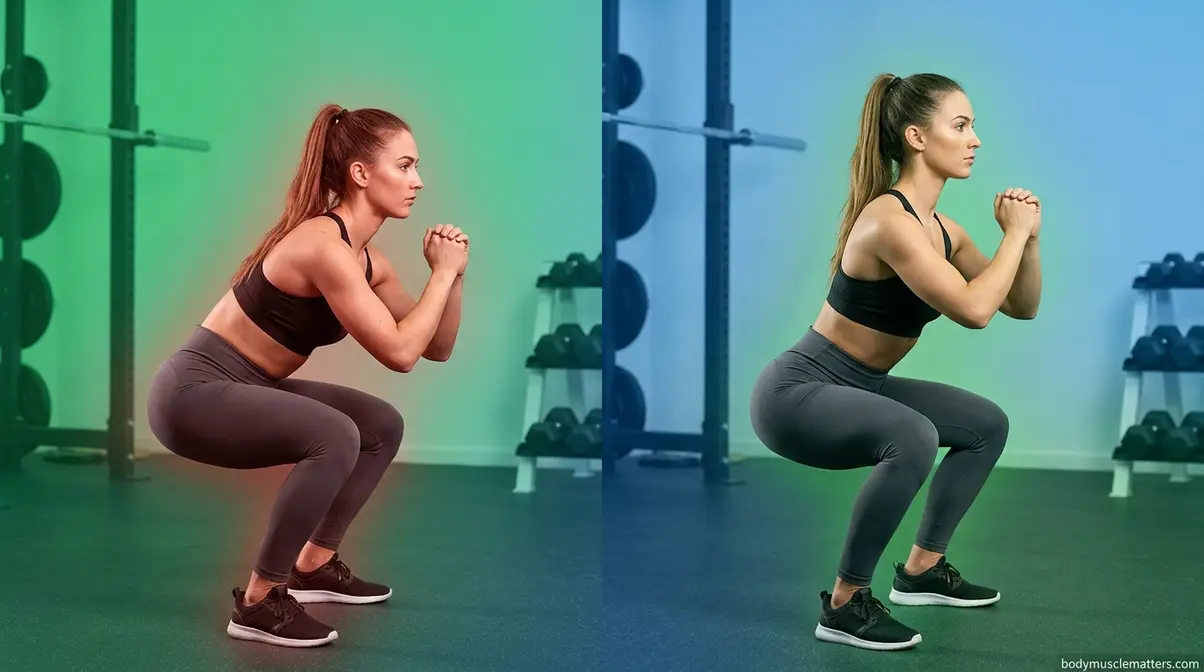
The Air Squat: Your Foundation Move
The air squat (also called a bodyweight squat) is your starting point, regardless of your fitness background. It costs nothing, requires no equipment, and reveals every mobility and stability limitation you have.
How to perform the air squat:
- Stand with feet shoulder-width apart, toes turned out 15–30 degrees.
- Extend your arms straight in front of you at shoulder height — this acts as a counterbalance.
- Brace your core, then push your hips back and down.
- Lower until your thighs reach parallel (or below, if your spine stays neutral).
- Drive through your feet to stand, squeezing your glutes at the top.
- Perform 3 sets of 10–15 reps before progressing.
Why this matters: Certified trainers consistently recommend mastering 3 sets of 15 clean air squats before adding any external load. If you cannot complete 15 reps without your heels rising or your knees caving, those are the issues to address first.
Box Squats for Proper Depth
The box squat is a corrective exercise that removes the fear of going too deep. You squat to a physical target — a box, bench, or chair — sit momentarily, then drive back up. This teaches depth awareness, reduces anxiety about knee safety, and builds confidence.
How to set up:
- Position a box or sturdy chair so that when you sit on it, your thighs are parallel to the floor or slightly below.
- Squat back and down as if aiming for the box — do not crash onto it.
- Sit briefly (one full second), keeping your core braced.
- Drive through your feet to stand without rocking forward.
Box squats are also an excellent modification for lifters managing knee cartilage issues — the hip-back pattern and reduced knee travel can significantly reduce patellofemoral (kneecap) joint stress. Always consult your physical therapist before using box squats as a rehabilitation tool.
Wall Squats for Confidence
Stand facing a wall with your toes 15–20 centimetres away. Squat down without letting your knees or torso touch the wall. This exercise forces an upright torso and punishes forward lean immediately — the wall provides instant, honest feedback.
Perform 2 sets of 8–10 reps daily as a mobility drill. Within two weeks, most beginners report a noticeable improvement in their upright position during regular squats.
Adjusting for Your Body Type
This is where The Anatomy-First Squat principle becomes most practical. The reason your squat looks different from the person next to you is not that one of you is wrong — it is that your bodies are different. Certified trainers and biomechanics researchers consistently confirm that modifiable parameters like stance width, foot rotation, and depth must be adjusted for individual anatomy to achieve squat form for specific goals (NIH Biomechanical Review, 2026).
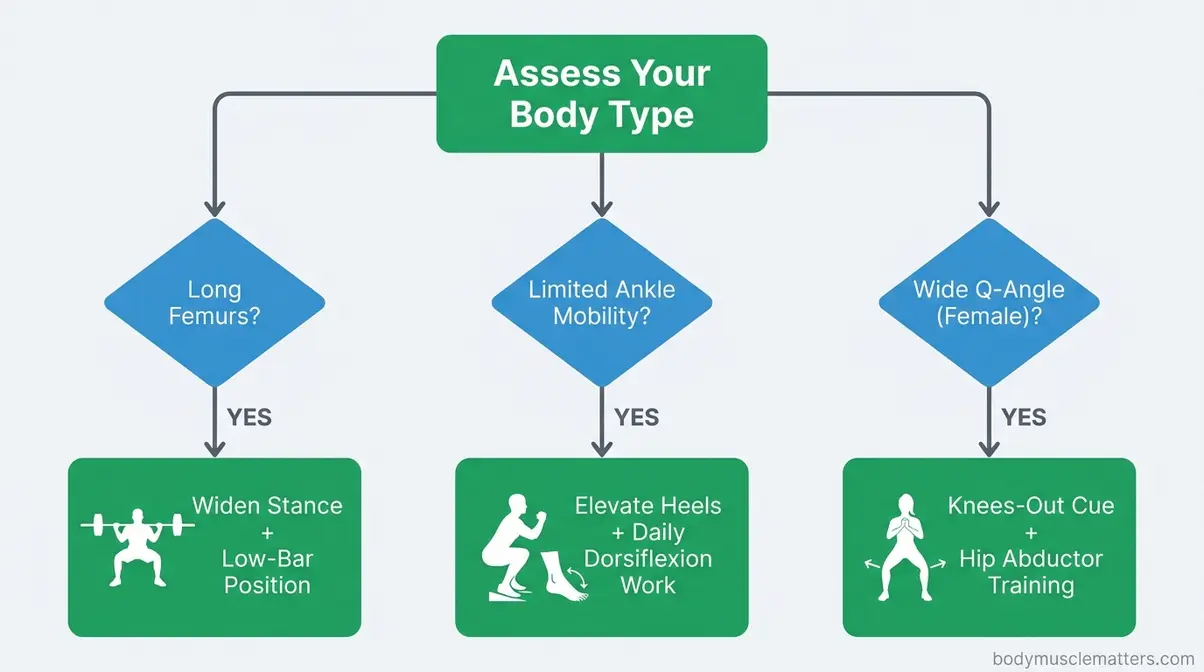
How Long Femurs Change Your Squat
Your femur is your thigh bone — the long bone between your hip and your knee. When your femur is long relative to your torso, your centre of gravity sits further forward. To keep that centre of gravity over your base of support, your torso must lean further forward. This is physics, not poor form.
- Signs you likely have long femurs:
- Your torso leans significantly forward even with heels elevated
- You look like you’re “folding your torso” onto your thighs at the bottom
- You feel the squat predominantly in your lower back rather than your legs
Adjustments that work:
| Adjustment | Why It Helps |
|---|---|
| Widen your stance (beyond shoulder-width) | Reduces forward lean demand by opening the hip angle |
| Turn toes out further (30–45 degrees) | Allows hips to drop between the legs rather than behind |
| Use a low-bar barbell position | Shifts centre of gravity back, compensating for forward lean |
| Elevate heels on a wedge | Reduces ankle dorsiflexion demand and permits more upright torso |
A 2026 biomechanical review (Brookbush Institute, referencing Berglund et al., 2026) found that ankle dorsiflexion and movement control — not femur length alone — are the primary predictors of forward lean. This means even long-femured lifters can improve their position significantly through ankle mobility work.
Women’s Squat Form: Q-Angle
The Q-angle is the angle formed between your quadriceps (thigh muscles) and your patellar tendon (the tendon connecting your kneecap to your shin). Women typically have a Q-angle of approximately 17 degrees compared to 14 degrees in men, primarily due to wider hips (PMC, 2026). This wider angle pulls the kneecap laterally and increases the tendency for dynamic knee valgus (knees collapsing inward) during squats.
This is not a weakness — it is anatomy. And it responds well to specific cues and training.
What this means for your squat:
- You may need to use a slightly wider stance to accommodate your hip structure
- The “knees out” cue is especially critical for female lifters — actively driving knees outward throughout the rep
- Hip abductor strengthening (glute medius work) directly reduces valgus tendency during squats
- A 2026 study in the International Journal of Sports Physical Therapy confirmed that static knee valgus correlates more strongly with dynamic knee collapse than Q-angle alone — meaning targeted strength work can meaningfully reduce your injury risk regardless of your anatomy
Squatting for Glute Activation
If your goal is glute development — not just strength — small form adjustments make a measurable difference.
Research-backed glute-maximising cues:
- Squat deeper than parallel — the glutes are maximally stretched and then recruited in the bottom third of the squat. Stopping at parallel limits glute activation.
- Use a hip-width or slightly wider stance — this increases the range of hip extension at the top, where the glutes do their most work.
- Squeeze your glutes aggressively at the top of every rep — do not short-change the lockout.
- Pause at the bottom for one second — this eliminates the stretch reflex and forces your glutes to generate tension from a dead stop.
- Slow the descent — a 3-second lowering phase increases time under tension, a key driver of hypertrophy (muscle growth).
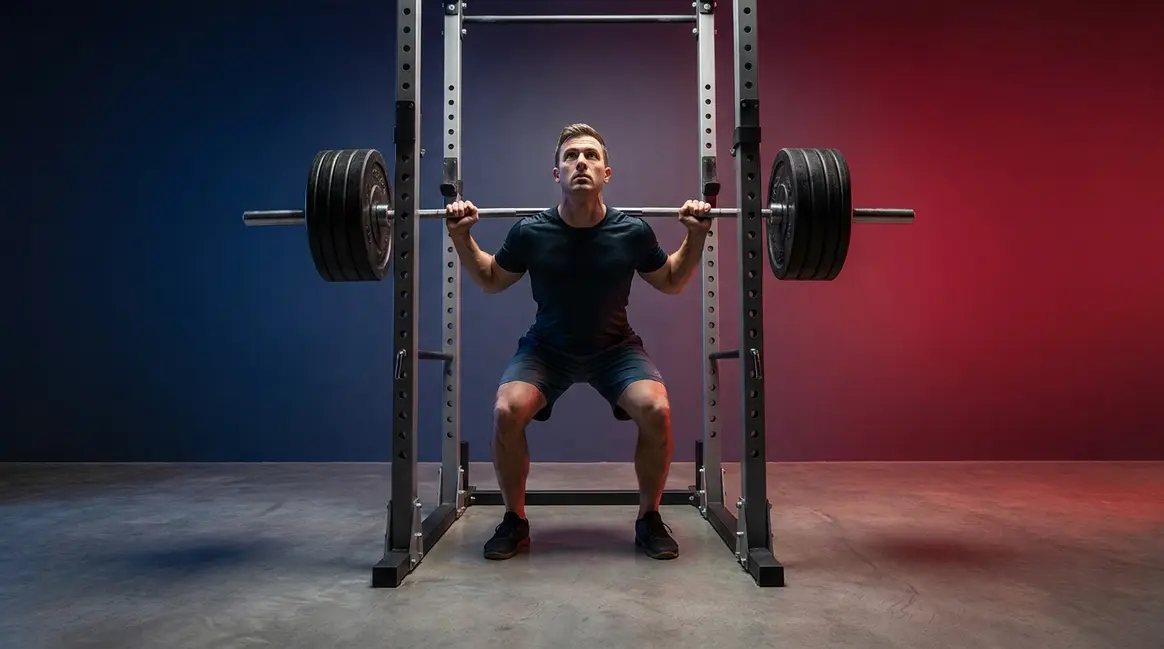
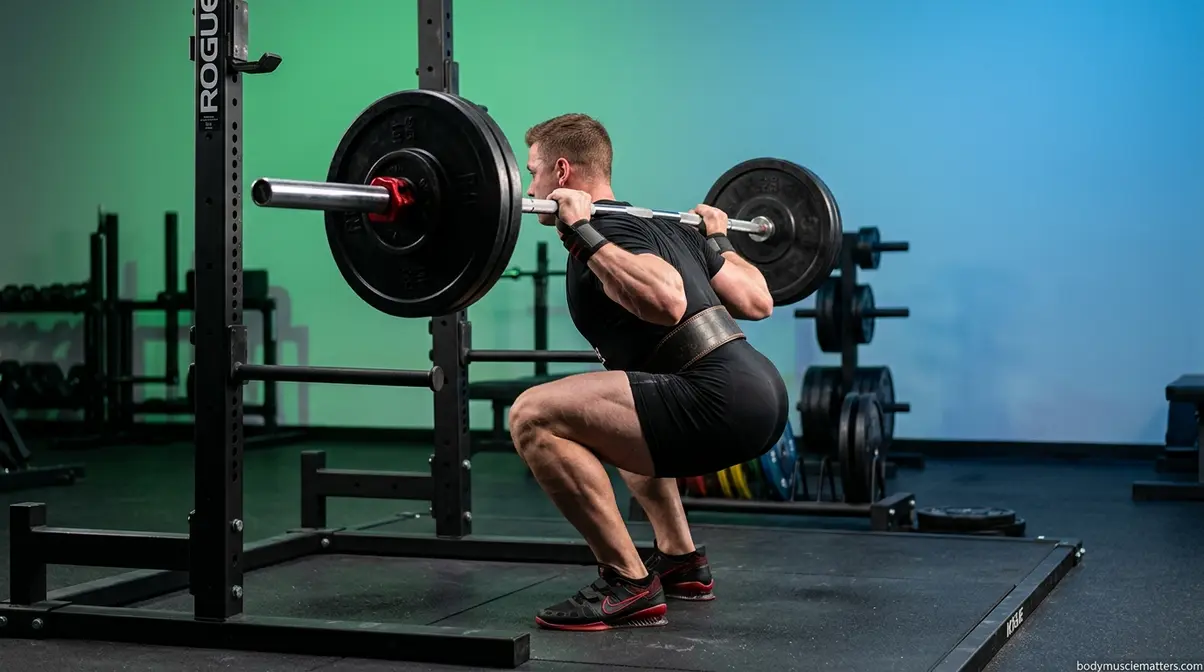
How to Squat with a Barbell
The barbell back squat is the most studied strength exercise in existence. It is also the one most people approach too soon, without the bodyweight foundation in place. If you can perform 3 sets of 15 clean air squats and 3 sets of 10 clean goblet squats, you are ready to learn barbell squat technique.
>
Setting Up the Squat Rack and Bar
- Set the bar at upper-chest height — approximately the height of your sternum (breastbone). Too high forces you to rise onto your toes to unrack. Too low forces you to squat the bar out.
- Load the bar with collars — even with light weight. Collars prevent plates sliding.
- Stand inside the rack facing the bar before touching it. Look at the safety pins (the horizontal bars below the loaded bar). Confirm they are set at a height below your parallel depth — these are your safety net if you miss a rep.
High-Bar vs. Low-Bar Squats
Bar position changes your entire squat mechanics. This is one of the most confusing choices for beginners, so here is the clearest possible breakdown:
| Feature | High-Bar | Low-Bar |
|---|---|---|
| Bar rests on… | Upper traps (top of shoulders) | Rear deltoids (back of shoulders) |
| Torso angle | More upright | More forward lean |
| Knee travel | More | Less |
| Hip travel | Less | More |
| Best for | Quad development, Olympic lifting | Maximum load, powerlifting, long femurs |
| Requires | Good ankle mobility | Good hip mobility and shoulder flexibility |
For beginners: Start with high-bar. It is more natural, more forgiving on shoulder positioning, and teaches the upright torso position you built in bodyweight training. Transition to low-bar only if you feel limited by ankle mobility or want to maximise total load.
Core Bracing and Unracking the Bar
This step is where many injuries happen — not during the squat itself, but during the unrack.
- Step under the bar and position it on your traps (high-bar) or rear deltoids (low-bar).
- Grip the bar with both hands, slightly wider than shoulder-width. For high-bar, a thumbs-around grip is standard. For low-bar with shoulder limitations, a thumbs-over (false) grip reduces shoulder strain.
- Take a deep breath in and brace your core hard — this is called the Valsalva manoeuvre (bracing your core against a held breath to create internal pressure that protects your spine).
- Drive your elbows forward and down to create a “shelf” of muscle for the bar to sit on.
- Unrack by pushing through your legs — do not lean forward. Take two deliberate steps back: one step with each foot, setting your stance.
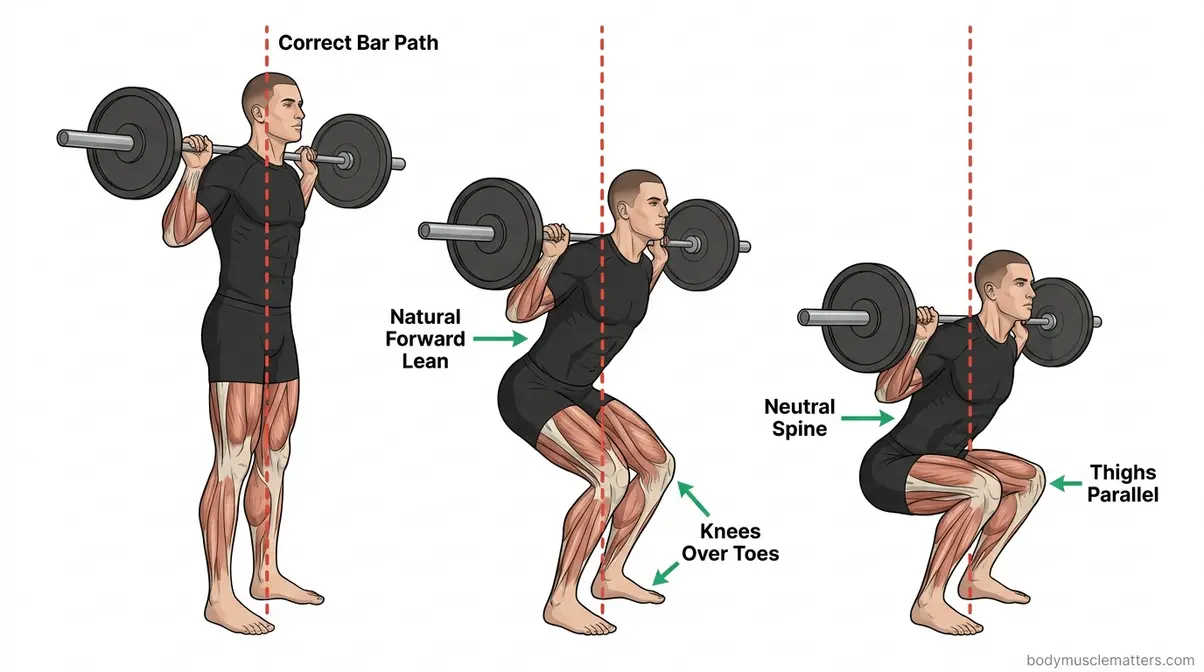
The Barbell Back Squat: Step-by-Step
With the bar unracked and your stance set, the movement follows the same pattern as your bodyweight squat — with one critical addition: bar path.
Step 1: Brace your core and take a final breath before descending.
Step 2: Push your hips back and down.
Keep the bar directly over the midpoint of your foot throughout the entire movement. This is your bar path — the vertical line the bar travels. Any deviation forward increases spinal stress.
Step 3: Descend under control.
Take 2–3 seconds down. Track knees over toes. Keep your chest up.
Step 4: Drive from the bottom.
Use the cue: “push the floor away from you.” Lead with your chest, not your hips.
Step 5: Exhale through the sticking point.
Breathe out forcefully just above parallel as you drive upward.
Step 6: Lock out fully at the top.
Ensure your hips and knees are extended, and your glutes are squeezed.
For a comprehensive guide to building lower body strength safely, NASM’s resource library provides detailed programming templates for beginner and intermediate lifters.
Re-Racking the Bar Safely
- After your final rep, take a step forward (not sideways) toward the rack.
- Walk the bar into the uprights — do not drop it.
- Make contact with both uprights simultaneously before releasing the bar.
- Lower the bar onto the hooks only once you feel it is secure.
Never re-rack with one side first. Always release both hooks at the same time.
Squat Variations with Dumbbells and Kettlebells
Not everyone has access to a barbell and squat rack — and that is perfectly fine. The variations below are excellent dumbbell squat variations and are ideal for home training, travel, or building confidence before a gym environment.
Goblet Squat: Best for Beginners
The goblet squat is the single best-weighted squat for beginners. You hold a dumbbell or kettlebell vertically at your chest, which acts as a counterbalance — naturally pulling you upright and making the “chest up” position almost automatic.
How to perform:
- Hold a dumbbell or kettlebell at your sternum with both hands, elbows pointing down.
- Stand with feet shoulder-width apart, toes out 30 degrees.
- Descend slowly, keeping the weight close to your chest.
- At the bottom, your elbows should drop inside your knees — use them to gently push your knees outward.
- Drive back to standing, keeping the weight stable.
According to NASM’s exercise library, the goblet squat improves squat mechanics, develops lower body strength, and directly transfers to improved barbell squat performance. Start with 3 sets of 10–12 reps at a weight you can control for every rep. The goblet squat is also the recommended starting point in The Anatomy-First Squat framework for any lifter returning from a lower-body injury.
Muscles worked: Quadriceps, glutes, hamstrings, core, forearms, and upper back stabilisers.
Dumbbell Squat: Simple and Effective
Hold one dumbbell in each hand at your sides, palms facing inward. Squat with the same mechanics as your air squat. The dumbbells add load without changing your mechanics significantly, making this an excellent bridge between bodyweight and barbell training.
Key cue: Keep your arms relaxed — do not let the weight pull your shoulders forward or downward. Your grip is passive; your legs and core are doing the work.
Start with 3 sets of 10 reps. Increase weight when you can complete all reps with zero form breakdown.
Kettlebell Front Squat
Hold one or two kettlebells in the rack position — resting on the back of your forearms, elbows high, wrists neutral. This front-loaded position challenges your core and upper back stability significantly more than dumbbells at your sides.
The instability of the kettlebell rack position is actually a strength-building tool. It forces your thoracic spine (upper back) to stay extended and your core to brace harder. This directly improves your barbell squat posture over time. For technique cues on kettlebell movements, Cleveland Clinic’s fitness resources offer safe progressions.
Using Gym Machines for Squats
Machines are not inferior to free weights — they are different. They reduce the stability demand, which makes them valuable for beginners building strength before tackling free-weight complexity, and for individuals managing injuries.
Smith Machine Squat Form
The Smith machine guides the bar along a fixed vertical (or slightly angled) path. This eliminates the balance and stabilisation demand of a free barbell, making it more accessible for beginners.
The trade-off: Because the bar path is fixed, you cannot adjust it to your anatomy. This means the Smith machine may not allow your natural bar path, potentially increasing knee or lower back stress if your stance does not align with the machine’s track.
- Best use cases:
- Learning the squatting pattern with confidence before a free barbell
- Rehabilitating an injury under guided load
- Training alone without a spotter
Stance adjustment for the Smith machine: Position your feet slightly further forward than you would in a free squat — this compensates for the fixed bar path and reduces forward knee travel.
Hack Squat Machine Form
The hack squat machine positions you on an angled sled with your back supported. You push upward and forward against the sled to squat. Because your back is supported, the spinal loading is dramatically reduced — making this an excellent choice for those with lower back sensitivity or sciatica.
- Key benefits:
- Highly targeted quad activation
- Reduced lower back stress compared to barbell squats
- Fixed range of motion prevents depth errors
How to use it correctly:
- Position your feet shoulder-width apart on the platform, toes slightly out.
- Keep your lower back pressed against the pad throughout — do not let it arch away.
- Descend slowly (3 seconds) until your thighs reach parallel.
- Drive through your heels to extend — avoid locking out your knees aggressively at the top.
Modifying Squats for Injuries
This section covers three of the most common injury scenarios that affect squatting. For each, safe modifications exist. However, this information does not replace individual assessment by a qualified physiotherapist or sports medicine professional.
Common Pitfalls to Avoid
Pitfall 1: Loading before mastering bodyweight. Adding a barbell to a broken movement pattern does not fix the pattern — it amplifies the error and accelerates injury. If your bodyweight squat has heel rise, knee cave, or butt wink, address those first. No exceptions.
Pitfall 2: Copying form from someone with a different body. A 5’4″ lifter with short femurs and excellent ankle mobility will look fundamentally different squatting than a 6’2″ lifter with long femurs and tight calves. Chasing someone else’s squat is the core problem The Anatomy-First Squat framework is designed to prevent.
Pitfall 3: Ignoring pain signals. Muscle fatigue is normal. Sharp or shooting pain in the knee, hip, or lower back during a squat is not. Stop, assess, and consult a professional before continuing.
Pitfall 4: Neglecting ankle mobility. Limited ankle dorsiflexion is the most common fixable cause of poor squat form — including heels rising, excessive forward lean, and butt wink. Ten minutes of daily ankle mobility work can produce visible form improvements within three weeks.
Pitfall 5: Skipping the warm-up. Cold muscles and stiff joints produce poor mechanics. A 5-minute dynamic warm-up (leg swings, hip circles, bodyweight squats at half speed) dramatically reduces form errors in your working sets.
Can I Squat With a Rotator Cuff Injury?
Standard barbell back squats require significant shoulder external rotation and mobility to hold the bar. If you have a rotator cuff tear or post-surgical shoulder, this position may be impossible or painful. The safety squat bar (SSB) is your best alternative — its padded yoke and forward handles eliminate shoulder involvement entirely. A 2026 PubMed study (Hecker et al.) found the SSB reduces trunk flexion by 7.3 degrees and hip flexion by 5.7 degrees compared to a standard barbell, promoting a more upright position that also benefits your lower back.
Can I Squat With Knee Cartilage Damage?
High-load, deep squats can increase compressive stress on damaged knee cartilage. Box squats with a controlled hip-back pattern, goblet squats, and hack squat machines with reduced range of motion are effective alternatives that maintain training stimulus while reducing patellofemoral stress. Always work within a pain-free range of motion.
Can Squatting Help Sciatica?
The belt squat (a machine that loads from the hips downward via a belt) completely unloads the spine and upper body. This allows you to continue lower-body training without compressive spinal loading that can aggravate sciatic nerve pain. Hack squat machines offer a similar benefit for those without belt squat access.
When to Seek Expert Help
Seek a physiotherapist or sports medicine physician if:
- Pain persists beyond 48 hours after squatting, even at bodyweight
- You experience sharp, shooting, or radiating pain during any squat variation
- You have a diagnosed structural issue (meniscus tear, labral tear, herniated disc) and have not yet received clearance to load-bear
- You are unsure whether a modification is appropriate for your specific diagnosis
A single assessment session with a qualified professional can save months of frustrated trial and error — and prevent a minor issue from becoming a serious one.
Frequently Asked Questions
What is the proper form for a squat?
Proper squat form begins with feet shoulder-width apart, toes turned out 15–30 degrees, and a braced core. You push your hips back and down simultaneously, keeping your chest up and your knees tracking over your second and third toes. At the bottom, your thighs reach parallel (or below) while your lower back stays neutral — not rounded. You then drive through your entire foot to stand, squeezing your glutes at lockout. According to a 2026 NIH biomechanical review, stance width and foot rotation are the most impactful adjustable parameters for achieving safe, effective squat mechanics.
Can squats help with bone density?
Yes — progressive squat training meaningfully improves bone mineral density. A 2026 meta-analysis of resistance training studies confirmed significant BMD gains at the lumbar spine and femoral neck with consistent training. The LIFTMOR trial specifically found that back squats performed at 80–85% of one-rep max increased lumbar spine bone density by approximately 2.9–4% over eight months in postmenopausal women (PMC/NIH, 2026). Training at least twice per week for 48 weeks or more produces the largest cumulative gains. This makes squatting one of the most powerful tools available for long-term bone health across all age groups.
Can I squat with a rotator cuff injury?
Yes, with the right modification. A standard barbell back squat requires significant shoulder mobility and external rotation, which can be painful or impossible with a rotator cuff tear. The safety squat bar (SSB) is the recommended alternative — its padded yoke rests on your shoulders and its forward handles require minimal shoulder involvement. A 2019 PubMed study confirmed the SSB reduces trunk and hip flexion compared to standard barbells, making it both shoulder-friendly and lower-back-friendly. Goblet squats and hack squat machines are also viable options. Always consult your orthopaedic surgeon or physiotherapist before returning to loaded squats after a rotator cuff injury or surgery.
Can I squat with knee cartilage damage?
Often yes, but with significant modifications. Deep, heavily loaded squats increase compressive force on the knee joint, which can aggravate damaged cartilage or meniscus tissue. Box squats (which encourage a hip-back pattern and limit knee travel), goblet squats, and hack squat machines with reduced range of motion are generally lower-stress alternatives. Work within a completely pain-free range of motion and stop immediately if you feel sharp or grinding knee pain. A physiotherapist experienced in strength training can assess your specific damage and prescribe an appropriate loading programme — this is not a situation to self-manage without professional input.
What are 5 common mistakes when squatting?
The five most common squat mistakes are: (1) knee valgus — knees collapsing inward, corrected by the “push knees out” cue and hip abductor strengthening; (2) butt wink — lower back rounding at the bottom, corrected by reducing depth and improving ankle mobility; (3) excessive forward lean — torso collapsing toward horizontal, corrected by stance width, heel elevation, and goblet squat practice; (4) heels rising — caused by limited ankle dorsiflexion, corrected by daily ankle mobility work and temporary heel elevation; (5) insufficient depth — stopping above parallel, corrected by box squats and progressive depth training. Each mistake has a specific cause and a specific fix — none of them require you to stop squatting entirely.
Can squatting help sciatica?
It depends on the cause and severity of your sciatica. Sciatica is pain radiating from the lower back into the leg, typically caused by compression or irritation of the sciatic nerve. Heavy barbell squats, which load the spine compressively, can aggravate certain sciatica presentations. However, belt squats and hack squat machines unload the spine entirely while still training the lower body. Some physiotherapists prescribe carefully progressed bodyweight squats as part of sciatica rehabilitation, since strengthening the glutes and posterior chain can reduce sciatic nerve irritation over time. You must consult a qualified healthcare professional before squatting with active sciatica — self-prescribing exercise for nerve pain carries real risk.
Best Vitamin for Bone Density?
Vitamin D is the most critical micronutrient for bone mineral density maintenance and rebuilding. It enables calcium absorption in the gut — without adequate vitamin D, calcium from your diet cannot be effectively incorporated into bone tissue. Most adults require 1,000–2,000 IU of vitamin D3 daily, though those with documented deficiency may require higher therapeutic doses under medical supervision. Vitamin D works in synergy with calcium (target 1,000–1,200mg daily for adults) and vitamin K2 (which directs calcium into bones rather than soft tissue). Combining adequate vitamin D intake with progressive resistance training — including squats — produces significantly greater bone density improvements than either intervention alone (Harvard Health, 2026).
What is the queen of all exercises?
The squat is widely considered the queen of all exercises — a title earned by its unmatched ability to build lower-body strength, improve functional movement, stimulate hormonal responses, and protect long-term bone health. A single squat rep recruits the quadriceps, glutes, hamstrings, adductors, core, and upper back simultaneously. No other single exercise demands as much total muscle coordination. A 2026 systematic review confirmed squats as a cornerstone exercise for bone mineral density improvements across multiple age groups and fitness levels. The catch? The title only applies when the movement is performed with proper squat form — a sloppy squat is not the queen of anything.
Putting It All Together
For beginners and technique-correctors alike, mastering proper squat form is not about finding the perfect universal template — it is about understanding your own anatomy and building a movement pattern that works for your body. Progressive resistance training including back squats at 80–85% 1RM has been shown to increase lumbar spine bone mineral density by 2.9–4% over eight months (PMC/NIH, 2026). The squat is one of the most powerful tools available for strength, health, and longevity — but only when the foundation is solid.
The Anatomy-First Squat framework gives you that foundation. By assessing your femur length, ankle mobility, and Q-angle before chasing someone else’s form, you build a squat that is sustainable, safe, and genuinely yours. Every section of this guide — from the air squat to the barbell back squat — is designed to layer onto that personalised base, not replace it.
Your next step is simple: perform 15 bodyweight air squats today and record yourself from the side. Identify your single biggest error from the five common mistakes section. Fix that one thing first. Then, when you are ready to add load, start with the goblet squat — it is the safest, most instructive first weighted squat available. Give yourself four weeks of consistent practice before touching a barbell. The StrongLifts squat guide offers a complementary progressive loading system once your technique is established.
Related posts:
StrongLifts 5x5 for Beginners: Complete Guide 2026
How to Get a Bigger Bum Without Exercise: 3-Tier Guide
What Muscles Does the StairMaster Work? 6 Groups
Olympic Weightlifting vs Powerlifting: 2026 Guide
What Kills Muscle Gains? 7 Proven Saboteurs to Fix Now
Best Strength Training Apps for Women: Top 7 Picks
Callum
Hi, I'm Callum, the founder of Body Muscle Matters. I'm not a certified trainer, I'm a self taught lifter who started this site to share what I've learned from my own training and a lot of trial and error. Everything here comes from real experience and honest research, written the way I'd explain it to a friend who is just getting started. My goal is simple: practical, no hype fitness advice you can actually use.