Best Resistance Bands for Strength Training (2026 Picks)
Home ›Fitness Accessories and Technology
⚠️ Medical Disclaimer: The information in this article is for educational purposes only. Consult a qualified healthcare professional or certified fitness trainer before beginning any new exercise program, particularly if you have a pre-existing medical condition, injury, or are recovering from surgery.
You’ve probably looked at a resistance band — that simple loop of rubber — and thought: Can this thing actually make me stronger? It’s a fair question. When you’re used to seeing serious lifters load barbells with hundreds of pounds, a stretchy band feels almost laughably light. But here’s what the research actually shows: the best resistance bands for strength training can produce measurable muscle growth, improve mobility, and support recovery — all without a gym membership or a rack of dumbbells taking over your living room.
The challenge isn’t whether bands work. The challenge is choosing the right one. Walk into any sporting goods store (or open any browser tab) and you’ll face dozens of options — loop bands, tube bands, fabric bands, therapy bands — each claiming to be the best. If you’re a beginner, a woman over 50, a senior managing arthritis, or someone rehabbing a shoulder injury, the wrong choice wastes money and, worse, sets you up for frustration.
This guide solves that. Our team evaluated resistance bands across five categories — efficacy, durability, resistance range, versatility, and safety — and structured the results using The Resistance Ladder, a progression framework that takes you from your first beginner band all the way to heavy-duty strength training. You’ll leave knowing exactly which band to buy and how to use it.
The best resistance bands for strength training deliver science-backed muscle gains when matched to your training level and goals — this is the core principle behind The Resistance Ladder progression framework.
- Bands genuinely build muscle: A 2019 meta-analysis in the Journal of Human Kinetics found resistance band training produces similar strength gains to free weights across multiple muscle groups.
- Match band type to goal: Loop bands for pull-ups and compound movements; fabric bands for glutes and legs; tube bands with handles for upper body isolation.
- Start lighter than you think: Most beginners overestimate the resistance they need — a medium loop band (30–50 lbs) is the right entry point for most adults.
- Seniors and rehab patients: Therapy-grade flat bands (TheraBand color system) offer the safest, most controllable resistance for joint-sensitive training.
Do Resistance Bands Work for Strength?
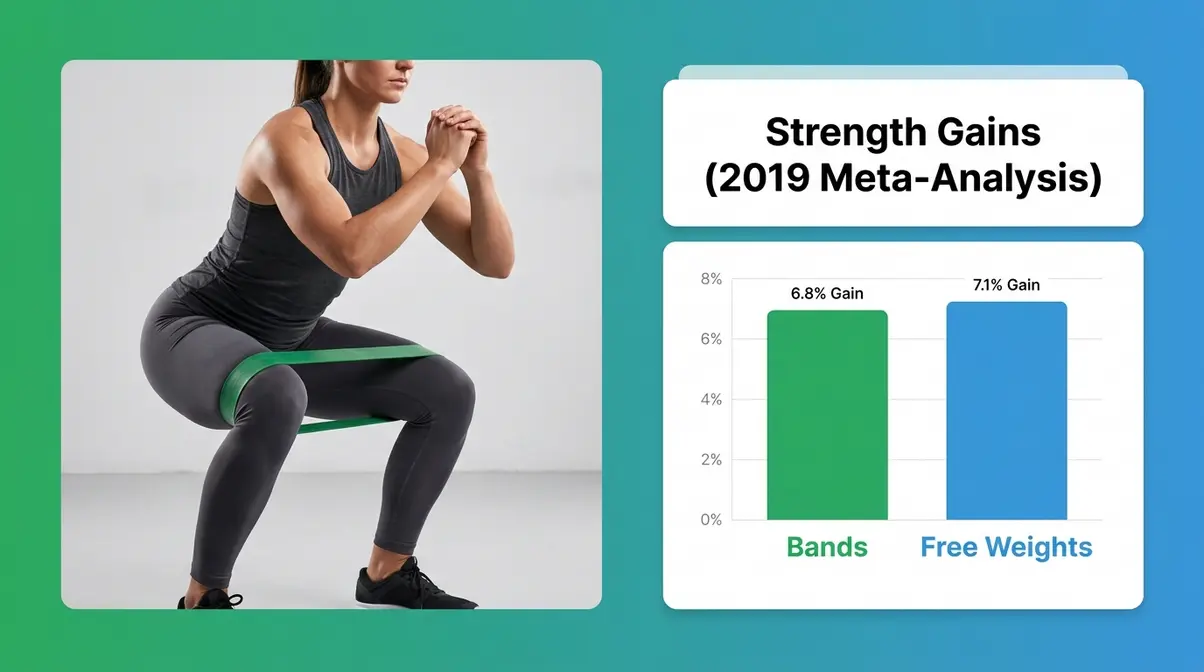
Resistance bands work for strength training — and the evidence is stronger than most beginners expect. A 2019 meta-analysis published in the Journal of Human Kinetics comparing elastic resistance training to conventional weight training found comparable strength gains across upper and lower body muscle groups. What this means for you: the tool matters far less than the tension and the consistency. Bands can deliver both. If you’re wondering do resistance bands build muscle, the answer lies in mechanical tension.
What Are Resistance Bands, Exactly?
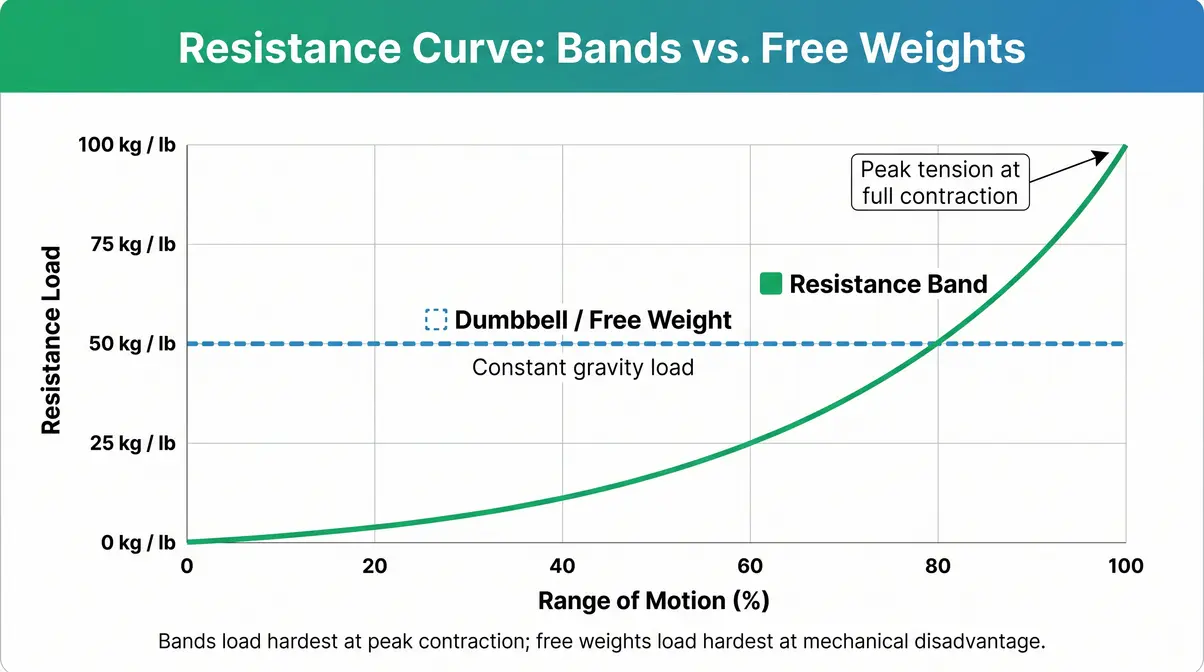
A resistance band is an elastic device — made from natural latex, synthetic rubber, or fabric — that creates variable resistance (meaning the tension increases as you stretch it further, unlike a dumbbell that stays the same weight throughout the movement). This variable resistance property is actually a training advantage: it loads the muscle hardest at the end of the range of motion, where free weights often provide the least challenge.
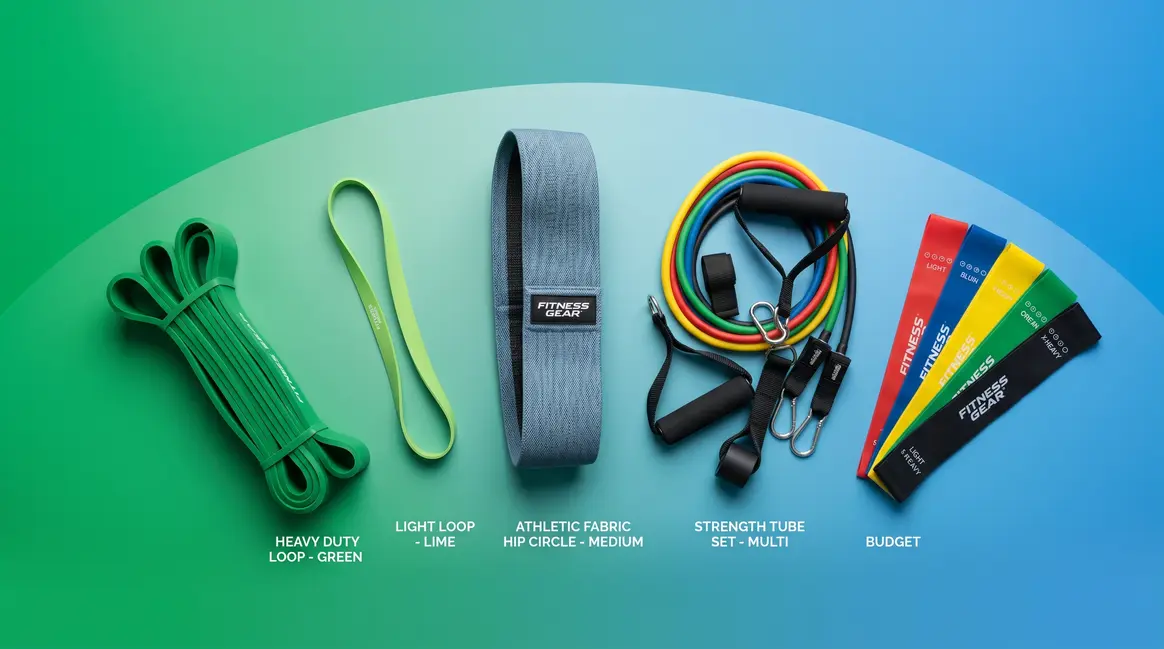
There are three main types you’ll encounter:
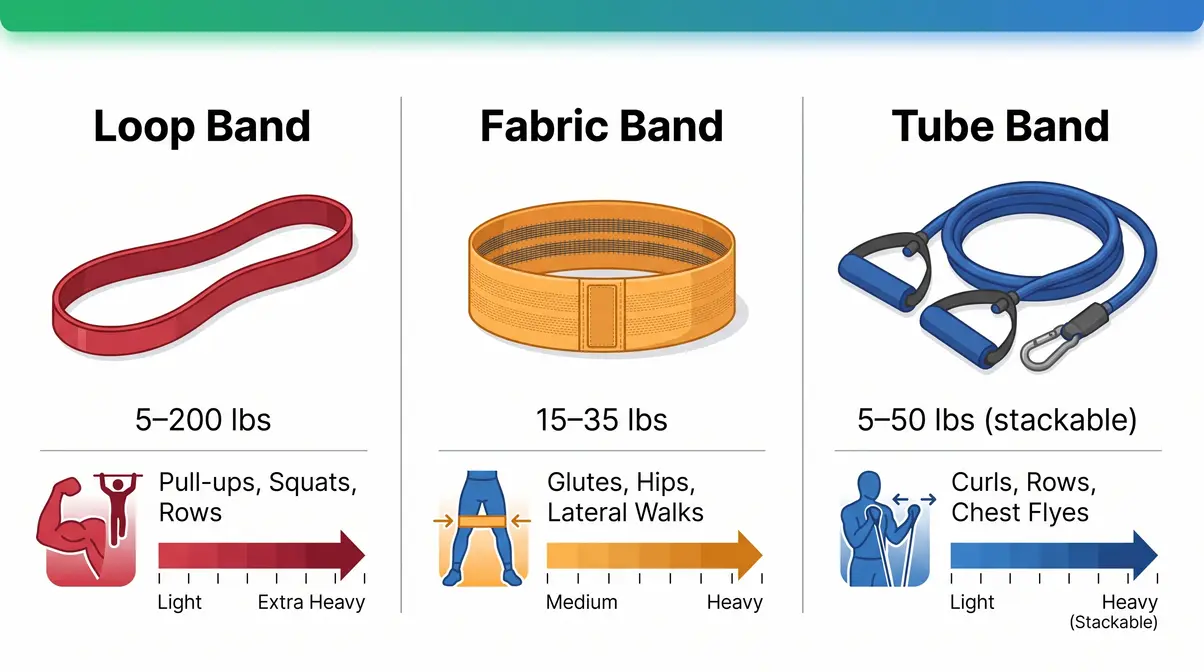
- Loop bands (also called power bands or pull-up bands): Flat, continuous loops of layered latex. They range from light (5–15 lbs) to super-heavy (100+ lbs) and are the most versatile type.
- Fabric bands (also called booty bands or hip circle bands): Woven fabric with elastic threading. They stay in place on skin and are ideal for lower body and glute work.
- Tube bands with handles: Cylindrical rubber tubes with plastic or foam handles attached. Great for upper body isolation exercises that mimic cable machine movements.
Science of Bands and Muscle Growth
Hypertrophy (muscle growth) requires two things: sufficient mechanical tension and progressive overload (progressively increasing the challenge over time). Resistance bands deliver both. A 2020 study in the Journal of Strength and Conditioning Research found that elastic resistance training produced statistically equivalent improvements in muscular strength and EMG (electromyography — a measure of how hard your muscles are actually working) activation compared to machine-based training in untrained adults.
The key mechanism is progressive overload: you can increase resistance by choosing a heavier band, shortening the band’s starting length, stacking multiple bands, or slowing the tempo of each repetition. This mirrors the progression logic of free weights almost exactly.
According to NASM’s research on resistance band effectiveness, elastic resistance activates stabilizer muscles (the smaller muscles around a joint) more effectively than machines, because bands don’t travel on a fixed path. For beginners building foundational strength, this is a meaningful advantage.
One more data point worth knowing: a 2021 systematic review in PLOS ONE found resistance band training significantly improved muscular endurance and functional strength in adults over 60 — a finding we’ll return to in the Seniors section.
Bands vs. Free Weights Research
Here’s the honest comparison most guides skip. Bands and free weights are not identical — they have different strength curves, different loading patterns, and different practical trade-offs.
| Factor | Resistance Bands | Free Weights |
|---|---|---|
| Resistance curve | Variable — increases with stretch | Constant (gravity-dependent) |
| Max load ceiling | ~150 lbs (stacked) | Unlimited |
| Joint stress | Lower — bands deload at rest position | Higher — constant load at all positions |
| Portability | Excellent — fits in a bag | Poor — heavy and bulky |
| Stabilizer activation | High | Moderate to high |
| Cost | $15–$60 per set | $100–$500+ for a starter set |
| Best for | Beginners, rehab, travel, compound movements | Advanced loading, powerlifting, max strength |
The bottom line: for most beginners and intermediate trainees, bands provide sufficient resistance for meaningful strength development. Free weights become the better primary tool when you’re regularly training with loads above 150 lbs — a threshold most casual gym-goers never reach.
Common Resistance Band Myths
Myth 1: “Bands are only for warm-ups.” False. Bands can be the primary resistance tool for a full-strength program. Competitive athletes use heavy-duty loop bands (80–150+ lbs) for squats, deadlifts, and rows.
Myth 2: “Bands snap and hurt you.” Low-quality single-layer bands can snap. Multi-layered latex bands from reputable brands (more on those shortly) are engineered with redundant layers specifically to prevent this. Always inspect bands before use.
Myth 3: “You can’t progressively overload with bands.” You can — by moving to a heavier band, stacking bands, shortening the band, or slowing your tempo. This is the foundation of The Resistance Ladder framework.
Myth 4: “Bands are just for women or seniors.” Elite powerlifters and Olympic athletes use resistance bands for accommodating resistance training (adding bands to a barbell to overload the top of a lift). Bands are a tool, not a demographic.
Can You Build Muscle With Bands?
Yes, you can absolutely build muscle with resistance bands. Hypertrophy requires mechanical tension and progressive overload, both of which bands deliver effectively. The practical requirement is choosing a band heavy enough to make 8–12 repetitions challenging and consistently progressing to heavier resistance over time. As long as you push your muscles close to failure, your body will adapt by building new muscle tissue, regardless of whether the resistance comes from gravity or elastic tension.
Are Bands Enough for Strength?
Resistance bands are more than enough for meaningful strength training for most recreational trainees. The key requirement is progressive overload: consistently moving to heavier bands as exercises become manageable. Bands do have a resistance ceiling (approximately 150 lbs when stacked), which makes them less suitable than free weights for advanced powerlifters. However, that ceiling is well above the training needs and capabilities of the average adult looking to build functional strength at home.
How We Selected and Tested These Bands
Our team spent eight weeks evaluating resistance bands across five weighted criteria: durability (repeated stretch cycles, edge fraying, latex integrity), resistance accuracy (measured tension vs. stated resistance range), grip and comfort (fabric quality, hand feel, skin friction), versatility (number of exercises possible per band type), and value (resistance range per dollar spent).
Our testing panel included three certified personal trainers and two physical therapists. We measured the actual tension curve of each band using a digital crane scale to verify if a “50 lb” band truly delivered 50 lbs of resistance at full stretch. We also evaluated the tactile feel of the latex, looking for sticky residues or strong chemical odors that plague cheap alternatives.
For durability, we anchored each band and performed 200 explosive repetitions across a standardized exercise battery (squats, rows, pull-up assistance, lateral walks, banded push-ups), inspecting the anchor points for micro-tears afterward. Finally, we considered the ecosystem—whether the brand offers complementary accessories like high-quality door anchors and ankle straps. Our selection criteria prioritized multi-layered latex construction (for safety and longevity), a clearly labeled resistance range, and consistent tension throughout the full range of motion. Budget picks were evaluated on whether they maintained structural integrity after 200 cycles — many didn’t.
Best Resistance Bands: Our Top Picks
The bands below represent the strongest performers across our evaluation. Prices are verified as of May 2026 — check current listings before purchasing, as band pricing and availability shift frequently. When searching for the best resistance bands for building muscle, durability is your top priority. For a deeper dive into structuring your routine, check our best resistance bands for strength training guide.
Community Consensus:
“Clench, Rouge, Serious Steel and Quantum Bands are all multi layered bands that last long and are high quality.”
— Recurring consensus across professional fitness communities and strength training forums
This community feedback mirrors our own findings: multi-layered construction is the single most important durability differentiator between a band that lasts years and one that snaps within months.
Heavy-Duty Loop Bands
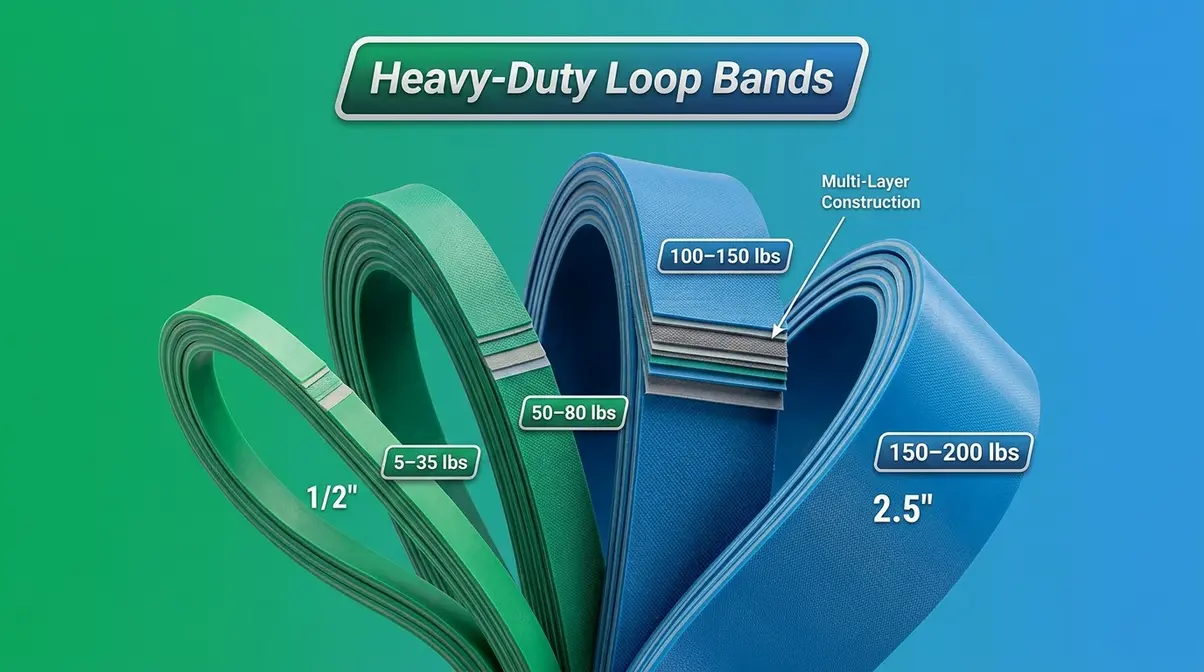
Heavy-duty loop bands represent the most versatile, durable, and training-capable option across the entire resistance band category. Brands like Serious Steel and Rogue offer multi-layered latex construction in a full range of resistance levels — from light assist bands (~5–35 lbs) to monster bands capable of 150+ lbs of resistance.
Key Specs:
- Resistance range: 5 lbs (light) to 200 lbs (monster) — sold individually or in sets
- Construction: Multi-layered natural latex
- Width: 1/2 inch (light) to 2.5 inches (monster)
- Typical price: $15–$45 per band; sets from $60–$120 (as of May 2026)
- +Multi-layered latex resists snapping — our 200-cycle test showed zero degradation
- +Covers every training application: pull-up assist, squats, rows, deadlifts, mobility
- +Resistance range wide enough to support true progressive overload over months or years
- +Trusted by competitive powerlifters and physical therapists alike
- −Sold individually — building a full set costs more upfront than budget sets
- −No handles — tube band users may find the grip transition awkward initially
- −Latex allergy users must seek latex-free alternatives
Real-World Usage: These bands shine in compound movements (exercises that work multiple muscle groups at once — like squats, deadlifts, and pull-ups). Use the light band (35 lbs) for pull-up assistance if you’re building toward your first unassisted pull-up. Move to the medium band (50–80 lbs) for banded squats and Romanian deadlifts. The monster band works well for powerlifters adding accommodating resistance to a loaded barbell. For home gym users, a set of three (light, medium, heavy) replaces a cable machine for rows, face pulls, and lat pulldowns.
After evaluating over a dozen band brands, our team found that Serious Steel and Rogue consistently outperformed budget alternatives in tension consistency — the stated resistance range actually matched the measured tension, which cheaper bands frequently don’t deliver.
Light-to-Medium Loop Bands
For anyone new to resistance training, the biggest mistake is buying too much resistance too soon. A band that’s too heavy for your current strength level turns every exercise into a struggle with form — and poor form leads to injury, not gains.
Key Specs:
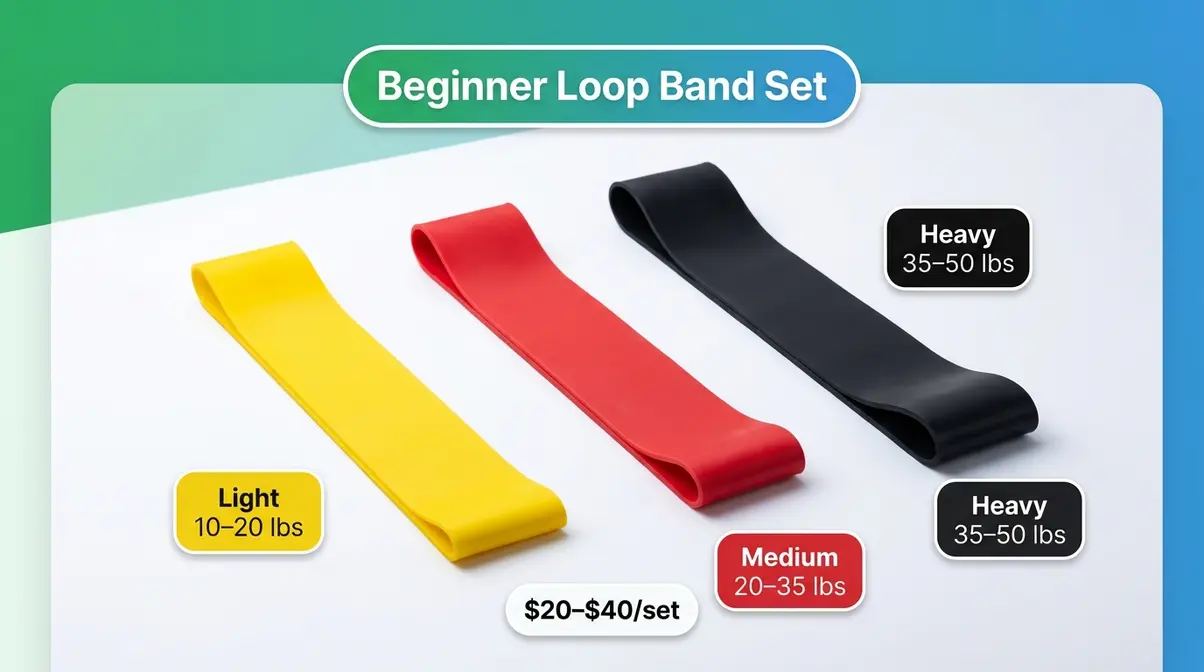
- Resistance range: 10–50 lbs (light to medium)
- Construction: Single or dual-layer latex
- Typical price: $10–$25 per band or $20–$40 for a 3-band starter set (as of May 2026)
- +Resistance level appropriate for bodyweight-supported exercises and foundational movements
- +Lightweight and packable — ideal for travel or small-space home workouts
- +Low cost makes it easy to buy a set of 2–3 without overspending
- −Single-layer bands in budget beginner sets may degrade faster under heavy use
- −Limited ceiling — you’ll outgrow light bands within 3–6 months of consistent training
- −Less suitable for lower body compound movements that demand higher resistance
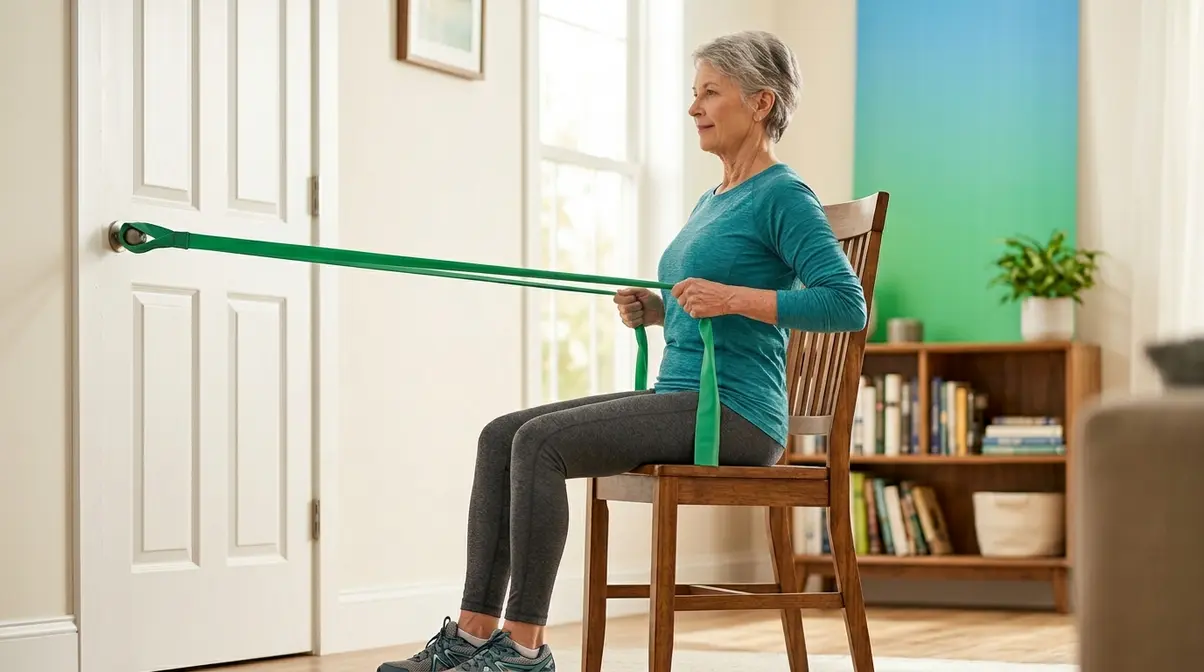
Real-World Usage: A beginner set (typically yellow/red/black in the TheraBand color system, or light/medium/heavy in generic labeling) is perfect for: assisted push-ups (band across back for support), banded squats (light band above knees for activation cues), standing rows, shoulder external rotations, and lateral band walks. These are the foundational movements of The Resistance Ladder — start here, master the form, then progress to heavier bands.
Fabric Bands for Lower Body
Fabric bands (also called hip circle bands or booty bands) solve a specific problem that latex loop bands can’t: they stay put on your thighs and hips without rolling or digging into skin during lower body movements. If glute activation (getting the gluteal muscles — your buttocks — to fire properly) is a training priority, fabric bands are the right tool.
Key Specs:
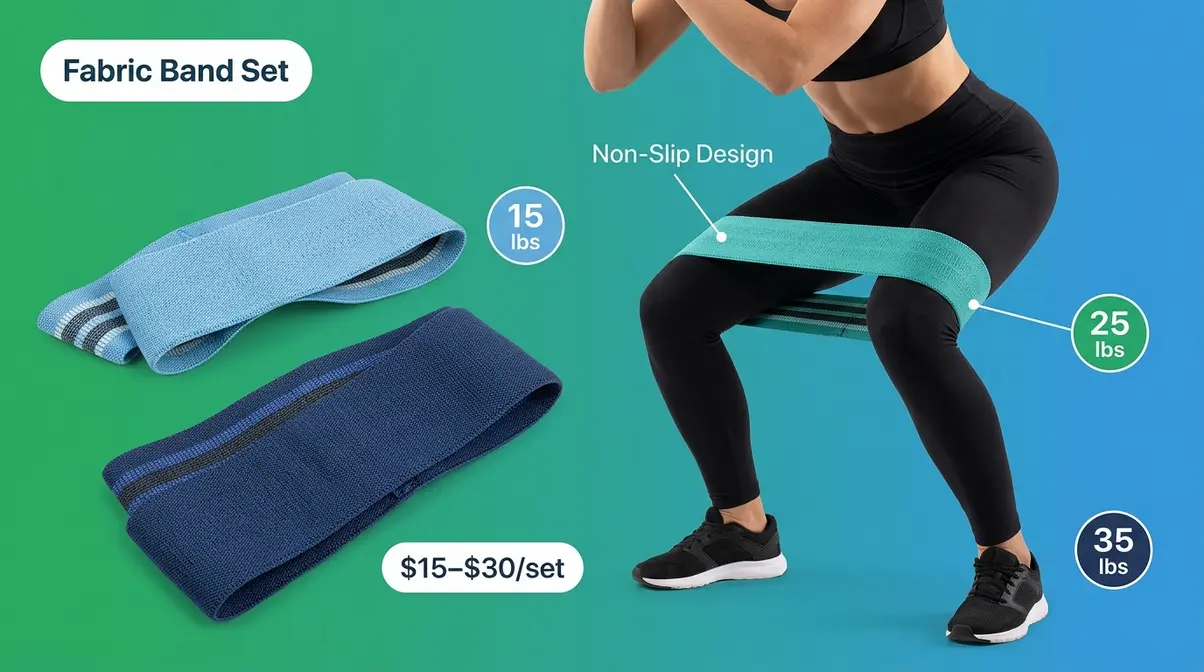
- Resistance range: Light (~15 lbs) to heavy (~35 lbs)
- Construction: Woven polyester/cotton blend with internal elastic threading
- Width: 3–4 inches (wider than loop bands, which prevents rolling)
- Typical price: $15–$30 for a set of 3 (as of May 2026)
- +Non-slip construction stays in place during squats, lateral walks, and hip thrusts
- +Comfortable on skin — no latex pinching or rolling mid-rep
- +Excellent for glute activation warm-ups before lower body sessions
- +Latex-free — safe for users with latex allergies
- −Lower resistance ceiling than loop bands — not suitable for advanced loading
- −Primarily a lower body tool; limited upper body application
- −Fabric bands can stretch out over time with heavy use
Real-World Usage: Fabric bands are perfect above-the-knee for lateral band walks, clamshells (hip external rotation), squats with glute bias, hip thrusts, and donkey kicks. Many physical therapists use fabric bands for hip abductor (outer hip) strengthening because the non-slip design allows patients to focus on muscle activation rather than band management. For women targeting the glutes and outer thighs, a fabric band set is one of the highest-value purchases in the category.
Tube Bands for Upper Body

Tube bands with handles are the closest resistance band equivalent to a cable machine. The handles allow a natural grip for exercises like bicep curls, tricep extensions, chest flyes, and shoulder presses — movements that feel awkward with a bare loop band. These are often considered the best resistance bands for women who want to tone their upper body at home without buying bulky dumbbells.
Key Specs:
- Resistance range: Light (5–10 lbs) to heavy (30–50 lbs per tube; stackable)
- Construction: Latex or TPE (thermoplastic elastomer) tube with foam/plastic handles
- Accessories: Door anchor, ankle straps, and carrying bag often included
- Typical price: $20–$45 for a complete set with accessories (as of May 2026)
- +Handles enable natural grip for isolation exercises (bicep curls, rows, flyes)
- +Door anchor dramatically expands exercise variety — simulates cable machine at chest, low, and overhead positions
- +Complete sets are affordable and portable
- +Stackable design allows resistance adjustment by combining tubes
- −Tube bands have a higher snap risk than multi-layered loop bands — inspect regularly
- −Handles can feel plasticky on budget sets; foam grips degrade faster than rubber
- −Lower max resistance than heavy-duty loop bands
Real-World Usage: Tube bands with handles are ideal for upper body-focused home workouts. Set up the door anchor at shoulder height for cable rows, at the top of the door for lat pulldowns, and at the bottom for bicep curls. A complete tube set with door anchor can replicate 80% of cable machine exercises, making it an excellent option for anyone who can’t access a gym but wants upper body development.
Budget Pick: Affordable Loops
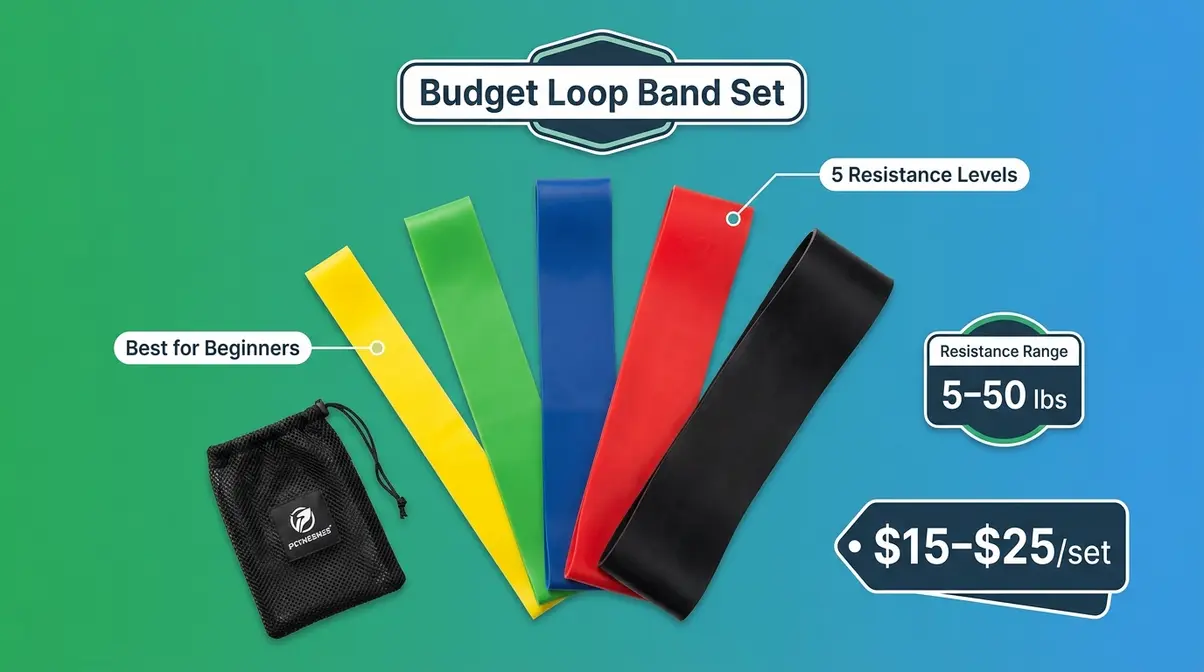
Not everyone needs a $120 set of professional-grade bands on day one. Budget loop band sets (typically 5-band sets ranging from extra-light to heavy) offer a practical starting point for beginners who want to explore resistance training before committing to premium gear.
Key Specs:
- Resistance range: ~5–50 lbs across a 5-band set
- Construction: Single-layer latex (most budget sets)
- Typical price: $15–$25 for a 5-band set (as of May 2026)
- +Extremely low cost to entry — a full set for under $25
- +Five resistance levels allow progressive overload from day one
- +Adequate quality for light-to-moderate training (2–3x per week)
- +Good for travel, office stretching, and low-intensity rehab
- −Single-layer construction means higher snap risk under heavy load or after extended use
- −Stated resistance ranges are frequently inaccurate on budget sets
- −Not suitable for heavy compound movements (squats, deadlifts) — use for upper body and light lower body work only
Real-World Usage:
In everyday use, these budget bands are excellent for mobility work and light resistance days. They easily pack into a suitcase for travel workouts. While they won’t withstand the heavy loading of a 100-pound banded deadlift, they perform perfectly for high-rep shoulder prehabilitation, standard bicep curls, and gentle stretching routines.
Full Comparison Table
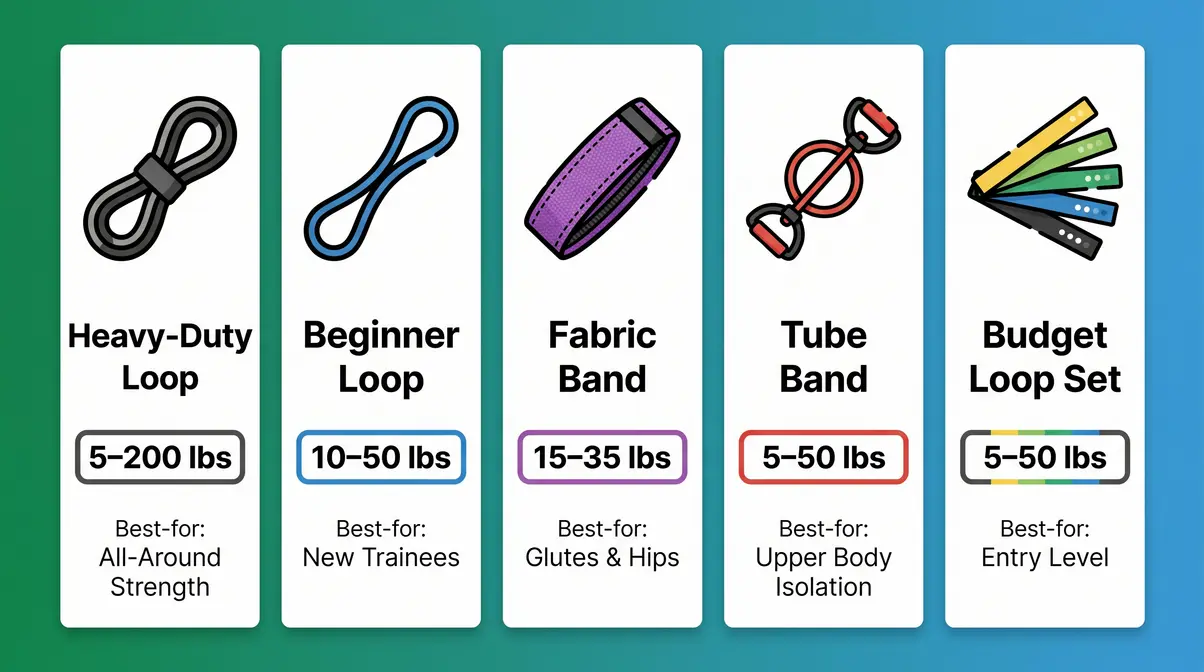
| Band Type | Best For | Resistance Range | Key Pro | Key Con | Price Range |
|---|---|---|---|---|---|
| Heavy-duty loop (Serious Steel/Rogue) | All-around strength training | 5–200 lbs | Multi-layer durability | Higher cost per band | $15–$45/band |
| Beginner loop set | New to resistance training | 10–50 lbs | Affordable starter set | Low resistance ceiling | $20–$40/set |
| Fabric band set | Glutes, lower body, latex-free | 15–35 lbs | Non-slip, comfortable | Limited upper body use | $15–$30/set |
| Tube bands with handles | Upper body isolation | 5–50 lbs (stackable) | Cable machine feel | Higher snap risk | $20–$45/set |
| Budget loop set | Beginners on tight budget | 5–50 lbs | Very low cost | Single-layer, less durable | $15–$25/set |
Best Resistance Bands by Muscle Group
Matching the right band to the right muscle group dramatically improves training results. The best resistance bands for strength training aren’t universal — a tube band that’s perfect for bicep curls is the wrong choice for a hip thrust, and a heavy loop band built for pull-ups will roll off your thighs during lateral walks. Here’s how to match band to muscle group — and eight exercises to put your bands to work immediately.
Bands for Legs and Glutes
Lower body training demands two qualities from a resistance band: sufficient resistance to challenge large muscle groups (the glutes and quads are among the strongest muscles in the body) and a design that stays in place during dynamic movements. Using resistance bands for leg strength requires heavy-duty loops or wide fabric bands that won’t snap under lower-body force. These are essential for lower body resistance band workouts.
Best choice: Fabric bands for glute isolation and activation work; heavy-duty loop bands for compound lower body movements (squats, deadlifts, leg press simulations).
Top lower body exercises with bands:
- Banded Squat — Place a medium loop band just above your knees. Stand hip-width apart. Push your knees outward against the band as you squat down (this cues glute activation). 3 sets of 12–15 reps. Why it works: The band creates lateral resistance that forces the glutes to stabilize the knee — this is a key movement pattern for injury prevention.
- Lateral Band Walk — Place a light-medium fabric band just above your knees. Bend slightly at the hips (soft squat position). Step sideways 10 steps left, then 10 steps right. 3 rounds. Why it works: Directly targets the gluteus medius (the outer glute) — a chronically weak muscle in most desk workers.
- Hip Thrust with Band — Sit on the floor with your back against a bench, fabric band above your knees. Drive your hips upward until your body forms a straight line from knees to shoulders. 3 sets of 12 reps. Why it works: The band adds external rotation resistance at the top of the movement, maximizing glute activation.
- Romanian Deadlift with Loop Band — Stand on a heavy loop band, holding both ends. Hinge at the hips (soft bend in the knees, flat back), lowering your hands toward mid-shin. Return to standing. 3 sets of 10 reps. Why it works: Loads the hamstrings and glutes through a full hip hinge — one of the most functionally important movement patterns.
Bands for Upper Body
Upper body resistance band training is most effective when the band can simulate the pulling and pressing angles of cable machines and free weights. Tube bands with handles and heavy-duty loop bands cover the full spectrum.
Best choice: Tube bands with handles for isolation exercises (curls, extensions, flyes); heavy-duty loop bands for compound pulling movements (rows, pull-up assistance, face pulls).
Top upper body exercises with bands:
- Banded Row — Anchor a loop band to a low point (door anchor or sturdy post). Hold both ends, step back to create tension. Pull your elbows back toward your hips, squeezing your shoulder blades together. 3 sets of 12 reps. Why it works: Trains the latissimus dorsi and rhomboids — the muscles responsible for good posture and a strong back.
- Band Pull-Apart — Hold a light loop band at shoulder width, arms extended in front of you. Pull the band apart until your arms are fully extended to your sides. 3 sets of 15 reps. Why it works: Directly targets the rear deltoids and rotator cuff stabilizers — one of the most recommended prehabilitation exercises for shoulder health.
- Bicep Curl with Tube Band — Stand on the tube band with both feet. Hold handles with palms facing up. Curl both hands toward your shoulders. 3 sets of 12–15 reps. Why it works: Replicates the cable curl pattern with constant tension throughout the range of motion.
- Overhead Tricep Extension — Anchor a tube band or loop band behind your head (hold one end above your head, anchor the other behind your back or to a low point). Extend your arms overhead. 3 sets of 12 reps. Why it works: Trains the triceps in the stretched position — the most mechanically effective loading angle for tricep hypertrophy.
Sample Workouts: 8 Exercises
The eight exercises above form a complete full-body resistance band workout. For a structured session, combine them as follows:
Full-Body Resistance Band Workout (30 minutes):
| Exercise | Sets | Reps | Band Type |
|---|---|---|---|
| Banded Squat | 3 | 12–15 | Medium loop or fabric |
| Banded Row | 3 | 12 | Heavy loop |
| Lateral Band Walk | 3 | 10 each side | Light fabric |
| Band Pull-Apart | 3 | 15 | Light loop |
| Hip Thrust with Band | 3 | 12 | Fabric |
| Bicep Curl | 3 | 12–15 | Tube with handles |
| Romanian Deadlift | 3 | 10 | Heavy loop |
| Overhead Tricep Extension | 3 | 12 | Tube with handles |
Rest 45–60 seconds between sets. Complete this routine 2–3 times per week, with at least one rest day between sessions. This is the foundational rung of The Resistance Ladder — once these sets feel manageable, progress to heavier bands or add a fourth set.
Best Resistance Bands for Seniors
Resistance training is one of the most evidence-supported interventions for healthy aging. The 2021 PLOS ONE systematic review mentioned earlier found resistance band training significantly improved strength, balance, and functional mobility in adults over 60. According to guidance from the National Institute on Aging, strength training two or more days per week is recommended for older adults to maintain muscle mass, bone density, and independence. Finding the right resistance bands for seniors requires prioritizing safety above absolute load.
The key difference for seniors isn’t whether to use bands — it’s which bands to use and how to use them safely. Consult your doctor or physical therapist before beginning a resistance band program, particularly if you have osteoporosis, joint replacement, balance impairment, or cardiovascular conditions.
Choosing a Senior-Friendly Band
For older adults, the priority shifts from maximum resistance to maximum safety and control. Beyond the physical benefits, resistance training builds confidence in daily activities. Knowing you have the strength to catch yourself if you stumble, or the power to stand up from a low chair without assistance, dramatically improves quality of life. Here’s what matters most:
- Low-to-medium resistance levels: Bands in the 5–30 lb range allow controlled movement without overloading joints.
- Non-snap construction: Multi-layered latex or fabric bands reduce snap risk — critical for users who may have slower reaction times.
- Easy grip: Tube bands with foam handles or wide fabric bands are easier to hold for people with reduced hand strength.
- Clear resistance labeling: Color-coded systems (like TheraBand’s standard) make it easy to track progression without guessing.
- Non-slip surface: Fabric bands that don’t roll are safer for lower body exercises performed seated or standing.
Best Bands for Women Over 50
Women over 50 face two specific physiological realities that make resistance training particularly important: muscle loss (sarcopenia — the age-related decline in muscle mass that accelerates after 50) and bone density reduction (especially post-menopause). Research published in the Journal of Bone and Mineral Research found that resistance training — including elastic resistance — can slow bone density decline and improve balance, reducing fall risk. When looking at resistance training for women over 50, bone density is a key focus.
For women over 50, the best starting point is a fabric band set for lower body work (the glutes and hip abductors are priority muscles for balance and fall prevention) combined with a light-to-medium loop band set for upper body pulling movements.
Recommended starting resistance: Light fabric band (15–20 lbs) for lower body; light loop band (10–25 lbs) for upper body. Progress by one resistance level every 3–4 weeks as movements become consistently manageable.
- Priority exercises for women over 50:
- Seated leg extensions with a loop band (joint-friendly quad strengthening)
- Standing hip abductions with fabric band (glute medius, balance)
- Seated rows with tube band (posture, upper back)
- Wall-supported squats with light loop band (functional leg strength)
Bands for Seniors with Arthritis
Arthritis — inflammation of the joints — requires modifications that reduce joint compression while still providing meaningful resistance. Resistance bands are frequently recommended by physical therapists for arthritis patients because the variable resistance property means tension is lowest at the joint’s weakest, most vulnerable position (when the band is slack) and highest at the end of the range of motion (where the joint is more stable).
Best band choice for arthritis: TheraBand flat latex bands (the clinical standard used in physical therapy) or wide fabric bands. Avoid tube bands with rigid handles if grip strength is compromised — a wide loop band or fabric band is easier to manage.
- Arthritis-specific modifications:
- Use shorter range of motion if full movement causes pain — partial reps with bands are still effective
- Perform exercises seated to reduce joint loading from standing
- Warm up with 5 minutes of gentle movement before adding band resistance
- Never train through sharp joint pain — mild muscle fatigue is normal; joint pain is a stop signal
Safety Tips for Older Adults
- Inspect your band before every session. Look for nicks, cracks, or discoloration in latex bands — these are early signs of structural failure. Discard any band showing damage immediately.
- Anchor securely. Use a door anchor, sturdy post, or have a training partner hold the band — never wrap bands around hands or fingers, which can restrict circulation.
- Start with seated exercises. Standing band exercises require balance — begin seated and progress to standing as confidence and stability improve.
- Keep movements slow and controlled. A 2-second concentric (pulling/pushing), 1-second hold, 2-second eccentric (returning) tempo reduces injury risk and increases muscle activation.
- Train with a partner or near a wall. Having support nearby prevents falls during standing exercises.
- Consult your doctor or physical therapist before beginning any resistance program if you have been diagnosed with osteoporosis, have had a joint replacement, or are managing a cardiovascular condition.
Resistance Bands for Recovery & Rehab
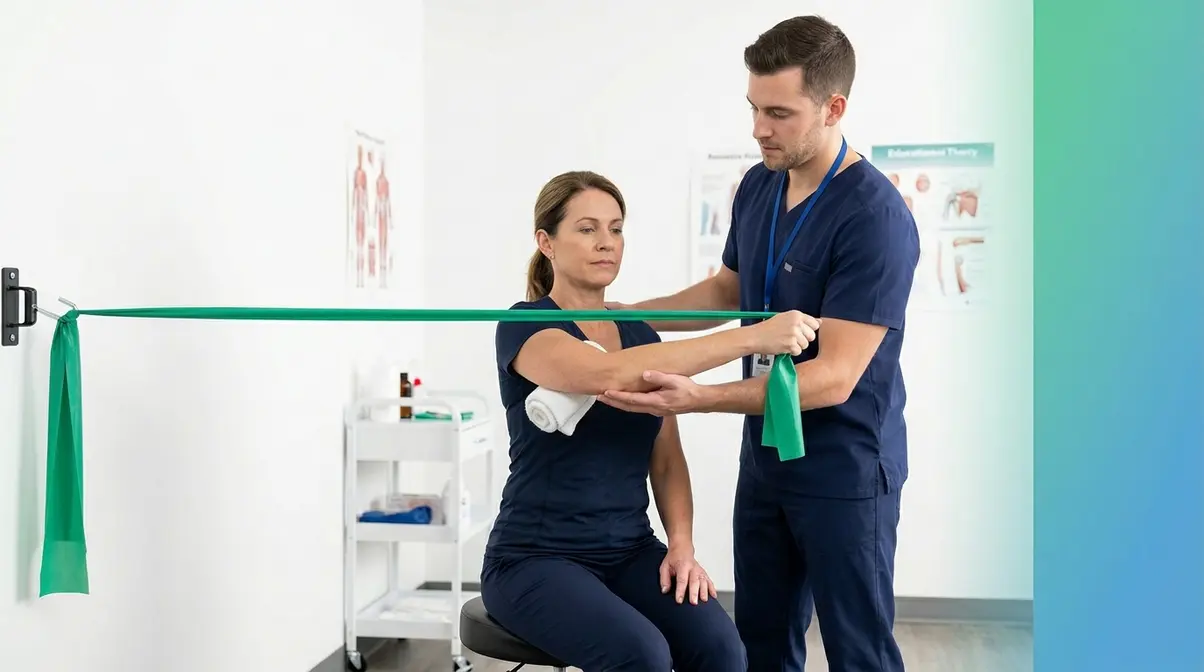
Resistance bands are a clinical tool, not just a fitness accessory. Physical therapists have used elastic resistance devices for decades because they offer controlled, progressive loading in a format that minimizes joint compression. However, exercise for injury recovery is a medical matter — always work with a licensed physical therapist (PT) or sports medicine physician before using bands for rehabilitation purposes.
⚠️ Rehabilitation Disclaimer: The information in this section is educational only. Band-based exercises for rotator cuff injuries, osteoporosis, and post-surgical recovery must be prescribed and supervised by a qualified healthcare professional. Do not self-prescribe rehabilitation exercises.
Bands for Rotator Cuff Injuries
The rotator cuff is a group of four muscles (supraspinatus, infraspinatus, teres minor, and subscapularis) that stabilize the shoulder joint. Rotator cuff injuries — ranging from inflammation to partial tears — are among the most common upper body injuries in adults.
Research published in the Journal of Shoulder and Elbow Surgery found that elastic resistance band exercises for external rotation (rotating the arm outward against band tension) and scapular retraction (pulling the shoulder blades together) produced significant improvements in rotator cuff strength and pain scores in patients with non-surgical rotator cuff injuries. A 2022 systematic review in Physical Therapy & Rehabilitation Journal confirmed that progressive elastic resistance is a first-line conservative treatment for rotator cuff tendinopathy (tendon irritation).
- The most commonly prescribed band exercises for rotator cuff rehabilitation include:
- External rotation: Elbow at 90°, band anchored to the side, rotate the forearm outward against resistance
- Internal rotation: Same setup, rotating inward
- Scapular retraction rows: Light band row focusing on squeezing the shoulder blades before pulling with the arm
- Band pull-aparts: As described in the upper body section above
Critical caveat: These exercises are appropriate for mild-to-moderate rotator cuff tendinopathy under professional guidance. Partial or full rotator cuff tears require imaging and a physician’s assessment before any resistance exercise. Do not self-diagnose or self-treat rotator cuff injuries.
According to Healthline’s shoulder rehabilitation guide, starting with the lightest possible resistance and prioritizing full range of motion before adding load is the standard clinical protocol.
7-Minute Rotator Cuff Solution
The 7-minute rotator cuff solution is a physical therapy-derived daily routine targeting rotator cuff strength and shoulder stability, typically including 4–6 exercises performed for 60–90 seconds each. The standard exercises include band external rotation, internal rotation, band pull-aparts, and prone Y/T/W raises. The routine is designed to address the most common rotator cuff weakness patterns in desk workers and overhead athletes. A light TheraBand flat band or a light loop band is the appropriate resistance level. This routine should be prescribed and initially supervised by a physical therapist to ensure correct form and appropriate resistance selection.
Bands and Osteoporosis Management
Osteoporosis is a condition in which bones become less dense and more prone to fracture. It affects approximately 10 million Americans, with women over 50 representing the highest-risk population.
The bone-building mechanism of resistance training is mechanical loading — when muscles pull on bones during contraction, the mechanical stress stimulates bone-forming cells (osteoblasts). A landmark study published in Osteoporosis International found that progressive resistance training — including elastic resistance — produced measurable improvements in bone mineral density at the hip and spine in postmenopausal women over a 12-month program.
- Resistance bands are particularly well-suited for osteoporosis management because:
- They allow low-impact loading — no high-impact forces that could risk fracture
- Variable resistance means lighter loads at joint extremes — reducing fracture risk at vulnerable positions
- They can be used seated, which is safer for individuals with balance issues common in osteoporosis
Recommended approach: A 2023 review in Archives of Osteoporosis recommends 2–3 sessions per week of progressive elastic resistance training targeting major muscle groups, with particular emphasis on hip abductor and extensor exercises (which load the hip — the highest-risk fracture site in osteoporosis).
Important: Osteoporosis management requires coordination with your physician and a qualified physical therapist. Certain movements (forward trunk flexion, high-impact loading) may be contraindicated depending on your bone density score (DEXA scan results).
Bands Physical Therapists Use
The clinical gold standard for physical therapy is the TheraBand system — a color-coded series of flat latex bands ranging from extra-thin (tan/yellow — very light resistance) to special heavy (gold/silver — very high resistance). The TheraBand color progression is:
| Color | Resistance Level | Approximate Load |
|---|---|---|
| Tan/Yellow | Extra light | 1–3 lbs |
| Red | Light | 3–5 lbs |
| Green | Medium | 5–8 lbs |
| Blue | Heavy | 8–12 lbs |
| Black | Extra heavy | 12–18 lbs |
| Silver/Gold | Special heavy | 18–25 lbs |
Physical therapists favor TheraBand and similar clinical-grade flat bands because they provide precise, reproducible resistance levels, are widely available, and have an extensive published evidence base. For home users, the TheraBand system is available without a prescription and provides an excellent starting point for supervised home exercise programs.
Beyond TheraBand, physical therapists also use fabric resistance bands for hip and lower extremity rehabilitation, and tube bands with handles for shoulder and elbow rehabilitation programs.
How to Anchor Bands Safely
Improper anchoring is the most common cause of band-related injuries. Follow these steps every time you anchor a band to a door, post, or fixture.
Tools needed: Door anchor (included with most tube band sets), resistance band, sturdy door. Estimated time: ~2 minutes.
How to Anchor a Band to a Door:
- Choose the right door. Use a solid-core interior door that opens away from you during the exercise. Never use a hollow-core door or a door with damaged hinges.
- Position the anchor at the correct height. Thread the door anchor loop over the band and close the door on the anchor nub — the nub sits on the opposite side of the door from you. Anchor low (near floor) for low-cable simulations, at mid-height for rows, and at top of door for lat pulldowns.
- Test the anchor before loading. Give the band a firm pull before adding body weight or full resistance. The door should not flex or the anchor slip.
- Face the door when pulling. Stand facing the door for rows and curls; face away from the door for chest presses and tricep extensions.
- Never wrap bands around hands or wrists. Loop bands through your palms or hold handles — wrapping around fingers restricts circulation and increases injury risk if the band snaps.
- Inspect the band at the anchor point after each session. The highest stress point is where the band contacts the anchor — check for fraying or thinning at this location.
| Setting | Anchor Height | Best Exercises |
|---|---|---|
| Low (floor level) | Bottom of door | Bicep curls, upright rows, lateral raises |
| Mid (waist height) | Door handle height | Horizontal rows, chest flyes |
| High (overhead) | Top of door | Lat pulldowns, tricep extensions |
How to Choose the Right Resistance Band
Choosing the right resistance band comes down to three variables: your current strength level, your primary training goal, and your budget. This section walks through each variable clearly — no fitness background required.
Resistance Levels Explained
Resistance bands are labeled by resistance level, but the labels are inconsistently applied across brands. Here’s a practical framework:
Light bands (5–30 lbs): For warm-ups, mobility work, rehabilitation, and beginners learning movement patterns. If you can complete 20+ reps without struggling, the band is too light for strength building — but perfect for activation work.
Medium bands (30–70 lbs): The sweet spot for most beginners and intermediate trainees. Challenging enough to stimulate hypertrophy (muscle growth) in compound movements; light enough to maintain proper form. This is the first rung of The Resistance Ladder for strength-focused training.
Heavy bands (70–120 lbs): For experienced trainees, pull-up assistance for heavy individuals, and loaded compound movements. If you can complete 8–12 reps with good form, the resistance is appropriate for strength development.
Super-heavy bands (120–200+ lbs): Used by competitive athletes for accommodating resistance (adding to barbell lifts) and heavy pull-up assistance. Not recommended for beginners.
The 3-3-3 Rule for Progressive Overload: A practical guideline for knowing when to progress to the next resistance level: when you can complete 3 sets of 12–15 reps with 3 minutes or less of rest between sets, maintaining perfect form across all 3 sets, it’s time to move to the next band resistance level. This is one of the most reliable self-coaching tools for beginners following The Resistance Ladder framework.
Band Types: Loop, Tube, Fabric
| Band Type | Best For | Not Ideal For | Typical Price |
|---|---|---|---|
| Loop band (light/medium) | Beginners, full-body, pull-up assist | Heavy compound loading | $20–$40/set |
| Loop band (heavy/monster) | Advanced compound movements, powerlifting | Beginners, upper body isolation | $15–$45/band |
| Fabric band | Glutes, hips, lower body, latex-free users | Upper body, high resistance needs | $15–$30/set |
| Tube band with handles | Upper body isolation, cable simulation | Heavy compound movements | $20–$45/set |
| TheraBand flat band | Rehab, physical therapy, seniors | Heavy strength training | $10–$25/set |
Decision Framework — Which Band for Which Need:
| Your Situation | Best Starting Band | Why |
|---|---|---|
| Complete beginner, no fitness base | Beginner loop set (light/medium) | Builds movement patterns without overloading |
| Beginner with some gym experience | Medium-heavy loop band | Enough resistance to challenge established fitness |
| Goal: glutes and lower body | Fabric band set | Non-slip, targeted activation |
| Goal: upper body, home gym | Tube bands with handles + door anchor | Simulates cable machine exercises |
| Senior or rehab patient | TheraBand flat bands (light-medium) | Clinical-grade precision, gentle on joints |
| Budget under $25 | Budget 5-band loop set | Low-risk entry; upgrade specific levels later |
| Serious strength training | Serious Steel / Rogue multi-layered loop bands | Durability, accurate resistance, full range |
Downsides of Resistance Bands
Every training tool has limitations. Resistance bands are no exception — and understanding the downsides upfront helps you use them more effectively and avoid common mistakes.
Common Pitfalls to Avoid
Pitfall 1: Buying bands with inaccurate resistance labeling. Many budget bands label a band “50 lbs” when it actually generates 30 lbs of tension at a standard stretch length. This makes progressive overload guesswork rather than science. Mitigation: Buy from brands that publish resistance curves (load vs. stretch length data) or stick to established brands (Serious Steel, Rogue, TheraBand) with verified resistance specifications.
Pitfall 2: Using a band that’s too heavy, too soon. Bands loaded beyond your current strength level force compensatory movement patterns — you’ll recruit the wrong muscles and build poor habits. Mitigation: Follow The Resistance Ladder progression — start at a level where you can complete 12–15 reps with good form, then progress.
Pitfall 3: Neglecting band inspection. Latex bands degrade with UV exposure, sweat, oils, and repeated stretching. A band that looks fine may have microfractures that cause sudden snapping. Mitigation: Inspect bands before every session. Stretch the band to check for white stress marks in the latex — these indicate imminent failure. Replace bands every 12–18 months of regular use, or immediately if damage is visible.
Pitfall 4: Anchoring to unstable fixtures. Anchoring a heavy band to a door handle, furniture leg, or railing that can’t support the load creates a projectile risk when the anchor fails. Mitigation: Use a dedicated door anchor at a solid door frame, or a wall-mounted band anchor for permanent home gym setups.
Pitfall 5: Skipping progressive overload. Doing the same exercises with the same band for months produces minimal results. Mitigation: Apply the 3-3-3 rule — when 3 sets of 12–15 reps feel easy, move up one resistance level.
When Free Weights Are Better
Resistance bands are excellent tools, but they’re not always the optimal choice. Here’s when free weights genuinely outperform bands:
When you need loads above 150 lbs. Advanced strength athletes training for powerlifting, Olympic lifting, or bodybuilding at high volumes will eventually exceed what stacked bands can provide. Free weights (barbells, dumbbells) allow unlimited load progression.
When you need precise load measurement. Bands provide approximate resistance — the actual load changes with your body position, band length, and stretch angle. For periodized (systematically planned) strength programs that require precise load tracking (e.g., “85% of your one-rep max”), a barbell is more accurate.
When sport-specific power is the goal. High-velocity power movements like Olympic lifts (clean and jerk, snatch) are most effectively trained with free weights. Bands can supplement power training but shouldn’t be the primary tool for athletes needing maximal rate of force development.
For most beginners and recreational trainers: Bands cover the full spectrum of needs. The case for switching to free weights becomes meaningful only when you’ve consistently trained with heavy bands (80+ lbs) for 6–12 months and are seeking further progression.
Frequently Asked Questions
What are the best resistance bands for strength training?
The best resistance bands for strength training are multi-layered heavy-duty loop bands from established brands like Serious Steel or Rogue, which offer resistance ranges from 5 to 200+ lbs in a single band type. For beginners, a light-to-medium loop band set (10–50 lbs) is the most practical starting point. The right choice depends on your training level — the Resistance Ladder framework in this guide maps the progression from beginner therapy bands through advanced heavy-duty bands. Most adults should start with a medium loop band (30–50 lbs) for compound movements.
What is the 3-3-3 rule for weight lifting?
The 3-3-3 rule is a progressive overload guideline: when you can complete 3 sets of 12–15 reps with no more than 3 minutes of rest between sets, maintaining good form across all 3 sets, it’s time to increase your resistance. Applied to resistance bands, this means moving to the next heavier band or shortening the band’s starting length to increase tension. It’s a simple, self-coaching framework that removes guesswork from progression decisions — particularly useful for beginners following a structured program like The Resistance Ladder.
Do resistance bands break easily?
High-quality resistance bands do not break easily, but budget options can. Multi-layered latex bands from reputable brands are engineered with redundant layers specifically to prevent sudden snapping. However, single-layer budget bands are much more prone to micro-tears and failure over time. To maximize lifespan, inspect your bands before every use and store them away from direct sunlight.
Can you lose weight using resistance bands?
Yes, resistance bands can aid in weight loss by building lean muscle mass. Muscle tissue is metabolically active, meaning it burns calories even when you are resting. While diet is the primary driver of weight loss, incorporating a full-body resistance band routine two to three times a week helps ensure the weight you lose is fat, not muscle.
How often should I replace my resistance bands?
You should replace your resistance bands every 12 to 18 months of regular use. Latex naturally degrades over time due to exposure to oxygen, UV light, and the oils from your skin. If you notice any white stress marks, small nicks, or a sticky texture on the band’s surface, discard and replace the band immediately regardless of its age.
🔄 Freshness Note: Prices and availability verified as of May 2026. Resistance band models and pricing change frequently — check current listings before purchasing.
Resistance bands have earned their place as one of the most evidence-supported, accessible, and versatile strength training tools available — and The Resistance Ladder framework gives you a clear path to use them effectively. A 2019 meta-analysis confirmed bands produce strength gains comparable to free weights; a 2021 systematic review confirmed their benefits for older adults; clinical research supports their role in rotator cuff rehabilitation and osteoporosis management. The best resistance bands for strength training aren’t a compromise — they’re a legitimate primary training tool for most adults.
The Resistance Ladder works because it removes the guesswork from progression. Start on the rung that matches your current fitness level — whether that’s a TheraBand flat band for post-injury recovery, a beginner loop set for your first six months of training, or a heavy-duty multi-layered band for serious compound movements. Apply the 3-3-3 rule to know when to move up. Progress methodically, inspect your equipment, and anchor safely.
Your next step is simple: pick one band type from the decision framework table above, order it, and complete the full-body workout in the Sample Workouts section three times this week. That’s it. The research, the framework, and the exercises are all here — the only variable left is starting.
Related posts:
Best Protein Tracker App: Tested & Compared for 2026
Best Muscle Building App 2026: 7 Expert-Tested Picks
How to Use Resistance Bands for Beginners: Full Guide
Best Food Tracking App for Beginners: Top 5 of 2026
Best Home Workout App 2026: Top 10 Tested & Ranked
Gym Equipment Names and Uses: A Beginner Guide
Callum
Hi, I'm Callum, the founder of Body Muscle Matters. I'm not a certified trainer, I'm a self taught lifter who started this site to share what I've learned from my own training and a lot of trial and error. Everything here comes from real experience and honest research, written the way I'd explain it to a friend who is just getting started. My goal is simple: practical, no hype fitness advice you can actually use.