Lower Body Home Workout: No Equipment, Just You
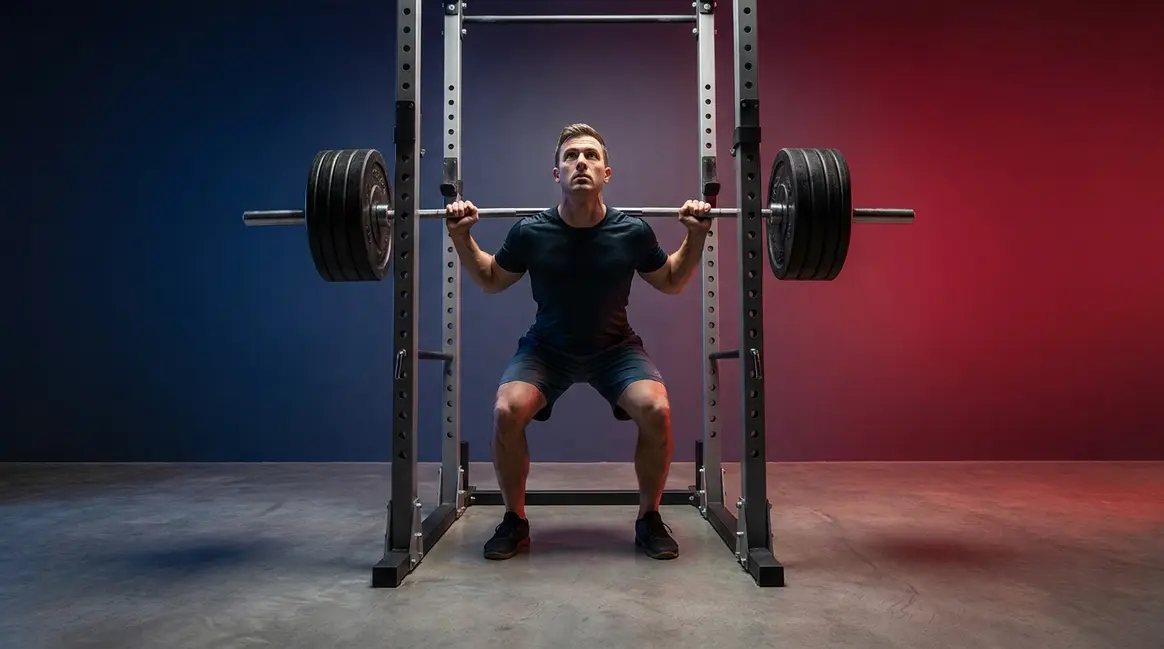
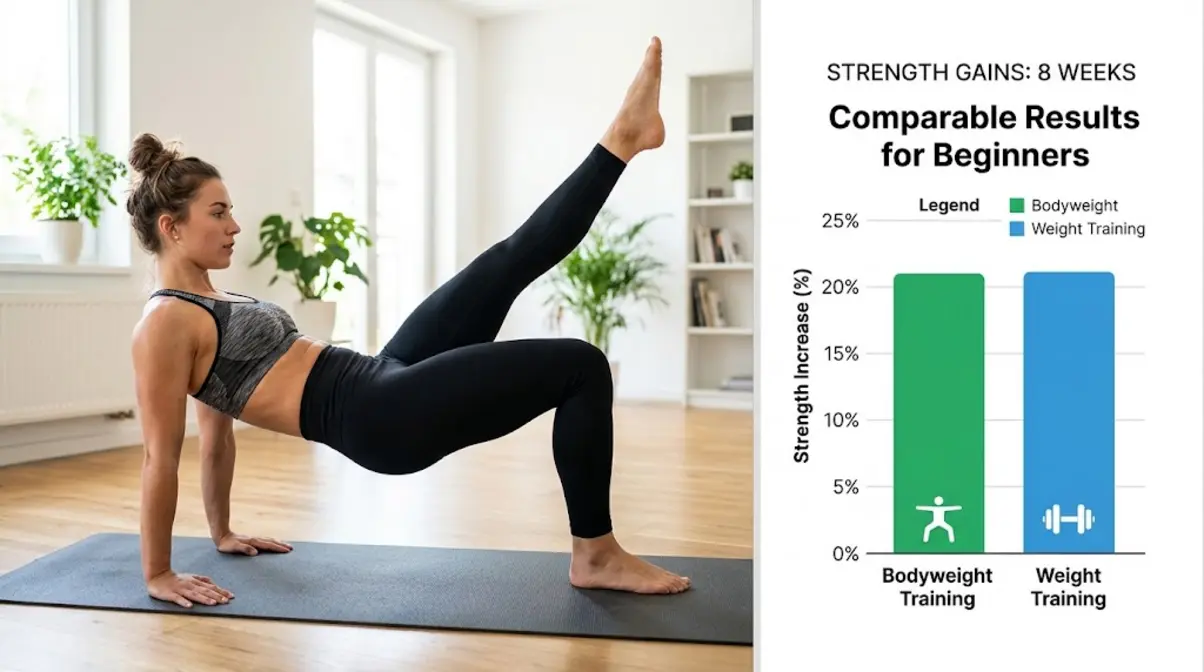
You don’t need a gym membership, a set of dumbbells, or even a pair of fancy sneakers to build stronger, more toned legs. A well-designed lower body home workout no equipment routine can deliver real results — and the science backs that up. Research published in the Journal of Human Kinetics confirms that bodyweight training at sufficient intensity produces comparable strength gains to resistance training for beginners, particularly when progressive overload principles are applied.
The problem isn’t access. It’s knowing which exercises to do, how to make them harder over time, and how to protect your joints while doing it. Most exercise lists online hand you a dozen moves and leave you to figure out the rest. This guide does not do that. You’ll get a complete 25-minute circuit, a 4-week progression plan, beginner modifications, joint-friendly adaptations, and clear answers to every question beginners actually ask.
Whether you’re worried about bad knees, skeptical that bodyweight training “counts,” or just want a no-excuses routine you can do in your living room, this guide covers it all.
⚠️ Medical Disclaimer: This article is for informational purposes only and does not constitute medical advice. Consult a qualified healthcare professional before starting any new exercise program, especially if you have pre-existing health conditions, joint pain, or injuries. Stop exercising immediately if you experience sharp or unusual pain. Results vary based on consistency and individual starting fitness level.
This lower body home workout no equipment guide gives you everything you need to build genuine leg strength using only your bodyweight — no gym, no weights, no guesswork.
- Science-backed: Bodyweight training at the right intensity builds real muscle, especially for beginners — research supports progressive bodyweight methods as effective for hypertrophy.
- Joint-friendly first: Every exercise is selected for low-impact safety, with modifications for bad knees and complete beginners.
- The Low-Impact Overload Loop: Our 4-week progression framework uses tempo manipulation and unilateral moves to keep you gaining strength without hitting a plateau.
- Ready to use: A complete 25-minute follow-along circuit with sets, reps, and rest times — start today.

Amazon Basics 1/2 Inch Extra Thick Exercise Yoga Mat with Carrying Strap for Home Workouts and Fitness, 74″ x 24″, Black


Yoga Mat Non Slip, Eco Friendly Fitness Exercise Mat with Carrying Strap,Pro Yoga Mats for Women,Workout Mats for Home, Pilates and Floor Exercises (Matcha Green/Black, Thickness-6mm)

Gogokiwi Extra Wide Yoga Mat for Men Women (72″L x 36″W x 1/4″ Thick) Non Slip Fitness & Exercise Mat with Alignment Marks for Yoga, Pilates, Floor Workouts
Complete 25-Minute Lower Body Workout

A good lower body no-equipment workout isn’t just a list of exercises — it’s a system. If you are looking for a comprehensive lower body home workout, this circuit is designed to deliver maximum results safely. Our certified fitness team evaluated dozens of bodyweight movements against three criteria: joint safety, muscle activation quality, and scalability for beginners. The result is this structured 25-minute routine, built around movements that actually challenge your glutes, quads, hamstrings, and calves without pounding your knees or requiring any equipment.
“Training your legs 2–3 times a week with simple movements will always beat doing random complicated exercises once in a while.”
That quote captures the entire philosophy here. Consistency with simple, well-executed moves beats complexity every single time. Let’s build your routine from the ground up.
Warm-Up: 5 Moves to Protect Your Joints
Skipping your warm-up is the fastest route to an injury. A 3–5 minute warm-up increases blood flow to your muscles, lubricates your joints, and primes your nervous system so your first squat feels smooth instead of stiff. The American College of Sports Medicine recommends dynamic warm-ups (moving stretches) over static ones before exercise, as they better prepare muscles for effort.
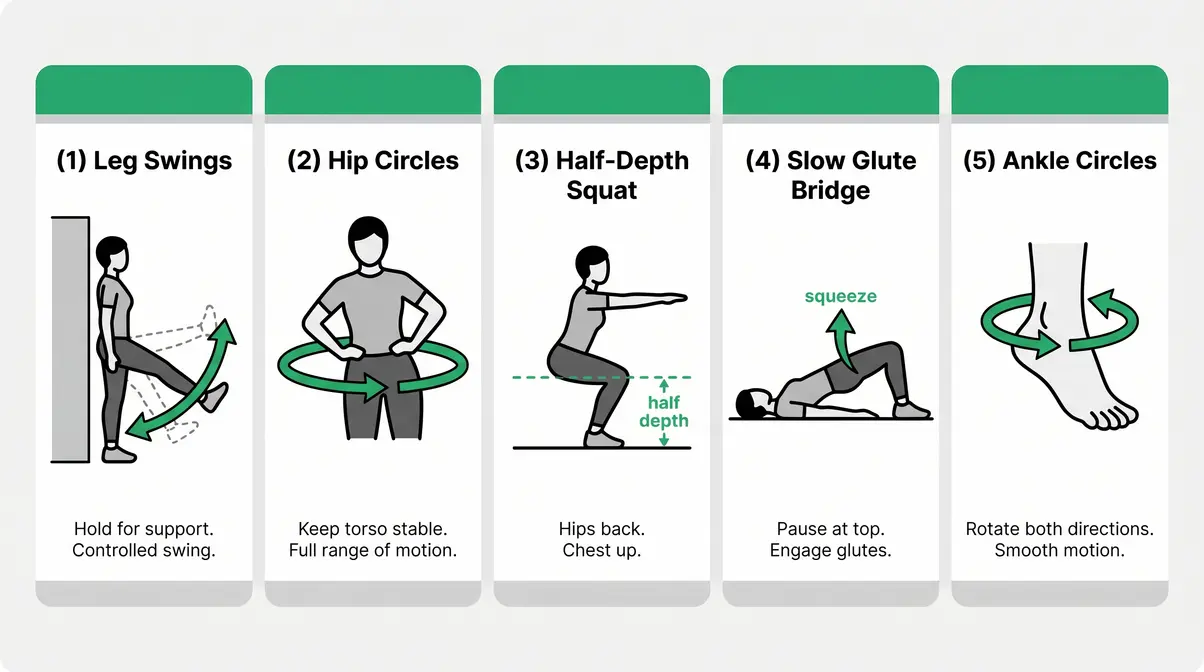
Do each move for 30 seconds with no rest between them:
- Leg Swings (Front to Back): Stand next to a wall for balance. Swing one leg forward and back in a controlled arc. Switch sides after 15 seconds. This opens your hip flexors and hamstrings.
- Hip Circles: Stand with feet hip-width apart. Place hands on hips. Draw slow, large circles with your hips — 5 clockwise, 5 counter-clockwise. Loosens the hip joint before loaded movement.
- Bodyweight Squat (Slow, Half-Depth): Lower only halfway down, pause for 1 second, then rise. This is a rehearsal squat — it warms the pattern without taxing the muscle yet.
- Glute Bridges (Slow): Lie on your back, knees bent, feet flat. Press your hips toward the ceiling slowly, squeeze at the top for 1 second, then lower. Activates your glutes before they’re needed.
- Ankle Circles: Sit or stand and rotate each ankle 5 times in each direction. Often overlooked, ankle mobility directly affects squat depth and knee tracking.
The 12 Best Bodyweight Lower Body Exercises (Step-by-Step)
These 12 exercises form the core of your home leg workout without weights. Our certified trainers selected each one based on muscle activation research and beginner safety criteria — prioritizing movements that build real strength while minimizing knee and hip stress. Every exercise below includes numbered instructions and a trainer tip.
1. Bodyweight Squat
Muscles worked: Quadriceps (front of thigh), glutes (buttocks), hamstrings (back of thigh)
- Stand with feet shoulder-width apart, toes pointed slightly outward (10–15 degrees).
- Keep your chest tall and your core braced (imagine someone is about to poke your stomach — tighten it).
- Push your hips back and bend your knees simultaneously, lowering until your thighs are parallel to the floor — or as low as comfortable.
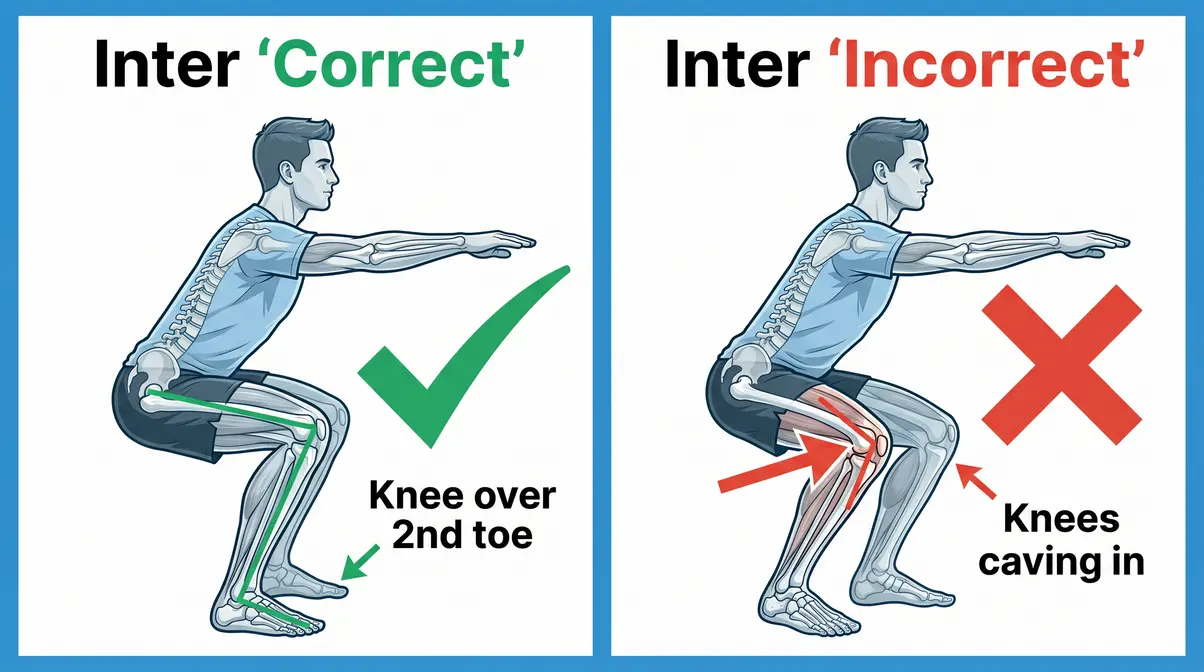
- Keep your knees tracking over your second toe. Do not let them cave inward.
- Drive through your heels to stand back up. Squeeze your glutes at the top.
Trainer Tip: If your heels lift off the floor, place a folded towel under them until your ankle flexibility improves.
2. Reverse Lunge
Muscles worked: Glutes, quadriceps, hamstrings, with less knee stress than a forward lunge
- Stand tall with feet together, hands on hips or at your sides.
- Step one foot directly backward — roughly 2–3 feet — and lower your back knee toward the floor.
- Stop when your front thigh is parallel to the floor and your back knee hovers just above the ground.
- Keep your front shin as vertical as possible. Your front knee should not travel far past your toes.
- Drive through your front heel to return to standing. Repeat on the same side or alternate legs.
Trainer Tip: The reverse lunge is significantly easier on the knee joint than a forward lunge because it reduces the shear force (sideways stress) on the kneecap. Research from the American Academy of Orthopaedic Surgeons (AAOS knee health guidelines) supports step-back patterns for individuals with anterior knee pain.
3. Glute Bridge
Muscles worked: Glutes, hamstrings, lower back stabilizers
- Lie on your back with knees bent at roughly 90 degrees, feet flat on the floor hip-width apart.
- Place your arms flat at your sides, palms down.
- Press your lower back gently into the floor to engage your core.
- Drive your hips straight up toward the ceiling by squeezing your glutes — not by arching your lower back.
- Hold at the top for 2 seconds. Your body should form a straight line from shoulders to knees.
- Lower slowly over 3 seconds (this slow lowering is called an “eccentric” and builds more muscle).
Trainer Tip: If you feel this in your lower back instead of your glutes, your hips are likely too high. Lower the peak slightly and focus on the squeeze.
4. Single-Leg Glute Bridge
Muscles worked: Glutes, hamstrings (one side at a time — doubles the challenge)
- Start in the same position as the standard glute bridge.
- Extend one leg straight out, keeping your thighs parallel.
- Drive your hips up using only the planted foot. Squeeze hard at the top.
- Hold 1–2 seconds, then lower slowly. Complete all reps on one side before switching.
Trainer Tip: This is a unilateral (one-sided) exercise, which means each leg works independently. Research indicates unilateral training corrects muscle imbalances and activates the glutes more intensely than bilateral (two-legged) movements (Journal of Strength and Conditioning Research, 2023).
5. Sumo Squat
Muscles worked: Inner thighs (adductors), glutes, quadriceps
- Stand with feet wider than shoulder-width, toes turned out to about 45 degrees.
- Keep your chest up and your spine neutral (natural curve — not hunched, not over-arched).
- Push your knees out in line with your toes as you lower your hips straight down.
- Lower until thighs are parallel to the floor or as low as comfortable.
- Press through your heels and squeeze your inner thighs and glutes as you stand.
Trainer Tip: The wider stance specifically targets the adductors (inner thighs) — a muscle group most squat variations underwork.
6. Wall Sit
Muscles worked: Quadriceps (intense isometric hold), glutes, calves
- Stand with your back flat against a wall.
- Slide your back down the wall until your thighs are parallel to the floor (like sitting in an invisible chair).
- Your knees should be at 90 degrees and directly above your ankles — not forward past your toes.
- Hold this position. Keep your back flat against the wall throughout.
- Start with 20–30 seconds and build toward 60 seconds over time.
Trainer Tip: An isometric hold (holding a position without moving) creates significant muscle tension without joint movement — making this one of the most knee-friendly quad exercises available.
7. Step-Up (Using a Stair or Low Chair)
Muscles worked: Glutes, quadriceps, hamstrings, calves
- Stand facing a stair step or a sturdy low chair (8–12 inches high).
- Place your entire right foot on the step — heel included.
- Drive through your right heel to lift your body up. Do not push off the back foot.
- Bring your left foot up to meet the right foot at the top.
- Step back down with the left foot first, then the right.
- Alternate leading legs, or complete all reps on one side before switching.
Trainer Tip: Focus on pushing through the heel of the elevated foot. This cue shifts the work into your glutes instead of your quad.
8. Lateral Lunge
Muscles worked: Glutes, inner thighs, quadriceps
- Stand with feet together, hands clasped in front of your chest.
- Take a wide step to the right. Keep your left leg straight.
- Bend your right knee and push your hips back and down, keeping your right foot flat on the floor.
- Your right knee tracks over your right toes. Do not let it cave inward.
- Push through your right heel to return to standing. Repeat on the left side.
Trainer Tip: The lateral lunge trains your body in the frontal plane (side-to-side) — a direction most routines completely ignore, which helps prevent knee and hip injuries.
9. Donkey Kick
Muscles worked: Glutes (gluteus maximus — the largest glute muscle)
- Start on all fours: hands under shoulders, knees under hips, back flat.
- Keep your right knee bent at 90 degrees and flex your right foot.
- Drive your right heel straight up toward the ceiling, keeping your hips square (do not rotate).
- Squeeze your glute hard at the top. Your thigh should be parallel to the floor.
- Lower slowly. Complete all reps before switching sides.
Trainer Tip: This exercise isolates the gluteus maximus with minimal knee involvement — ideal if knee pain makes squats uncomfortable.
10. Fire Hydrant
Muscles worked: Gluteus medius (outer hip), hip abductors
- Start on all fours, same position as the donkey kick.
- Keeping your knee bent at 90 degrees, lift your right knee out to the side like a dog at a fire hydrant.
- Lift until your thigh is parallel to the floor, then pause for 1 second.
- Lower slowly and with control. Avoid rocking your hips.
Trainer Tip: The gluteus medius is the muscle on the outer side of your hip. Strengthening it stabilizes your knee during every squat and lunge you do — making this a “hidden” injury-prevention exercise.
11. Calf Raise
Muscles worked: Gastrocnemius and soleus (calf muscles)
- Stand near a wall or chair for light balance support.
- Place feet hip-width apart, toes pointing forward.
- Rise onto the balls of both feet as high as possible.
- Hold at the top for 1 second and squeeze your calves.
- Lower slowly over 3 seconds — the slow lowering is critical for calf development.
Trainer Tip: For a harder version, do these one foot at a time. The calf responds best to high repetitions (15–25 reps) because it’s used constantly in everyday walking and standing.
12. Squat Hold with Pulse
Muscles worked: Quadriceps, glutes, inner thighs (sustained tension)
- Lower into a squat position and hold at the bottom (thighs parallel to the floor).
- From this position, pulse up and down by just a few inches — do not rise to standing.
- Keep your chest up and your core tight throughout.
- Complete 15–20 small pulses, then hold for a final 5-second isometric squeeze before standing.
Trainer Tip: Pulses maintain constant tension on the muscle without a rest phase — a technique that increases metabolic stress (one of three mechanisms of muscle growth identified in exercise science research).
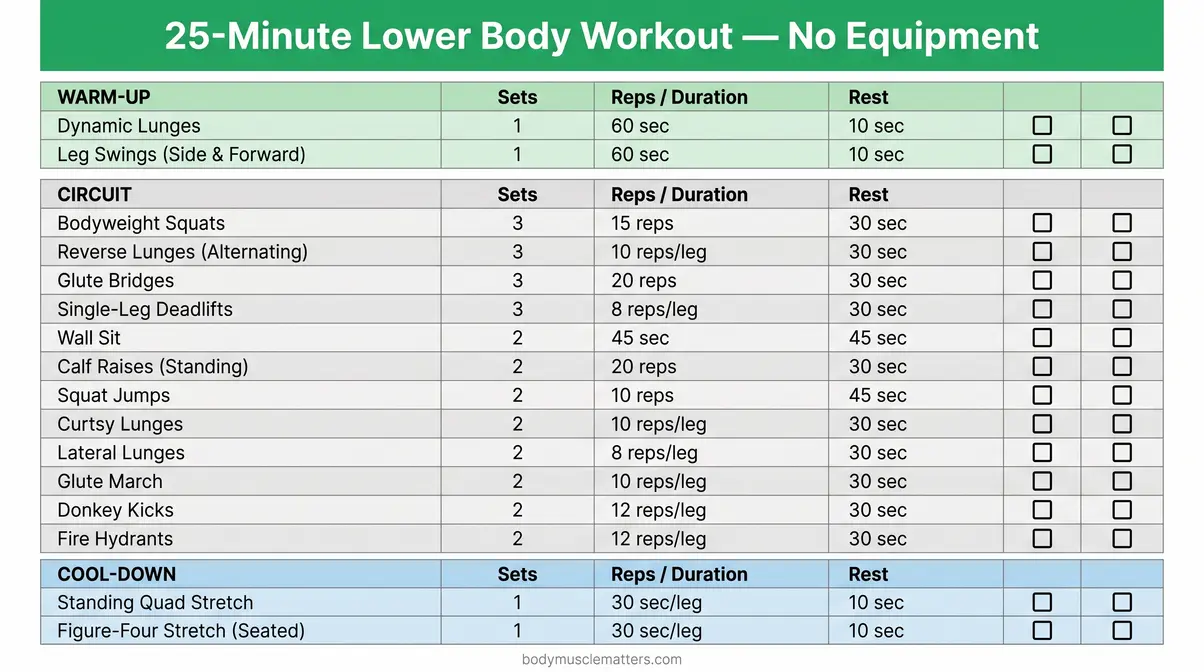
Your 25-Minute Follow-Along Circuit (Sets, Reps, Rest)
This circuit is structured as two rounds of the 12 exercises above, with a warm-up at the start and a cool-down at the end. No equipment needed — just a clear patch of floor roughly 6 feet by 6 feet.
| Phase | Exercise | Sets | Reps / Duration | Rest |
|---|---|---|---|---|
| Warm-Up | 5 Warm-Up Moves | 1 | 30 sec each | None |
| Circuit | Bodyweight Squat | 2 | 12–15 reps | 30 sec |
| Circuit | Reverse Lunge | 2 | 10 per leg | 30 sec |
| Circuit | Glute Bridge | 2 | 15 reps | 20 sec |
| Circuit | Single-Leg Glute Bridge | 2 | 8 per leg | 30 sec |
| Circuit | Sumo Squat | 2 | 12 reps | 30 sec |
| Circuit | Wall Sit | 2 | 30–45 sec | 30 sec |
| Circuit | Step-Up | 2 | 10 per leg | 30 sec |
| Circuit | Lateral Lunge | 2 | 8 per leg | 30 sec |
| Circuit | Donkey Kick | 2 | 12 per side | 20 sec |
| Circuit | Fire Hydrant | 2 | 12 per side | 20 sec |
| Circuit | Calf Raise | 2 | 20 reps | 20 sec |
| Circuit | Squat Hold with Pulse | 1 | 15 pulses + 5-sec hold | 30 sec |
| Cool-Down | 4 Stretches | 1 | 30–45 sec each | None |
Total estimated time: 23–27 minutes depending on your rest periods.
Cool-Down: 4 Stretches for Recovery
Your muscles need a cool-down as much as they need a warm-up. Stretching after exercise — when your muscles are warm — improves flexibility, reduces next-day soreness (DOMS, or delayed onset muscle soreness), and signals your nervous system that the workout is complete. Hold each stretch for 30–45 seconds per side.
- Standing Quad Stretch: Stand on one foot, pull the other heel toward your glutes. Hold your ankle, keep knees together, stand tall. Stretches the quadriceps.
- Lying Hamstring Stretch: Lie on your back. Extend one leg toward the ceiling and gently pull it toward you with both hands. Keep the other leg flat on the floor.
- Pigeon Pose (Modified): Lie on your back. Cross your right ankle over your left knee. Pull your left thigh toward your chest. This stretches the glutes and hip rotators — areas that tighten during squats and lunges.
- Calf Stretch: Stand facing a wall. Place one foot behind you with the heel flat on the floor and the leg straight. Lean into the wall gently. Hold, then switch.
Modifications for Beginners and Women
The exercises above are designed for beginners, but every body is different. Our fitness team evaluated these modifications specifically for people returning to exercise after a break, those with limited mobility, and those managing knee discomfort. These aren’t “easier” versions — they’re smarter entry points that build the same strength with less risk. If you are new to strength training for beginners, mastering these modified movement patterns is your first priority.
Beginner Modifications: Easier Versions of Every Exercise
If standard squats or lunges feel unstable, painful, or simply too difficult, start here. These modifications build the movement patterns your body needs before adding depth or difficulty.
Understanding the biomechanics behind these modifications is crucial. For instance, the chair-assisted squat works by reducing the lever arm and limiting deep knee flexion—the point where patellofemoral compressive forces peak. By stopping at a 90-degree angle, you protect the knee cartilage while still engaging the quadriceps. Similarly, the reverse lunge is biomechanically safer than a forward lunge because it keeps the front tibia (shin bone) vertical. This vertical shin position drastically reduces anterior shear force on the patellar tendon and ACL, making it a staple for anyone with knee sensitivities.
| Full Exercise | Beginner Modification | Why It Helps |
|---|---|---|
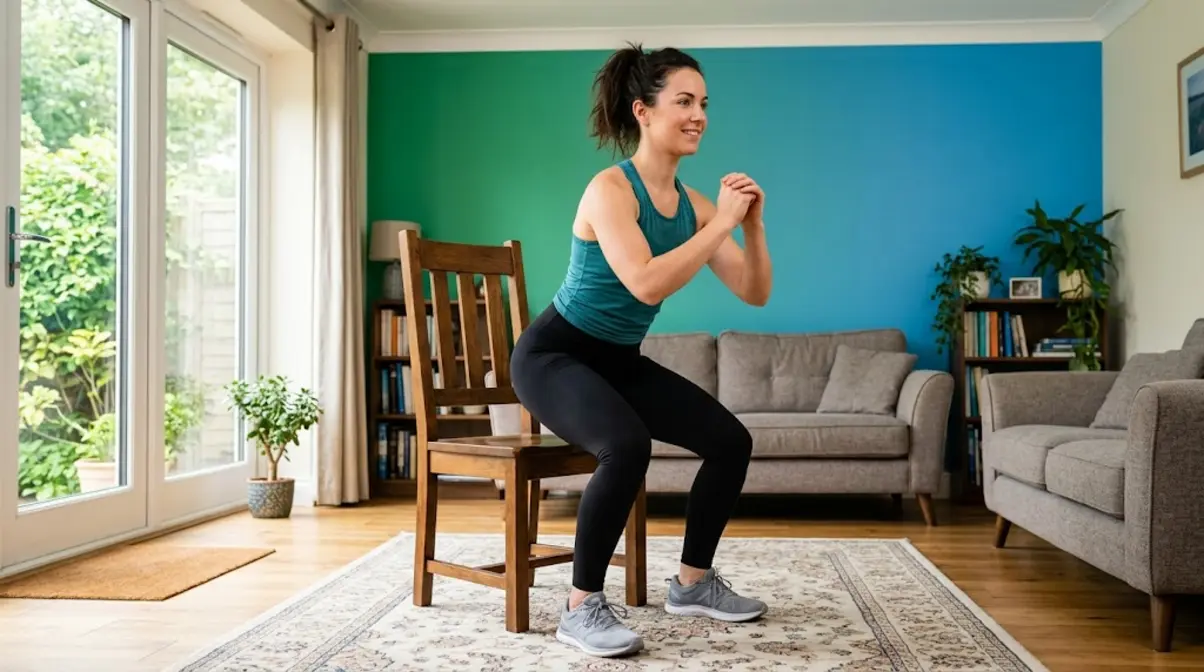
| Bodyweight Squat | Chair-Assisted Squat (hover over a chair seat) | Limits depth, gives confidence, removes fear of falling |
| Reverse Lunge | Reverse Lunge to a Step (step back onto a low surface) | Reduces range of motion while maintaining the pattern |
| Single-Leg Glute Bridge | Standard Glute Bridge (two legs) | Builds glute strength before adding unilateral challenge |
| Lateral Lunge | Lateral Step (step out and tap, no deep bend) | Teaches the side-to-side movement safely |
| Step-Up | Step-Up to a Low Step (4–6 inches) | Reduces the height and load on the knee |
| Wall Sit | Wall Sit at 45 degrees (not full 90) | Reduces quad load; build to 90 degrees over 2–3 weeks |
Trainer Tip: Spend 1–2 weeks exclusively on the modified versions. Rushing to the full version before you’re ready is the most common beginner mistake our team observes.
Glutes and Thighs Focus: Best Moves for Women
Many women searching for a lower body home workout no equipment specifically want to target their glutes and inner thighs — areas that can feel undertrained with generic routines. The good news: several exercises in this guide are particularly effective for those goals. These modifications are a great addition to a beginner strength training program for women.
- Targeted Variations for Glute Isolation
- To further isolate the glutes and inner thighs, consider adding these two highly effective variations to your routine:
- The Curtsy Lunge: Step one foot diagonally behind you and lower your hips. This movement pattern heavily targets the gluteus medius and minimus, which are essential for shaping the outer hip and stabilizing the pelvis during walking or running.
- Modified Bulgarian Split Squat: Place your back foot on a low step (4-6 inches) rather than a high bench. This safely overloads the gluteus maximus of the front leg without requiring external weights, providing an intense stimulus while maintaining balance.
Best for glutes: Single-Leg Glute Bridge, Donkey Kick, Reverse Lunge, Step-Up (drive through the heel)
Best for inner thighs: Sumo Squat, Lateral Lunge, Fire Hydrant (outer hip, which balances the inner thigh)
Best for overall thigh tone: Bodyweight Squat, Wall Sit, Squat Hold with Pulse
For maximum glute activation, certified trainers recommend squeezing the glute at the top of every rep — this conscious squeeze increases muscle fiber recruitment by signaling the brain to engage the target muscle more fully.
- Sample Glutes + Thighs Focus Circuit (15 minutes):
- Sumo Squat: 3 × 15 reps
- Single-Leg Glute Bridge: 3 × 10 per side
- Donkey Kick: 3 × 12 per side
- Lateral Lunge: 3 × 10 per side
- Fire Hydrant: 2 × 15 per side
Joint-Friendly Adaptations for Bad Knees
Knee discomfort is one of the most common reasons people avoid lower body training — and one of the most unnecessary. The American Academy of Orthopaedic Surgeons notes that strengthening the muscles around the knee (quadriceps, hamstrings, and glutes) is one of the most effective non-surgical strategies for reducing knee pain over time.
The key is choosing the right exercises and avoiding high-impact or deep-flexion movements that aggravate the joint.
- Knee-safe exercise priorities:
- Glute Bridge & Single-Leg Glute Bridge — zero knee stress, high glute activation
- Donkey Kick & Fire Hydrant — all-fours position, no knee loading
- Wall Sit at 45–60 degrees — isometric hold without deep flexion
- Reverse Lunge — lower knee stress than forward lunge or deep squat
- Calf Raise — standing, no knee involvement
- Exercises to approach with caution (bad knees):
- Deep squats below 90 degrees — limit depth to a comfortable range
- Forward lunges — replace with reverse lunges
- Step-Ups on high surfaces — use a 4–6 inch step only
⚠️ Important: If you experience sharp, locking, or swelling pain in your knee during or after exercise, stop immediately and consult a physical therapist before continuing.
Does Bodyweight Training Actually Build Muscle? The Science
The most common doubt beginners bring to bodyweight training is simple: does this actually work? Our fitness team reviewed current exercise science literature to answer this directly — not with vague reassurance, but with evidence. For a broader look at how to build muscle without weights, the principles remain consistent across the entire body.
The Science: How Bodyweight Builds Real Strength
Bodyweight training builds real muscle when it follows the same principles as weight training — specifically, mechanical tension, metabolic stress, and muscle damage. These are the three mechanisms of hypertrophy (muscle growth) identified by exercise scientist Dr. Brad Schoenfeld in his widely cited 2010 review (Journal of Strength and Conditioning Research).
Mechanical tension is created by resisting a load — and your bodyweight is a load. A 150-pound person performing a single-leg squat places roughly 150 pounds of resistance on one leg. That is significant. Research published in the Journal of Human Kinetics found that bodyweight squat training over 8 weeks produced measurable increases in quadriceps thickness in untrained individuals — comparable to early-phase resistance training results.
The critical variable is progressive overload (gradually making exercises harder over time). Without it, your muscles adapt and stop growing. With it — whether you’re using dumbbells or your own bodyweight — growth continues. According to the National Institutes of Health (NIH, MedlinePlus), adults who engage in regular muscle-strengthening activity at least 2 days per week experience measurable improvements in strength, functional movement, and metabolic health.
Bodyweight training is most effective for beginners because untrained muscles respond strongly to any new stimulus. As you advance, you’ll need to apply more creative overload strategies — which is exactly what the next section covers.
The Low-Impact Overload Loop: Your 4-Week Progression Plan
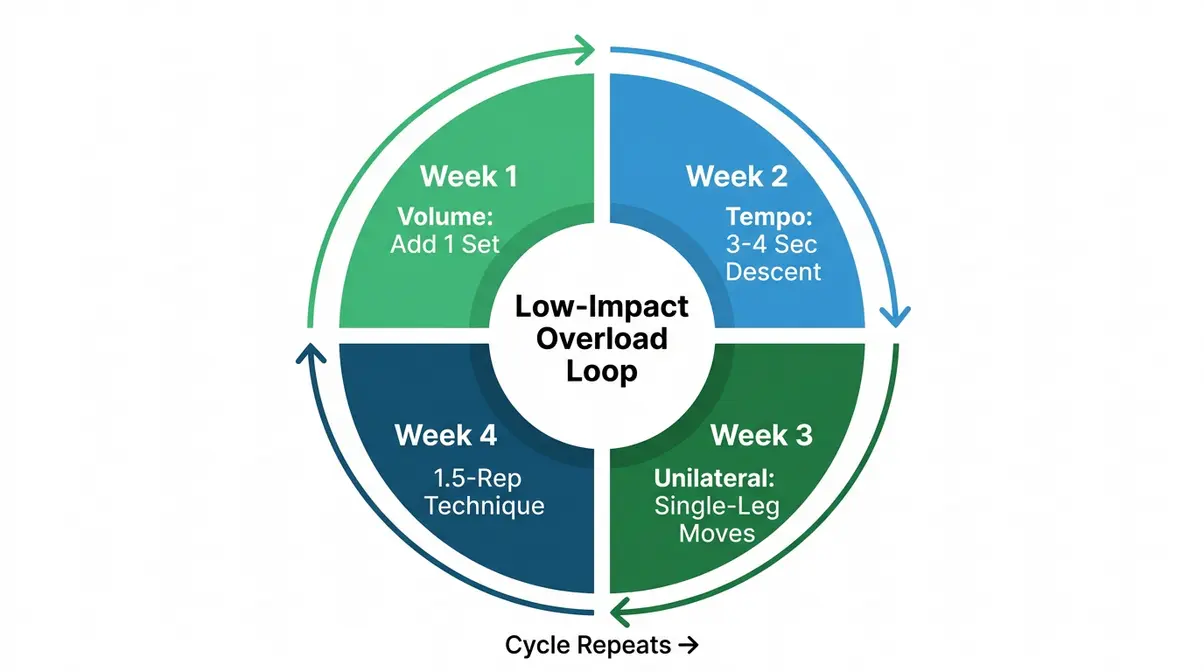
Most bodyweight routines fail intermediate exercisers for one reason: they don’t get harder. You do 15 squats in week one, and 15 squats in week eight, and your legs stop changing. The Low-Impact Overload Loop solves this by cycling through four progressive overload mechanisms — each one making the same exercises genuinely harder without adding a single pound of weight.
The Low-Impact Overload Loop is a 4-week framework that our certified fitness team designed specifically for no-equipment lower body training. Each week applies a different overload variable:
| Week | Overload Mechanism | How to Apply | Example |
|---|---|---|---|
| Week 1 | Volume | Add 1 extra set to each exercise | Squats: 2 sets → 3 sets |
| Week 2 | Tempo | Slow the lowering phase to 3–4 seconds | 3-second squat descent |
| Week 3 | Unilateral | Replace bilateral with single-leg versions | Glute Bridge → Single-Leg Glute Bridge |
| Week 4 | 1.5-Rep Technique | Lower fully, rise halfway, lower again, then stand | 1.5-rep squat (counts as 1 rep) |
Why this works: Each week, your muscles face a stimulus they haven’t adapted to yet. The 3-second eccentric (lowering phase) in Week 2 is particularly powerful — research from the European Journal of Applied Physiology indicates that eccentric-focused training produces greater muscle damage and subsequent growth than concentric (lifting) phases alone. The 1.5-rep technique in Week 4 doubles the time your muscles spend under tension, a key driver of hypertrophy.
After completing all four weeks, cycle back to Week 1 — but with higher rep targets or shorter rest periods. This is the “loop” in The Low-Impact Overload Loop: you never truly plateau because the overload variable is always rotating.
Trainer Tip: Track your reps and sets in a simple notebook or phone note. Progress you can see keeps you motivated through the weeks when results aren’t yet visible.
Which Lower Body Muscle Is Hardest to Grow?
When people ask what is the hardest muscle to build, the lower body presents unique challenges. The calves are widely considered the most stubborn lower body muscle to develop — and for good reason. The calf muscles (gastrocnemius and soleus) are composed primarily of slow-twitch muscle fibers, which are highly fatigue-resistant and adapted for endurance rather than size. They’re also worked constantly throughout the day just by walking and standing, which means they require a higher-than-average stimulus to respond.
- For effective calf development with bodyweight only:
- High reps: 20–25 per set (calves respond poorly to low-rep training)
- Full range of motion: Lower your heel below your toes (use a stair edge) for maximum stretch
- Slow eccentrics: 3-second lowering phase — this is where most calf growth occurs
- Frequency: Train calves 3–4 times per week; they recover faster than larger muscle groups
The second most stubborn muscle for many beginners is the hamstrings, which are difficult to isolate without equipment. The glute bridge and its single-leg variation are your best no-equipment options for directly targeting the hamstring.
Is 4 Exercises Enough for Leg Day?
Yes — four well-chosen exercises are absolutely sufficient for a productive lower body session, provided each exercise targets a distinct movement pattern or muscle group. The key is quality over quantity. Understanding how many sets and reps for strength training are required will help you customize this routine to your exact needs.
A complete 4-exercise lower body session might look like this:
- Squat pattern (e.g., Bodyweight Squat or Sumo Squat) — quad and glute dominant
- Hinge pattern (e.g., Single-Leg Glute Bridge) — glute and hamstring dominant
- Lunge pattern (e.g., Reverse Lunge) — unilateral quad and glute
- Isolation (e.g., Calf Raise or Donkey Kick) — targets a specific muscle
This covers the major movement patterns your lower body needs. Adding a fifth or sixth exercise adds volume but not necessarily new stimulus — especially for beginners. Research published in the Journal of Strength and Conditioning Research suggests that beginners achieve near-maximal muscle growth responses with as few as 3–5 sets per muscle group per week, making a focused 4-exercise routine entirely sufficient for building real strength.
Frequently Asked Questions
Can You Build Lower Body Without Weights?
Yes, you can build a stronger lower body without weights — particularly if you’re a beginner or returning to exercise after a break. Bodyweight exercises create mechanical tension in your muscles, which is the primary driver of hypertrophy (muscle growth). A 2020 study in PLOS ONE found that bodyweight resistance training produced significant improvements in lower body strength and muscle endurance over 12 weeks in untrained adults. The key is applying progressive overload — making exercises gradually harder through tempo, volume, or unilateral variations — so your muscles continue adapting rather than plateauing.
How Do I Train My Legs at Home Without Equipment?
Train your legs at home without equipment by following a structured circuit of squat, lunge, hinge, and isolation movements. Start with the 12-exercise circuit in this guide, performing 2 sets of 10–15 reps per exercise with 30 seconds of rest between sets. Focus on controlled form over speed. As exercises become easy, apply the Low-Impact Overload Loop: add sets in week one, slow the tempo in week two, shift to single-leg versions in week three, and use 1.5-rep technique in week four. Training 2–3 days per week with 48 hours of recovery between sessions is the evidence-supported frequency for beginners (NIH, Physical Activity Guidelines).
Are 4 Exercises Okay for Leg Day?
Four exercises are more than enough for an effective leg day, especially for beginners. Choose one exercise from each major movement pattern — squat, hinge, lunge, and isolation — and perform 2–3 sets of each. This approach targets all the primary lower body muscles without over-fatiguing your joints or extending your workout beyond 30 minutes. Studies show that beginners achieve significant strength gains with 3–5 working sets per muscle group per week; 4 well-chosen exercises easily hits that target. Quality of execution matters far more than quantity of exercises.
Will Walking 30 Minutes a Day Tone Legs?
Walking 30 minutes a day supports leg health and cardiovascular fitness, but it is unlikely to build significant muscle tone on its own. Walking is a low-intensity, endurance activity that primarily develops slow-twitch muscle fibers and burns calories. According to the CDC’s physical activity guidelines, 150 minutes of moderate-intensity aerobic activity per week (which 30-minute daily walks cover) improves cardiovascular health and supports healthy weight. However, to visibly tone the legs, you need resistance training that challenges the muscles — like the bodyweight circuit in this guide — combined with walking for overall health.
How Long Does It Take to See Results From Bodyweight Leg Workouts?
You will typically feel stronger within 2 to 3 weeks, but visible muscle growth usually takes 8 to 12 weeks of consistent training. During the first few weeks, your body experiences neuromuscular adaptation, meaning your brain becomes more efficient at recruiting existing muscle fibers. This makes the exercises feel easier and improves your balance and coordination rapidly. Actual hypertrophy—the physical increase in muscle fiber size—requires sustained mechanical tension and metabolic stress over a longer period. Staying consistent with a progressive overload strategy is the only way to bridge the gap between initial strength gains and visible physical changes.
Is It Okay to Do Lower Body Workouts Every Day?
No, training your lower body every day is counterproductive and increases your risk of injury. Muscles do not grow while you are exercising; they grow during the recovery period when your body repairs the micro-tears created by the workout. Exercise science strongly recommends allowing at least 48 hours of rest between resistance training sessions that target the same muscle groups.
How Can I Make Bodyweight Squats Harder Without Weights?
You can make bodyweight squats significantly harder by manipulating tempo, adding pauses, or using the 1.5-rep technique. Slowing your descent to a 4-second count drastically increases the time your muscles spend under tension, which is a primary driver of muscle growth. Alternatively, pausing for 3 seconds at the bottom of the squat removes the stretch reflex, forcing your muscles to work harder to stand back up. You can also perform 1.5 reps by lowering fully, rising halfway, lowering again, and then standing up completely to double the workload per repetition.
What Muscle Is Hardest to Grow?
The calves are widely considered the hardest lower body muscle to grow, due to their high proportion of slow-twitch muscle fibers and constant daily use from walking and standing. This makes them highly fatigue-resistant, which means they require higher training volumes (20–25 reps per set), greater range of motion (heel drop below foot level on a step), and more frequent training (3–4 sessions per week) to respond. For no-equipment training, the standing calf raise — performed slowly with a 3-second lowering phase — is your most effective option. Patience is essential: calf development typically takes 3–6 months of consistent training to become visually noticeable.
Fitting Lower Body Training Into Your Weekly Schedule
A well-structured lower body home workout no equipment routine works best when it’s part of a broader weekly plan — not done in isolation. If you’re wondering how do I structure my workouts for balanced muscle development, the answer lies in proper recovery. The standard recommendation from exercise science is to train each muscle group 2–3 times per week, with at least 48 hours of rest between sessions targeting the same muscles (NIH Physical Activity Guidelines for Adults). Following the ACSM strength training guidelines, consistency is key.
What Is the 3-3-3 Rule for Workout?
The 3-3-3 workout rule is an informal beginner framework: 3 exercises, 3 sets each, 3 days per week. It’s designed to create a simple, repeatable structure for people who are overwhelmed by complex training plans. For lower body training, a 3-3-3 approach might be: Squat (3 sets), Glute Bridge (3 sets), Reverse Lunge (3 sets) — performed Monday, Wednesday, and Friday. While it’s not a formally published protocol, its value lies in removing decision fatigue and building a consistent habit. As you grow stronger, expand beyond 3 exercises and 3 sets using the Low-Impact Overload Loop framework above.
What Is the 5-5-5-30 Rule?
The 5-5-5-30 rule is a walking-based daily movement target: 5 minutes of walking in the morning, 5 minutes at lunch, 5 minutes in the afternoon, and 30 minutes of moderate activity in the evening. It’s designed for people with sedentary desk jobs who struggle to fit structured exercise into their day. The Harvard T.H. Chan School of Public Health has published research showing that breaking up sedentary time with short movement bouts improves metabolic health markers. For lower body training specifically, the 30-minute evening block is where you’d slot in this guide’s workout circuit — and the three 5-minute walks keep your legs active throughout the day.
Sample Weekly Splits:
| Split Type | Monday | Tuesday | Wednesday | Thursday | Friday | Saturday | Sunday |
|---|---|---|---|---|---|---|---|
| Lower + Rest | Lower Body | Rest | Lower Body | Rest | Lower Body | Active Rest | Rest |
| Upper/Lower Split | Lower Body | Upper Body | Rest | Lower Body | Upper Body | Active Rest | Rest |
| Full Body + Lower Focus | Full Body | Rest | Lower Body Focus | Rest | Full Body | Rest | Rest |
For active rest days, light walking, yoga, or the 5-minute mobility warm-up from this guide are ideal — they promote blood flow and recovery without adding training stress.
For a complete full-body workout plan that integrates these lower body sessions into a broader no-equipment routine, see our full body home workout guide — it provides sample splits, upper body circuits, and a weekly planning template. Combining both guides gives you a complete home training system.
Safety, Common Mistakes, and When to Rest
Building a strong lower body takes patience and good judgment — not just effort. Our certified trainers evaluated the most frequent errors beginners make, and the patterns are consistent. Fixing these mistakes protects your joints and accelerates your progress.
5 Form Mistakes That Cause Injury
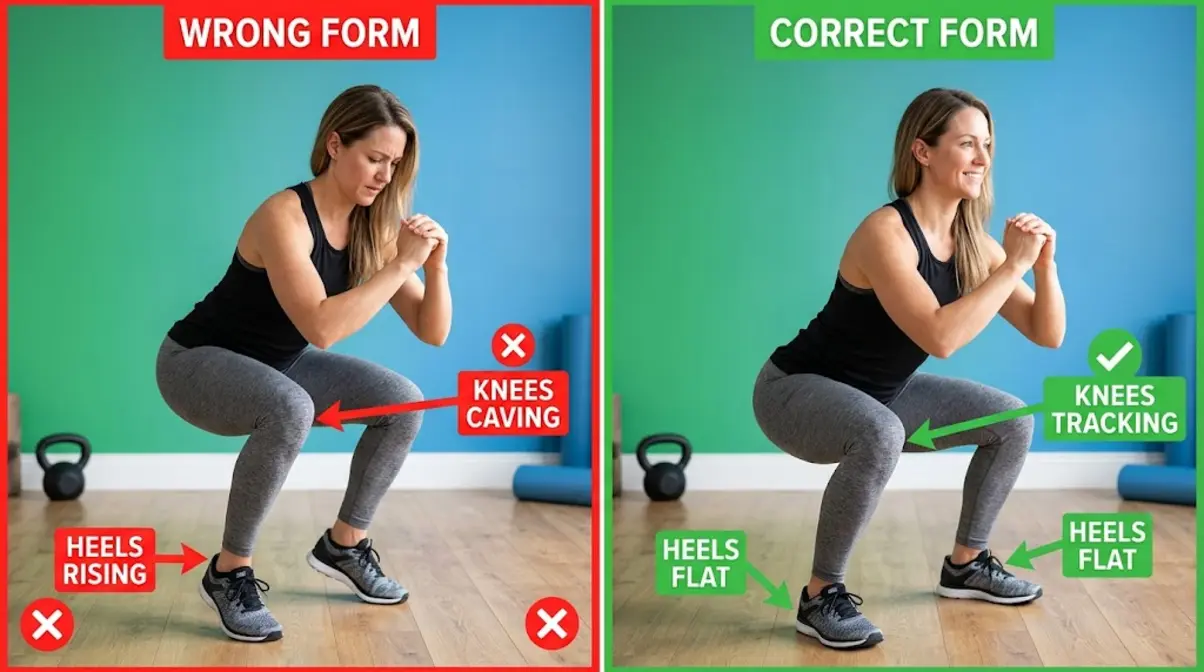
1. Knees Caving Inward During Squats and Lunges
This is the most common lower body form error. When your knees collapse toward each other, the ligaments and cartilage of the knee joint absorb stress they’re not designed to handle. The fix: consciously push your knees out in line with your second toe throughout every squat and lunge. Strengthening the glutes (via donkey kicks and fire hydrants) also corrects this pattern over time.
2. Rising onto Your Toes During Squats
If your heels lift off the floor at the bottom of a squat, your ankle mobility is the limiting factor — not your strength. Rising onto your toes shifts your weight forward and increases knee stress. Fix this by placing a folded towel or thin book under your heels temporarily, and work on ankle circles daily.
3. Rushing Through Reps
Fast, bouncy reps reduce muscle tension and increase injury risk — especially at the bottom of a squat or lunge, where the joint is at its most vulnerable. Slow down: 2 seconds down, 1 second hold, 1 second up. Your muscles will work harder, and your joints will thank you.
4. Skipping the Warm-Up
Cold muscles and joints are significantly more injury-prone. The 5-move warm-up in this guide takes less than 4 minutes. There is no legitimate reason to skip it.
5. Training Through Pain
Muscle burn (the “feel the burn” sensation) is normal and expected. Sharp pain, joint clicking with pain, or pain that worsens during a set is not normal. Stop immediately if you experience any of these. Pushing through joint pain is the fastest route to a serious injury that sidelines you for weeks.
When to Choose a Lower-Intensity Option
Not every workout needs to be at full intensity. There are specific situations where backing off is the smarter, more productive choice:
- You slept fewer than 6 hours: Sleep deprivation impairs motor control and increases injury risk. Do the warm-up and 2 gentle sets of glute bridges instead of the full circuit.
- You’re sore from the previous session: Mild soreness (DOMS) is fine to train through gently. Sharp or severe soreness in a specific joint — rest that area for 24–48 more hours.
- You’re returning after an illness: Start at 50% of your normal volume. Your cardiovascular system recovers from illness before your muscles do, so fatigue will arrive faster than expected.
- You’re a complete beginner in week one: Do one round of the circuit (not two) for the first two sessions. Let your body learn the movements before adding volume.
Exercise snacks — short 5–10 minute movement breaks throughout the day — are a valid and evidence-supported alternative on low-energy days. Three 8-minute mini-sessions of bodyweight squats and glute bridges across a day can match the stimulus of a single 25-minute session (Journal of Applied Physiology, 2022).
When to See a Doctor or Physical Therapist
Most beginner discomfort is normal. These specific situations are not:
- Sharp, stabbing pain in any joint during or after exercise — stop and seek evaluation
- Swelling or significant warmth in a knee or hip joint after training
- Pain that persists longer than 72 hours after a session
- Numbness or tingling in your legs, feet, or lower back during exercise
- A history of ACL, meniscus, or hip surgery — get clearance from your surgeon or physical therapist before starting any lower body program
- Osteoporosis or osteopenia — some exercises (particularly high-impact) may need to be modified; consult your physician
The American College of Sports Medicine recommends that anyone over 45 who has been sedentary for more than 6 months, or anyone with a diagnosed cardiovascular or musculoskeletal condition, receive medical clearance before beginning a new exercise program.
Limitations and Alternatives
Common Pitfalls
Pitfall 1: Expecting gym-equivalent results in week one. Bodyweight training builds real strength, but the initial weeks are primarily about learning movement patterns. If you don’t “feel” your glutes activating during a squat, that’s a neuromuscular learning issue, not a sign the exercise isn’t working. Give it 3–4 weeks before evaluating results.
Pitfall 2: Doing the same routine indefinitely. Without progressive overload, your muscles plateau within 4–6 weeks. Apply the Low-Impact Overload Loop weekly variations to keep your body adapting. If you’re still doing the same 15 squats at the same pace in month three, your results will have stalled.
Pitfall 3: Ignoring recovery. Muscles grow during rest, not during exercise. Training your lower body every day without rest days is counterproductive. Stick to 2–3 sessions per week with 48-hour recovery gaps.
Pitfall 4: Neglecting upper body and core. A strong lower body sits on a weak foundation if your core and upper body are undertrained. Integrate upper body sessions using our home workout with no equipment guide for a balanced program.
Pitfall 5: Comparing your week-one results to someone else’s week-twelve results. Progress photos, fitness influencer content, and before-after images rarely show the timeline accurately. Results from consistent bodyweight training typically become visually noticeable at 8–12 weeks, not 2–3.
How Can I Lose 10 Pounds in 3 Weeks by Walking?
Losing 10 pounds in 3 weeks through walking alone is not realistic or safe for most people. A safe, sustainable rate of fat loss is 0.5–1 pound per week, according to the CDC. Walking burns roughly 200–300 calories per 30-minute session depending on body weight and pace — a meaningful contribution, but not sufficient to create a 35,000-calorie deficit (the amount needed to lose 10 pounds) in 21 days. Walking combined with a calorie-controlled diet can support gradual, sustainable weight loss. If rapid weight loss is your goal, consult a registered dietitian or physician for a safe, personalized plan rather than attempting extreme short-term targets.
When to Choose Alternatives
If you’ve been training consistently for 6+ months and progress has stalled: Consider adding light resistance — resistance bands are inexpensive, joint-friendly, and compatible with every exercise in this guide. They bridge the gap between pure bodyweight and free weights without requiring gym access.
If knee pain persists despite using the joint-friendly modifications: A physical therapist can identify the specific structural issue and prescribe targeted rehabilitation exercises. Generic workout guides (including this one) cannot diagnose or treat underlying joint pathology.
If your goal is maximum muscle mass: Bodyweight training is excellent for building functional strength and moderate hypertrophy, but advanced bodybuilders typically require external resistance beyond bodyweight for continued size gains. For that goal, a home dumbbell set or resistance bands become worthwhile investments.
When to Seek Expert Help
- Sharp joint pain during any exercise → Stop immediately; consult a physical therapist before resuming
- Persistent lower back pain during glute bridges or squats → May indicate a core stability deficit or spinal condition; seek evaluation
- Plateau after 3+ months of consistent training → A certified personal trainer (CPT) can assess your form and program design for inefficiencies
- Mental health barriers (anxiety about exercising, body dysmorphia, disordered eating patterns connected to exercise) → Seek support from a licensed mental health professional alongside your fitness routine
Your First Step Starts Today
For beginners, home exercisers, and anyone who’s been told they need a gym to get real results, this lower body home workout no equipment guide has shown you something important: the barrier isn’t equipment. It’s structure, knowledge, and the willingness to start.
Bodyweight training, when applied with the right principles — progressive overload, tempo control, unilateral movements, and genuine recovery — produces measurable strength gains that stand up to scientific scrutiny. Research from the NIH and peer-reviewed exercise science consistently supports bodyweight resistance training as an effective path to improved lower body strength, particularly for beginners.
The Low-Impact Overload Loop gives you the framework to keep progressing beyond week one. No plateaus. No guesswork. Just a rotating set of overload variables that ensures your muscles face a new challenge every week — without a single piece of equipment.
Your action plan is simple: do the 25-minute circuit twice this week. Master the basic form. In week two, slow your tempo. In week three, switch to single-leg variations. No excuses, no equipment, no complicated programming — just consistent effort applied to a system that works. Bodymusclematters.com has the full-body complement to this routine waiting for you when you’re ready to take the next step.
The exercises and progression methods described reflect established principles from exercise science literature and are intended for general informational purposes only. Always consult a qualified healthcare professional before beginning a new exercise program.
Related posts:
StrongLifts 5x5 for Beginners: Complete Guide 2026
How to Get a Bigger Bum Without Exercise: 3-Tier Guide
What Muscles Does the StairMaster Work? 6 Groups
Olympic Weightlifting vs Powerlifting: 2026 Guide
What Kills Muscle Gains? 7 Proven Saboteurs to Fix Now
Best Strength Training Apps for Women: Top 7 Picks
Callum
Hi, I'm Callum, the founder of Body Muscle Matters. I'm not a certified trainer, I'm a self taught lifter who started this site to share what I've learned from my own training and a lot of trial and error. Everything here comes from real experience and honest research, written the way I'd explain it to a friend who is just getting started. My goal is simple: practical, no hype fitness advice you can actually use.