Beginner Dumbbell Workout Plan at Home: 3-Day Guide
⚠️ Before You Begin: The information in this article is for educational purposes only and is not a substitute for professional medical advice. Consult your doctor or a qualified healthcare professional before starting any new exercise program, especially if you have pre-existing health conditions, injuries, or are new to exercise.
Starting a workout routine from scratch feels overwhelming — especially when you’re staring at a pair of dumbbells and have no idea where to begin.
“I am a 30M and looking to get into working out to get strong and improve my physique.”
— A common goal shared by thousands of beginners starting this exact journey
Most beginner guides throw a list of exercises at you with no structure, no schedule, and no explanation of how to actually get stronger week after week. That leaves you guessing — and guessing is where injuries and frustration begin. In this guide, you’ll get a complete, CPT-reviewed beginner dumbbell workout plan at home — including a 3-day weekly schedule, step-by-step instructions for 10 exercises, and a free PDF tracker to monitor your progress. You’ll also learn how to pick the right weight, how to warm up safely, and how to keep making progress with the same pair of dumbbells over time.
A 3-day-per-week full-body beginner dumbbell workout plan at home is the most effective starting point for beginners — the CDC recommends muscle-strengthening activity at least twice weekly for measurable health benefits.
- The Push/Pull Blueprint alternates push days (chest, shoulders, legs) with pull days (back, biceps, glutes)
- Choose your weight using the 12-15 rep rule: challenging but never sloppy
- Progressive overload — not heavier weights — is the real key to getting stronger at home
- Three 30-40 minute sessions per week is all a complete newbie needs to see results
- Rest 1-2 minutes between sets to maximize muscle recovery and workout quality
Before You Start — Foundational Principles
Every successful beginner starts with a plan — not just a list of exercises. Understanding these essential strength training principles for beginners sets you up for long-term success. This section covers the five things you need to understand before your first rep: weight selection, progressive overload, rest periods, lifting tempo, and equipment. Our CPT-reviewed approach prioritizes safety and clarity so you can start with confidence, not confusion.
What weight dumbbells should a beginner use at home?
Choosing the wrong weight is the most common beginner mistake. Go too heavy and your form breaks down — which is how injuries happen. Go too light and you won’t build any strength. The right approach is simple: pick a weight you can lift with good form for 12-15 reps, where the last 2-3 reps feel genuinely challenging.
According to the National Institute on Aging (NIA), beginners should start with a weight that allows completion of an exercise without straining — and increase only when the current weight feels easy for all sets.
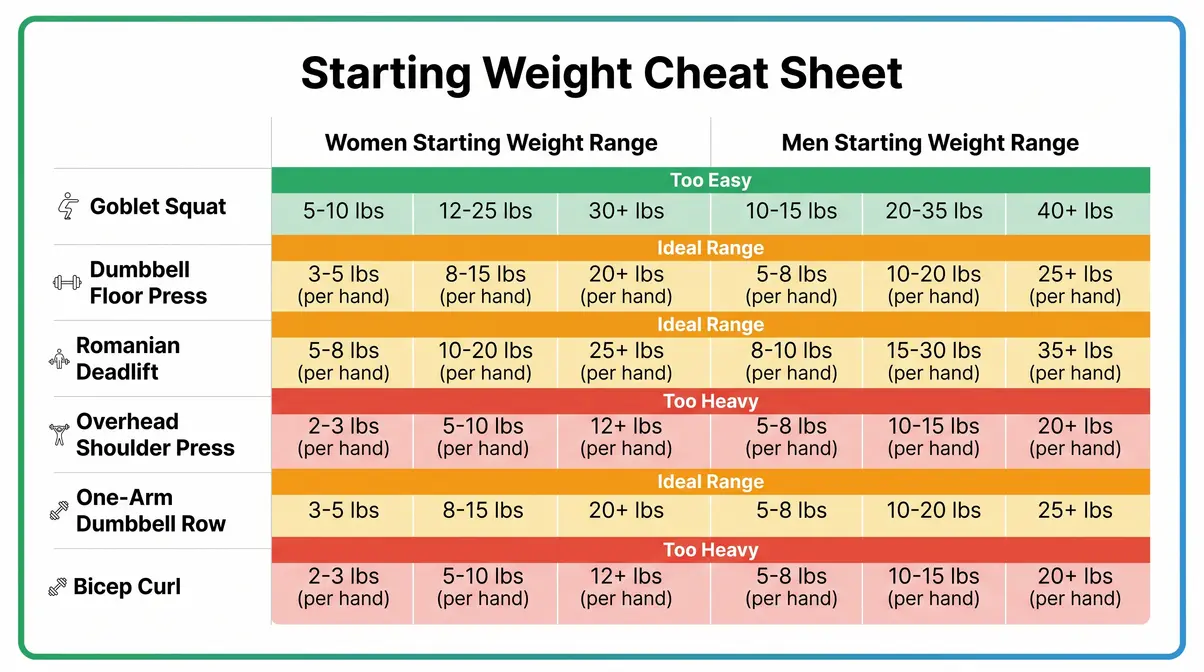
Here’s a starting point for common exercises. These are general guidelines — adjust based on how the last few reps feel:
| Exercise | Women (Starting Range) | Men (Starting Range) |
|---|---|---|
| Goblet Squat | 8–15 lbs | 15–25 lbs |
| Dumbbell Floor Press | 8–12 lbs | 15–20 lbs |
| Romanian Deadlift (RDL) | 10–15 lbs | 20–30 lbs |
| Overhead Shoulder Press | 5–10 lbs | 10–15 lbs |
| One-Arm Dumbbell Row | 10–15 lbs | 15–25 lbs |
| Bicep Curl | 5–10 lbs | 10–15 lbs |
The golden rule: If you can’t complete 8 clean reps, the weight is too heavy. If you can do 20 reps without effort, it’s too light. Start in the middle and adjust after your first session.
Understanding Progressive Overload
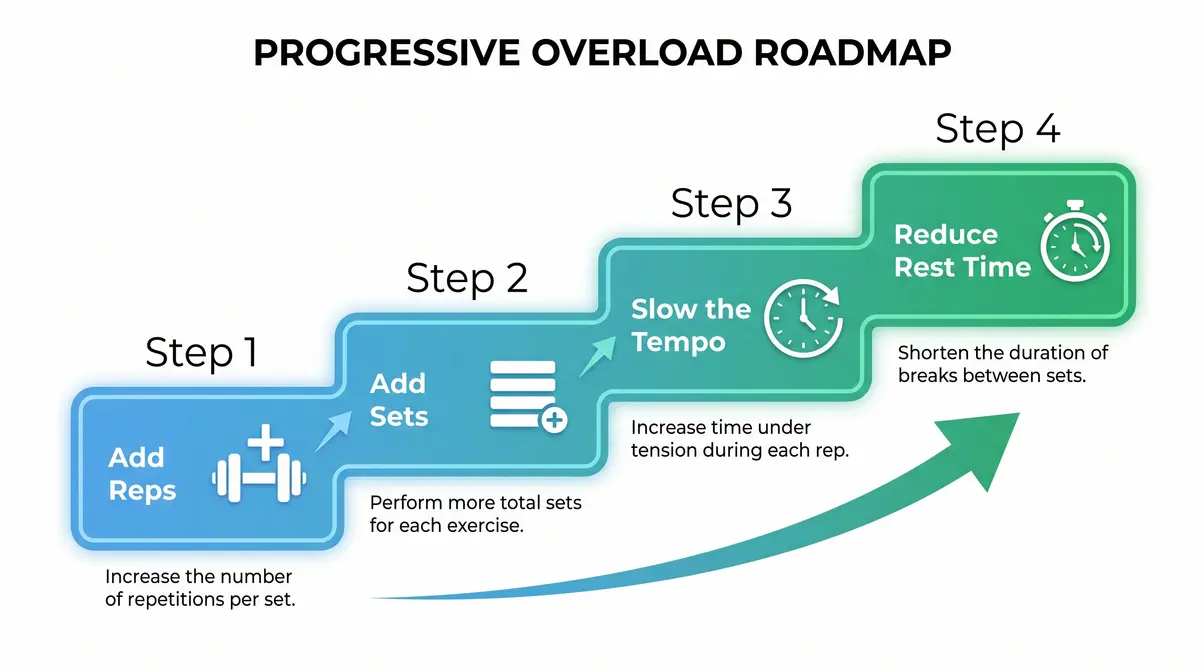
Progressive overload (gradually increasing the challenge placed on your muscles over time) is the single most important concept in strength training. Without it, your body adapts to your current workouts and stops changing. With it, you get stronger every week — even with the same pair of dumbbells.
Research published in the Journal of Strength and Conditioning Research confirms that progressive overload is the primary driver of muscle and strength gains in resistance training programs. You don’t need heavier weights to apply it. Here are four ways to progress with fixed dumbbells:
- Add reps: If you did 10 reps last week, aim for 11-12 this week.
- Add sets: Move from 2 sets per exercise to 3 sets over 2-3 weeks.
- Slow the tempo: Take 3 seconds to lower the weight instead of 1 — this dramatically increases muscle stimulus.
- Reduce rest time: Cut rest from 90 seconds to 60 seconds between sets as you get fitter.
Why this matters for you: If you’re using a single pair of 20-lb dumbbells, you can still make meaningful progress for 8-12 weeks using these four methods before you need heavier weights. Progressive overload is The Push/Pull Blueprint’s built-in engine for results.
Rest Periods — How Long to Wait Between Sets
Rest periods (the time you pause between sets of an exercise) directly affect how well your muscles recover and how hard you can push in the next set. For more detailed science-based guidance on sets, reps, and rest periods, remember that beginners benefit most from 60-90 seconds of rest between sets for strength and muscle-building goals. This aligns with recommendations from the American College of Sports Medicine (ACSM), the leading authority on exercise science (ACSM Position Stand, Medicine & Science in Sports & Exercise).
Here’s a simple guide:
- Strength goal (fewer, heavier reps): Rest 90 seconds to 2 minutes
- Muscle tone / endurance (higher reps, lighter weight): Rest 60 seconds
- Between different exercises: Rest 90 seconds before starting the next movement
Why this matters: Resting too little means your muscles are still fatigued when you start the next set — your form suffers and your results stall. Resting too long (over 3 minutes) slows the workout unnecessarily. Set a timer on your phone. It sounds simple, but most complete newbies skip this step.
Workout Tempo — Why Slowing Down Builds More Muscle
Tempo refers to the speed at which you lift and lower a weight. Most beginners rush through reps — but research in the European Journal of Applied Physiology shows that a controlled lowering phase (called the eccentric phase) significantly increases muscle damage and repair, which drives growth.
- For every exercise in this plan, use a 2-1-2 tempo:
- 2 seconds to lower the weight (eccentric)
- 1 second pause at the bottom
- 2 seconds to lift the weight (concentric)
Example: In a bicep curl, take 2 full seconds to lower the dumbbell back to your hip — don’t just drop it. That controlled lowering is where much of the muscle-building stimulus happens. Slowing down also forces better form, which reduces injury risk for beginners.
Equipment, Warm-Up, and Safety
What you need: One pair of dumbbells is genuinely enough to start. Adjustable dumbbells (which allow you to change weight on a single handle) are ideal if your budget allows, but a fixed pair in the 10-25 lb range works for most beginners.
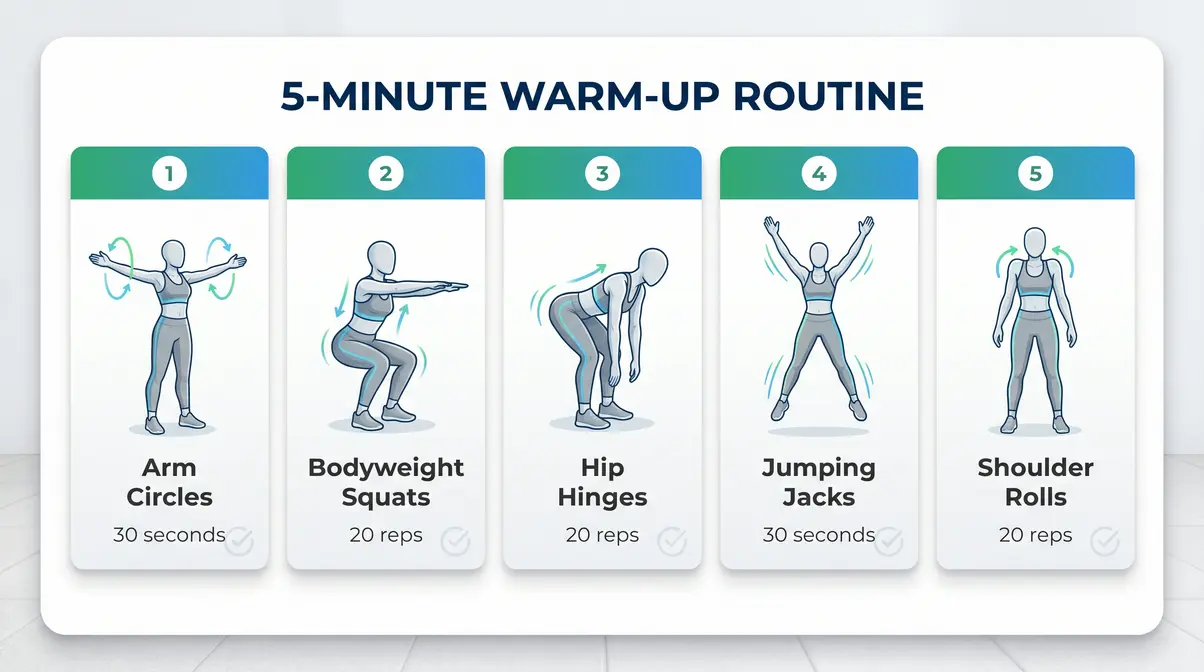
Warm-up (5 minutes before every session):
- 30 seconds of arm circles (forward and backward)
- 20 bodyweight squats (slow and controlled)
- 10 hip hinges (bend forward with a flat back, hands on thighs)
- 20 jumping jacks or 2 minutes of brisk walking in place
- 10 shoulder rolls
- Safety reminders:
- Never hold your breath. Exhale on the exertion (the “hard” part of the lift), inhale on the return — a guideline supported by the National Institute on Aging.
- Stop immediately if you feel sharp or joint pain (muscle burn is normal; joint pain is not).
- Keep your core braced (tight like you’re about to take a punch) during every exercise.
Your 3-Day Beginner Dumbbell Workout Schedule
A structured beginner dumbbell workout plan at home doesn’t require five days a week — in fact, training too often is one of the most common beginner mistakes. While this guide covers your initial phase, you can eventually transition to a complete 4-week full-body dumbbell workout plan as you advance. The CDC recommends that adults perform muscle-strengthening activities on 2 or more days per week. Our CPT-reviewed plan goes one step further with a 3-day structure that maximizes results while giving your body the recovery time it needs to actually get stronger.
How many days a week should a beginner work out with dumbbells?
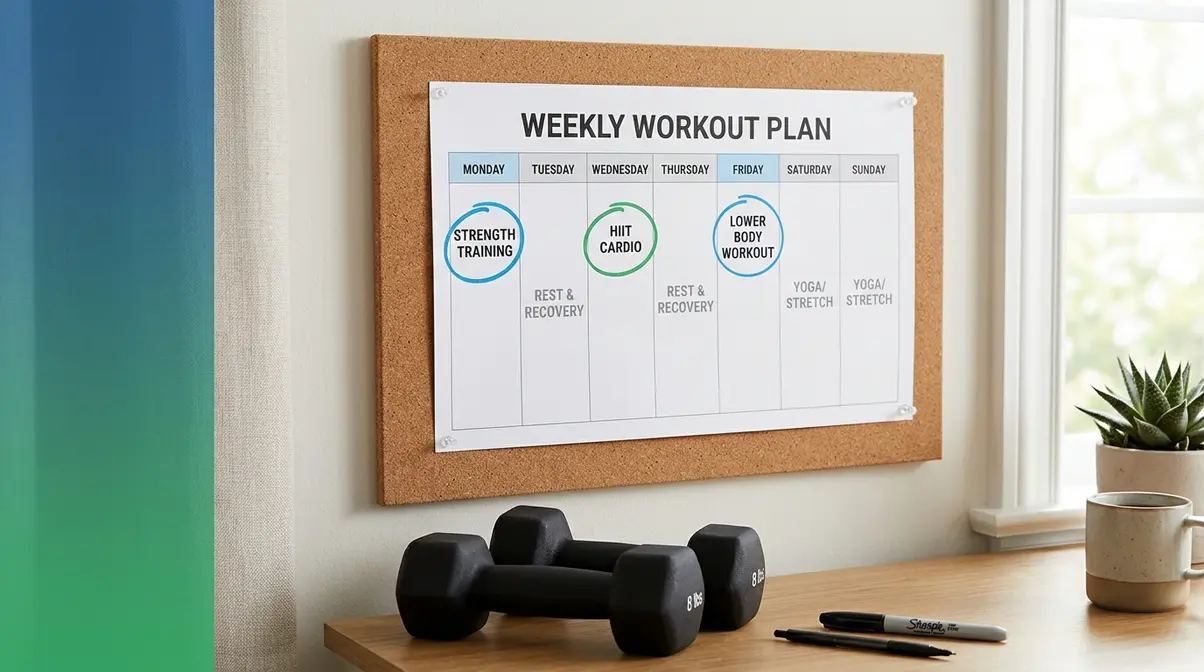
Here’s how a typical week looks with The Push/Pull Blueprint. These effective 30-minute full body home workout routines fit perfectly into a busy lifestyle:
| Day | Session | Focus |
|---|---|---|
| Monday | Workout A | Full-Body Push Emphasis |
| Tuesday | Rest | Active recovery (walk, stretch) |
| Wednesday | Workout B | Full-Body Pull Emphasis |
| Thursday | Rest | Active recovery |
| Friday | Workout A | Full-Body Push Emphasis |
| Saturday | Rest | Full rest or light activity |
| Sunday | Rest | Full rest |
The following week, you swap: start with Workout B on Monday, then Workout A on Wednesday. This alternation ensures every muscle group gets equal training frequency across the month.
Why a 3-Day Full-Body Split Works for Beginners
Most beginners are tempted to train 5-6 days a week. But more training isn’t better — better recovery is better. When you lift weights, you create small tears in muscle fibers. Those fibers repair and grow stronger during rest — not during the workout itself. Three days per week gives you enough stimulus to trigger growth and enough rest to actually rebuild.
A full-body split (training all major muscle groups in each session) is also superior for beginners compared to body-part splits (like “chest day” or “leg day”) because you practice each movement pattern more frequently. Research consistently shows that training a muscle group 2 times per week produces superior strength gains compared to once per week for untrained individuals (ACSM, 2009).
Workout A vs. Workout B — What Each Session Targets
| Workout A (Push) | Workout B (Pull) | |
|---|---|---|
| Primary muscles | Chest, shoulders, triceps, quads | Back, biceps, hamstrings, glutes |
| Movement pattern | Pushing away from body | Pulling toward body |
| Core exercise | Goblet Squat, Floor Press | Romanian Deadlift, Dumbbell Row |
| Session length | 30-40 minutes | 30-40 minutes |
Why this balance matters: Most beginners naturally favor “push” exercises (bench press, shoulder press) because they train the muscles you see in the mirror. The Push/Pull Blueprint forces equal attention to your back, hamstrings, and glutes — the muscles that protect your posture and your spine. Ignoring pull muscles leads to rounded shoulders and lower back pain within months.
Exercise Substitutions and Rest Day Guidelines
Can’t do an exercise? Here are beginner-friendly substitutions:
- Goblet Squat → Bodyweight Squat (no dumbbell, same movement)
- Romanian Deadlift → Dumbbell Sumo Deadlift (wider stance, easier for tight hamstrings)
- Overhead Press → Seated Overhead Press (reduces lower back strain)
- Dead Bug → Modified Dead Bug with knees bent at 90°
On rest days: Active recovery is a critical component of your new routine. On your rest days, engaging in light, low-impact movement helps increase blood flow to your recovering muscles, which can reduce soreness and stiffness. Activities like a brisk 20-minute walk, gentle stretching, or beginner-friendly yoga are excellent choices. The goal isn’t to break a heavy sweat or elevate your heart rate significantly, but simply to keep your body moving.
Avoid the temptation to add intense cardio sessions or HIIT workouts between your lifting days. Your muscles repair and grow stronger during the recovery phase, and adding high-intensity stress interrupts this process. Stick to true active recovery, and you’ll find yourself stronger and more energized for your next dumbbell session.
Workout A: Full-Body Push Emphasis Guide
Estimated Time: 30-40 minutes
Tools Needed: One pair of dumbbells
Workout A focuses on your push muscles: chest, shoulders, triceps, and quads (the front of your thighs). You’ll perform 3 sets of 12-15 reps for each exercise unless noted otherwise. Rest 60-90 seconds between sets. Complete all sets of one exercise before moving to the next.
Exercise 1: Goblet Squat
The goblet squat is a lower-body exercise that trains your quads (front of thighs), glutes (buttocks), and core simultaneously. Focusing on mastering the goblet squat with perfect form is crucial for your progression. It’s the safest squat variation for beginners because the dumbbell held at your chest naturally keeps your torso upright.
Sets/Reps: 3 sets × 12-15 reps | Rest: 60-90 seconds
- How to do it:
- Stand with feet shoulder-width apart, toes pointed slightly outward (about 15-30 degrees).
- Hold one dumbbell vertically at your chest with both hands cupped around the top end.
- Take a deep breath and brace your core (tighten your midsection as if bracing for a punch).
- Push your hips back and bend your knees, lowering your body until your thighs are at least parallel to the floor.
- Keep your chest tall and your heels flat on the floor throughout the descent.
- Drive through your heels to stand back up, exhaling as you rise.
- Squeeze your glutes at the top. That’s one rep.
Common error to avoid: Letting your knees cave inward as you squat. Push your knees out in line with your toes throughout the movement.
Exercise 2: Dumbbell Floor Press
The dumbbell floor press is a chest and triceps exercise performed lying on the floor. It’s safer than a bench press for beginners because the floor limits your range of motion and protects your shoulder joints. If you eventually upgrade to a bench, learning the benefits and proper form for the incline dumbbell press will be your next step.
Sets/Reps: 3 sets × 12-15 reps | Rest: 60-90 seconds
- How to do it:
- Lie flat on your back on the floor with your knees bent and feet flat.
- Hold one dumbbell in each hand, positioned at chest level with palms facing forward.
- Keep your elbows at a 45-degree angle from your body (not flared out to 90 degrees).
- Brace your core and press both dumbbells straight up toward the ceiling until your arms are fully extended.
- Slowly lower the dumbbells back down over 2 seconds until your upper arms rest lightly on the floor.
- Pause for one second, then press again. That’s one rep.
Common error to avoid: Flaring your elbows out to 90 degrees. Keep them tucked at 45 degrees to protect your shoulder joints.
Exercise 3: Dumbbell Reverse Lunge
The dumbbell reverse lunge trains your quads, glutes, and hamstrings while also challenging your balance. The reverse (stepping back) variation is safer for beginners than a forward lunge because it places less stress on the knee joint.
Sets/Reps: 3 sets × 10-12 reps per leg | Rest: 60-90 seconds
- How to do it:
- Stand tall with a dumbbell in each hand, arms at your sides, feet hip-width apart.
- Take a controlled step backward with your right foot, landing on the ball of your right foot.
- Lower your right knee toward the floor, stopping about 1 inch above the ground.
- Keep your front shin (left leg) as vertical as possible — your front knee should not push far past your toes.
- Drive through your left heel to return to standing. That’s one rep on the left side.
- Repeat on the other side, stepping back with your left foot.
Common error to avoid: Letting your front knee collapse inward. Keep it tracking over your second toe throughout the movement.
Exercise 4: Overhead Shoulder Press
The overhead shoulder press (also called the dumbbell press) builds your shoulder muscles (deltoids) and triceps (the back of your upper arm). It also challenges your core to stabilize your spine under load.
Sets/Reps: 3 sets × 12-15 reps | Rest: 60-90 seconds
- How to do it:
- Stand with feet shoulder-width apart, or sit on a sturdy chair if you have lower back sensitivity.
- Hold a dumbbell in each hand at shoulder height, palms facing forward, elbows at about 90 degrees.
- Brace your core firmly — do not let your lower back arch excessively.
- Press both dumbbells straight overhead until your arms are fully extended.
- Hold for one second at the top, then lower the weights back to shoulder height over 2 seconds.
- That’s one rep.
Common error to avoid: Leaning back and arching your lower back to press the weight up. If this happens, the weight is too heavy — reduce it.
Exercise 5: Dumbbell Crunch
The dumbbell crunch trains your rectus abdominis (the “six-pack” muscles) with added resistance. For beginners, a light dumbbell held at the chest adds challenge without risking neck strain.
Sets/Reps: 3 sets × 15 reps | Rest: 60 seconds
- How to do it:
- Lie on your back with knees bent and feet flat on the floor, hip-width apart.
- Hold one dumbbell horizontally across your chest with both hands.
- Press your lower back firmly into the floor — this is your starting position.
- Exhale and curl your upper back off the floor, lifting your shoulder blades about 4-6 inches.
- Hold for one second at the top, squeezing your abs.
- Slowly lower back down over 2 seconds. That’s one rep.
Common error to avoid: Pulling on your neck or jerking your head forward. The movement comes from your abs — your neck stays neutral.
Workout B: Full-Body Pull Emphasis Guide
Estimated Time: 30-40 minutes
Tools Needed: One pair of dumbbells
Workout B focuses on your pull muscles: back, biceps, hamstrings, and glutes. These are the muscles most beginners neglect — and the ones most responsible for good posture and a strong, injury-resistant body. Perform 3 sets of 12-15 reps per exercise unless noted. Rest 60-90 seconds between sets.
Exercise 1: Romanian Deadlift (RDL)
The Romanian deadlift (RDL) is a hip-hinge exercise that targets your hamstrings (back of thighs) and glutes. It’s one of the most effective posterior-chain exercises — but it requires careful attention to form. Our CPT-reviewed instructions prioritize spinal safety above all else.
Sets/Reps: 3 sets × 12 reps | Rest: 90 seconds
- How to do it (Setup):
- Stand with feet hip-width apart, holding a dumbbell in each hand in front of your thighs, palms facing your body.
- Soften your knees slightly — they should have a gentle bend throughout, not be locked straight.
- Brace your core firmly and pull your shoulder blades back and down (imagine squeezing a pencil between them).
- How to do it (Execution):
- Hinge forward at your hips — push your hips backward as if touching a wall behind you — while keeping your back completely flat.
- Lower the dumbbells along your legs, keeping them close to your body. Stop when you feel a strong stretch in your hamstrings (usually when the dumbbells reach mid-shin level).
- Do NOT round your lower back to go lower. Your range of motion ends where your flat back ends.
- Drive your hips forward to stand back up, squeezing your glutes at the top. Exhale as you rise. That’s one rep.
⚠️ Safety note: If you feel sharp lower back pain at any point, stop immediately. The RDL requires hamstring flexibility — if your hamstrings are very tight, reduce your range of motion and consider consulting a physical therapist before progressing.
Exercise 2: One-Arm Dumbbell Row
The one-arm dumbbell row builds your latissimus dorsi (the large back muscle that creates a V-shape), rhomboids, and rear deltoids. This is one of the most effective dumbbell pull exercises for building back muscles. Strong back muscles are essential for posture and counterbalancing all the push exercises in Workout A.
Sets/Reps: 3 sets × 12 reps per arm | Rest: 60-90 seconds
- How to do it:
- Place your left knee and left hand on a sturdy chair or couch for support. Your back should be roughly parallel to the floor.
- Hold a dumbbell in your right hand, arm extended straight toward the floor, palm facing your body.
- Brace your core and keep your back flat — no twisting or rotating your torso.
- Pull the dumbbell upward toward your right hip, leading with your elbow (not your hand).
- Squeeze your back muscles at the top for one second.
- Lower the dumbbell slowly over 2 seconds back to the starting position. That’s one rep.
- Complete all reps on the right side, then switch to the left.
Common error to avoid: Shrugging your shoulder or swinging your torso to help lift the weight. The movement should be isolated to your back and arm.
Exercise 3: Glute Bridge
The glute bridge isolates your glutes and hamstrings while also strengthening your lower back and core. It’s a beginner-friendly exercise with zero equipment required — adding a dumbbell on your hips increases the challenge significantly.
Sets/Reps: 3 sets × 15 reps | Rest: 60 seconds
- How to do it:
- Lie on your back with knees bent, feet flat on the floor about hip-width apart, and heels 6-8 inches from your glutes.
- Place one dumbbell horizontally across your hip crease and hold it in place with both hands.
- Brace your core and press your lower back gently into the floor.
- Drive through both heels to lift your hips toward the ceiling, squeezing your glutes hard at the top.
- Your body should form a straight line from your shoulders to your knees — don’t hyperextend your lower back.
- Hold the top position for one second, then lower your hips slowly over 2 seconds. That’s one rep.
Common error to avoid: Pushing through your toes instead of your heels. Heel drive is what activates the glutes — toe drive shifts the work to your quads.
Exercise 4: Bicep Curl
The bicep curl directly targets your biceps brachii (the front of your upper arm). It’s one of the most recognizable exercises — and one of the most commonly done wrong. The key is controlled movement, not momentum.
Sets/Reps: 3 sets × 12-15 reps | Rest: 60 seconds
- How to do it:
- Stand with feet shoulder-width apart, holding a dumbbell in each hand with palms facing forward.
- Keep your elbows pinned at your sides throughout the entire movement — they should not move forward or back.
- Curl both dumbbells upward toward your shoulders by bending your elbows.
- Stop when your forearms are vertical and you feel a peak contraction in your biceps.
- Hold for one second at the top.
- Lower the dumbbells slowly over 2 seconds back to the starting position. That’s one rep.
Common error to avoid: Swinging your body backward to help lift the weight. This is called momentum-cheating — it takes the work away from your biceps and strains your lower back. Reduce the weight if you’re swinging.
Exercise 5: Dead Bug
The dead bug is a core stability exercise that trains your deep abdominal muscles (specifically the transverse abdominis) without putting any load on your spine. It’s one of the most underrated beginner exercises — and one that very few competitor guides include.
Sets/Reps: 3 sets × 8-10 reps per side | Rest: 60 seconds
- How to do it:
- Lie on your back and raise both arms straight toward the ceiling, directly above your shoulders.
- Lift both legs so your knees are bent at 90 degrees and your thighs are vertical (tabletop position).
- Press your lower back firmly into the floor — this is your neutral spine position. Maintain it throughout.
- Slowly lower your right arm toward the floor overhead while simultaneously extending your left leg toward the floor.
- Stop just before either limb touches the floor (or before your lower back lifts — whichever comes first).
- Return both limbs to the starting position in a controlled manner. That’s one rep.
- Repeat on the opposite side (left arm + right leg).
Common error to avoid: Letting your lower back arch off the floor. That arch means your core has lost tension. Reduce the range of motion until you can maintain contact.
Common Beginner Mistakes and How to Avoid Them
Even with the best plan, beginners run into predictable problems. Our CPT-reviewed analysis of the most common form and programming errors — drawn from patterns seen consistently across beginner training populations — shows that most injuries and plateaus stem from the same handful of mistakes. Here’s how to avoid them before they slow you down.
5 Form Mistakes That Lead to Injury
1. Rounding your lower back on the Romanian Deadlift.
This is the most injury-prone error in this entire plan. A rounded lower back under load compresses your spinal discs. Solution: reduce the weight and only lower the dumbbells as far as your flat back allows.
2. Flaring your elbows during the floor press.
Elbows at 90 degrees from your torso places enormous stress on the shoulder joint. Keep them at 45 degrees from your body — always.
3. Letting your knees cave inward during squats and lunges.
Knee cave (valgus collapse) is a sign of weak glutes and poor control. Focus on actively pushing your knees outward in line with your toes on every rep.
4. Using momentum instead of controlled movement.
Swinging dumbbells, rushing reps, or bouncing at the bottom of a movement removes tension from the target muscle and adds stress to your joints. Slow down. Use the 2-1-2 tempo from the Foundational Principles section.
5. Skipping the warm-up.
Cold muscles and joints are significantly more vulnerable to strains. The 5-minute warm-up in this plan is not optional — it’s what separates a productive session from a painful one.
When Dumbbells Aren’t the Right Tool
Dumbbells are an excellent starting point — but they’re not the right tool for every situation. Consider these alternatives or additional steps if they apply to you:
- You have a pre-existing injury (shoulder impingement, knee pain, lower back issues): See a physical therapist before starting any resistance training program. The exercises in this plan can be modified, but modifications should be guided by a professional who has assessed your specific condition.
- You find all exercises too easy at maximum dumbbell weight: You’ve outgrown the beginner phase. Consider progressing to a barbell program or investing in adjustable dumbbells with a higher weight ceiling.
- You have cardiovascular health concerns: Consult your doctor before beginning this or any exercise program. Resistance training increases heart rate and blood pressure during exercise — your physician can advise on appropriate intensity.
- You experience dizziness, chest pain, or shortness of breath during workouts: Stop immediately and seek medical attention. These are not normal exercise sensations.
Recognizing the limits of any home program is a sign of good judgment — not failure. Mayo Clinic recommends that individuals with health concerns always consult a physician before starting a new exercise regimen.
Frequently Asked Questions
Can a beginner build muscle with just dumbbells at home?
Yes — dumbbells alone are sufficient to build meaningful muscle as a beginner. Research consistently shows that untrained individuals respond strongly to resistance training regardless of equipment type, provided progressive overload is applied. A pair of dumbbells, combined with The Push/Pull Blueprint’s structured approach to progressive overload, can drive significant muscle and strength gains for 3-6 months. By simply adding reps, sets, or slowing your lifting tempo over time, you force your muscles to adapt and grow before any additional equipment is needed.
How long should a beginner workout be?
For optimal results, 30-40 minutes per session is ideal for beginners. Longer sessions are not more effective and often lead to fatigue-related form breakdown, which is where injuries happen. Quality of movement matters far more than session length when you’re first starting out.
How do I know when to increase the weight?
You should increase the weight when you can complete all 3 sets of 15 reps with good form and the last 2 reps feel easy. This is progressive overload in practice, ensuring your muscles remain adequately challenged. A good rule of thumb is to increase by the smallest available increment, usually 2.5 to 5 pounds. Expect the first session at the new weight to feel significantly harder. If you can’t maintain good form at the new weight, simply return to the previous weight for one more week and try again.
Is it normal to feel sore after starting a dumbbell routine?
Yes, experiencing delayed onset muscle soreness (DOMS) is completely normal when you introduce your body to new resistance exercises. This soreness typically peaks 24 to 48 hours after your workout and will gradually subside as your body adapts. If the pain is sharp or located in your joints rather than the muscle belly, you should consult a healthcare professional.
Can I do cardio on the same days as my dumbbell workouts?
While you can combine cardio and strength training, beginners should generally separate them to maximize recovery and performance. If you must do them on the same day, always perform your dumbbell workout first when your energy levels are highest. Lifting weights requires strict form and core stability, which is difficult to maintain if you are already fatigued from cardio. For the best results, schedule your moderate cardio sessions on your active recovery days. This approach keeps your heart healthy without compromising your strength gains.
Start This Week: Your First Session Awaits
For a complete newbie, the hardest part of any fitness journey isn’t the workout itself — it’s getting started. This plan removes every excuse: no gym, no complex equipment, no experience required. Just a pair of dumbbells, 30-40 minutes three times a week, and a commitment to showing up consistently.
The Push/Pull Blueprint works precisely because it’s structured without being complicated. It alternates push and pull movements to build a balanced physique, it builds progressive overload directly into the plan, and it gives your body the recovery time it needs to actually get stronger. The CDC confirms that even twice-weekly strength training produces measurable health benefits — three sessions per week puts you ahead of the vast majority of people who never start at all.
Your next step is simple: schedule your first session of this beginner dumbbell workout plan at home this week. Print the PDF tracker, set a timer for your rest periods, and pick a starting weight using the table in the Foundational Principles section. Follow the numbered steps for each exercise, prioritize form over speed, and record what you did. Then do it again on Wednesday. That’s the whole plan — and it’s enough to change your physique, your strength, and your confidence over the next 12 weeks.
Related posts:
StrongLifts 5x5 for Beginners: Complete Guide 2026
How to Get a Bigger Bum Without Exercise: 3-Tier Guide
What Muscles Does the StairMaster Work? 6 Groups
Olympic Weightlifting vs Powerlifting: 2026 Guide
What Kills Muscle Gains? 7 Proven Saboteurs to Fix Now
Best Strength Training Apps for Women: Top 7 Picks
Callum
Hi, I'm Callum, the founder of Body Muscle Matters. I'm not a certified trainer, I'm a self taught lifter who started this site to share what I've learned from my own training and a lot of trial and error. Everything here comes from real experience and honest research, written the way I'd explain it to a friend who is just getting started. My goal is simple: practical, no hype fitness advice you can actually use.