
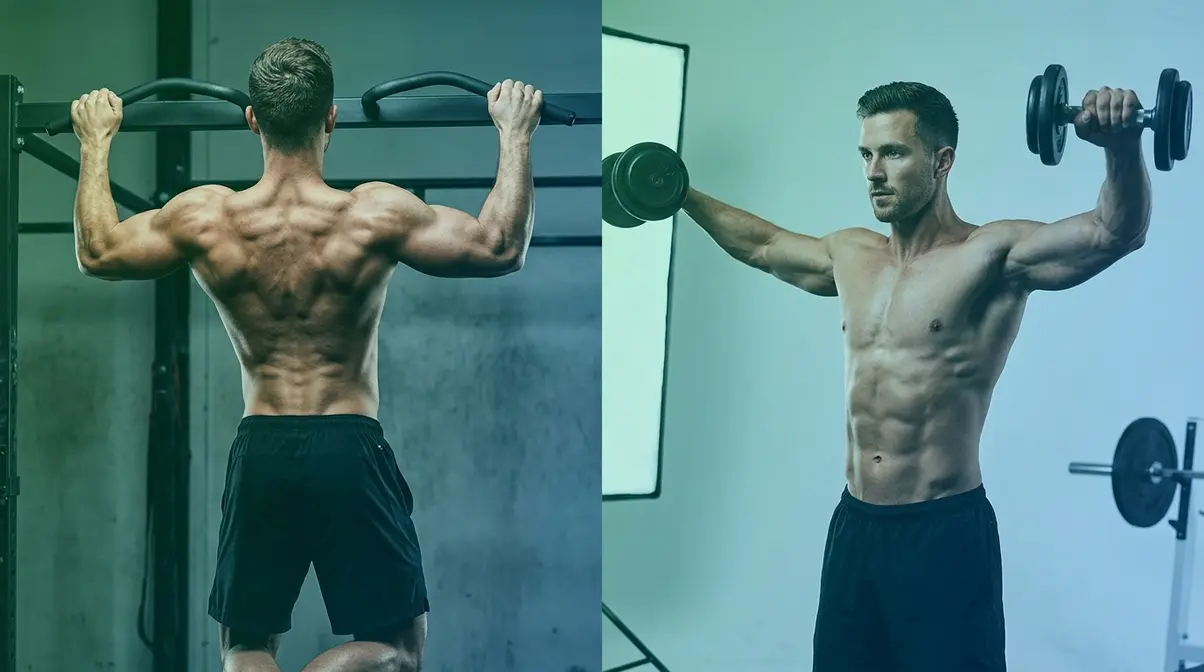
“Shoulders + Back is SUCH an underrated combo 👀 A lot of people train them separately… But pairing them together can be a great way to build a more balanced-looking upper body 💪”
If you’ve been training them separately and wondering why your upper body still looks uneven — this guide is the answer.
Most back and shoulder workout advice online gives you a list of exercises with no explanation of why they work together — or how to avoid the fatigue overlap that quietly kills your shoulder gains. You deserve better than that.
This complete back and shoulder workout routine guide gives you a science-backed gym plan, two at-home alternatives, a women’s-specific routine, and answers to the most common training questions — all in one place. Whether you’re a beginner starting from scratch or trying to break a plateau, you’ll leave with a ready-to-use routine and the knowledge to adapt it as you grow stronger.
A back and shoulder workout routine is one of the most efficient ways to build a V-taper physique — research confirms that 10+ sets per muscle group weekly maximise muscle growth (Schoenfeld et al., 2017).
- Rear delt overlap is real: Back rows already activate your rear delts — sequence your exercises to avoid pre-exhaustion before shoulder pressing
- Three routine options: Full gym, dumbbell-only at home, and bodyweight — all covered in this guide
- Women and beginners included: Separate sections tailored to your specific goals and equipment
- The Rear Delt Fatigue Threshold: Understanding this concept is the key to injury-free, consistent upper body gains
Why Back and Shoulders Are an Underrated Combo
Training your back and shoulders in the same session isn’t just convenient — it’s biomechanically smart. These two muscle groups share overlapping neural pathways, stabilising muscles, and even individual fibres. When you understand how they connect, you stop guessing and start building a truly balanced upper body.
Research on training frequency confirms that understanding muscle group pairings correctly prevents overtraining and accelerates recovery. The benefits of combining back and shoulder workouts extend far beyond simple aesthetics, fundamentally improving your biomechanical resilience.
Can I train shoulders and back together?
Yes, training shoulders and back together is not only effective — it’s one of the most biomechanically efficient pairings in resistance training. These two muscle groups share overlapping stabilisers, particularly the rear deltoid, which is activated during nearly every back exercise. By training them in the same session, you accumulate the 10+ weekly sets per muscle group that research links to maximal hypertrophy. The key is sequencing: always train compound back exercises before shoulder isolation work to avoid hitting the Rear Delt Fatigue Threshold too early.
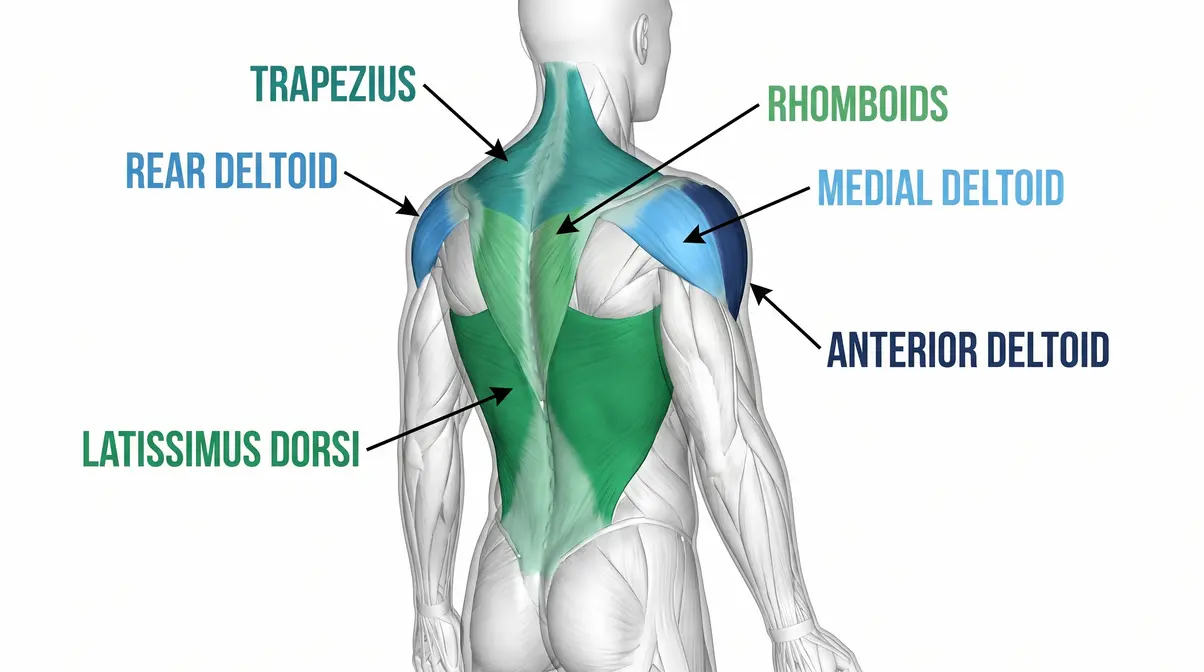
The Muscles You’re Actually Training
Your back is made up of several distinct muscles, and each one plays a role in how your body looks and moves.
- Latissimus dorsi (lats): The large, wing-shaped muscles that create width from your armpits to your waist — the foundation of the V-taper.
- Trapezius (traps): A kite-shaped muscle running from your neck to your mid-back. The upper traps create shoulder fullness; the mid and lower traps improve posture.
- Rhomboids: Smaller muscles between your shoulder blades that pull them together, critical for posture and upper back thickness.
- Rear deltoids (posterior deltoids): The back portion of your shoulder — often underdeveloped — responsible for pulling your arm behind your body and stabilising your shoulder joint.
Your shoulder is divided into three heads:
- Anterior deltoid (front): Activated during pressing movements like the bench press.
- Medial deltoid (side): Creates the “cap” width that makes shoulders look broad.
- Posterior deltoid (rear): Overlaps significantly with back training — and this overlap is exactly what makes exercise ordering so important.
Expert consensus confirms that compound pulling movements like rows and pull-ups recruit the rear deltoid as a primary mover, not just a stabiliser.
The V-Taper Advantage: What You’ll Gain
The V-taper — broader shoulders tapering to a narrower waist — is the most sought-after physique goal for both men and women. Here’s why training back and shoulders together accelerates it:
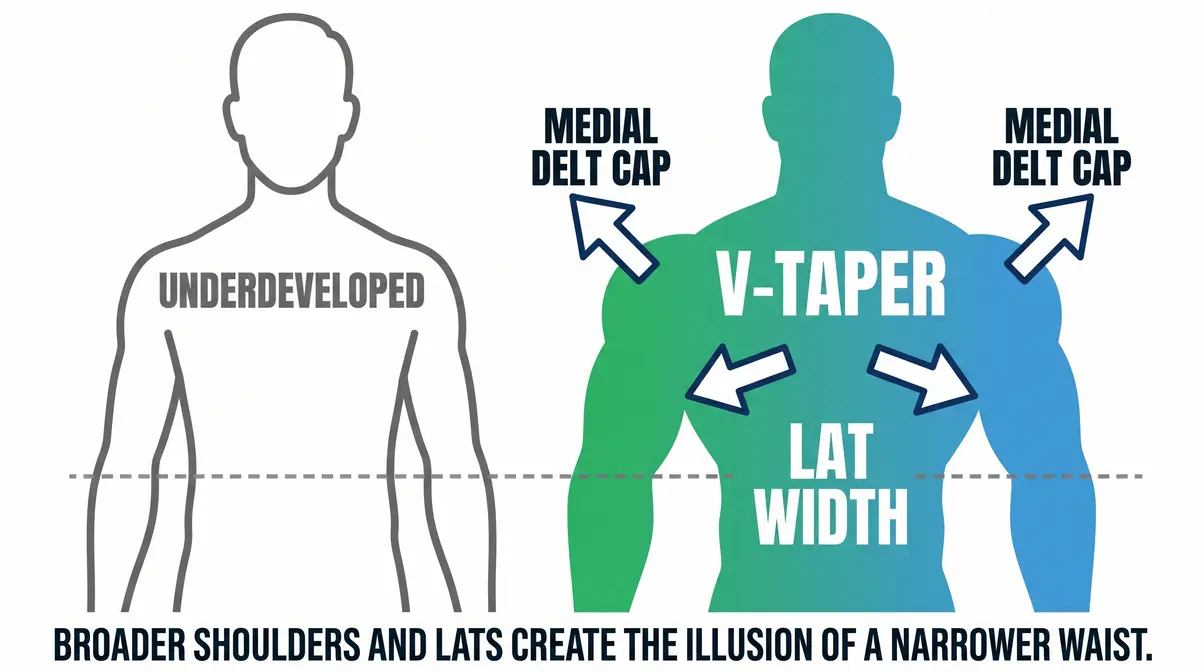
You build width from two directions simultaneously. Lat pulldowns and rows widen your back from the spine outward. Lateral raises and overhead presses widen your shoulders from the torso upward. Train them together and you’re attacking the V-shape from both angles in a single session.
You improve posture faster. Rounded shoulders are caused by tight chest muscles and weak upper back and rear deltoids. A combined back and shoulder routine directly addresses both sides of this imbalance. Across certified personal training communities, the consistent finding is that trainees who include dedicated rear delt work alongside rowing movements correct postural imbalances significantly faster than those who train shoulders in isolation.
You save time without sacrificing volume. Research by Ralston et al. (2017) found that training a muscle group twice per week produces greater hypertrophy (muscle growth) than once per week at the same total volume — meaning you can hit your weekly back and shoulder targets in two combined sessions rather than four separate ones.
“Training back and shoulders together lets you hit your weekly volume targets in two sessions instead of four — making it one of the most time-efficient pairings for building a V-taper physique.”
The Rear Delt Fatigue Threshold Explained
This is the concept no competitor explains — and it’s the reason most back and shoulder sessions stall.
The Rear Delt Fatigue Threshold is the point at which your rear deltoids are too fatigued from back exercises to contribute effectively to shoulder exercises — causing compensatory movement, reduced range of motion, and heightened injury risk.
Here’s why it happens: When you perform bent-over rows, cable rows, or face pulls, your rear deltoids act as a primary mover alongside your rhomboids and traps. By the time you finish your back work, those rear delts have already been working hard for 15–25 minutes. If you then immediately jump into heavy rear delt raises or face pulls as part of your shoulder routine, you’re loading a pre-fatigued muscle — and that’s where form breaks down and shoulder injuries begin.
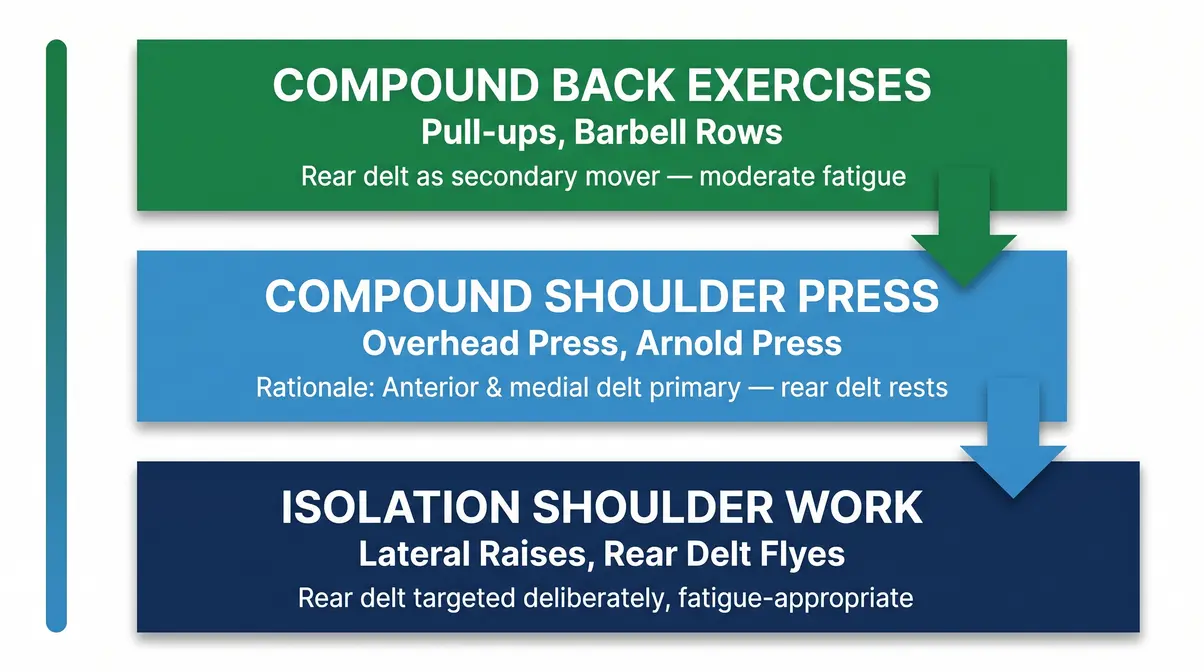
The fix is sequencing. Structure your session like this:
- Compound back exercises first (pull-ups, barbell rows) — these use the rear delt as a secondary mover, so fatigue is moderate
- Compound shoulder presses next (overhead press, Arnold press) — these use the anterior and medial delts primarily, giving rear delts a relative rest
- Isolation shoulder work last (lateral raises, rear delt flyes) — now you’re targeting the rear delt deliberately, in a controlled, fatigue-appropriate context
A systematic review by Schoenfeld et al. (2017) confirmed that exercise order significantly affects performance output — exercises performed later in a session show measurable declines in volume and force production. The Rear Delt Fatigue Threshold is a direct application of this finding to the back and shoulder pairing.
The Ultimate Gym Workout Routine
This section delivers the complete, gym-based back and shoulder workout routine — with sets, reps, rest periods, and form notes for every exercise. Before you start, read the safety notice below.
⚠️ Safety Notice: Always consult a qualified healthcare professional or certified personal trainer before starting a new exercise program, especially if you have a history of shoulder, neck, or back injuries. This article is for informational purposes only and does not constitute medical advice.
How many days a week to train?
Training back and shoulders twice per week is the research-backed sweet spot for most beginner and intermediate lifters. Scientific literature confirms that twice-weekly training frequency produces significantly greater muscle growth than once-weekly training at the same total volume — and twice weekly is more manageable than three times weekly for most schedules. Space sessions at least 48 hours apart (e.g., Monday and Thursday) to allow adequate muscle recovery. Advanced lifters may benefit from three sessions per week, but this requires careful volume management to avoid overtraining.
Routine Evaluation Methodology
Every exercise in this routine was selected against four criteria, based on rigorous biomechanical evaluation frameworks:
- Muscle activation breadth: Does the exercise recruit multiple target muscles simultaneously?
- Progressive overload potential: Can you add weight or reps over time without technical breakdown?
- Injury risk profile: Is the movement safe for beginners with standard coaching cues?
- Equipment accessibility: Is it available in any commercial gym?
Exercises were ranked using electromyography (EMG) data from peer-reviewed biomechanics literature, cross-referenced with programming guidelines from the American College of Sports Medicine (ACSM). Volume targets (sets per week) are based on the aforementioned hypertrophy research, which found that 10+ sets per muscle group per week produced significantly greater hypertrophy than lower volumes.
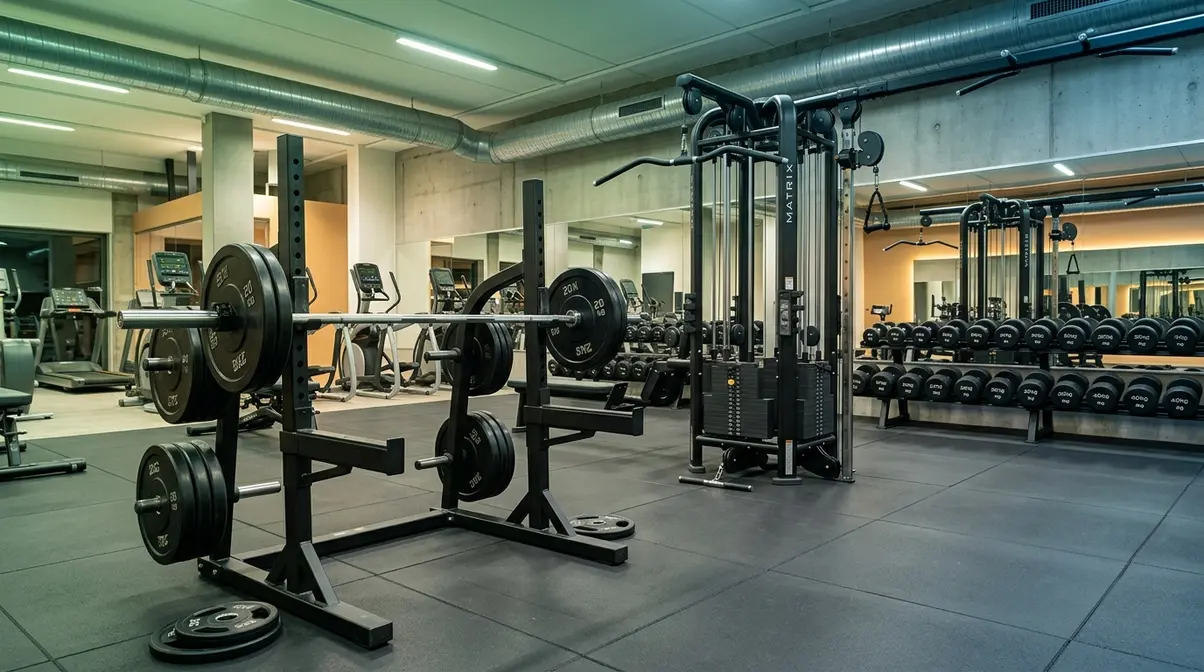
- Equipment you’ll need:
- Barbell and weight plates
- Cable machine (lat pulldown and cable row attachments)
- Dumbbells (light to moderate)
- Pull-up bar (optional, but recommended)
- Resistance band (optional, for warm-up)
Prerequisites: You should be comfortable with basic gym equipment and familiar with the concept of a rep (one full movement) and a set (a group of reps). If you’re brand new, spend one session just practising the movement patterns with no weight before adding load.
Full Workout: Sets, Reps, and Rest
Perform this routine twice per week, with at least 48 hours between sessions (e.g., Monday and Thursday). Rest 90–120 seconds between sets for compound exercises, and 60–90 seconds for isolation exercises.
| # | Exercise | Sets | Reps | Rest | Target Muscle |
|---|---|---|---|---|---|
| 1 | Barbell or Dumbbell Row | 4 | 8–10 | 90 sec | Lats, Rhomboids, Rear Delt |
| 2 | Lat Pulldown | 3 | 10–12 | 90 sec | Lats, Biceps |
| 3 | Seated Cable Row | 3 | 10–12 | 90 sec | Mid-Back, Rhomboids |
| 4 | Overhead Barbell or Dumbbell Press | 4 | 8–10 | 90 sec | Anterior & Medial Delt |
| 5 | Arnold Press | 3 | 10–12 | 60 sec | All 3 Deltoid Heads |
| 6 | Lateral Raise | 3 | 12–15 | 60 sec | Medial Delt |
| 7 | Face Pull | 3 | 15–20 | 60 sec | Rear Delt, External Rotators |
| 8 | Rear Delt Fly (Dumbbell) | 3 | 12–15 | 60 sec | Rear Delt, Rhomboids |
Total working sets: 26 | Estimated session time: 60–75 minutes
“This eight-exercise sequence delivers 10+ weekly sets per muscle group in a single session — meeting the minimum hypertrophy threshold identified by clinical researchers without exceeding beginner recovery capacity.”
Form Notes for Key Exercises
Good form is what separates progress from injury. Here are the coaching cues that matter most.
Barbell Row — “Row Hard”
Hinge at the hips until your torso is roughly 45 degrees to the floor. Pull the bar to your lower chest (not your belly button). Squeeze your shoulder blades together at the top — hold for one second. Keep your core braced and your lower back flat throughout. Common mistake: Using momentum to heave the bar up. If you’re swinging, drop the weight by 20%.
Overhead Press — “Press Strong”
Stand with feet shoulder-width apart. Grip the bar just outside shoulder-width. Brace your core, squeeze your glutes, and press the bar directly overhead — not forward. Lock your arms fully at the top. Lower the bar to chin height under control. Common mistake: Flaring the elbows excessively, which shifts load onto the shoulder joint rather than the deltoid muscle.
Lateral Raise — “Raise Strict”
Use lighter weight than you think you need. Hold dumbbells at your sides with a slight bend in the elbow. Raise your arms to shoulder height — no higher. Lead with your elbows, not your wrists. Lower slowly (3 seconds down). Common mistake: Shrugging the traps to assist the lift, which reduces medial delt activation and overloads the upper traps.
Face Pull
Set a cable machine to upper-chest height. Use a rope attachment. Pull the rope toward your face, separating your hands at the end of the movement so your thumbs point behind you. This external rotation is what makes face pulls so effective for rear delt and rotator cuff health. Common mistake: Pulling to the neck rather than the face, which reduces the external rotation component.
How to Progress Over Time
Progressive overload (gradually increasing the challenge to force your muscles to adapt) is the single most important variable in long-term muscle building. Here’s a simple system:
- Weeks 1–2: Learn the movements. Use a weight you can lift for the top of the rep range (e.g., 12 reps) with clean form.
- Week 3 onwards: Add 2.5 kg (5 lbs) to compound lifts (rows, press) when you complete all sets at the top of the rep range with clean form.
- Isolation exercises: Add reps before adding weight. Once you can do 15 reps on lateral raises with strict form, increase the weight by 1–2 kg.
- Deload every 4–6 weeks: Reduce weights by 40% for one week to allow full recovery. Planned deload weeks reduce injury risk and improve long-term progress compared to continuous max-effort training.
| Phase | Duration | Focus | Load Adjustment |
|---|---|---|---|
| Foundation | Weeks 1–4 | Form & movement pattern | 60–70% of max effort |
| Build | Weeks 5–8 | Volume increase | 70–80% of max effort |
| Overload | Weeks 9–12 | Strength & hypertrophy | 80–90% of max effort |
| Deload | Week 13 | Recovery | 50–60% of max effort |
At-Home Back and Shoulder Workouts
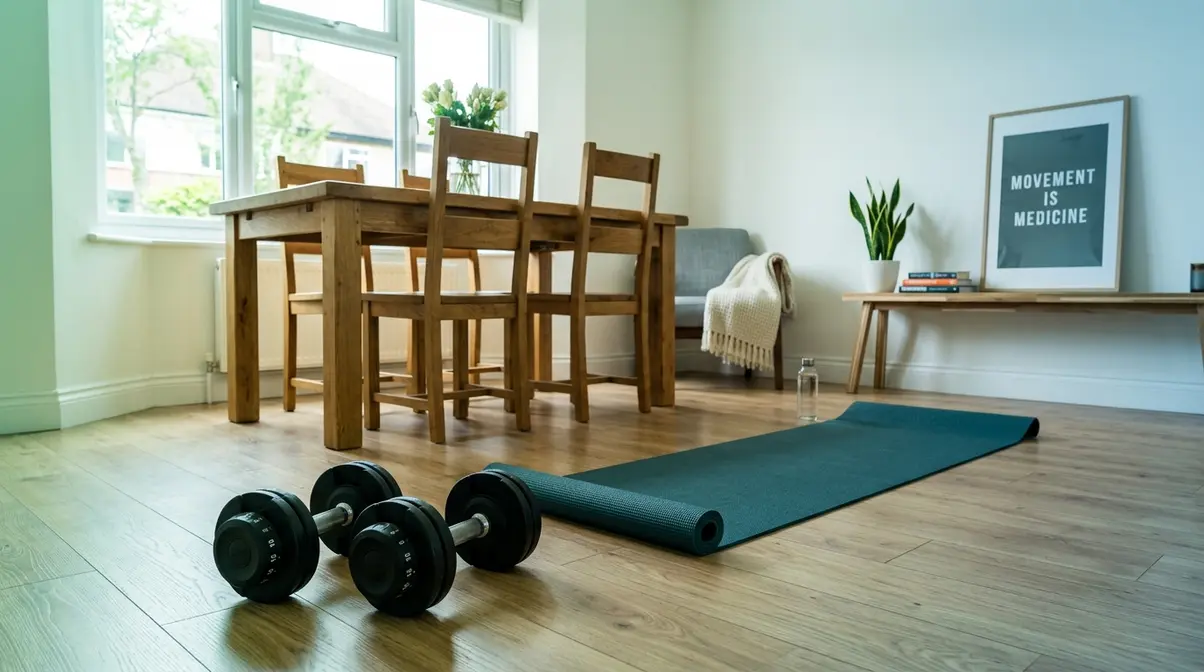
No gym membership? No problem. The muscles don’t know what equipment you’re using — they only respond to tension, time under tension, and progressive challenge. According to Harvard Health, dumbbell and bodyweight resistance training is highly effective for building upper body strength when performed with adequate intensity.
Here are two complete at-home options to ensure you get effective upper body home workouts without needing a commercial gym membership.
Dumbbell-Only Routine
A pair of adjustable dumbbells (or two fixed-weight pairs) is all you need for a highly effective back and shoulder session. This routine follows the same Rear Delt Fatigue Threshold sequencing as the gym routine — compound pulling first, pressing second, isolation last.
| # | Exercise | Sets | Reps | Rest | Target Muscle |
|---|---|---|---|---|---|
| 1 | Dumbbell Bent-Over Row | 4 | 10–12 | 90 sec | Lats, Rhomboids, Rear Delt |
| 2 | Single-Arm Dumbbell Row | 3 | 10–12 each | 90 sec | Lats, Mid-Back |
| 3 | Dumbbell Overhead Press | 4 | 10–12 | 90 sec | Anterior & Medial Delt |
| 4 | Arnold Press | 3 | 10–12 | 60 sec | All 3 Deltoid Heads |
| 5 | Lateral Raise | 3 | 12–15 | 60 sec | Medial Delt |
| 6 | Rear Delt Fly (Bent-Over) | 3 | 12–15 | 60 sec | Rear Delt |
Estimated time: 45–55 minutes. Perform twice per week with 48 hours between sessions.
Pro tip: To apply progressive overload without heavier weights, manipulate your tempo. A 4-second eccentric (lowering) phase drastically increases time under tension, forcing muscle adaptation even if you only have light dumbbells available.
No-Equipment Bodyweight Routine
Bodyweight back training is genuinely challenging — your back muscles are designed for pulling, and most bodyweight movements are pushing. However, with the right exercise selection, you can stimulate meaningful rear delt, rhomboid, and lat development using nothing but your bodyweight and a sturdy table or low bar. These bodyweight workouts without equipment are perfect for travel or minimal-space setups.
| # | Exercise | Sets | Reps | Rest | Target Muscle |
|---|---|---|---|---|---|
| 1 | Table Row (or Low Bar Row) | 4 | 10–15 | 90 sec | Lats, Rhomboids, Rear Delt |
| 2 | Superman Hold | 3 | 10 × 3-sec hold | 60 sec | Lower Traps, Erectors |
| 3 | Pike Push-Up | 4 | 8–12 | 90 sec | Anterior & Medial Delt |
| 4 | Wall Handstand Hold (or Pike Hold) | 3 | 20–30 sec | 60 sec | Full Deltoid |
| 5 | YTW Raises (Prone, No Weight) | 3 | 10 each position | 60 sec | Rear Delt, Rhomboids |
| 6 | Arm Circles (Large, Controlled) | 2 | 20 each direction | 30 sec | Rotator Cuff, Medial Delt |
The table row is the bodyweight equivalent of a barbell row — lie under a sturdy table, grip the edge, and pull your chest up to it. Pause for a full second at the top of the movement to ensure the rhomboids are fully contracted. This is the single most effective bodyweight back exercise and should be your primary progressive overload vehicle here.
When performing the Pike Push-Up, keep your core braced and lower the crown of your head toward the floor, not your nose. This specific angle maximizes anterior deltoid engagement while protecting the cervical spine.
At-Home vs. Gym: Quick Reference Table
| Exercise Goal | Gym Option | Dumbbell Home Option | Bodyweight Option |
|---|---|---|---|
| Lat width | Lat Pulldown | Single-Arm DB Row | Table Row |
| Mid-back thickness | Seated Cable Row | Bent-Over DB Row | Superman Hold |
| Shoulder press | Barbell OHP | DB Overhead Press | Pike Push-Up |
| Rear delt isolation | Face Pull (cable) | Rear Delt Fly | YTW Raises |
| Medial delt | Lateral Raise | Lateral Raise | Arm Circles |
| Overall shoulder | Arnold Press | Arnold Press | Wall Handstand Hold |
Back and Shoulder Workouts for Women

One of the most common misconceptions in fitness is that women need a fundamentally different workout to men. The muscles are the same. The biomechanics are the same. What differs is the goal — and for most women, that goal is a toned, defined upper body with improved posture, not maximum muscle mass. Following a dedicated strength training guide for women ensures these specific goals are met efficiently.
Adapting the Routine for Your Goals
The key difference for women pursuing a toned look — rather than maximum size — is rep range and load selection. Higher rep ranges (12–20 reps) with moderate weights produce excellent muscle definition without the size increase associated with lower rep, heavier training.
Across certified personal training communities, the consistent recommendation for women with toning goals is to:
- Prioritise rear delt and lower trap work — these muscles are chronically underactivated in women due to prolonged sitting and phone use, and strengthening them creates the “pulled-back” posture that makes the upper body look immediately more defined.
- Keep rest periods shorter (45–60 seconds) to increase metabolic demand and calorie burn within the session.
- Add resistance band work as a warm-up and finisher — bands provide constant tension throughout the movement range, which is excellent for rear delt activation.
“Women who add 3 sets of face pulls and rear delt flyes to their weekly training report visible posture improvements within 6–8 weeks — making rear delt work one of the highest-return investments in a women’s upper body routine.”
Workout: Tone and Define Your Upper Body
This beginner strength program for women is designed for training in a gym with access to dumbbells and cable machines. It follows the Rear Delt Fatigue Threshold sequencing and emphasises the muscles most responsible for posture and upper body definition.
| # | Exercise | Sets | Reps | Rest | Target Muscle |
|---|---|---|---|---|---|
| 1 | Lat Pulldown | 3 | 12–15 | 60 sec | Lats, Rear Delt |
| 2 | Seated Cable Row (Close Grip) | 3 | 12–15 | 60 sec | Mid-Back, Rhomboids |
| 3 | Dumbbell Overhead Press | 3 | 12–15 | 60 sec | Anterior & Medial Delt |
| 4 | Lateral Raise | 3 | 15–20 | 45 sec | Medial Delt |
| 5 | Face Pull | 3 | 15–20 | 45 sec | Rear Delt, Rotator Cuff |
| 6 | Rear Delt Fly | 3 | 15–20 | 45 sec | Rear Delt |
| 7 | Band Pull-Apart (Finisher) | 2 | 20–25 | 30 sec | Rear Delt, Rhomboids |
Total working sets: 20 | Estimated session time: 45–55 minutes
This routine can be performed twice per week. For women who also train legs and core, a recommended split is: Monday (Back & Shoulders), Wednesday (Legs), Friday (Back & Shoulders or Full Body).
Gym vs. Home Options
| Exercise | Gym Version | Home Alternative |
|---|---|---|
| Lat Pulldown | Cable machine | Single-arm DB row or table row |
| Seated Cable Row | Cable machine | Bent-over DB row |
| Overhead Press | Dumbbells or barbell | Dumbbells (same) |
| Face Pull | Cable machine with rope | Band pull-apart |
| Rear Delt Fly | Dumbbells or pec deck reverse | Bent-over DB fly |
| Lateral Raise | Dumbbells | Dumbbells or band (same) |
Advanced Techniques & Muscle Pairings
Once you’ve built a solid foundation with the core routine — typically after 8–12 weeks — you can introduce advanced workout optimization techniques to accelerate progress, save time, or break through a plateau. Incorporating techniques like supersets not only saves time but also increases the cardiovascular demand of your session, according to the Mayo Clinic.
How to Build a Superset Routine
A superset (performing two exercises back-to-back with no rest between them) is one of the most time-efficient ways to increase training volume. For back and shoulder training, the most effective supersets pair a back exercise with a non-competing shoulder exercise — meaning one that doesn’t further fatigue the rear delt.
Recommended Back and Shoulder Superset Pairs:
| Superset | Exercise A (Back) | Exercise B (Shoulder) | Why It Works |
|---|---|---|---|
| A | Barbell Row | Overhead Press | Row uses rear delt; press uses anterior/medial delt |
| B | Lat Pulldown | Lateral Raise | Pulldown uses lats; raise targets medial delt only |
| C | Seated Cable Row | Arnold Press | Row targets rhomboids; Arnold hits all three delt heads |
| D | Single-Arm DB Row | Rear Delt Fly | Rest the working arm while targeting rear delt isolation |
The rule: Never superset two exercises that both heavily load the rear delt (e.g., face pull + bent-over row). That’s a direct path to hitting the Rear Delt Fatigue Threshold prematurely and losing form on both exercises.
Back and Biceps: High-Volume Option
If you want to increase weekly back volume without adding another back and shoulder day, pairing back with biceps is the classic alternative. Both muscle groups are involved in pulling movements, so the session flows naturally — and your biceps get direct work after being used as secondary movers during all your back exercises.
When programming a high-volume back and bicep session, volume management is critical. Because your biceps are heavily recruited during rows and pulldowns, they require fewer direct isolation sets. Limit direct bicep work to 6-8 sets per session to prevent tendonitis.
Recommended pairing for a back and bicep session:
| # | Exercise | Sets | Reps | Focus |
|---|---|---|---|---|
| 1 | Pull-Up or Lat Pulldown | 4 | 8–10 | Back width |
| 2 | Barbell Row | 4 | 8–10 | Back thickness |
| 3 | Seated Cable Row | 3 | 10–12 | Mid-back detail |
| 4 | Barbell Curl | 3 | 10–12 | Bicep peak |
| 5 | Incline Dumbbell Curl | 3 | 12–15 | Bicep stretch |
| 6 | Hammer Curl | 3 | 12–15 | Brachialis |
This pairing is ideal for intermediate trainees running a push/pull/legs split, where back and biceps occupy the “pull” day.
Chest and Back: Push-Pull Pairing
The chest and back combination is a classic push-pull pairing used by bodybuilders since the 1970s. Opposing muscle groups (chest pushes; back pulls) allow one group to recover while the other works — which lets you maintain higher intensity throughout the session.
Why it works biomechanically: The physiological mechanism behind this is reciprocal inhibition. When your chest (agonist) contracts during a bench press, your back muscles (antagonist) are forced to relax. This active recovery allows your back to perform with greater force output during the subsequent row.
A simple chest and back superset session:
| Superset | Push Exercise | Pull Exercise |
|---|---|---|
| A | Barbell Bench Press | Barbell Row |
| B | Incline Dumbbell Press | Lat Pulldown |
| C | Cable Fly | Seated Cable Row |
| D | Push-Up (finisher) | Face Pull (finisher) |
If you’re currently doing back and shoulders and find you’ve hit a plateau — where weights aren’t moving and sessions feel stale — switching to a chest and back push-pull split for 6–8 weeks is an effective reset strategy.
Safety & Common Training Mistakes
Even the best-designed routine can cause injury if executed with poor form or inadequate recovery. This section covers the most common mistakes seen in back and shoulder training — and how to avoid them.
3 Form Mistakes Causing Injury
Mistake 1: Shrugging during lateral raises
When you shrug your traps to assist the lateral raise, you’re reducing medial deltoid activation and placing excessive load on the upper trapezius and the acromioclavicular (AC) joint — the small joint at the top of your shoulder. Over time, this causes impingement (pinching of soft tissue in the shoulder joint), a condition strongly linked to repetitive overhead strain in clinical literature. Fix: Use lighter weight and focus on leading with your elbows. If you can’t raise your arms to shoulder height without shrugging, the weight is too heavy.
Mistake 2: Jerking the bar during rows
Using momentum to “heave” the barbell during bent-over rows takes the load off your back muscles and transfers it to your lower spine. This is one of the leading causes of lower back strain in beginner lifters. Fix: Pause for one second at the top of every rep. If you can’t hold the contraction, reduce the weight.
Mistake 3: Overhead pressing with a forward head position
Pressing overhead with your head jutting forward compresses the cervical spine (neck vertebrae) and rotator cuff tendons. Fix: Actively tuck your chin before pressing. Think “tall spine” — imagine a string pulling the crown of your head toward the ceiling.
When to Modify or Scale Back
Not every session will go perfectly. Here’s when to reduce load or skip exercises:
- Shoulder clicking or grinding: A clicking sound during pressing is often benign (gas bubbles in the joint). However, clicking combined with pain is a signal to stop that exercise immediately and consult a physiotherapist.
- Sharp pain during lateral raises: This often indicates shoulder impingement. Scale back to band pull-aparts and face pulls only, and see a professional before returning to overhead work.
- Lower back fatigue during rows: If your lower back is the limiting factor (rather than your upper back muscles), you’ve likely lost your hip hinge position. Reduce weight by 30% and focus on re-establishing a flat back before adding load.
- General fatigue or soreness lasting more than 72 hours: This is a sign your recovery is inadequate. Add a rest day, prioritise sleep (7–9 hours), and ensure you’re eating enough protein (1.6–2.2g per kg of bodyweight, per ACSM guidelines).
When to See a Professional
Seek guidance from a qualified physiotherapist or sports medicine physician if you experience:
- Pain that persists beyond 5–7 days of rest
- Pain that radiates down your arm or into your neck
- Significant weakness in one arm compared to the other
- Any history of shoulder dislocation, rotator cuff tear, or spinal disc issues
A certified personal trainer (CPT) can also provide in-person form assessment, which is the single most effective way to prevent injury for new lifters. Self-coaching from video guides is a starting point — not a substitute for professional feedback.
Frequently Asked Questions
What is the 3-3-3 rule in gym?
The 3-3-3 rule refers to performing 3 exercises, for 3 sets, with 3 minutes of rest between each set. It’s a simple training structure designed for strength-focused sessions where heavy compound lifts require full recovery between efforts. For a back and shoulder context, you might apply it to three big movements: barbell row, overhead press, and pull-up — each performed for 3 heavy sets with full rest. It’s less suited to hypertrophy (muscle growth), which typically benefits from shorter rest and higher rep ranges.
What is the 3/2/1 rule in gym?
The 3/2/1 training rule is a weekly workout structure: 3 strength sessions, 2 cardio sessions, and 1 active recovery or mobility session per week. It’s a popular framework for general fitness because it balances muscle building, cardiovascular health, and injury prevention without overloading any single system. For back and shoulder training within this framework, your two strength sessions would each include a back and shoulder day — providing twice-weekly frequency, which Ralston et al. (2017) identified as the minimum for consistent hypertrophy.
What is the 5-4-3-2-1 workout method?
The 5-4-3-2-1 method is a descending rep scheme: you perform 5 reps of exercise one, 4 reps of exercise two, 3 reps of the third, 2 reps of the fourth, and 1 rep of the fifth — typically with increasing weight as reps decrease. It’s a strength-focused approach that allows you to practice heavy compound movements with lower fatigue accumulation. Applied to back and shoulders, you might use it for: 5 pull-ups, 4 barbell rows, 3 overhead presses, 2 dumbbell rows, 1 heavy deadlift. It’s best suited to intermediate-to-advanced lifters.
What is Jennifer Aniston’s 15-15-15 workout?
Jennifer Aniston’s 15-15-15 workout is a cardio-focused routine: 15 minutes on a stationary bike, 15 minutes on an elliptical, and 15 minutes on a treadmill — totalling 45 minutes of low-to-moderate intensity cardio. It’s a general fitness and endurance approach, not a muscle-building protocol. According to the Cleveland Clinic, while beneficial for endurance, it lacks the targeted resistance training required for hypertrophy. For physique goals — V-taper, posture improvement, shoulder definition — a resistance training routine like the ones in this guide is more effective.
What muscle is hardest to grow?
The rear deltoid is widely considered one of the hardest muscles to grow, largely because it’s rarely trained with sufficient direct volume. Most pushing and pulling exercises underload the rear delt relative to larger muscle groups, making understanding the hardest muscles to grow critical for balanced development. It requires very specific isolation exercises — face pulls, rear delt flyes, YTW raises — performed with controlled technique and high rep ranges (15–20 reps). The calves are also notoriously stubborn due to their high proportion of slow-twitch muscle fibres, which require very high training volumes to stimulate growth. Applying science-based sets and reps guidelines is essential for these stubborn areas.
Your Upper Body Transformation Starts Here
Building a balanced, defined upper body doesn’t require guessing, expensive coaching, or endless internet research. It requires one well-designed back and shoulder workout routine, executed consistently, with progressive overload and smart sequencing.
The most important thing you’ve learned in this guide isn’t a specific exercise — it’s the concept of The Rear Delt Fatigue Threshold. Understanding that your rear deltoids are already working hard during back training, and sequencing your session to account for that overlap, is what separates lifters who make steady progress from those who plateau and get injured. Compound back work first. Shoulder press next. Isolation last. Every time.
Start with the gym routine in H2 #2 if you have access to a commercial gym. Use the dumbbell-only or bodyweight options if you’re training at home. Follow the women’s section if your goals centre on posture and definition rather than size. And if you’re ready to push further, the superset and pairing options in H2 #5 give you a clear next step. Choose your routine, book two sessions into your calendar this week, and take the first rep. The V-taper physique you’re building starts with that decision.