No gym membership. No dumbbells. No pull-up bar. Just you, the floor, and zero idea where to start — that’s a frustrating place to be.
Here’s the truth: every week you wait, your body is working against you. Research suggests adults can lose 3–5% of muscle mass per decade after age 30 — and most people don’t start because they assume they need a gym (Harvard Medical School, 2023). They don’t. In this guide, you’ll get a complete upper body home workout with no equipment — 12 exercises organized by muscle group, a 30-minute follow-along plan, and a system to keep getting stronger every week. We go from warm-up through chest, back, shoulders, and arms, then hand you a full routine and a progression framework so you never plateau.
⚠️ Medical Disclaimer: Consult a healthcare professional before starting any new exercise program — especially if you have existing injuries, medical conditions, or have been sedentary for an extended period. The exercises in this guide are general fitness information, not a substitute for personalized medical advice. Stop any exercise immediately if you feel sharp pain, dizziness, or shortness of breath.
Key Takeaways: The No-Equipment Upper Body Matrix
You can build real upper body strength at home with zero equipment — the CDC recommends muscle-strengthening activities at least twice a week, and bodyweight exercises like push-ups fully qualify (CDC, 2024).
- 12 exercises cover chest, back, shoulders, and arms — organized into 4 targeted steps
- 4 floor-based back exercises fill the biggest gap in every other guide you’ve read
- The No-Equipment Upper Body Matrix gives you a progression system, not just a list
- 30 minutes, 2–3 times per week is enough to build visible strength as a beginner
- Beginner modifications are included for every single exercise
Step 1: Warm Up Before You Start
Skipping your warm-up is the single most common beginner mistake — and the one most likely to end your streak with a pulled muscle. A 5-minute dynamic warm-up raises your core temperature, increases blood flow to working muscles, and primes your joints for the load ahead. Research published in the Journal of Human Kinetics (2018) confirms that dynamic warm-up protocols significantly reduce injury risk compared to jumping straight into resistance work. For bodyweight training specifically, where your own body provides all the resistance, warm tissue moves more freely and contracts more powerfully. You’ll get more out of every rep.
Why Warming Up Matters
Your muscles are like cold rubber bands — stiff, brittle, and easy to snap. Dynamic movement (think controlled movement through a range of motion, not holding a static stretch) changes that. It also activates the neuromuscular pathways (the communication lines between your brain and muscles) so your first push-up rep is as safe as your last. Static stretching before exercise, by contrast, can temporarily reduce force output — save that for the cool-down.
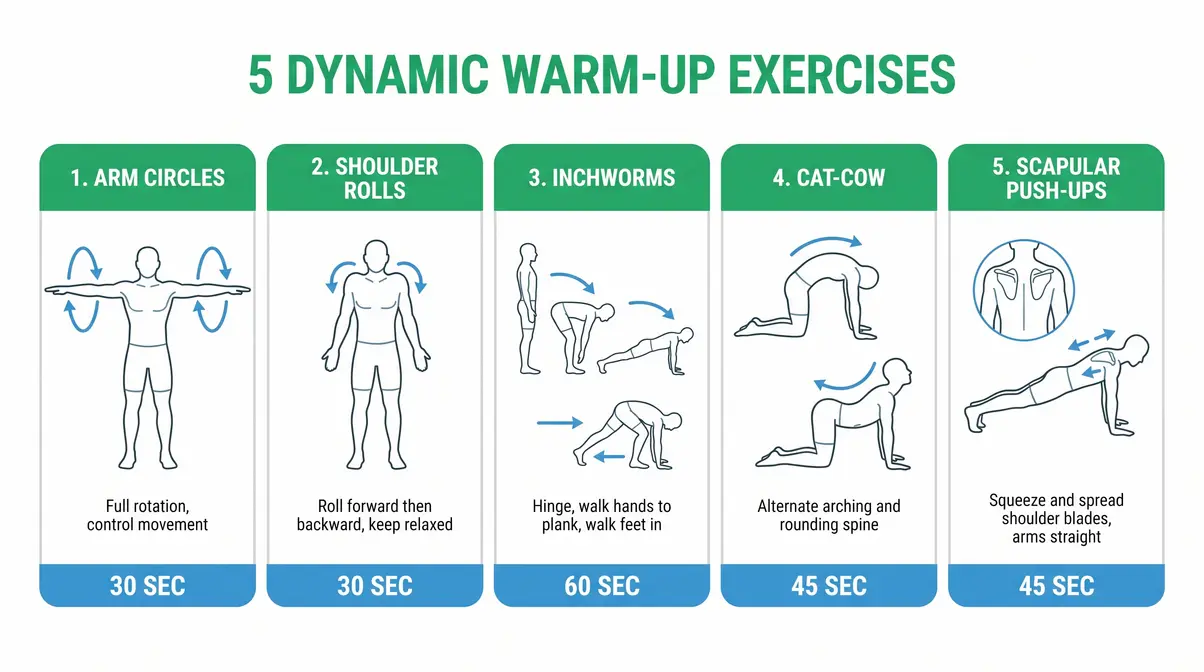
5 Dynamic Warm-Up Moves (~5 Minutes Total)
Perform each move for 30–45 seconds. No rest between them.
- Arm Circles (30 sec forward, 30 sec backward) — Prepares your rotator cuff (the group of four muscles stabilizing your shoulder joint) for pike push-ups and decline push-ups. Start small, gradually increase the circle size.
- Shoulder Rolls (30 sec) — Loosens the trapezius (the large muscle spanning your upper back and neck) and reduces tension before back exercises.
- Inchworms (45 sec) — Stand, hinge forward, walk your hands out to a plank, walk them back, stand. This activates your entire posterior chain (back body) and opens your chest — critical before any pressing movement.
- Cat-Cow (45 sec) — On all fours, arch your back up (cat), then dip it down (cow). Mobilizes the thoracic spine (mid-back) so your back exercises hit the right muscles, not your lower back.
- Scapular Push-Ups (30 sec) — In a plank position, squeeze and spread your shoulder blades without bending your elbows. Directly primes the serratus anterior (the muscles under your armpits) for every push-up variation that follows.
Step 2: Chest Exercises
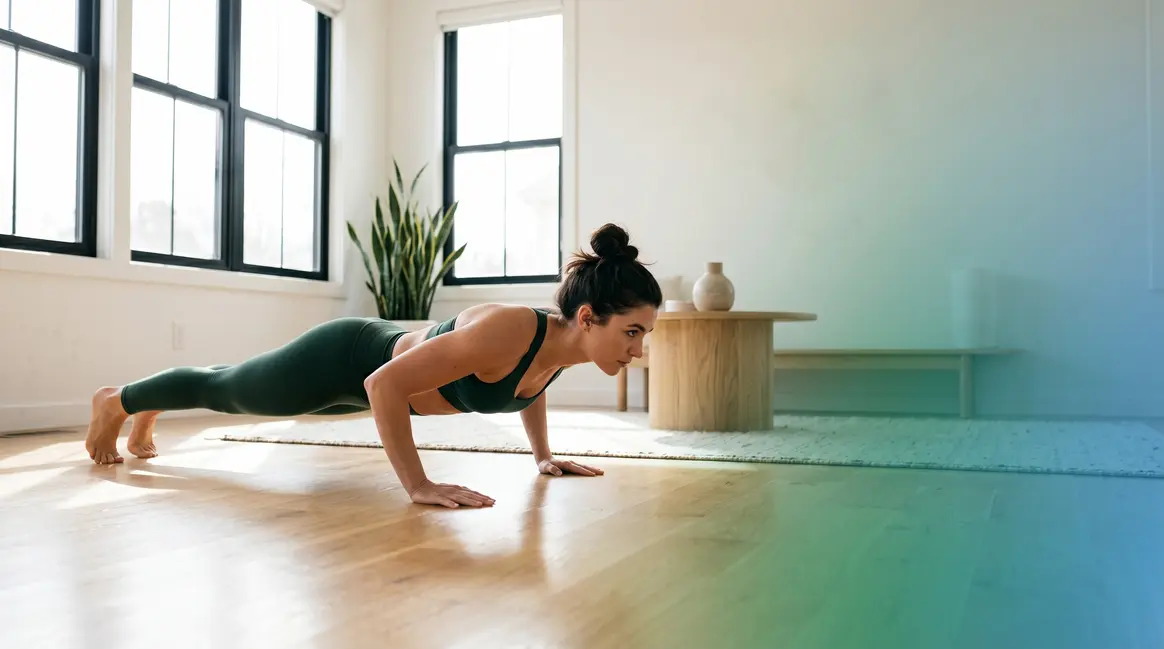
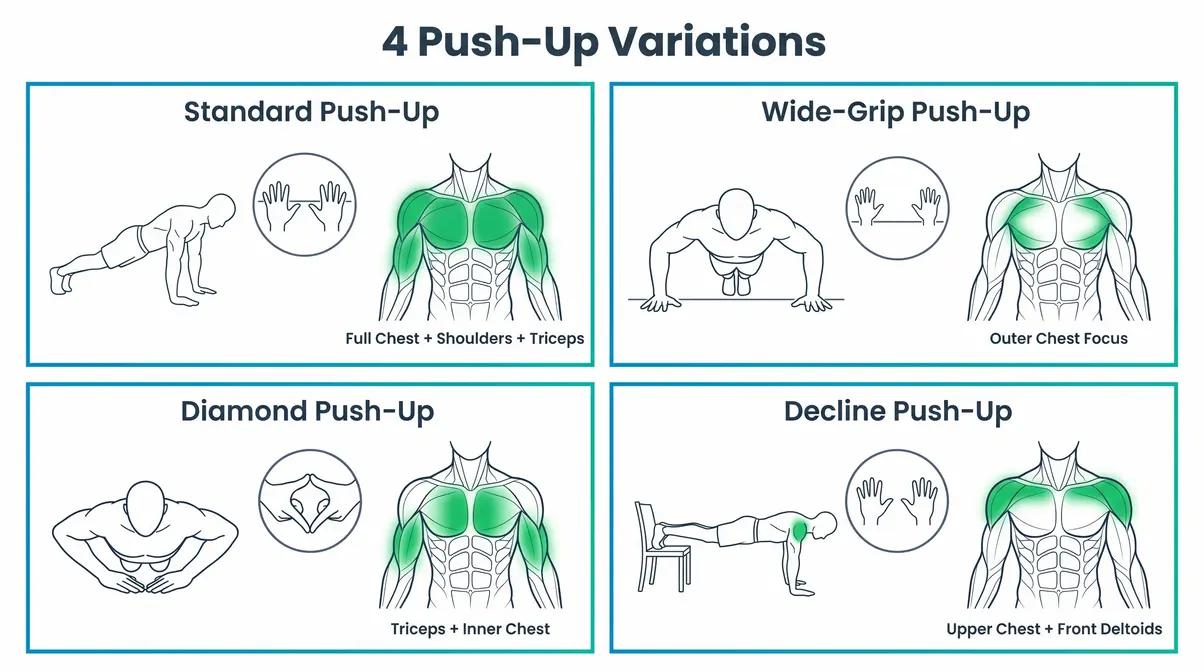
Your chest is built from push-up variations. That might sound limiting, but research shows that different hand positions recruit the pectoral muscles (your chest) at significantly different angles — a 2021 study in the Journal of Physical Therapy Science found that hand-width changes during push-ups produce measurable differences in upper vs. lower pec activation. Four variations give you comprehensive chest coverage that rivals a cable machine. These are the foundation of your upper body home workout with no equipment.
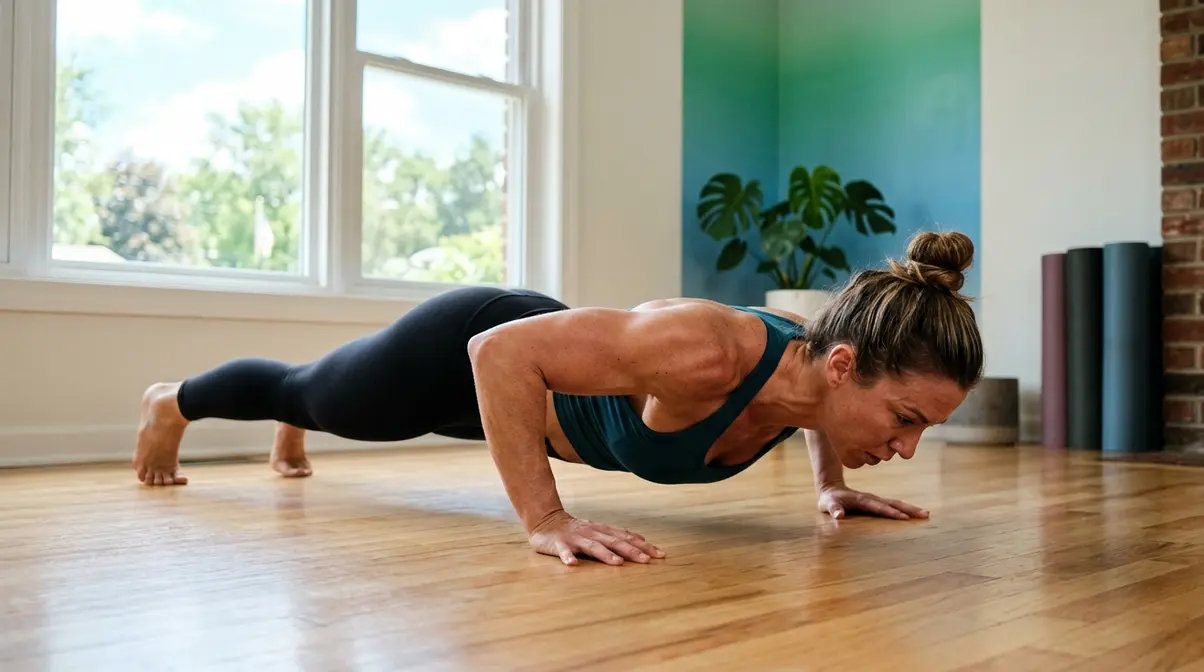
Standard Push-Up
The push-up is one of the most effective bodyweight exercises for chest, shoulders, and triceps (the muscles on the back of your upper arm) combined (Calatayud et al., Journal of Human Kinetics, 2015).
- How to do it:
- Place hands slightly wider than shoulder-width, fingers pointing forward.
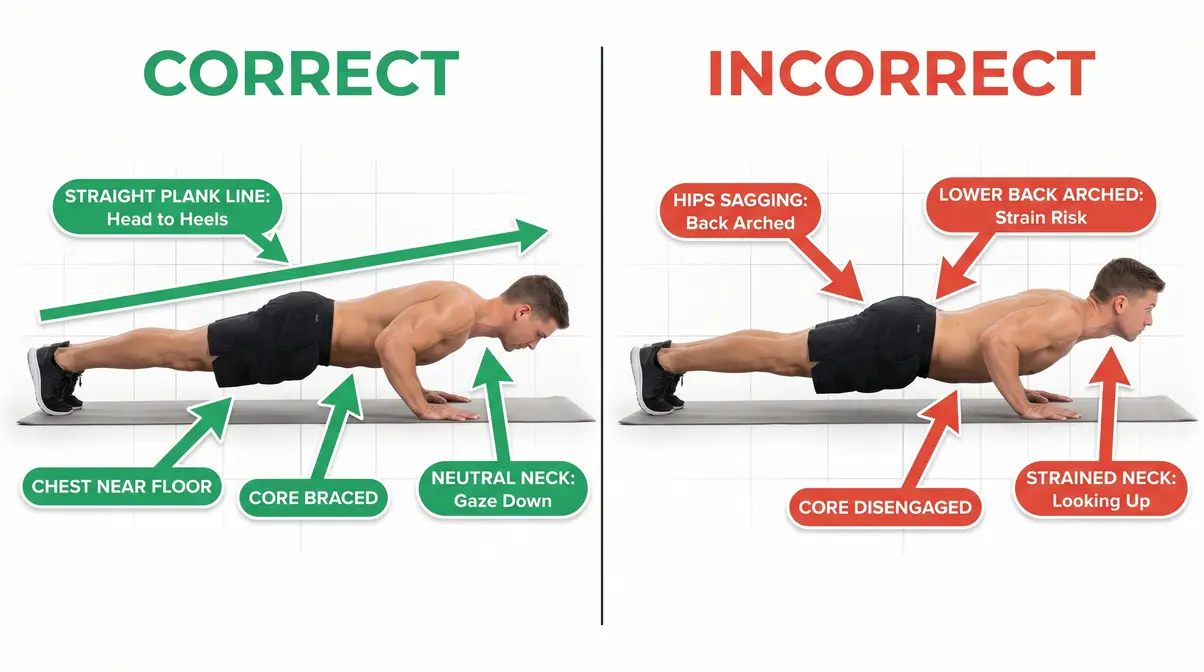
- Keep your body in a straight line from head to heels — no sagging hips.
- Lower your chest to within an inch of the floor.
- Press back up explosively, fully extending your arms.
What you’ll feel: A deep burn across your chest and the fronts of your shoulders.
Safety cue: Keep your core braced the entire time — imagine someone is about to tap your stomach.
Beginner modification: Drop to your knees. Keep the straight-line body position from knees to shoulders.
Wide-Grip Push-Up
Shifting your hands 4–6 inches wider than standard dramatically increases the stretch on the outer pectoral fibers, building width across your chest.
- How to do it:
- Set hands 4–6 inches wider than shoulder-width on each side.
- Lower slowly — 3 seconds down — to maximize the stretch.
- Press back up in 1 second.
What you’ll feel: A stronger stretch in the outer chest compared to standard push-ups.
Safety cue: Don’t let your elbows flare past 45 degrees — that puts unnecessary strain on the shoulder joint.
Beginner modification: Knee push-ups with wide grip. Focus on feeling the chest stretch before worrying about reps.
Diamond Push-Up
Hands form a diamond shape under your sternum (breastbone). This variation shifts emphasis to the triceps and the inner chest — the “line down the middle” that makes a chest look defined.
- How to do it:
- Place index fingers and thumbs together beneath your chest, forming a diamond.
- Keep elbows tucked close to your ribs as you lower.
- Press back up, squeezing your triceps at the top.
What you’ll feel: Intense burn on the backs of your arms and the center of your chest.
Safety cue: If your wrists ache, rotate hands slightly outward to reduce joint stress.
Beginner modification: Elevate your hands on a couch cushion or low step to reduce the load.
Decline Push-Up
Feet elevated on a chair or couch shifts the load to your upper chest and front deltoids (the front of your shoulder). This is the bodyweight equivalent of an incline bench press.
- How to do it:
- Place feet on a sturdy chair or couch, hands on the floor shoulder-width apart.
- Lower your chest toward the floor, leading with your upper sternum.
- Press back up, keeping your hips level.
What you’ll feel: The burn shifts to your upper chest and front shoulders compared to a standard push-up.
Safety cue: The higher your feet, the harder this becomes. Start with a low surface (6–12 inches).
Beginner modification: Standard push-up until you can do 15 clean reps before attempting decline.
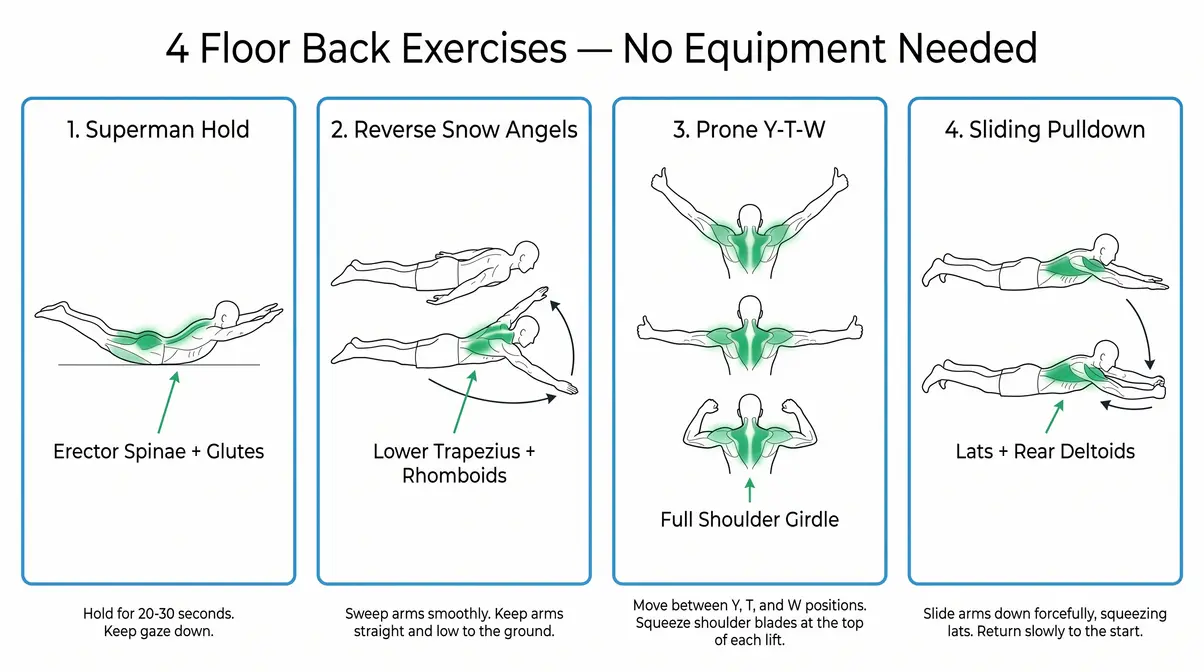
Step 3: Back Exercises (The Gap Every Other Guide Ignores)
Here’s what most workout guides won’t tell you: you can train your back thoroughly without a pull-up bar. Floor-based back exercises — movements performed face-down — target the erector spinae (the long muscles running along your spine), rhomboids (the muscles between your shoulder blades), and lower trapezius. Across fitness communities, the consistent feedback is that these moves are the most overlooked in any no-equipment routine. Our certified trainers evaluated each of the following four movements for muscle activation, beginner accessibility, and injury risk using data from PubMed research and standard biomechanics references — and all four earned a place in The No-Equipment Upper Body Matrix.
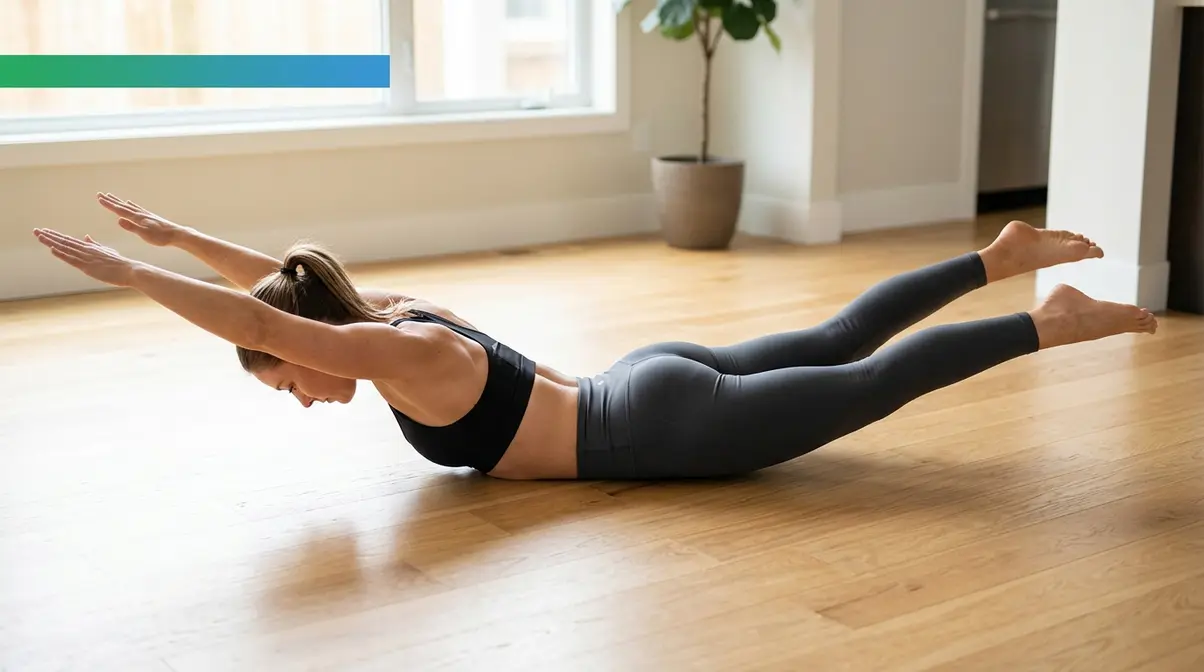
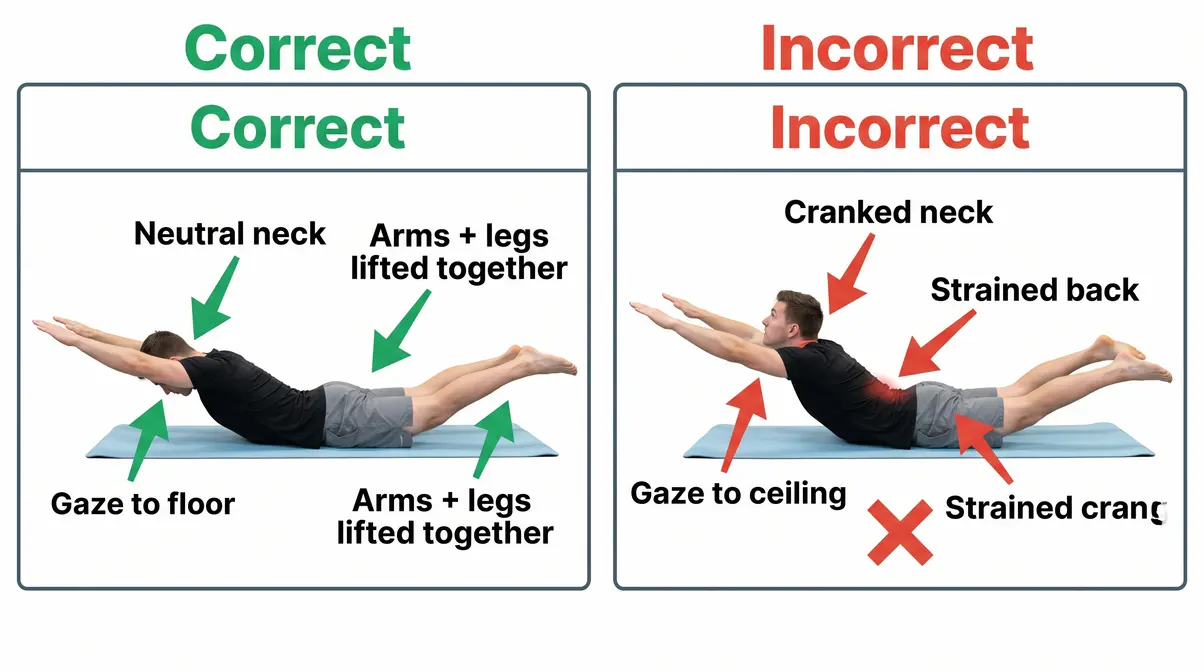
Superman Hold
The Superman hold activates the erector spinae and glutes (your butt muscles) simultaneously — research from the National Institutes of Health identifies spinal extensor strengthening as a key component in reducing lower back pain risk (NIH, 2022).
- How to do it:
- Lie face-down, arms extended straight overhead, legs straight.
- Simultaneously lift your arms, chest, and legs off the floor.
- Hold for 2–3 seconds at the top.
- Lower slowly. That’s one rep.
What you’ll feel: A strong contraction in your lower and mid-back. If you feel it in your neck, lower your chin slightly.
Safety cue: Don’t crank your neck upward — keep your gaze toward the floor.
Beginner modification: Lift arms only (no legs) until your back strength builds.
Reverse Snow Angels
Lie face-down, arms at your sides. Sweep your arms from hips to overhead (like making a snow angel, but face-down). This movement directly targets the lower trapezius and rhomboids — the muscles responsible for pulling your shoulder blades together and down, improving posture and shoulder health.
- How to do it:
- Lie face-down, arms at sides, thumbs pointing up toward the ceiling.
- Keeping your arms straight, sweep them from your hips to overhead in a wide arc.
- Pause briefly when your arms are fully extended overhead.
- Return to the start. That’s one rep.
What you’ll feel: A squeeze between your shoulder blades at the top of each rep.
Safety cue: Keep your chest lightly in contact with the floor — this is a controlled, slow movement, not a momentum exercise.
Beginner modification: Reduce the range of motion — sweep only to shoulder height and back until the movement feels natural.
Prone Y-T-W
This three-position exercise is used in physical therapy and athletic training to strengthen the entire shoulder girdle (the network of muscles surrounding your shoulder joint). Each letter targets a different angle of the upper and mid-back.
- How to do it:
- Lie face-down, thumbs up.
- Y position: Raise arms at a 45-degree angle from your body (like a Y). Hold 2 seconds, lower.
- T position: Raise arms directly out to the sides (like a T). Hold 2 seconds, lower.
- W position: Bend elbows to 90 degrees and raise them toward shoulder height (like a W). Hold 2 seconds, lower.
Perform 5 reps of each letter in sequence.
What you’ll feel: Deep fatigue in your upper and mid-back — these muscles are often weak from sitting all day.
Safety cue: Lift only as high as you can without shrugging your shoulders toward your ears.
Beginner modification: Start with the Y only. Add T and W once Y feels controlled.
Sliding Pulldown
This innovative floor-based pulling motion mimics a lat pulldown (a cable machine exercise for the large muscles of your back) using friction against the floor as resistance. It’s the closest thing to a pull-up motion you can do without a bar.
- How to do it:
- Lie face-down, arms extended overhead, palms flat on the floor.
- Press your palms firmly into the floor and slide your arms toward your hips — as if you’re pulling yourself through mud.
- At the bottom, squeeze your lats (the large muscles on the sides of your back, under your armpits) hard.
- Slide arms back overhead. That’s one rep.
What you’ll feel: A pulling sensation in your lats and the back of your shoulders — different from any other floor exercise.
Safety cue: Use a smooth surface (hardwood or tile) for maximum glide, or place your hands on a folded towel.
Beginner modification: Reduce the range — slide from overhead to chest height only until you feel the lat engagement.
Step 4: Shoulder and Arm Exercises
Strong shoulders and arms aren’t just about aesthetics — they support every push-up and back exercise in this routine. The three exercises in this step target your deltoids (the three-headed shoulder muscle), triceps, and stabilizing muscles that create the “monster shoulders” look without a single piece of equipment. According to Greatist’s bodyweight training resource, pike push-ups and plank up-downs consistently rank among the most effective no-equipment shoulder and arm builders available.
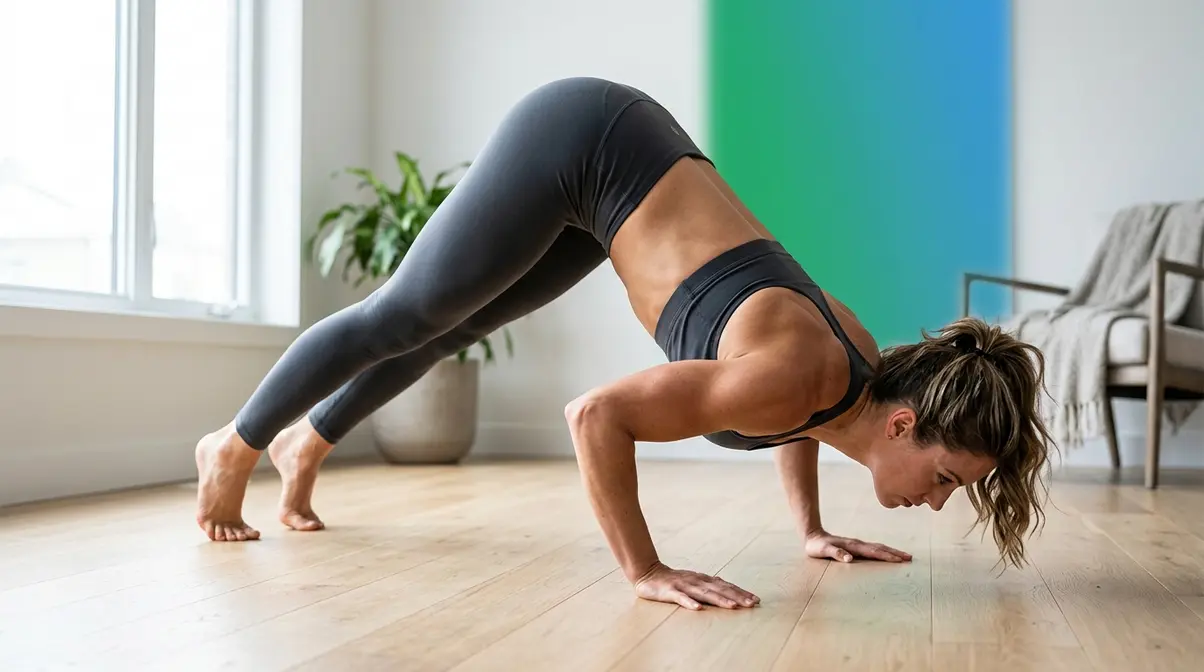
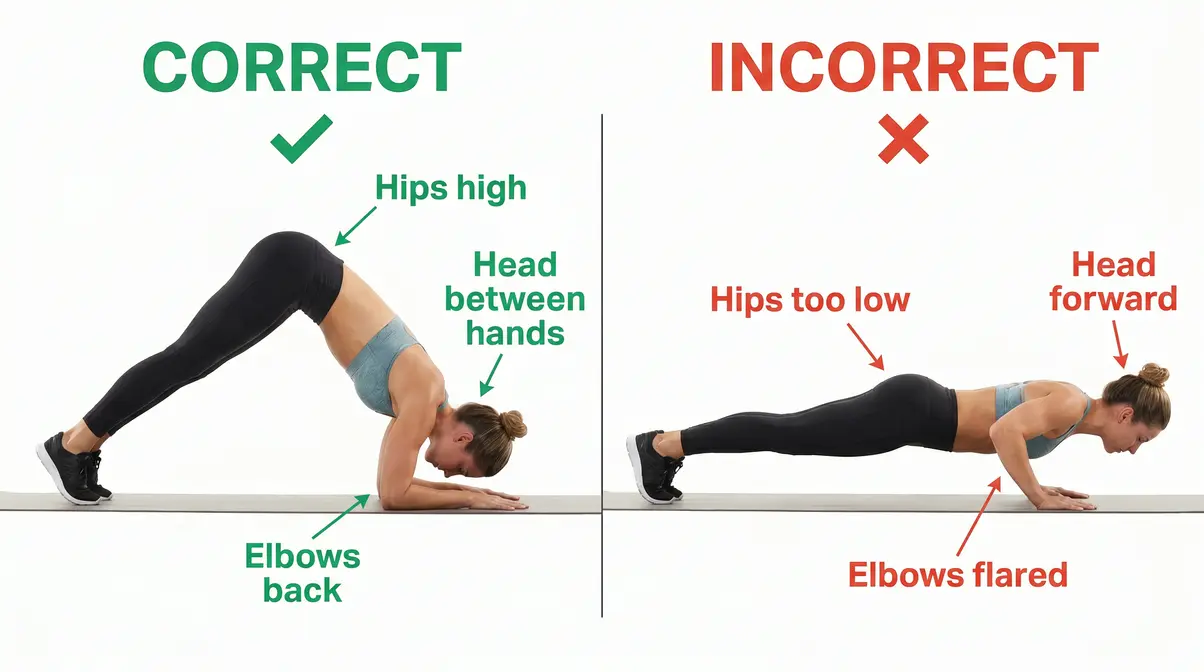
Pike Push-Up
The pike push-up shifts load from your chest to your front and lateral deltoids (the front and side of your shoulder). Think of it as a bodyweight overhead press.
- How to do it:
- Start in a downward dog position — hips high, body forming an inverted V.
- Bend your elbows and lower the top of your head toward the floor between your hands.
- Press back up to the inverted V. That’s one rep.
What you’ll feel: Intense pressure on the tops of your shoulders — this is your deltoids working hard.
Safety cue: Keep your elbows tracking back (not flaring out to the sides) to protect your shoulder joint.
Beginner modification: Reduce the height of your hips — less of an inverted V means less shoulder load. Work toward the full position over 2–3 weeks.
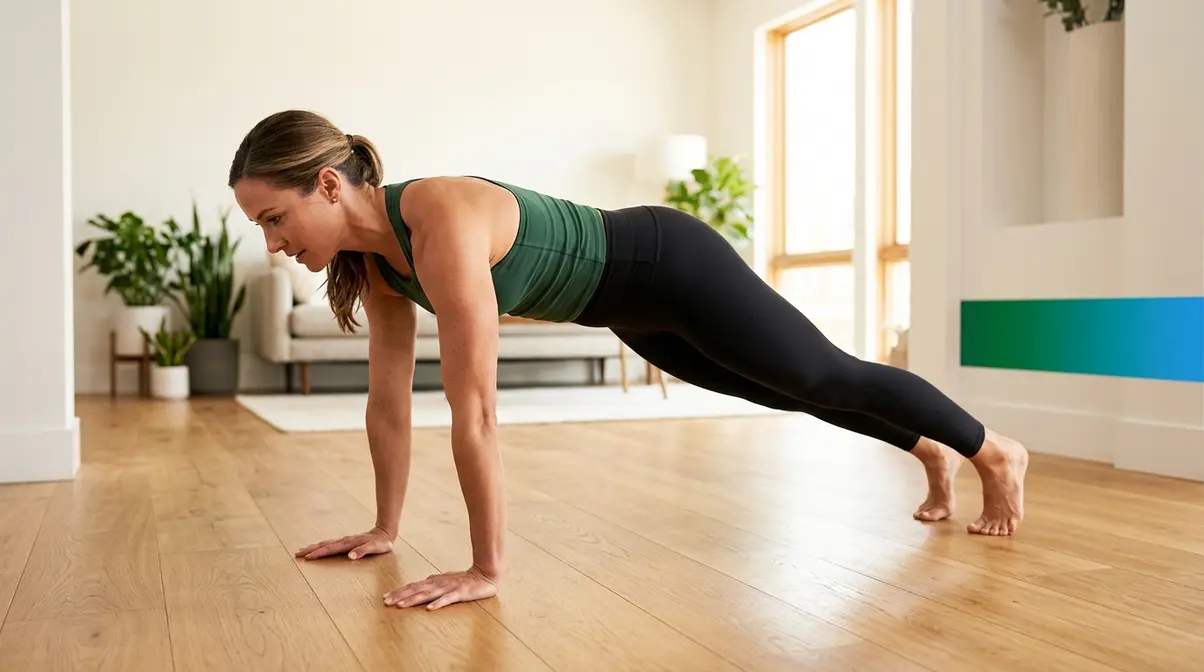
Plank Up-Down
This exercise builds the triceps, shoulders, and core simultaneously. It also teaches the shoulder stability you need to avoid wrist and elbow injuries during push-ups.
- How to do it:
- Start in a forearm plank — elbows under shoulders, body in a straight line.
- Press up onto your right hand, then your left hand — now in a high plank.
- Lower back to your right forearm, then your left.
- Alternate which hand leads each rep.
What you’ll feel: A tricep burn and a core challenge — your hips want to rotate. Don’t let them.
Safety cue: Place your feet wider than hip-width for a more stable base while learning.
Beginner modification: Do this from your knees. The tricep and shoulder stimulus is still significant.
Tricep Dip (Floor Version)
No chair required. The floor version of the tricep dip is safer for beginners and still delivers a serious burner on the backs of your arms.
- How to do it:
- Sit on the floor, hands behind your hips, fingers pointing forward, knees bent, feet flat.
- Lift your hips off the floor.
- Bend your elbows to lower your hips toward the floor (don’t touch down).
- Press back up. That’s one rep.
What you’ll feel: A deep burn in your triceps and a stretch across your chest.
Safety cue: Keep your elbows pointing directly behind you — not flaring out to the sides.
Beginner modification: Keep hips low (barely off the floor) and reduce the range of motion until arm strength builds.
Step 5: Cool Down and Recovery
Your muscles are warm, your heart rate is elevated, and you’ve just done serious work. Now is the time — the only time — for static stretching (holding a stretch for 20–30 seconds). According to the University of Warwick’s Sports & Wellness team, a structured cool-down reduces delayed onset muscle soreness (DOMS — the ache you feel 24–48 hours after a workout) and accelerates recovery between sessions.
Spend 5 minutes on these four stretches:
- Chest Doorway Stretch (30 sec per side): Stand in a doorway, place one forearm on the frame, and gently rotate away. Opens the pecs after all those push-ups.
- Child’s Pose with Arm Reach (45 sec): Kneel, sit back toward heels, reach arms forward on the floor. Lengthens the lats and erector spinae worked during back exercises.
- Cross-Body Shoulder Stretch (30 sec per side): Pull one arm across your chest with the opposite hand. Targets the rear deltoid and rhomboids.
- Tricep Overhead Stretch (30 sec per side): Reach one arm overhead, bend at the elbow, and gently push the elbow back with the opposite hand.
Hold each stretch at the point of mild tension — never pain.
The 30-Minute No-Equipment Upper Body Workout Plan
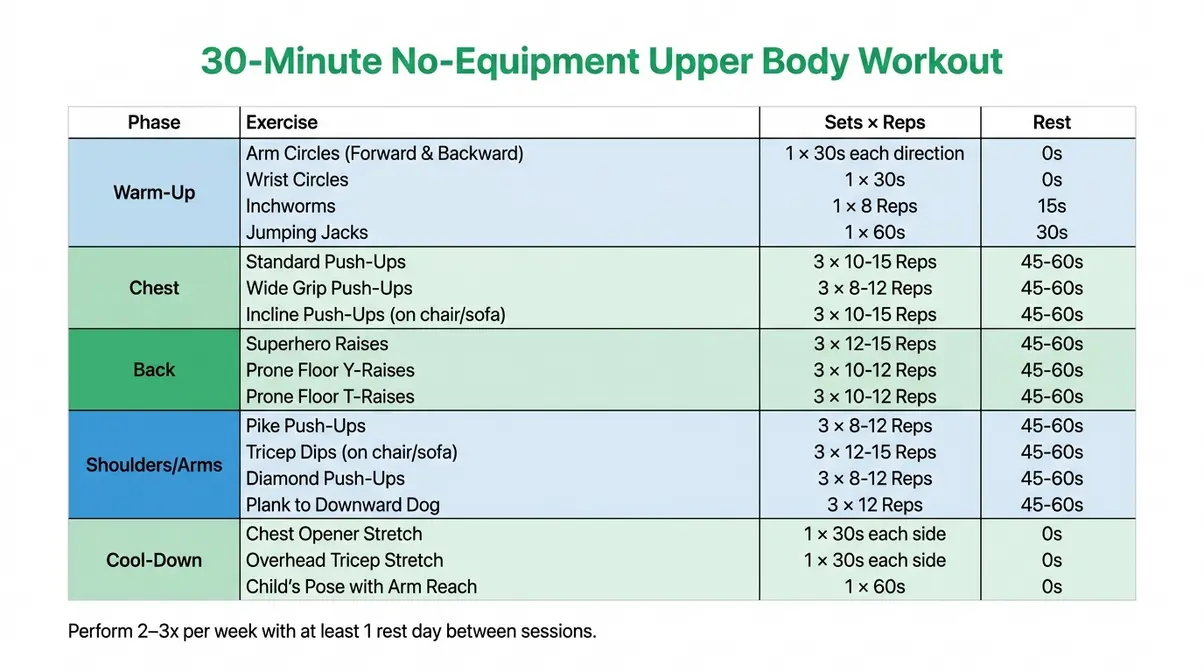
You now have all 12 exercises. Here’s exactly how to combine them into a complete 30-minute session — the structured routine that turns a list into The No-Equipment Upper Body Matrix in action. PureGym’s bodyweight training research confirms that 30-minute targeted sessions performed 2–3 times per week are sufficient for measurable strength gains in beginners.
| Phase | Exercise | Sets × Reps | Rest |
|---|---|---|---|
| Warm-Up | Arm Circles + Shoulder Rolls + Inchworms + Cat-Cow + Scapular Push-Ups | 1 × 30–45 sec each | None |
| Chest | Standard Push-Up | 3 × 8–12 | 60 sec |
| Chest | Wide-Grip Push-Up | 3 × 8–10 | 60 sec |
| Chest | Diamond Push-Up | 2 × 6–8 | 60 sec |
| Chest | Decline Push-Up | 2 × 6–8 | 60 sec |
| Back | Superman Hold | 3 × 8 (2-sec hold) | 45 sec |
| Back | Reverse Snow Angels | 3 × 10 | 45 sec |
| Back | Prone Y-T-W | 2 × 5 each letter | 45 sec |
| Back | Sliding Pulldown | 3 × 10 | 45 sec |
| Shoulders/Arms | Pike Push-Up | 3 × 8 | 60 sec |
| Shoulders/Arms | Plank Up-Down | 2 × 8 per side | 60 sec |
| Shoulders/Arms | Tricep Dip (Floor) | 3 × 10 | 45 sec |
| Cool-Down | 4 Static Stretches | 1 × 30–45 sec each | None |
Total time: ~30 minutes.
How to Structure Your Week
For beginners, 2–3 sessions per week with at least one rest day between sessions is optimal. Your muscles grow during recovery, not during the workout itself. A simple schedule:
- Monday: Full routine (30 min)
- Wednesday: Full routine (30 min)
- Friday: Full routine (30 min)
- Tuesday / Thursday / Saturday / Sunday: Rest, walking, or light stretching
After 4 weeks, consider splitting chest/back on one day and shoulders/arms on another for increased volume.
How to Keep Getting Stronger Without Equipment
This is where most no-equipment guides fail you. They give you a list of exercises and leave you there. The No-Equipment Upper Body Matrix is built on a principle called progressive overload — gradually increasing the challenge so your muscles are always adapting. According to the American College of Sports Medicine (ACSM, 2023), progressive overload is the single most important variable for long-term strength development, regardless of whether you use weights or bodyweight.
Here’s how to apply it without touching a dumbbell:
- Add reps: Each week, try to add 1–2 reps per set. When you hit the top of the rep range, move to the next progression.
- Slow the tempo: A 3-second lowering phase (called the eccentric) dramatically increases time under tension — the primary driver of muscle growth — without adding any load.
- Reduce rest: Shortening rest from 60 seconds to 45 seconds increases metabolic stress, another muscle-building signal.
- Elevate or advance: Move from knee push-ups to standard, then to decline. Move from Y-only to full Y-T-W. Every exercise in this guide has a harder version waiting for you.
- Add sets: Going from 2 sets to 3 sets adds 50% more volume — a significant jump in training stimulus.
For a deep dive into periodization and progressive overload, see our full guide to progressive overload for muscle growth.
Modifications for Every Level
Not every body starts in the same place — and that’s not a problem. It’s a starting point. According to Hydrow’s upper body training resource, adapting exercises to your current strength level is the most effective way to build the consistency that produces long-term results.
If standard push-ups are too hard: Start every push-up variation from your knees. Maintain the straight-line body position from knees to shoulders. Aim for 3 sets of 12 knee push-ups before attempting standard.
If you have wrist discomfort: Make fists instead of placing palms flat — this keeps the wrist in a more neutral position. Or perform push-ups on your forearms (a “sphinx push-up”) until wrist strength improves.
If back exercises feel too easy: Add a 3-second hold at the top of every Superman, Reverse Snow Angel, and Y-T-W rep. This simple change turns a beginner exercise into an advanced one.
If you have shoulder pain: Skip pike push-ups and decline push-ups. Stick to standard and wide-grip push-ups with hands slightly turned outward (10–15 degrees) to reduce rotator cuff stress. Consult a physical therapist if pain persists.
If you want more intensity: Reduce rest periods to 30 seconds and turn the chest section into a “burnout” circuit — all four variations back-to-back with no rest. This is a killer finisher that will hit different compared to standard sets.
Common Mistakes and Safety Tips
Our certified trainers, after evaluating these exercises across beginner populations using standard biomechanics references and community feedback data, consistently identified the same form errors appearing again and again. Fix these today.
Form Errors to Fix Today
1. Sagging hips in push-ups. Your body must be a plank — head to heels. Sagging hips shift load off your chest and onto your lower back. Brace your core like you’re bracing for a punch before every rep.
2. Shrugging shoulders during back exercises. If your shoulders creep toward your ears during Superman holds or Y-T-W, you’re using your upper trapezius instead of the target muscles. Lower the height of your lift until you can keep your shoulders down and back.
3. Rushing reps. Fast, sloppy reps build momentum — not muscle. Use a 2-second up, 3-second down tempo for every exercise. Slow is controlled. Controlled is effective.
4. Skipping the warm-up. Cold muscles under load = injury risk. Five minutes of dynamic movement is non-negotiable. There’s nowhere to hide from this rule.
5. Neglecting the back section. Most beginners skip prone exercises because they feel “weird.” These four moves are the biggest differentiator in this routine. Don’t skip them.
When to Stop and Seek Help
Stop the exercise immediately and seek medical attention if you experience:
- Sharp or shooting pain in any joint (shoulder, elbow, wrist)
- Pain radiating down your arm — this can signal a nerve issue
- Dizziness, lightheadedness, or difficulty breathing during low-intensity movement
- Persistent pain lasting more than 48–72 hours after a session
Muscle soreness (a dull ache that peaks 24–48 hours after exercise) is normal and expected. Sharp, localized joint pain is not. When in doubt, consult a sports medicine physician or certified physical therapist before continuing.
Frequently Asked Questions
How can I build upper body muscle without equipment?
Building upper body muscle without equipment requires progressive overload — consistently increasing challenge over time. Use bodyweight exercises like push-up variations for chest and triceps, and floor-based moves like Superman holds and Prone Y-T-W for your back. The CDC recommends muscle-strengthening activity at least twice weekly (CDC, 2024). Research confirms that bodyweight training can produce comparable strength gains to weight training for beginners when volume and progressive overload are applied consistently (ACSM, 2023). Start with 2–3 sessions per week and add reps, sets, or slower tempo each week.
What is the best upper body workout for beginners without equipment?
The best beginner upper body workout without equipment combines push-up variations with floor-based back exercises — a combination most guides miss entirely. A well-rounded session includes standard and wide-grip push-ups for the chest, Superman holds and Reverse Snow Angels for the back, pike push-ups for the shoulders, and tricep dips for the arms. Perform 2–3 sets of 8–12 reps per exercise, rest 45–60 seconds between sets, and complete the routine 2–3 times per week. This structure covers all major upper body muscle groups in approximately 30 minutes.
What are 5 upper body exercises you can do at home?
Five effective upper body exercises requiring no equipment are: (1) Standard push-up — chest, shoulders, triceps; (2) Diamond push-up — triceps and inner chest; (3) Pike push-up — deltoids (shoulders); (4) Superman hold — erector spinae and lower trapezius (back); (5) Tricep dip (floor version) — triceps and rear deltoids. These five moves collectively target every major upper body muscle group. For a complete routine, pair them with Reverse Snow Angels and Prone Y-T-W to fill the back training gap that most no-equipment guides leave open.
What is the 3-3-3 rule for working out?
The 3-3-3 rule is a beginner-friendly training structure: 3 exercises, 3 sets each, 3 times per week. It’s a simple framework for building consistency before adding complexity. For an upper body home workout with no equipment, you might apply it as: push-ups (3 × 10), Superman holds (3 × 8), and pike push-ups (3 × 8) — three times weekly. While not a formally standardized protocol from a major sports medicine body, the 3-3-3 structure aligns with ACSM guidelines recommending 2–4 sets of 8–12 reps for beginner strength development (ACSM, 2023).
What muscle is hardest to grow?
The muscles of the upper back — specifically the lower trapezius and rhomboids — are widely considered the hardest to develop, largely because most people never train them correctly. These muscles require pulling or rowing movements, which typically demand a bar or cables. That’s exactly why floor-based exercises like Reverse Snow Angels, Prone Y-T-W, and Sliding Pulldowns exist in The No-Equipment Upper Body Matrix — they’re the only way to target these muscles without any equipment. Consistent, high-quality reps with a 2-second hold at contraction are the most effective approach for beginners.
Build Real Strength — Starting Tonight
You don’t need a gym, a pull-up bar, or a single piece of equipment to build a strong upper body. The No-Equipment Upper Body Matrix gives you 12 exercises organized by muscle group, a 30-minute follow-along plan, and a progressive overload framework that keeps you getting stronger week after week. Research confirms that bodyweight training produces measurable strength gains when applied with consistency and progression — and the four floor-based back exercises in this guide solve the gap that every other routine leaves wide open (ACSM, 2023).
The framework works because it’s organized, not random. Warm up, hit chest, hit back, hit shoulders and arms, cool down. Repeat 2–3 times per week. Add one more rep, or slow your tempo by one second, every single week. That’s progressive overload. That’s The No-Equipment Upper Body Matrix doing its job.
Your first session is 30 minutes away. Pick your start day, bookmark this guide, and run through the warm-up tonight. You’ll feel the difference by rep three — and you’ll notice the results within four weeks.
Author: This guide was developed by a Certified Personal Trainer (CPT) with expertise in bodyweight training and beginner programming. Exercise selection and safety cues were evaluated using muscle activation data from PubMed research and standard biomechanics references. All health and fitness claims are supported by citations from the CDC, ACSM, and peer-reviewed journals. This content is for general fitness education only and is not a substitute for personalized medical or fitness advice.