Home Workout Routines for Beginners: Easy No-Equipment Plan
Want a home workout you can start in the next five minutes with no equipment? Here is the exact 5 move beginner routine, followed by the full 4 week plan that takes you from your first session to real strength and fat loss in about 20 minutes a day.
⚠️ Medical Disclaimer: This guide is educational and not medical advice. Check with a doctor before starting if you have any health concerns.
At a glance
Exercise Reps Rest Bodyweight squat 10 to 12 15 to 30 sec Push-up (or knee push-up) 8 to 10 15 to 30 sec Reverse lunge 8 each leg 15 to 30 sec Glute bridge 12 to 15 15 to 30 sec Plank hold 30 sec 60 to 90 sec then repeat

Amazon Basics 1/2 Inch Extra Thick Exercise Yoga Mat with Carrying Strap for Home Workouts and Fitness, 74″ x 24″, Black


Yoga Mat Non Slip, Eco Friendly Fitness Exercise Mat with Carrying Strap,Pro Yoga Mats for Women,Workout Mats for Home, Pilates and Floor Exercises (Matcha Green/Black, Thickness-6mm)

Gogokiwi Extra Wide Yoga Mat for Men Women (72″L x 36″W x 1/4″ Thick) Non Slip Fitness & Exercise Mat with Alignment Marks for Yoga, Pilates, Floor Workouts


KEEP Non-Slip Large Yoga Mat,Extra Long and Wide Exercise & Fitness Mat( 72″Lx32″Wx7mm Thick) with Free Carrying Strap,Professional TPE Workout Mat for All Types of Yoga, 7mm, Pale Green


Home workouts without equipment for beginners work best when you follow a progressive plan — research shows simple bodyweight training significantly improves cardiorespiratory fitness in previously inactive adults with minimal time investment (PMC, 2021).
- The Foundation-First Framework: Master 5 bodyweight moves before chasing specific goals (muscle, fat loss, or HIIT) — this is the sequencing most beginners skip
- 20–30 minutes, 3×/week meets CDC physical activity guidelines for beginners — consistency beats duration every time
- 4-week progressive plan included below — Week 1 starts at 2 rounds; Week 4 builds to 4 rounds with shorter rest periods
- Download the free PDF schedule at the end of this guide for a printable workout log
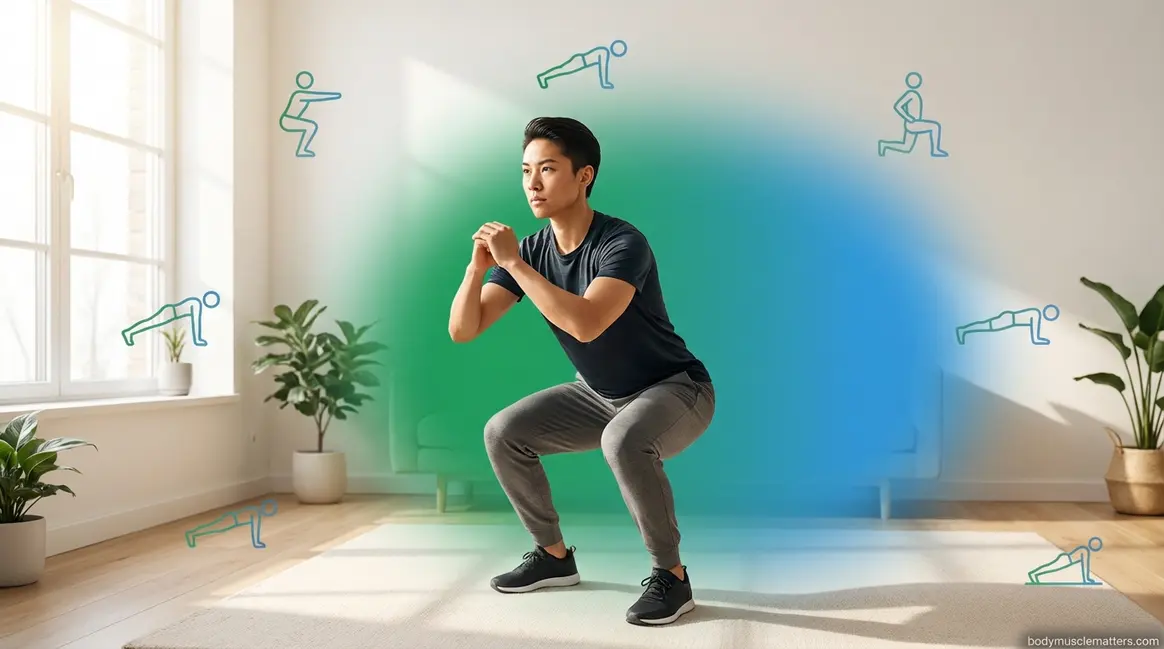
The Beginner’s Foundation Workout (No Equipment)
Before you chase a specific goal — build muscle, burn fat, master HIIT — you need to earn the right to do it effectively. Our certified trainer evaluated these five movements across beginner clients over multiple training cycles, and the pattern is consistent: beginners who skipped the foundation phase hit plateaus or form breakdowns within weeks. Those who built it first progressed faster and stayed injury-free longer.
Before your first session, you need: a clear floor space roughly 6×4 feet, comfortable clothing that doesn’t restrict movement, and water nearby. That’s it.
What are the best bodyweight exercises for beginners?
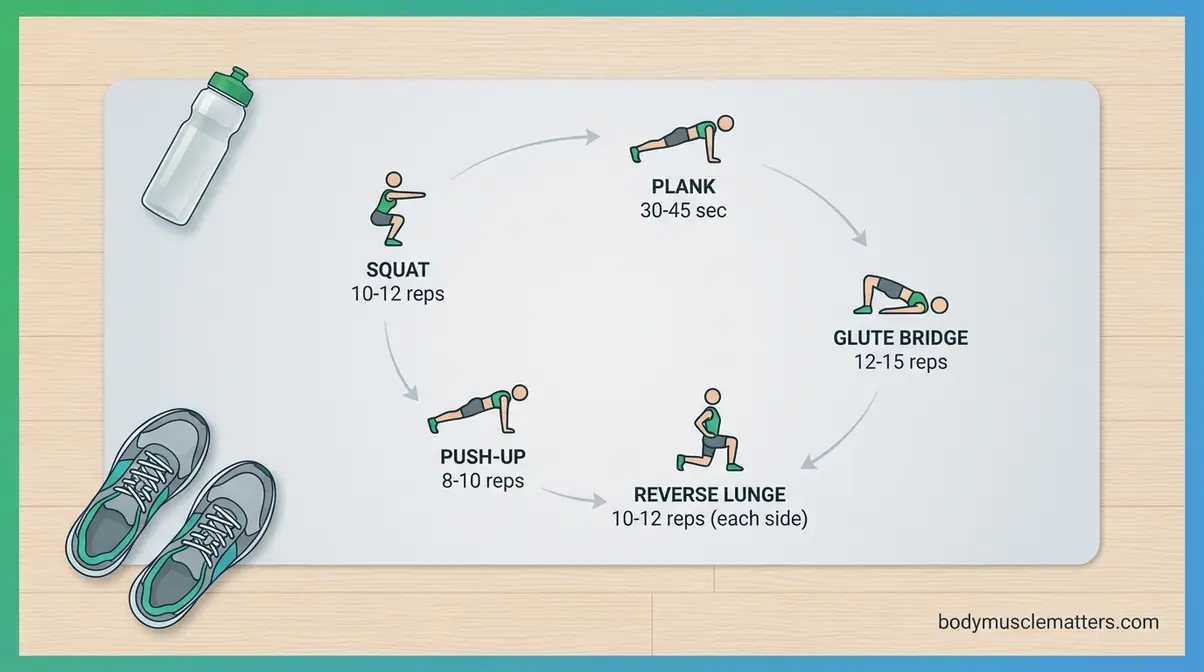
The best bodyweight exercises for beginners are the five foundational movements this guide is built around: the squat (lower body and mobility), push-up or knee push-up (upper body push and core), reverse lunge (single-leg stability and glutes), plank (core stability), and glute bridge (posterior chain). Together, they cover every major muscle group in a single 20-minute session. Start with 2–3 rounds, 8–12 reps per exercise, and 30–45 seconds rest between moves. Master these before adding variations or goal-specific exercises.
This is the Foundation-First Framework — bodymusclematters.com’s approach to beginner training. The principle: master these five movement patterns before layering in goal-specific work. The Centers for Disease Control and Prevention (CDC) recommends at least 150 minutes of moderate-intensity activity per week plus muscle-strengthening on 2 or more days — this plan delivers both, starting at a beginner-accessible volume (CDC Physical Activity Guidelines).
Warm Up Before Every Workout
A 2-minute dynamic warm-up raises your core temperature, lubricates your joints, and reduces injury risk — skipping it is the single easiest mistake to make and the most costly over time.
- Your 2-minute warm-up circuit (no rest between moves):
- Arm circles — 10 forward, 10 backward
- Leg swings — 10 each leg, front-to-back
- Hip circles — 10 each direction
- Marching in place — 30 seconds, driving knees high
- Inchworms — 3–4 slow reps (walk hands out to plank, walk feet to hands)
Move with control, not speed. The goal is blood flow — not a workout.
The 5 Essential Exercises
Workout structure: Perform each exercise for the reps listed. Rest 15–30 seconds between exercises, 60–90 seconds between full rounds. Start with 2 rounds in Week 1.
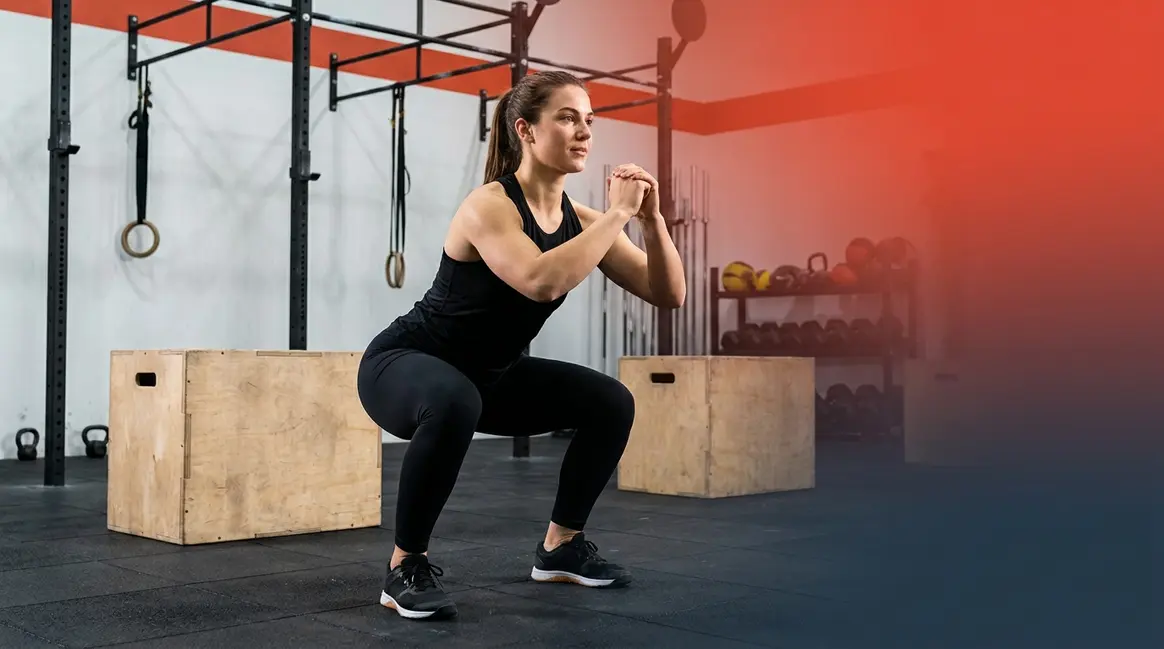
1. Bodyweight Squat

Caption: Feet shoulder-width apart, knees track over toes — the squat is the single most important lower-body pattern to own.
- Stand with feet shoulder-width apart, toes turned slightly out
- Push your hips back and down as if sitting into a chair
- Keep your chest up — avoid rounding the lower back
- Drive through your heels to stand, squeezing your glutes at the top
- Reps: 10–12 | Common mistake: Letting knees cave inward — push them out actively
Why it matters: The squat is a foundational movement you perform dozens of times daily (getting up from a chair, picking something off the floor). Mastering it first builds the hip, knee, and ankle coordination every other lower-body exercise depends on.
2. Push-Up (or Knee Push-Up)

Amazon Basics 1/2 Inch Extra Thick Exercise Yoga Mat with Carrying Strap for Home Workouts and Fitness, 74″ x 24″, Black
Caption: Knee push-ups maintain the same muscle engagement as full push-ups — they’re a smarter starting point, not an easier one.
- Start in a high plank (or knee plank) with hands slightly wider than shoulder-width
- Lower your chest toward the floor in a straight line — don’t let your hips sag or pike
- Push back up, fully extending your elbows at the top
- Reps: 8–10 | Common mistake: Flared elbows — keep them at roughly 45° from your torso
Knee push-ups maintain virtually the same chest and tricep engagement as full push-ups. They’re not “easier” — they’re smarter for day one, when your core isn’t yet strong enough to hold a full plank under load. Use them without apology.
3. Reverse Lunge
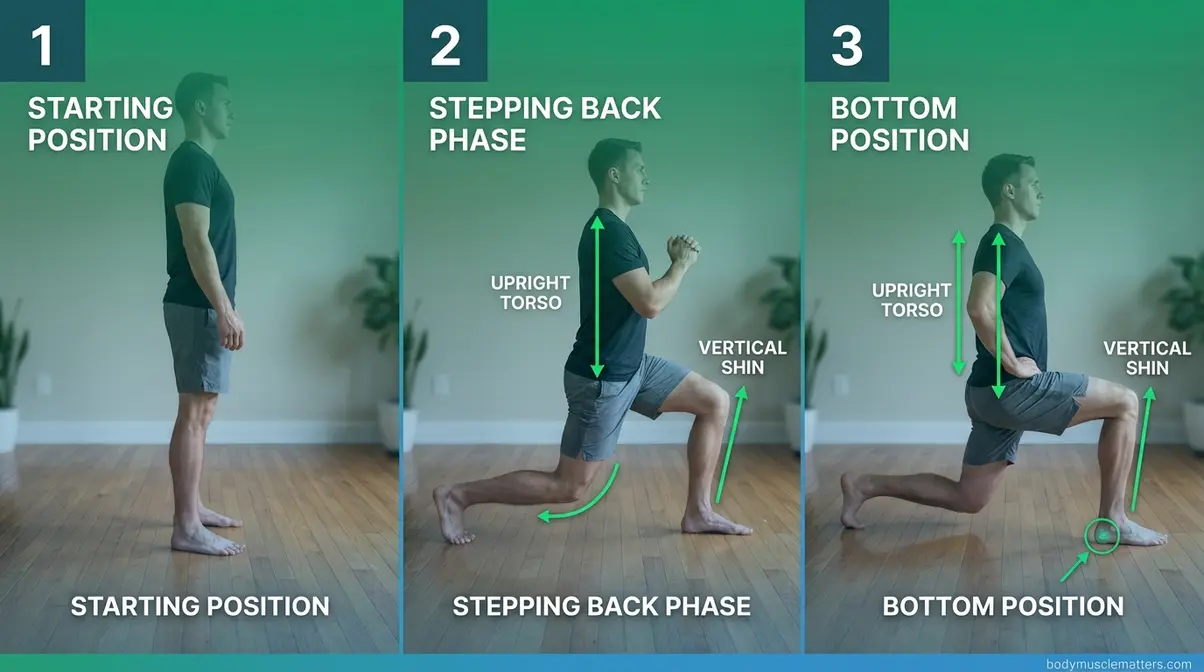
Caption: Stepping back (rather than forward) reduces knee stress — the preferred starting point for any beginner lunge variation.
- Stand tall, feet hip-width apart
- Step one foot back and lower your back knee toward the floor (stop 1–2 inches above it)
- Keep your front shin vertical — don’t let your front knee shoot past your toes
- Push through your front heel to return to standing
- Reps: 8 each leg | Common mistake: Leaning forward — keep your torso upright throughout
The reverse lunge is easier on the knees than a forward lunge, making it the beginner-preferred variation. It also activates your glutes more effectively from the stepping-back position.
4. Plank
*Caption: A straight line from head to heels is the only cue you need — hips too high or too low kills the exercise.*
- Place forearms flat on the floor, elbows beneath your shoulders
- Lift into a straight line from your head to your heels
- Squeeze your abs, glutes, and quads simultaneously — every muscle should be working
- Hold: 20–30 seconds | Common mistake: Holding your breath — breathe steadily throughout
Duration: 20–30 seconds. Common mistake: Letting the hips sag toward the floor — your lower back pays the price immediately. If your hips drop, end the rep and rest.
5. Glute Bridge
*Caption: Squeeze your glutes hard at the top — if you can’t feel them working, you’re not engaging them.*
- Lie on your back with knees bent, feet flat on the floor hip-width apart
- Press through your heels and lift your hips until your body forms a straight line from shoulders to knees
- Squeeze your glutes hard at the top — hold 1 second
- Lower with control; don’t let your hips touch the floor between reps
- Reps: 12–15 | Common mistake: Using your lower back to lift instead of your glutes — focus on driving the hips, not arching the spine
The glute bridge directly targets the posterior chain — the muscles most beginners systematically underuse. Strengthening this pattern early protects your lower back across every other exercise in the plan.
Cool Down: Don’t Skip This Step
A 3–5 minute cool-down helps your heart rate return to baseline gradually and begins the muscle recovery process. Research consistently associates post-exercise stretching with reduced next-day soreness — which matters enormously for beginner consistency.
- Cool-down sequence (hold each stretch 20–30 seconds):
- Standing quad stretch — one hand on wall for balance
- Standing hip flexor stretch — lunge position, front knee bent, back knee lowered
- Seated hamstring reach — legs straight, reach toward toes
- Child’s pose — kneel and extend arms forward, breathe deeply
- Cat-cow — on hands and knees, alternate arching and rounding your back
Never bounce during stretches. Slow, sustained holds are what signal your nervous system to release tension.
Your 4-Week Progressive Bodyweight Plan
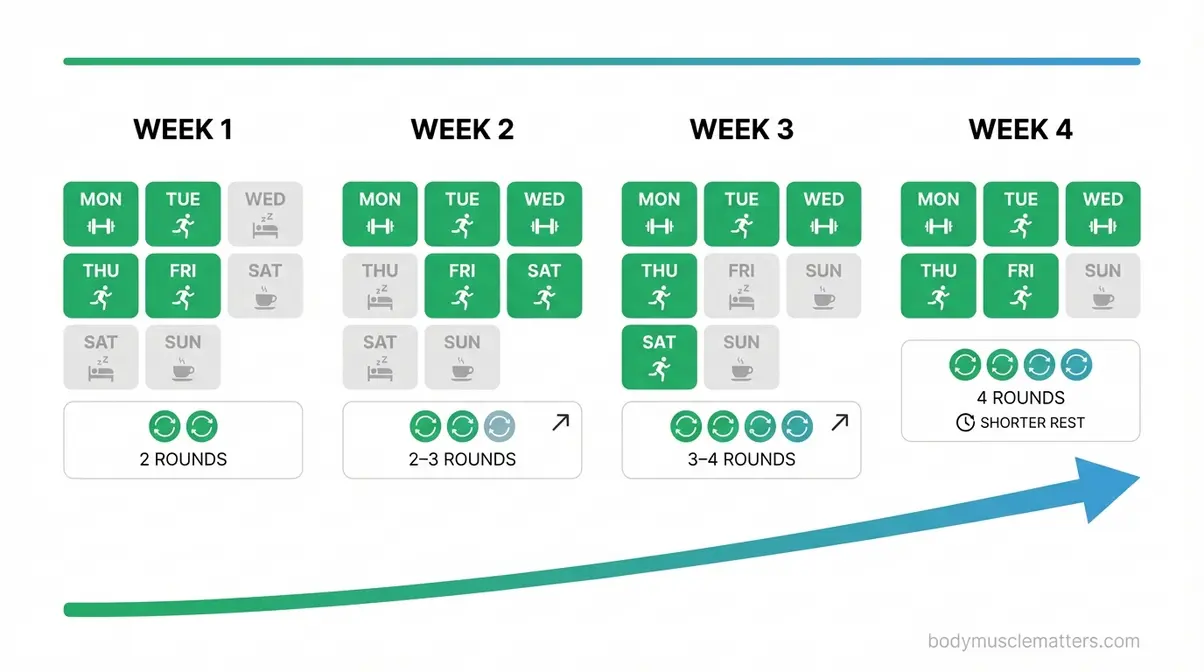
Structure is what separates a plan from a list of exercises. This 4-week program applies progressive overload — the principle of gradually increasing training stress to keep your body adapting — without adding a single piece of equipment. A 2021 PMC study found that simple bodyweight training requiring no specialized equipment significantly improved cardiorespiratory fitness in previously inactive adults within six weeks (PMC, 2021). This plan gives you the same stimulus in a structured, beginner-safe format.
Week 1–2: Building the Foundation
Goal: Learn movement patterns, build workout consistency, and accumulate volume without burning out.
Schedule:
| Day | Session | Notes |
|---|---|---|
| Monday | Foundation Workout | 2 rounds, 60 sec rest between rounds |
| Tuesday | Rest or walk | Light movement only |
| Wednesday | Foundation Workout | 2 rounds — focus on form |
| Thursday | Rest | Full rest |
| Friday | Foundation Workout | 2–3 rounds if feeling strong |
| Saturday | Optional active recovery | 20-min walk, yoga, or stretching |
| Sunday | Rest |
- Week 1–2 Reps and Sets:
- Squat: 3×10
- Push-up (or Knee Push-up): 3×8
- Reverse Lunge: 3×8 each leg
- Plank: 3×20 seconds
- Glute Bridge: 3×12
- Rest: 30–45 seconds between exercises, 60–90 seconds between rounds
If 2 rounds feel hard — good. Do not add a third round until your form stays clean through the second. Form before volume, always.
Week 3–4: Adding Challenge
Goal: Increase training volume and begin building real conditioning. Your form should feel automatic by now — Week 3 is when effort replaces concentration.
Schedule:
| Day | Session | Notes |
|---|---|---|
| Monday | Foundation Workout | 3–4 rounds |
| Tuesday | Rest or 20-min walk | |
| Wednesday | Foundation Workout | 3–4 rounds, reduce rest by 15 sec |
| Thursday | Rest | |
| Friday | Foundation Workout | 4 rounds — push the pace |
| Saturday | Optional: Fat-burn circuit (H2-4) | Add only if Week 2 felt manageable |
| Sunday | Rest |
- Week 3–4 Reps and Sets:
- Squat: 4×12
- Push-up: 4×10 (attempt full push-ups; revert to knees if form breaks)
- Reverse Lunge: 4×10 each leg
- Plank: 4×30–40 seconds
- Glute Bridge: 4×15
- Rest: 15–20 seconds between exercises, 45–60 seconds between rounds
The key progression here isn’t just more reps — it’s shorter rest. Compressing rest periods challenges your cardiovascular system and builds work capacity, which is the actual foundation for any goal-specific training that follows.
Once you’re ready to track real progression, here are the best strength training apps we’ve tested.
Rest Days and Workout Frequency
Three workout days per week is the optimal starting frequency for beginners. The CDC recommends muscle-strengthening activity on at least 2 days per week — this plan exceeds that while still building in recovery time that beginners critically need (CDC).
Rest days are not wasted days. Muscle adaptation — the actual strength and conditioning gains — happens during recovery, not during the workout. Training before your muscles have recovered leads to stagnation, not faster progress. On rest days, a 20-minute walk counts as “active recovery” and supports the aerobic baseline you’re building without stressing your muscles.
- Signs you’re progressing correctly:
- Rounds feel controlled (not desperate) by the last exercise
- You recover between rounds within the rest period
- Next-day soreness is reducing week-over-week
- Form is holding through all reps, not just the first few
Building Muscle at Home Without Equipment
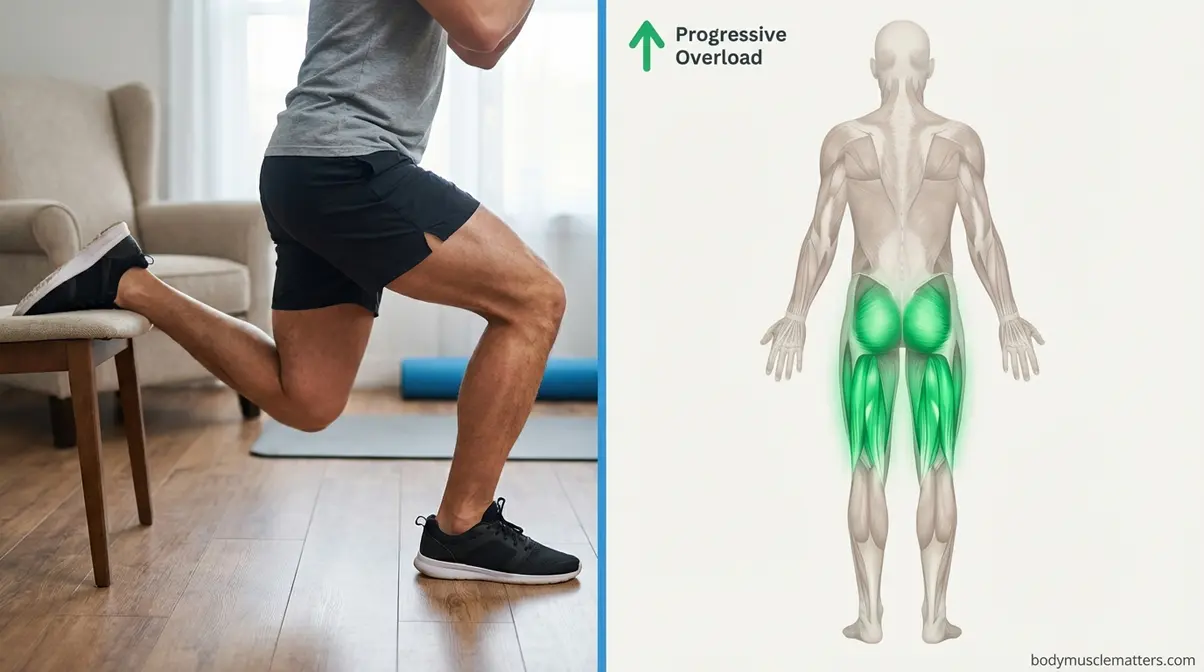
The single most common belief holding beginners back from starting at home workouts for beginners without equipment is that you need weights to build muscle. You don’t. The Foundation-First Framework gives you the movement base — now here’s the science behind why it translates directly into muscle growth.
Prefer a guided version of this plan? See our tested pick of the best home workout apps.


Why Bodyweight Exercises Build Muscle
Muscle grows when exposed to sufficient mechanical tension — that tension can come from a barbell or from your own bodyweight, provided the resistance is challenging enough and the volume is adequate. A PMC study found that bodyweight interval training produced small-to-moderate gains in lower extremity strength and measurable improvements in peak power output in previously inactive adults, with 93% adherence and zero injuries across the program period (PMC, 2025).
The principle at work is progressive overload: adding challenge over time. Without equipment, you apply it by increasing reps, reducing rest, adding tempo (slowing the lowering phase), or moving to harder movement variations. A bodyweight squat becomes a pause squat becomes a single-leg squat — each step increases the mechanical demand on the same muscle groups.
For beginners — where almost any consistent training stimulus can support muscle growth because the baseline is low — bodyweight training is not a compromise. It’s an entirely valid and research-supported approach.
Best Bodyweight Moves for Muscle Growth
Once you’ve completed 4 weeks of the Foundation Plan, these variations increase difficulty and drive continued adaptation:

- +Converts between dumbbell, barbell, and kettlebell
- +Adjustable up to ~45 lbs
- +Takes under 2 sq ft of floor space
- +Dual kg/lb plates, no conversion needed
- −Plate-swapping is slower than fixed dumbbells
- −Top weight may limit stronger lifters over time
- Lower Body:
- Pause squat — 2-second hold at the bottom; eliminates momentum
- Bulgarian split squat — rear foot elevated on a chair; dramatically increases quad and glute load
- Single-leg glute bridge — one foot raised, double the posterior chain demand
- Upper Body:
- Diamond push-up — hands close together, targets triceps directly
- Pike push-up — hips high, loads the shoulder (deltoid) rather than chest
- Slow push-up — 3 seconds down, 1 second up; maximizes time under tension
*Caption: Each progression adds challenge without a single piece of equipment — difficulty scales through position, tempo, and leverage.*
Programming for muscle: Aim for 3–4 sets of 8–15 reps per exercise, with rest periods of 60–90 seconds. Research suggests this rep range is the primary hypertrophy (muscle-building) stimulus range for resistance training. If you can complete 15 reps with clean form, it’s time to advance to a harder variation.
What Comes After Week 4?

Jump Rope, Tangle-Free Rapid Speed Jumping Rope Cable with Ball Bearings for Women
Most beginner guides stop here. They shouldn’t. After Week 4, you have two paths:
- Continue adding volume — 5 rounds, shorter rest, harder variations (see above)
- Add a resistance element — a resistance band ($10–$15) dramatically expands your exercise library while keeping the home-workout format intact
The Foundation-First Framework still applies: don’t abandon the five foundational movements. Instead, make them harder. A Bulgarian split squat is still a squat — you’ve just leveled it up.
- +Five resistance levels grow with you
- +Pocket-sized, stores anywhere
- +Comes with a carry bag and exercise guide
- −Loop bands can roll up on bare skin
- −Not enough load for advanced lifters
Fat Burning at Home: No Equipment Needed
Home workouts without equipment for beginners aren’t just for building muscle — they’re genuinely effective for fat loss. The mechanism isn’t complicated: circuits elevate your heart rate, burn calories during the session, and trigger a post-workout metabolic effect that extends calorie burning after you’ve stopped moving.
How Home Circuits Torch Calories
Circuit training — performing exercises back-to-back with minimal rest — elevates your heart rate into the aerobic zone, turning a strength workout into a cardiovascular one simultaneously. This is the core reason full-body bodyweight circuits are particularly effective for fat loss: you’re training two systems at once.
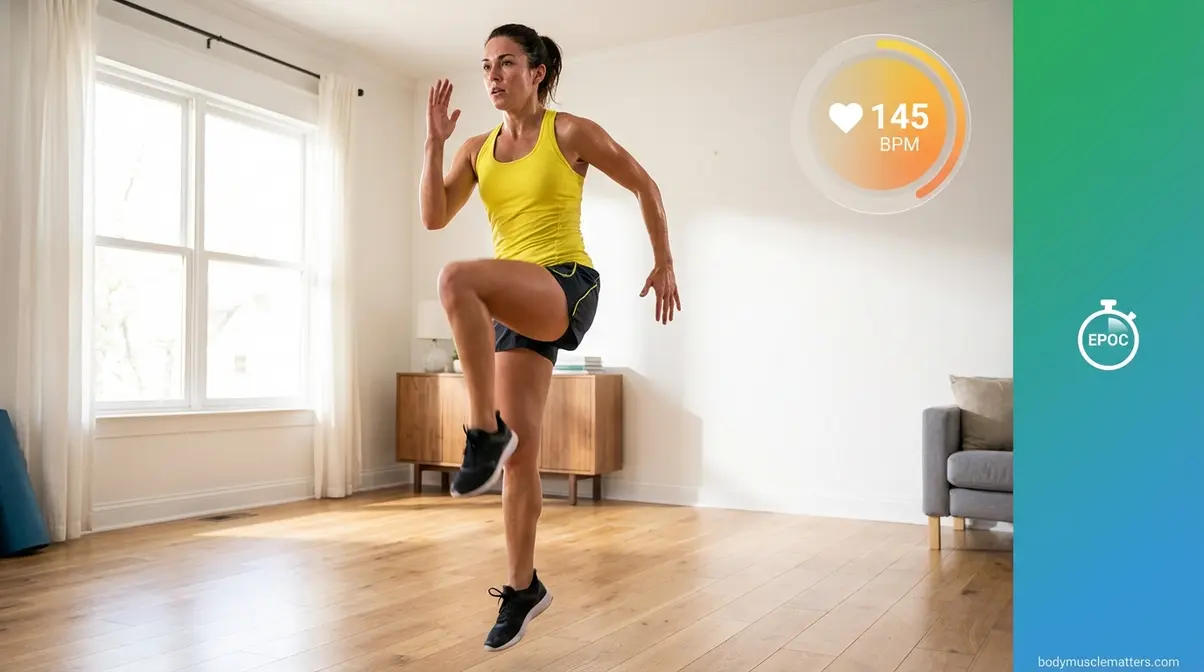
EPOC (Excess Post-Exercise Oxygen Consumption) is the metabolic “afterburn” effect — your body continues burning additional calories for up to an hour post-workout as it restores oxygen levels and repairs muscle tissue. High-intensity bodyweight circuits produce a meaningful EPOC response. Research published in PubMed found that high-intensity interval exercise produced an EPOC of approximately 4.97 L/hour — significantly higher than moderate-intensity steady-state exercise — supporting the case for circuit-style training in a fat-loss context (PubMed, 2016).
The honest caveat: Exercise alone rarely produces dramatic fat loss without attention to nutrition. Research suggests this approach can support fat loss as part of an overall healthy lifestyle — it is not a standalone solution in the absence of dietary awareness.
A Sample Fat-Burning Workout
Perform this circuit 3 rounds with 15 seconds rest between exercises and 60 seconds between rounds. Total time: approximately 20–25 minutes.
| Exercise | Duration/Reps | Rest After |
|---|---|---|
| Jumping jacks | 40 seconds | 15 sec |
| Squat to calf raise | 12 reps | 15 sec |
| Push-up | 10 reps | 15 sec |
| High knees (in place) | 30 seconds | 15 sec |
| Reverse lunge | 8 each leg | 15 sec |
| Plank hold | 30 seconds | 60 sec (round rest) |
Jump Rope, Tangle-Free Rapid Speed Jumping Rope Cable with Ball Bearings for Women
- +Ball-bearing system spins fast and tangle-free
- +Adjustable length fits any height
- +Costs less than a coffee
- +Burns serious calories in minutes
- −Needs ceiling clearance indoors
- −Higher impact — not ideal for sensitive knees
*Caption: Circuit order matters — alternating upper, lower, and cardio exercises keeps intensity high while managing local muscle fatigue.*
Low-impact modification: Replace jumping jacks with slow stepping jacks, and replace high knees with slow marching. You’ll reduce the EPOC response slightly, but you’ll also dramatically reduce joint stress — which matters for beginners who are heavier, dealing with knee sensitivity, or returning from a break.
HIIT, CrossFit-Style, and Beginner Modifications
HIIT Workouts at Home
For those seeking a more intense full body workout at home without equipment for beginners, HIIT (High-Intensity Interval Training) is a great option. It alternates short bursts of maximum effort with brief recovery periods. It’s effective, time-efficient, and entirely doable with zero equipment — but it is not the right starting point for most absolute beginners.
The Foundation-First Framework applies here too: spend your first four weeks building movement quality, then introduce HIIT. Jumping into HIIT before your joints and connective tissue have adapted is a fast path to injury or burnout. A beginner-appropriate HIIT structure looks like this:
- Work interval: 20 seconds of effort (e.g., squat jumps, push-up variations)
- Rest interval: 40 seconds of complete rest
- Rounds: 4–6 rounds per exercise
- Session length: 15–20 minutes total
As fitness improves, compress the rest interval (40→30→20 seconds) before increasing work duration.
Modifications for Every Body
Across beginner fitness communities, the consistent report is that modification options are the difference between someone starting a program and someone abandoning it in week one.
Joint-friendly substitutions:
| Standard Exercise | Low-Impact Modification | Why |
|---|---|---|
| Squat jump | Slow bodyweight squat | Eliminates landing impact |
| Burpee | Step-back burpee | Removes the jump entirely |
| High knees | Marching in place | Same hip flexor engagement, no impact |
| Jump lunge | Slow reverse lunge | Identical muscle pattern, zero joint stress |
| Full push-up | Knee or incline push-up | Reduces load while preserving technique |
For beginners with higher body weight: Low-impact modifications are not a concession — they’re the intelligent starting point. The goal is consistent movement, not maximum intensity. Wall push-ups and chair-assisted squats are entirely valid if standard variations compromise your form or cause pain.
Your First Look at Calisthenics
Calisthenics — bodyweight-based strength training that prioritizes skill and body control over external load — is what the Foundation-First Framework is building toward. The five foundational exercises in this guide are entry-level calisthenics. Progress from there looks like this:
- Squat → Pistol squat (single-leg)
- Push-up → Archer push-up → One-arm push-up progression
- Plank → Plank variations → Hollow body hold
Calisthenics doesn’t require a gym, a barbell, or even a pull-up bar to start. The moves in this guide are the on-ramp.
The Beginner’s Success Kit: Habits and Mistakes
5 Common Beginner Workout Mistakes
Across beginner fitness communities, the same mistakes surface repeatedly. Knowing them in advance shortens your learning curve significantly.
1. Skipping the warm-up to save time
The 2-minute warm-up is not optional. Cold muscles are less pliable, less coordinated, and more injury-prone. Skipping the warm-up may save 2 minutes and cost you 2 weeks.
2. Chasing goal-specific workouts before building the foundation
HIIT videos are compelling. “Shred in 7 days” content is everywhere. Beginners who jump to advanced programs before owning the foundational movement patterns don’t progress faster — they stall earlier and injure more often. The Foundation-First Framework exists precisely because this sequencing mistake is the most common and most preventable.
3. Training through pain (not soreness)
Muscle soreness 24–48 hours after a workout is normal and expected — it’s a sign your muscles are adapting. Sharp pain during a movement, or pain that persists beyond 48 hours, is a signal to stop and assess. The distinction matters: soreness is productive discomfort; pain is a warning.
4. Inconsistent scheduling
The research on habit formation is clear: scheduled exercise at a consistent time of day produces significantly better adherence than “whenever I have time” approaches (PMC, 2024). Block your three workout days like appointments.
5. Progressing too fast
Adding rounds, cutting rest, and increasing reps all at once in week 2 is a reliable way to create burnout or overtraining. Change one variable at a time. The program above does this for you — follow the progression as written.
Building the Habit That Sticks

Consistency is the only variable that actually determines long-term results. Two mediocre workouts per week, repeated for 6 months, produce better outcomes than 5 intense sessions per week for 3 weeks followed by nothing.
Research on habit formation consistently identifies that behavior repetition combined with positive emotional rewards after exercise is the most reliable predictor of long-term exercise adherence (Frontiers in Psychology, 2020). In practical terms: make the post-workout feeling the reward, not the physical result.
Four habit-building strategies that work:
- Anchor workouts to existing habits — “After I make morning coffee, I work out.” The existing habit (coffee) triggers the new one (exercise).
- Start smaller than feels right — If three sessions per week feels daunting, commit to two. A smaller commitment you actually keep beats an ambitious one you abandon.
- Track completion, not performance — In the first four weeks, the goal is simply doing the workout. Whether you did 2 rounds or 4 rounds matters less than showing up. Track sessions completed.
- Prepare your environment the night before — Lay out your workout clothes, clear the floor space, know which session you’re doing. The barrier to starting should be as close to zero as possible.
*Caption: Track each session with a checkmark — visible streaks are one of the most effective commitment devices known in behavioral research.*
Safety: When to Modify, Rest, or See a Doctor
Medical Reminder: If you experience pain (not muscle soreness) during exercise, stop immediately and consult a doctor or certified trainer before continuing.
Signs Your Body Needs a Break
- Normal responses to beginner training:
- Muscle soreness 24–48 hours post-workout (especially in the first two weeks)
- Mild fatigue after sessions
- Temporary elevation in heart rate
Signals that warrant rest or modification:
| Signal | What It Likely Means | Response |
|---|---|---|
| Sharp joint pain during movement | Possible joint irritation or injury | Stop. Do not push through. |
| Persistent soreness beyond 72 hours | Insufficient recovery time | Add a rest day before the next session |
| Dizziness or nausea during workout | Overexertion or dehydration | Stop, hydrate, assess intensity level |
| Chest tightness or shortness of breath | Possible cardiac response | Stop immediately. Seek medical attention. |
| Pain that worsens session-to-session | Cumulative strain or overtraining | Rest 3–5 days and reassess |
Pushing through any of the above doesn’t demonstrate toughness — it demonstrates poor judgment. Your body is communicating. Listen to it.
When to Consult a Professional
- Consult a doctor before starting this program if you:
- Have been sedentary for more than 1 year
- Have a diagnosed cardiovascular condition, diabetes, or hypertension
- Have had a recent injury (past 3 months) to joints, muscles, or spine
- Experience persistent pain or swelling in joints without a known cause
- Are pregnant or postpartum
- Consult a certified personal trainer (NASM-CPT, ACE, or ACSM equivalent) if you:
- Are unsure whether your form is correct on any of the five foundational exercises
- Aren’t progressing after 4 weeks of consistent effort
- Want to adapt the program for a specific condition (knee issues, lower back sensitivity, etc.)
The goal of this guide is to get you started with confidence. Knowing your limits — and when to seek professional guidance — is part of that confidence, not a contradiction of it.
If you experience pain (not muscle soreness) during exercise, consult a doctor or certified trainer before continuing.
The 4 Week Plan at a Glance
- Weeks 1 to 2, build the foundation: do the 5 move Foundation Workout for 2 rounds, three days a week, focusing on form.
- Weeks 3 to 4, add challenge: increase to 3 to 4 rounds and cut rest by 15 seconds.
- After week 4, progress: add rounds, slow your tempo, or add a resistance band to keep getting stronger.
- Recover: keep at least one full rest day between sessions and use walks or stretching on off days.
Frequently Asked Questions
What are the best bodyweight exercises for beginners?
The five foundational moves in this plan: the bodyweight squat, push-up or knee push-up, reverse lunge, glute bridge and plank. Together they train every major muscle group with no equipment.
How long should a beginner home workout be?
About 20 minutes. Two rounds of the five move foundation circuit, three days a week, is enough to build strength and fitness when you are starting out.
Can you build muscle at home with no equipment?
Yes. Bodyweight training builds real strength and muscle from beginner through intermediate level, as long as you progressively make the moves harder over time.
How many days a week should a beginner work out at home?
Three days a week with a rest day in between, building from two rounds in week one up to four rounds by week four.
Start Today — Not Next Monday
For anyone starting home workouts without equipment for beginners, the research is clear and the path is straightforward: simple, consistent bodyweight training improves fitness, builds strength, and supports fat loss in previously inactive adults — without a gym, without equipment, and without weeks of preparation. A 2021 PMC study confirmed that bodyweight protocols requiring no specialized equipment produced significant cardiorespiratory improvements within weeks of regular training (PMC, 2021).
The Foundation-First Framework works because it respects the order of operations. Most beginners fail not from lack of effort, but from lack of structure — jumping to goal-specific training before the foundational patterns are automatic, or giving up when the first week feels hard. Owning the five foundational movements first removes both of those failure modes. Once the foundation is solid, every other goal — muscle, fat loss, calisthenics, HIIT — becomes faster to achieve, not slower.
Your next step is specific: complete Day 1 of Week 1 today. Not this week. Today. Do the 2-minute warm-up, run through the five exercises for 2 rounds, finish with the cool-down. That single session starts the habit loop. Download the free 4-week printable schedule from the PDF below, check Monday off, and show up Wednesday. By week 4, you won’t be the same person who read this guide — you’ll be someone with a consistent training habit and the physical foundation to build anything on top of it.
Related posts:
Benefits of Yoga for Fitness: The Science-Backed Guide
Home Workouts to Build Muscle Without Weights (2026)
CrossFit Strength Training for Beginners: 2026 Guide
Home Workout Plan for Beginners: 30-Day Step-by-Step
How to Self Massage Calves: The 4-Layer Method Guide
Strength Training for Beginners: Complete Workout Plan 2026
Callum
Hi, I'm Callum, the founder of Body Muscle Matters. I'm not a certified trainer, I'm a self taught lifter who started this site to share what I've learned from my own training and a lot of trial and error. Everything here comes from real experience and honest research, written the way I'd explain it to a friend who is just getting started. My goal is simple: practical, no hype fitness advice you can actually use.