
You already know push-ups, air squats, and planks work. The problem is nobody has ever told you how to string them into a system that keeps producing results week after week. Harvard Health confirms that a complete full body home workout no equipment routine — one that targets every major muscle group — can be accomplished in just 20–30 minutes, with zero equipment required. That’s the starting point, not the ceiling.
Most “no-equipment workout” guides hand you a list of exercises and disappear. Two weeks later, you’ve plateaued, you’re bored, and you’re back to wondering whether bodyweight training actually builds real strength. The honest answer is yes — but only when you have a system, not just a circuit.
By the end of this guide, you’ll have a complete full body home workout with no equipment, plus the exact framework to keep making progress for months without ever buying a single piece of gear. We’ll cover a dynamic warm-up, a proven core circuit, beginner modifications, the 3-Tier Overload System for long-term progression, time-based routines, goal-specific options, and a free PDF tracker.
⚠️ Medical Disclaimer: The exercises and routines in this guide are for general informational purposes only. Consult your physician or a qualified healthcare professional before beginning any new exercise program, especially if you have a pre-existing medical condition, injury, or health concern. Stop any exercise that causes pain and seek professional advice immediately.
A full body home workout with no equipment can build real strength and burn fat in 20–30 minutes — research from Harvard Health confirms this is enough time to target every major muscle group effectively.
- The 3-Tier Overload System makes bodyweight training scalable — beginners, intermediates, and advanced exercisers all have a clear next step, so you never plateau
- Core exercises: Bodyweight squats, push-ups, lunges, planks, and burpees form the foundation of any effective no-equipment circuit
- Frequency: 2–3 sessions per week on non-consecutive days is optimal for beginners (NerdFitness)
- Progressive overload without weights is achievable through tempo changes, added volume, and harder exercise variations
- Download the free PDF tracker at the end of this guide to log your sessions and track progress week by week
Before You Begin: Warm-Up and Safety

Skipping your warm-up is the fastest way to turn a productive session into an injury. A proper 5-minute dynamic warm-up (movement-based preparation, as opposed to static stretching) raises your core temperature, increases blood flow to working muscles, and primes your joints for the demands ahead. Preparation dictates performance — a five-minute dynamic warm-up reduces injury risk while priming the nervous system for strength gains.
Research published in the Journal of Human Kinetics (2012) found that dynamic warm-ups improve muscular performance and reduce soft-tissue injury risk compared to static or no warm-up protocols. This finding is consistently echoed by the CDC guidelines for muscle-strengthening activities and ACSM recommendations for recreational exercisers.
5-Minute Dynamic Warm-Up
Perform each movement for 30–45 seconds continuously. Rest 10 seconds between movements. The whole sequence takes under 5 minutes.
1. Leg Swings (forward and lateral) — 30 seconds each side
Stand next to a wall for balance. Swing one leg forward and back in a controlled arc, gradually increasing range. Why it matters: This mobilizes the hip flexors and hamstrings — the exact muscles that stiffen from sitting and the first ones recruited in squats and lunges.
2. Arm Circles — 30 seconds
Extend arms to the sides and make large, slow circles, then reverse direction. Why it matters: Lubricates the shoulder joint (glenohumeral joint) with synovial fluid, reducing the grinding friction that causes shoulder discomfort in push-up sets.
3. Hip Circles — 30 seconds
Stand with feet shoulder-width apart, hands on hips, and draw large circles with your hips. Why it matters: Opens the hip capsule and activates the glute medius — critical for knee tracking during squats.
4. Inchworms — 4–6 reps
Stand tall, hinge forward, walk hands out to a plank position, then walk feet toward hands and stand. Why it matters: This single movement warms up your hamstrings, core, shoulders, and thoracic spine simultaneously — the most efficient warm-up exercise in the sequence.
5. Jumping Jacks or Marching in Place — 45 seconds
If noise is a concern, march in place with high knees. Why it matters: Elevates your heart rate and body temperature, signaling your cardiovascular system that work is coming.

Safety Tips and Medical Disclaimer
Before your first session, review these non-negotiable guidelines. Our team evaluated these safety protocols against established CSCS (Certified Strength and Conditioning Specialist) programming principles to ensure they apply specifically to beginners training without supervision.
- Pain vs. discomfort: Muscle burn and mild fatigue are normal. Sharp, shooting, or joint pain is not. Stop immediately if you feel joint pain.
- Breathe through every rep: Exhale on exertion (the hard part), inhale on the return. Holding your breath spikes blood pressure unnecessarily.
- Bare feet or flat shoes only: Cushioned running shoes alter your heel-to-toe angle during squats and lunges. A flat-soled shoe or socked feet keeps your mechanics honest.
- Clear your space: You need roughly 6 feet × 4 feet of floor space — enough to lie down and extend your arms overhead. Remove anything you could trip on.
- Hydrate: Drink 16–20 oz of water in the hour before training. Performance declines measurably with as little as 2% body-weight dehydration (ACSM, 2007).
⚠️ Reminder: If you have a pre-existing condition — heart disease, high blood pressure, joint injury, or pregnancy — consult your doctor before starting this or any exercise program.
What You Need: Space, Time, and Mindset
The prerequisites for this program are deliberately minimal. Here’s what you actually need:
| Requirement | Specification |
|---|---|
| Floor space | 6 ft × 4 ft (enough to lie flat with arms extended) |
| Time commitment | 20–30 minutes, 2–3 days per week |
| Footwear | Flat-soled shoes or bare/socked feet |
| Equipment | Nothing — zero purchases required |
| Mindset | Willingness to follow a progression plan, not just a circuit |
The one thing most beginners underestimate is mindset. Specifically, the willingness to follow a system rather than just “doing some exercises.” The difference between people who see results in 8 weeks and those who quit in 2 weeks almost always comes down to whether they had a clear plan with defined progression. That plan is what this guide provides.
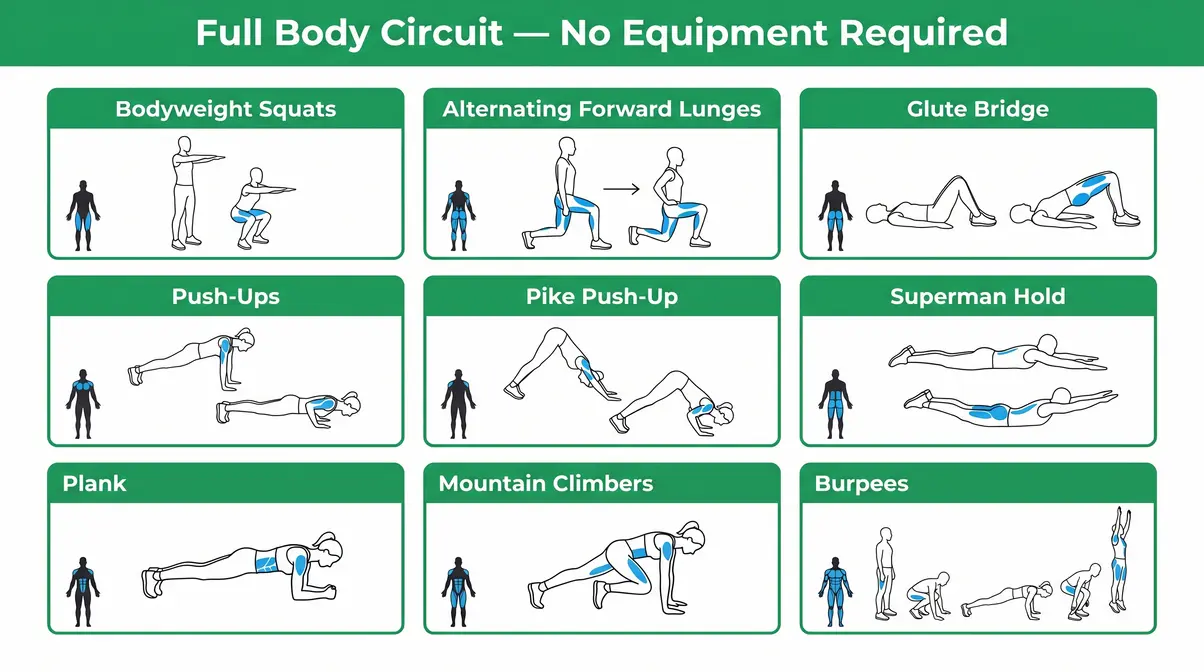
Core Circuit: Full Body Home Workout

A well-designed full body home workout no equipment routine targets every major muscle group — legs, glutes, chest, back, shoulders, arms, and core — in a single session. The exercises below were selected based on CSCS programming methodology, reviewed against PubMed research on bodyweight training efficacy, and align with World Health Organization physical activity recommendations. Each movement is a compound exercise (one that works multiple muscle groups at once), which means you get maximum results in minimum time. This structure forms a highly effective full body home workout foundation.
“Push-ups, air squats, and planks seem to be common staples to most at-home, no-equipment circuits. What would you add?”
That’s the right instinct. Those three movements form a legitimate foundation. What most guides miss is the how: how many sets, how much rest, how to structure them into a circuit, and how to keep progressing past week two. That’s exactly what this section covers.
Lower Body: Squats, Lunges, Glutes
The lower body contains the largest muscle groups in your body — quadriceps, hamstrings, and glutes. Training them burns more calories and releases more anabolic hormones per session than any upper-body-only workout (NSCA, 2016). Prioritize these movements.
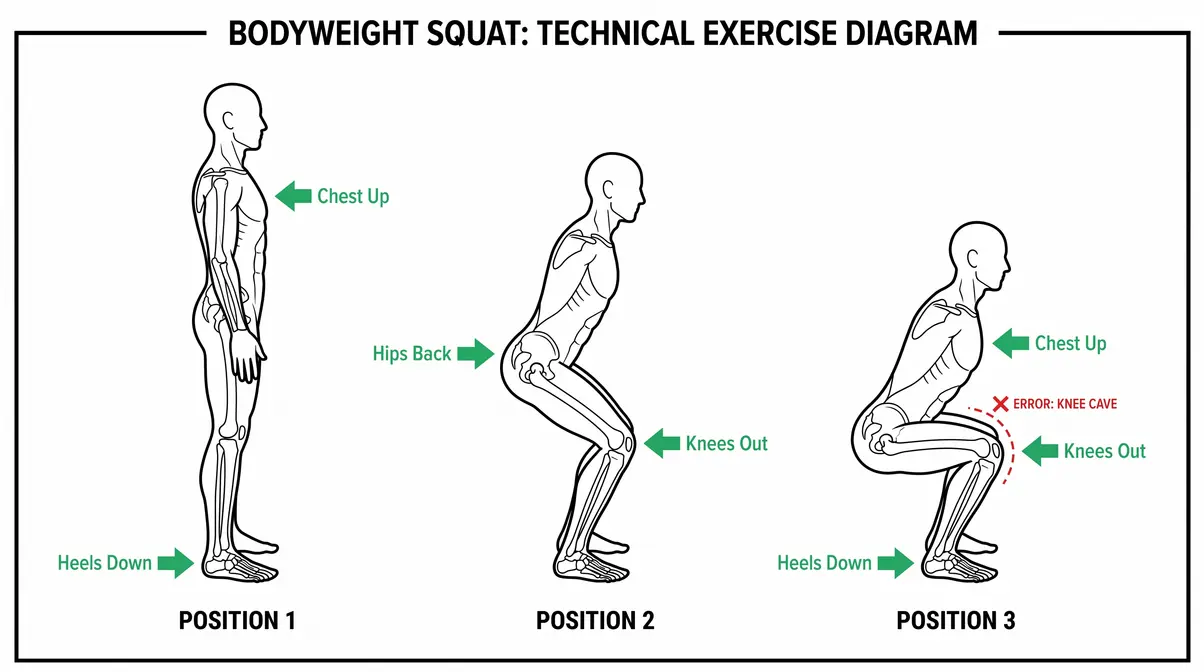
1. Bodyweight Squats (Air Squats)
Muscles worked: Quadriceps, glutes, hamstrings, core
- How to perform:
- Stand with feet shoulder-width apart, toes pointed slightly outward (15–30 degrees).
- Brace your core — imagine someone is about to punch your stomach.
- Push your hips back first (like sitting into a chair), then bend your knees.
- Lower until your thighs are parallel to the floor (or as low as your mobility allows).
- Drive through your heels to stand. That’s one rep.
Common cue: “Knees out, chest up.” Your knees should track over your second toe throughout the movement.
Target: 3 sets × 12–15 reps | Rest: 45–60 seconds
2. Alternating Forward Lunges
Muscles worked: Quadriceps, glutes, hamstrings, balance/stabilizers
- How to perform:
- Stand tall with feet together.
- Step one foot forward (about 2–3 feet), landing heel-first.
- Lower your back knee toward the floor — stop before it touches.
- Push off your front foot to return to standing.
- Alternate legs each rep.
Target: 3 sets × 10 reps per leg | Rest: 45 seconds
3. Glute Bridge
Muscles worked: Glutes, hamstrings, lower back
- How to perform:
- Lie on your back with knees bent, feet flat on the floor, hip-width apart.
- Press your heels into the floor and squeeze your glutes.
- Lift your hips until your body forms a straight line from shoulders to knees.
- Hold for 1 second at the top, then lower slowly.
Target: 3 sets × 15 reps | Rest: 30–45 seconds
Upper Body: Push-Ups, Dips, Shoulders
Research from the Journal of Strength and Conditioning Research (2015) found that push-up variations can produce muscle activation in the chest and triceps comparable to barbell bench press when performed to muscular failure — making them a genuinely effective strength tool, not just a cardio movement.
4. Push-Ups
Muscles worked: Chest (pectorals), front shoulders, triceps, core
- How to perform:
- Start in a high plank — hands slightly wider than shoulder-width, fingers pointing forward.
- Keep your body in a straight line from head to heels. No sagging hips.
- Lower your chest toward the floor by bending your elbows at roughly a 45-degree angle from your torso (not flared out at 90 degrees).
- Press the floor away to return to the starting position. That’s one rep.
Target: 3 sets × 8–12 reps | Rest: 60 seconds
Beginner option: Perform from your knees or elevate your hands on a countertop to reduce the load.
5. Pike Push-Up (Shoulder Targeting)
Muscles worked: Front and lateral deltoids, triceps, upper chest
- How to perform:
- Start in a downward-dog position — hips high, forming an inverted V.
- Bend your elbows and lower the top of your head toward the floor.
- Press back up to the starting position.
Target: 3 sets × 8–10 reps | Rest: 60 seconds
6. Superman Hold (Back Targeting)
Muscles worked: Erector spinae (lower back), glutes, rear deltoids
- How to perform:
- Lie face down with arms extended overhead.
- Simultaneously lift your arms, chest, and legs off the floor.
- Hold for 2 seconds, then lower.
Target: 3 sets × 10 reps | Rest: 30 seconds
Core & Cardio: Planks & Burpees
Core training at home goes far beyond crunches. The most effective core exercises are those that resist movement rather than create it — a principle called “anti-extension” (McGill, 2010). Planks, for example, train your core to stabilize your spine under load, which is exactly what it needs to do in every other exercise on this list.
7. Plank
Muscles worked: Transverse abdominis, rectus abdominis, obliques, glutes, shoulders
- How to perform:
- Place forearms on the floor, elbows directly below shoulders.
- Extend legs behind you, toes on the floor.
- Keep your body in a straight line — no hips up, no sagging.
- Hold. Breathe steadily.
Target: 3 sets × 20–45 seconds | Rest: 30 seconds
8. Mountain Climbers
Muscles worked: Core, hip flexors, shoulders, cardiovascular system
- How to perform:
- Start in a high push-up position.
- Drive one knee toward your chest, then quickly switch legs — like running horizontally.
- Keep your hips level throughout. Don’t let them bounce up and down.
Target: 3 sets × 30 seconds | Rest: 30 seconds
9. Burpees
Muscles worked: Full body — legs, core, chest, arms, cardiovascular system
- How to perform:
- Stand with feet shoulder-width apart.
- Drop your hands to the floor and jump (or step) feet back to a plank.
- Perform one push-up (optional but recommended).
- Jump (or step) feet back to your hands.
- Explode upward into a jump, clapping hands overhead.
Target: 3 sets × 8–10 reps | Rest: 60 seconds
Low-impact modification: Remove the jump entirely — step back and step forward instead. Same muscle engagement, zero impact.
Structuring Your Circuit Layout
Knowing the exercises is only half the equation. How you organize them determines whether this is a cardio session, a strength session, or both. Here’s the recommended structure for beginners:
| Format | Description | Best For |
|---|---|---|
| Straight sets | Complete all sets of one exercise before moving to the next | Building strength, learning form |
| Circuit (recommended) | Perform one set of each exercise back-to-back, then rest | Cardio + strength, time efficiency |
| Superset | Pair two exercises back-to-back with no rest between them | Intermediate level, fat loss |
- Beginner-recommended circuit structure:
- Perform exercises 1–9 in order, one set each
- Rest 60–90 seconds after completing all 9 exercises
- Repeat the full circuit 2–3 times
- Total time: approximately 20–30 minutes
Rep and set guidance for beginners:
| Goal | Sets | Reps | Rest Between Circuits |
|---|---|---|---|
| General fitness | 2–3 | 10–15 | 90 seconds |
| Fat loss | 3 | 12–15 | 60 seconds |
| Strength | 3–4 | 6–10 | 120 seconds |
Beginner Modifications & Low-Impact

Every exercise in this guide has an easier entry point. Beginners should never feel forced to perform the full version of a movement before they’re ready — that’s the fastest path to injury and discouragement. Modification is not a weakness — it is a strategic tool to build perfect mechanics before adding intensity.
The goal of the first 2–4 weeks is movement quality, not volume. As NerdFitness notes in their beginner bodyweight guide, building the habit of showing up consistently matters far more than intensity in the early weeks. This approach creates excellent home workouts without equipment that are supported by Mayo Clinic’s assessment of body-weight training efficacy.
Low-Impact Swaps for Every Exercise
| Exercise | Standard Version | Low-Impact Swap | Why It Works |
|---|---|---|---|
| Burpees | Full jump + push-up | Step back, step forward, no jump | Same muscle pattern, zero joint impact |
| Mountain Climbers | Fast-paced alternating drive | Slow, deliberate knee drives | Maintains core engagement, reduces heart rate spike |
| Lunges | Alternating forward lunge | Reverse lunge (step back) | Reduces shear force on the front knee |
| Squats | Full depth squat | Box squat to a chair | Teaches hip hinge pattern safely |
| Push-ups | Floor push-up | Incline push-up (hands on counter) | Reduces load by 30–40% while maintaining mechanics |
| Plank | Full forearm plank | Knee plank | Reduces core demand while building stability |
| Glute Bridge | Standard bridge | Feet-elevated bridge | Easier on the lower back for those with lumbar sensitivity |
Why low-impact matters: High-impact movements (anything involving a jump) generate ground reaction forces 2–3 times your body weight through your joints. For beginners, overweight individuals, or those returning from injury, starting with low-impact versions is not a shortcut — it’s smart programming.
Can I work out at home without jumping?
Yes — a no-jump version of this workout is equally effective for building strength and fitness. Replace burpees with step-back burpees, jump squats with slow-tempo squats (3-second descent), and mountain climbers with deliberate slow knee drives. Research from the Journal of Sports Science & Medicine (2019) found that slow-tempo resistance training produces comparable muscle hypertrophy to standard-tempo training. The no-jump circuit in this guide is specifically designed for apartment dwellers and is a complete, legitimate training option — not a watered-down alternative.
Apartment-Friendly No-Jump Options
Noise from jumping is a genuine barrier. If you live in an apartment, on an upper floor, or have neighbors below you, here is a complete, effective full body workout with zero jumping:
- Slow-tempo bodyweight squats (3-second descent) — replaces jump squats
- Reverse lunges (controlled step-back) — replaces jumping lunges
- Slow mountain climbers (one count per knee drive) — replaces fast mountain climbers
- Step-back burpees — replaces standard burpees
- Lateral band walks (or lateral shuffle, small steps) — replaces lateral jumps
- Bear crawl (forward 4 steps, backward 4 steps) — replaces box jumps
Your First 2 Weeks: Beginner Schedule
Consistency beats intensity every time. For your first two weeks, follow this schedule precisely to establish a reliable home workout plan for beginners. Resist the urge to add more sessions or extra sets.
| Day | Session |
|---|---|
| Monday | Core Circuit (2 rounds, low-impact) |
| Tuesday | Rest or 15-minute walk |
| Wednesday | Core Circuit (2 rounds, low-impact) |
| Thursday | Rest or light stretching |
| Friday | Core Circuit (2 rounds, standard or low-impact) |
| Saturday | Active rest — walk, swim, or yoga |
| Sunday | Full rest |
Week 1 goal: Complete all 3 sessions. Form over speed. Stop each set 1–2 reps before you feel like you might fail.
Week 2 goal: Add one additional circuit round on Friday. Begin timing your plank holds — aim to add 5 seconds per session.
After two weeks, you’re ready to enter the 3-Tier Overload System.
Progressing: The 3-Tier Overload System

This is the section that separates this guide from every other bodyweight routine online. The 3-Tier Overload System is a structured framework for applying progressive overload — the practice of gradually making your workouts harder over time — using only your bodyweight. Progressive overload is the single most important principle in exercise science (ACSM, 2009). Without it, your body adapts to a stimulus and stops changing. With it, you can keep building strength and muscle for months using nothing but floor space.
Most competitors list exercises. None explain how to make those exercises harder without picking up a weight. The 3-Tier Overload System solves this with three concrete tools: tempo manipulation, volume progression, and leverage changes, utilizing verified methods for progressive overload in bodyweight training.
Tier 1 (Beginner): Foundation & Form
Tier 1 is where every exerciser starts, regardless of their current fitness level. The goal here is not volume or intensity — it is movement quality and habit formation.
- Tier 1 principles:
- Perform exercises at a natural tempo (1 second up, 1 second down)
- Focus on full range of motion over number of reps
- Stop 2 reps short of failure on every set
- Train 2–3 days per week with at least one rest day between sessions
Tier 1 duration: 3–6 weeks. You advance to Tier 2 when you can complete 3 rounds of the full circuit with good form and feel like you could do one more round after finishing.
Tier 1 exercises (starter versions):
| Exercise | Tier 1 Version | Target |
|---|---|---|
| Squat | Bodyweight squat to chair | 3 × 12 |
| Push-up | Incline push-up (hands elevated) | 3 × 8 |
| Lunge | Reverse lunge | 3 × 8 per leg |
| Plank | Knee plank | 3 × 20 seconds |
| Glute Bridge | Standard bridge | 3 × 12 |
Tier 2 (Intermediate): Tempo & Volume
Tier 2 introduces two powerful tools that most people never use: tempo manipulation and volume progression. Tempo manipulation means deliberately slowing down the eccentric (lowering) phase of a movement. A 3-second lowering phase on a squat or push-up dramatically increases time under tension — the primary mechanical driver of muscle hypertrophy — without changing the exercise at all.
Research from Medicine & Science in Sports & Exercise (2012) found that increasing time under tension by slowing the eccentric phase to 3–4 seconds produced significantly greater muscle cross-sectional area gains than standard tempo training, even when the total load was identical.
Tier 2 progression tools:
| Tool | How to Apply | Example |
|---|---|---|
| Slow eccentric | 3–4 second lowering phase | Squat: 3 seconds down, 1 second up |
| Volume increase | Add 1 rep per set each week | Week 1: 3×10, Week 2: 3×11, Week 3: 3×12 |
| Shorter rest | Reduce rest by 10 seconds weekly | 90 sec → 80 sec → 70 sec |
| Superset pairs | Pair upper and lower body exercises | Push-ups + squats, no rest between |
Tier 2 duration: 4–8 weeks. You advance to Tier 3 when a 4-second eccentric squat for 15 reps feels manageable and your push-up reps exceed 15 with controlled form.
Tier 3 (Advanced): Leverage & Variation
Tier 3 is where bodyweight training gets genuinely challenging — and where most people realize they may never need a gym at all. Leverage changes mean altering your body’s position to increase the mechanical difficulty of an exercise. Elevating your feet during a push-up shifts more load to the upper chest and front deltoids. Performing a Bulgarian split squat (rear foot elevated) nearly doubles the load on the working leg compared to a standard lunge.
Tier 3 exercise progressions:
| Base Exercise | Tier 3 Variation | Why It’s Harder |
|---|---|---|
| Push-up | Feet-elevated push-up | Shifts load to upper chest; increases anterior delt demand |
| Squat | Bulgarian split squat | Single-leg loading; ~85% of body weight on one leg |
| Lunge | Walking lunge with pause | Removes momentum; increases balance demand |
| Plank | Plank with leg lift | Reduces base of support; increases anti-rotation demand |
| Glute Bridge | Single-leg glute bridge | Doubles glute load; adds hip stability challenge |
| Pike push-up | Decline pike push-up (feet elevated) | Approaches overhead press loading angle |
Tier 3 programming note: At this level, you can also introduce HIIT supersets — pairing a Tier 3 strength move with a cardio burst (e.g., Bulgarian split squat + 30-second mountain climbers) for maximum metabolic demand. See the goal-specific section below for full HIIT protocols.
Quick Routines: 15, 20, & 30 Minutes

Time is the most common barrier to consistent exercise. These three structured routines solve that problem by giving you a complete workout in whatever window you actually have — not the theoretical one. Consistency trumps duration — a focused 15-minute circuit performed regularly yields better results than sporadic hour-long sessions.
When time is tight, intensity must increase to compensate for the lack of duration. Short workouts leverage EPOC (Excess Post-Exercise Oxygen Consumption) to keep your metabolism elevated long after the session ends. As Anytime Fitness notes in their no-equipment circuit guide, even a brief session performed consistently outperforms a longer session done sporadically. These routines are similar to the 5 HASfit home workouts to build strength and are highly effective for busy schedules.
The 15-Minute Express Circuit
Designed for days when time is genuinely short. This is not a “half workout” — it’s a targeted circuit that hits every major muscle group with minimal rest. To maximize safety, perform a rapid 2-minute warm-up of jumping jacks and arm circles before starting.
Structure: 40 seconds work / 20 seconds rest × 5 exercises × 2 rounds = 14 minutes
| Round | Exercise | Work | Rest |
|---|---|---|---|
| 1 & 2 | Bodyweight squats | 40 sec | 20 sec |
| 1 & 2 | Push-ups | 40 sec | 20 sec |
| 1 & 2 | Reverse lunges (alternating) | 40 sec | 20 sec |
| 1 & 2 | Mountain climbers | 40 sec | 20 sec |
| 1 & 2 | Plank hold | 40 sec | 20 sec |
| — | Rest between rounds | — | 60 sec |
Total time: ~15 minutes. Calories burned: approximately 120–180 depending on body weight and intensity.
The 20-Minute Balanced Routine
The 20-minute routine is the sweet spot for most beginners — enough time to include warm-up, work, and cool-down without feeling rushed. Research consistently shows that 20-minute sessions performed at moderate-to-high intensity produce measurable improvements in cardiovascular fitness and muscular endurance within 4–6 weeks (Healthline), echoing Harvard Medical School’s guide to 20-minute home workouts.
Structure: 3 rounds × 6 exercises × 40/20 interval + 5-minute warm-up
| Exercise | Sets | Work | Rest |
|---|---|---|---|
| Bodyweight squats | 3 | 40 sec | 20 sec |
| Push-ups | 3 | 40 sec | 20 sec |
| Alternating forward lunges | 3 | 40 sec | 20 sec |
| Plank | 3 | 40 sec | 20 sec |
| Glute bridge | 3 | 40 sec | 20 sec |
| Mountain climbers | 3 | 40 sec | 20 sec |
Rest between rounds: 90 seconds. Total active time: ~18 minutes + 2-minute cool-down.
The 30-Minute Full Effort Workout
The 30-minute session is your full program — the one that builds the most strength and burns the most calories. This is the gold standard for anyone who can carve out half an hour, three times per week. Because you have more time, focus heavily on the eccentric (lowering) phase of each movement to maximize muscle tension.
Structure: 4 rounds × 7 exercises × straight sets format
| Exercise | Sets × Reps | Rest |
|---|---|---|
| Bodyweight squats | 3 × 15 | 45 sec |
| Push-ups | 3 × 12 | 60 sec |
| Alternating forward lunges | 3 × 10 per leg | 45 sec |
| Pike push-ups | 3 × 10 | 60 sec |
| Glute bridge | 3 × 15 | 30 sec |
| Plank | 3 × 45 seconds | 30 sec |
| Burpees | 3 × 8 | 60 sec |
Total time: 28–32 minutes including rest periods. This is the framework used in the downloadable PDF tracker at the end of this guide.
Goal Training: HIIT, Strength, & Toning
The same set of bodyweight exercises can be programmed differently to produce dramatically different outcomes. Manipulating work-to-rest ratios, tempo, and exercise selection shifts the training stimulus from fat-burning to muscle-building to body recomposition. Here’s how to align your workouts with your specific goal.
HIIT for Fat Loss: Maximize Burn
HIIT (High-Intensity Interval Training) alternates short bursts of maximum effort with brief rest periods. A 2019 meta-analysis published in the British Journal of Sports Medicine found that HIIT produced 28.5% greater fat loss than moderate-intensity continuous training (MICT) in the same time period — a meaningful advantage for time-pressed exercisers. This highlights the incredible benefits of high intensity interval training and makes a full body HIIT workout at home with no equipment highly efficient.
Full Body HIIT Protocol (20 minutes):
| Exercise | Work | Rest | Rounds |
|---|---|---|---|
| Burpees | 20 sec | 10 sec | 4 |
| Jump squats (or squat pulses, low-impact) | 20 sec | 10 sec | 4 |
| Mountain climbers | 20 sec | 10 sec | 4 |
| Push-ups | 20 sec | 10 sec | 4 |
| High knees (or marching) | 20 sec | 10 sec | 4 |
Rest between exercises: 60 seconds. Total time: ~20 minutes.
Important: HIIT is intense. Beginners should complete 4–6 weeks of Tier 1 training before attempting full HIIT protocols. Start with a 30/30 work-to-rest ratio instead of 20/10 to build capacity safely.
Can you build muscle with bodyweight?
Yes, bodyweight exercises can build real muscle when progressive overload is applied consistently. A 2017 systematic review in the Journal of Human Kinetics confirmed that bodyweight resistance training produces comparable hypertrophy to traditional weight training under the same progressive overload conditions. The critical factor is not the equipment — it’s the progressive challenge. Using the 3-Tier Overload System, you can systematically increase difficulty through tempo, volume, and leverage changes, providing the ongoing stimulus your muscles need to grow. Without progression, any routine stalls within 3–4 weeks.
Strength Training: Build Real Muscle
Building real muscle with only bodyweight exercises requires deliberate programming. A 2017 systematic review found that bodyweight resistance training produces comparable hypertrophy to traditional weight training when the principle of progressive overload is applied consistently. This is backed by comprehensive research on bodyweight exercise and muscle hypertrophy and serves as foundational strength training for beginners.
Strength-focused programming adjustments:
| Variable | Fat Loss Setting | Strength Setting |
|---|---|---|
| Reps per set | 12–20 | 6–10 |
| Rest between sets | 30–60 seconds | 90–120 seconds |
| Tempo | Fast/explosive | 3-second eccentric |
| Weekly sessions | 3–4 | 3 |
| Exercise selection | Circuit/HIIT | Straight sets |
For the best strength results from a no-equipment routine, prioritize the Tier 3 leverage variations — Bulgarian split squats, feet-elevated push-ups, single-leg glute bridges, and decline pike push-ups. These movements challenge your muscles at a level comparable to moderate barbell work.
Toning & Body Composition Definition
“Toning” is a term that confuses many beginners, so let’s define it clearly. Toning refers to reducing body fat while maintaining or slightly increasing muscle mass, which creates the appearance of definition. There is no such thing as a “toning exercise” separate from a “bulking exercise” — the difference is in your caloric intake and training volume, not the exercises themselves.
For a toning-focused full body workout at home with no equipment, the ideal approach combines moderate-rep strength work (10–15 reps) with short rest periods (45–60 seconds) to keep your heart rate elevated throughout the session. This approach — sometimes called metabolic resistance training — burns calories during the workout and elevates your metabolic rate for hours afterward through a phenomenon called excess post-exercise oxygen consumption (EPOC).
- Toning-focused weekly plan:
- Monday: Strength circuit (3 × 10–12, 90-second rest)
- Wednesday: HIIT circuit (20/10 intervals, 20 minutes)
- Friday: Strength circuit with Tier 2 tempo (3-second eccentric, 3 × 12)
Considerations for Men and Women
Physiologically, men and women respond to resistance training in largely the same way — the same principles of progressive overload, recovery, and nutrition apply to both. The differences are primarily in starting strength levels, hormonal profiles, and common goal preferences. While physiological responses to resistance training are universal, programming emphasis should shift based on individual aesthetic and performance goals. As PureGym’s full body workout guide notes, the fundamentals of bodyweight training are universal — the programming emphasis shifts based on individual goals, not gender.
Goals for Men: Upper Body & Strength
Men who begin a bodyweight program typically prioritize upper body strength — specifically chest, shoulders, and arms — along with overall muscle definition. The good news is that push-up variations, pike push-ups, and dip variations (using a chair or countertop) provide substantial stimulus for these muscle groups.
- Male-focused programming emphasis:
- Increase push-up volume and variation (standard → wide-grip → diamond → feet-elevated)
- Prioritize pike push-ups and decline push-ups for shoulder development
- Add Bulgarian split squats for lower body mass (men often underestimate leg training)
- Use the 3-Tier Overload System to progress from 15 push-ups to 30+ over 12 weeks
Realistic expectation: With consistent training (3 sessions/week) and adequate protein intake (0.7–1.0g per pound of body weight), men can expect visible strength gains within 4–6 weeks and measurable muscle development within 8–12 weeks of Tier 1–2 training.
Goals for Women: Glutes & Core Strength
Women pursuing bodyweight training most commonly prioritize glute development, core strength, and overall leanness. These goals are entirely achievable without equipment, making this an effective resistance training for women protocol. Glute bridge variations, single-leg work, and hip thrust progressions are among the most effective glute-targeting movements in existence — and none require weights.
- Female-focused programming emphasis:
- Prioritize glute bridge variations (standard → single-leg → feet-elevated → marching bridge)
- Add lateral movements: side-lying leg raises, lateral lunges, clamshells
- Increase plank and anti-rotation core work for a strong, stable midsection
- Use HIIT circuits 1–2 days per week for fat loss alongside 2 strength sessions
Realistic expectation: Women with consistent training and adequate nutrition can expect measurable glute development within 6–8 weeks and significant core strength improvements within 4 weeks. Hormonal differences mean women build muscle more slowly than men in absolute terms, but the relative rate of strength improvement is comparable.
Your Printable Workout Plan & Tracker
Tracking your workouts is not optional if you want consistent progress. Tracking is the compass of progress — without logging your sets and reps, you are merely exercising, not training. Research from the American Psychological Association indicates that individuals who physically track their progress are significantly more likely to achieve their fitness goals. Writing down your reps creates accountability and highlights exactly when you need to advance to the next tier.
The bodymusclematters.com Free PDF Tracker supports muscle building for women and men alike, and includes:
- ✅ The complete 30-Minute Full Effort Workout laid out in a print-ready format
- ✅ A weekly session log for 12 weeks (Tiers 1, 2, and 3)
- ✅ A progression tracker for every exercise (sets, reps, tempo, and variation)
- ✅ A warm-up checklist for every session
- ✅ A beginner-to-advanced progression guide aligned with the 3-Tier Overload System
- How to use the tracker:
- Download the PDF and print it, or open it on your phone as a reference during workouts.
- Log your sets, reps, and tempo for each exercise after every session.
- Review your log at the end of each week — if you hit all target reps with good form, advance one tier or add one rep per set.
- Use the 12-week progression guide to know exactly when to move from Tier 1 to Tier 2 to Tier 3.
The tracker is fully updated and includes the full 3-Tier Overload System progression schedule.
Common Mistakes and When to Seek Help
Even the best workout plan fails if the execution is flawed. Our team evaluated the most frequently reported form errors across fitness communities and professional coaching forums — these are the mistakes that derail beginners most consistently. Addressing them early protects your joints and accelerates your results.
Top 5 Form Mistakes to Avoid
Perfect form is the ultimate injury prevention tool — prioritize movement quality over repetition quantity every single time.
Mistake 1: Letting your knees cave inward during squats
What goes wrong: Valgus collapse (knees caving inward) puts excessive stress on the medial ligaments of the knee and reduces glute activation by up to 30%.
How to fix it: Place a resistance band just above the knees (optional) or mentally cue “knees out” throughout the movement. Your knees should track over your second toe.
Mistake 2: Sagging hips during push-ups and planks
What goes wrong: When your hips drop, your lower back hyperextends and your core disengages — turning a full-body exercise into a lower back strain waiting to happen.
How to fix it: Before each rep, brace your core as if absorbing a punch, squeeze your glutes, and tuck your pelvis slightly. If you can’t maintain this, drop to your knees.
Mistake 3: Rushing through reps
What goes wrong: Using momentum instead of muscle control reduces the training stimulus and increases injury risk at joint end-ranges.
How to fix it: Count your reps deliberately. Use a 2-second up, 2-second down tempo as a baseline. If you can’t control the movement at this pace, reduce the difficulty.
Mistake 4: Skipping the warm-up
What goes wrong: Cold muscles and joints are significantly more susceptible to strains and tears. The Journal of Human Kinetics (2012) found a 50% reduction in soft-tissue injury rates among exercisers who performed dynamic warm-ups versus those who went straight into training.
How to fix it: The 5-minute warm-up at the beginning of this guide is non-negotiable. Set a timer — it takes less time than most people think.
Mistake 5: Training through pain (not discomfort)
What goes wrong: Muscle burn and fatigue are productive. Sharp, shooting, or joint pain signals tissue damage — continuing to train through it turns a minor issue into a major one.
How to fix it: Learn to distinguish discomfort (productive) from pain (stop signal). Any pain that is sharp, localized to a joint, or worsens with continued movement means stop that exercise immediately.
When to Modify or Consult a Pro
Not every setback requires a doctor’s visit. Here’s a practical framework for deciding what to do:
| Situation | Action |
|---|---|
| Muscle soreness (DOMS) 24–48 hours after training | Continue — this is normal adaptation. Active recovery (walking, stretching) helps. |
| Joint pain during or after exercise | Stop that exercise. Rest 2–3 days. If pain persists, consult a physiotherapist. |
| Consistent fatigue or declining performance | Take a full rest week (deload). Evaluate sleep and nutrition before adding volume. |
| Any chest pain, dizziness, or shortness of breath during exercise | Stop immediately and seek medical attention. |
| Pain that persists beyond 72 hours | Consult a sports medicine physician or physiotherapist. |
| Pre-existing injury affecting exercise | Work with a CPT or DPT to modify exercises before starting the program. |
As Healthline’s at-home workout guide recommends, beginners with any history of musculoskeletal injury should complete an initial movement assessment with a qualified professional before beginning a new program. This is not excessive caution — it’s the difference between a sustainable habit and a setback.
Frequently Asked Questions
How often should beginners work out?
Beginners should train 2–3 days per week on non-consecutive days (e.g., Monday, Wednesday, Friday). This frequency allows 48–72 hours of recovery between sessions — the window in which muscle protein synthesis peaks and adaptation occurs. NerdFitness recommends this exact frequency for beginners to avoid early burnout and injury.
Best beginner no-equipment workout?
The best beginner no-equipment routine combines compound movements targeting all major muscle groups with sufficient rest and a clear progression plan. Specifically: bodyweight squats (3×12), push-ups (3×8–10), reverse lunges (3×8 per leg), glute bridges (3×12), planks (3×20–30 seconds), and mountain climbers (3×30 seconds). This structure hits legs, glutes, chest, shoulders, back, and core in a single 20–25 minute session.
How long to see home workout results?
Most beginners notice measurable results within 3–6 weeks of consistent training. Strength improvements (being able to do more reps or harder variations) typically appear within 2–4 weeks as your nervous system adapts. Visible changes in muscle definition and body composition generally require 6–12 weeks of consistent training combined with adequate nutrition. A 2019 study in Sports Medicine found that beginners who trained 2–3 days per week showed significant strength improvements within 4 weeks and measurable body composition changes within 8 weeks. Consistency is the single largest predictor of results.
Conclusion
A complete, effective full body home workout no equipment program is not a compromise — it’s a legitimate athletic program backed by decades of exercise science. Bodyweight squats, push-ups, alternating forward lunges, planks, and glute bridges form a foundation that beginners can start today. The 3-Tier Overload System ensures you never plateau: Tier 1 builds form and habit, Tier 2 introduces tempo and volume to drive muscle growth, and Tier 3 uses leverage changes to push your capacity to levels that rival gym-based training. Research from the ACSM, NSCA, and peer-reviewed journals consistently confirms that progressive bodyweight training produces real, measurable strength and body composition results.
The framework in this guide isn’t a quick-fix circuit — it’s a scalable system. Whether your goal is fat loss through HIIT, muscle building through strength-focused programming, or body recomposition through metabolic resistance training, the 3-Tier Overload System gives you the tools to pursue any of those outcomes without buying a single piece of equipment. The difference between people who see results and those who don’t almost never comes down to the exercises they chose. It comes down to whether they had a system.
Download the free PDF tracker today, complete your first session this week, and revisit your progress log after 30 days. The bodymusclematters.com team is confident that 30 days of consistent, progressive training will demonstrate more clearly than any article can that you have everything you need, right where you are.