You’ve decided to start lifting. Now you’re staring at a sea of equipment, five different Reddit threads, and twelve conflicting YouTube videos — and you still don’t know what to do on Monday. Most beginners waste their first three to six months on routines that are either too complicated to follow or completely wrong for their experience level. You want to learn moves and get strong — not spend your evenings decoding complex periodization schemes designed for advanced athletes.
This guide solves that. By the end, you’ll know exactly what the StrongLifts 5×5 programme for beginners is, how to run it from day one, and how to keep making progress for months — without guessing. We cover the full workout schedule, form cues for every lift, how to break through plateaus, and an honest review of where the programme excels and where it falls short. You’ll also find three free downloadable tracking tools — a Google Sheets tracker, a printable PDF log, and a Notion template — embedded in this guide so you can start logging from your very first session.
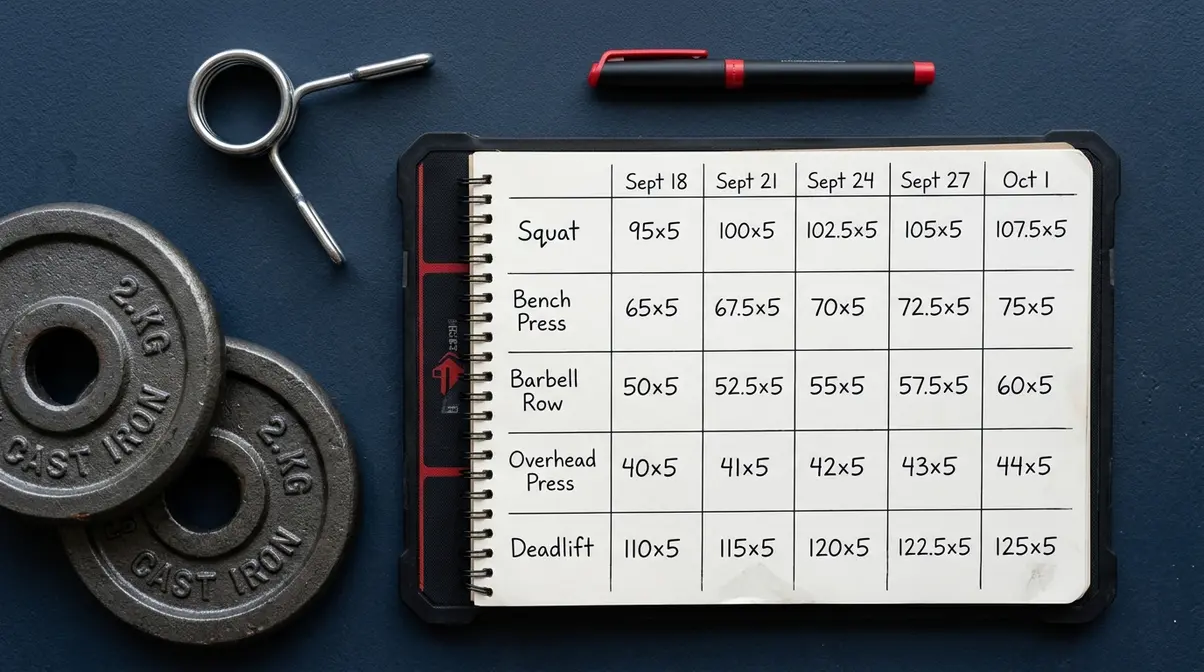
The StrongLifts 5×5 programme for beginners is a three-day-a-week barbell programme that adds weight every session — helping true blue beginners build strength and muscle faster than most gym routines.
- Two workouts: Alternate between Workout A (Squat, Bench Press, Row) and Workout B (Squat, Overhead Press, Deadlift)
- Simple rule: Complete all 5 sets of 5 reps? Add 5 lbs (2.5 kg) next session
- The 5×5 Foundation Stack: Core lifts + Progression rules + Assistance work = a complete beginner programme
- Free tools: Google Sheets tracker, PDF log, and Notion template available in this guide
- Honest truth: Outstanding for building strength; add targeted assistance exercises to avoid “T-Rex mode”
What Is StrongLifts 5×5? The Programme Explained
StrongLifts 5×5 is one of the most straightforward beginner strength programmes available — and that simplicity is its greatest strength. The programme alternates between two full-body workouts, three times per week, using only five compound barbell exercises. Every session, your goal is the same: complete five sets of five reps, then add a small amount of weight next time. That’s the entire system.
User consensus across r/Stronglifts5x5 and r/fitness consistently places it among the top three beginner barbell programmes, alongside Starting Strength and GZCLP. Its appeal is clarity: you never walk into the gym unsure of what to do.
Why StrongLifts 5×5 Works: The Science of Linear Progression
The engine behind the programme is linear progression — the practice of adding a small, fixed amount of weight to the bar every single training session. For squats, bench press, overhead press, and barbell row, that means adding 5 lbs (2.5 kg) per session. For the deadlift, you add 10 lbs (5 kg).
This sounds almost too simple. But it works because beginners are in a uniquely advantaged position: your nervous system can adapt faster than your muscles can grow, meaning you can get meaningfully stronger session after session for weeks or even months before hitting your first real plateau.
A 2017 meta-analysis published in the Journal of Strength and Conditioning Research (Ralston et al., 2017) found that periodized training — structured, progressive loading — produced significantly greater strength gains than non-periodized approaches. Linear progression is the most beginner-accessible form of periodization (structured, progressive loading designed to produce specific physical adaptations over time). You don’t need to understand the theory deeply to benefit from it. You just need to add weight consistently.
“Linear progression is arguably the most powerful tool a beginner has — the ability to add weight every session produces strength gains no advanced method can replicate at this stage.” That observation is consistent across strength coaching communities, from the NSCA to independent coaches on platforms like PowerliftingToWin.
The Five Compound Exercises (And Why Nothing Else Is Needed at First)
StrongLifts 5×5 uses only five movements. That’s intentional, not lazy.
Compound exercises — movements that work multiple muscle groups simultaneously, like the squat and deadlift — give beginners the highest return on time invested. Instead of isolating individual muscles with curls or leg extensions, compound barbell exercises train your entire body in coordinated patterns that build real-world strength and muscle efficiently.
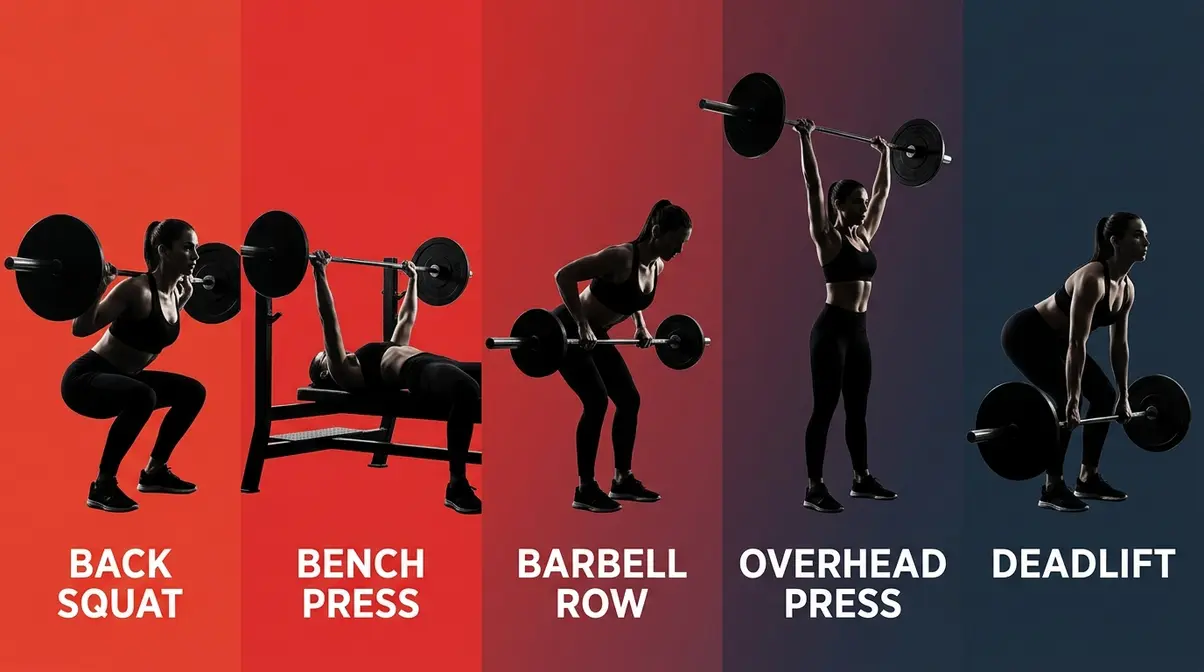
The five exercises are:
- Back Squat — the king of lower body movements; trains quads, hamstrings, glutes, and core simultaneously
- Bench Press — the primary horizontal push; develops chest, front deltoids, and triceps
- Barbell Row (also called Bent-Over Row) — the horizontal pull that balances the bench press; works upper back, lats, and biceps
- Overhead Press (OHP) — the vertical push; builds shoulders and triceps while demanding core stability
- Deadlift — the full posterior chain movement; trains hamstrings, glutes, lower back, and grip strength
Strength coaches consistently recommend this movement selection for beginners because it creates balanced strength across the entire body. The reason you don’t need isolation work at first is that compound exercises already recruit the biceps (in rows), triceps (in presses), and core (in every lift). Specialisation comes later — and this guide addresses exactly when and how.
Is StrongLifts 5×5 Right for You?
StrongLifts 5×5 is designed specifically for true blue beginners — people with little to no barbell experience. It works best if you meet these criteria:
- You can commit to three sessions per week (Monday, Wednesday, Friday or similar)
- You have access to a barbell, a squat rack, and weight plates
- Your primary goal is to build foundational strength and muscle — not sport-specific conditioning
- You are not currently recovering from a significant injury that affects any of the five movement patterns
The programme is less suitable if you are an intermediate lifter (someone who has trained consistently for 12+ months and can no longer add weight every session). It is also not designed for athletes whose sport demands high cardiovascular output or single-leg stability. The “When StrongLifts Isn’t the Right Choice” section later in this guide covers this in more detail.
What You’ll Need Before You Start
Equipment checklist:
| Item | Notes |
|---|---|
| Olympic barbell (20 kg / 45 lbs) | Standard in most commercial gyms |
| Weight plates (pairs: 1.25, 2.5, 5, 10, 20 kg) | Start light — you’ll need small increments |
| Squat rack or power cage | Non-negotiable for safety |
| Flat bench | Required for bench press |
| Collars / clips | Always secure plates before lifting |
| Flat-soled shoes | Chuck Taylors or barefoot-style shoes recommended |
| Training log | App, notebook, or our free Google Sheets tracker |
Optional but helpful: Lifting belt (not needed until squatting body weight), chalk (for grip on deadlifts), and knee sleeves (for comfort, not correction).
Free tracking tools: Download the StrongLifts 5×5 Google Sheets Tracker, Printable PDF Workout Log, and Notion Training Template — all free, no email required. Logging every session is one of the highest-leverage habits a beginner can build.
The StrongLifts 5×5 Workout Schedule: Week-by-Week
The StrongLifts 5×5 workout schedule alternates two full-body sessions — Workout A and Workout B — across three training days per week, with at least one rest day between each session. You never train two days in a row on this programme.
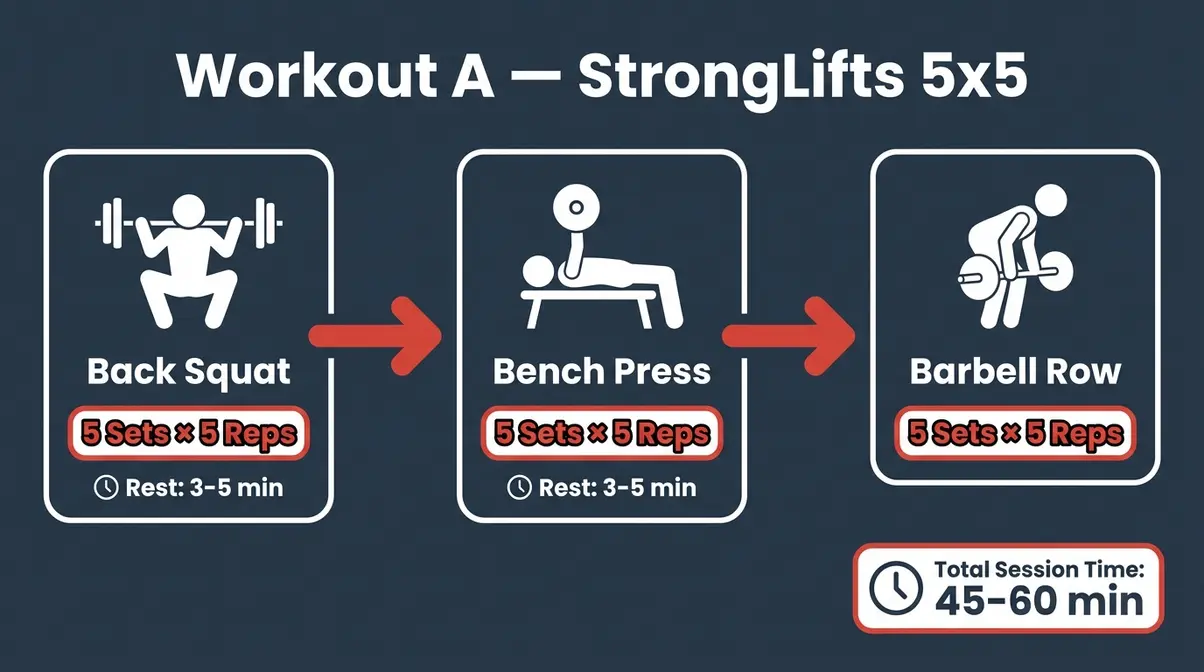
Workout A: Squat, Bench Press, and Barbell Row
Workout A is your primary horizontal pushing and pulling session, anchored by the squat.
Workout A — Exercise List:
| Exercise | Sets | Reps | Starting Weight |
|---|---|---|---|
| Back Squat | 5 | 5 | Empty bar (20 kg) |
| Bench Press | 5 | 5 | Empty bar (20 kg) |
| Barbell Row | 5 | 5 | Empty bar (20 kg) |
Session structure: Complete all five sets of the squat before moving to bench press, then barbell row. Rest fully between sets (see the Rest Times section). The entire session takes 45-60 minutes, including warm-up sets.
Warm-up protocol: Before your working sets, perform 2-3 lighter warm-up sets. Example for a 60 kg squat working weight: 20 kg × 5, 40 kg × 3, 50 kg × 2, then 60 kg × 5 × 5. Warm-up sets are not logged toward your five working sets.
Workout B: Squat, Overhead Press, and Deadlift
Workout B swaps bench press for overhead press and barbell row for deadlift — shifting the loading emphasis toward the vertical push and the full posterior chain.
Workout B — Exercise List:
| Exercise | Sets | Reps | Starting Weight |
|---|---|---|---|
| Back Squat | 5 | 5 | Empty bar (progressed) |
| Overhead Press | 5 | 5 | Empty bar (20 kg) |
| Deadlift | 1 | 5 | 60 kg (or empty bar + 20 kg) |
Important note on the deadlift: The deadlift is performed for only one set of five reps. This is intentional — the deadlift is neurologically demanding, and beginners recover better from a single heavy set. You add 10 lbs (5 kg) per session to the deadlift rather than 5 lbs.
Your Weekly Training Schedule
The programme runs on a three-days-per-week template. The most common schedule is Monday, Wednesday, and Friday — but any three non-consecutive days work.
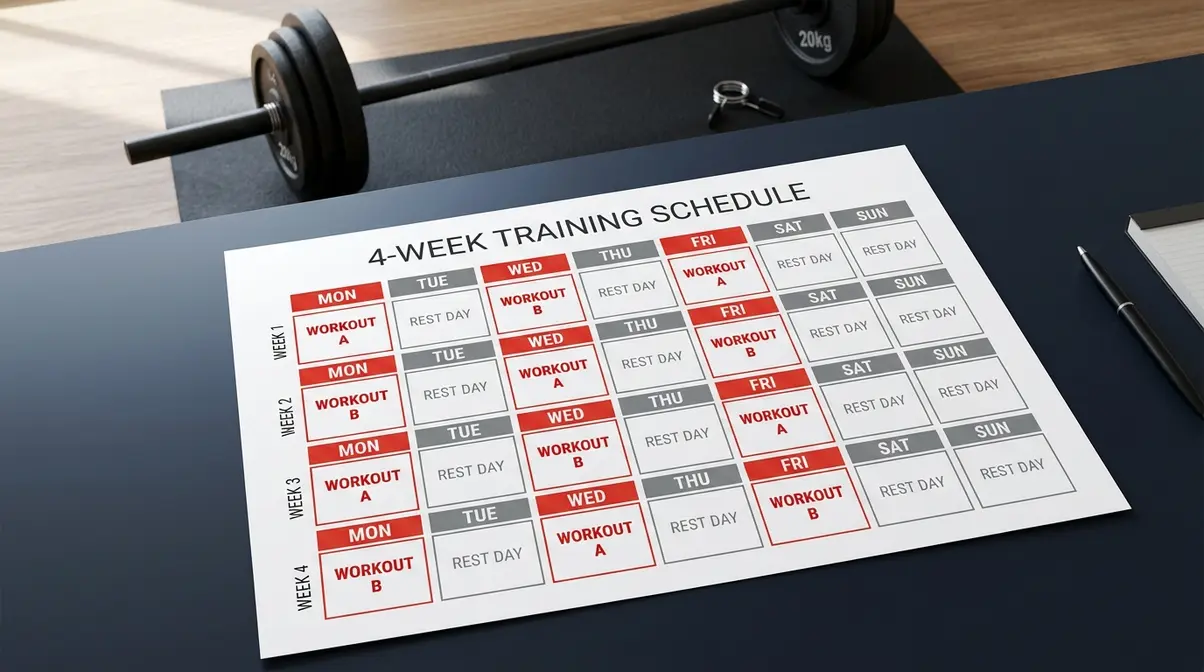
Example four-week schedule:
| Week | Monday | Wednesday | Friday |
|---|---|---|---|
| Week 1 | Workout A | Workout B | Workout A |
| Week 2 | Workout B | Workout A | Workout B |
| Week 3 | Workout A | Workout B | Workout A |
| Week 4 | Workout B | Workout A | Workout B |
Notice that Workout A and Workout B alternate regardless of the week. You do not reset to Workout A at the start of each week. This ensures equal frequency for all five exercises over time — the squat appears in every session, while bench, row, OHP, and deadlift each appear 1.5 times per week on average.
Rest days matter. The 48-hour minimum between sessions is not arbitrary — it is the window your muscles need to complete the repair and growth cycle that makes you stronger. Training on back-to-back days undermines this process and increases injury risk for beginners.
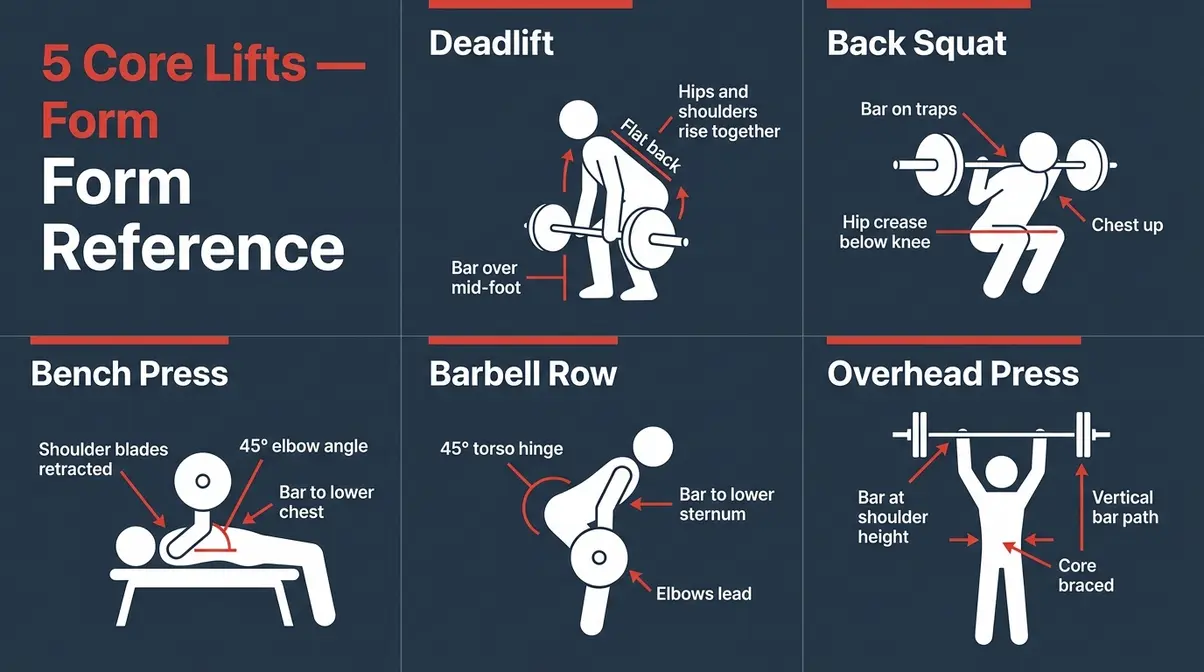
Form Cues for All Five Core Lifts
Proper form is the single most important investment you make in your first month of training. Poor technique with light weight becomes dangerous technique with heavy weight. Our team reviewed guidance from certified strength coaches and NSCA-affiliated resources to compile these cues.
- 1. Back Squat
- Position the bar across your upper traps (not your neck)
- Grip the bar slightly wider than shoulder-width; elbows point down and back
- Stand with feet shoulder-width apart, toes pointed 30° outward
- Take a deep breath into your belly and brace your core hard (this is called the Valsalva manoeuvre — creating intra-abdominal pressure to protect your spine)
- Break at the hips and knees simultaneously — do not push the knees forward first
- Descend until your hip crease is at or below the top of your knee (parallel depth)
- Drive through your whole foot, not just your heels, on the way up
- Keep your chest up throughout — do not let your torso collapse forward
- 2. Bench Press
- Lie flat with your eyes under the bar; grip slightly wider than shoulder-width
- Pull your shoulder blades together and down — this protects the shoulder joint
- Plant your feet flat on the floor for leg drive
- Unrack the bar with straight arms; lower it to your lower chest (nipple line) in a slight arc
- Keep your elbows at roughly 45-75° from your torso — not flared at 90°
- Press back up and slightly back toward the rack in the same arc
- 3. Barbell Row
- Stand with feet hip-width apart, barbell over mid-foot
- Hinge at the hips until your torso is roughly 45° to the floor (some coaches prefer more horizontal — experiment)
- Grip the bar just outside shoulder-width, overhand
- Pull the bar to your lower sternum, leading with your elbows
- Lower the bar under control — do not let it crash to the floor
- 4. Overhead Press
- Hold the bar at shoulder height, just outside shoulder-width, with a full grip
- Keep your wrists straight and elbows slightly in front of the bar
- Brace your core and glutes — your lower back should not hyperextend
- Press the bar straight up; as it clears your forehead, move your head slightly forward so the bar travels in a vertical line
- Lock out at the top with arms fully extended, bar over your heels
- 5. Deadlift
- Stand with feet hip-width apart, bar over mid-foot (about 1 inch from your shins)
- Hinge and grip the bar just outside your legs — use a double overhand grip to start
- Drop your hips until your shins touch the bar; your back should be flat, not rounded
- Take a big breath and brace hard before the bar moves
- Push the floor away (think “leg press”), keeping the bar close to your body
- Stand tall at the top — hips and shoulders rise at the same rate; do not let your hips shoot up first
- Lower the bar by hinging at the hips first, then bending the knees once the bar passes them
⚠️ Health & Safety Disclaimer
Before You Begin: The information in this guide is for educational purposes only and does not constitute medical advice. Barbell strength training carries an inherent risk of injury. Consult a qualified physician or healthcare provider before beginning any new exercise programme, especially if you have a pre-existing medical condition, injury, or have been inactive for an extended period. Always start with an empty bar or very light weight to learn proper form before adding load. If you experience pain (not general muscle fatigue) during any exercise, stop immediately and seek professional guidance.
How to Add Assistance Work (Fixing the “T-Rex Mode” Problem)
The most common complaint about StrongLifts 5×5 — voiced consistently across strength training forums — is what lifters call “T-Rex mode”: strong legs and back, noticeably underdeveloped arms, shoulders, and chest aesthetics. The five compound exercises build a powerful foundation, but they do not provide enough direct volume for the biceps, triceps, and upper chest to develop the physique most beginners also want.
This is not a flaw in the programme’s strength-building logic. It’s a gap in volume that targeted assistance work can fill — without breaking the programme’s recovery demands.
The 8 Best Assistance Exercises for StrongLifts 5×5
User consensus across r/Stronglifts5x5 and strength coaching communities identifies these eight exercises as the most effective additions for beginners running a 5×5 programme. Add them after your main working sets, keeping total assistance volume low (2-3 sets each, 8-12 reps).
| Exercise | Targets | Sets × Reps | Add to |
|---|---|---|---|
| Barbell or Dumbbell Curl | Biceps | 2 × 10-12 | Workout A |
| Triceps Pushdown (cable or band) | Triceps | 2 × 10-12 | Workout B |
| Dumbbell Lateral Raise | Side deltoids | 2 × 12-15 | Workout B |
| Face Pull (cable or band) | Rear delts, external rotators | 2 × 15 | Workout A or B |
| Dips (bodyweight or weighted) | Chest, triceps | 2 × 8-10 | Workout A |
| Pull-Ups or Lat Pulldowns | Lats, biceps | 2 × 8-10 | Workout A |
| Plank or Ab Wheel | Core | 2 × 30-60 sec | Either |
| Dumbbell Romanian Deadlift | Hamstrings, glutes | 2 × 10 | Workout B |
Why these eight? Face pulls and lateral raises address the rotator cuff and rear deltoid — muscles the five main lifts underwork and that are critical for long-term shoulder health. Curls and triceps work fill the direct arm volume gap. Dips and pull-ups add upper body pressing and pulling volume that compounds with the barbell work without adding significant recovery demand.
Research on training volume supports this approach: a 2019 meta-analysis by Schoenfeld et al. found that higher weekly training volumes (10+ sets per muscle group per week) produce greater hypertrophy than lower volumes. The five compound lifts alone deliver approximately 5-7 indirect sets per muscle group per week — the assistance exercises bring key muscle groups into the evidence-based hypertrophy range.
How to Fit Assistance Work Into Your Sessions Without Overtraining
Overtraining — accumulating more stress than your body can recover from between sessions — is a real risk if you stack too much assistance work onto an already demanding programme. Follow these rules to stay safe:
- Add assistance work after your main sets — never before, as pre-fatiguing muscles increases injury risk during compound lifts
- Start with 2 exercises per session — add more only after 4-6 weeks of consistent training
- Keep each assistance exercise to 2-3 sets of 8-15 reps — this is enough stimulus for beginners without creating excessive soreness
- If your next session feels harder than expected, reduce assistance volume first before blaming the main programme
- Do not add lower body assistance work (leg curls, leg extensions) in the first 8 weeks — the squat and deadlift already tax your legs substantially
The goal is a session that takes 60-75 minutes total, not 90+. Efficiency matters more than volume at this stage.
StrongLifts 5×5 Progression: How to Add Weight and Break Plateaus
Progression is the heartbeat of StrongLifts 5×5. Without it, you are just exercising — not training. This section covers exactly when to add weight, what to do when you can’t, and how to break through your first real plateau.
How Much Weight to Add (And When)
The rule is binary and simple:
- Complete all 5 sets of 5 reps? → Add weight next session
- Miss any rep? → Use the same weight again next session (up to the 3-strike rule)
Weight increments per exercise:
| Exercise | Add per Session | Reasoning |
|---|---|---|
| Squat | 5 lbs (2.5 kg) | Large muscle group; recovers quickly |
| Bench Press | 5 lbs (2.5 kg) | Standard upper body increment |
| Barbell Row | 5 lbs (2.5 kg) | Standard upper body increment |
| Overhead Press | 5 lbs (2.5 kg) | Progress here slows fastest — be patient |
| Deadlift | 10 lbs (5 kg) | Larger muscle groups; single set |
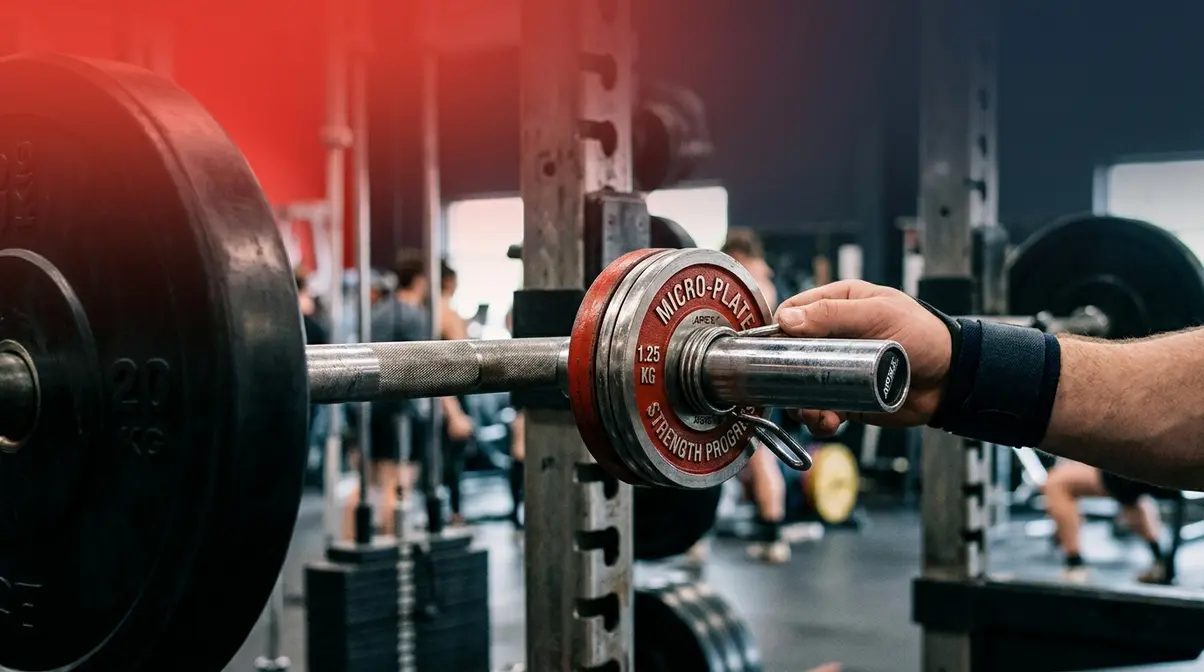
Micro-loading tip: If you can’t find 1.25 kg plates at your gym, buy a pair of fractional plates (often called “micro-plates”). These allow you to add 2.5 lbs (1.25 kg) instead of 5 lbs — critical for the overhead press, where most beginners stall first.
What to Do When You Fail a Set: The 3-Strike Rule
Failing a set means you did not complete all five reps with good form. This is normal and expected — it is a sign you are training at the right intensity. The 3-Strike Rule tells you exactly what to do:
- First failure: Repeat the same weight at your next session. Do not add weight.
- Second failure (same weight): Repeat the weight again. Consider adding 5 minutes of rest between sets.
- Third failure (same weight): Trigger the deload protocol (see below).
This rule prevents the most common beginner mistake: grinding away at a weight for weeks with no systematic response. Three failures at the same weight is a clear signal that your body needs a reset, not more attempts.
The Deload Protocol: How to Break Through a Plateau
A deload is a planned reduction in training weight — typically 10% — followed by a systematic rebuild back to and beyond your previous best. It is not a sign of failure. Every experienced lifter uses deloads. They are a tool.
StrongLifts 5×5 Deload Protocol:
- After your third consecutive failure at the same weight, reduce that exercise’s weight by 10%
- Round down to the nearest weight you can load with available plates
- Resume adding weight every session as normal from the deloaded weight
- When you reach your previous sticking point, your body will typically push through it — because the deload allowed full recovery
Example: You fail 80 kg squats three times. Deload to 72 kg (round to 70 kg). Add 2.5 kg each session: 70 → 72.5 → 75 → 77.5 → 80 → 82.5 kg (new personal best).
Common pain points reported by beginners include frustration with the deload — it feels like going backward. It is not. Research on fatigue management (Zourdos et al., 2016, Journal of Strength and Conditioning Research) confirms that strategic load reductions allow neuromuscular recovery that enables subsequent performance improvements.
Rest Times Between Sets: The Science-Backed Answer
The official StrongLifts programme recommends 90 seconds of rest between sets. Strength coaching communities and research suggest this is too short for most beginners — especially as weights get heavy.
A landmark study by Schoenfeld et al. (2016, Journal of Strength and Conditioning Research) found that three minutes of rest between sets produced significantly greater strength and muscle gains than one-minute rest periods. The mechanism: longer rest allows more complete phosphocreatine (the energy system used for maximal strength efforts) replenishment.
Evidence-based rest time recommendations:
| Weight Relative to Your Max | Recommended Rest |
|---|---|
| Light (warm-up sets) | 60-90 seconds |
| Moderate (first 2-3 working sets) | 2-3 minutes |
| Heavy (last 2 working sets) | 3-5 minutes |
| After deadlift (single heavy set) | 5+ minutes before next exercise |
Practical rule: Rest until your breathing has fully normalised and you feel confident you can complete the next set with good form. For beginners, this is almost always longer than 90 seconds. Do not rush rest periods to save time — incomplete recovery is a leading cause of beginner stalls.
Tracking Your Lifts: App, Spreadsheet, and Notebook Options
Tracking is not optional on StrongLifts 5×5. The entire programme depends on knowing exactly what weight you lifted last session. Without a log, you will forget, guess, and stall.
Three free options:
- StrongLifts App (iOS/Android) — the official app auto-calculates your next weight and tracks all sessions. The free version covers everything a beginner needs. The paid version adds analytics and plate calculator features.
- Google Sheets Tracker — Download free template — works on any device, shareable with a coach or training partner, and fully customisable.
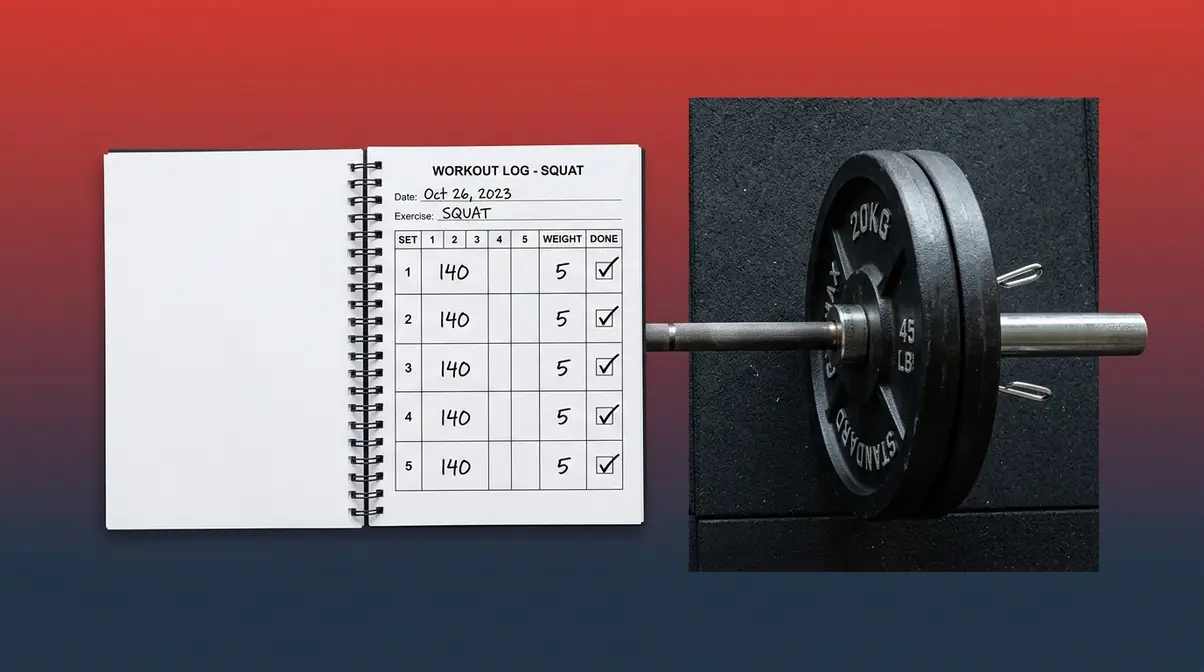
- Printable PDF Log — Download free PDF — ideal if you prefer pen-and-paper logging. Print a new sheet each week.
- Notion Template — Download free template — best for users who already use Notion for other planning.
Which should you use? The StrongLifts app is the lowest-friction option for most beginners. If you dislike apps tracking your data, the Google Sheets tracker provides identical functionality with full control.
Is StrongLifts 5×5 Worth It? An Honest Review
StrongLifts 5×5 is a genuinely effective programme. It is also not perfect. This section gives you both sides — what the programme does exceptionally well and where its real limitations lie — so you can make an informed decision.
What StrongLifts 5×5 Does Well
Simplicity that enables consistency. The biggest reason beginners fail programmes is complexity — too many exercises, too many variables, too much to track. StrongLifts 5×5 removes almost all of that. You have two workouts, five exercises, and one rule. Strength coaches consistently point to adherence as the primary driver of beginner results, and this programme’s simplicity dramatically increases adherence.
Rapid early strength gains. Linear progression works. Beginners following the programme correctly report squat increases of 30-50 kg within their first three months — a rate of progress that no intermediate programme can match. The NSCA’s position stand on resistance training (2009, updated 2019) confirms that beginners respond to a broader range of training stimuli than intermediate or advanced lifters, making simple linear programmes highly effective.
Full-body frequency. Training each muscle group three times per week (or close to it) is consistent with the research on training frequency for beginners. A 2018 meta-analysis by Ralston et al. found that higher weekly training frequencies produced greater strength gains in novice lifters, all else being equal.
Zero equipment complexity. You need a barbell, a rack, and plates. No cables, no machines, no guesswork about exercise order.
The Real Criticisms of StrongLifts 5×5
No programme is ideal for everyone, and intellectual honesty demands acknowledging where StrongLifts 5×5 falls short.
“Good for starters looking to learn moves and get strong. You’ll gain muscle but not as much if you were doing higher reps and more volume.”
This user observation, shared widely across strength training communities, captures the central limitation precisely. The programme is designed for strength, not hypertrophy (muscle size). Research by Schoenfeld (2010, Journal of Strength and Conditioning Research) established that hypertrophy is maximised in the 6-12 rep range with moderate loads — not the 5-rep, near-maximal loads that StrongLifts emphasises. Beginners will build muscle on this programme, but those prioritising aesthetics over strength should supplement with the assistance work described earlier in this guide.
Additional criticisms:
- No upper body pulling volume on Workout B — the deadlift replaces the row, leaving a horizontal pull gap
- Overhead press stalls early — most beginners hit their first OHP plateau within 8-10 weeks; the programme’s response (deload) can feel discouraging
- High squat frequency is taxing — squatting every session works for many beginners but creates knee discomfort for others with pre-existing mobility limitations
- No conditioning or cardiovascular component — the programme does not address aerobic fitness
The 5×5 Foundation Stack — core lifts, structured progression, and targeted assistance work — addresses these gaps when implemented as a complete system rather than following the base programme alone.
StrongLifts 5×5 vs. Starting Strength: Which Is Better for Beginners?
Both programmes use linear progression and compound barbell exercises. The differences are meaningful but not dramatic.
| Feature | StrongLifts 5×5 | Starting Strength |
|---|---|---|
| Volume | 5 sets × 5 reps (main lifts) | 3 sets × 5 reps (main lifts) |
| Deadlift frequency | 1.5× per week | Every session |
| Power clean | No | Yes (replaces row in Workout B) |
| Squat frequency | Every session | Every session |
| App support | Yes (free) | Third-party only |
| Best for | Beginners wanting more volume | Beginners focused on pure strength |
| Primary resource | stronglifts.com | Starting Strength (book) |
Our evaluation: StrongLifts 5×5 is marginally better for most beginners because its higher volume (5×5 vs 3×5) provides a slightly greater hypertrophy stimulus, and the free app reduces friction. Starting Strength’s inclusion of the power clean is valuable for athletic development but adds a technically demanding movement that most beginners struggle to learn without coaching. For a complete beginner with no coach, StrongLifts 5×5 is the more accessible starting point.
For a deeper comparison, PowerliftingToWin’s Starting Strength vs StrongLifts analysis provides an excellent breakdown from a strength sport perspective.
What to Do After StrongLifts 5×5: Intermediate Programmes
You will know you’ve outgrown StrongLifts 5×5 when you can no longer add weight every session despite correct deload protocols — typically after 4-9 months of consistent training. At that point, you need a programme that manipulates volume and intensity across longer cycles.
Recommended next steps:
- GZCLP — the most popular Reddit-recommended transition; adds a tiered exercise structure with built-in volume progression
- Texas Method — a weekly volume/intensity split designed specifically for the linear-to-intermediate transition
- 5/3/1 (Jim Wendler) — a monthly cycle programme that works well for lifters who want more structure and variety
- PHUL (Power Hypertrophy Upper Lower) — ideal if aesthetics and hypertrophy become a higher priority
The transition point is not a failure. It is a graduation. Every intermediate programme builds on the strength base you built with StrongLifts 5×5.
Common Mistakes and Safety Precautions
The most common beginner errors on StrongLifts 5×5 are predictable — and preventable. Our review of community feedback across r/Stronglifts5x5 and r/fitness identified these patterns repeatedly.
5 Common Beginner Mistakes to Avoid
- Starting too heavy. The single most common mistake. Ego-loading the bar in week one leads to poor form, early stalls, and injury. Start with the empty bar (20 kg) for every exercise except the deadlift (start with 60 kg or whatever allows perfect form). You will add weight every session — you will reach challenging weights faster than you expect.
- Skipping the warm-up sets. Warm-up sets are not optional — they groove your movement pattern, prepare your joints, and reduce injury risk. Never go straight to your working weight.
- Ignoring rest times. Cutting rest to 60-90 seconds when you need 3-4 minutes is the fastest way to stall. Rest as long as you need to complete the next set with full effort and good form.
- Not logging workouts. If you do not write down what you lifted, you will guess — and guessing leads to inconsistent progression. Use the free tracking tools in this guide.
- Adding too much assistance work too soon. More is not better. Adding six assistance exercises in week one will leave you so sore you cannot complete your next session. Build gradually: add one exercise per session in weeks 1-4, then assess recovery.
When StrongLifts 5×5 Isn’t the Right Choice
StrongLifts 5×5 is not the right programme if:
- You are recovering from a lower body injury — high squat frequency will aggravate most knee, hip, and lower back issues. Consult a physiotherapist before starting.
- Your primary goal is fat loss — while strength training supports fat loss, a programme with more conditioning work (circuits, HIIT, or metabolic resistance training) will be more appropriate as a primary intervention.
- You cannot commit to three sessions per week consistently — the linear progression model depends on regular, frequent stimulus. Sporadic training (once per week) will not produce the expected results.
- You are an experienced lifter — if you have trained consistently for over 12 months and can squat 1.5× bodyweight, you have likely outgrown linear progression and need a programme with weekly or monthly wave loading.
When to Seek Professional Guidance
Certain situations require professional input — not a guide, however detailed.
- Pain in joints during any exercise (not muscle fatigue — actual joint pain): Stop the exercise and consult a sports medicine physician or physiotherapist before continuing.
- Pre-existing spinal conditions (herniated discs, scoliosis, previous surgery): The squat and deadlift place significant spinal load. Get medical clearance and, ideally, work with a certified strength coach for your first 4-8 weeks.
- Cardiovascular conditions or high blood pressure: Heavy barbell training produces significant cardiovascular demand. Consult your physician before starting.
- No access to coaching: If your gym has a personal trainer, one or two form-check sessions are worth the investment — especially for the squat and deadlift.
Frequently Asked Questions
Is StrongLifts 5×5 good for beginners?
StrongLifts 5×5 is one of the most beginner-friendly barbell programmes available. Its two-workout structure, five compound exercises, and single progression rule eliminate the complexity that causes most beginners to abandon programmes. Research on novice adaptation confirms that simple, consistent linear programmes produce rapid strength gains in the first 3-6 months of training. The main caveat: add targeted assistance exercises (curls, face pulls, lateral raises) if aesthetics matter alongside strength — the base programme alone underserves arm and shoulder development.
How much weight should I start with on StrongLifts 5×5?
Start every exercise with the empty bar (20 kg / 45 lbs) — even if it feels easy. This is not weakness; it is strategy. The empty bar allows you to groove perfect movement patterns before adding load. You will add weight every session, so you will reach challenging weights within 2-4 weeks. The one exception is the deadlift: start with 60 kg (a 20 kg bar plus 20 kg plates) or whatever weight allows you to maintain a completely flat back throughout the movement.
What happens if I miss a session?
Missing one session is not a problem — just pick up where you left off. Do not add extra sessions to “make up” for missed training; this increases injury risk. If you miss two or more consecutive weeks due to illness or travel, reduce your working weights by 10-20% and rebuild. Your strength returns faster than it was originally built — this is called muscle memory (the ability of trained muscle fibres to regain strength faster than they gained it originally). Consistent attendance over months matters far more than any single missed session.
How long does it take to see results on StrongLifts 5×5?
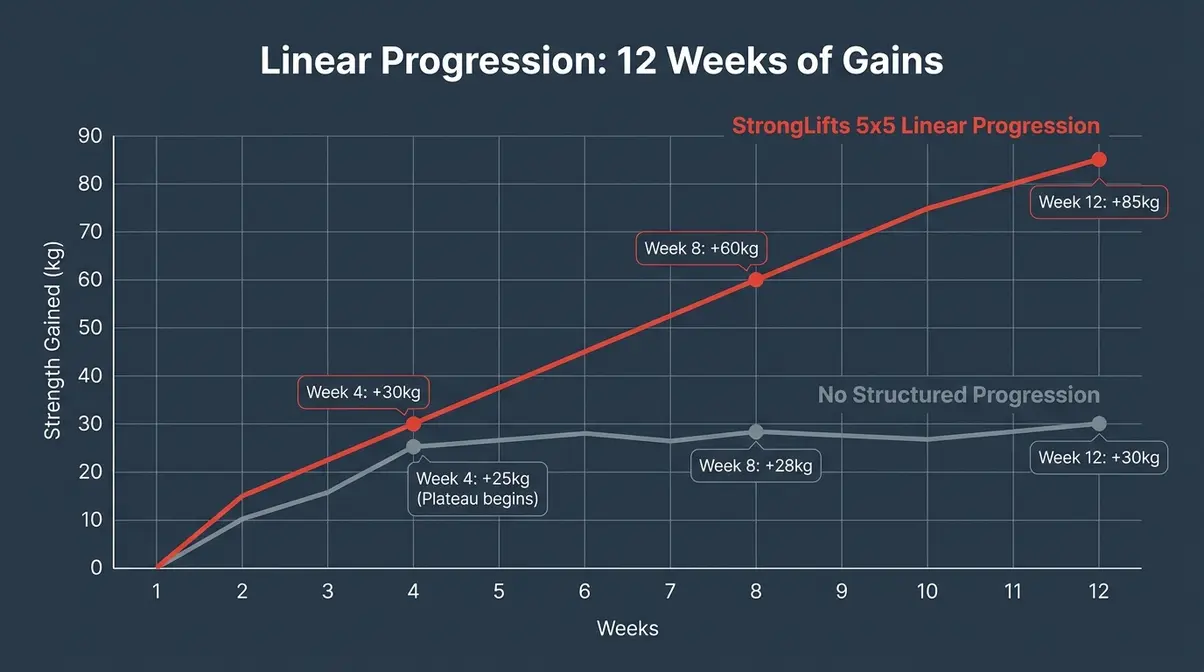
Most beginners notice strength improvements within 2-3 weeks and visible muscle changes within 6-8 weeks. Strength gains come first because your nervous system adapts faster than your muscles grow. User consensus across strength training communities suggests beginners following the programme consistently for 12 weeks typically add 30-50 kg to their squat and 15-25 kg to their bench press. Results vary based on starting fitness level, nutrition, sleep quality, and programme adherence.
Do I need to follow a specific diet on StrongLifts 5×5?
No specific diet is required, but nutrition significantly affects your results. To build strength and muscle simultaneously, aim to eat at or slightly above your maintenance calorie level — roughly bodyweight in pounds × 16 calories as a starting estimate. Prioritise protein: evidence-based recommendations from the NSCA suggest 1.6-2.2 g of protein per kg of bodyweight per day for those engaged in resistance training (Morton et al., 2018, British Journal of Sports Medicine). Adequate sleep (7-9 hours per night) is equally important — most muscle repair occurs during sleep, not during training.
Conclusion
StrongLifts 5×5 remains one of the most effective ways for a complete beginner to build foundational strength and muscle — precisely because it is built on sound principles that research consistently supports: linear progression, compound movements, and full-body frequency three times per week. The programme’s simplicity is not a limitation; it is the feature that makes it work when more complex programmes cause beginners to quit.
The 5×5 Foundation Stack — the combination of the five core lifts, structured progression rules, and targeted assistance work — is what transforms StrongLifts 5×5 from a basic strength programme into a complete beginner system. The base programme builds strength. The assistance exercises build the physique. The progression rules keep you moving forward for months.
Your next step is concrete: download the free Google Sheets tracker or PDF log from this guide, load the bar to 20 kg, and start with Workout A this week. Give the programme 12 weeks of consistent effort before evaluating. The beginners who see the best results are not the ones who find the perfect programme — they are the ones who pick a good programme and execute it consistently. StrongLifts 5×5 is a very good programme. Now go lift.