⚕️ Medical Disclaimer: The information in this article is for educational purposes only and does not constitute medical or professional fitness advice. Consult a licensed physician or certified personal trainer (CPT) before beginning any new exercise program — especially if you have a pre-existing injury, health condition, or have been sedentary for an extended period. Exercise carries inherent risk; always prioritize safety over progression.
Most beginners spend months in the gym doing the wrong exercises and wonder why they’re not getting stronger. The truth is, five movements — done consistently and correctly — will do more for your strength than any other combination you could choose. These are the best compound exercises for strength, and they’ve been the foundation of effective training programs for decades.
Every day you spend on the cable machine or the leg extension is a day you’re leaving real strength gains on the table. The most effective lifts aren’t a secret — but most gym guides bury them in noise, leaving you more confused than when you started.
By the end of this guide, you’ll know exactly which are the best compound exercises for strength, how to perform each one safely, and how to structure your training around them — whether you’re at a fully-equipped gym or working out at home. We’ll cover what compound exercises are, rank the top five by muscle recruitment and strength payoff, and show you how to program them for your specific goal.
The best compound exercises for strength recruit multiple muscle groups at once — research shows multi-joint movements are more time-efficient for building strength than single-joint exercises (NCBI, 2015).
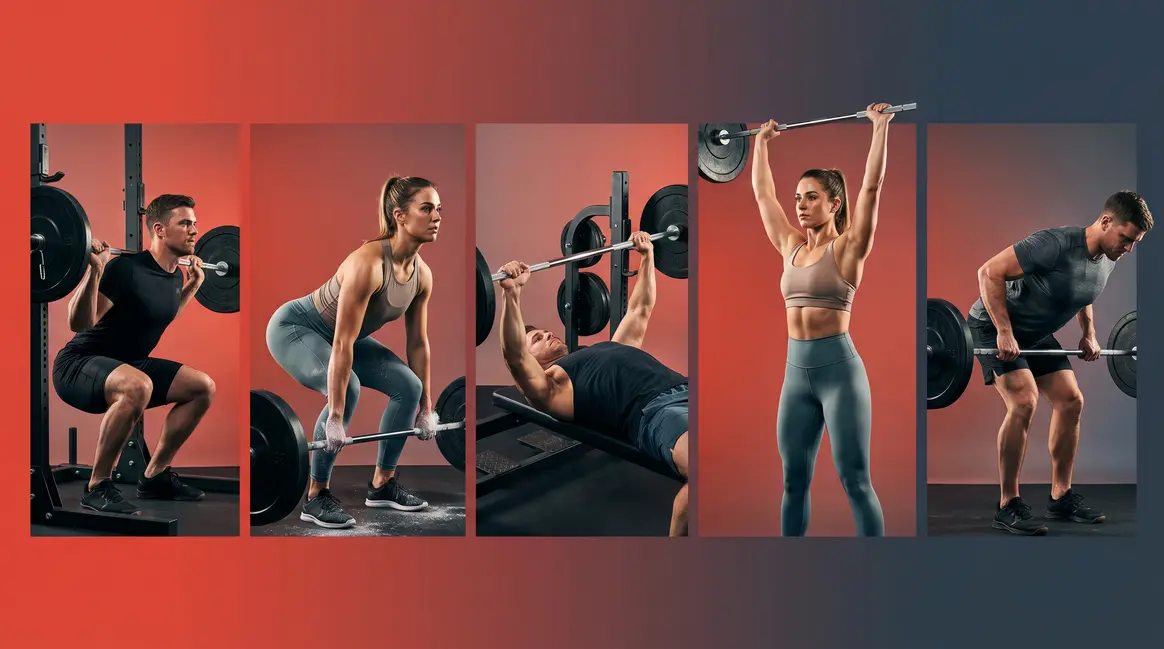
- The Big 5 lifts — squat, deadlift, bench press, overhead press, and pull-up/barbell row — cover every major movement pattern your body uses.
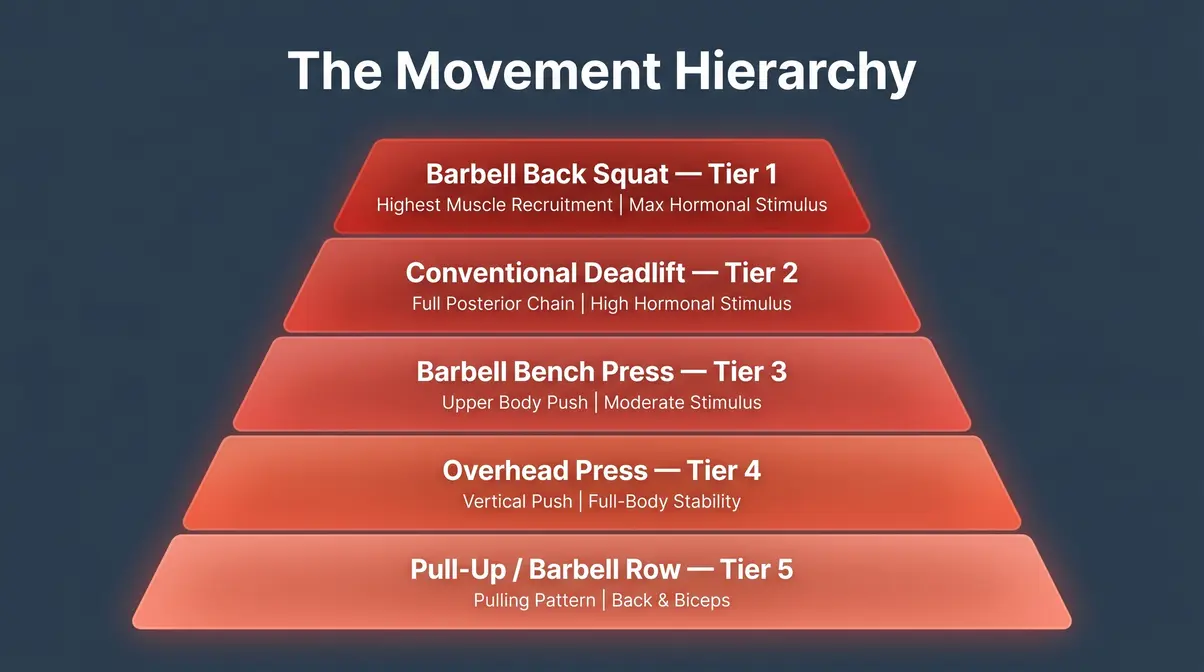
- The Movement Hierarchy ranks these lifts by muscle recruitment and hormonal stimulus — the squat and deadlift sit at the top.
- Home alternatives exist for every barbell lift — no gym membership required to start building strength.
- Programming matters: 1–5 reps builds pure strength; 6–12 reps builds muscle size (hypertrophy).
What Are Compound Exercises & Why They Work
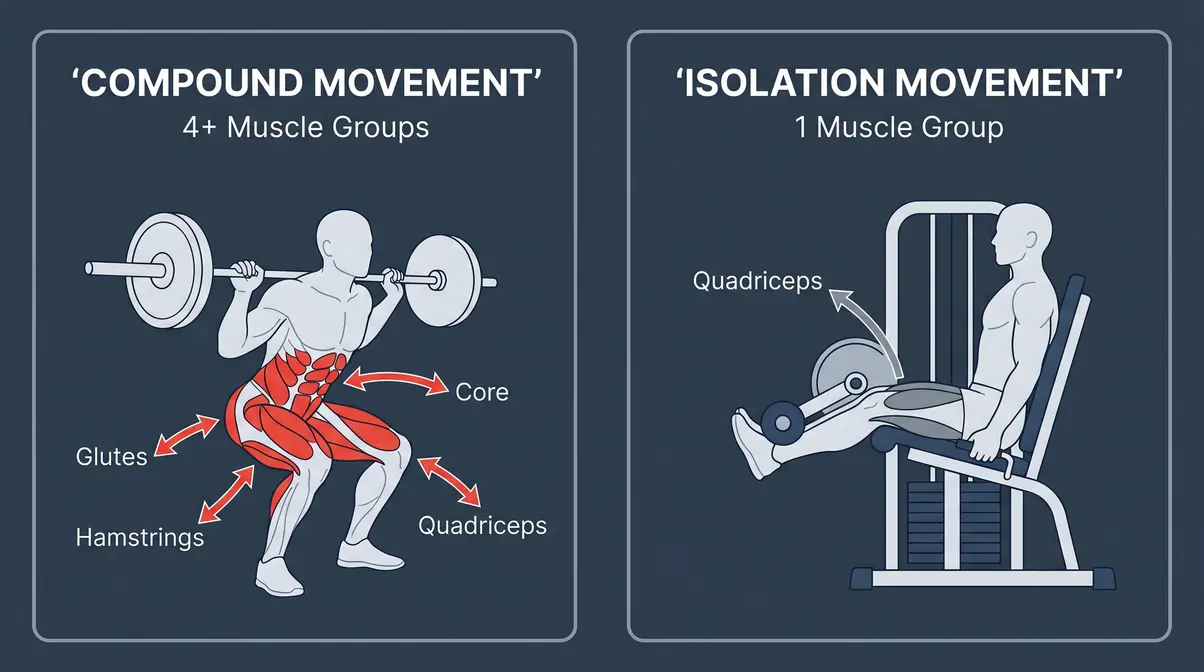
A compound exercise is any movement that uses two or more joints and recruits multiple muscle groups at the same time. The barbell squat, for example, works your quads, hamstrings, glutes, and core simultaneously. That’s why compound exercises are the foundation of every effective strength training program — and why they deliver more results in less time than almost anything else you can do in the gym.
Not all compound exercises are created equal, though. Throughout this guide, we’ll use The Movement Hierarchy — a framework that ranks lifts by total muscle recruitment, hormonal stimulus, and strength transfer — to show you which ones deserve your time most.
The Simple Definition (and Why It Matters for Your Training)
A compound exercise uses at least two joints — like your hip and knee — and activates multiple muscle groups in one movement. Compare that to an isolation exercise, which targets one muscle group using a single joint, like a bicep curl (elbow joint only) or a leg extension (knee joint only). The difference in efficiency is enormous.
Think of compound lifts as “big ticket” exercises. They cost more effort, but they pay out far more in return. A barbell squat works your quads (the four muscles on the front of your thigh), hamstrings (back of the thigh), glutes (your backside), and core (the muscles stabilizing your spine) — all in one set. A leg extension works only your quads.
If you have limited time, compound exercises give you the most muscle activation per minute in the gym. NCBI research confirms that multi-joint exercises provide a more time-efficient approach to increasing muscle strength and size compared to single-joint exercises (2015). For beginners learning what strength training actually means, this distinction shapes everything about how you should train.
Compound vs. Isolation Exercises: Which Builds Strength Faster?
An isolation exercise targets one muscle group using one joint — like a dumbbell curl (elbow joint only) or a leg extension (knee joint only). Isolation work isn’t useless; it plays a real role in rehabilitation, fixing muscle imbalances, and targeting a weak link in a movement chain. But for building full-body strength from scratch, compound exercises win decisively.
Here’s why: compound movements recruit more motor units (the groups of muscle fibers your brain signals to contract), and they stimulate a significantly greater release of testosterone and growth hormone. The University of Rochester Medical Center notes that free-weight compound movements engage stabilizer muscles — the smaller supporting muscles that machines simply can’t train — far more effectively than fixed equipment.
| Exercise Type | Joints Used | Muscles Activated | Best For |
|---|---|---|---|
| Barbell Row (compound) | Hip, shoulder, elbow | Back, biceps, rear delts, core | Total-body pulling strength |
| Dumbbell Curl (isolation) | Elbow | Biceps only | Bicep size/detail |
| Barbell Squat (compound) | Hip, knee, ankle | Quads, hamstrings, glutes, core | Lower-body strength + power |
| Leg Extension (isolation) | Knee | Quads only | Quad detail, rehab |
The table above makes the efficiency gap impossible to ignore. One set of barbell rows builds your back, biceps, rear deltoids (the back of your shoulder), and core. One set of dumbbell curls builds your biceps — and that’s it.
4 Science-Backed Reasons to Build Your Workouts Around Compound Lifts
The case for compound exercises isn’t just logical — it’s backed by research. Here are four reasons the evidence points firmly in their direction.
1. Time Efficiency
CDC physical activity guidelines recommend that adults perform muscle-strengthening activities targeting all major muscle groups at least 2 days per week. Compound exercises let you meet that requirement in fewer, shorter sessions. Why this matters for you: a 45-minute session built around squats, deadlifts, and rows hits every major muscle group — no hour-long machine circuit required.
2. Greater Calorie Burn
More muscles working simultaneously means more energy required per set. Research consistently shows that multi-joint exercises produce a higher metabolic demand than single-joint alternatives. Why this matters for you: if body composition (losing fat while building muscle) is part of your goal, compound lifts give you a two-for-one benefit.
3. Hormonal Response
Multi-joint movements involving large muscle groups — squats, deadlifts, overhead presses — stimulate a measurably greater release of testosterone and growth hormone compared to isolation work. Harvard Health notes that resistance training involving large muscle groups produces the strongest anabolic (muscle-building) hormonal response of any exercise modality. Why this matters for you: more hormonal stimulus means faster adaptation and strength gains.
4. Intermuscular Coordination
Compound lifts train your muscles to work together as a system — not in isolation. This intermuscular coordination (the ability of multiple muscle groups to fire in sequence and synchronize) transfers directly to real-world activities: lifting groceries, carrying furniture, climbing stairs, and virtually every sport. Why this matters for you: the strength you build with compound exercises isn’t just gym strength — it’s life strength.
The 5 Best Compound Exercises for Strength
“The 5 main compound exercises: squats, deadlifts, bench press, overhead press, barbell row. If you have the time, I would also recommend…”
This is how experienced lifters and certified coaches consistently describe the foundation of any effective program. Fitness professionals across certified training communities agree that these five movements — the Big 5 lifts — cover every major human movement pattern: squat, hinge, push (horizontal), push (vertical), and pull. If you build your program around these compound lifts for strength, you cover your entire body with the minimum number of exercises possible.
What are the big 5 compound lifts?
The big 5 compound lifts are the squat, deadlift, bench press, overhead press, and barbell row (or pull-up). These are the five foundational movements that appear in virtually every evidence-based strength program — from Starting Strength to the StrongLifts 5×5 plan to Greyskull LP. They’re called the “big 5” because they collectively train every major muscle group and movement pattern the human body uses, making them the most efficient compound exercises for strength and total-body development.
How We Selected and Ranked These 5 Lifts
Our team evaluated hundreds of resistance exercises against three criteria drawn from exercise science literature: total muscle recruitment (how many muscle groups a lift activates), hormonal stimulus (the degree of testosterone and growth hormone response), and real-world strength transfer (how directly the movement pattern translates to athletic and functional performance). These three criteria form The Movement Hierarchy — the ranking framework used throughout this guide.
Exercises were cross-referenced against data from StrengthLog’s compound exercise database, biomechanics research on EMG (electromyography — the measurement of electrical activity in muscles during exercise) activation, and programming recommendations from Garage Gym Reviews and Strength Ambassadors. The result: five exercises that no legitimate strength program omits.
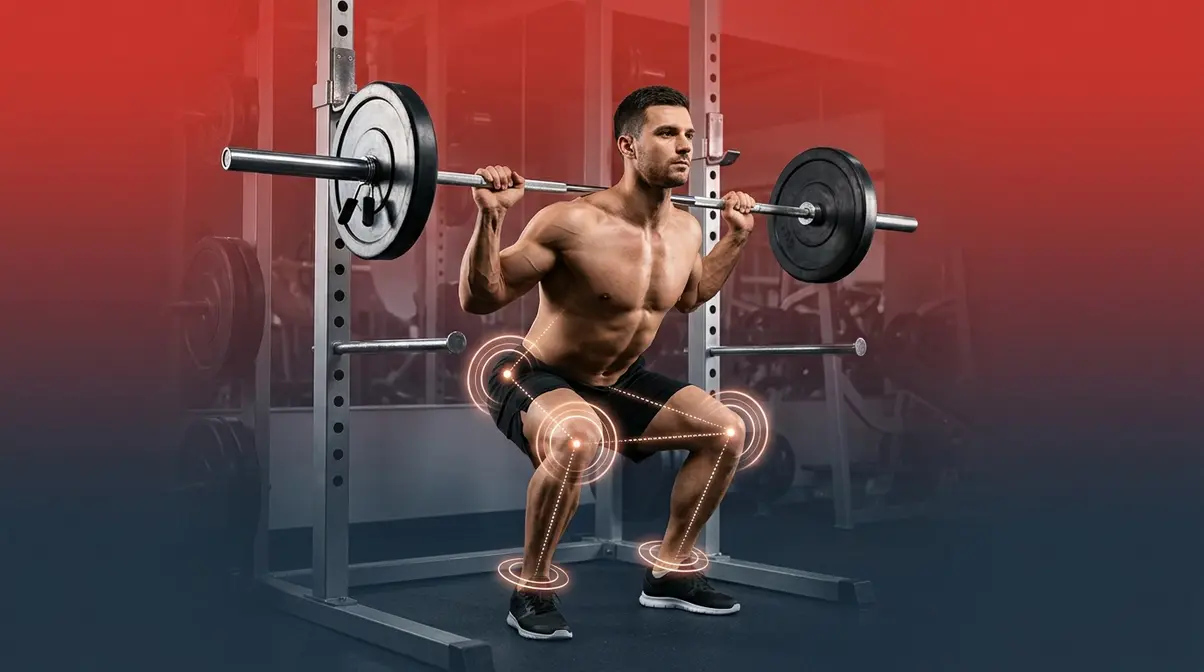
1. Barbell Back Squat

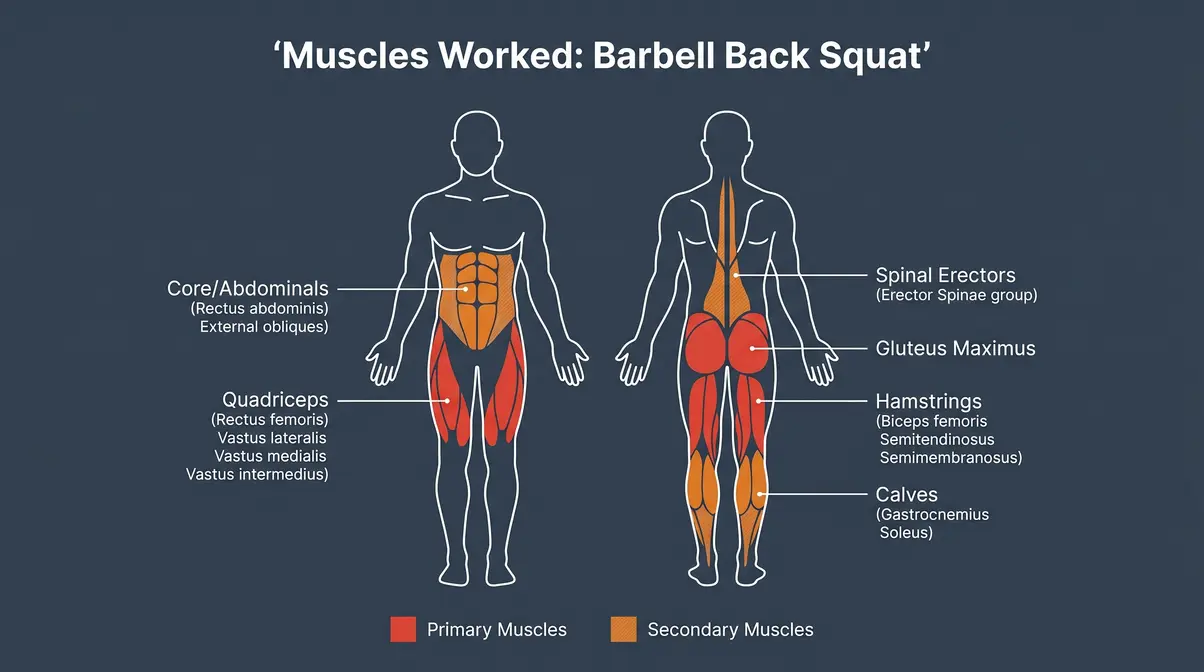
Tier 1 in The Movement Hierarchy | Primary muscles: Quadriceps, Glutes, Hamstrings | Secondary: Core, Spinal Erectors, Calves
The barbell back squat is the king of the gym — and that title is earned, not assigned. No other single exercise recruits as many muscle groups under as much load. Research using EMG analysis consistently identifies the squat as producing the highest combined lower-body and core muscle activation of any compound movement. For any beginner serious about building total-body strength, this is where you start.
If you have a pre-existing injury or health condition, consult a certified personal trainer or physician before attempting this lift.
- Muscles Worked:
- Primary: Quadriceps (front of thigh), Gluteus Maximus (glutes/backside), Hamstrings (back of thigh)
- Secondary: Core (abdominals and obliques), Spinal Erectors (muscles running along your spine), Calves, Hip Adductors (inner thigh)
5-Step Form Guide:
Step 1: Set up the bar
Set up the bar at upper-chest height on a squat rack. Step under it and rest it across your upper traps (the muscular shelf at the top of your back — not your neck). Grip the bar just outside shoulder width. Why this matters: correct bar position distributes load across your back, not your spine.
Step 2: Unrack and step back
Take two steps back, feet shoulder-width apart, toes turned out 15–30 degrees. Take a deep breath and brace your core (imagine someone is about to punch you in the stomach). Why: core bracing creates intra-abdominal pressure that protects your spine under load.
Step 3: Initiate the descent
Push your hips back and bend your knees simultaneously. Keep your chest up and your spine neutral (no rounding). Lower until your thighs are at least parallel to the floor. Why: parallel depth ensures full glute and hamstring engagement.
Step 4: Drive back up
Push the floor away with your whole foot — heels and toes both in contact. Keep your knees tracking over your toes throughout the movement. Why: this prevents knee cave, one of the most common squat injuries.
Step 5: Lock out at the top
Squeeze your glutes and fully extend your hips and knees. Breathe out at the top. Re-brace before the next rep. Why: full lockout ensures you’re training the full range of motion.
- 3 Common Mistakes:
- Knee cave (valgus collapse): Your knees falling inward during the ascent. Fix: actively push your knees out over your toes throughout the movement.
- Forward torso lean: Excessive forward lean usually means tight ankles or weak upper back. Fix: elevate heels slightly on plates or work on ankle mobility before your session.
- Half-repping: Stopping above parallel to use more weight. Fix: reduce load and squat to depth — partial squats underwork the glutes and hamstrings entirely.
Home/Dumbbell Alternative: Hold a dumbbell in each hand at your sides (goblet squat: hold one dumbbell vertically at chest height) and perform the same movement pattern. The goblet squat is an outstanding teaching tool — the front-loaded weight naturally pulls you into an upright torso position.
Pro Tip: Film yourself from the side on your first few sessions. Most beginners are shocked by how much forward lean they have — video feedback fixes form faster than any coaching cue.
2. Conventional Deadlift
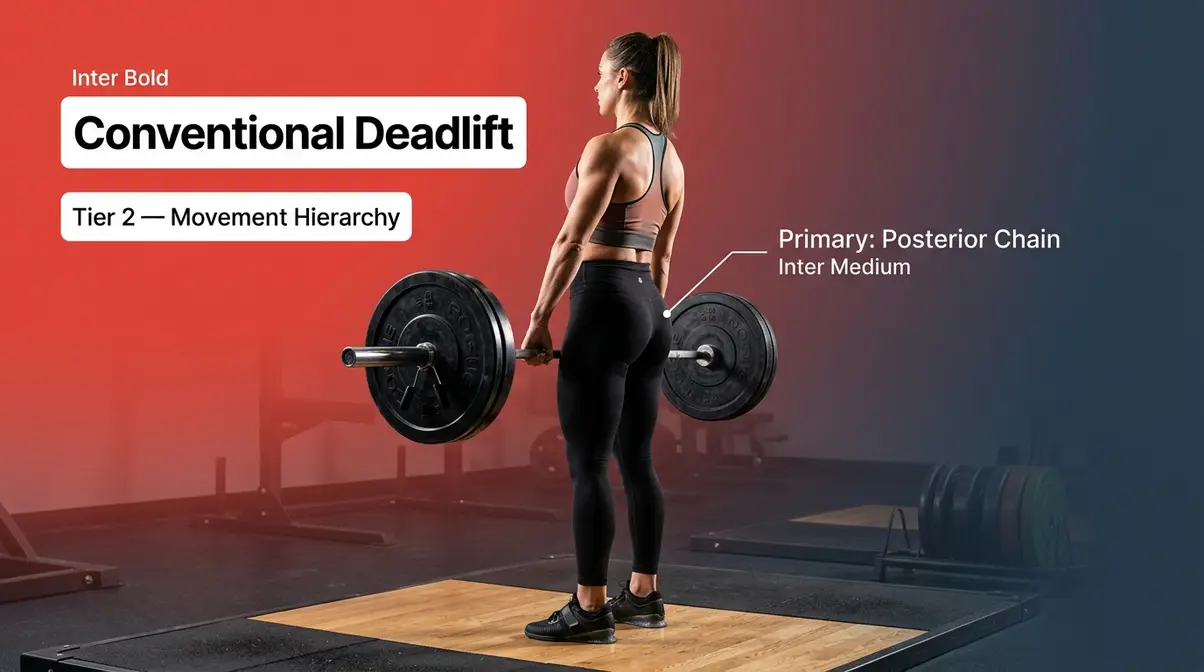
Tier 2 in The Movement Hierarchy | Primary muscles: Posterior Chain, Glutes | Secondary: Quads, Core, Traps, Forearms
The conventional deadlift trains the posterior chain (the muscles along the back of your body — glutes, hamstrings, and spinal erectors) more completely than almost any other movement. It is the purest test of total-body strength: you pick a heavy object off the floor. Every muscle in your body contributes. Studies measuring muscle activation during the deadlift show simultaneous high recruitment across the glutes, hamstrings, spinal erectors, traps, and forearms — a combination no isolation exercise can replicate.
If you have a pre-existing injury or health condition, consult a certified personal trainer or physician before attempting this lift.
- Muscles Worked:
- Primary: Hamstrings, Gluteus Maximus, Spinal Erectors (lower back muscles running alongside your spine)
- Secondary: Quadriceps, Core, Trapezius (the large muscle across your upper back and neck), Forearm Flexors, Lats (the broad muscles of your mid-back)
5-Step Form Guide:
Step 1: Position your feet
Stand with the bar over your mid-foot — about an inch from your shins. Keep your feet hip-width apart, toes pointing forward or slightly out. Why: this position puts you in the strongest mechanical position to pull.
Step 2: Hinge and grip
Hinge at the hips (push them back, not down) and grip the bar just outside your legs. Take a big breath, brace your core hard, and pull your shoulder blades back and down — “proud chest.” Why: this pre-loads your lats and protects your lower back.
Step 3: Push the floor away
Don’t think “pull the bar up,” think “push the earth down.” Drive through your heels as the bar rises. Keep the bar dragging up your shins. Why: keeping the bar close minimizes the torque (rotational force) on your lower back.
Step 4: Lock out
Drive your hips forward and squeeze your glutes as the bar passes your knees. Stand tall — don’t hyperextend (lean back excessively) at the top. Why: hyperextension at lockout compresses the lumbar spine.
Step 5: Lower with control
Hinge at the hips first, then bend the knees once the bar passes them. Don’t just drop the weight. Why: controlled descent builds eccentric strength and reduces injury risk.
- 3 Common Mistakes:
- Rounding the lower back: The single most dangerous deadlift error. Fix: reduce the weight significantly and practice the hip hinge pattern with a broomstick until your spine stays neutral.
- Bar drifting away from the body: Creates a long moment arm (the distance between the load and your spine), dramatically increasing lower back stress. Fix: keep the bar in contact with your legs throughout the pull.
- Jerking the bar off the floor: Yanking the bar attempts to use momentum instead of muscle. Fix: take the slack out of the bar first (apply gentle upward tension before the main pull), then pull smoothly.
Home/Dumbbell Alternative: Romanian Deadlift (RDL) with dumbbells — hold a dumbbell in each hand, hinge at the hips while keeping a neutral spine, lower the dumbbells along your thighs until you feel a stretch in your hamstrings, then drive your hips forward to stand. This is an excellent hamstring and glute builder that requires no barbell.
Pro Tip: The deadlift is a hinge, not a squat. If your hips are dropping too low, you’re turning it into a squat and losing the posterior chain benefits. Think “hips high, chest proud” as your setup cue.
3. Barbell Bench Press
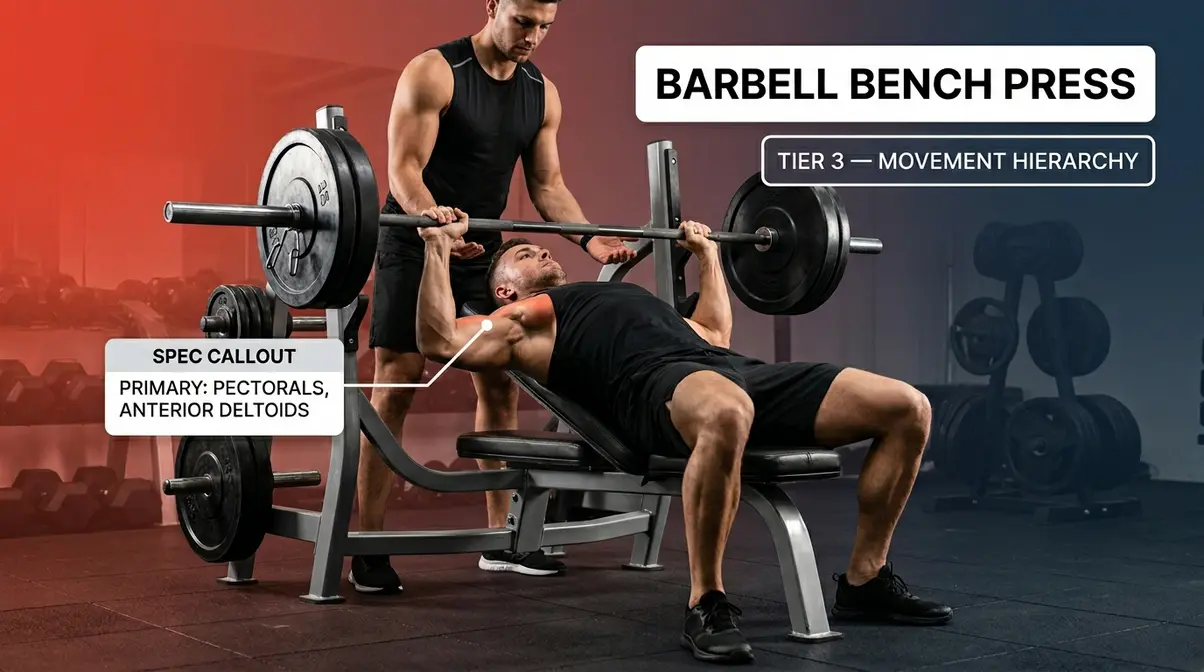
Tier 3 in The Movement Hierarchy | Primary muscles: Pectorals, Anterior Deltoids | Secondary: Triceps, Serratus Anterior
The barbell bench press is the standard horizontal pushing movement — and the most widely tested upper-body strength exercise in the world. It develops the pectorals (chest muscles), anterior deltoids (front of the shoulder), and triceps (back of the upper arm) under the heaviest loads a horizontal push will ever encounter. According to Muscle & Fitness, the bench press consistently ranks as one of the top compound lifts for upper-body mass and strength development.
If you have a pre-existing injury or health condition, consult a certified personal trainer or physician before attempting this lift.
- Muscles Worked:
- Primary: Pectoralis Major (chest), Anterior Deltoids (front of shoulder)
- Secondary: Triceps Brachii (back of upper arm), Serratus Anterior (the finger-like muscles along your ribs), Core (stabilization)
5-Step Form Guide:
Step 1: Set up on the bench
Lie with your eyes directly under the bar. Plant your feet flat on the floor. Create a slight natural arch in your lower back — your glutes and upper traps stay in contact with the bench. Why: this stable base lets you generate more force and protects your shoulder joint.
Step 2: Grip the bar
Place your hands slightly wider than shoulder width — thumbs wrapped around the bar (never a “thumbless” grip, which risks dropping the bar). Why: shoulder-width-plus grip targets the chest optimally without stressing the shoulder joint.
Step 3: Unrack the bar
Straighten your arms to unrack, then move the bar directly over your chest (not your face or belly). Take a deep breath and brace your core. Why: holding the bar directly over the chest is the strongest pressing position.
Step 4: Lower the bar
Bring the bar down to your mid-chest (nipple line) in a controlled arc. Keep your elbows at roughly 45–75 degrees from your torso, not flared straight out. Why: tucking the elbows slightly reduces shoulder impingement risk.
Step 5: Press the bar back up
Push in a slight arc toward your upper chest/chin as you exhale. Fully extend your arms at the top without locking out aggressively. Why: the arc follows the natural movement path of the shoulder joint.
- 3 Common Mistakes:
- Elbows flared at 90 degrees: Pointing elbows straight out puts enormous stress on the shoulder joint. Fix: tuck elbows to 45–75 degrees.
- Bouncing the bar off the chest: Using momentum instead of muscle. Fix: pause briefly at the chest, then press.
- Lifting your hips off the bench: Reduces the range of motion and compromises your base. Fix: keep feet flat, glutes and upper back in contact with the bench throughout.
Home/Dumbbell Alternative: Dumbbell Bench Press — the same movement with dumbbells allows a greater range of motion and is easier to learn safely without a spotter. Push-ups are also a legitimate alternative: a full push-up from the floor activates the chest, shoulders, and triceps in the same pattern and can be loaded progressively by elevating your feet.
Pro Tip: Always use a spotter or safety pins in a power rack when pressing heavy. Never bench press alone to failure without safety equipment — this is one of the most preventable gym injuries.
4. Overhead Press (OHP)
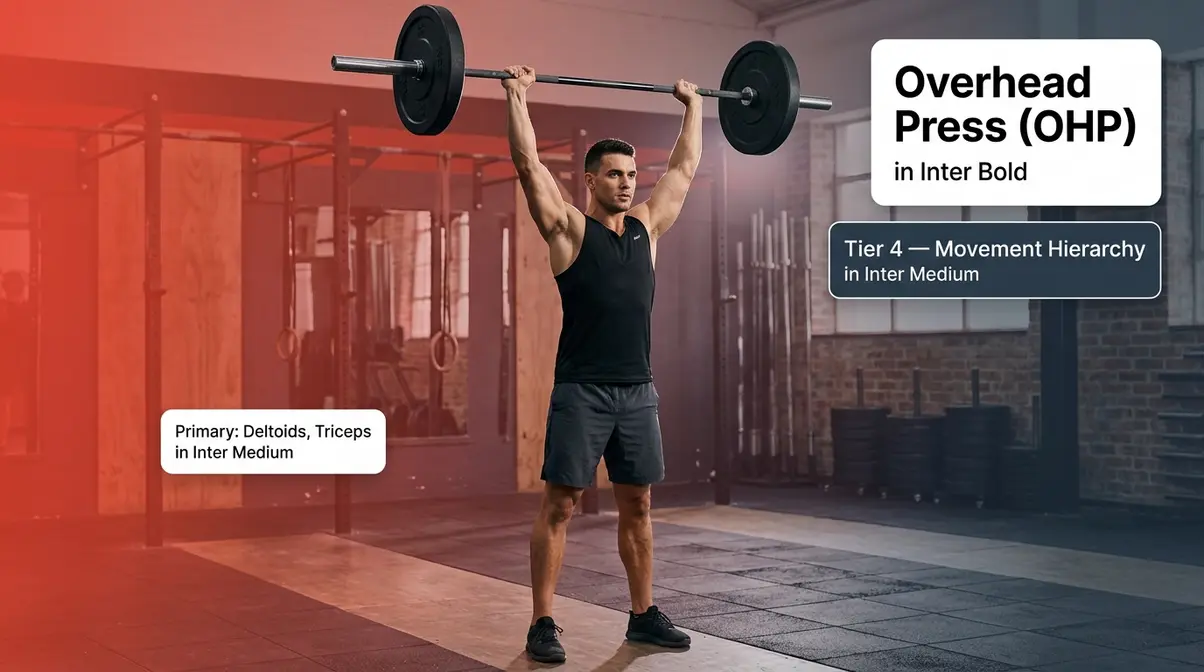
Tier 4 in The Movement Hierarchy | Primary muscles: Deltoids, Triceps | Secondary: Core, Traps, Upper Chest
The overhead press (OHP) — also called the shoulder press or military press — is the definitive vertical pushing movement. It develops the deltoids (the three-headed shoulder muscle), triceps, and upper chest while demanding significant core stability to prevent lower back extension under load. Unlike the bench press, the OHP is performed standing, which adds a whole-body stabilization demand that makes it uniquely challenging — and uniquely valuable.
If you have a pre-existing injury or health condition, consult a certified personal trainer or physician before attempting this lift.
- Muscles Worked:
- Primary: Deltoids (all three heads — front, side, and rear), Triceps Brachii
- Secondary: Upper Pectorals, Trapezius, Core (anti-extension stability), Serratus Anterior
5-Step Form Guide:
Step 1: Set the bar
Place the bar at upper-chest height in a rack. Grip just outside shoulder width, thumbs wrapped around the bar. Step back — feet hip-width apart. Why: stable foot position prevents swaying under load.
Step 2: Brace your core
Brace your core hard and squeeze your glutes before you press. Your body should be in a straight line from heels to ears — no excessive lower back arch. Why: a rigid torso transfers force efficiently from legs to bar.
Step 3: Press the bar upward
Drive the weight up. As the bar passes your forehead, move your head slightly back to let it clear, then bring it forward again as the bar rises. Why: moving your head prevents hitting your chin and allows a straight bar path.
Step 4: Lock out fully
Finish at the top with arms fully extended, bar directly over your mid-foot (viewed from the side), and ears in front of your biceps. Why: full lockout activates the upper traps and completes the shoulder range of motion.
Step 5: Lower with control
Bring the bar down smoothly to the front of your upper chest, re-brace, and repeat. Why: controlled descent builds shoulder strength through the full range.
- 3 Common Mistakes:
- Excessive lower back arch: Leaning back to compensate for weak shoulders or poor mobility. Fix: reduce the weight and focus on keeping your ribs down and core braced.
- Pressing in front of the body: Not achieving full lockout overhead. Fix: think “press to the ceiling, not the wall in front of you.”
- Bar path drifting forward: The bar should travel in a nearly straight vertical line. Fix: video from the side — if the bar swings forward, your core is not braced enough.
Home/Dumbbell Alternative: Seated or standing Dumbbell Shoulder Press — identical movement pattern with dumbbells, which also challenges each shoulder independently (helping to identify and correct imbalances). Pike Push-Ups are a bodyweight alternative: set up in a downward-dog position and lower your head toward the floor — this closely mimics the overhead pressing pattern.
Pro Tip: The OHP is humbling — most people can press far less than they expect. Start light, master the braced-core technique, and add weight slowly. Shoulder injuries are some of the most frustrating to recover from.
5. Pull-Up or Barbell Row
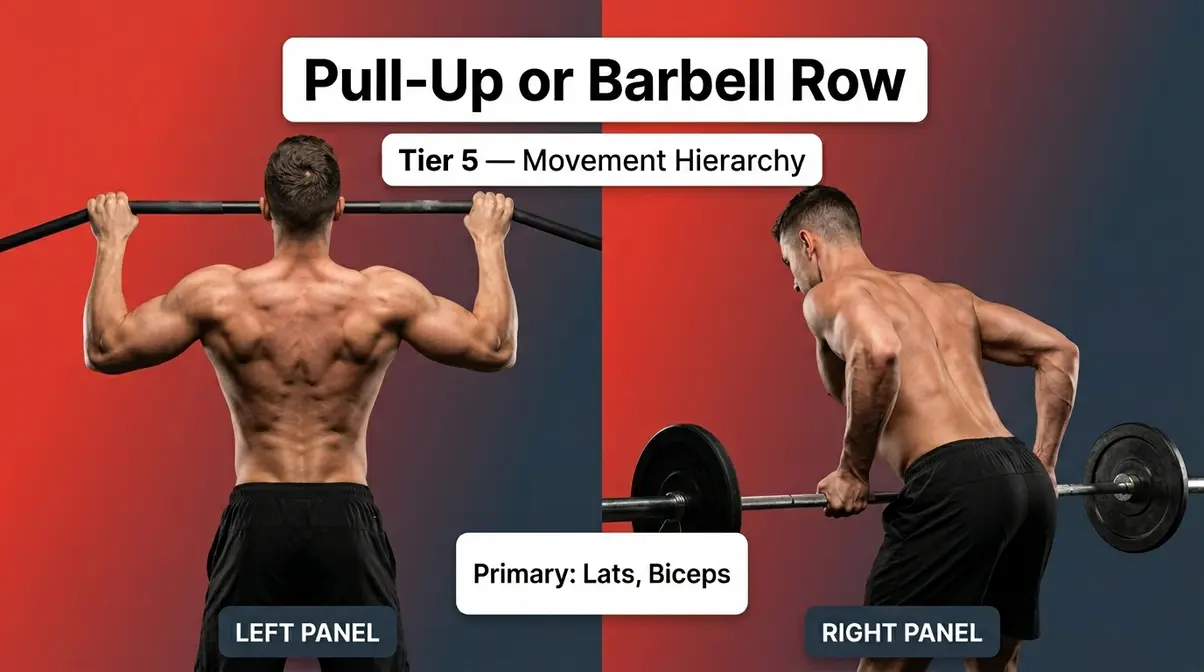
Tier 5 in The Movement Hierarchy | Primary muscles: Latissimus Dorsi, Biceps | Secondary: Rear Delts, Rhomboids, Core
Every push needs a pull. The squat, deadlift, bench press, and overhead press are all pushing or hinging movements. The fifth lift in the Big 5 fills the pulling gap — and you have two excellent options: the pull-up (bodyweight vertical pull) or the barbell row (weighted horizontal pull). Both develop the latissimus dorsi (the large, wing-shaped muscles of your mid-back), biceps, and rear deltoids. Your choice depends on your current strength level.
If you have a pre-existing injury or health condition, consult a certified personal trainer or physician before attempting this lift.
- Muscles Worked:
- Primary: Latissimus Dorsi (lats — the broad back muscles that give the “V-taper” shape), Biceps Brachii
- Secondary: Rear Deltoids, Rhomboids (the muscles between your shoulder blades), Trapezius, Core
5-Step Form Guide (Barbell Row):
Step 1: Find your stance
Stand with the bar over your mid-foot, feet hip-width apart. Hinge at the hips until your torso is roughly 45 degrees to the floor (or more parallel for a stricter row). Grip the bar just outside hip width, overhand grip. Why: this torso angle places maximum load on the lats.
Step 2: Brace and retract
Brace your core and pull your shoulder blades together before the row begins. Why: pre-activating the scapular retractors ensures the back — not the biceps — does the work.
Step 3: Pull the bar
Draw the bar to your lower chest/upper abdomen, driving your elbows back past your torso. Why: pulling to the lower chest targets the lats; pulling to the upper chest targets the traps.
Step 4: Squeeze at the top
Pinch your shoulder blades together at the top for one second. Why: this peak contraction ensures full lat activation.
Step 5: Lower with control
Don’t just drop the bar. Extend your arms fully before the next rep. Why: the eccentric (lowering) phase builds as much strength as the concentric (lifting) phase.
- 3 Common Mistakes (Both Movements):
- Using momentum/swinging: Kipping (swinging your hips) on pull-ups or jerking on rows. Fix: slow down, reduce weight, and prioritize controlled movement.
- Bicep-dominant pulling: Feeling it mostly in your arms, not your back. Fix: focus on driving your elbows, not your hands. Think “elbows to your back pockets.”
- Not achieving full range of motion: Short-rapping pull-ups or not extending arms fully on rows. Fix: full extension at the bottom, full contraction at the top — every rep.
Home/Dumbbell Alternative: Dumbbell Row (one arm at a time, braced against a bench) or Resistance Band Pull-Down (anchor a band overhead, pull down toward your chest). For pull-ups at home, a doorframe pull-up bar costs under $30 and handles most bodyweight loads effectively.
Pro Tip: Can’t do a pull-up yet? That’s normal for beginners. Use a resistance band looped over the bar for assistance — or perform negative pull-ups (jump to the top position, then lower yourself as slowly as possible). Most beginners get their first unassisted pull-up within 4–6 weeks of consistent training.
How to Program These Lifts for Strength or Muscle Growth
Knowing the best compound exercises for strength is only half the equation. How you program them — figuring out exactly how many sets and reps for strength training you need — determines whether you’re building maximum strength or building muscle size (hypertrophy). The good news: you don’t need separate programs for both. The Big 5 serve both goals — you just adjust the variables.
Training for Pure Strength: The 1–5 Rep Range
Pure strength training means teaching your nervous system to recruit more muscle fibers simultaneously. You’re not just building bigger muscles — you’re building more efficient muscles. The 1–5 rep range is the gold standard for this adaptation, used by powerlifters and strength athletes across every discipline.
The key principles for strength-focused training:
- Sets: 3–6 working sets per exercise
- Reps: 1–5 per set
- Load: 80–95% of your 1-rep maximum (1RM — the heaviest weight you can lift for one rep)
- Rest: 3–5 minutes between sets (full nervous system recovery is essential at this intensity)
- Frequency: Each lift 2–3 times per week
Research published in the Journal of Strength and Conditioning Research confirms that training in the 1–5 rep range produces superior maximal strength gains compared to higher rep ranges — primarily through neural adaptations (your nervous system becomes more efficient at firing muscle fibers) rather than muscle size increases alone.
For complete beginners: don’t rush into the 1–5 range. Spend your first 8–12 weeks in the 5–8 rep range while mastering technique. Neural adaptation happens quickly — beginners often see strength gains of 5–10% per week in the early stages simply from learning the movement patterns.
Training for Muscle Growth (Hypertrophy): The 6–12 Rep Range
Hypertrophy (the scientific term for muscle growth) occurs when muscle fibers experience sufficient mechanical tension and metabolic stress to trigger repair and growth. If you are comparing strength training vs hypertrophy, the 6–12 rep range is the sweet spot for the latter — it’s heavy enough to create tension but allows enough volume (total reps) to accumulate the metabolic stress that drives growth.
The key principles for hypertrophy-focused training:
- Sets: 3–5 working sets per exercise
- Reps: 6–12 per set
- Load: 65–80% of your 1RM
- Rest: 60–90 seconds between sets (shorter rest increases metabolic stress)
- Frequency: Each muscle group 2 times per week
A 2017 meta-analysis in the Journal of Strength and Conditioning Research found no significant difference in hypertrophy between low-load and high-load training when volume was equated — meaning total work done matters more than the exact rep range. However, the 6–12 range remains the most practical for combining load and volume efficiently.
Strength vs. Hypertrophy: Side-by-Side Comparison
| Variable | Strength Focus | Hypertrophy Focus |
|---|---|---|
| Rep Range | 1–5 reps | 6–12 reps |
| Sets per Exercise | 3–6 | 3–5 |
| Load (% of 1RM) | 80–95% | 65–80% |
| Rest Between Sets | 3–5 minutes | 60–90 seconds |
| Tempo | Explosive concentric | Controlled (2–3 sec down) |
| Primary Adaptation | Neural efficiency | Muscle fiber size |
| Weekly Frequency | 2–3x per lift | 2x per muscle group |
| Best For | Powerlifters, strength athletes | Bodybuilders, physique goals |
Which should you choose as a beginner? The honest answer: it doesn’t matter much in the first 3–6 months. Beginners gain both strength and muscle simultaneously regardless of rep range — this is called “newbie gains,” and it’s the most productive phase of any training career. To maximize this phase, you must focus on progressive overload for muscle growth. Start with 3 sets of 5–8 reps on each of the Big 5 lifts. Add weight when you can complete all reps cleanly, and you’ll build both strength and size efficiently.
1-Week Sample Beginner Schedule
To put this into practice, here is a simple 3-day full-body split that incorporates the Big 5 lifts. This schedule ensures you hit every muscle group while allowing adequate recovery time.
- Monday: Workout A
- Barbell Back Squat: 3 sets of 5–8 reps
- Barbell Bench Press: 3 sets of 5–8 reps
- Barbell Row: 3 sets of 5–8 reps
- Wednesday: Workout B
- Conventional Deadlift: 3 sets of 5 reps
- Overhead Press: 3 sets of 5–8 reps
- Pull-Ups (Assisted if needed): 3 sets to failure
- Friday: Workout A
- Barbell Back Squat: 3 sets of 5–8 reps
- Barbell Bench Press: 3 sets of 5–8 reps
- Barbell Row: 3 sets of 5–8 reps
(Alternate Workouts A and B each week to ensure balanced progression).
What muscle is hardest to grow?
The calves are widely considered the most difficult muscle group to grow, primarily because of their high proportion of slow-twitch muscle fibers (the type designed for endurance, not explosive force) and the fact that they’re conditioned by daily walking. The forearms and lower traps are also notoriously stubborn. For most beginners, however, the limiting factor isn’t muscle fiber type — it’s training consistency and understanding how long does it take to build muscle. Compound lifts that load the calves and forearms indirectly — like the deadlift and squat — provide a solid foundation before isolation work is needed.
Safety First: Avoiding the Most Common Compound Lifting Mistakes
The same qualities that make compound lifts so effective — heavy loads, multiple joints, full-body tension — also make them the exercises where form errors cause the most harm. Fitness professionals consistently report that the majority of gym injuries in beginners are not caused by the exercises themselves, but by progressing weight too quickly before technique is established.
3 Form Mistakes That Lead to Injury (and How to Fix Them)
Mistake 1: Adding Weight Before Mastering Form
This is the single most common cause of compound lift injuries. The ego-driven urge to add plates every session overrides the technique foundation that makes heavy lifting safe. What goes wrong: Your body compensates for weak links by recruiting the wrong muscles — the lower back rounds on the deadlift, the knees cave on the squat, the shoulder impinges on the press. How to fix it: Use the “three-rep rule” — if you can’t perform three consecutive reps with perfect form, the weight is too heavy. Reduce load by 10–20% and rebuild.
Mistake 2: Skipping the Warm-Up
Walking into the gym and immediately loading the bar with your working weight is a reliable path to injury. What goes wrong: Cold muscles and joints have reduced elasticity and blood flow — the conditions under which strains and tears occur. How to fix it: Perform 2–3 progressive warm-up sets before your working weight. For squats at 100 kg (220 lbs), for example: empty bar × 10, 60 kg × 5, 80 kg × 3, then working sets.
Mistake 3: Training Through Pain (Not Discomfort)
Muscle burn and fatigue are normal. Sharp, joint-specific, or shooting pain is not. What goes wrong: Beginners often don’t know the difference between productive discomfort and warning pain — and push through signals their body is sending for a reason. How to fix it: If you feel pain in a joint (not a muscle), stop the set immediately. Pain that persists beyond 24–48 hours after training warrants evaluation by a sports medicine physician or physiotherapist (a healthcare professional specializing in movement and injury rehabilitation).
When Barbell Lifts Aren’t Right for You: Safer Alternatives
Barbell lifts are powerful — but they’re not universally appropriate. Here are three scenarios where modifications or alternatives are the smarter choice:
Scenario 1: You have a lower back injury or history of disc problems.
The conventional deadlift and barbell squat place significant compressive and shear forces on the lumbar spine (lower back). Better alternative: Trap bar (hex bar) deadlifts reduce lumbar stress by allowing a more upright torso. Goblet squats with a dumbbell are far safer for beginners with back concerns. Always consult a physician or physiotherapist before returning to heavy barbell work after a back injury.
Scenario 2: You have a shoulder injury or limited shoulder mobility.
The overhead press and high-bar back squat both require significant shoulder external rotation and mobility. Better alternative: Landmine press (pressing a barbell loaded at one end from an angled position) dramatically reduces shoulder stress while still training the pushing pattern. For squats, the safety bar squat or goblet squat removes the shoulder component entirely.
Scenario 3: You’re training at home without a barbell or rack.
Barbell lifts require equipment. Better alternatives: The dumbbell and bodyweight alternatives listed in each exercise section above are genuine substitutes — not consolation prizes. Dumbbell Romanian deadlifts, goblet squats, push-ups, dumbbell rows, and pike push-ups cover the same movement patterns effectively.
Frequently Asked Questions About Compound Training
What is the 3-3-3 rule at the gym?
The 3-3-3 rule is an informal beginner training guideline suggesting 3 exercises, 3 sets each, and 3 days per week as a starting framework. It’s not a formal scientific protocol, but it reflects sound programming principles: sufficient volume to stimulate adaptation, adequate frequency for skill development, and enough rest for recovery. For beginners using the Big 5, a 3-day-per-week full-body program with 3 sets of each lift is an excellent starting point that aligns with this principle.
What are the 5 best compound lifts?
The 5 best compound lifts for strength are the barbell back squat, conventional deadlift, barbell bench press, overhead press, and pull-up or barbell row. These five movements cover every major human movement pattern — squat, hinge, horizontal push, vertical push, and pull — and together recruit virtually every major muscle group in the body. Fitness professionals and exercise scientists consistently identify these five as the foundation of any effective strength program (StrengthLog, 2026).
What exercise is best for high blood pressure?
For individuals with high blood pressure (hypertension), low-to-moderate intensity aerobic exercise — such as brisk walking, cycling, or swimming — is generally the first-line exercise recommendation from cardiologists and the CDC. Resistance training, including compound lifts, can be beneficial for blood pressure management at appropriate intensities, but heavy maximal-effort lifts (1–3 rep max attempts) cause transient (temporary) blood pressure spikes that may be contraindicated. Always consult your physician before starting any exercise program if you have been diagnosed with hypertension.
How did David Goggins lose 100 lbs in 3 months?
David Goggins, the retired Navy SEAL and ultramarathon runner, has described an extreme period of rapid weight loss involving multiple training sessions per day — including long-distance running, cycling, and swimming — combined with severe caloric restriction to qualify for BUD/S (Basic Underwater Demolition/SEAL training). This approach is not medically recommended and carries serious health risks, including muscle loss, hormonal disruption, cardiac stress, and nutritional deficiency. The CDC and major health organizations recommend a sustainable weight loss rate of 0.5–1 kg (1–2 lbs) per week. Goggins’ experience is an extreme outlier, not a model to follow.
What are the big 3 compound lifts?
The big 3 compound lifts — also called the “powerlifting big three” — are the squat, bench press, and deadlift. These are the three movements contested in competitive powerlifting and represent the most widely tested measures of total-body strength. The big 3 is a subset of the big 5: if you only have time for three lifts, these cover lower-body pushing (squat), upper-body pushing (bench), and full-body hinging (deadlift). Adding the overhead press and a pulling movement completes the full movement pattern picture.
What are the only 5 exercises you’ll ever need?
The five exercises you’ll ever need are the squat, deadlift, bench press, overhead press, and pull-up or row — exactly the Big 5 covered in this guide. This isn’t hyperbole. These five movements train every major muscle group, every fundamental movement pattern, and every energy system relevant to functional strength. A beginner who masters these five movements and consistently applies progressive overload (adding challenge over time) will build more strength and muscle than someone spending years rotating through dozens of machine exercises. The compound lifts for strength are, genuinely, all you need to start.
Conclusion
For anyone beginning their strength training journey, the best compound exercises for strength are the most powerful investment you can make in your fitness. The squat, deadlift, bench press, overhead press, and pull-up or barbell row cover every major movement pattern your body uses — and research confirms that multi-joint compound movements are more time-efficient for building strength and size than any other approach (NCBI, 2015). These five lifts, programmed consistently with progressive overload, will build more total-body strength than years of machine-based training.
The Movement Hierarchy exists to cut through the noise that overwhelms beginners. By ranking lifts according to muscle recruitment, hormonal stimulus, and real-world strength transfer, it gives you a clear priority order: squat first, deadlift second, then press, overhead press, and pull. You don’t need to reinvent the wheel — you need to master the movements that have built strong, capable humans for generations. Every exercise in this guide has a home or dumbbell alternative, so equipment is never an excuse.
Your next step is simple: pick one of the Big 5 lifts, watch a form video, and perform three sets of five reps at a weight that feels manageable. Do that three days this week. Add a second lift the following week. Within a month, you’ll be running a full Big 5 program — and within three months, you’ll understand firsthand why fitness professionals and exercise scientists keep coming back to these same five movements. Start today.