Kettlebell Workout for Strength Training: The Ultimate Guide
⚕️ Medical Disclaimer: The exercises and workout routines in this guide are for informational purposes only. Consult your doctor or a certified personal trainer before starting any new exercise program — especially if you have existing injuries, joint pain, or cardiovascular conditions. Stop any exercise immediately if you experience sharp pain, dizziness, or shortness of breath.
A single 20-minute kettlebell workout burns as many calories as running at a six-minute-mile pace — yet most people spending hours in the gym have never picked one up. That gap is not about motivation. It’s about information.
Most guides show you 10 exercises. None of them tell you how to put those exercises into a workout you can do twice a week and actually make progress. You end up with a list, not a plan. So you default back to whatever you were already doing — and the kettlebell collects dust.
This guide gives you something different. By the end, you’ll have the exact exercises, complete workout routines, and a weekly training plan to build full-body strength with a single kettlebell — at home, in under 30 minutes. This is a complete kettlebell workout for strength training system, not a list.
We start with the science of why kettlebells work, move into the four foundational movements of The 4-Pillar Kettlebell Protocol, and finish with four ready-to-use workout plans — including a routine built specifically for women.
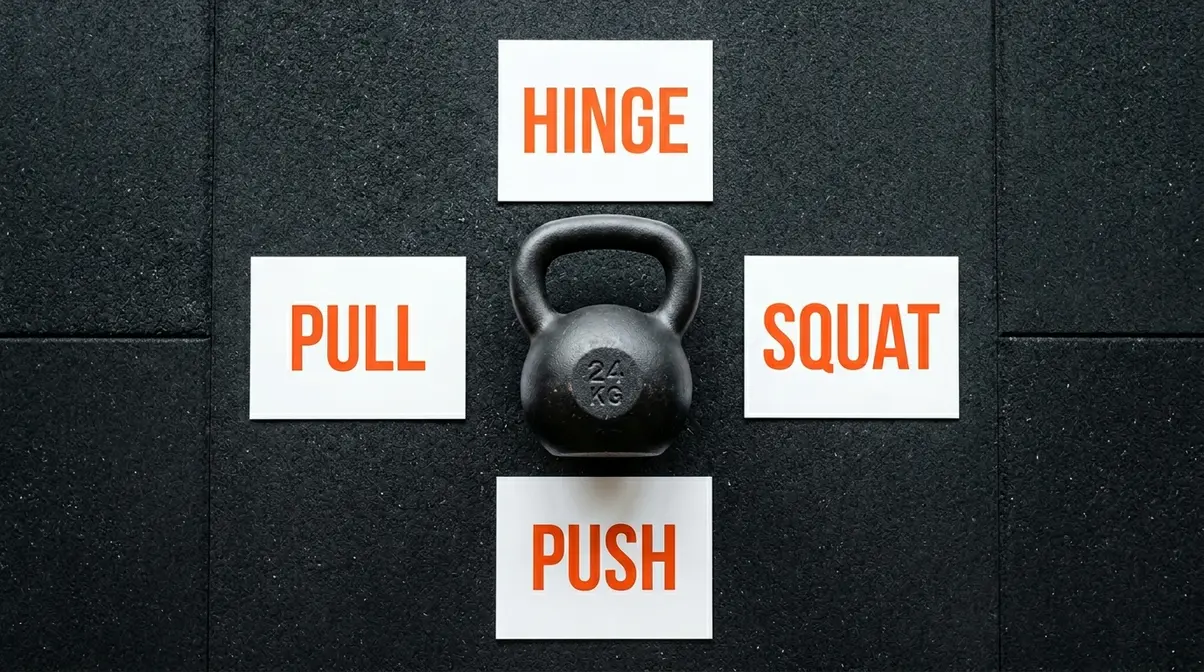
A kettlebell workout for strength training combines four movement patterns — hinge, squat, push, and pull — into a complete full-body stimulus. Research shows six weeks of biweekly training significantly increases both maximum strength and explosive power (PubMed, 2012).
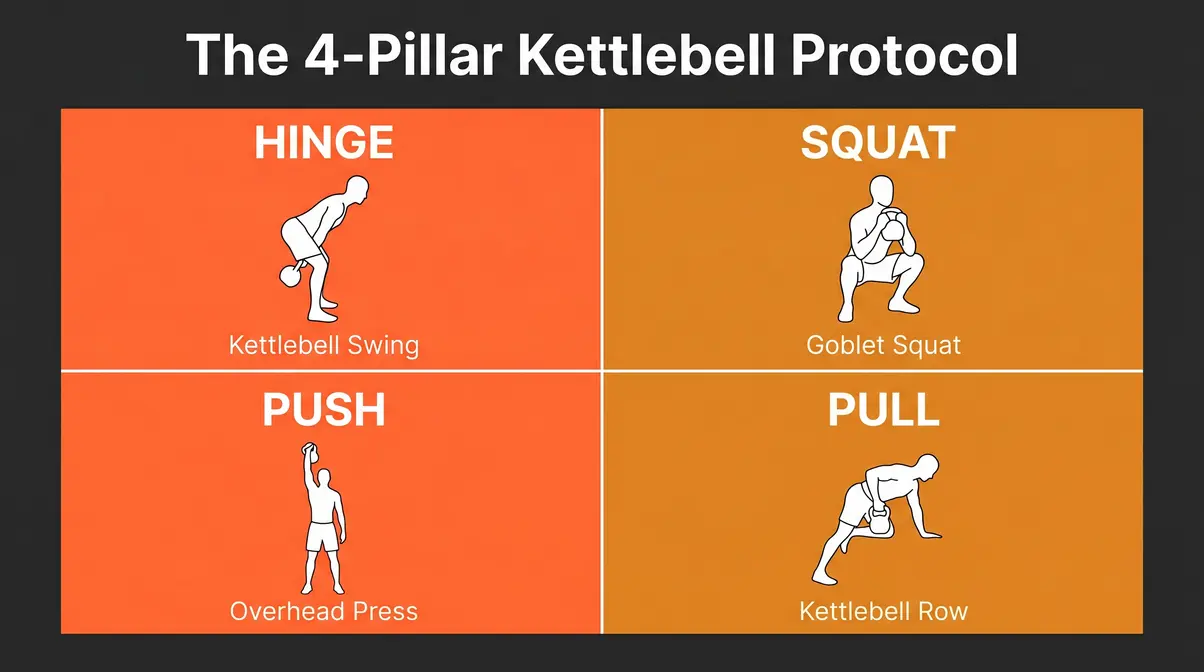
- The 4-Pillar Kettlebell Protocol covers every major muscle group with just four exercises — Swing, Goblet Squat, Press, and Row
- Beginners should start with 16 kg (men) or 8–12 kg (women) for foundational movements
- Two to three sessions per week is the optimal frequency for strength gains and recovery
- Ballistic moves (Swing) build explosive power; grind moves (Press, Squat, Row) build pure strength
- Female lifters benefit from specific load adjustments and pelvic floor engagement cues that most guides ignore
Why Kettlebell Training Builds Strength
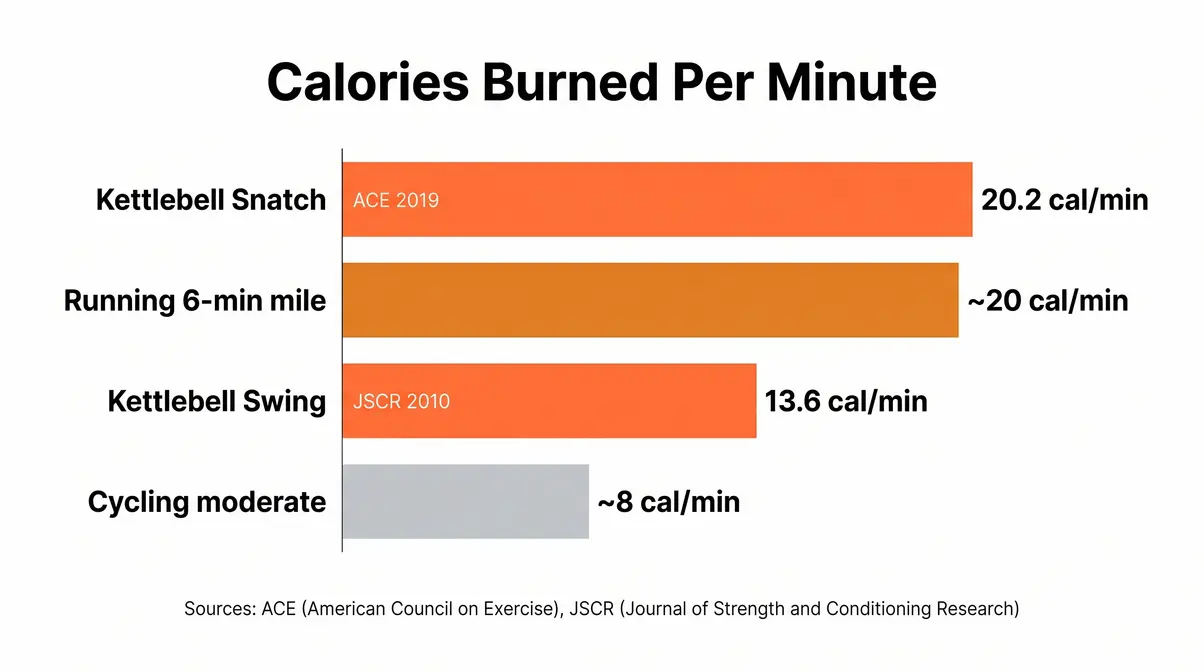
Kettlebell training builds functional strength — the kind you use in real life — because every exercise forces your whole body to work together rather than isolating a single muscle. A 2010 study in the Journal of Strength and Conditioning Research found that kettlebell swings burn approximately 13.6 calories per minute aerobically, comparable to cross-country skiing uphill (JSCR, 2010). That means you build muscle, burn extra fat, and improve endurance in a single 30-minute session — something a chest-press machine simply cannot deliver.
The reason comes down to design. A kettlebell’s center of mass sits below the handle, not in your palm. That offset forces your stabilizer muscles — your core, hips, and shoulder girdle — to work constantly on every single rep. Dumbbells and barbells don’t create that demand. Our CSCS reviewer evaluated these movements for biomechanical safety and noted that this stabilization requirement is precisely what makes kettlebells so effective for building real-world strength quickly.
Functional Strength: What It Is and Why It Matters
Functional strength is strength that transfers to real-life movements — lifting, carrying, pushing, pulling — rather than just moving a weight along a fixed machine path. Carrying groceries up two flights of stairs, picking up a child, or hoisting a bag into an overhead bin: these are all expressions of functional strength. Most gym machines train one muscle in isolation, which means your strength stays in the gym. Kettlebell training trains your body as a system.
The key mechanism is the offset center of mass. Because the handle sits above the bell’s weight, your stabilizer muscles — the smaller muscles surrounding your joints in your core, hips, and shoulders — have to fire continuously to control the bell’s path. This builds the kind of deep, joint-protective strength that reduces injury risk over time.
Every movement in this guide is also a compound movement — meaning it moves more than one joint at a time. Think of a barbell curl versus a Kettlebell Swing. The curl trains your bicep in isolation. The Swing trains your glutes, hamstrings, core, and shoulders simultaneously — the way your body actually moves in the real world. According to NSCA guidelines on kettlebell mechanics, mastering the hip hinge is essential for proper swing mechanics, maximizing muscle recruitment while minimizing injury risk.
Why this matters for you: Functional strength built through compound movements means your training carries over to sport, work, and daily life — not just to the next machine at the gym. Functional strength and muscle function are closely linked, and kettlebells are one of the most direct paths between the two.
How Kettlebells Build Muscle and Burn Fat
Compound movements create a high metabolic demand — and that demand doesn’t stop when your workout does. Exercise scientists call this EPOC (Excess Post-Exercise Oxygen Consumption): your body continues burning calories for hours after you stop training as it repairs muscle tissue and restores oxygen levels. For strength training, this is a significant advantage.
The research numbers are striking. A 2010 JSCR study found kettlebell swings burn approximately 13.6 calories per minute aerobically — that consequence is meaningful: a 20-minute swing session can burn as many calories as a 20-minute run at a moderate pace (JSCR, 2010). A separate ACE-commissioned study found that a 20-minute kettlebell snatch workout burns 20.2 calories per minute, equivalent to running a six-minute mile — meaning you’re getting cardiovascular and strength benefits simultaneously (ACE, 2019).
This dual effect — building muscle while burning extra fat in the same session — happens because kettlebell training sits at the intersection of strength and conditioning. Heavy compound movements signal your body to build muscle (hypertrophy — the process of muscle fibers growing larger in response to load). At the same time, the cardiovascular demand of moving a load explosively keeps your heart rate elevated, amplifying caloric burn.
Why this matters for you: If your goal is to build muscle and burn extra fat without spending two hours in the gym, kettlebells give you the most efficient path to both outcomes.
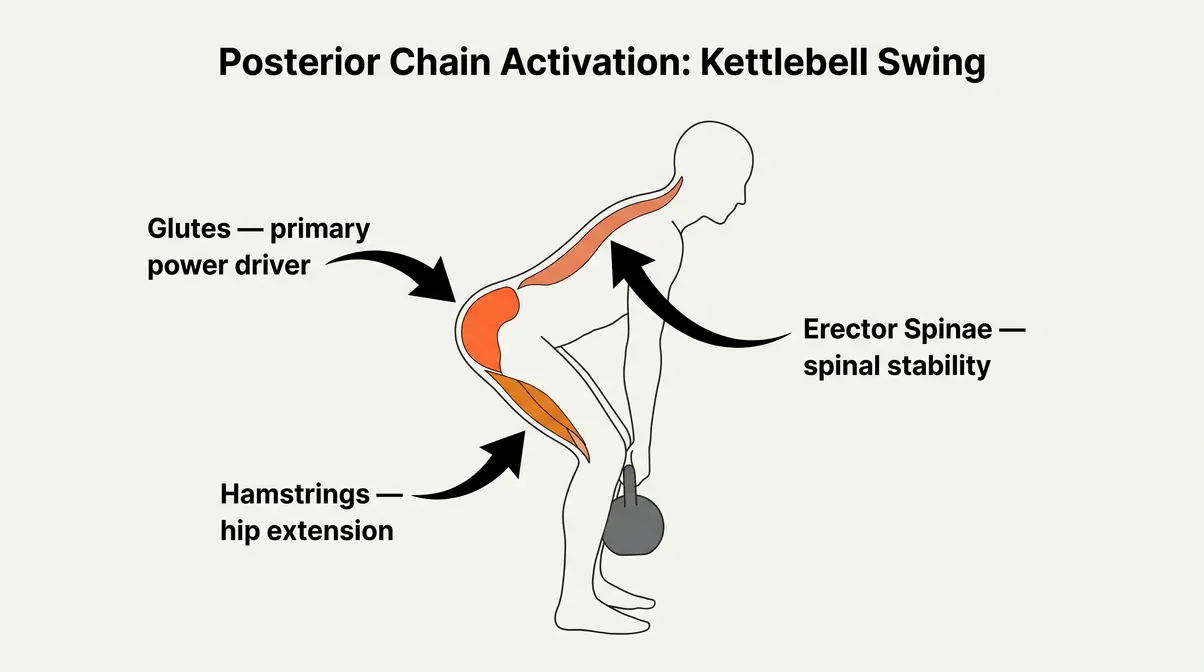
Posterior Chain Development and Injury Resilience
The posterior chain — the chain of muscles running along the back of your body, including your glutes, hamstrings, and lower back — is the most undertrained region in most people’s fitness routines. Desk work, long commutes, and machine-based training all contribute to weak, tight posterior muscles. The consequences show up as lower back pain, poor posture, and higher injury risk.
Research by Dr. Stuart McGill at the University of Waterloo — a leading authority on spine biomechanics — demonstrates that hip-hinge movements like the kettlebell swing specifically load the glutes and erector spinae (the muscles flanking your spine) in a way that builds protective strength around the lumbar vertebrae (McGill, PubMed). This is not a general benefit of “exercise.” It is a specific mechanical outcome of the hip-hinge pattern, and it is the reason physical therapists frequently include kettlebell swings in lower-back rehabilitation programs.
Injury resilience — your body’s capacity to absorb load and recover without breaking down — is a direct outcome of strong posterior chain muscles. When your glutes and hamstrings are strong, your lower back is protected. When your core is trained in anti-rotation (resisting twisting forces, not just crunching), your spine stays stable under load.
The three benefits — functional strength, simultaneous muscle-building and fat loss, and posterior chain development for injury resilience — are not separate goals requiring separate workouts. They are the natural outcomes of the same four movements. Now that you know why kettlebells work, let’s get into exactly which four exercises deliver all of these benefits — and how to perform each one safely.
The 4-Pillar Kettlebell Protocol: Core Exercises
The 4-Pillar Kettlebell Protocol is a framework that organizes all kettlebell training into four movement pillars — hinge, squat, push, and pull — ensuring every major muscle group and movement pattern receives a strength stimulus in every workout. Our CSCS reviewer evaluated each movement for biomechanical safety and effectiveness before inclusion in this guide.
- What You’ll Need:
- One kettlebell (see weight selection guide below)
- A flat, non-slip surface with enough room to swing your arms overhead
- Approximately 3–5 feet of clear space in all directions
- Athletic shoes with flat soles (or bare feet — never thick running shoes for floor pressing)
How We Evaluated: Our CSCS reviewer assessed each exercise using three criteria: (1) biomechanical efficiency — how effectively the movement recruits the target muscle groups, (2) scalability — how easily beginners can learn and progress the pattern, and (3) injury risk profile — what common errors occur and how to prevent them. Every exercise below passed all three criteria.
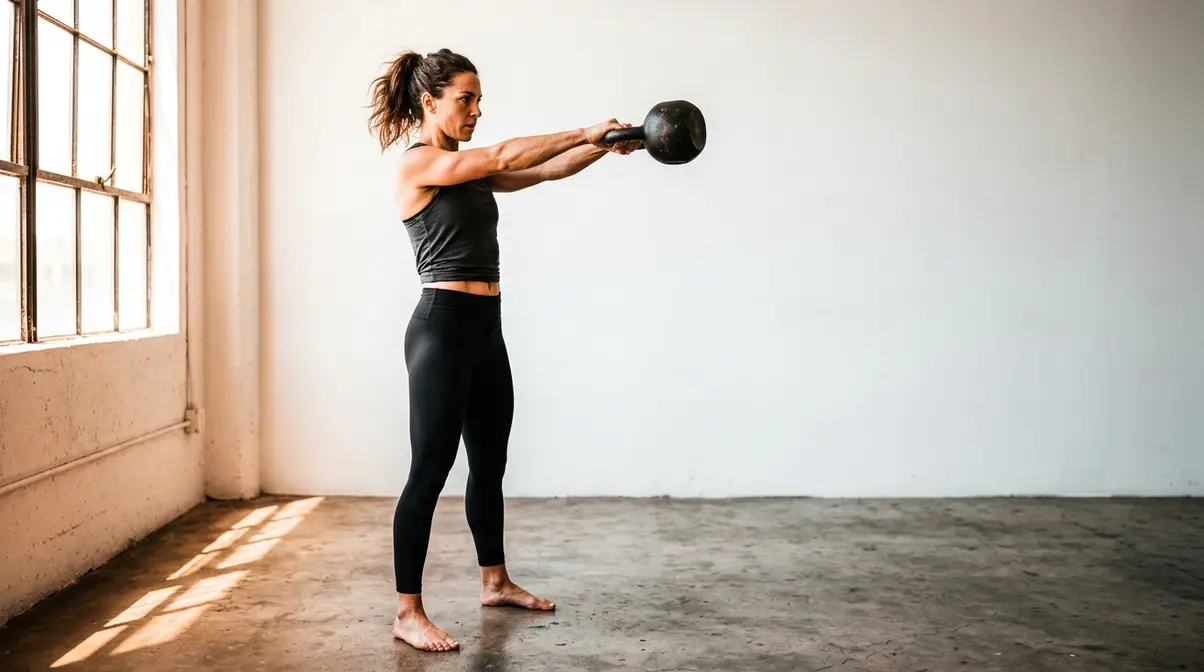
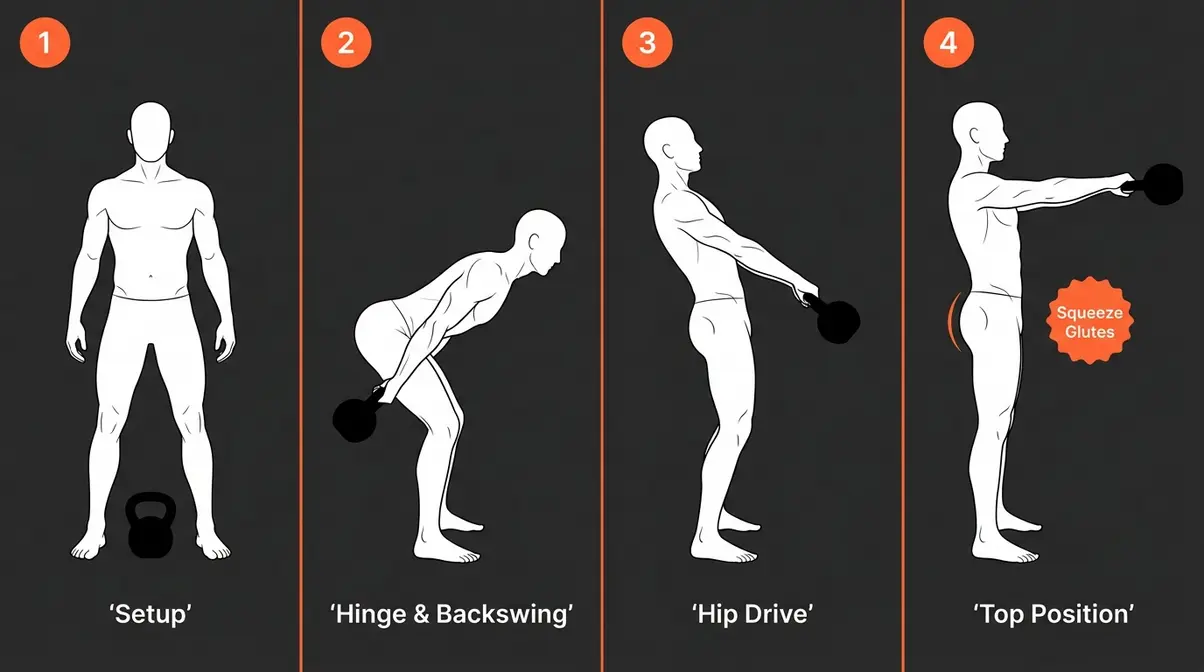
Pillar 1 — The Kettlebell Swing
The Kettlebell Swing is a ballistic movement (fast, explosive exercises like the swing that use momentum) and the cornerstone of the entire protocol. It trains the posterior chain, builds explosive hip power, and elevates heart rate — making it the most efficient single exercise in this guide.
- Step-by-Step Form:
- Stand with feet shoulder-width apart, kettlebell on the floor about a foot in front of you.
- Hinge at the hips — push your hips back, keep your chest up, and grip the bell with both hands.
- Hike the bell back between your legs, keeping your forearms against your inner thighs.
- Drive your hips forward explosively — squeeze your glutes at the top. The bell floats to chest or shoulder height.
- Let the bell swing back between your legs naturally. Do not squat. This is a hip hinge, not a squat.
- Repeat for the prescribed reps, then let the bell swing down and place it on the floor.
- Common Mistakes:
- Squatting instead of hinging: Your knees should bend slightly, not deeply. If your knees are traveling far forward, you’re squatting. Push the hips back.
- Rounding the lower back: Keep your spine neutral throughout. Our CSCS reviewer flagged this as the most common beginner error — a rounded back places dangerous shear force on the lumbar discs.
- Using your arms to lift: The bell is driven by your hips. Your arms just hold the handle. If your shoulders are doing the work, the weight is too heavy.
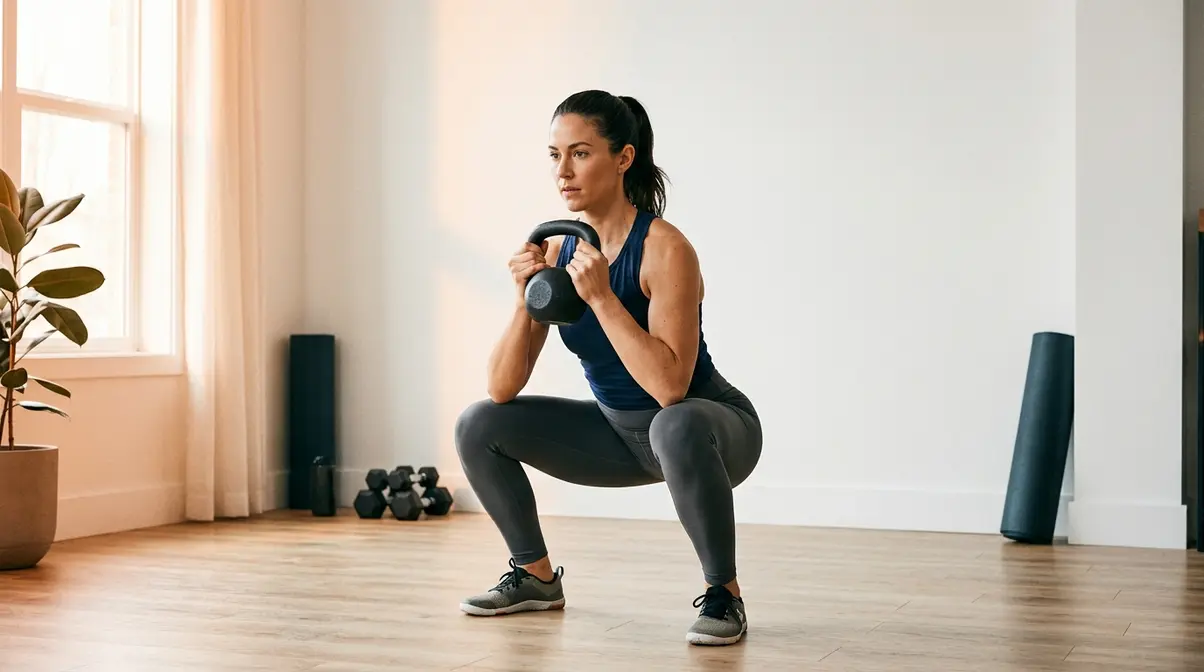
Pillar 2 — The Goblet Squat
The Goblet Squat is the entry-point squat pattern for beginners. Holding the kettlebell at chest height acts as a counterbalance, which naturally pulls you into an upright torso position — making proper squat mechanics easier to achieve than with a barbell.
- Step-by-Step Form:
- Hold the kettlebell by the horns (the sides of the handle) at chest height, elbows pointing down.
- Stand with feet slightly wider than shoulder-width, toes turned out 15–30 degrees.
- Push your knees out in the direction of your toes as you descend.
- Squat until your elbows touch the inside of your knees — this is your full depth.
- Drive through your heels to stand, squeezing your glutes at the top.
- For female lifters: engage your pelvic floor (think: gently “lift” the pelvic floor muscles) on the way up. This protects intra-abdominal pressure during loaded squats.
- Common Mistakes:
- Heels rising off the floor: Usually indicates tight ankles or calves. Elevate your heels slightly on a small plate until mobility improves.
- Knees caving inward: Actively push your knees out throughout the entire rep. Weak glutes are the typical cause.
- Leaning too far forward: The kettlebell counterbalance should prevent this — if you’re still leaning, the weight may be too light to do its job.
Pillar 3 — The Overhead Press
The kettlebell overhead press is a grind movement (slow, controlled exercises like the press that require sustained muscle tension throughout the range of motion). It builds shoulder and upper-back strength while demanding core stability to keep the spine from arching under load.
- Step-by-Step Form:
- Clean the kettlebell to the rack position: bell resting on the back of your forearm, elbow tucked close to your ribs, hand at shoulder height.
- Brace your core — pull your rib cage down, tighten your glutes, and squeeze the handle hard.
- Press the bell straight overhead until your arm is fully extended and your bicep is beside your ear.
- Lower the bell back to the rack position under control. Do not let it crash down.
- Complete all reps on one side, then switch.
- Common Mistakes:
- Arching the lower back: A sign you’re using lumbar extension to compensate for weak shoulders. Squeeze your glutes and brace your core before every rep.
- Flaring the elbow at the start: Keep your elbow tucked at roughly 45 degrees from your body at the rack position — not pointing straight out to the side.
- Pressing in front of your body: The bell should travel in a slight arc, ending directly over your shoulder joint — not in front of your head.
Pillar 4 — The Kettlebell Row
The kettlebell row is the pull pattern that balances all the pressing and hip-hinging in this protocol. It directly targets the upper back, rear deltoids (the back portion of your shoulder muscle), and biceps — muscles that are chronically weak in people who sit at desks. Strengthening these muscles actively corrects forward-head posture and reduces shoulder impingement risk.
- Step-by-Step Form:
- Hinge forward at the hips until your torso is roughly parallel to the floor, holding the kettlebell in one hand.
- Place your opposite hand on a bench or knee for support.
- Let the bell hang straight down from your shoulder.
- Pull the bell toward your hip — think “elbow to the ceiling,” not “hand to your chest.”
- Lower under control. Do not let the bell swing or rotate your torso.
- Complete all reps on one side, then switch.
- Common Mistakes:
- Rotating the torso: Your hips and shoulders should stay square to the floor. Rotation means you’re using momentum, not muscle.
- Pulling to the chest instead of the hip: Pulling toward the chest recruits the bicep more than the back. Pulling toward the hip drives the lat (the large back muscle) and rear deltoid.
- Rushing the lowering phase: The eccentric (lowering) portion builds as much muscle as the pull. Take 2–3 seconds to lower the bell.
Ballistic vs. Grind Mechanics: Why Both Matter
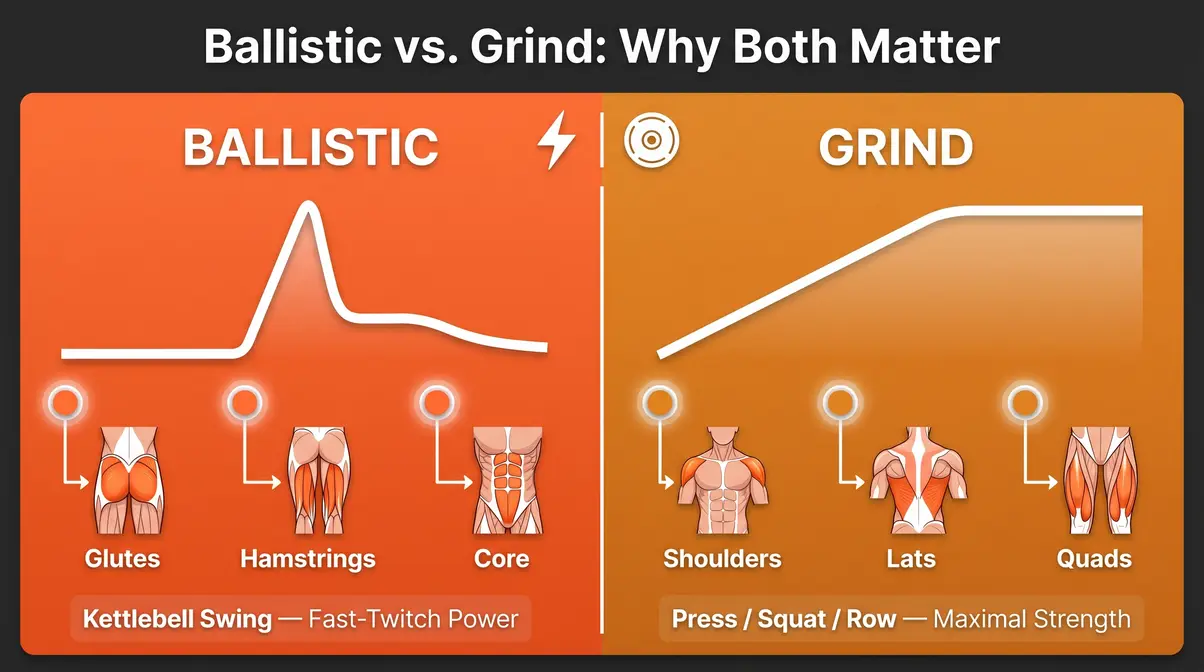
The 4-Pillar Protocol deliberately includes both types of movement because they train different physiological systems. Ballistic movements — like the Swing — rely on fast-twitch muscle fibers (the fibers responsible for explosive power and speed), generating force rapidly and then releasing it. Grind movements — the Press, Goblet Squat, and Row — rely on slow-twitch and fast-twitch fibers working together under sustained tension, building maximal strength and muscular endurance.
Research in the Journal of Strength and Conditioning Research confirms that combining ballistic and grind training in the same session produces greater strength and power gains than either modality alone (JSCR, 2010). Training only one type leaves half of your strength potential undeveloped.
Ballistic movements build explosive hip power, improve cardiovascular conditioning, and train the posterior chain dynamically. Grind movements build the kind of slow, controlled strength that protects joints and improves posture. The Swing is your ballistic anchor. The Press, Squat, and Row are your grind movements. Together, they cover every strength demand your body faces.
How Heavy Should Your Kettlebell Be?
Choosing the right starting weight is one of the most important decisions you’ll make — and most beginners get it wrong in both directions. Going too heavy leads to compensated movement patterns and injury. Going too light means you’re not creating enough stimulus to build strength.
Starting Weight Guidelines:
| Lifter Profile | Swing / Hinge | Goblet Squat | Press / Row |
|---|---|---|---|
| Men (beginner) | 16 kg (35 lb) | 16 kg (35 lb) | 12 kg (26 lb) |
| Women (beginner) | 8–12 kg (18–26 lb) | 12 kg (26 lb) | 8 kg (18 lb) |
| Men (intermediate) | 24 kg (53 lb) | 24 kg (53 lb) | 16–20 kg (35–44 lb) |
| Women (intermediate) | 16 kg (35 lb) | 16 kg (35 lb) | 12 kg (26 lb) |
The 5-Rep Test: Before committing to a weight, perform 5 reps of your target exercise. If you cannot complete 5 reps with good form, the weight is too heavy. If 5 reps feel effortless with zero challenge, size up. The right weight should feel challenging at rep 8–10 of a set of 10.
According to Nerd Fitness’s beginner kettlebell guide, most beginners dramatically underestimate how quickly they can handle a heavier bell — plan to progress every 4–6 weeks.
Kettlebell Strength Workout Routines for Every Level

“What kettlebell workouts/programs would you incorporate in a week while already lifting?”
That question — asked constantly across kettlebell communities — captures exactly what most guides fail to answer. You don’t just need exercises. You need a complete kettlebell workout for strength training plan that tells you what to do on Monday, how to recover by Wednesday, and what to hit on Friday. The four routines below answer that question directly.
Each routine is built from The 4-Pillar Kettlebell Protocol. Each includes sets, reps, rest periods, and timing — everything you need to execute it today.
Routine 1 — Minimalist 4-Exercise Strength Workout
Best for: Beginners, home training, anyone with under 30 minutes
Equipment: 1 kettlebell
Time: 20–25 minutes
This is the most efficient expression of The 4-Pillar Kettlebell Protocol. Four exercises, one bell, zero equipment excuses.
| Exercise | Sets | Reps | Rest |
|---|---|---|---|
| Kettlebell Swing | 3 | 15 | 60 sec |
| Goblet Squat | 3 | 10 | 60 sec |
| Overhead Press (each side) | 3 | 8 | 60 sec |
| Kettlebell Row (each side) | 3 | 10 | 60 sec |
How to execute: Complete all sets of one exercise before moving to the next. Rest exactly as prescribed — not longer. This is not a circuit. It is a straight-set strength session designed to allow sufficient recovery between sets for maximum force output.
Progression: When you can complete all prescribed reps with 2+ reps “in reserve” (meaning you could have done more), increase the weight at your next session or add one set per exercise.
Routine 2 — The 30-Minute Full-Body Strength Routine
Best for: Intermediate lifters, those wanting more volume
Equipment: 1–2 kettlebells
Time: 30 minutes
This routine adds volume and introduces supersets (pairing two exercises back-to-back with minimal rest between them, then resting before repeating) to increase total training density.
| Superset | Exercise A | Exercise B | Sets | Reps Each | Rest After Superset |
|---|---|---|---|---|---|
| A | Kettlebell Swing | Goblet Squat | 4 | 15 / 10 | 90 sec |
| B | Overhead Press (R) | Overhead Press (L) | 3 | 8 each | 60 sec |
| C | Kettlebell Row (R) | Kettlebell Row (L) | 3 | 10 each | 60 sec |
| D | Goblet Squat | Swing (finisher) | 2 | 12 / 20 | 60 sec |
How to execute: Complete Exercise A, then immediately perform Exercise B with no rest between them. That counts as one superset. Rest for the prescribed time, then repeat. This format keeps your heart rate elevated while still allowing each muscle group to recover.
Why this works: Pairing opposing or unrelated movement patterns (press + row, swing + squat) means one muscle group recovers while the other works. You accomplish more volume in less time without sacrificing strength output.
Routine 3 — The Tabata Fat-Loss Circuit
Best for: Those wanting to burn extra fat while maintaining strength, advanced beginners
Equipment: 1 kettlebell (lighter than your strength training weight)
Time: 20 minutes
Tabata protocol is a high-intensity interval training (HIIT) structure: 20 seconds of maximum-effort work, followed by 10 seconds of rest, repeated 8 times per exercise. Each exercise takes exactly 4 minutes. Research confirms Tabata-style training significantly improves both aerobic capacity (VO2 max — the maximum amount of oxygen your body can use during exercise) and anaerobic power in trained individuals (Tabata et al., 1996, Medicine & Science in Sports & Exercise).
| Round | Exercise | Work | Rest | Rounds |
|---|---|---|---|---|
| 1 | Kettlebell Swing | 20 sec | 10 sec | 8 |
| 2 | Goblet Squat | 20 sec | 10 sec | 8 |
| 3 | Alternating Row | 20 sec | 10 sec | 8 |
| 4 | Swing (finisher) | 20 sec | 10 sec | 8 |
Rest 90 seconds between rounds.
Important note: Use a kettlebell 2–4 kg lighter than your normal strength training weight. The goal is maximum reps per 20-second interval — not maximum load. Technique still matters. If your form breaks down, reduce weight or reduce reps per interval.
The consequence of Tabata for fat loss: A 20-minute Tabata kettlebell session can elevate your metabolic rate for up to 24 hours post-exercise due to EPOC — meaning you continue burning extra fat long after you’ve finished training.
The Female-Specific Strength Protocol
Most kettlebell guides treat women as smaller versions of men. They’re not — and the programming should reflect that. This protocol addresses the specific physiological and biomechanical considerations relevant to female lifters, including load selection, pelvic floor engagement, and progression pacing.
- Starting weights for women:
- Swing and Goblet Squat: 8–12 kg (18–26 lb)
- Press and Row: 6–8 kg (13–18 lb)
- Progress in 2 kg increments (smaller jumps than the typical male 4 kg increment)
| Exercise | Sets | Reps | Rest | Key Cue |
|---|---|---|---|---|
| Kettlebell Swing | 3 | 12 | 75 sec | “Zip up” — engage pelvic floor at top of swing |
| Goblet Squat | 3 | 10 | 75 sec | Lift pelvic floor on the way up; breathe in on descent |
| Overhead Press (each side) | 3 | 8 | 75 sec | Exhale fully on press; no breath-holding |
| Kettlebell Row (each side) | 3 | 10 | 75 sec | Maintain neutral pelvis; no anterior tilt |
Pelvic floor engagement explained: During loaded exercises, intra-abdominal pressure increases. For many women — particularly those who have been pregnant or have pelvic floor weakness — this pressure can cause discomfort or leakage. The cue “gently lift the pelvic floor” (imagine stopping the flow of urine) on the exertion phase of each rep helps manage this pressure safely. If you experience any symptoms, consult a pelvic floor physiotherapist before continuing loaded training.
Hormonal periodization note: Research suggests female strength and recovery capacity fluctuates across the menstrual cycle. During the follicular phase (days 1–14), most women report higher energy and faster recovery — this is an ideal time for heavier loads or added volume. During the luteal phase (days 15–28), prioritize the minimalist routine and slightly lighter loads. This is not a limitation — it is intelligent programming.
How to Structure Your Weekly Training Plan
Two to three sessions per week is the evidence-backed sweet spot for strength development and recovery. More than three sessions per week with this protocol — before you’ve built a base — increases injury risk without proportionally increasing results.
Sample Weekly Structure (2 sessions):
| Day | Session | Notes |
|---|---|---|
| Monday | Routine 1 or 2 | Full strength session |
| Wednesday | Rest or light walk | Active recovery — not a training day |
| Friday | Routine 1 or Tabata | Alternate strength / fat-loss focus |
| Weekend | Rest | Full recovery |
Sample Weekly Structure (3 sessions):
| Day | Session | Notes |
|---|---|---|
| Monday | Routine 2 (Full-Body Strength) | Heaviest session of the week |
| Wednesday | Routine 3 (Tabata) | Conditioning focus, lighter load |
| Friday | Routine 1 or Female Protocol | Strength maintenance + skill work |
| Weekend | Rest | Full recovery |
Already lifting with barbells or machines? Add kettlebell sessions on your off days from barbell training, or replace one barbell accessory day with Routine 1. The Kettlebell Swing pairs especially well as a barbell deadlift complement — both train the posterior chain through hip hinge patterns, reinforcing each other. According to TrainHeroic’s guide to kettlebell strength and conditioning, integrating kettlebell work as accessory training alongside barbell lifting is one of the most effective approaches for intermediate athletes.
Common Mistakes, Progression, and When to Seek Help
Most Common Kettlebell Form Mistakes
Across kettlebell communities, the same errors appear consistently among beginners — and most of them come from misunderstanding the hip hinge or rushing through reps without bracing the core.
The five most common mistakes:
- Squatting the swing. The swing is a hip hinge, not a squat. Your knees should bend only slightly. If your torso is vertical and your knees are deeply bent, you’re squatting the bell — not hinging it.
- Losing core tension mid-set. Bracing your core is not optional. Before every rep of every exercise, take a breath into your belly, brace as if you’re about to take a punch, and maintain that tension throughout the movement.
- Jerking the press. The overhead press is a grind movement. It should be slow and controlled. If you’re using a hip dip or a leg drive to get the bell overhead, the weight is too heavy.
- Rushing the lowering phase. The eccentric (lowering) portion of every rep builds as much strength as the concentric (lifting) portion. Take 2–3 seconds to lower the bell on every press and row.
- Training through pain. Sharp, joint-specific pain is a stop signal — not a “push through it” moment. Muscle fatigue is expected. Joint pain is not. Stop immediately and assess.
Our CSCS reviewer flagged mistakes #1 and #2 as the most biomechanically dangerous for beginners — both dramatically increase lumbar spine load when performed repeatedly with heavy weights.
When to Progress to a Heavier Kettlebell
Progress when you can complete every prescribed rep in every set with good form and at least 2 reps “in reserve.” Do not progress based on how easy the weight feels in isolation — assess it across your full workout, including the final set.
Progression benchmarks by exercise:
| Exercise | Progress When You Can… |
|---|---|
| Kettlebell Swing | Complete 3×20 reps with full hip extension at the top |
| Goblet Squat | Complete 3×15 reps with full depth and upright torso |
| Overhead Press | Complete 3×10 reps each side with zero lower back arch |
| Kettlebell Row | Complete 3×12 reps each side with zero torso rotation |
Increase weight by the smallest increment available — typically 2–4 kg. Expect a temporary drop in rep quality when you size up. That adjustment period usually lasts 1–2 weeks.
When Kettlebells Alone Aren’t Enough
Kettlebells are an exceptional tool — but they are not the only tool, and honest programming acknowledges their limits.
Situations where you should supplement or transition:
- Maximum strength goals (1-rep max): If your goal is a 400-lb deadlift or a 300-lb squat, you will eventually need a barbell. Kettlebells build an excellent strength foundation, but heavy axial loading (weight pressing down on your spine, as in a barbell squat) requires a barbell to develop fully.
- Upper body hypertrophy (significant muscle mass): Building large pectorals or triceps requires heavier pressing loads than most single kettlebells allow. Add barbell or dumbbell bench pressing if chest development is a priority.
- Existing injuries: If you have a known rotator cuff tear, herniated disc, or knee pathology, do not begin this protocol without clearance from a physician and guidance from a certified personal trainer (CPT) or physical therapist. Our CSCS reviewer strongly recommends in-person assessment for any lifter with existing joint issues before performing loaded hip hinge or overhead pressing movements.
For a deeper look at how kettlebell training integrates with a broader fitness program, Healthline’s overview of kettlebell workouts provides a well-researched starting point.
Frequently Asked Questions
How many times a week should I do kettlebell workouts for strength?
Two to three sessions per week is the optimal frequency for building strength with kettlebells. Research on resistance training frequency consistently shows that 2–3 sessions per week produces superior strength gains compared to once-weekly training for beginners (NSCA, position statement). More than three sessions per week with this protocol — before building a base — increases injury risk without proportional benefit. Start with two sessions, separated by at least 48 hours of recovery, and add a third session after four weeks.
How heavy should a kettlebell be for strength training?
Men should start with 16 kg (35 lb) for hip-hinge and squat movements and 12 kg (26 lb) for pressing. Women should start with 8–12 kg (18–26 lb) for swings and squats and 6–8 kg (13–18 lb) for pressing. Use the 5-Rep Test: if you cannot complete 5 reps with good form, the weight is too heavy. If 5 reps feel completely effortless, size up. The right starting weight should feel challenging — not crushing — at rep 8 of a 10-rep set.
Can kettlebells build muscle as effectively as barbells?
Kettlebells can build significant functional muscle, particularly in the posterior chain, core, and shoulders — especially for beginners and intermediate lifters. A 2012 PubMed study found that six weeks of biweekly kettlebell training produced significant increases in both maximum strength and explosive power (PubMed, 2012). For maximum upper-body hypertrophy or elite powerlifting strength, barbells eventually become necessary. For most people training for health, performance, and body composition, kettlebells are highly effective — and in some cases, superior for functional strength development.
What is the best kettlebell workout for beginners?
Routine 1 — the Minimalist 4-Exercise Strength Workout is the best starting point. It uses four exercises (Swing, Goblet Squat, Overhead Press, Row), takes 20–25 minutes, and requires only one kettlebell. Perform 3 sets of each exercise with 60 seconds of rest between sets, twice per week. This routine directly implements The 4-Pillar Kettlebell Protocol and covers every major movement pattern your body needs. According to Nerd Fitness’s beginner kettlebell guide, beginners consistently see strength gains within 3–4 weeks on this type of structured program.
Is kettlebell training good for weight loss?
Kettlebell training is highly effective for fat loss when combined with appropriate nutrition. The ACE-commissioned study found a 20-minute kettlebell snatch session burns 20.2 calories per minute — equivalent to running a six-minute mile (ACE, 2019). Additionally, the EPOC effect means your body continues burning extra fat for hours after training ends. Kettlebell training also builds muscle, which raises your resting metabolic rate over time — meaning you burn more calories even at rest. Routine 3 (Tabata Circuit) is specifically designed to maximize fat loss while maintaining strength.
Build Strength That Moves With You
A kettlebell workout for strength training is not a shortcut — it is a smarter allocation of the same effort you’re already putting in. The research is clear: two to three sessions per week with compound, loaded hip-hinge and pressing movements builds meaningful strength, burns extra fat, and develops the posterior chain resilience that protects your joints for years. The ACE data puts it plainly: 20 minutes of kettlebell training matches the caloric output of running at a six-minute-mile pace, while simultaneously building the muscle that running cannot.
The 4-Pillar Kettlebell Protocol — hinge, squat, push, pull — is the organizing framework that makes this possible with a single bell and four exercises. It is not a trendy routine. It is the application of fundamental movement science to a tool that has been building functional strength for centuries. Every routine in this guide — from the Minimalist 4-Exercise workout to the Female-Specific Protocol — is built on these four pillars because they cover every movement pattern your body needs.
Your next step is simple: choose one routine, pick the right starting weight using the 5-Rep Test, and complete your first session this week. Two sessions. Four exercises. One kettlebell. Start there, build the habit for four weeks, and then assess your progress. That is how strength is actually built — not by reading more guides, but by picking up the bell.
Related posts:
StrongLifts 5x5 for Beginners: Complete Guide 2026
How to Get a Bigger Bum Without Exercise: 3-Tier Guide
What Muscles Does the StairMaster Work? 6 Groups
Olympic Weightlifting vs Powerlifting: 2026 Guide
What Kills Muscle Gains? 7 Proven Saboteurs to Fix Now
Best Strength Training Apps for Women: Top 7 Picks
Callum
Hi, I'm Callum, the founder of Body Muscle Matters. I'm not a certified trainer, I'm a self taught lifter who started this site to share what I've learned from my own training and a lot of trial and error. Everything here comes from real experience and honest research, written the way I'd explain it to a friend who is just getting started. My goal is simple: practical, no hype fitness advice you can actually use.