Muscles Used in Tennis: Every Stroke From Serve to Backhand
⚠️ Medical Disclaimer: This article is for informational purposes only and does not constitute medical advice. Consult a qualified sports medicine physician or physical therapist before starting any new exercise program or if you are experiencing pain or have a pre-existing condition.
Most tennis players spend hours refining their swing mechanics and building arm strength — but the real engine behind every powerful shot starts in your legs, not your racquet arm. Ask any experienced player where their serve speed actually comes from, and you’ll hear the same answer.
“Quads/hamstrings/calves are the most important muscles in tennis. To prevent injuries as well as promote stamina and leg drive on the serve.”
If you’ve been focusing only on your arm and shoulder while your groundstrokes stay flat and your serve stays slow, you’re training half the machine. Worse, that imbalance is also why tennis elbow and rotator cuff injuries happen — the arm absorbs forces the legs and core should be handling.
This guide covers exactly which muscles are used in tennis for every major stroke, why each one matters, and the 10 specific exercises that will make them stronger. We’ll walk through the full kinetic chain from the ground up, break down the serve and groundstrokes phase by phase, and show you how to keep your arm and shoulder healthy for the long term.
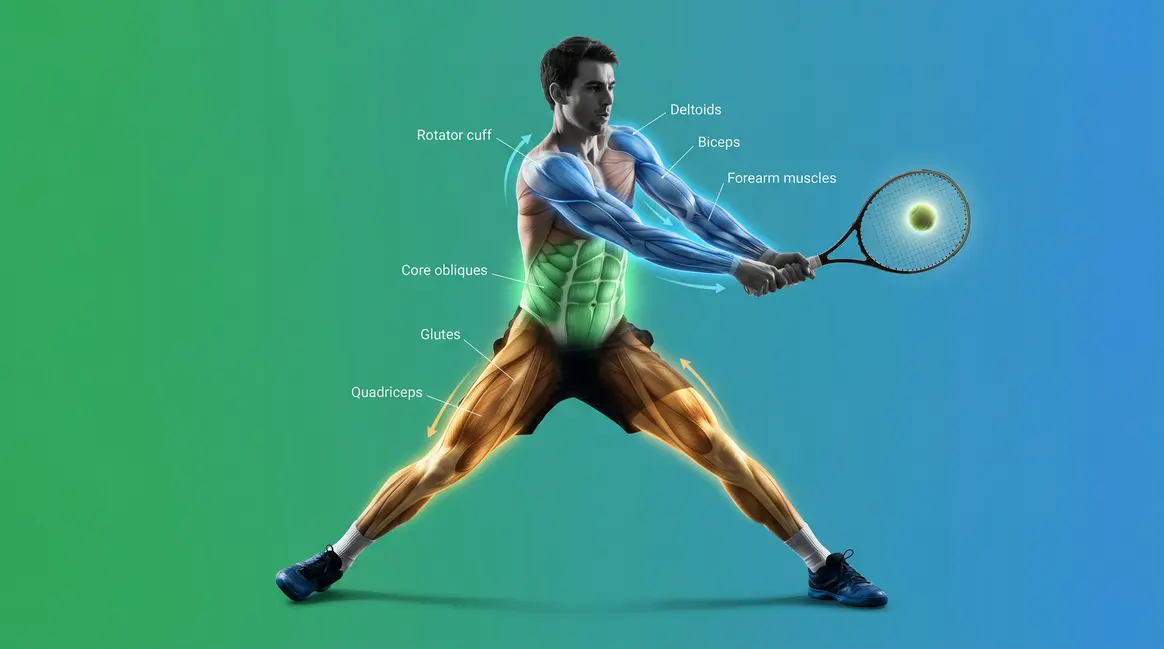
Tennis uses every major muscle group in your body — the muscles used in tennis fire in a precise sequence called the kinetic chain, with leg and trunk power accounting for up to 50% of racket head speed during a forehand (PubMed, 2007).
- Legs first: Quadriceps, glutes, and calves generate the explosive power behind every shot
- Core transfers it: The obliques rotate force from your hips into your racquet arm
- Arms deliver it: Deltoids, pectorals, and rotator cuff control speed, spin, and safety
- Train the chain: The Tennis Power Chain framework maps each exercise to its stroke phase, not just a body part
- Protect the arm: Rotator cuff and forearm strength are your most effective injury-prevention tools
Training Prerequisites
- Estimated Time: 30-45 minutes per session
- Tools/Materials:
- Light to moderate dumbbells (1-5 kg)
- Resistance bands (light tension)
- Medicine ball (4-6 kg)
- Cable machine access
What Muscles Are Used in Tennis?

Tennis uses every major muscle group in your body, firing in a precise sequence from your feet to your fingertips. Research shows that trunk rotation powered by the obliques (the diagonal abdominal muscles that wrap around your midsection) can contribute up to 50% of total racket head speed during a forehand (PubMed, 2007). Training only your arm is like pressing a gas pedal that’s disconnected from the engine — the force never fully arrives at the ball.
Tennis Is a Full-Body Sport
The muscles used in tennis don’t fire randomly — they work through what biomechanists call the kinetic chain (the sequence of body segments — feet, legs, hips, torso, shoulder, arm — that pass force from one to the next like links in a chain). Think of cracking a whip: a small flick of the wrist creates a powerful snap at the tip because energy transfers and amplifies through every segment in sequence. Your tennis stroke works exactly the same way. The “flick” starts in your legs, travels through your hips, accelerates through your core, and arrives at your racquet face.
In this guide, we’ll use the Tennis Power Chain model — mapping each muscle group to the exact stroke phase it powers — so every exercise you do has a direct, measurable on-court application. This is different from a standard “train your body parts” approach. Train the sequence, not the segments.
Here’s the critical insight: when any link in the chain is weak, the next link absorbs the missing force. A player with weak glutes will unconsciously overload the shoulder to compensate — and that is a primary driver of tennis-related rotator cuff injuries (USTA). Rafael Nadal’s famously low, wide stance isn’t just style; it’s a deliberate strategy for maximizing leg drive before the kinetic chain fires upward.
According to USTA guidelines on core power transfer, the abdominal and lower back muscles act as a critical bridge, transferring power from the lower body to the upper body during groundstrokes and serves. You can understand the full-body kinetic chain in tennis and how it applies to your specific strokes by studying the mechanics stroke by stroke — which is exactly what the next sections do.
So which muscles actually make up this chain? Start at the bottom — because everything starts with the ground.
The Lower Body: Your Power Foundation
The main muscles used in tennis start in the lower body, and they do far more than just move you around the court. These four muscle groups generate the raw force that the rest of your body converts into racquet speed:
- Quadriceps (the four-muscle group at the front of your thigh): bend and extend the knee during the loading phase of the serve and during every split step
- Hamstrings (the muscles running along the back of your thigh): decelerate your leg and stabilize your knee during explosive lateral movements
- Gluteus maximus (the large muscle of your buttocks that drives hip extension): the single most powerful muscle in the body; it creates the “push” phase of leg drive on the serve
- Gastrocnemius / Calves (the muscles at the back of your lower leg): absorb landing shock, enable pivoting, and provide the final push-off for lateral movement
The split step — the small, anticipatory jump you take just before your opponent strikes the ball — is the mechanism that “loads” all four of these muscles like a compressed spring. The faster and more explosive your split step, the more elastic energy is stored and available for your shot response.
Picture a serve: as you toss the ball, your knees bend — that’s your quadriceps and hamstrings loading. When you push upward, your glutes fire. That upward force travels through your entire body in less than a second. Quads, hamstrings, and calves are indeed the most important muscles in tennis for stamina and leg drive on the serve — your intuition about this is correct, and the biomechanics confirm it (PubMed, 2007).
Once your legs generate that initial burst of power, your core takes over — and this is where most recreational players lose the energy they’ve just created.
The Core: Rotating Force into Speed
Your core is the rotational engine of every tennis stroke. It doesn’t just stabilize your spine — it actively transfers and amplifies the force your legs produce. The key muscles here are:
- Obliques (the diagonal abdominal muscles that wrap around your midsection and drive rotational power): these are the primary force-transfer muscles in groundstrokes, rotating your hips and torso toward the ball at high speed
- Transverse abdominis (the deep, horizontal abdominal muscle that acts like a natural weight belt): stabilizes your spine during rotation, protecting your lower back from injury
- Erector spinae (the long muscles running either side of your spine): extend and stabilize the back during the serve’s trophy pose and follow-through
- Hip flexors (the muscles connecting your lower spine to your upper thigh): drive the rapid hip rotation that initiates every groundstroke
Research from a biomechanical analysis of the tennis forehand confirms that trunk rotation powered by the obliques can contribute up to 50% of total racket head speed — making core strength arguably the highest-leverage training investment for recreational players (biomechanical analysis of the tennis forehand, 2007).
Why this matters for your game: A player with strong arms but a weak core is essentially trying to throw a punch with no torso rotation — the power ceiling is low, and the arm takes all the strain.
Upper Body: The Final Strike
By the time the kinetic chain reaches your upper body, it’s carrying accumulated force from your legs and core. Your upper body muscles don’t generate this force — they shape, direct, and control it. The key players are:
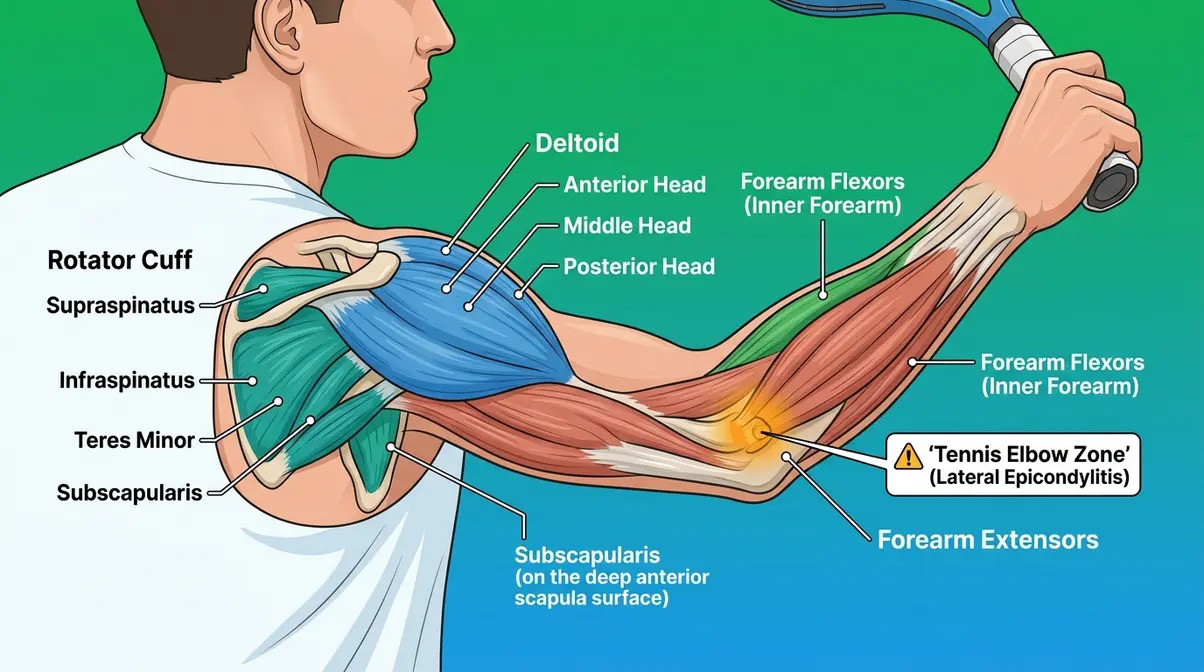
- Deltoids (the three-headed muscle capping your shoulder): raise and rotate your arm through the swing arc
- Pectoral muscles (the large chest muscles): drive internal shoulder rotation, especially during the forehand and serve acceleration phase
- Rotator cuff (a group of four small muscles — supraspinatus, infraspinatus, teres minor, subscapularis — that wrap around the shoulder joint): stabilize the shoulder during every stroke and decelerate the arm after contact
- Triceps (the three-headed muscle at the back of the upper arm): extend the elbow at contact for full arm reach and power delivery
- Forearm flexors and extensors (the muscles running along the inside and outside of your forearm): control grip tightness, wrist position, and spin generation
Why this matters for your game: Your shoulder and arm are the final link in the chain. If the chain upstream is working well, these muscles can do their job with precision and far less stress. If the chain is broken, they compensate — and that’s when injury follows.
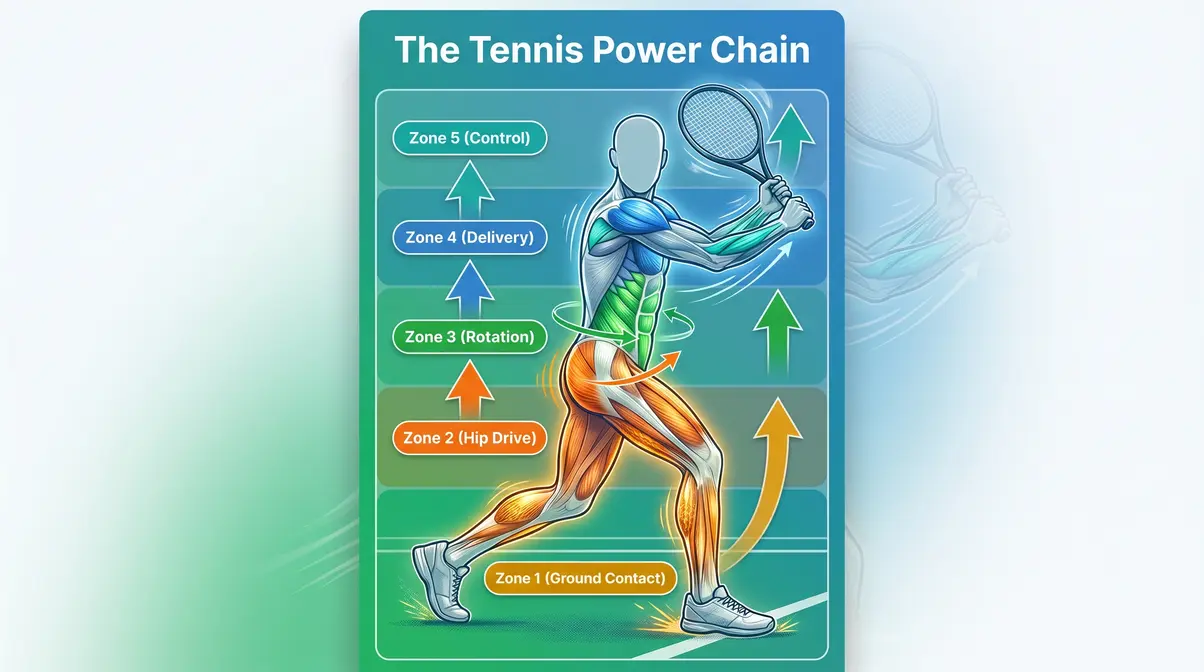
The Tennis Power Chain
The Tennis Power Chain works like a relay race. Each muscle group passes the baton to the next — and the baton is kinetic energy. Legs generate it. The core rotates and amplifies it. The upper body delivers and controls it.
| Phase | Muscle Group | Role |
|---|---|---|
| Ground contact | Calves, Quadriceps | Load and push off |
| Hip drive | Gluteus maximus, Hamstrings | Generate upward/forward force |
| Rotation | Obliques, Transverse abdominis | Transfer and amplify force |
| Delivery | Deltoids, Pectorals | Accelerate the arm |
| Control | Rotator cuff, Forearm muscles | Direct and decelerate |
When a player trains each of these phases specifically — not just “arms and legs” in isolation — their power and consistency improve measurably. That’s the principle behind the Tennis Power Chain framework, and it’s what separates structured training from random gym work.
Muscles Used in a Tennis Serve
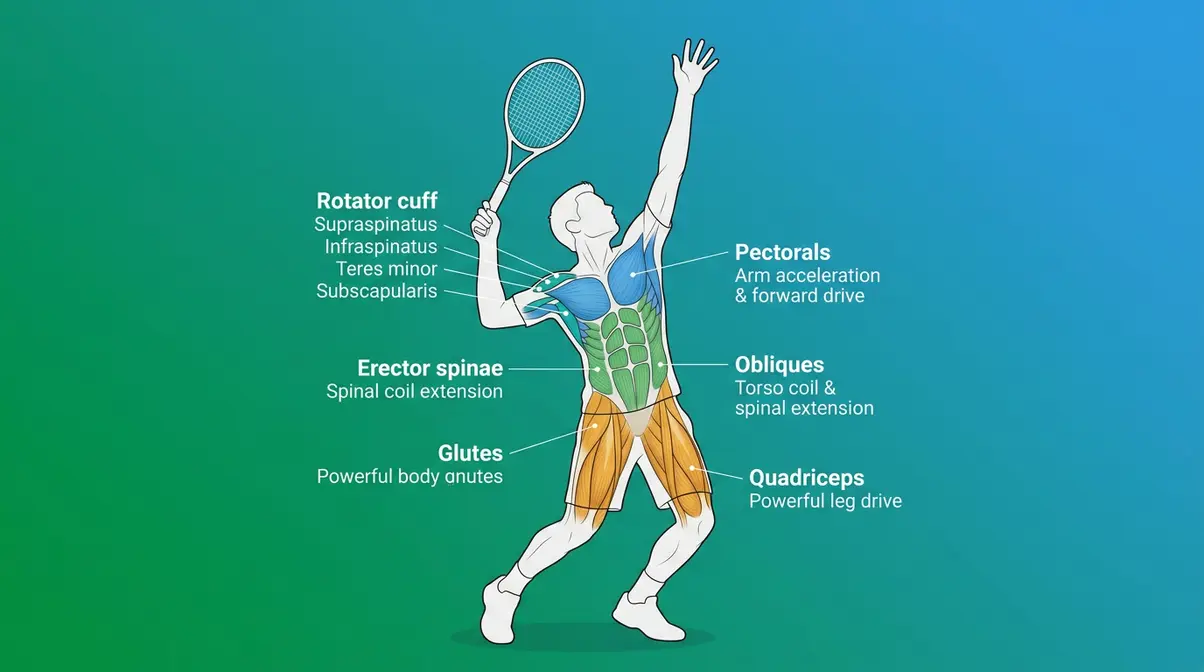
The tennis serve is the most muscularly complex stroke in the game. It demands coordinated firing across your entire body in under one second. Sports medicine professionals consistently identify the serve as the stroke most associated with shoulder and elbow overuse injuries — precisely because so many players generate serve power from the arm alone, bypassing the legs and core entirely (Tidal Chiropractic, 2026). The Tennis Power Chain approach breaks the serve into four phases so you can train each one deliberately.

Phase 1: The Wind-Up and Leg Drive
The serve begins long before the racquet moves. As you lift the ball to toss it, your weight shifts to your back foot, your knees bend, and your legs load like a coil spring. The quadriceps (front of thigh) and hamstrings (back of thigh) control this loading phase. The gluteus maximus prepares to fire the hip extension that will drive your body upward.
The toss arm (non-dominant arm) also activates here — the anterior deltoid (front of the shoulder) raises the arm, and the biceps brachii (the muscle on the front of your upper arm) stabilizes the elbow. This phase sets the entire serve’s power ceiling. A shallow knee bend means a weak leg drive, which means the arm has to do everything — and that’s where injuries begin.
Why this matters for your game: Every centimeter of knee bend in the loading phase translates directly into racquet speed at contact. This is why elite servers like Novak Djokovic drop into a deep squat before every first serve.
Phase 2: The Trophy Pose and Torso Coil
The trophy pose — the moment both arms are raised and your body is coiled — is where rotational energy is stored. Your erector spinae (the long muscles running either side of your spine) extend your back, and your obliques rotate your torso away from the target, creating a coiled spring effect. Your hip flexors (the muscles connecting your lower spine to your upper thigh) stabilize the pelvis, preventing energy from leaking downward.
This phase also demands significant shoulder stability. To support this phase, you must strengthen your back and shoulder muscles for serving. The rotator cuff holds your racquet arm in the cocked position against the upward momentum of your leg drive. A weak rotator cuff will allow the shoulder joint to drift — a known precursor to labrum tears and impingement syndromes (Tidal Chiropractic, 2026).
Why this matters for your game: The trophy pose isn’t aesthetic — it’s functional. The deeper your torso coil at this phase, the more rotational force you release into the next phase.
Phase 3: Arm Acceleration and Contact
This is the fastest phase of the serve — the arm goes from cocked to contact in roughly 0.15 seconds. The pectoral muscles (large chest muscles) and subscapularis (the front-facing rotator cuff muscle) drive internal shoulder rotation, pulling the racquet forward. The triceps extend the elbow, and the forearm extensors (muscles along the outer forearm) snap the wrist through contact to add spin and speed.
The deltoids — particularly the anterior (front) and middle heads — elevate and rotate the arm through the contact arc. Research on shoulder kinematics during the tennis serve shows that peak muscle activation in the pectorals and subscapularis occurs within this acceleration window (PMC, 2008). A hyper-extended wrist at contact is a sign that the forearm extensors are not controlling this phase adequately — and it’s a common source of wrist strain.
Why this matters for your game: Explosive power in tennis comes from this arm-acceleration phase, but only when it’s preceded by a proper leg drive and torso coil. Without the upstream chain, the arm is doing all the work alone.
Phase 4: Follow-Through
After contact, your arm doesn’t stop — it continues in a controlled arc across your body. This deceleration phase is where the rotator cuff does its most critical injury-prevention work. The infraspinatus and teres minor (the two rear-facing rotator cuff muscles) act as brakes on the internal rotation that just propelled your racquet. The biceps brachii also engages eccentrically (lengthening under tension) to slow elbow extension.
Poor deceleration mechanics — often caused by rotator cuff fatigue or weakness — are the leading cause of shoulder pain after serving (Tidal Chiropractic, 2026). If your shoulder aches after a heavy serving session, this is the phase to examine.
Why this matters for your game: A strong, controlled follow-through isn’t just good form — it’s how your shoulder stays healthy through thousands of serves per season.
What is the hardest skill in tennis?
The serve is widely considered the hardest skill in tennis to learn and master. It requires coordinating leg drive, torso coil, arm acceleration, and wrist snap in a precise sequence — all within approximately 0.5 seconds — while tossing the ball to an exact location. Unlike groundstrokes, which are reactive, the serve is entirely self-initiated, which creates additional performance pressure. Biomechanical research on the tennis serve identifies it as the most technically complex stroke in the game, with the highest number of injury-related muscle activations of any shot (PMC, 2008). Most beginners take 12–18 months to develop a reliable serve.
3 Exercises to Build Your Serving Power
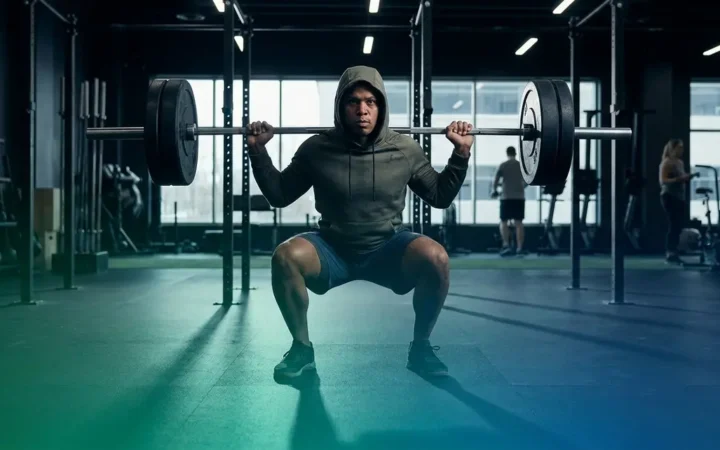
Exercise 1: Romanian Deadlift (RDL) — For Leg Drive (Phase 1)
The Romanian deadlift targets the hamstrings and gluteus maximus — the primary muscles driving the push-off phase of the serve.
- Stand with feet hip-width apart, holding a barbell or two dumbbells in front of your thighs
- Hinge at the hips (not the waist), pushing your hips back as you lower the weight down your shins
- Keep your back flat and your knees slightly bent — do not round your lower back
- Lower until you feel a strong stretch in your hamstrings (typically just below the knee)
- Drive your hips forward to return to standing, squeezing your glutes at the top
- Perform 3 sets of 8–10 reps with moderate weight
Exercise 2: Medicine Ball Overhead Slam — For Torso Coil (Phase 2)
This exercise trains the obliques and erector spinae in the exact rotational pattern used during the trophy pose.
- Stand with feet shoulder-width apart, holding a 4–6 kg medicine ball overhead
- Raise onto your toes, fully extending your body upward (mimicking the trophy pose)
- Explosively slam the ball straight down into the ground, engaging your core and pulling your arms through the motion
- Catch the ball on the bounce (or pick it up) and reset
- Perform 3 sets of 10 reps — focus on the explosive contraction, not just the movement
Exercise 3: Cable Internal Rotation — For Arm Acceleration (Phase 3)
This exercise isolates the pectorals and subscapularis in the internal-rotation movement that powers arm acceleration at contact.
- Set a cable machine pulley to elbow height; attach a single handle
- Stand sideways to the machine, holding the handle with your dominant hand, elbow bent at 90 degrees and tucked to your side
- Rotate your forearm inward (toward your stomach) against the cable resistance
- Slowly return to the starting position — control the return
- Perform 3 sets of 12–15 reps per arm; keep your elbow stationary throughout
Muscles Used in the Tennis Forehand and Backhand
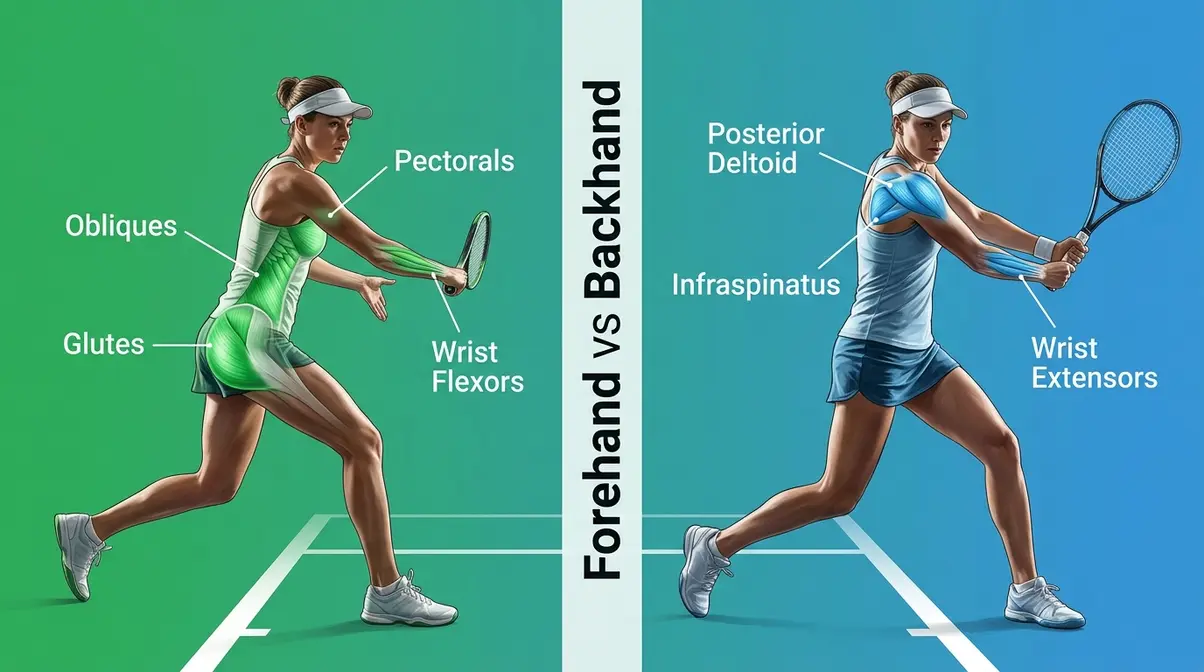
Groundstrokes are the foundation of every rally, and the muscles used in tennis forehand and backhand shots are more similar than most players expect — but the key differences explain why one-handed backhands demand more from the shoulder than forehands do.
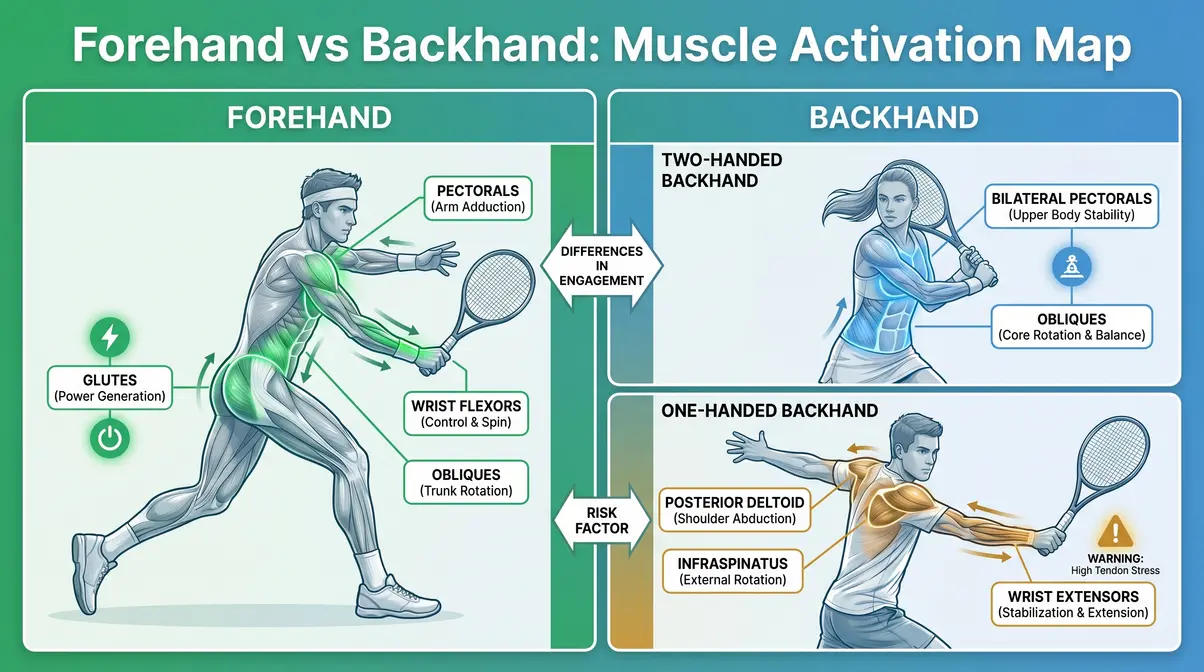
Muscles Used in the Tennis Forehand
The forehand is driven primarily by hip rotation — your hips open toward the target, and the obliques transfer that rotation through your torso and into your arm. The sequence from the ground up:
- Glutes and quadriceps: initiate the weight transfer from back foot to front foot
- Obliques: rotate the hips and torso toward the target, generating the majority of racquet speed
- Pectoral muscles (large chest muscles): drive internal shoulder rotation as the arm swings forward
- Anterior deltoid (front of the shoulder): elevates the arm through the swing arc
- Wrist flexors (muscles on the inside of your forearm): control the wrist snap at contact that adds topspin
Research from a biomechanical analysis of the tennis forehand confirms that oblique-driven trunk rotation is the dominant contributor to forehand power — not the arm (PubMed, 2007). Players who hit “arm-only” forehands are not only losing power — they’re placing the wrist and elbow at elevated injury risk.
Why this matters for your game: If your forehand feels heavy or inconsistent, check your hip rotation before you adjust your swing. The arm follows where the hips lead.
Muscles Used in the Tennis Backhand
The backhand divides into two distinct biomechanical patterns depending on whether you use one hand or two.
Two-handed backhand: Both hands share the load, which means the non-dominant arm’s pectorals and biceps contribute significantly to power. The obliques rotate in the opposite direction from the forehand — from front-facing to side-facing. Because two hands stabilize the racquet, shoulder stress is distributed and wrist injuries are less common.
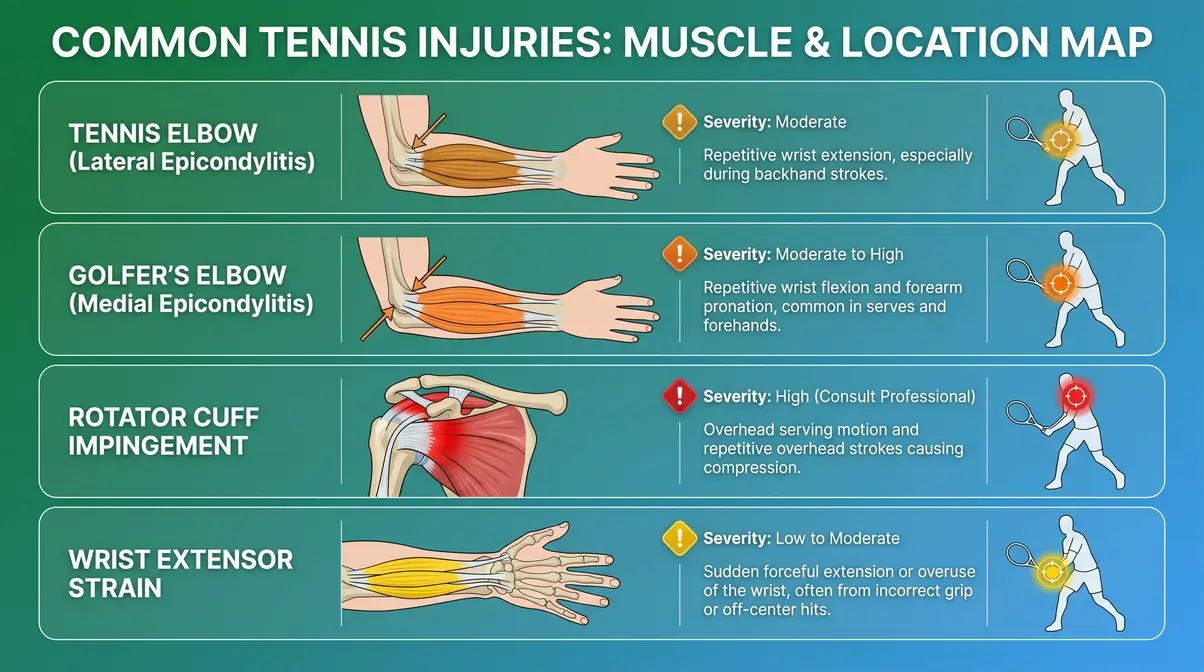
One-handed backhand: This stroke places substantially greater demand on the posterior deltoid (rear of the shoulder), infraspinatus (rear rotator cuff muscle), and wrist extensors (muscles along the outer forearm). Without the non-dominant hand sharing the load, the dominant shoulder must control the entire deceleration phase alone. This is why one-handed backhand players are statistically more susceptible to wrist extensor strain and posterior shoulder impingement (PMC, 2008).
Why this matters for your game: If you play a one-handed backhand, posterior shoulder and wrist extensor strengthening is not optional — it’s injury prevention.
What are the 5 R’s in tennis?
The 5 R’s in tennis refer to the five tactical principles that guide point construction: Rally, Redirect, Rush, Recover, and React. These aren’t official rules but a coaching framework used to teach beginners how to think through a point. Rally means sustaining consistent groundstrokes; Redirect means changing the ball’s direction; Rush means attacking a short ball; Recover means returning to a defensive position; React means reading your opponent’s shot early. The framework helps beginners move beyond just hitting the ball and start playing strategically.
3 Groundstroke Exercises
Exercise 4: Medicine Ball Rotational Throw — For Forehand Hip Rotation
This exercise directly trains the oblique-driven rotation pattern of the forehand.
- Stand sideways to a solid wall (or with a partner), holding a 4–6 kg medicine ball at hip height
- Load into your back hip, rotating your torso away from the wall (mimicking the forehand wind-up)
- Explosively rotate toward the wall, releasing the ball as your hips open — the ball should travel in the same arc as your forehand swing
- Catch the rebound and reset
- Perform 3 sets of 10 throws per side
Exercise 5: Dumbbell Reverse Fly — For One-Handed Backhand Shoulder Stability
This exercise strengthens the posterior deltoid and infraspinatus — the muscles most stressed by the one-handed backhand.
- Hold a light dumbbell in each hand, hinge forward at the hips to about 45 degrees
- With arms hanging down and elbows slightly bent, raise both arms out to the sides until they reach shoulder height
- Squeeze the rear shoulder muscles at the top — do not shrug your shoulders
- Lower slowly (3 seconds) back to the start
- Perform 3 sets of 12–15 reps; use a light weight — this is a precision exercise, not a strength exercise
Exercise 6: Pallof Press — For Anti-Rotation Core Stability
The Pallof press trains the transverse abdominis and obliques to resist unwanted rotation — critical for maintaining a stable base during both groundstrokes.
- Set a cable machine to chest height; attach a single handle
- Stand sideways to the machine, holding the handle with both hands at your chest
- Step away from the machine until there is tension in the cable
- Press the handle directly out from your chest until your arms are straight — resist the cable’s pull to rotate you
- Hold for 2 seconds, then return the handle to your chest
- Perform 3 sets of 10 reps per side
The Surprising Health Benefits of Playing Tennis
Beyond power and performance, the muscles used in tennis are being worked in ways that carry significant long-term health benefits. Three questions come up repeatedly among tennis players — and the research answers are more compelling than most people expect.
Does Tennis Improve Longevity?
Yes — and the evidence is striking. A large-scale Danish cohort study published in the British Journal of Sports Medicine (2017) tracked over 8,500 adults and found that tennis players outlived sedentary individuals by an average of 9.7 years — the highest longevity gain of any sport studied, including cycling, swimming, and jogging. The researchers attributed this to tennis’s combination of aerobic conditioning, interval-intensity bursts, social interaction, and coordination demands — a combination no single-modality exercise replicates.
Sports medicine professionals note that tennis’s stop-start pattern closely mimics high-intensity interval training (HIIT), which is associated with improved cardiovascular efficiency and reduced all-cause mortality risk (British Journal of Sports Medicine, 2017).
Why this matters for your game: Every hour on the court is an investment in your health that compounds over decades — not just a workout.
Does Tennis Lower Cholesterol?
Research suggests it can. Aerobic exercise at moderate-to-vigorous intensity — the kind tennis reliably delivers during a match — has been shown to raise HDL cholesterol (the “good” kind that removes harmful deposits from blood vessels) and lower LDL cholesterol (the “bad” kind associated with arterial plaque) (Harvard Health, 2026). A typical recreational tennis match sustains heart rate at 60–80% of maximum for 60–90 minutes, which falls within the exercise intensity range most associated with favorable lipid changes.
What flushes cholesterol from your body? Physical activity triggers the liver to process LDL more efficiently while simultaneously raising HDL production — and tennis, with its sustained aerobic demand punctuated by explosive bursts, appears particularly effective at this dual action (Harvard Health, 2026).
Why this matters for your game: If you’re playing tennis two to three times per week, you’re likely getting measurable cardiovascular and metabolic benefits alongside the on-court improvements.
What flushes cholesterol out of your body?
Regular aerobic exercise, dietary fiber, and certain medications are the primary evidence-backed methods for reducing LDL cholesterol. Exercise triggers the liver to process and remove LDL from the bloodstream more efficiently while simultaneously increasing HDL production (Harvard Health, 2026). Soluble fiber (found in oats, beans, and fruits) binds to cholesterol in the digestive tract and removes it before it enters circulation. Tennis, as a sustained aerobic activity, contributes to both mechanisms — physical activity and, indirectly, the appetite and dietary habits associated with an active lifestyle.
Does Tennis Affect Your Cortisol Levels?
The relationship between tennis and cortisol (the primary stress hormone produced by the adrenal glands) is nuanced. Moderate-intensity exercise, including recreational tennis, is associated with a reduction in resting cortisol levels over time — meaning regular players tend to handle everyday stress more efficiently (Mayo Clinic, 2026). However, very high-intensity competitive tennis — particularly long, physically demanding matches — can temporarily spike cortisol during and immediately after play.
The practical takeaway: recreational tennis at a moderate pace is a net stress-reducer. Elite competitive tennis requires recovery protocols to manage acute cortisol spikes. For most club-level players reading this guide, tennis is a cortisol-lowering activity when practiced consistently.
Why this matters for your game: Playing tennis regularly isn’t just good for your body — research suggests it’s a meaningful tool for mental health and stress management (Mayo Clinic, 2026).
Arm Muscles Used in Tennis
The arm muscles used in tennis are the most injury-prone part of the body for recreational players — not because they’re weak, but because they’re asked to do work that the legs and core should be sharing. Understanding how these muscles function, and where they fail, is the clearest path to a long, pain-free tennis career.
Rotator Cuff: Shoulder Protection
The rotator cuff is a group of four muscles — supraspinatus (top of the shoulder, initiates arm elevation), infraspinatus (rear of the shoulder, controls external rotation), teres minor (rear, assists infraspinatus), and subscapularis (front, drives internal rotation during the serve) — that collectively wrap around the shoulder joint and hold the upper arm bone precisely in its socket during every stroke.
Without an intact rotator cuff, the deltoids and pectorals would simply pull the arm out of the joint during the serve’s acceleration phase. Sports medicine professionals consistently identify rotator cuff weakness as the primary mechanism behind impingement, tendinitis, and partial tears in recreational tennis players (Tidal Chiropractic, 2026).
Why this matters for your game: The rotator cuff doesn’t need to be big — it needs to be strong relative to the deltoids and pectorals. Most gym training overdevelops the “pushing” muscles and neglects the “stabilizing” ones. That imbalance is the setup for injury.
Forearm Muscles: Grip, Spin, and Control
The forearm contains two competing muscle groups that every tennis player should understand:
- Forearm flexors (muscles on the inside of your forearm, running from the elbow to the palm): control grip tightness, wrist flexion, and topspin generation — these are the muscles most stressed during the forehand and serve follow-through
- Forearm extensors (muscles on the outer forearm, running from the elbow to the back of the hand): control wrist extension, slice backspin, and deceleration — these are the muscles most associated with lateral epicondylitis (tennis elbow)
It is crucial to develop strong forearm muscles for groundstroke control. A hyper-extended wrist at contact — where the wrist bends too far backward — is a sign that the forearm extensors are not adequately controlling the stroke. This position dramatically increases stress on the lateral elbow tendons (Mayo Clinic, 2026).
Why this matters for your game: Grip and forearm conditioning are not just about power — they determine whether you can play pain-free for the next 10 years.
Tennis and Golfer’s Elbow
Two overuse injuries dominate the recreational tennis world:
Tennis elbow (lateral epicondylitis): Inflammation and micro-tearing of the forearm extensor tendons where they attach to the outer elbow. It’s caused by repetitive wrist extension under load — most commonly during backhand strokes or off-center contact on the forehand. Despite the name, tennis elbow affects approximately 50% of people who play racket sports at some point in their playing career (Mayo Clinic, 2026).
Golfer’s elbow (medial epicondylitis): Inflammation of the forearm flexor tendons at the inner elbow. Less common in tennis than lateral epicondylitis, but it can develop in players who over-grip the racquet or generate excessive topspin through wrist flexion. Both conditions are overuse injuries — they develop gradually from repeated mechanical stress, not a single traumatic event.
If you experience pain on the outer or inner elbow that worsens with gripping, seek evaluation from a physical therapist before continuing to play.
4 Arm and Shoulder Exercises
Exercise 7: Dumbbell External Rotation (Side-Lying) — For Rotator Cuff Strength
This is the single most effective exercise for building the infraspinatus and teres minor — the deceleration muscles of the rotator cuff.
- Lie on your non-dominant side, with a light dumbbell (1–3 kg) in your top hand
- Bend your top elbow to 90 degrees, tucking it against your side — the dumbbell should point toward the floor
- Keeping your elbow pinned to your side, rotate your forearm upward until the dumbbell points toward the ceiling
- Lower slowly (3 seconds) back to the starting position
- Perform 3 sets of 15 reps per arm; use very light weight — this is precision, not power
Exercise 8: Wrist Extensor Eccentric Curl — For Tennis Elbow Prevention
Eccentric (lengthening) exercises are the most evidence-backed rehabilitation and prevention tool for lateral epicondylitis (Mayo Clinic, 2026).
- Sit with your forearm resting on a table, palm facing down, holding a light dumbbell (0.5–1 kg)
- Use your non-dominant hand to lift your wrist into extension (wrist bent back)
- Release your non-dominant hand and slowly lower the wrist back down over 3–4 seconds — your forearm extensors are working against gravity
- Perform 3 sets of 15 reps; perform this exercise pain-free only
Exercise 9: Band Pull-Apart — For Posterior Shoulder Stability
This exercise activates the posterior deltoid and infraspinatus, counterbalancing the overdeveloped anterior (front) muscles that dominate most gym training.
- Hold a resistance band with both hands at shoulder width, arms extended straight in front of you
- Pull the band apart by squeezing your shoulder blades together, bringing your hands out to your sides
- Hold for 1 second at full stretch — you should feel the work in the back of your shoulders
- Return slowly to the starting position
- Perform 3 sets of 15–20 reps; use a light band that allows full range of motion
Exercise 10: Farmer’s Carry — For Grip Endurance and Forearm Conditioning
The farmer’s carry is the most functional grip-endurance exercise available — it mimics the sustained grip demand of a long match.
- Pick up a moderately heavy dumbbell in each hand (approximately 30–40% of your bodyweight total)
- Stand tall with your shoulders back and your core braced
- Walk in a straight line for 20–30 meters, maintaining an upright posture
- Set the weights down, rest 60 seconds, and repeat
- Perform 3–4 rounds; increase weight gradually as your grip endurance improves
When Tennis Hurts: Overuse & Help
Training harder is not always the right answer. Understanding when to push and when to stop is as important as any exercise in this guide. Sports medicine professionals consistently identify overtraining and poor load management as the primary contributors to chronic tennis injuries — not technical errors alone.
Common Overuse Mistakes to Avoid
Most recreational tennis injuries follow predictable patterns. Recognizing these mistakes protects the muscles used in tennis from preventable damage. Following general principles for injury prevention in sports is essential:
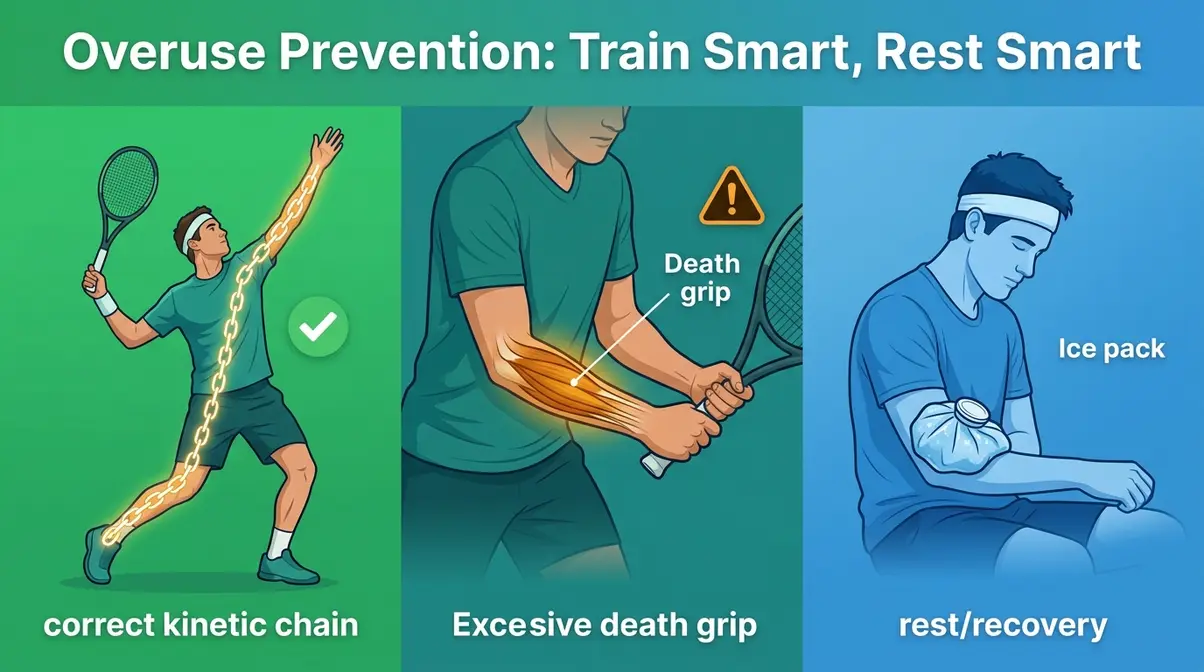
Skipping the warm-up. Jumping straight into hard hitting without a dynamic warm-up (leg swings, arm circles, light jogging) means your muscles are cold and less elastic — injury risk is significantly elevated in the first 10–15 minutes of play (Cleveland Clinic, 2026).
Serving at full intensity every session. The serve is the highest-load stroke in the game. Recreational players who serve at maximum effort in every practice session accumulate rotator cuff stress faster than the tissue can repair. Varying serve intensity across training sessions — using 60–70% effort for technical work — reduces cumulative load substantially.
Ignoring grip pressure. Death-gripping the racquet is a primary cause of both tennis elbow and forearm fatigue. Research suggests the optimal grip pressure during groundstrokes is firm at contact but relaxed during the swing — a concept called “dynamic grip control” (Firefly Recovery, 2026).
Training through pain. Sharp, localized pain during a stroke is a warning signal, not a weakness to push through. Continuing to play through acute pain converts a minor overuse issue into a structural injury requiring months of recovery.
When to Rest Instead of Train
Rest is an active training strategy, not a failure. If you notice any of the following, reduce intensity or take a complete rest day:
- Persistent soreness in the elbow, wrist, or shoulder that lasts more than 48 hours after play
- Reduced grip strength compared to your baseline — a sign of forearm muscle fatigue
- Shoulder clicking or catching during the serve follow-through
- Swelling or warmth around any joint
For most recreational players, two consecutive days of tennis without a rest day is the upper limit for sustainable training. Research on overuse injury patterns in racket sports supports a 48-hour recovery window between high-intensity sessions for amateur athletes (Cleveland Clinic, 2026).
When to See a Physical Therapist
Some symptoms require professional evaluation. Consult a physical therapist or sports medicine physician if you experience:
- Elbow pain that persists for more than 2 weeks, particularly on the outer or inner elbow — this warrants assessment for lateral or medial epicondylitis
- Shoulder pain during or after the serve, especially if it’s sharp or limits your range of motion — rotator cuff issues require imaging to rule out structural damage
- Wrist pain with a sensation of clicking or locking — this may indicate ligament or cartilage involvement that self-treatment will not resolve
- Numbness or tingling in the hand or fingers — this may indicate nerve involvement requiring specialist assessment
A physical therapist can identify biomechanical compensations in your stroke that are invisible to you — and correct them before they become chronic injuries. Do not substitute this guide for professional medical advice.
Frequently Asked Questions
What is the 80/20 rule in tennis?
The 80/20 rule in tennis suggests that approximately 80% of your results come from 20% of your skills — specifically, consistency and court positioning rather than winners. The principle, borrowed from Pareto’s law, is used by coaches to remind players that reducing unforced errors matters more than hitting spectacular shots. In practical terms, keeping 80% of your shots deep and in the middle of the court forces more errors from opponents than trying to hit winners on every ball. It’s a strategy for recreational players who want to win more matches without changing their technique.
What is the unspoken rule in tennis?
The unspoken rule in tennis most commonly refers to the gentlemen’s agreement around line calls: if you’re not certain a ball was out, call it in. Tennis relies heavily on player honesty because most recreational matches have no line judges. Other unspoken rules include not returning a serve that is clearly a fault before the opponent calls it, waiting until the point is over before walking behind a court in use, and acknowledging a net cord or lucky shot with a brief gesture. These conventions preserve the sport’s integrity and culture.
Does tennis improve longevity?
Tennis is associated with one of the highest longevity gains of any sport studied. A large Danish cohort study published in the British Journal of Sports Medicine (2017) found that regular tennis players outlived sedentary individuals by an average of 9.7 years — more than swimmers, cyclists, or joggers. The combination of aerobic conditioning, explosive bursts, social interaction, and full-body coordination appears to drive this effect. Sports medicine researchers suggest the social component of tennis — playing with a partner or in leagues — may be as important as the physical activity itself.
Does tennis lower cholesterol?
Regular tennis play can lower LDL (“bad”) cholesterol and raise HDL (“good”) cholesterol through its sustained aerobic demands. A typical recreational match maintains heart rate at 60–80% of maximum for 60–90 minutes — the intensity range most associated with favorable lipid changes (Harvard Health, 2026). The liver processes LDL more efficiently in response to regular aerobic exercise, while HDL production increases. Playing two to three times per week appears sufficient to produce measurable improvements in lipid profiles over 8–12 weeks.
Does tennis raise cortisol?
The effect of tennis on cortisol depends on intensity and duration. Moderate recreational tennis is associated with a reduction in resting cortisol levels over time — regular aerobic exercise improves the body’s ability to regulate the stress response (Mayo Clinic, 2026). However, very long or highly competitive matches can temporarily spike cortisol during and immediately after play, similar to any high-intensity exertion. For most club-level players, the net effect of regular tennis is lower baseline cortisol — meaning better stress management in daily life.
Build the Chain, and the Power Will Follow
For beginner-to-intermediate players, understanding the muscles used in tennis changes how you train, how you recover, and how you think about injury. Every powerful shot you’ve ever admired — the explosive serve, the whipping forehand, the controlled backhand — was produced by a precisely sequenced chain of muscle activations, not just a strong arm.
The Tennis Power Chain framework gives you a practical way to close the gap between gym work and on-court performance. Train the legs that generate force. Strengthen the core that transfers it. Condition the arm that delivers it — and protect the rotator cuff and forearm muscles that keep the whole chain healthy. Research consistently shows that players who train the kinetic chain as an integrated system, rather than isolated body parts, develop faster, more durable strokes with lower injury rates (PubMed, 2007; USTA).
Start with the 10 exercises in this guide — one or two per training session, mapped to the stroke you’re working on that week. If your shoulder or elbow is already bothering you, begin with Exercises 7, 8, and 9 before adding load. And if pain persists beyond two weeks, consult a qualified sports medicine physician or physical therapist. The goal is a long, powerful, pain-free tennis career — and that starts with understanding exactly how your body works.
Related posts:
Progressive Overload Guide: 7 Methods to Build Muscle
Muscle Atrophy: Causes, Symptoms & How to Reverse It
What Is Muscle Memory? The Complete Science Guide
Muscle Hypertrophy Explained: The Science of Muscle Growth
Strength Training vs Hypertrophy: The Complete 2026 Guide
Muscle Building Transformation Stories: What Actually Worked
Callum
Hi, I'm Callum, the founder of Body Muscle Matters. I'm not a certified trainer, I'm a self taught lifter who started this site to share what I've learned from my own training and a lot of trial and error. Everything here comes from real experience and honest research, written the way I'd explain it to a friend who is just getting started. My goal is simple: practical, no hype fitness advice you can actually use.