How to Build Back Muscles: The 3-Vector Method Guide
⚠️ Medical Disclaimer: The information in this article is for educational purposes only and is not a substitute for professional medical advice, diagnosis, or treatment. Consult a licensed physician, physical therapist, or certified strength and conditioning specialist (CSCS) before starting any new exercise program, especially if you have pre-existing back pain, a history of spinal injury, or any other health condition.
You already know your back needs work. Maybe your posture is rounding forward at your desk. Maybe you want that V-taper — the wide, tapered look that makes a shirt fit differently. Maybe you’ve been doing lat pulldowns for months and nothing seems to be happening. Whatever brought you here, the problem is usually the same: conflicting advice, generic exercise lists, and zero guidance on how to actually build a complete back.
This guide will show you exactly how to build back muscles from scratch — whether you train at home with a bedsheet or at a fully equipped gym with cables and barbells. You’ll get the anatomy you need to understand why certain exercises work, a proven selection framework, five complete periodized programs, and the form cues that prevent injury and accelerate results.
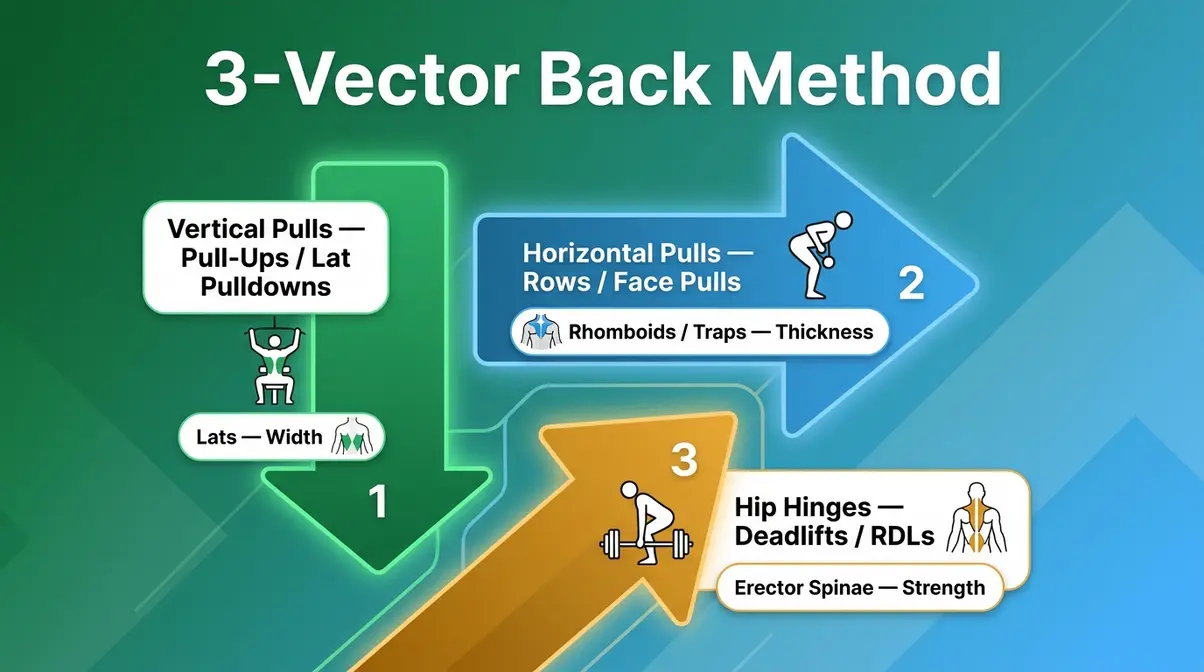
Learning how to build back muscles effectively requires training through three distinct movement patterns — not just picking random exercises.
- The 3-Vector Back Method: Every complete back program includes vertical pulls (width), horizontal pulls (thickness), and hip hinges (lower back/posterior chain).
- Science confirms it: EMG research shows different back muscles activate preferentially across these three vectors — no single exercise trains them all (PMC, 2020).
- Beginners see results fast: Most people notice measurable muscle gains within 6–10 weeks of consistent, progressive training (Healthline, 2026).
- Equipment doesn’t limit you: Bedsheet rows to barbell deadlifts — the 3-Vector Back Method works at every equipment level.
- Progressive overload is non-negotiable: A 2026 PubMed study confirms that progressive overload produces significantly greater hypertrophy than static training in untrained individuals.
Back Anatomy and Why It Matters
Most people walk into the gym and start pulling things. That’s not necessarily wrong, but understanding which muscles you’re targeting and why is what separates slow progress from rapid, visible change. Your back is the largest muscle group on the posterior side of your body, and it’s made up of several distinct regions — each with a different function, and each requiring different exercises to develop.
A 2026 EMG study published in PMC examined muscle activation across seven lat pulldown variants and found that lat pulldown exercise variations preferentially recruit different regions of the latissimus dorsi — meaning grip, angle, and movement pattern all matter. This is exactly why the 3-Vector Back Method exists: to ensure you’re hitting every region systematically, not randomly.
The 4 Key Muscles of Your Back
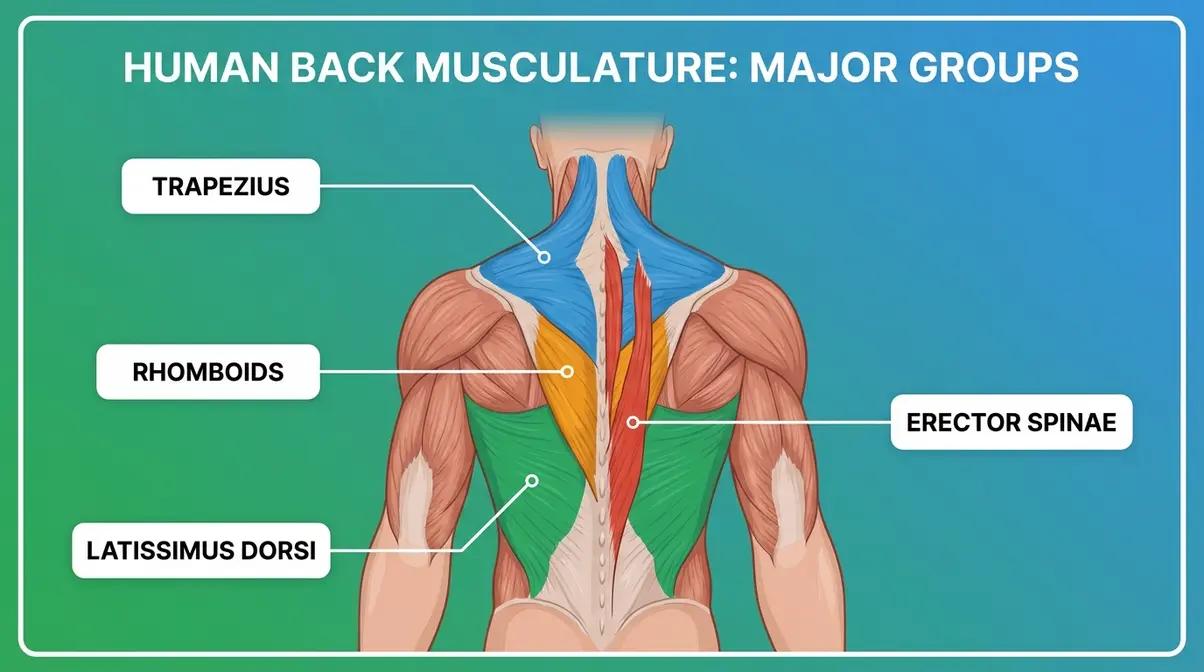
Your back has four muscle groups that matter most for both aesthetics and function:
1. Latissimus dorsi (lats) — The large, wing-shaped muscles that run from your armpits down to your lower back. These are the primary muscles responsible for the V-taper look. They pull your arms downward and toward your body. Think of them as the “width” muscles.
2. Trapezius (traps) — A large diamond-shaped muscle covering your upper and mid-back. The upper traps help you shrug; the middle and lower traps retract your shoulder blades and maintain posture. Neglected traps lead to the rounded-shoulder look that plagues desk workers.
3. Rhomboids — Located between your shoulder blades, the rhomboids squeeze your scapulae (shoulder blades) together. They’re the “thickness” muscles of the mid-back. Weak rhomboids are one of the most common causes of poor posture and upper-back pain.
4. Erector spinae — The column of muscles running along both sides of your spine from your pelvis to your skull. These are your lower back’s primary movers and stabilizers. Strong erectors protect your spine during every lift you’ll ever do — and they’re the reason deadlifts belong in every back program.
Why Back Training Matters
The V-taper is a legitimate goal, and there’s nothing wrong with wanting it. But your back muscles do far more than look good in a T-shirt. Your posterior chain — the interconnected system of muscles running from your calves through your hamstrings, glutes, erector spinae, and up through your traps — is the engine behind nearly every athletic movement you perform.
Research consistently shows that posterior chain strength correlates with reduced injury risk, improved posture, and better performance in compound lifts. A 2022 systematic review published in PMC found that higher weekly training volume applied across muscle groups produced significantly greater hypertrophy outcomes — and the back, being one of the body’s largest muscle groups, responds particularly well to volume when distributed intelligently across sessions.
Strong traps and rhomboids pull your shoulders back and down. This counters the forward-head, rounded-shoulder posture that results from hours at a desk. Strong lats stabilize your shoulder joint and protect you from rotator cuff injuries. Strong erectors keep your lumbar spine safe during every squat, deadlift, and carry you’ll ever perform. Training your back isn’t just about aesthetics — it’s one of the highest-return investments you can make for long-term health.
The 7 Best Back Exercises for Building Muscle
Here are the most effective exercises for building back muscles, ranked by their ability to deliver measurable results for beginners and intermediates. Each exercise maps directly to one or more vectors of the 3-Vector Back Method — the framework introduced in this section that ensures you’re developing your back completely, not accidentally. Mastering these essential back exercises and foundational concepts will set you up for long-term success.
“I believe the back, like all muscles, benefit from a deep stretch. I finish my back day with 3 sets of barbell trap raises and sometimes I’ll throw in some extra work just to feel that deep stretch at the bottom…” — Community voice from fitness forums
This kind of feedback is common among experienced lifters. The pursuit of a deep stretch during back exercises isn’t just about feel — it reflects genuine understanding of how muscles grow. Research on resistance training technique published in PMC (2024) confirms that full range of motion training and optimizing technique directly maximizes muscle hypertrophy outcomes.
Deadlifts: The King of Posterior Chain
The deadlift is the single most effective exercise for building the posterior chain — the erector spinae, glutes, hamstrings, and upper back all working together in one movement. A 2020 systematic review published in the Journal of Electromyography and Kinesiology analyzed EMG data across deadlift variations and found that erector spinae activation during deadlifts was greater than the gluteus maximus and biceps femoris across most variants — making the deadlift uniquely effective for lower back and spinal development. This is the hip hinge vector of the 3-Vector Back Method.
How to perform a conventional deadlift:
- Stand with feet hip-width apart, bar over mid-foot
- Hinge at the hips and bend your knees until your shins touch the bar
- Grip the bar just outside your legs, arms straight
- Take a deep breath, brace your core like you’re about to take a punch
- Drive through the floor with your legs while keeping your chest up and back flat
- Stand fully upright, squeezing your glutes at the top
- Lower the bar with control by pushing your hips back first, then bending the knees
Key form cues: Keep the bar close to your body throughout the lift — it should drag along your shins. Never round your lower back. Think “push the floor away,” not “pull the bar up.”
Beginner starting point: 3 sets × 5 reps at a light weight. Add 5 lb per session as long as your form stays clean.
Trap bar deadlift (recommended for beginners): The trap bar (hex bar) places you inside the weight instead of behind it. This reduces the demand on your lower back, makes the movement more intuitive, and is an excellent starting point if conventional deadlifts feel awkward.
Pull-Ups and Lat Pulldowns
Pull-ups and lat pulldowns are the primary vertical pull exercises — the first vector of the 3-Vector Back Method. These movements drive lat width more directly than any other exercise. A 2026 EMG study in PMC compared seven lat pulldown variants and confirmed that all major back muscles — including the latissimus dorsi, teres major, and posterior deltoid — were meaningfully activated during lat pulldown movements, with grip variations producing less difference in lat recruitment than commonly assumed.
How to perform a lat pulldown:
- Sit at a cable machine and grip the bar slightly wider than shoulder-width
- Pull your shoulder blades down and back before you begin pulling
- Drive your elbows down toward your hips — not backward
- Pull the bar to your upper chest, holding the contraction for one second
- Return the bar slowly (3 seconds) to feel the deep stretch in your lats
- Avoid shrugging your shoulders or leaning back excessively
How to progress toward pull-ups:
- Start with band-assisted pull-ups or a pull-up machine
- Perform negative (lowering-only) pull-ups: jump to the top and lower yourself for 5 seconds
- Once you can do 3 × 8 negatives, attempt full pull-ups
Beginner starting point: 3 sets × 10–12 reps (lat pulldown) or 3 sets × 3–5 reps (pull-ups with assistance).
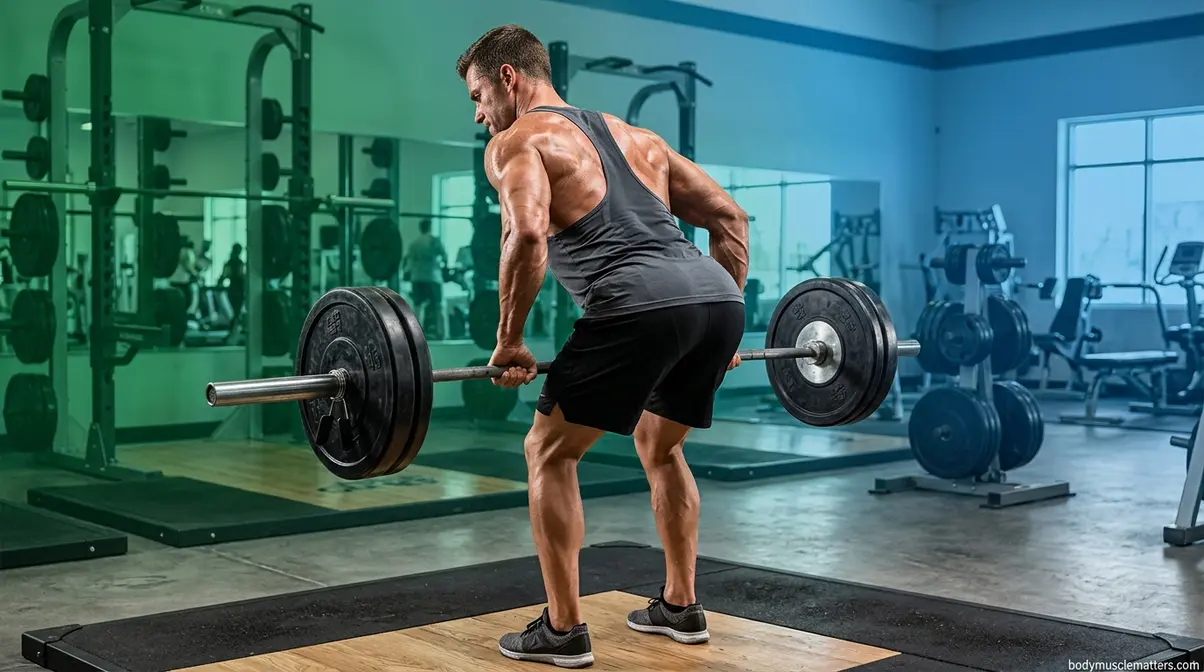
Bent-Over Rows: Back Thickness
If pull-ups build width, bent-over rows build thickness. This is the horizontal pull vector — the second vector of the 3-Vector Back Method — and it’s what develops the rhomboids, middle traps, and rear deltoids that create that full, dense look across your mid-back. Most beginners skip rows or perform them incorrectly, which is why their backs look flat even after months of lat pulldowns.
How to perform a barbell bent-over row:
- Stand with feet hip-width apart, grip the barbell just outside your legs
- Hinge forward at the hips until your torso is roughly parallel to the floor
- Let the bar hang at arm’s length, shoulder blades relaxed
- Pull the bar to your lower ribs — not your chest — driving your elbows back
- Squeeze your shoulder blades together at the top for one second
- Lower the bar slowly, feeling the stretch across your upper back
- Keep your lower back flat throughout — do not round
Key form cue: Think about pulling your elbows — not your hands — toward the ceiling. This engages your lats and rhomboids far more effectively than pulling with your biceps.
Beginner starting point: 3 sets × 8–10 reps. Add 5 lb when you can complete all reps with clean form.
Seated Cable Rows and Machine Rows
Seated cable rows provide constant tension throughout the movement — something free weights cannot replicate. Because the cable remains taut at both the top and bottom of the movement, your muscles work harder during the stretch phase. This makes cable rows particularly effective for hypertrophy (muscle growth focused on size). Machine rows offer the same benefit with added stability, making them ideal for beginners learning to feel their back muscles engage.
How to perform a seated cable row:
- Sit upright on the cable row machine, feet flat on the footrests
- Grip the handle with both hands, arms fully extended — feel the stretch across your back
- Sit tall — do not round your lower back to reach the handle
- Row the handle toward your lower abdomen, leading with your elbows
- Squeeze your shoulder blades together at the finish
- Return slowly and under control, allowing a full stretch at the end
Sets/reps: 3–4 sets × 10–15 reps. The higher rep range works well here because the constant tension makes lighter weights feel more challenging.
Mind-muscle connection tip: Research published in PubMed (2016) found that mind-muscle connection increases activation in the target muscle during resistance training, particularly at moderate loads (20–60% of your maximum). Before each set of rows, consciously think about squeezing your shoulder blades together. This mental focus — the mind-muscle connection — measurably increases back muscle recruitment.
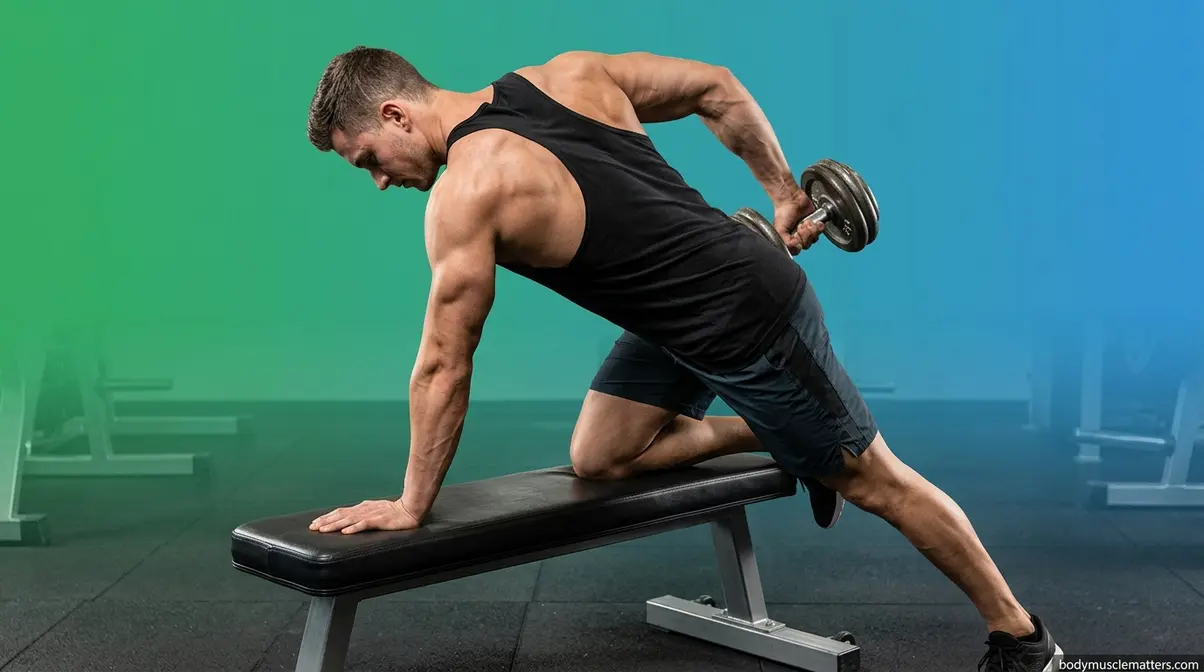
Single-Arm Dumbbell Rows
Single-arm dumbbell rows are one of the best back exercises for beginners because they allow you to use a full range of motion, correct left-right muscle imbalances, and really feel each lat working independently. Most people have a dominant side that compensates during barbell rows — single-arm work eliminates that problem.
How to perform a single-arm dumbbell row:
- Place one hand and the same-side knee on a flat bench for support
- Hold a dumbbell in the opposite hand, arm fully extended
- Keep your back flat — parallel to the bench
- Row the dumbbell toward your hip, not your shoulder
- Drive your elbow back and up, keeping it close to your body
- Lower the dumbbell slowly, fully extending your arm for a deep stretch
Key form cue: Think of your arm as a hook. Your back muscles do the pulling — your hand just holds the weight.
Beginner starting point: 3 sets × 10–12 reps per arm. Match the weight on both sides — do not let your stronger side dictate the load.
Face Pulls: The Overlooked Posture Saver
Face pulls are the most underrated exercise in this entire guide. Almost nobody does them. Almost everybody should. They directly target the rear deltoids (posterior deltoids), middle and lower traps, and external rotators of the shoulder — muscles that are chronically weak in people who sit at desks, drive frequently, or do a lot of pressing exercises without balancing them with pulling.
How to perform face pulls:
- Attach a rope handle to a cable machine at face height
- Grip both ends of the rope with thumbs pointing toward you
- Step back until your arms are fully extended
- Pull the rope toward your face, splitting it apart as you pull (hands end up beside your ears)
- Squeeze your rear delts and upper back at the end position for one second
- Return slowly and with control
Why they matter: Strong rear delts and external rotators keep your shoulders in their correct position. This prevents the internally rotated, rounded-shoulder posture that leads to shoulder impingement and chronic upper back pain. Include face pulls in every single back session — 3 sets × 15–20 reps is the standard recommendation.
The 3 Core Training Principles
Choosing the right exercises matters. But three training principles determine whether those exercises actually build muscle — or just burn calories.
Principle 1: Progressive Overload
Your muscles only grow when they’re forced to do more than they’ve done before. A 2026 PubMed study on untrained individuals found that progressive overload increases hypertrophy substantially more than static training — 21–25% greater thickness gains in the progressive group versus 11–12% in the non-progressive group. In practice: add 5 lb to your compound lifts (deadlifts, rows) each week as long as your form stays clean.
Principle 2: The Mind-Muscle Connection
The mind-muscle connection is your ability to consciously feel and activate the target muscle during an exercise. Research confirms it increases EMG activation at moderate training loads. Before every set, mentally “pre-activate” the muscle you’re training. For rows, think about squeezing your shoulder blades. For pulldowns, think about pulling your elbows to the floor.
Principle 3: The 3-Vector Back Method
This is the core framework of this guide. The 3-Vector Back Method is the principle that complete back development requires training three distinct movement vectors: (1) vertical pulls (pull-ups, lat pulldowns) for lat width; (2) horizontal pulls (rows, face pulls) for mid-back thickness; and (3) hip hinges (deadlifts, Romanian deadlifts) for lower back and posterior chain strength. Most generic back programs accidentally train only one or two vectors — which is why progress stalls. Every program in this guide is built around all three.
If you’re wondering which back muscles are hardest to grow, applying these principles is the first step to overcoming those plateaus.
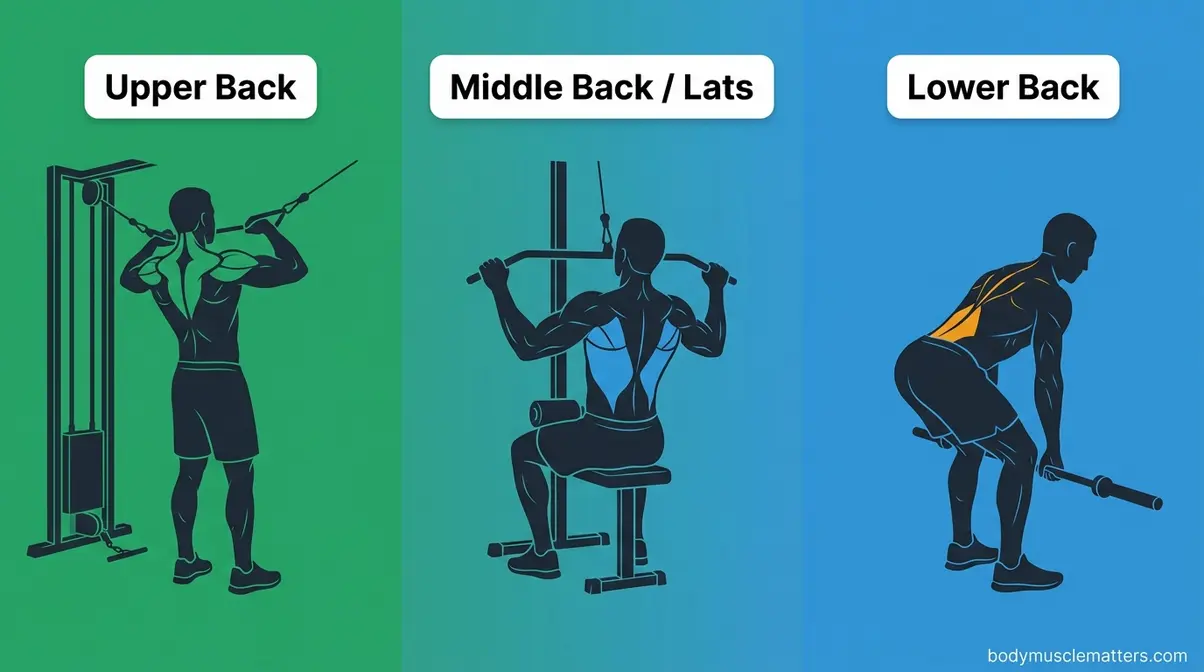
How to Target Your Upper, Middle, and Lower Back
Understanding which exercises hit which regions lets you program intelligently instead of guessing. Here’s a region-by-region breakdown — with the exercises that target each area most effectively.
Upper Back: Traps and Rhomboids
The upper back — specifically the trapezius and rhomboids — is the region most commonly neglected and most visibly affected by poor posture. Weak upper back muscles are the primary mechanical cause of rounded shoulders and forward head posture — two of the most common postural complaints among desk workers aged 25–45.
The best exercises for your upper back include:
- Face pulls (3 × 15–20 reps) — primary rear delt and middle trap developer
- Barbell shrugs (3 × 12–15 reps) — upper trap isolation
- Barbell trap raises — the community-favorite movement for building the upper trap and creating that thick, powerful look from behind
- Prone Y-T-W raises (bodyweight) — excellent for lower trap and rhomboid activation with zero equipment
Programming note: Train your upper back 2–3 times per week. Because these muscles are involved in nearly every pulling exercise, they recover relatively quickly. Include face pulls in every session — they take less than 5 minutes and pay dividends in shoulder health.
Middle Back: Lats for Width
The lats are the primary muscle behind the V-taper look. They originate at your pelvis and lower spine and insert at your upper arm bone (humerus). When they’re developed, they flare outward visually, creating the appearance of a wider upper body even when viewed from the front.
A 2026 regional EMG study published in PMC found that shoulder extension activates thoracic lats and enhances scapular stability. This means straight-arm pulldowns and pullover-style movements complement traditional lat pulldowns by targeting a slightly different region of the same muscle.
Best exercises for lat width:
- Pull-ups and lat pulldowns (vertical pull vector)
- Straight-arm cable pulldowns (shoulder extension focus)
- Dumbbell pullovers
- Single-arm rows with a full stretch at the bottom
Key technique tip: At the bottom of every vertical pull, let your arms fully extend and feel the lats stretch. That deep stretch — the one experienced lifters chase — is not just a feeling. It’s a mechanical signal that you’re training through the full range of motion, which research consistently links to greater hypertrophy.
Lower Back: Erector Spinae
The erector spinae (the long muscles running alongside your spine) are among the most important muscles in your body for structural integrity, yet they’re also the most commonly injured when trained incorrectly. The good news: they respond well to relatively low-intensity work performed with perfect form.
Safe, effective exercises for the erector spinae:
- Romanian deadlifts (RDLs): The hip hinge movement that maximally stretches and loads the erectors and hamstrings together. Start light — the stretch at the bottom is intense.
- Good mornings: A barbell or bodyweight hip hinge with the bar on your upper back. Excellent for erector hypertrophy.
- Hyperextensions (back extensions): On a GHD (glute-ham developer) machine or a 45-degree back extension bench. Keep a neutral spine — do not hyperextend.
- Prone supermans (bodyweight): Lie face down, lift your arms and legs simultaneously off the floor. A beginner-friendly erector exercise with zero equipment.
Critical safety rule: Never round your lower back under load. If you feel your lower back rounding during a deadlift or row, the weight is too heavy. Reduce the load immediately. Lower back injuries from poor form can sideline you for months — progress is never worth that trade.
What Muscle Is Hardest to Grow?
The rear deltoids and lower traps are widely considered the hardest muscles to grow, largely because most training programs underemphasize them. They’re involved in pulling movements but rarely trained in isolation. The calves are also notoriously stubborn due to their high proportion of slow-twitch muscle fibers. For back specifically, the lower lats — the portion that creates the coveted V-taper flare — respond slowly because they’re difficult to isolate from the upper lats without deliberate technique adjustments. Consistency and targeted isolation work are the solution.
Your Balanced Back Program
A well-designed weekly back program hits all three vectors across 2–3 sessions. Here is a simple template for beginners:
| Day | Session Focus | Exercises |
|---|---|---|
| Day 1 | Vertical Pull + Hip Hinge | Lat Pulldown, Deadlift, Face Pulls |
| Day 2 | Horizontal Pull + Upper Back | Bent-Over Row, Seated Cable Row, Prone Y-T-W |
| Day 3 (optional) | Full Back Volume | Single-Arm Row, RDL, Face Pulls, Shrugs |
A 2022 meta-analysis found that training a muscle group 2–3 times per week produces 30–40% greater hypertrophy than training it once per week when volume is equated — making frequency one of the most powerful variables you can manipulate for back development.
How to Build Back Muscles at Home
You do not need a gym to build a strong back. The 3-Vector Back Method applies equally to home training — you just need to choose exercises that match your available equipment. You can find many effective bodyweight back exercises at home that require zero gear. Check out our guide on building back muscle without weights using the TRRR Method.
- Vertical pull (at home):
- Pull-ups on a doorframe pull-up bar (~$20–$30)
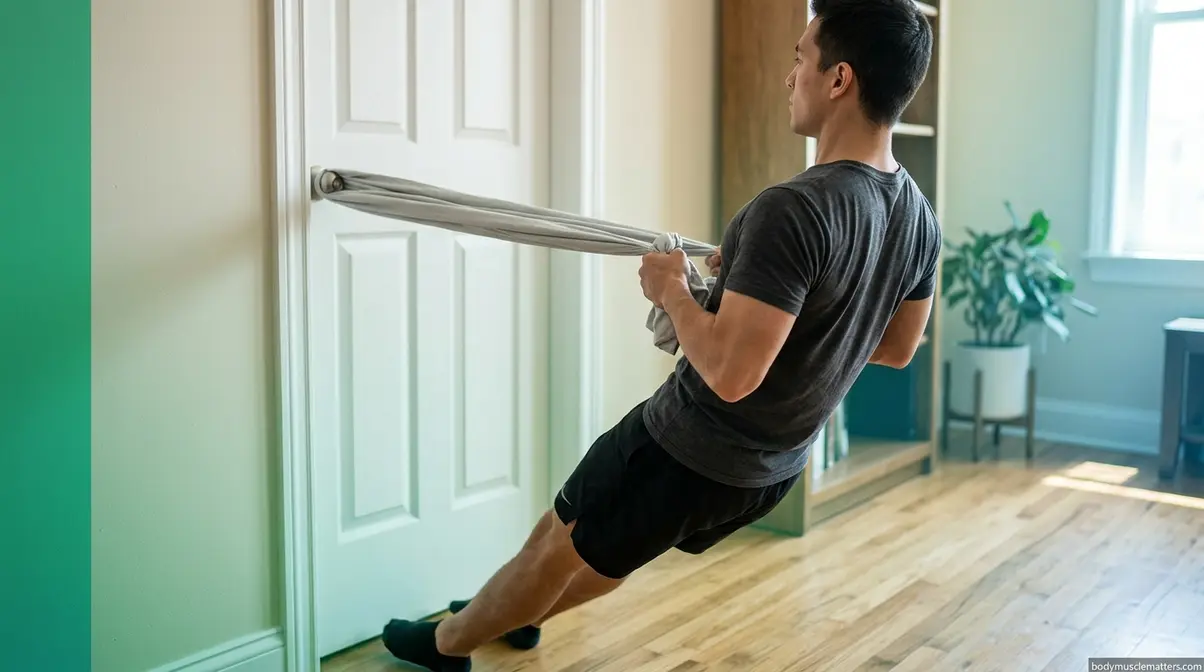
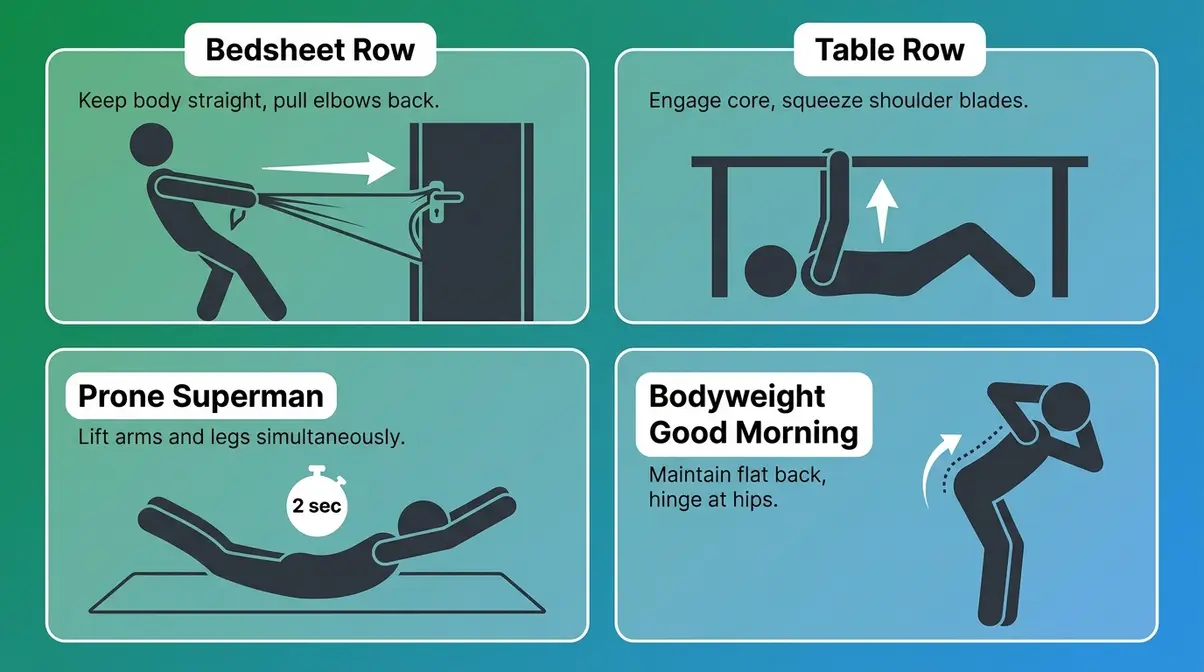
- Bedsheet rows: Loop a bedsheet around a door handle, lean back, and row your chest to the door. This is a legitimate horizontal pull that challenges your lats and rhomboids with zero equipment.
- Horizontal pull (at home):
- Bedsheet rows (as above)
- Table rows: Lie under a sturdy table, grip the edge, and row your chest up to it
- Backpack rows: Fill a backpack with books, perform single-arm rows using a chair for support
- Hip hinge (at home):
- Prone supermans: Lie face down, lift arms and legs off the floor simultaneously. Hold 2 seconds, lower, repeat.
- Single-leg Romanian deadlifts with a backpack
- Good mornings with bodyweight or a broomstick
Sample home back workout:
| Exercise | Sets | Reps |
|---|---|---|
| Doorframe Pull-Ups | 3 | Max (or to failure) |
| Bedsheet Rows | 3 | 12–15 |
| Table Rows | 3 | 10–12 |
| Prone Supermans | 3 | 15 |
| Bodyweight Good Mornings | 2 | 15 |
For a complete home back training system with progressions, regressions, and weekly programs, see our dedicated guide to building back muscles at home without equipment.
Can I Build Back Muscles Without a Gym?
Yes — you can build a strong, well-developed back with no gym equipment at all. Doorframe pull-up bars, bedsheet rows, table rows, prone supermans, and bodyweight good mornings cover all three vectors of the 3-Vector Back Method. The limiting factor at home is progressive overload — it’s harder to add load incrementally. You can work around this by adding reps, increasing leverage difficulty, and wearing a weighted backpack. Many people build impressive backs entirely at home, particularly during the beginner phase where bodyweight exercises provide sufficient challenge.
How to Build Back Muscles with Dumbbells
Dumbbells are one of the most versatile tools for back development. They allow for a greater range of motion than barbells in many exercises, they correct left-right muscle imbalances, and they’re accessible at virtually every gym and most home setups. These dumbbell exercises for back muscles are perfect for home gyms.
The 4 Best Dumbbell Back Exercises
1. Single-arm dumbbell rows — The gold standard of dumbbell back training. Targets the lats, rhomboids, and rear delts unilaterally. Full form guide appears in the exercise section above.
2. Dumbbell Romanian deadlifts (RDLs) — Hold dumbbells in front of your thighs and hinge forward, pushing your hips back until you feel a deep stretch in your hamstrings and lower back. Drive your hips forward to stand. Excellent for erector spinae and posterior chain development.
3. Dumbbell bent-over rows — Hinge forward with a flat back, hold a dumbbell in each hand, and row both simultaneously toward your lower ribs. More challenging to stabilize than single-arm rows — master those first.
4. Dumbbell pullovers — Lie on a bench, hold one dumbbell with both hands above your chest, then lower it in an arc behind your head. This shoulder extension movement targets the lower lats through a long range of motion — a movement that preferentially activates the thoracic lat region according to 2026 EMG research.
Your Dumbbell-Only Back Workout
This program is structured around the 3-Vector Back Method and requires only a set of dumbbells and a bench or chair.
| Exercise | Vector | Sets | Reps | Rest |
|---|---|---|---|---|
| Single-Arm Dumbbell Row | Horizontal Pull | 4 | 10–12 per arm | 60 sec |
| Dumbbell Romanian Deadlift | Hip Hinge | 3 | 10–12 | 90 sec |
| Dumbbell Bent-Over Row | Horizontal Pull | 3 | 10–12 | 60 sec |
| Dumbbell Pullover | Vertical Pull | 3 | 12–15 | 60 sec |
| Prone Superman | Hip Hinge (bodyweight) | 3 | 15 | 45 sec |
Progression rule: Add 2.5–5 lb to each exercise every 1–2 weeks. When you can complete all reps with perfect form, increase the weight at your next session.
For a complete dumbbell-only back program with four weeks of progressive programming, visit our full guide on how to build back muscles with dumbbells.
How to Build Back and Shoulder Muscles Together
Your back and shoulders share a close anatomical relationship. The rear deltoids (posterior deltoids) sit at the back of your shoulder and work alongside your upper back during every rowing movement. The rotator cuff muscles — a group of four small muscles that stabilize your shoulder joint — are also part of the posterior upper body system.
Training your back and shoulders together is one of the most efficient combinations in strength training. Exercises like face pulls, rear delt flyes, high pulls, and upright rows bridge the gap between the two muscle groups perfectly. By grouping these muscles, you allow for adequate recovery on your other training days, preventing overuse injuries in the shoulder joint. A balanced push-pull approach — pairing chest and front shoulder work with back and rear delt work — is one of the most evidence-supported strategies for preventing shoulder impingement and maintaining structural balance.
For a complete guide, see our integrated back and shoulder workout routines.
Back Training for Women and Better Posture
Back training is equally important — and equally effective — for women. The concern about “bulking up” is understandable but physiologically unfounded. Women produce approximately 10–20 times less testosterone than men (Cleveland Clinic, 2023), making the kind of dramatic muscle mass that many women fear essentially impossible without deliberate, multi-year effort and often pharmacological intervention.
What back training does for women: it creates the appearance of a smaller waist (by widening the upper back proportionally), improves posture, reduces chronic neck and shoulder pain, and builds the functional strength that makes everyday tasks — carrying groceries, lifting children, sitting at a desk without pain — dramatically easier. Strong rhomboids and mid-traps actively pull the shoulders back, counteracting the forward-head “desk slump” that plagues modern workers.
The exercises are identical. The programs are the same. The 3-Vector Back Method applies equally regardless of gender. The only meaningful difference is that women often start with lower absolute loads — but the progression principles are the same. Do not be afraid to lift heavy and challenge your muscles.
Learn more about muscle building strategies for women. Also, explore our guide on strength training for women to improve posture.
How to Loosen Tight Lower Back Muscles
Tight lower back muscles are one of the most common complaints among people beginning a back training program. The erector spinae, quadratus lumborum (a deep muscle at the side of your lower back), and hip flexors can all contribute to that familiar stiff, achy sensation — especially after a new training session or a long day at a desk.
Stretching and mobility work should be part of every back training program. Aim to hold static stretches for 30 to 60 seconds post-workout, while using dynamic movements like cat-cow before you lift. Key movements include:
- Child’s pose — gently decompresses the lumbar spine
- Cat-cow — mobilizes the entire spine through flexion and extension
- Knee-to-chest stretch — releases the erector spinae and glutes
- Piriformis stretch — addresses the deep hip rotators that contribute to lower back tension
- 90/90 hip stretch — opens the hip flexors and external rotators
Important distinction: Stretching tight muscles is different from treating injured muscles. If your lower back pain is sharp, radiates down your leg, or persists for more than a few days, stop training and consult a physical therapist or physician before continuing.
Discover more techniques to relieve tight lower back muscles. We also recommend these stretching exercises for improved flexibility and lower back mobility.
How Long Does It Take to Build Back Muscles?
This is the question every beginner asks — and the honest answer is: faster than you think, but slower than you want. Here’s what the research actually shows. For more details, review realistic timelines for building muscle.
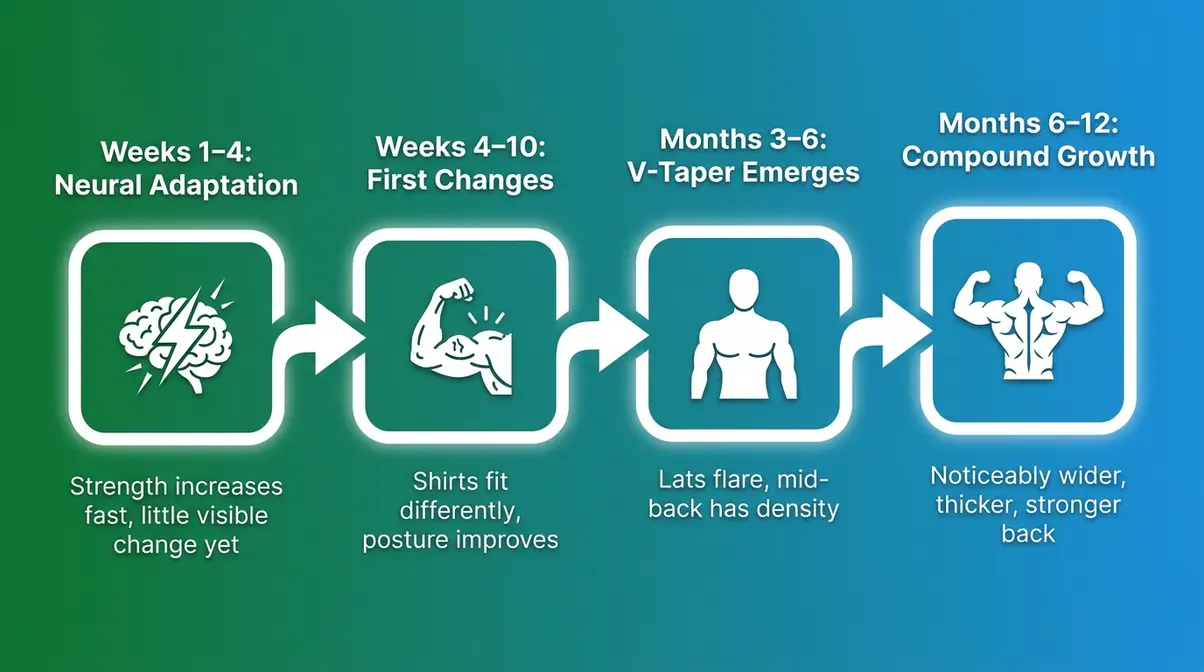
Your First 3, 6, and 12 Months
Weeks 1–4 (Neural Adaptation Phase):
You won’t see much visible change yet, but your nervous system is working overtime. Your brain is learning to recruit more motor units (groups of muscle fibers) with each rep. You’ll get noticeably stronger — often adding weight to your lifts every session — but this is neural adaptation, not muscle growth. Most beginners can add 5–10 lb per week to their main lifts during this phase.
Weeks 4–10 (First Visible Changes):
Research from Healthline (2026) confirms that most beginners notice measurable muscle gains within 6–10 weeks of consistent training. Your shirts will start to fit differently across the upper back. Your posture may improve noticeably. The “newbie gains” phase — where untrained individuals respond rapidly to any form of progressive overload — is in full effect.
Months 3–6 (Significant Development):
This is when back training becomes visually apparent. The V-taper begins to emerge. Your lats visibly flare when you spread them. Your mid-back has density and definition. If you’ve been consistent with progressive overload and eating enough protein (0.7–1.0 g per pound of bodyweight daily is the standard recommendation), you’ll have made more progress in 6 months than most people make in 2 years of unfocused training.
Months 6–12 (Compound Growth):
Progress slows relative to the first six months — this is normal and expected. Your body adapts, and you’ll need to continue increasing volume and intensity to keep making gains. By the 12-month mark, a beginner who has followed the 3-Vector Back Method consistently will have a noticeably wider, thicker, and stronger back than they started with.
3 Factors That Speed Up Your Progress
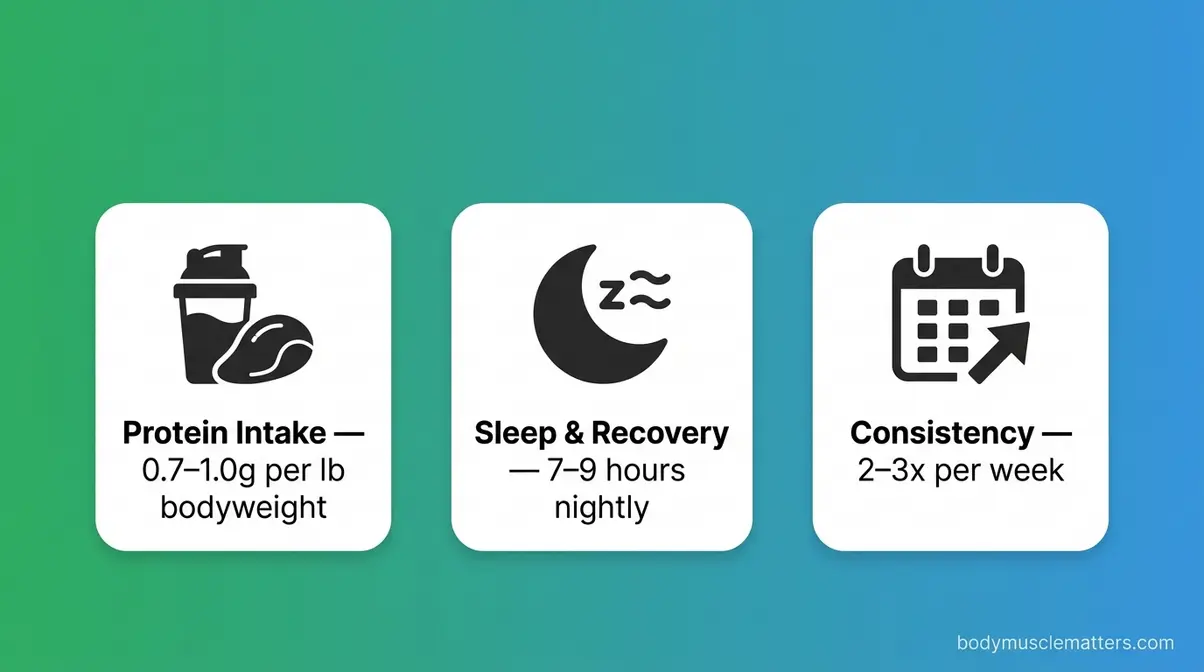
1. Protein intake: Muscle protein synthesis (the process of building new muscle tissue) requires adequate dietary protein. Research consistently points to 0.7–1.0 g of protein per pound of bodyweight daily as the effective range for muscle building. For a 160 lb person, that’s 112–160 g of protein per day. Chicken, eggs, Greek yogurt, fish, and protein shakes are all effective sources.
2. Sleep and recovery: Muscle growth happens during recovery — not during the workout. During deep sleep, your body releases growth hormone and repairs the muscle fibers you’ve damaged during training. Aim for 7–9 hours per night. Consistently sleeping less than 6 hours significantly impairs muscle protein synthesis and strength gains.
3. Consistency over intensity: The most common mistake beginners make is training hard for 2 weeks, then missing 2 weeks, then repeating. A 2022 systematic review confirmed that training frequency of 2–3 times per week produces 30–40% greater hypertrophy than once-weekly training — meaning showing up consistently matters more than any single epic workout. Dive deeper into the advanced principles of progressive overload for muscle growth.
How Do You Gain Back Muscles Fast?
Gaining back muscles faster comes down to three non-negotiable factors: progressive overload, training frequency, and adequate protein. Train your back 2–3 times per week using the 3-Vector Back Method — vertical pulls, horizontal pulls, and hip hinges. Add weight or reps every session. Eat 0.7–1.0 g of protein per pound of bodyweight daily. Research confirms that progressive overload produces 21–25% greater muscle thickness gains than static training in untrained individuals (PubMed, 2026). Most beginners see their first visible results within 6–10 weeks.
Common Back Building Mistakes
Most beginners plateau not because they lack effort, but because of systematic, fixable errors. Here are the most common — and how to correct them.
Form and Technique Mistakes
Mistake 1: Using your biceps instead of your back
This is the most universal beginner error. During rows and pulldowns, the biceps want to take over because they’re smaller and closer to the hands. The fix: think about leading with your elbows, not your hands. Your hands are just hooks — the back muscles do the work.
Mistake 2: Half reps
Half reps — not using a full range of motion — are one of the most common causes of stalled back development. If you’re not letting your lats fully stretch at the bottom of a pulldown or fully squeezing your shoulder blades at the top of a row, you’re leaving half the muscle-building stimulus on the table. Research on resistance training technique confirms that full range of motion training maximizes hypertrophy outcomes compared to partial reps.
Mistake 3: Rounding the lower back during deadlifts
Lower back rounding under load is the primary injury mechanism for lumbar disc herniation during deadlifts. Before every deadlift, take a breath and brace your core (think about expanding your belly in all directions). Keep your chest up and your back flat throughout. If you feel your back rounding, stop and reduce the weight.
Mistake 4: Shrugging during pulldowns
Many beginners shrug their shoulders up toward their ears during lat pulldowns. This shifts the work to the upper traps and away from the lats. Before you pull, depress your shoulder blades — pull them down and back — and hold that position throughout the movement.
Programming and Recovery Mistakes
Mistake 5: Training back only once per week
A single weekly back session is sub-optimal for hypertrophy. Research supports 2–3 sessions per week for maximum muscle growth. If you train at a gym, add a second back day. If you train at home, bodyweight back work can be done almost daily with appropriate volume management.
Mistake 6: Ignoring the hip hinge vector
Most beginners focus exclusively on rows and pulldowns — the horizontal and vertical pull vectors — and neglect deadlifts and RDLs. This creates a lopsided development: wide lats, weak lower back, and a posterior chain that can’t support the loads you want to lift. The 3-Vector Back Method exists precisely to prevent this imbalance.
Mistake 7: Chasing true failure on every set
Training to true failure (the point where you physically cannot complete another rep) on every set is not optimal for beginners and significantly increases injury risk on compound movements like deadlifts. Research on resistance training load effects published in PMC (2021) found that training close to volitional failure produces similar muscle hypertrophy across training loads. Stop 1–2 reps before failure on compound lifts. Save all-out effort for isolation exercises at the end of your session.
Mistake 8: Skipping progressive overload
Going to the gym and lifting the same weight, for the same reps, every week is the number one reason people stop making progress. Your muscles adapt to a stimulus within weeks. You must continuously challenge them by adding weight, reps, or sets over time. Track your workouts — write down every set and rep — so you always know what you did last session and what you need to beat this session.
Limitations and When to Seek Alternatives
Common Pitfalls
Pitfall 1: Starting too heavy on deadlifts
Specific scenario: A beginner loads 135 lb on a deadlift on their first session because it “looks right.” What goes wrong: The lower back rounds, the bar drifts away from the body, and the movement becomes a lower back injury waiting to happen. How to avoid it: Start with just the barbell (45 lb) or even lighter and focus entirely on form for the first 2–3 weeks. Add weight only when your form is airtight.
Pitfall 2: Neglecting rear deltoids and face pulls
Scenario: A beginner does 4 exercises for their lats and rhomboids but skips face pulls because they “don’t feel hard enough.” What goes wrong: The rear deltoids and external rotators atrophy relative to the pressing muscles, leading to shoulder impingement within 3–6 months. How to avoid it: Include face pulls in every back session — non-negotiable.
Pitfall 3: Relying on momentum during rows
Scenario: As the weight gets heavier, the lifter starts using a hip-swinging motion to initiate each rep. What goes wrong: The back muscles do less work, the lower back absorbs more stress, and the stimulus for growth decreases. How to avoid it: If you’re swinging, the weight is too heavy. Reduce it by 10–20% and focus on a slow, controlled eccentric (lowering) phase.
When to Choose Alternatives
When deadlifts cause lower back pain: Substitute trap bar deadlifts, Romanian deadlifts, or hyperextensions. These place less compressive load on the lumbar spine while still training the posterior chain. If pain persists, consult a physical therapist before continuing any hip hinge movements.
When pull-ups are not yet possible: Lat pulldowns and band-assisted pull-ups are perfect substitutes. They train the same muscles through the same movement pattern. Work toward full pull-ups gradually — most beginners reach their first unassisted pull-up within 8–12 weeks of consistent lat pulldown training.
When you have no gym access: The home workout section above provides a complete alternative system. Bedsheet rows and table rows are legitimate training tools — not consolation prizes.
When to Seek Expert Help
- Consult a certified personal trainer (CPT) or physical therapist (PT/DPT) if:
- You experience sharp, shooting, or radiating pain during any back exercise
- Your lower back pain persists for more than 72 hours after training
- You have a history of herniated discs, spinal stenosis, or scoliosis
- You are new to strength training and want to learn proper form before increasing loads
- You’ve been training for 3+ months without visible progress (a trainer can identify technique errors that are hard to self-diagnose)
Frequently Asked Questions
What is the 3-3-3 rule at the gym?
The “3-3-3 rule” is not a standardized training protocol, and you may encounter it used differently by different coaches and content creators. The most common interpretation is: 3 exercises, 3 sets each, 3 times per week. This is actually a solid framework for beginners — it’s simple, sustainable, and covers adequate frequency and volume. Applied to back training using the 3-Vector Back Method, it would mean: 1 vertical pull + 1 horizontal pull + 1 hip hinge, 3 sets each, trained 3 days per week. That’s a legitimate beginner program.
What age is hardest to gain muscle?
Muscle building becomes progressively more challenging after age 40, due to declining anabolic hormone levels (testosterone, growth hormone, IGF-1) and a phenomenon called anabolic resistance — where the muscle protein synthesis response to training and protein intake diminishes. However, research consistently shows that adults in their 50s, 60s, and even 70s can build meaningful muscle mass with progressive resistance training. The principles are the same at any age — the main adjustments are longer recovery times between sessions and potentially higher protein requirements (closer to 1.0 g per pound of bodyweight) to overcome anabolic resistance.
What drink builds muscle fast?
No single drink builds muscle — but protein shakes are the most practical supplement for meeting daily protein targets. A standard whey protein shake provides 20–25 g of complete protein per serving, with a fast absorption rate that makes it useful immediately after training. Milk (especially chocolate milk, which provides protein and carbohydrates) is also well-researched for post-workout recovery. Creatine monohydrate — dissolved in water — is the most evidence-supported supplement for improving strength and muscle-building capacity, with hundreds of peer-reviewed studies confirming its safety and efficacy.
What is not allowed in the gym?
Most gyms prohibit chalk (unless chalk-friendly), dropping weights excessively, bringing outside food, and using phones for calls on the gym floor. Many also prohibit filming without consent from other members. Equipment-wise, some gyms restrict deadlifts or Olympic lifting due to noise and floor concerns — always check your gym’s rules before attempting heavy deadlifts. The universal gym rule: respect other members’ space, re-rack your weights, wipe down equipment after use, and don’t monopolize machines during peak hours.
Can I build muscle while on Zepbound?
Yes, you can build muscle while taking Zepbound (tirzepatide), provided you prioritize protein intake and progressive resistance training. Because GLP-1 medications suppress appetite and lead to rapid weight loss, there is a high risk of losing lean muscle mass alongside fat. To counteract this, you must consume adequate protein (at least 0.7–1.0 g per pound of your target body weight) and strength train 2–3 times per week. The 3-Vector Back Method is highly effective for preserving and building upper body mass during a caloric deficit.
Conclusion
Building back muscles is not complicated — but it does require a system. Most beginners spend months doing random pulling movements without understanding why they’re choosing those exercises or how they fit together. The result is frustration, stalled progress, and a back that never quite develops the way they hoped.
The 3-Vector Back Method changes that. By training all three movement vectors — vertical pulls for width, horizontal pulls for thickness, and hip hinges for posterior chain strength — you ensure that every session contributes to complete, balanced back development. A 2022 meta-analysis confirms that training frequency of 2–3 sessions per week produces 30–40% greater hypertrophy than once-weekly training, and progressive overload research from 2026 shows that systematically adding load produces more than double the muscle growth of static training. The framework works because it’s grounded in how your back muscles actually function — not in tradition or guesswork.
Your next step is simple. Choose the program that matches your current equipment — home bodyweight, dumbbell-only, or full gym — and begin this week. Follow the 3-Vector Back Method. Add weight or reps every session. Eat enough protein. Sleep enough. Show up consistently. The first visible changes will arrive faster than you expect — and by the 6-month mark, you’ll have a back that reflects the work you’ve put in.
Related posts:
StrongLifts 5x5 for Beginners: Complete Guide 2026
How to Get a Bigger Bum Without Exercise: 3-Tier Guide
What Muscles Does the StairMaster Work? 6 Groups
Olympic Weightlifting vs Powerlifting: 2026 Guide
What Kills Muscle Gains? 7 Proven Saboteurs to Fix Now
Best Strength Training Apps for Women: Top 7 Picks
Callum
Hi, I'm Callum, the founder of Body Muscle Matters. I'm not a certified trainer, I'm a self taught lifter who started this site to share what I've learned from my own training and a lot of trial and error. Everything here comes from real experience and honest research, written the way I'd explain it to a friend who is just getting started. My goal is simple: practical, no hype fitness advice you can actually use.