How to Relieve Tight Lower Back Muscles: 12 Techniques
⚕️ Medical Disclaimer: The information in this article is for educational purposes only and is not a substitute for professional medical advice, diagnosis, or treatment. Always consult a qualified healthcare provider — such as a physical therapist or physician — before beginning any new exercise program, especially if you are experiencing severe, worsening, or injury-related pain. If you experience any of the red flags described in this article, seek immediate medical attention.
That brutal low back stiffness — the one that makes you wonder “where to start?” every time you try to get out of bed — affects more people than you might expect. Low back pain now affects an estimated 619 million people globally, with working-age cases rising 52.66% since 1990 (PMC/NIH, 2025). When tight lower back muscles are left untreated or managed with vague generic advice, the stiffness compounds: mobility narrows, pain becomes chronic, and tasks as simple as tying your shoes become ordeals.
This guide shows you exactly how to relieve tight lower back muscles using 12 expert-backed techniques — from 30-second quick fixes you can do right now to the McGill Big 3 for lasting core stability. The approach follows three phases: immediate release for acute pain, core stretching for flexibility, and advanced stabilization plus root-cause prevention. Whether your pain flares while standing, sleeping, or first thing in the morning, you’ll find targeted, step-by-step guidance here.
To relieve tight lower back muscles, combine immediate release techniques (Child’s Pose, Knees-to-Chest) with the McGill Big 3 for core stability — research shows McGill stabilization exercises produce significant improvements in chronic low back pain symptoms (PubMed, 2018).
- Immediate relief: Child’s Pose and diaphragmatic breathing can begin releasing lower back tension within minutes by activating the parasympathetic nervous system
- Core stability: The McGill Big 3 (Curl-Up, Side Plank, Bird Dog) builds spinal endurance and reduces recurrence risk
- The Release-Stabilize-Prevent Framework structures your recovery in three clear phases: release acute tension, stabilize the spine, then prevent recurrence
- Red flags exist: Numbness, leg weakness, or bowel/bladder changes require immediate medical attention — do not attempt self-treatment
📋 How We Selected These Techniques
These 12 techniques were evaluated against three criteria: (1) clinical evidence from Tier 1 sources including NIH, PubMed, and Harvard Health; (2) endorsement or description by licensed physical therapists in peer-reviewed physical therapy research; and (3) safety for complete beginners with no prior exercise experience. This article is intended for educational purposes only and is not a substitute for professional medical advice.
Get Fast Relief from Tight Lower Back Muscles Right Now
If you’re in pain as you read this, you don’t need a lengthy explanation — you need something that works in the next five minutes. Physical therapists recommend starting with gentle, passive techniques that decompress the lower spine and signal your nervous system to stand down. Child’s Pose, Knees-to-Chest, and diaphragmatic breathing can begin reducing lower back tension within minutes by reducing spinal compression and activating the body’s natural relaxation response. No equipment is required. Stop any movement immediately if you feel sharp or shooting pain.
This is Phase 1 of the Release-Stabilize-Prevent Framework: releasing acute tension before building stability.
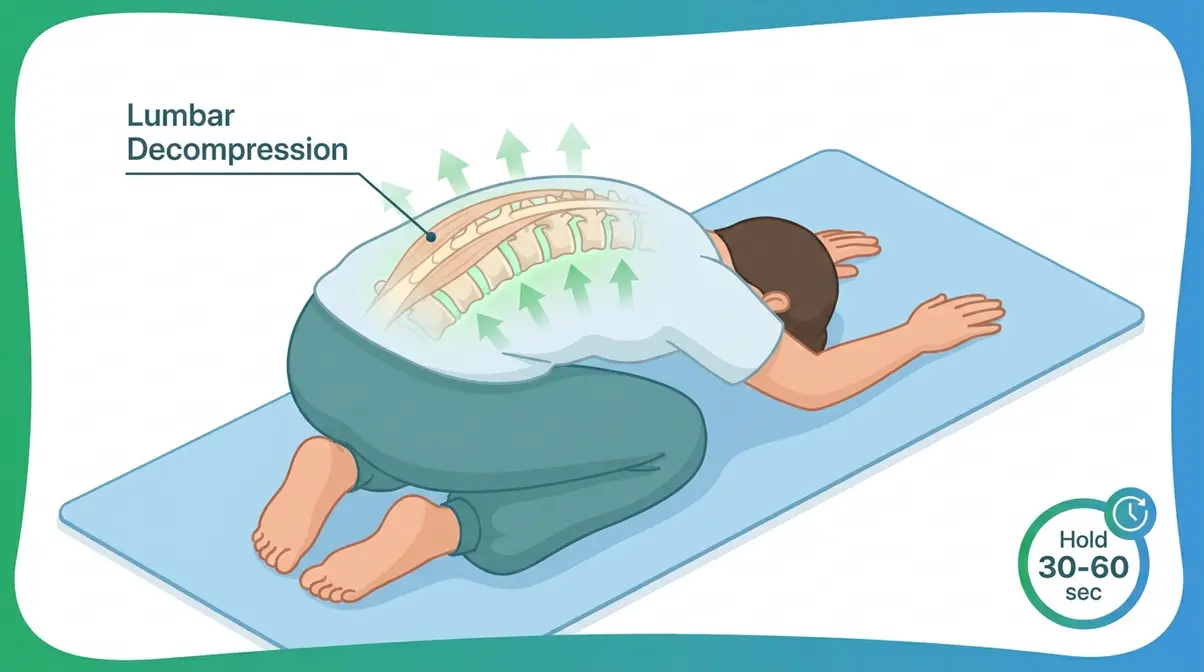
Child’s Pose for Instant Tension Relief
Child’s Pose is a gentle yoga-derived resting stretch that decompresses the lower spine by creating gentle traction between the lumbar vertebrae (the five bones in your lower back). Physical therapists frequently recommend it as the first response to acute lower back tightness because it requires zero strength and creates immediate space between compressed spinal segments.
- How to do it:
- Start on your hands and knees on a mat or carpeted floor, wrists directly under your shoulders.
- Slowly push your hips back toward your heels, extending your arms forward along the floor.
- Let your forehead rest gently on the floor (or a folded towel if that’s more comfortable).
- Allow your lower back to soften and widen with each exhale — do not force the stretch.
- Hold for 30–60 seconds, breathing slowly and deeply.
- To come out, walk your hands back toward your knees and slowly push upright.
Why this works: Flexing the hips and spine in this position gently separates the lumbar vertebrae, reducing compression on the discs and the small facet joints (the connective joints along the back of your spine). The position also lengthens the erector spinae (the long muscles running alongside your spine), which are often the primary source of that “locked up” feeling.
Repeat: 2–3 times, resting 30 seconds between holds.
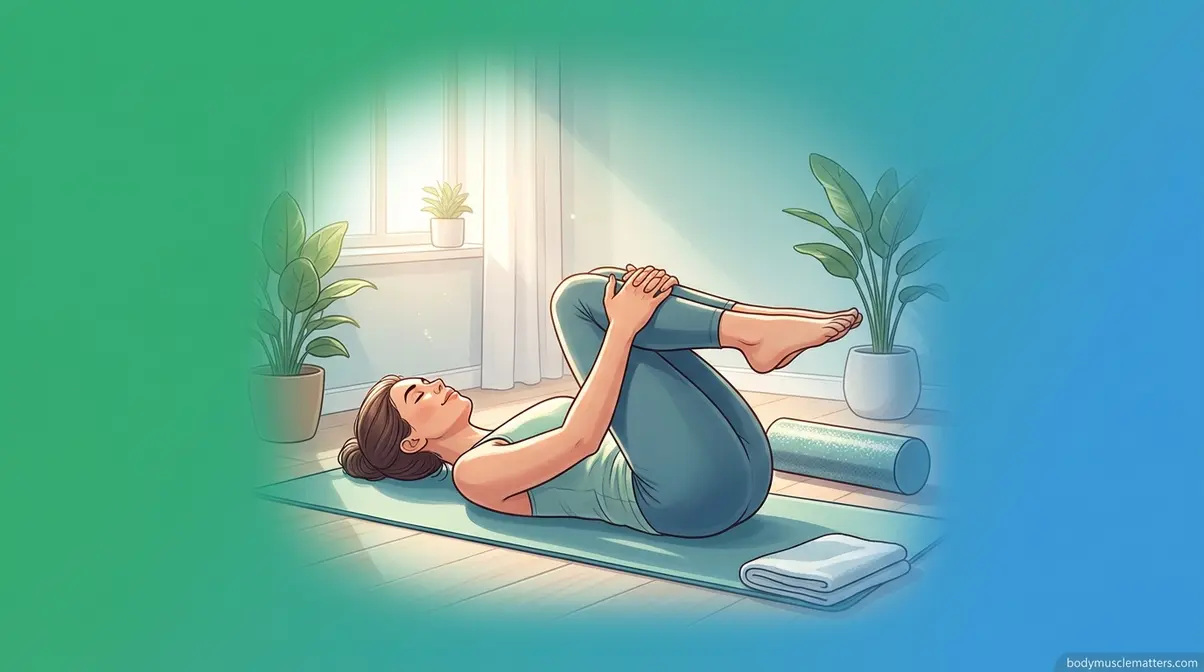
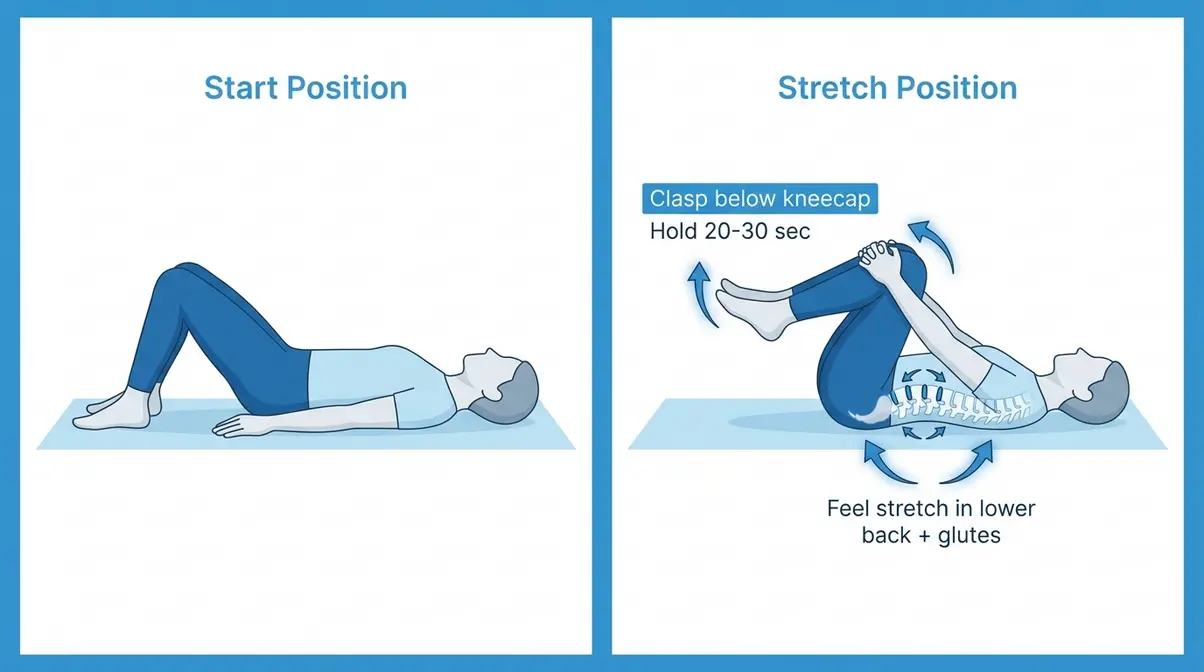
Knees-to-Chest Stretch
The Knees-to-Chest stretch is one of the most widely recommended positions for acute lower back relief — it appears in guidelines from the Hospital for Special Surgery and Healthline alike. It gently flexes the lumbar spine while lying down, making it safe even when standing or sitting is painful.
- How to do it:
- Lie flat on your back on a firm surface (a mat or the floor is better than a soft mattress for this exercise).
- Bend both knees and place your feet flat on the floor.
- Slowly bring one knee up toward your chest, clasping your hands just below the kneecap (not on the knee joint itself).
- Gently pull the knee closer to your chest until you feel a comfortable stretch in your lower back and glutes (buttock muscles). Do not force it.
- Hold for 20–30 seconds, then slowly lower your foot back to the floor.
- Repeat on the other side. Then try both knees simultaneously if comfortable.
Why this works: This movement reverses the forward-leaning posture that compresses the lower lumbar vertebrae. Bringing the knees to the chest creates gentle traction on the lower spine and stretches the piriformis (the deep hip rotator muscle beneath the glutes) — a muscle that often contributes to “tight lower back and hips” sensations.
Repeat: 3 repetitions per side, once per session.
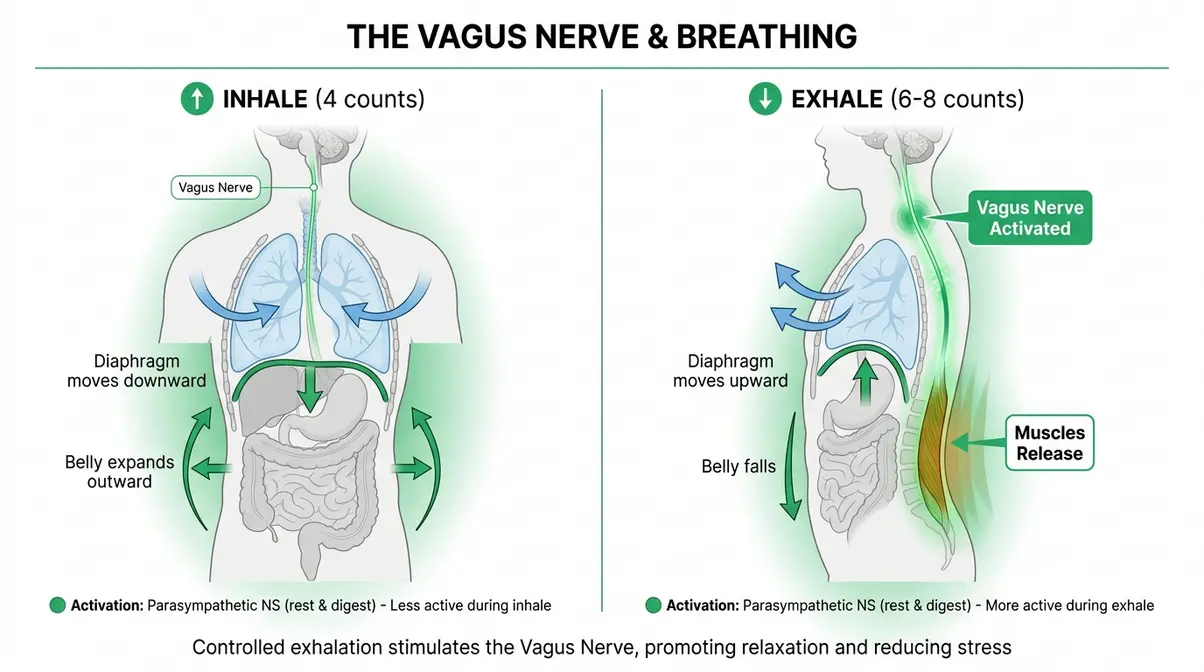
Diaphragmatic Breathing to Signal Muscle Release
This technique is the differentiator that zero top competitors mention — and it may be the most powerful tool in this section. Diaphragmatic breathing (also called belly breathing or deep abdominal breathing) directly activates the parasympathetic nervous system, the body’s “rest and digest” mode that signals chronically guarded muscles to release their protective tension.
Research published in PMC (2023) confirms that slow, controlled diaphragmatic breathing significantly increases parasympathetic tone, counterbalancing the high sympathetic activity — the “fight or flight” tension — that keeps tight muscles locked up. A 2025 narrative review in PMC further found that slow nasal diaphragmatic breathing significantly improves vagal tone and parasympathetic activity (PMC, 2025). For lower back pain specifically, Johns Hopkins Medicine notes that diaphragmatic breathing can help manage symptoms of chronic pain by activating the vagus nerve and reducing cortisol (Johns Hopkins Medicine).
- How to do it:
- Lie on your back with your knees bent and feet flat on the floor.
- Place one hand on your chest and one hand on your belly, just below your navel.
- Inhale slowly through your nose for 4 counts. Your belly hand should rise while your chest hand stays relatively still.
- Exhale slowly through pursed lips for 6–8 counts, letting your belly fall.
- As you exhale, consciously imagine your lower back muscles softening and widening against the floor.
- Repeat for 8–10 breath cycles (approximately 2–3 minutes).
Why this works: When you are in pain, your nervous system activates the sympathetic “fight or flight” response, which increases muscle tension as a protective mechanism. Slow diaphragmatic breathing breaks this cycle by stimulating the vagus nerve, which triggers a parasympathetic response — essentially sending a neurological signal that it is safe for your muscles to let go. This is why physical therapists often pair breathing cues with manual therapy.
Core Stretches to Loosen Tight Lower Back Muscles
Once acute tension has been addressed, physical therapists recommend a series of core stretches to systematically restore mobility and flexibility to the lower back, hips, and hamstrings. These six movements address the full range of muscular contributors to lower back tightness and represent the most evidence-supported stretching sequence for ongoing relief. This is Phase 2 of the Release-Stabilize-Prevent Framework: building the flexibility foundation your spine needs to stay pain-free.
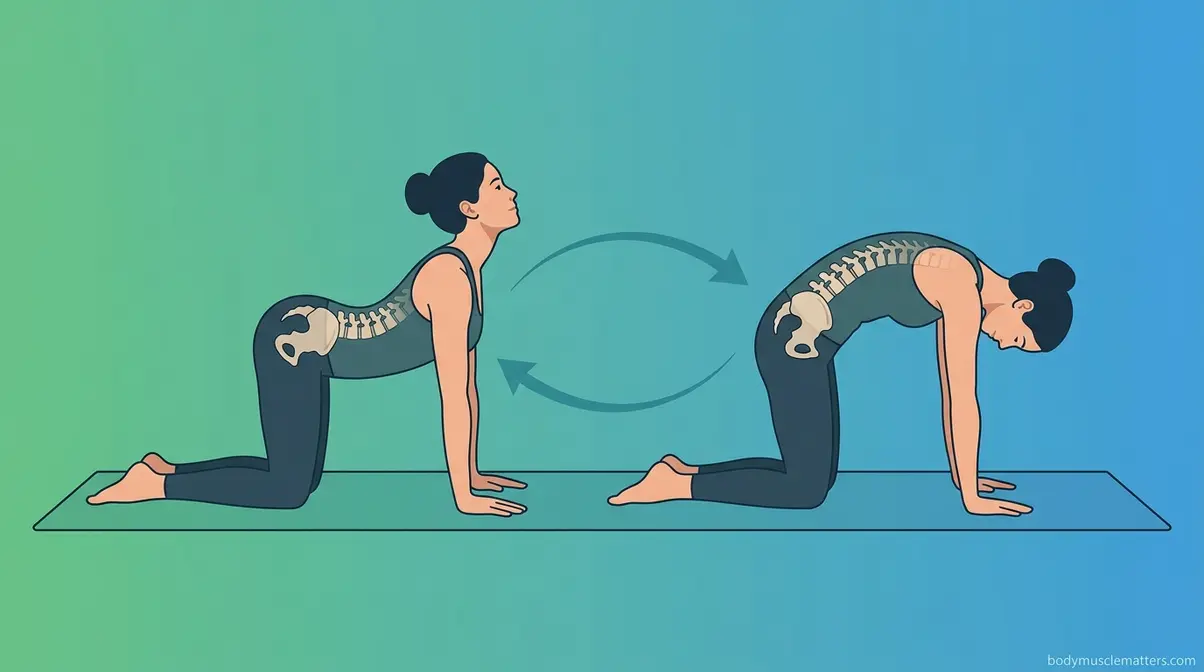
Cat-Cow Stretch
The Cat-Cow stretch is a paired spinal mobilization exercise that moves your lower back through its full range of flexion (rounding) and extension (arching). Physical therapists recommend it as a daily warm-up because it lubricates the spinal joints with synovial fluid (the natural joint lubricant) and gently activates the erector spinae and multifidus (the small stabilizing muscles running along each vertebra).
- How to do it:
- Start on all fours, wrists under shoulders, knees under hips. Your spine should be neutral — not arched or rounded.
- Cow: Inhale slowly. Let your belly drop toward the floor, arch your lower back, and lift your head and tailbone gently toward the ceiling.
- Cat: Exhale slowly. Round your spine toward the ceiling like a frightened cat, tucking your chin to your chest and your tailbone under your hips.
- Move smoothly between these two positions, following your breath. Inhale into Cow, exhale into Cat.
- Complete 10–15 slow, controlled repetitions.
Why this works: This rhythmic movement pumps nutrient-rich fluid into the spinal discs (the cushions between your vertebrae), which become compressed and dehydrated from prolonged sitting. It also gently mobilizes the facet joints that often stiffen overnight or during sedentary work.
- Troubleshooting / Common Mistakes:
- Moving too fast: Speed defeats the purpose. Each cycle should take 4–6 seconds.
- Forcing the arch: In Cow position, the arch should feel comfortable — never strain into it.
- Holding your breath: Breathing drives the movement; breath-holding increases muscle tension.
Pelvic Tilts
Pelvic tilts are subtle but powerful. They strengthen the deep abdominal muscles (transverse abdominis) while gently mobilizing the lumbar spine — making them one of the safest exercises for acute lower back pain because they involve almost no spinal movement.
- How to do it:
- Lie on your back, knees bent, feet flat on the floor. Arms rest by your sides.
- You will likely notice a small gap between your lower back and the floor. This is your natural lumbar curve.
- Gently flatten your lower back against the floor by tightening your abdominal muscles and tilting your pelvis slightly upward — as if you are trying to press your navel toward the floor.
- Hold this flattened position for 5 seconds, breathing normally throughout.
- Relax, allowing the natural curve to return.
- Repeat 10–15 times.
Why this works: Pelvic tilts gently activate the transverse abdominis — the deep “corset” muscle that wraps around your lower spine. When this muscle is weak or inhibited by pain, the lumbar spine loses its primary stabilizer, which forces the surrounding muscles to work overtime and tighten protectively. Even this gentle activation can begin to restore normal neuromuscular patterns.
Trunk Rotation (Supine Twist)
The Trunk Rotation, also called the Supine Twist, targets the rotational muscles of the lower back and hips — muscles that rarely get addressed by forward-flexion stretches alone. The Hospital for Special Surgery includes this among their recommended stretches for lower back relief.
- How to do it:
- Lie on your back with your knees bent and feet flat on the floor.
- Extend both arms out to the sides at shoulder height, forming a “T” shape.
- Keeping your knees together and your shoulders flat on the floor, slowly lower both knees to one side until you feel a comfortable stretch in your lower back and outer hip.
- Hold for 20–30 seconds, breathing deeply.
- Slowly bring your knees back to center, then lower them to the opposite side.
- Repeat 3 times per side.
Why this works: This stretch targets the quadratus lumborum (QL), the deep muscle running alongside your lower spine, as well as the obliques and the thoracolumbar fascia (the thick connective tissue sheet covering the lower back). Rotating the spine in a supported, horizontal position decompresses the lumbar joints while lengthening the muscles responsible for lateral stiffness.
Half-Kneeling Hip Flexor Stretch
Many people do not realize that tight hip flexors — specifically the iliopsoas (a deep muscle connecting your lower spine to your thigh bone) — are a primary driver of lower back tightness. When hip flexors shorten from prolonged sitting, they pull the pelvis forward, increasing the arch in the lower back and compressing the lumbar discs.
- How to do it:
- Kneel on one knee on a mat, with the other foot flat on the floor in front of you. Your front knee should be directly above your front ankle.
- Keep your torso upright — do not lean forward.
- Gently shift your hips forward until you feel a stretch in the front of the hip on the kneeling side. Do not let your lower back arch excessively.
- To deepen the stretch, tuck your tailbone slightly under (a gentle posterior pelvic tilt). This is the key movement — it prevents the lower back from compensating.
- Hold for 30 seconds, breathing normally.
- Switch sides and repeat.
Why this works: The gentle forward shift lengthens the iliopsoas at its attachment points on the lumbar vertebrae (the bones in your lower back). Research from HSS supports hip flexor stretching as part of a comprehensive lower back relief protocol — because releasing the hip flexors directly reduces the anterior (forward) pull on the pelvis that compresses the lower spine.
Hamstring Stretch
Tight hamstrings (the muscles running along the back of your thighs) exert a constant downward pull on the pelvis that tilts it backward, flattening the natural lumbar curve and increasing stress on the lower back muscles and discs. Physical therapists consistently include hamstring stretching in lower back protocols for this reason.
- How to do it:
- Lie on your back with both knees bent and feet flat on the floor.
- Slowly straighten one leg and lift it toward the ceiling, keeping the other foot flat on the floor.
- Hold the back of your thigh (not your knee) with both hands, or loop a towel or resistance band around your foot.
- Gently pull your leg toward your chest until you feel a stretch in the back of your thigh. Your lifted leg does not need to be fully straight — a slight bend in the knee is fine.
- Hold for 30 seconds, breathing slowly.
- Lower the leg and repeat on the other side.
- Complete 2–3 repetitions per side.
Why this works: Lengthening the hamstrings reduces the posterior pelvic tilt they create, allowing the lumbar spine to return to its natural, load-distributing curve. The Emory Healthcare lower back protocol specifically includes hamstring stretching for this biomechanical reason.
Legs-Up-the-Wall
Legs-Up-the-Wall (Viparita Karani in yoga) is a passive, fully supported position that uses gravity to decompress the lower spine while simultaneously allowing the hip flexors and hamstrings to passively lengthen. It requires no strength or effort — making it ideal when pain is high.
- How to do it:
- Sit sideways against a wall with your hip touching the wall’s base.
- Swing your legs up the wall as you lower your back to the floor, so your legs rest vertically against the wall and your back is flat on the floor.
- Adjust your distance from the wall until your lower back feels comfortable and relatively flat on the floor. A folded blanket under your hips can help if your lower back arches uncomfortably.
- Rest your arms by your sides or on your belly.
- Hold for 3–5 minutes, breathing slowly and deeply.
Why this works: The elevated leg position reduces venous pooling (blood collecting in the lower limbs) and relieves the compressive load on the lumbar discs that accumulates from standing and sitting. The passive hamstring and hip flexor lengthening in this position complements the active stretches above, creating a cumulative release effect across the posterior chain (the entire chain of muscles from your heels to your upper back).
Advanced Release Techniques: The McGill Big 3 and QL Targeting
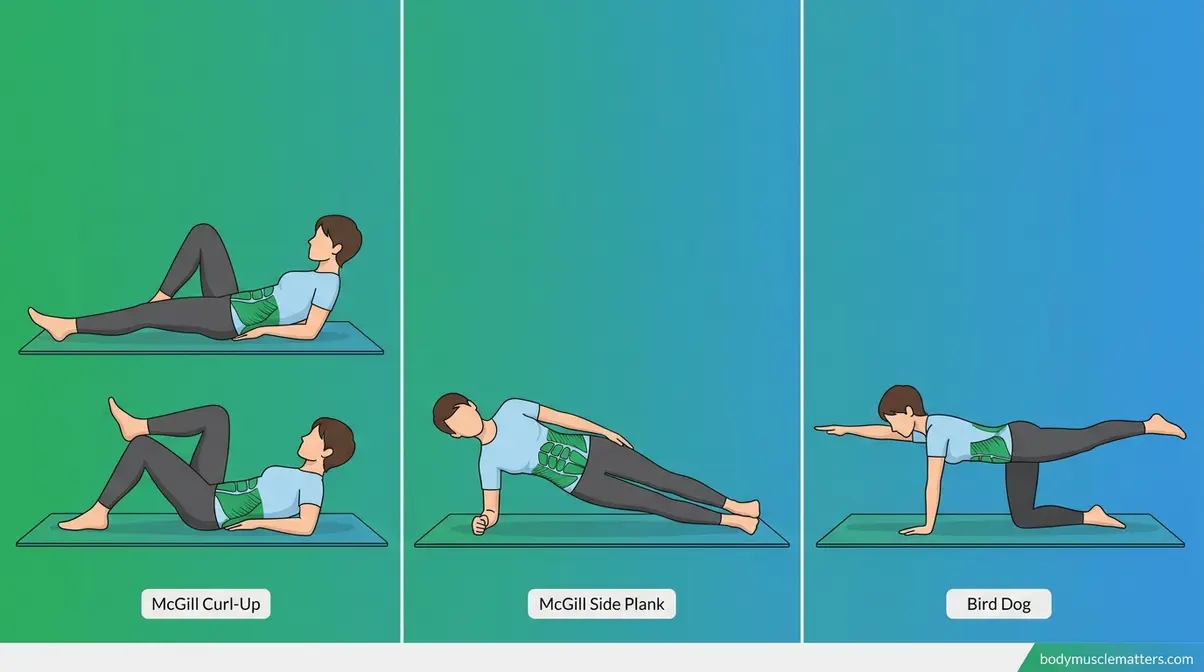
Once you have moved through the core stretches, you are ready for Phase 3 of the Release-Stabilize-Prevent Framework: building the spinal endurance that prevents tightness from returning. The McGill Big 3 — developed by Dr. Stuart McGill, a leading spine biomechanics researcher — are the most clinically validated exercises for achieving this. A 2018 randomized controlled trial published in PMC found that McGill stabilization exercises produced statistically significant improvements in pain, functional disability, and lumbar range of motion in patients with chronic non-specific lower back pain (PMC, 2018). Zero top competitors cover these exercises — which is precisely why this section represents the most important information gain in this guide.
“The McGill Big 3 — Curl-Up, Side Plank, and Bird Dog — represent the most evidence-based core stabilization protocol available for chronic lower back pain, building spinal endurance without harmful flexion stress (PMC, 2018).”
The McGill Curl-Up
The McGill Curl-Up is not a standard crunch. It is a spine-sparing core activation exercise that builds endurance in the rectus abdominis (the front abdominal muscle) without creating the dangerous flexion forces that traditional crunches place on the lumbar discs.
- How to do it:
- Lie on your back. Extend one leg flat on the floor and bend the other knee, placing that foot flat on the floor.
- Slide both hands under your lower back, palms down. This is critical — it maintains your lumbar spine in its natural neutral curve throughout the exercise.
- Tuck your elbows down toward the floor.
- Lift your head and shoulders only a few centimeters off the floor — this is not a full sit-up. Your lower back should stay in contact with your hands throughout.
- Hold for 8–10 seconds, breathing normally. Do not hold your breath.
- Lower slowly and repeat. Switch which leg is extended each set.
Sets/reps: Start with 5 repetitions. Build toward 3 sets using a descending ladder (e.g., 6, 4, 2 reps per set).
Why this works: This movement activates the anterior core without forcing the lumbar spine into flexion — the position that loads spinal discs most dangerously. The hands under the lower back serve as a biofeedback tool: if your lower back presses into your hands, you have gone too high.
The McGill Side Plank
The McGill Side Plank targets the quadratus lumborum (QL), the obliques, and the lateral hip stabilizers — muscles that support the spine from the sides. Lateral core weakness is one of the most overlooked contributors to lower back tightness, because when the sides are weak, the lumbar spine is forced to compensate.
- How to do it (beginner variation — knee down):
- Lie on your side with your knees bent at 90 degrees, feet stacked.
- Place your bottom elbow directly under your shoulder.
- Lift your hips off the floor, creating a straight line from your head to your knees.
- Keep your top hand on your hip or extend your arm toward the ceiling.
- Hold for 8–10 seconds, breathing normally.
- Lower slowly and repeat on the other side.
Sets/reps: 3 repetitions per side, building hold time gradually over weeks.
Why this works: The lateral position loads the QL and obliques in the direction they actually stabilize the spine — resisting lateral bending forces. This builds the kind of muscular endurance that protects the lower back during daily activities like carrying bags, reaching sideways, or getting out of a car.
The McGill Bird Dog
The McGill Bird Dog is considered by many physical therapists to be the single most important exercise for lower back health. It builds coordinated stability across the entire posterior chain — the glutes (buttock muscles), multifidus (deep spinal stabilizers), and erector spinae — while training the spine to maintain a neutral position under load.
- How to do it:
- Start on all fours, wrists under shoulders, knees under hips. Spine neutral (not arched or rounded).
- Brace your core gently — imagine someone is about to poke you in the belly. This is your “stiffness without strain” position.
- Slowly extend your right arm forward and your left leg backward simultaneously, keeping both parallel to the floor.
- Hold for 8–10 seconds. Your lower back should not rotate or arch — keep your hips level.
- Slowly return to the starting position and repeat with the opposite arm and leg.
- That is one repetition.
Sets/reps: 5 repetitions per side, building toward 3 sets using a descending ladder.
Why this works: The Bird Dog forces the deep spinal stabilizers (multifidus and transverse abdominis) to hold the lumbar spine in neutral while the limbs create an unbalancing load. This is the exact challenge the lower back faces during everyday movement — making this exercise the most functional preparation available.
Quadratus Lumborum (QL) Foam Roller Release
The Quadratus Lumborum (QL) is the deep muscle running alongside your lower spine, connecting your lowest rib to the top of your pelvis. It is responsible for the sharp, one-sided ache that many people feel deep in the lower back — and it is rarely addressed by standard stretching alone. A foam roller release targets the QL’s trigger points (tight, hyperirritable knots within the muscle) directly.
Physical therapists at RehabHero recommend this soft tissue mobilization technique as a complement to active stabilization exercises for the lateral flexors of the lumbar spine.
What you need: A standard foam roller (firm density works best for this technique).
- How to do it:
- Place the foam roller on the floor perpendicular to your body.
- Lie on your side and position the foam roller under your lateral lower back — in the space between your lowest rib and the top of your hip bone (iliac crest). This is where the QL lives.
- Support your upper body on your bottom elbow. Place your top leg in front of you on the floor for balance and to control pressure.
- Rotate your torso about 45 degrees toward the ceiling — this exposes the QL more directly to the roller.
- Gently roll forward and backward over a 3–4 inch range, searching for tender spots (trigger points).
- When you find a tender spot, pause and hold gentle pressure for 20–30 seconds, or 3–5 slow breaths, until the tension begins to release.
- Move to the next tender spot and repeat.
- Switch sides.
Why this works: Sustained pressure on a trigger point increases blood flow to the area and interrupts the pain-spasm cycle that keeps the QL locked in chronic contraction. This technique complements the McGill exercises above by releasing the passive tension before the active stabilization work begins. Limit to 2–3 sessions per week — over-rolling can irritate the tissue.
How to Relieve Lower Back Tightness in Specific Situations
Tight lower back muscles do not always present at the gym or on a yoga mat. For many people, the pain is worst in specific scenarios — waking up, standing for extended periods, or lying in bed unable to find comfort. These targeted protocols address each situation directly.
How to Relieve Lower Back Pain While Sleeping
Waking up with a stiff back is one of the most common complaints physical therapists hear. The problem is usually one of two things: a sleep position that compresses the lumbar spine for hours at a time, or a mattress that fails to support the spine’s natural curve.
Evidence-based sleeping positions for lower back relief:
| Sleep Position | Modification | Why It Helps |
|---|---|---|
| Side sleeping | Place a pillow between your knees | Keeps the hips and pelvis aligned, reducing lumbar rotation |
| Back sleeping | Place a pillow under your knees | Reduces the lumbar arch by ~30°, decreasing disc pressure |
| Stomach sleeping | Place a pillow under your lower abdomen | Reduces excessive lumbar extension (use only if other positions are impossible) |
- Morning routine to relieve stiffness before getting up:
- Before rising, perform 10 slow Cat-Cow movements while lying on your side.
- Roll to your side, push up with your arms (do not flex forward from the waist), and sit on the edge of the bed for 30 seconds before standing.
- Stand and perform 5 gentle backward bends (hands on hips, lean back slightly) to counteract the flexed position of sleep.
Physical therapists recommend Healthline’s sleep position guidance as a starting reference for positioning modifications.
How to Loosen Tight Lower Back Muscles While Standing
Standing for extended periods compresses the lumbar discs and fatigues the paraspinal muscles (the muscles running alongside your spine) — especially if your posture allows the lower back to hyperextend (arch excessively). Lower back pain that worsens while standing is a distinct pattern that responds to specific interventions.
- Immediate standing relief techniques:
- Foot elevation: Place one foot on a low step or footrest (6–8 inches high) while standing. This slightly flexes one hip, reducing lumbar lordosis (the arch in your lower back). Alternate feet every 10–15 minutes.
- Wall-supported standing: Stand with your back against a wall, feet 6 inches from the baseboard. Gently flatten your lower back against the wall using a pelvic tilt. Hold 30 seconds, then step away.
- Standing hip flexor release: While standing, take a wide stride forward with one foot. Bend the front knee gently and push the rear hip forward until you feel a stretch in the front of the rear hip. Hold 20 seconds per side.
Postural correction: Physical therapists consistently find that “anterior pelvic tilt” — where the pelvis tips forward and the lower back arches — is the dominant posture among people with standing-related lower back tightness. The foot elevation and wall techniques above directly address this.
Stretches to Do in Bed for Lower Back Stiffness
When pain is severe enough that getting to the floor feels impossible, these in-bed techniques provide a practical alternative. They are also useful as a morning routine before you even stand up.
“Kneel on your bed and put your back leg against the wall….or better still, put it against a yoga ball that’s against the wall.”
— Community-sourced technique from back pain forums
This forum-sourced tip captures an important principle: using your environment creatively to find supported positions that relieve pressure. Here are four evidence-informed techniques you can do without leaving your bed:
- In-bed lower back relief sequence:
- Knees-to-Chest (lying): As described in the first section — hold each knee for 20 seconds, then both together for 30 seconds.
- Supine Twist (lying): Lower both bent knees to one side, keeping shoulders flat. Hold 20 seconds each side.
- Pelvic Tilts: Flatten your lower back gently against the mattress and hold for 5 seconds. Repeat 10 times.
- Child’s Pose on the mattress: If your mattress is firm enough, move to all fours and perform Child’s Pose, pushing your hips back toward your heels.
Note: A very soft mattress will make some of these less effective. If possible, move to the floor for the Cat-Cow and Bird Dog exercises — the firm surface provides better proprioceptive feedback (your body’s sense of position and movement).
What Causes Tight Lower Back Muscles (and How to Prevent It)
Understanding why your lower back gets tight is the difference between temporary relief and lasting freedom from pain. Physical therapists emphasize that most cases of lower back tightness have identifiable, addressable root causes — and that targeted prevention is far more effective than repeated emergency stretching.
The Most Common Causes of Lower Back Tightness
What is the main cause of tightness in the lower back? In most cases, lower back tightness results from a combination of muscular imbalances, sustained postures, and deconditioning — not structural damage. The most common causes include:
| Cause | Mechanism | Who It Affects Most |
|---|---|---|
| Prolonged sitting | Shortens hip flexors, weakens glutes, compresses lumbar discs | Office workers, drivers |
| Muscle imbalance | Weak core + tight hip flexors = excessive lumbar arch | Most sedentary adults |
| Poor sleep position | Hours of lumbar compression or rotation without relief | Side sleepers without pillow support |
| Repetitive bending/lifting | Cumulative disc stress and paraspinal muscle fatigue | Manual workers, parents |
| Stress and anxiety | Chronic sympathetic nervous system activation = sustained muscle guarding | Anyone under prolonged stress |
| Dehydration | Spinal discs are 80% water — dehydration reduces their shock-absorbing capacity | Athletes, people in dry climates |
According to the NIH StatPearls database, the lifetime prevalence of back pain in adults may reach 84%, with most cases being non-specific — meaning no structural cause is identified on imaging (NIH StatPearls, 2025). This is reassuring: it means the vast majority of tight lower back cases respond to the movement-based approaches in this guide.
Is It Muscle Tightness or SI Joint Dysfunction?
This diagnostic question is missed entirely by every top competitor — and it matters enormously, because the treatment approach differs significantly. SI joint dysfunction (sacroiliac joint dysfunction) is a condition where the sacroiliac joint — the joint connecting your sacrum (the triangular bone at the base of your spine) to your pelvis — becomes inflamed or moves abnormally. It accounts for an estimated 15–30% of lower back pain cases (NIH StatPearls on Sacroiliac Joint Pain, 2023).
Use this symptom checklist to distinguish between the two:
| Symptom | Muscle Tightness (QL/Piriformis) | SI Joint Dysfunction |
|---|---|---|
| Pain location | Bilateral (both sides) or central lower back | One-sided, near the beltline or buttock |
| Pain character | Aching, stiffness, “locked up” feeling | Sharp, stabbing, or deep aching |
| Radiation | May radiate into both hips | Radiates into groin or upper thigh (rarely below knee) |
| Worst trigger | Bending forward, prolonged sitting | Prolonged sitting, stairs, sit-to-stand transitions |
| Morning stiffness | Common | Common |
| Relieved by | Movement, stretching | Rest, specific positions |
Key diagnostic clue: SI joint pain is almost always one-sided and localizes to a point inferior and medial to the PSIS (the bony bump you can feel at the back of your hip). If you can point to your pain with one finger in that location, SI joint involvement is more likely (NIH StatPearls, 2023). Muscle tightness, by contrast, tends to feel more diffuse and bilateral.
What to do if you suspect SI joint dysfunction: The stretches in this guide — particularly the Supine Twist and hip flexor stretch — may still provide some relief, but SI joint dysfunction typically requires specific manual therapy and pelvic stabilization exercises from a physical therapist. Consult a healthcare provider before continuing self-treatment if you identify with the SI joint pattern above.
Long-Term Prevention Strategies
Physical therapists consistently emphasize that the exercises in this guide are most effective when combined with lasting lifestyle changes. Research from Mayo Clinic identifies these as the most evidence-supported prevention strategies:
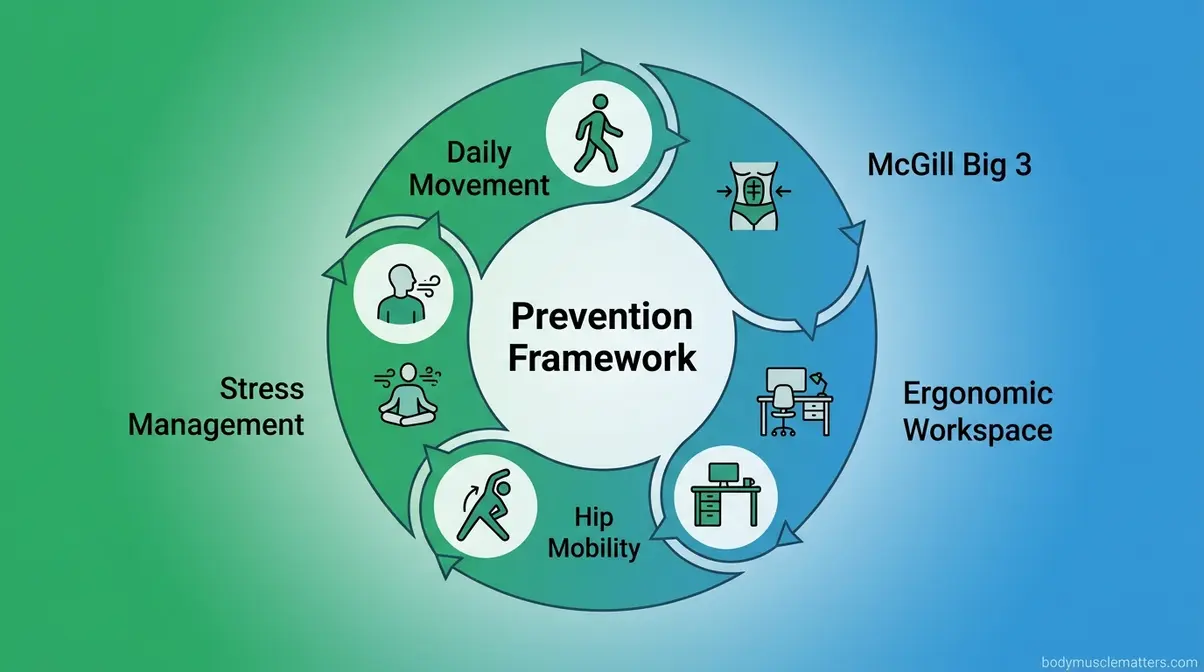
The five pillars of lower back tightness prevention:
- Daily movement: Even 20–30 minutes of walking daily reduces lower back pain recurrence risk significantly. Movement keeps the spinal discs hydrated and the paraspinal muscles conditioned.
- Core stability training: The McGill Big 3 performed 3–4 days per week builds the spinal endurance that prevents tightness from returning. Start with the beginner progressions and advance gradually over 4–6 weeks.
- Ergonomic workspace: If you sit for work, ensure your chair supports your lumbar curve (a rolled towel works well), your screen is at eye level, and you stand or walk for at least 5 minutes every 45–60 minutes.
- Hip mobility maintenance: Daily hip flexor and hamstring stretching (2–3 minutes each) prevents the postural imbalances that drive lower back tightness. The half-kneeling stretch and supine hamstring stretch above are ideal for this.
- Stress management: Because chronic sympathetic nervous system activation directly increases muscle tension, practices like diaphragmatic breathing, yoga, or mindfulness can reduce baseline lower back tightness over time (PMC, 2023).
Timeline for results: Physical therapists report that most patients with non-specific lower back tightness notice meaningful improvement within 2–4 weeks of consistent practice. The McGill Big 3 typically requires 6–8 weeks of regular training before spinal endurance improvements become measurable. If symptoms persist beyond 2 weeks despite consistent practice, consult a physical therapist for a personalized assessment.
Lower Back Pain Red Flags: When to See a Doctor
Most lower back tightness is benign and responds well to the techniques in this guide. However, a small percentage of lower back pain presentations signal serious underlying conditions that require immediate medical evaluation. Knowing these red flags could protect your long-term health — or your life.
5 Warning Signs That Require Immediate Medical Attention
Clinical guidelines from the Journal of Orthopaedic & Sports Physical Therapy (2020) and a 2025 PMC standardized framework identify the following as the highest-priority red flags for serious spinal pathology (JOSPT, 2020; PMC, 2025):
Stop self-treatment and seek immediate medical attention if you experience:
- Bowel or bladder dysfunction — sudden inability to urinate, urinary retention, or loss of bladder/bowel control. This can signal cauda equina syndrome (CES), a spinal emergency where compressed nerves at the base of the spine lose function. CES requires emergency surgery within hours to prevent permanent paralysis.
- Saddle anesthesia — numbness or tingling in the inner thighs, groin, genitals, or perineal (anal) area. This is the most specific symptom of cauda equina syndrome and requires emergency evaluation.
- Progressive leg weakness — weakness that is getting worse over hours or days, difficulty walking, or bilateral (both legs) neurological symptoms. This suggests cord compression or serious nerve damage.
- Fever with back pain — a temperature above 38°C (100.4°F) combined with lower back pain may indicate spinal infection (discitis or epidural abscess), which requires urgent antibiotic treatment.
- Pain following trauma or in patients over 50 with cancer history — back pain following a fall, car accident, or direct blow, or new severe back pain in someone with a known cancer history, raises concern for spinal fracture or metastatic disease.
“Cauda equina syndrome, spinal infection, and metastatic spinal disease are among the four categories of serious pathology that back pain red flags are designed to screen for — early recognition is critical (PMC, 2025).”
When to Choose Professional Help Over Self-Treatment
Beyond emergency red flags, certain patterns of lower back pain benefit from professional assessment rather than continued self-treatment:
- Pain lasting more than 2 weeks without improvement despite consistent stretching and exercise
- Pain that wakes you from sleep (not just stiffness in the morning — pain that interrupts sleep)
- Radiating pain down one or both legs below the knee, especially with numbness or tingling (this may indicate a pinched nerve or disc herniation)
- Pain that is consistently worsening rather than fluctuating
- First episode of severe lower back pain in someone under 20 or over 55 — these age groups have different underlying causes than the typical working-age adult
A physical therapist can perform a thorough movement assessment, identify the specific structures involved, and design a targeted program far more precise than any general guide. Many physical therapy clinics offer direct access appointments without a physician referral.
Frequently Asked Questions
How do you loosen very tight lower back muscles?
The most effective approach combines immediate passive release with active stabilization. Start with Child’s Pose and Knees-to-Chest to decompress the lumbar spine, then use diaphragmatic breathing to activate the parasympathetic nervous system and signal muscle release. Follow with Cat-Cow and pelvic tilts to restore mobility. Research supports combining passive stretching with active core stabilization — the McGill Big 3 — for both short-term relief and long-term prevention (PMC, 2018). If tightness persists beyond 2 weeks, consult a physical therapist.
What are the 5 red flags of low back pain?
The five red flags requiring immediate medical attention are bowel or bladder dysfunction, saddle anesthesia (numbness in the groin or inner thighs), progressive leg weakness, fever with back pain, and pain following trauma or in someone with a cancer history. These symptoms can indicate cauda equina syndrome, spinal infection, or fracture. A 2025 PMC framework identifies these as the highest-priority indicators of serious spinal pathology (PMC, 2025). Do not attempt self-treatment if any of these are present — seek emergency evaluation immediately.
How can I release tension in my lower back?
You can release lower back tension using three approaches: physical decompression, muscle lengthening, and nervous system calming. For decompression, Child’s Pose and Legs-Up-the-Wall reduce compressive load on the lumbar discs. For muscle lengthening, the Cat-Cow, Supine Twist, and hamstring stretch target the primary tight muscles. For nervous system calming, diaphragmatic breathing activates the parasympathetic response, which directly signals chronically guarded muscles to release — a mechanism confirmed by PMC research (2023). Combining all three approaches produces faster results than any single technique alone.
How long does it take to loosen tight back muscles?
Most people notice meaningful relief within one to three sessions of consistent stretching, though full resolution of chronic tightness typically takes two to four weeks. A single session of Child’s Pose, Knees-to-Chest, and diaphragmatic breathing can reduce acute pain perception within minutes. However, if the underlying cause is muscular deconditioning or postural imbalance, lasting relief requires 2–6 weeks of regular practice. The McGill Big 3 typically requires 6–8 weeks before spinal endurance improvements become measurable. Consistency matters far more than intensity.
What is the main cause of tightness in the lower back?
The most common cause of lower back tightness is a combination of shortened hip flexors, weak core stabilizers, and prolonged spinal compression from sitting. When the iliopsoas (the deep hip flexor connecting your lower spine to your thigh bone) shortens from extended sitting, it pulls the pelvis forward and compresses the lumbar vertebrae. The surrounding muscles then contract protectively to guard the compressed joints. According to NIH StatPearls (2025), up to 84% of adults experience back pain in their lifetime, with the majority having non-specific causes — meaning movement-based interventions like those in this guide are the appropriate first response.
Limitations and When to Seek Professional Help
Common Pitfalls to Avoid
Pitfall 1: Stretching through sharp or shooting pain.
There is a critical difference between the productive discomfort of a stretch and sharp, shooting, or electric pain. If any technique in this guide produces pain that shoots down your leg, causes numbness, or feels significantly worse than before you started — stop immediately. Sharp pain during stretching can indicate nerve involvement or a disc herniation that requires professional evaluation, not more stretching.
Pitfall 2: Skipping the breathing component.
Many people work through the stretches mechanically while holding their breath or breathing shallowly. This activates the sympathetic nervous system, which increases muscle tension and directly counteracts the stretching work. Breathing slowly and deeply throughout every technique is not optional — it is the mechanism by which the nervous system permits muscle release.
Pitfall 3: Progressing to the McGill Big 3 too quickly.
The McGill exercises are stabilization exercises, not stretches. Starting with too many repetitions or too long a hold time before the muscles are ready can increase pain. Begin with the prescribed beginner progressions (5 reps, 8–10 second holds) and add repetitions only when you can complete each set without lower back discomfort.
Pitfall 4: Expecting one session to solve chronic tightness.
Muscles that have been tight for weeks or months will not release after a single stretching session. Physical therapists typically recommend daily practice for the first two weeks, then maintenance 3–4 days per week. Expecting immediate permanent resolution leads to abandoning the program prematurely.
When to Choose Alternatives Over Self-Treatment
Scenario 1: Pain radiating below the knee.
If lower back pain radiates below the knee with numbness, tingling, or weakness, this suggests nerve involvement — most commonly a lumbar disc herniation pressing on a nerve root. Self-stretching may provide temporary relief but will not resolve the underlying nerve compression. A physical therapist or physician can assess whether conservative care, imaging, or referral is appropriate.
Scenario 2: No improvement after 2 consistent weeks.
If you have followed this protocol consistently for two full weeks without meaningful improvement, the underlying cause may be beyond muscular tightness — possible contributors include facet joint arthritis, disc pathology, or SI joint dysfunction. A physical therapy evaluation at this point is the appropriate next step, not continuing to repeat the same stretches.
Scenario 3: Pain in a high-risk individual.
Anyone over 55 experiencing their first episode of significant lower back pain, anyone with osteoporosis, or anyone currently undergoing cancer treatment should consult a physician before beginning any exercise program for back pain. These populations have a higher likelihood of structural causes that require imaging before exercise.
When to Seek Expert Help
Consult a physical therapist if: your pain has lasted more than 2 weeks, you are unsure whether your pain is muscular or structural, you want a personalized exercise program beyond what a general guide can provide, or you are recovering from a back injury or surgery. Consult a physician or go to an emergency room if you experience any of the five red flags described in the previous section.
Putting It All Together: Your Lower Back Relief Plan
The 12 techniques in this guide are most powerful when used together within the Release-Stabilize-Prevent Framework — not as isolated stretches pulled from a list. Low back pain affects an estimated 619 million people globally, and the majority of cases are non-specific and fully addressable with movement-based care (PMC/NIH, 2025). The three-phase approach here — release acute tension, build core stability, prevent recurrence — mirrors the protocol a physical therapist would build for a new patient.
The Release-Stabilize-Prevent Framework works because it addresses all three levels of the problem simultaneously: the immediate mechanical compression (Phase 1 release), the underlying muscular weakness that allows compression to occur (Phase 2 and 3 stabilization), and the postural and lifestyle habits that recreate tension daily (prevention). Treating only one level — as most generic stretch lists do — is why lower back tightness keeps coming back.
Start today with Phase 1: five minutes of Child’s Pose, Knees-to-Chest, and diaphragmatic breathing. Add the core stretches tomorrow. Introduce the McGill Big 3 in week two. If your pain has not improved meaningfully after two consistent weeks, book an appointment with a physical therapist — because you deserve a plan as specific as your pain.
Related posts:
Benefits of Yoga for Fitness: The Science-Backed Guide
Home Workouts to Build Muscle Without Weights (2026)
CrossFit Strength Training for Beginners: 2026 Guide
Home Workout Plan for Beginners: 30-Day Step-by-Step
How to Self Massage Calves: The 4-Layer Method Guide
Strength Training for Beginners: Complete Workout Plan 2026
Callum
Hi, I'm Callum, the founder of Body Muscle Matters. I'm not a certified trainer, I'm a self taught lifter who started this site to share what I've learned from my own training and a lot of trial and error. Everything here comes from real experience and honest research, written the way I'd explain it to a friend who is just getting started. My goal is simple: practical, no hype fitness advice you can actually use.