How to Self Massage Calves: The 4-Layer Method Guide
⚠️ Medical Disclaimer
This article is for informational purposes only and does not constitute medical advice. Always consult a qualified healthcare professional before beginning any self-treatment, especially if you have underlying health conditions.
Do NOT massage your calves if you suspect Deep Vein Thrombosis (DVT). DVT symptoms include sudden swelling, redness, warmth, and pain in the calf or leg. Seek emergency care immediately if DVT is suspected. Massaging a blood clot can dislodge it and cause a life-threatening pulmonary embolism.
Your calves are screaming after a long run — or maybe they’ve been tight for days with no obvious cause. Here’s the part most people miss: the majority of self-massage attempts push in the wrong direction, forcing blood away from the heart instead of toward it, which actively works against your body’s circulation.
Without the right technique, you’re not just wasting effort — you’re potentially irritating already-stressed tissue. Tight calves don’t resolve on their own. They tighten further, restrict ankle mobility, and can trigger heel pain (plantar fasciitis) over time.
This guide teaches you exactly how to self massage calves using The 4-Layer Method — a progressive, step-by-step system that mirrors what physical therapists use, taking you from gentle warm-up to deep muscle release in under 10 minutes. You’ll also learn which tools work best, the hidden root causes of chronic calf tightness, and the critical safety warnings you must know before you start.
You can safely self massage tight calf muscles at home using the 4-Layer Method — warm up, knead, release knots, then strip muscle lanes — always massaging upward toward the knee to support healthy circulation.
- Always massage upward (ankle to knee) to work with venous valves, not against them
- The 4-Layer Method progresses from surface tissue to deep muscle for maximum relief
- Tight calves are often linked to magnesium deficiency, stress, and plantar fasciitis
- Stop immediately if you notice swelling, redness, or heat — these are DVT warning signs
- Tools like foam rollers can reach the soleus (deep calf muscle) that hands cannot
Understanding Your Calf Muscles Before You Start
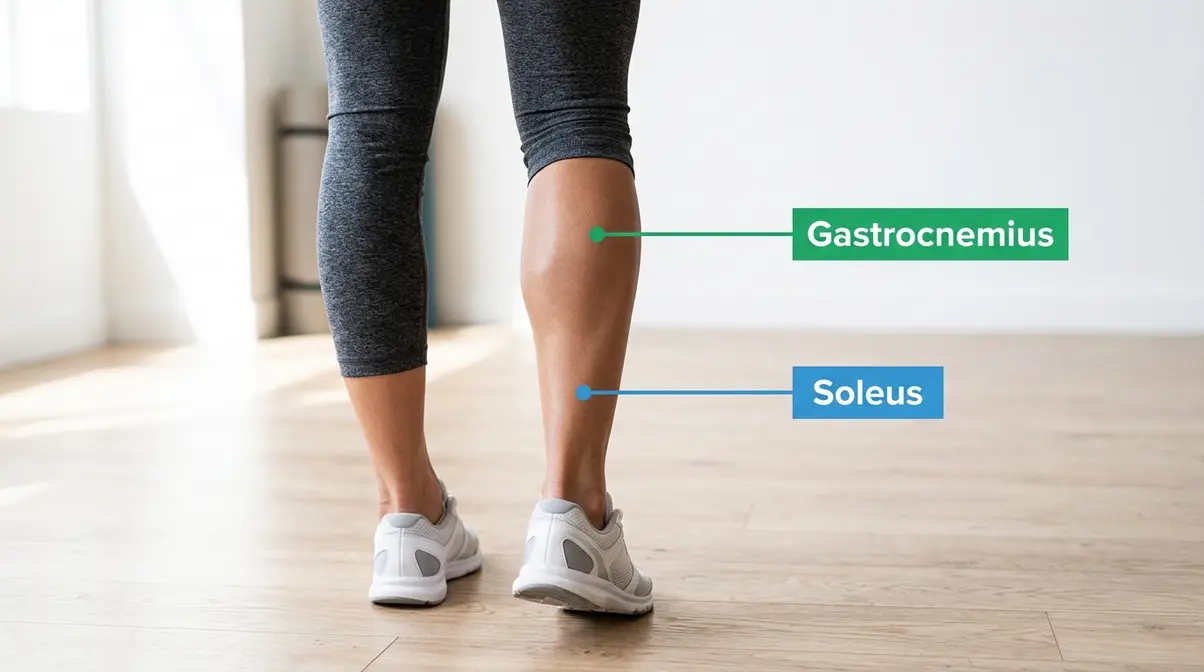
Your calf is not one muscle — it is two, stacked on top of each other. Understanding which muscle is tight tells you exactly which technique to use. Most self-massage guides treat the calf as a single unit, which is why so many people get temporary relief but the tightness always comes back. The 4-Layer Method addresses both muscles in sequence, which is what separates it from generic technique lists.
The calf contains two muscles — the gastrocnemius and soleus — and most self-massage guides address only one, leaving stubborn tightness unresolved.
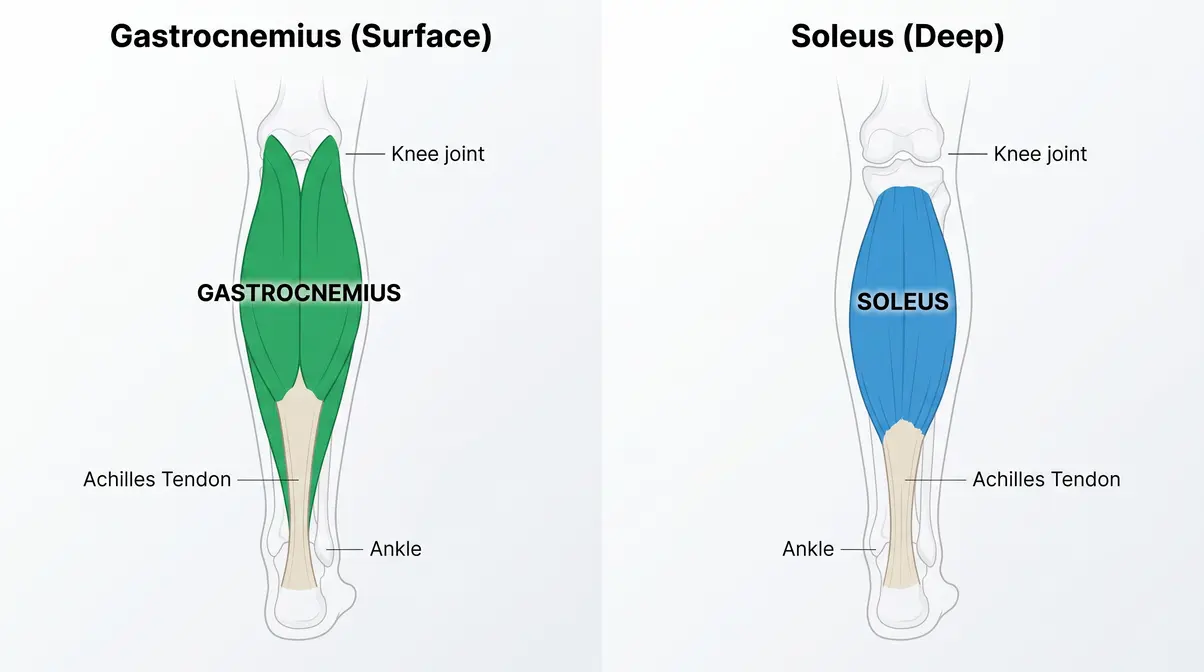
The Gastrocnemius: Your Surface Calf Muscle
The gastrocnemius (pronounced “gas-trock-NEE-me-us”) is the large, diamond-shaped muscle you can see and feel when you flex your calf. It runs from just behind the knee down to the heel via the Achilles tendon — making it the most visible part of your lower leg.
This muscle is most active during high-effort movements with a straight knee: running, jumping, and climbing stairs. That’s why runners feel tight calf muscles most acutely in the gastrocnemius after a hard effort. Because it sits directly on the surface, your hands can reach it effectively. It is the primary target of the first four steps in the 4-Layer Method. When you press into the middle of your calf and feel a hard, rope-like band — that is the gastrocnemius responding to pressure.
But beneath the gastrocnemius lies a muscle that’s often the real culprit behind stubborn tightness — the soleus.
The Soleus: The Hidden Muscle Beneath
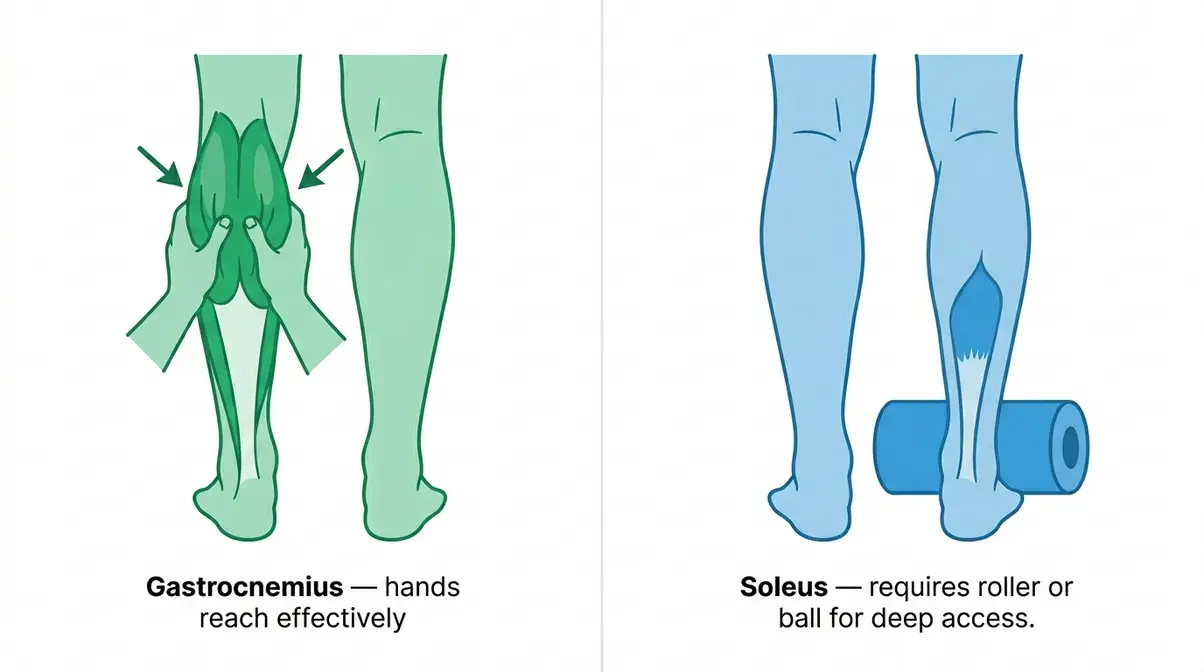
The soleus is a flat, wide muscle lying directly beneath the gastrocnemius — the one responsible for most stubborn tightness that hand massage alone fails to resolve. You cannot see it, but you can feel it when you press deeply into the lower third of your calf near the ankle.
Unlike the gastrocnemius, the soleus is most active when your knee is bent — during slow walking, cycling, and prolonged standing. Runners with chronic calf tightness often have a tight soleus that hand massage barely touches. Reaching the soleus requires deeper, sustained pressure. A foam roller or lacrosse ball positioned under the lower calf is significantly more effective than thumbs alone for this deeper layer. If pressing with your thumbs feels like you’re only skimming the surface, the soleus is where your real tightness lives.
Now that you know your targets, here’s exactly what to prepare before you start massaging.
Before You Begin: Your Pre-Massage Checklist
Effective calf self-massage starts before your hands ever touch your leg. Skipping preparation is the most common reason people say “massage didn’t help” — they massaged cold, tight tissue in an awkward position, got poor muscle penetration, and gave up. Two minutes of setup makes every technique significantly more effective. Massaging cold, unprepared muscle tissue is significantly less effective than massaging warmed tissue — a 5-minute warm-up (light walking or a warm shower) can meaningfully improve how deeply techniques penetrate.
What You’ll Need (Equipment Options)
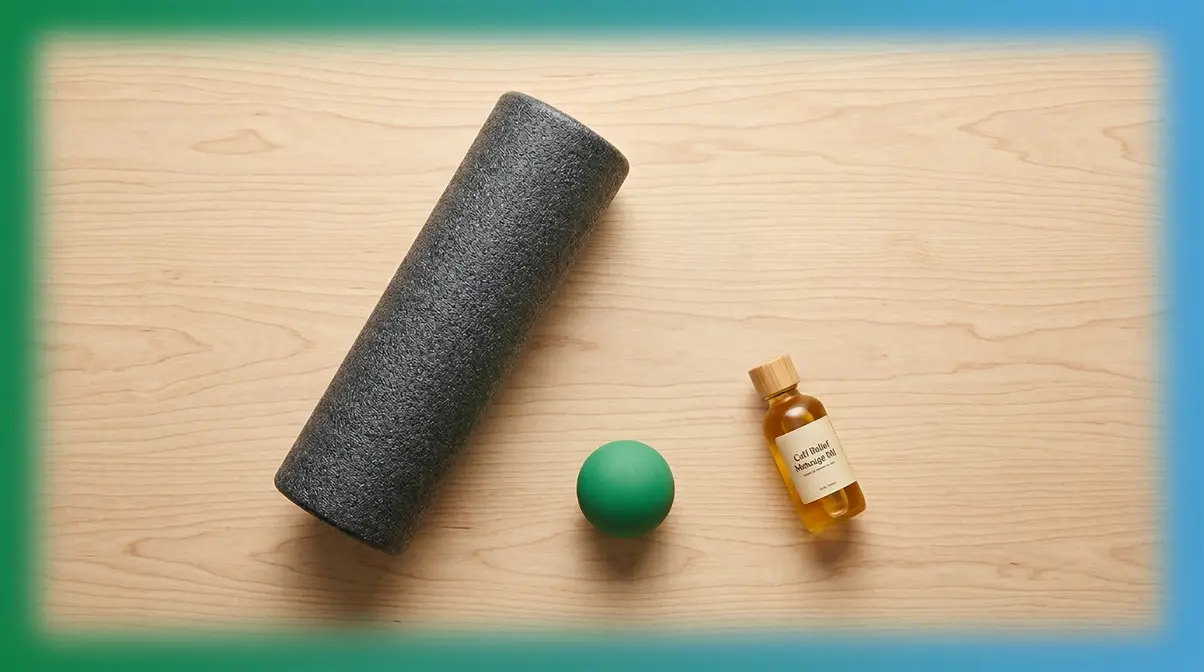
You don’t need special equipment for your first session. Here’s what physical therapists recommend, from minimal to more targeted:
- Hands only — Sufficient for reaching the gastrocnemius. Use your thumbs, knuckles, or the heel of your palm. No purchase required, and ideal for learning the technique first.
- Foam roller — A foam roller (a cylindrical tool used for self-myofascial release) is best for reaching the soleus and covering large surface areas quickly. Place it on the floor and rest your calf on top.
- Lacrosse ball or massage ball — A lacrosse ball (a firm rubber ball ideal for targeted pressure on knots) provides more precise, concentrated pressure than a foam roller. Use it once you’ve identified the tightest spots.
- Massage oil or lotion (optional) — Reduces friction during gliding strokes. Coconut oil or any unscented lotion works well.
For a first-time session, your hands are all you need. Add tools after you’ve located the tightest areas. For broader muscle relaxation before your session, explore full-body muscle relaxation techniques.
Once you have your tools ready, position matters more than most people realize.
The Best Positions for Calf Self-Massage
How you position your body determines how much pressure you can actually apply. These three positions work for most people learning how to massage your calves at home:
- Seated on a chair — Bend your knee and place your foot flat on the floor. Lean forward and reach both hands around the back of your calf. Best for beginners — stable, comfortable, and easy to control pressure.
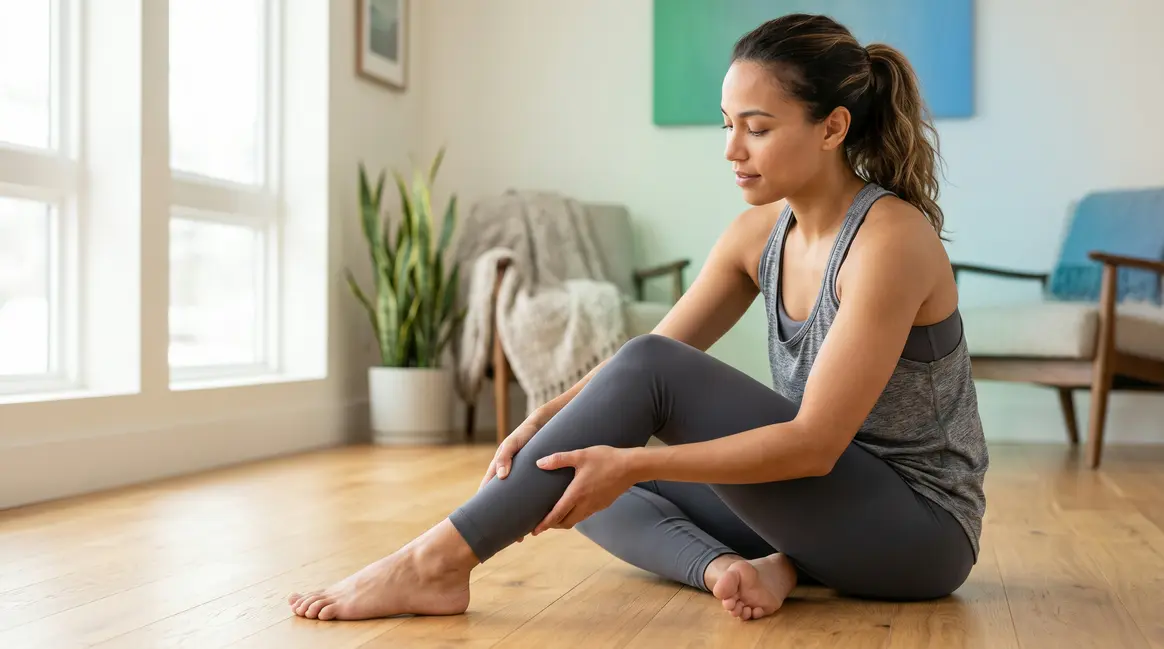
- Seated on the floor — Extend one leg slightly and bend the knee so you can access the full back of the calf. This position gives better leverage for deeper pressure with your thumbs or knuckles.
- Foam roller position — Sit on the floor and place the foam roller under one calf. Use your arms to support your body weight and lift your hips slightly. Cross the opposite ankle over the top for added pressure on the soleus.
The directional rule — never skip this: Always massage upward, from ankle toward knee. This works with your venous valves, which push blood back toward the heart. Massaging downward works against those valves. Place your thumb at the ankle and slide firmly upward toward the back of the knee — never push toward the foot.
If lower back tightness accompanies your calf soreness, see our guide to relieving tight lower back muscles.
With your position set and direction clear, you’re ready for the 4-Layer Method.
How to Self Massage Your Calves: The 4-Layer Method (Step-by-Step)
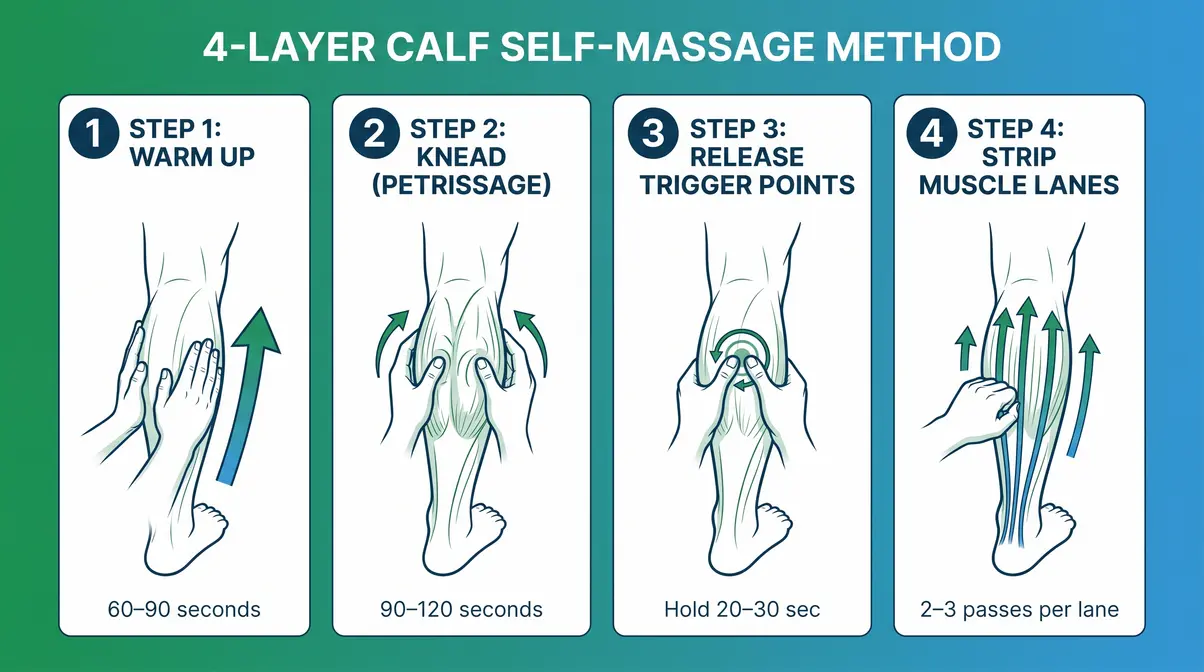
The 4-Layer Method follows the same sequence a licensed massage therapist uses: you cannot effectively release a deep knot in cold, unprepared tissue. Each layer prepares the tissue for the next. Work through all four layers in order — skipping ahead is the most common reason self-massage “doesn’t work.” The fifth step is a tool-free alternative that requires no hand strength at all.
The 4-Layer Method — warm, knead, release, strip — mirrors the sequence professional massage therapists use and addresses both the gastrocnemius and soleus in a single session.
Step 1 — Warm Up the Tissue
How to self massage calves effectively always begins with a warm-up — never skip this layer.
- Place both palms flat on the back of your lower calf, just above the ankle.
- Apply moderate, even pressure and glide your hands firmly upward toward the back of your knee.
- Lift off at the top and return to the ankle without pressing down.
- Repeat for 60–90 seconds at a slow, deliberate pace — about 6–8 strokes per minute.
What you’ll feel: Mild warmth spreading through the calf. The skin may flush slightly pink. This is normal and indicates increased blood flow.
Why it works: Warming the tissue raises local muscle temperature by 1–2°C, increases circulation, and makes muscle fiber more pliable — similar to warming cold clay before shaping it. Research suggests warmed muscle responds to compression techniques significantly better than cold muscle (PMC8320327).
Common mistake: Moving too fast. This step should feel like slow, deliberate ironing — not brisk rubbing. Speed reduces penetration depth.
For a broader look at proven calf self-massage techniques, see our dedicated resource.
“Veins have valves in them. Blood is encouraged to flow back to the heart. Massaging down towards the foot goes against those valves.”
Step 2 — Knead the Muscle (Petrissage)
- Form a C-shape with both hands around the back of your calf, thumbs on one side, fingers on the other.
- Gently lift and squeeze the muscle tissue — compress it, hold for one second, then release.
- Work in slow sections: lower calf → mid calf → upper calf, spending about 20 seconds per zone.
- Continue for 90–120 seconds total.
What you’ll feel: A satisfying, dull “good hurt” — the muscle being compressed and released. You may notice areas that feel harder or more tender than others. These are your target zones for Step 3.
Why it works: This technique is called petrissage (the kneading technique used by massage therapists to compress and release muscle tissue). Petrissage mechanically pumps metabolic waste products — like lactic acid — out of the muscle and draws fresh, oxygenated blood in. According to myphysiosa.com.au, this rhythmic compression is one of the most effective ways to reduce post-exercise muscle soreness.
Common mistake: Squeezing only the skin. Grip deeper — you should feel the actual muscle belly moving under your hands, not just surface tissue.
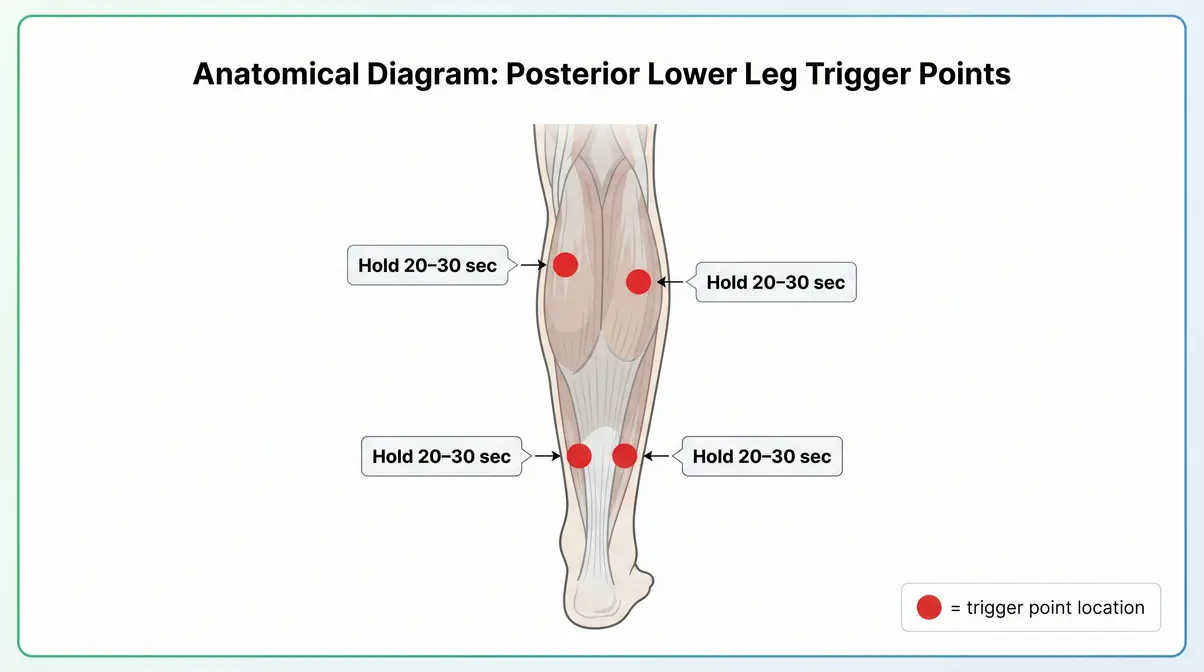
Step 3 — Release Trigger Points (Knots)
- Using both thumbs stacked on top of each other, locate the tenderest spot you found in Step 2.
- Press directly into the center of that tender area with firm, sustained pressure.
- Hold for 20–30 seconds without moving. Breathe slowly.
- You should feel the tension gradually release under your thumbs — like a knot slowly loosening.
- Move to the next tender area and repeat.
What you’ll feel: Initial sharp or aching pressure that softens into a dull release within 20–30 seconds. This is the trigger point (small areas of tightly contracted muscle fiber — often felt as hard “knots”) releasing its contraction.
Why it works: Sustained pressure on a trigger point interrupts the local contraction cycle. The nervous system eventually signals the muscle fiber to release. Physical therapists refer to this as “ischemic compression” — temporarily reducing blood flow to the contracted area, which triggers a relaxation response when pressure is released. Evidence from drgraeme.com supports trigger point therapy as an effective tool for calf pain management.
Common mistake: Pressing and immediately moving. The hold duration is essential — releasing too early means the trigger point doesn’t fully resolve.
Step 4 — Strip the Muscle Lanes
- Make a fist with one hand and place your knuckles at the base of the calf, just above the ankle.
- Apply firm downward pressure into the muscle and slowly glide your knuckles upward toward the back of the knee in a straight line.
- Pause and hold for 2–3 seconds on any area that feels particularly dense or restricted.
- Repeat this stripping motion along three lanes: center of the calf, inner edge, and outer edge.
- Perform 2–3 passes per lane over 2–3 minutes.
What you’ll feel: A deep, linear pressure that may feel intense but should not be sharp or stabbing. You’ll feel the muscle “give” slightly as the knuckle passes over dense tissue.
Why it works: Muscle stripping applies longitudinal pressure along the muscle fiber direction, breaking up adhesions (small areas where muscle fibers have stuck together) and restoring the smooth gliding motion between tissue layers. According to strengthresurgence.com, stripping techniques are particularly effective for runners experiencing chronic calf tightness because they target the deep fiber structure that kneading cannot reach.
Common mistake: Using too much pressure too quickly. Start at 60% of maximum pressure and build. Bruising is a sign you went too hard, too fast.
For additional techniques suited to muscle recovery, see post-workout muscle recovery strategies.
Step 5 — The Opposite Knee Technique (Tool-Free Alternative)
This final step requires zero hand strength — ideal if your hands are fatigued or if you want a passive finishing technique.
- Sit on the floor with both legs extended.
- Bend your right knee and place your left calf directly on top of your right knee, so the bony point of the knee presses into the soft tissue of the left calf.
- Apply gentle downward pressure with the left leg while using your arms to control the intensity.
- Slowly rotate your left ankle in circles — 5 clockwise, 5 counterclockwise — while maintaining the pressure.
- Slide your calf slowly along the knee from ankle to mid-calf to find tighter zones.
- Hold on tender areas for 15–20 seconds, then move.
What you’ll feel: A targeted, bony pressure that reaches deeper than thumbs alone — particularly effective on the soleus. It may feel intense at first; use body weight to control pressure precisely.
Why it works: The knee acts as a natural massage tool — firm, curved, and perfectly shaped to apply sustained pressure into the calf. The ankle rotation simultaneously mobilizes the ankle joint and adds a gentle stretching component to the release. Across runner communities, this technique is consistently reported as one of the most effective tool-free methods for reaching the deeper soleus layer.
Using Massage Tools on Your Calves
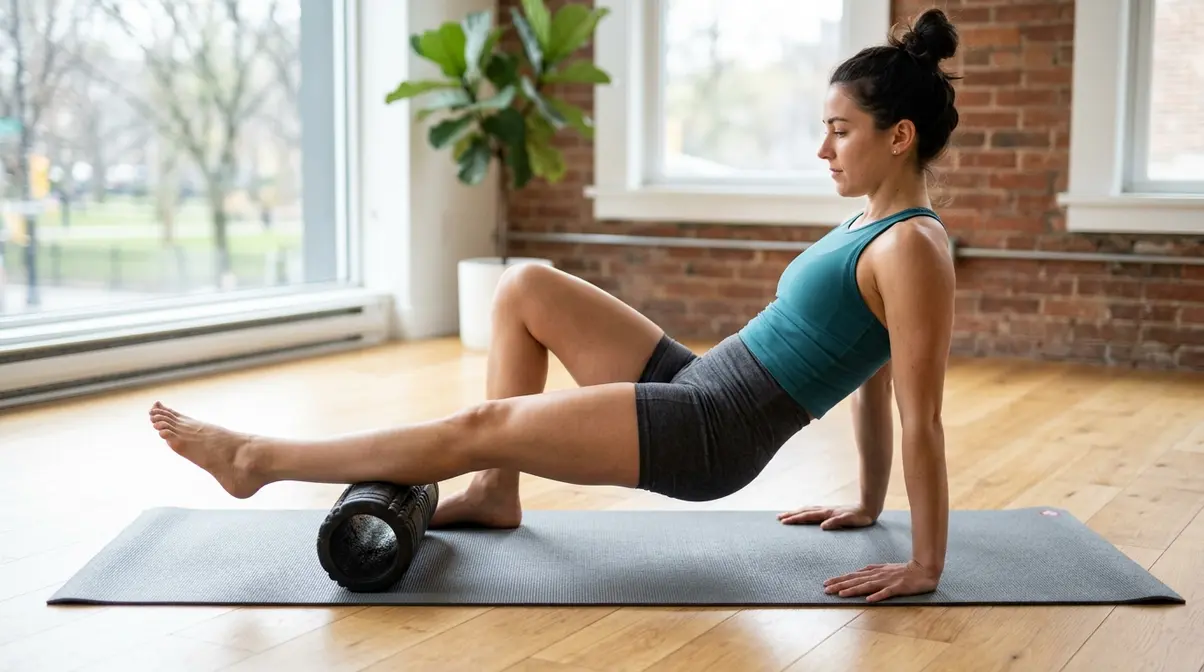
Hand techniques alone are highly effective for the gastrocnemius. But reaching the soleus — and covering the full calf surface efficiently — is where tools become genuinely valuable. Physical therapists frequently recommend adding tools after mastering the hand technique basics, as tools can apply more consistent pressure over larger areas.
Foam Roller Technique for Calves
A foam roller is the most accessible tool for calf self-massage and works exceptionally well for the soleus.
- Sit on the floor and place the foam roller perpendicular to your calf, just above the ankle.
- Lift your hips off the floor using your arms, transferring your body weight onto the roller.
- Slowly roll upward from ankle to just below the knee — never roll over the back of the knee.
- When you find a tender area, stop and hold for 20–30 seconds before continuing.
- For more pressure on the soleus: cross your opposite ankle over the top of the massaged leg.
- Spend 60–90 seconds per calf.
Why it works: The foam roller applies broad, even pressure across the full calf width — something hands cannot replicate efficiently. It is particularly effective for reaching the soleus because the roller’s firm surface can penetrate through the gastrocnemius to the deeper muscle. Research published on PMC supports foam rolling as an effective intervention for reducing muscle stiffness and improving range of motion in lower limb muscles.
Common mistake: Rolling too fast. Slow passes (about 1 inch per second) allow the tissue to respond to pressure. Fast rolling is stimulating but not therapeutic.
For further guidance on using self-massage tools effectively, see self-massage tools and techniques.
Massage Ball (Lacrosse Ball) Technique
Where the foam roller covers broad areas, a lacrosse ball delivers pinpoint precision on specific knots.
- Sit in a chair and place the lacrosse ball on the floor beneath your calf.
- Lower your calf onto the ball and apply gentle pressure.
- Use small, slow circles to search for the tightest, most tender spots.
- When you find one, hold still with sustained pressure for 20–30 seconds.
- After the release, move 1–2 inches and repeat.
- Work through the full calf in sections: lower, mid, and upper calf.
Why it works: The firm rubber of a lacrosse ball creates concentrated pressure on a very small area — ideal for stubborn trigger points that foam rolling can’t fully resolve. The smaller contact surface allows the ball to sink deeper into the muscle tissue, reaching adhesions that broader tools miss. Physical therapists frequently recommend this for runners with sore calves who have specific, persistent knots that general rolling doesn’t clear.
Common mistake: Putting the ball directly on a bony area (Achilles tendon insertion, ankle bones). Keep the ball on soft muscle tissue only.
Massage Gun on Your Calves
A vibration massager (massage gun) uses rapid percussive vibration to relax muscle tissue — a different mechanism from compression techniques.
- Set the massage gun to a low or medium speed for the calf — high speed on a small muscle can cause bruising.
- Hold the head of the device against the calf and let the vibration do the work — do not press hard.
- Move slowly in sections: lower → mid → upper calf, spending 20–30 seconds per zone.
- Avoid the back of the knee (popliteal fossa) entirely.
- Use for 60–90 seconds per calf maximum per session.
Why it works: Percussive vibration stimulates muscle spindles (sensory receptors within the muscle) and promotes rapid relaxation of tense fibers through a neurological pathway distinct from compression. It also increases local circulation quickly, making it an efficient warm-up tool before applying the 4-Layer Method’s hand techniques.
Common mistake: Pressing the gun head firmly into the muscle. The vibration itself is the active mechanism — pressing harder reduces vibration penetration and increases bruising risk.
Why Are Your Calves Always Tight? Root Causes Explained
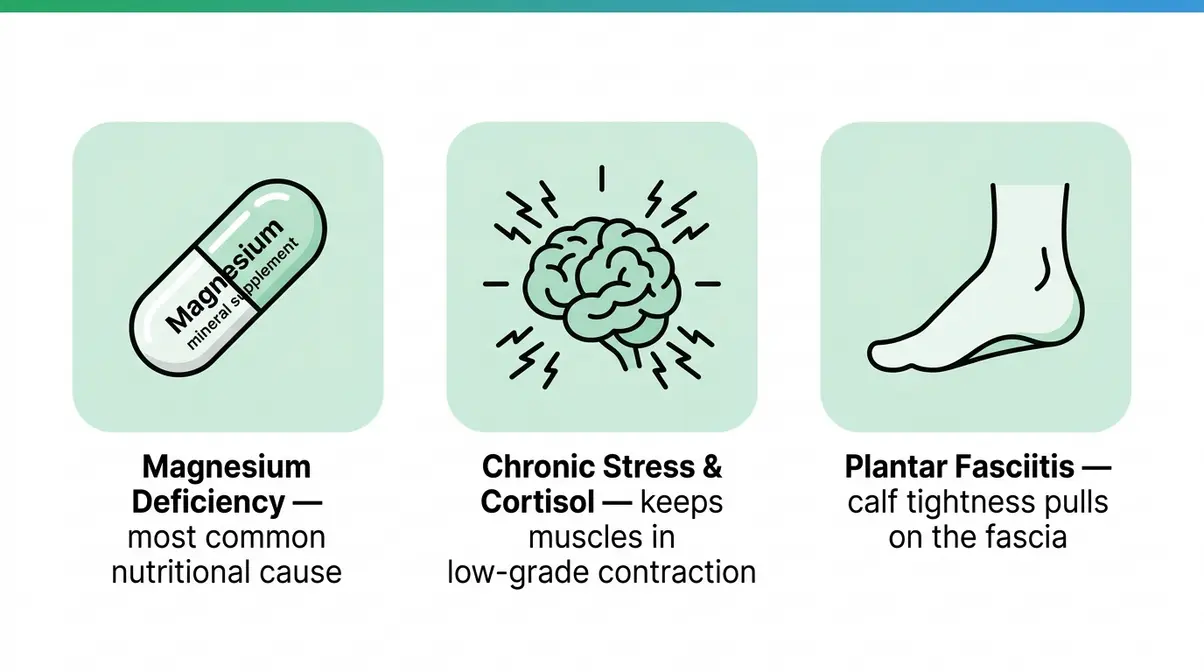
If your calf tightness keeps coming back despite regular massage, the cause may not be in the muscle itself. Physical therapists and sports medicine practitioners increasingly recognize that chronic calf tightness is often a systemic issue — driven by nutritional deficiencies, hormonal stress responses, or biomechanical problems elsewhere in the kinetic chain. Addressing root causes is what separates long-term relief from temporary symptom management.
Nutritional Deficiencies: Magnesium, Potassium, and Calcium
Magnesium deficiency is one of the most commonly overlooked causes of muscle cramps and chronic tightness. Magnesium plays a direct role in muscle relaxation — without adequate levels, muscles cannot fully release after contraction. Studies estimate that up to 48% of Americans consume less magnesium than the recommended daily amount (National Institutes of Health, 2022), making subclinical deficiency surprisingly common.
Potassium works alongside magnesium to regulate muscle contraction and nerve signaling. Low potassium (hypokalemia) can cause muscle weakness, cramping, and persistent tightness — particularly in the lower limbs. Calcium is required for the contraction phase of the muscle cycle; imbalances can disrupt the contraction-relaxation rhythm.
If your calf tightness is accompanied by frequent cramping, nighttime leg cramps, or general muscle fatigue, speak to your doctor about testing electrolyte levels before assuming a purely mechanical cause.
Cortisol, Stress, and Muscle Tension
Chronic psychological stress elevates cortisol, the body’s primary stress hormone. Sustained high cortisol levels trigger a physiological “bracing” response — the nervous system keeps muscles in a state of low-grade contraction readiness. The calves, as postural muscles that bear load throughout the day, are particularly susceptible to this chronic tension pattern.
Research supports the connection between psychological stress and musculoskeletal tension: a review published in PMC noted that stress-related muscle tension is a significant contributor to chronic lower limb tightness that persists despite physical treatment alone. Massage directly counteracts this by stimulating the parasympathetic nervous system — reducing cortisol levels and promoting a genuine relaxation response in muscle tissue. This is why a good calf massage often produces a full-body sense of calm, not just local relief.
The Calf–Plantar Fasciitis Connection
The plantar fascia (the thick band of tissue running along the bottom of your foot) is biomechanically continuous with the calf muscles via the Achilles tendon. When the gastrocnemius and soleus are chronically tight, they place constant tension on the Achilles, which in turn pulls on the plantar fascia — contributing directly to plantar fasciitis (heel pain caused by inflammation of the plantar fascia).
This connection is clinically well-established. Physical therapists treating plantar fasciitis routinely prescribe calf stretching and massage as a primary intervention — not just a supplement — because releasing calf tension directly reduces the load on the plantar fascia. If you have persistent heel pain alongside calf tightness, regular calf self-massage may provide meaningful relief for both conditions simultaneously. See our full guide on calf tightness and plantar fasciitis for a deeper breakdown of this connection.
When NOT to Massage Your Calves: Safety & Red Flags
⚠️ DVT Warning — Repeat Notice: Do NOT massage your calves if you experience sudden swelling, redness, warmth, or unexplained pain. These are symptoms of Deep Vein Thrombosis (DVT). Seek emergency medical care immediately. Massaging a suspected DVT can dislodge the clot and cause a pulmonary embolism.
Self-massage is safe for the vast majority of people with routine calf tightness. However, there are specific situations where massage is contraindicated (medically inadvisable) — and knowing them is as important as knowing the technique itself.
Red Flags: Stop Immediately If You Notice These
A “red flag in massage” is any sign that the tissue you’re treating may have an underlying condition that massage could worsen. Physical therapists use this checklist to screen before any soft tissue treatment:
- 🔴 Sudden, unexplained swelling in one calf — possible DVT; seek emergency care
- 🔴 Redness, warmth, or heat in a localized area — possible DVT or active infection
- 🔴 Sharp, stabbing pain (not the dull “good hurt” of trigger point work) — possible muscle tear or stress fracture
- 🔴 Numbness or tingling that extends into the foot — possible nerve compression; stop and consult a physiotherapist
- 🔴 Open wounds, varicose veins, or skin infections in the area — massage directly over these is contraindicated
- 🔴 Pain that worsens significantly during massage — healthy muscle responds to massage with decreasing discomfort; escalating pain is a warning sign
If any of these are present, stop immediately and seek professional evaluation.
When to See a Professional Instead
Calf self-massage is appropriate for routine tightness, post-exercise soreness, and general maintenance. Seek professional care — from a licensed massage therapist, physiotherapist, or sports medicine physician — in these situations:
- Pain persists beyond 2 weeks despite regular self-massage and stretching
- The tightness is in only one calf with no obvious cause (asymmetric symptoms warrant investigation)
- You have a diagnosed condition such as peripheral artery disease, diabetes with neuropathy, or a blood clotting disorder
- You are recovering from a calf strain or tear — massage timing and depth must be guided by a clinician in the acute phase
- You are pregnant — calf massage during pregnancy requires professional guidance, particularly regarding DVT risk
As myphysiosa.com.au notes, persistent calf pain that doesn’t respond to self-care is a clear signal to escalate to professional assessment rather than increasing massage intensity at home.
Frequently Asked Questions
How can I massage my own calves?
You can effectively massage your own calves using just your hands in a seated position. Sit in a chair, bend your knee, and use both thumbs or the heel of your palm to apply upward pressure from ankle to knee. The most effective approach is the 4-Layer Method: warm the tissue first with gliding strokes, then knead with petrissage, release specific knots with sustained thumb pressure, and finish with knuckle stripping along the muscle lanes. Each session should take 5–10 minutes per calf for meaningful results.
Can calf massage help plantar fasciitis?
Calf massage can meaningfully reduce plantar fasciitis symptoms because the calf and plantar fascia are biomechanically connected through the Achilles tendon. Chronic tightness in the gastrocnemius and soleus places continuous tension on the Achilles, which pulls on the plantar fascia and contributes to heel pain. Physical therapists routinely prescribe calf massage and stretching as a primary plantar fasciitis intervention. Regular calf self-massage — particularly targeting the soleus with a foam roller — can reduce this tension load and provide measurable heel pain relief alongside calf relief.
What deficiency causes tight calves?
Magnesium deficiency is the most common nutritional cause of tight calves and muscle cramps. Magnesium is essential for the muscle relaxation phase — without adequate levels, muscles struggle to fully release after contraction. Potassium deficiency can cause similar symptoms, including cramping and persistent tightness, by disrupting nerve-to-muscle signaling. Up to 48% of Americans fall below the recommended daily magnesium intake (NIH, 2022). If your calf tightness is accompanied by frequent cramping or nighttime leg cramps, ask your doctor to test your electrolyte levels before assuming a purely mechanical cause.
What is a red flag in massage?
A red flag in massage is any sign that massage may be unsafe or could worsen an underlying condition. The most serious red flag is suspected Deep Vein Thrombosis (DVT): sudden swelling, redness, warmth, and pain in one calf — seek emergency care immediately if these appear. Other red flags include sharp stabbing pain (not the dull ache of muscle work), numbness or tingling extending into the foot, open wounds or skin infections in the area, and pain that worsens during massage rather than easing. If any of these are present, stop immediately and consult a healthcare professional.
Conclusion
For anyone dealing with tight, sore calves — whether after running, a long day on your feet, or chronic tension with no clear cause — the 4-Layer Method provides a structured, clinically logical approach to self-massage that goes beyond generic advice. By warming the tissue first, then kneading, releasing trigger points, and stripping the muscle lanes, you address both the gastrocnemius and the deeper soleus in a single session. Research supports massage as an effective intervention for muscle stiffness and recovery (PMC8320327), and the directional rule — always upward, ankle to knee — ensures you’re working with your body’s circulation, not against it.
The 4-Layer Method works because it respects the tissue’s needs: you cannot release a deep knot in cold, unprepared muscle. Each layer earns the next. That progression is what separates a genuinely therapeutic self-massage from one that barely scratches the surface — and it’s what your calves have been waiting for.
Start with a 5-minute warm-up walk or warm shower, find a comfortable seated position, and work through the four layers using your hands alone. Once you’ve located your tightest spots, add a foam roller or lacrosse ball for the soleus. Most people notice meaningful relief within a single session. If tightness persists beyond two weeks despite consistent effort, consult a licensed physiotherapist — some causes require professional assessment to resolve.
Related posts:
Benefits of Yoga for Fitness: The Science-Backed Guide
Home Workouts to Build Muscle Without Weights (2026)
CrossFit Strength Training for Beginners: 2026 Guide
Home Workout Plan for Beginners: 30-Day Step-by-Step
Strength Training for Beginners: Complete Workout Plan 2026
Strength Training for Seniors at Home: 15 Safe Exercises
Callum
Hi, I'm Callum, the founder of Body Muscle Matters. I'm not a certified trainer, I'm a self taught lifter who started this site to share what I've learned from my own training and a lot of trial and error. Everything here comes from real experience and honest research, written the way I'd explain it to a friend who is just getting started. My goal is simple: practical, no hype fitness advice you can actually use.