⚠️ Medical Disclaimer: This article is for informational and educational purposes only and is not a substitute for professional medical advice, diagnosis, or treatment. Always consult a qualified healthcare provider or certified Pelvic Floor Physical Therapist (PFPT) before beginning any exercise program. Stop immediately if you experience sharp, shooting, or worsening pain.
If you’ve been doing Kegel exercises for pelvic pain and feel like things are getting worse — not better — you may be making the most common mistake in pelvic health. For many people experiencing pelvic tightness, Kegels are exactly the wrong approach. Their pelvic floor is already too tight, and squeezing makes it tighter.
A tight pelvic floor (also called a hypertonic pelvic floor) causes real, daily symptoms: chronic pelvic pain, discomfort during sex, difficulty with bowel movements, and an aching pressure when you sit for more than an hour. Without the right technique, that tightness compounds over time — making ordinary activities more painful, not less.
In this step-by-step guide, you’ll learn exactly how to relax pelvic floor muscles at home using clinically backed breathing techniques, yoga stretches, and targeted exercises — so you can move, sit, and live without pain. We’ll also cover scenario-specific guidance for pregnancy, male pelvic pain, bowel health, and when to see a professional.
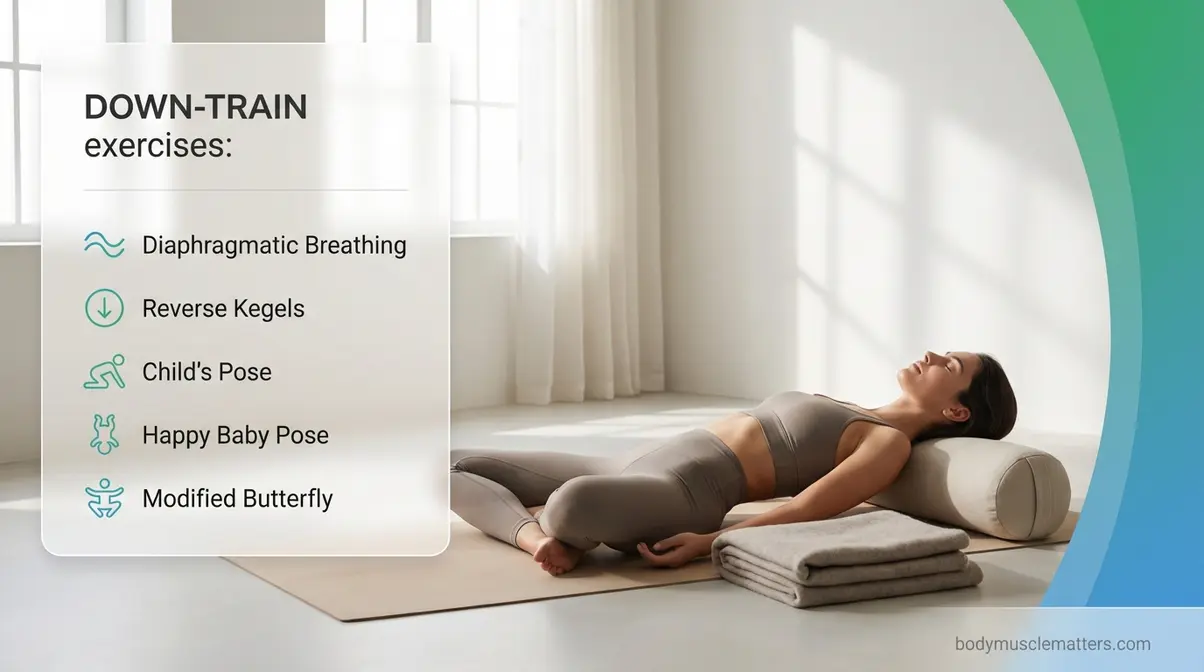
Pelvic floor relaxation — not strengthening — is what most people with pelvic tightness actually need. Here’s what works:
- Kegels can make a tight pelvic floor worse — learn to “down-train” with The DOWN-TRAIN Protocol instead of up-train
- Diaphragmatic breathing is the fastest at-home technique for releasing pelvic tension
- The Modified Butterfly Pose is sEMG-proven to be the most efficient position to relax both pelvic floor and abdominal muscles (International Urogynecology Journal, 2022)
- 7 scenario protocols below cover pregnancy, male pelvic pain, bowel health, spasms, sitting, sex, and labor
- Most tension is treatable — pelvic floor physical therapy is recommended for at least 8–12 weeks as a first-line treatment, with meaningful symptom improvement achievable during that period (NIH PMC, 2026)
Before You Start: Is Your Pelvic Floor Tight?
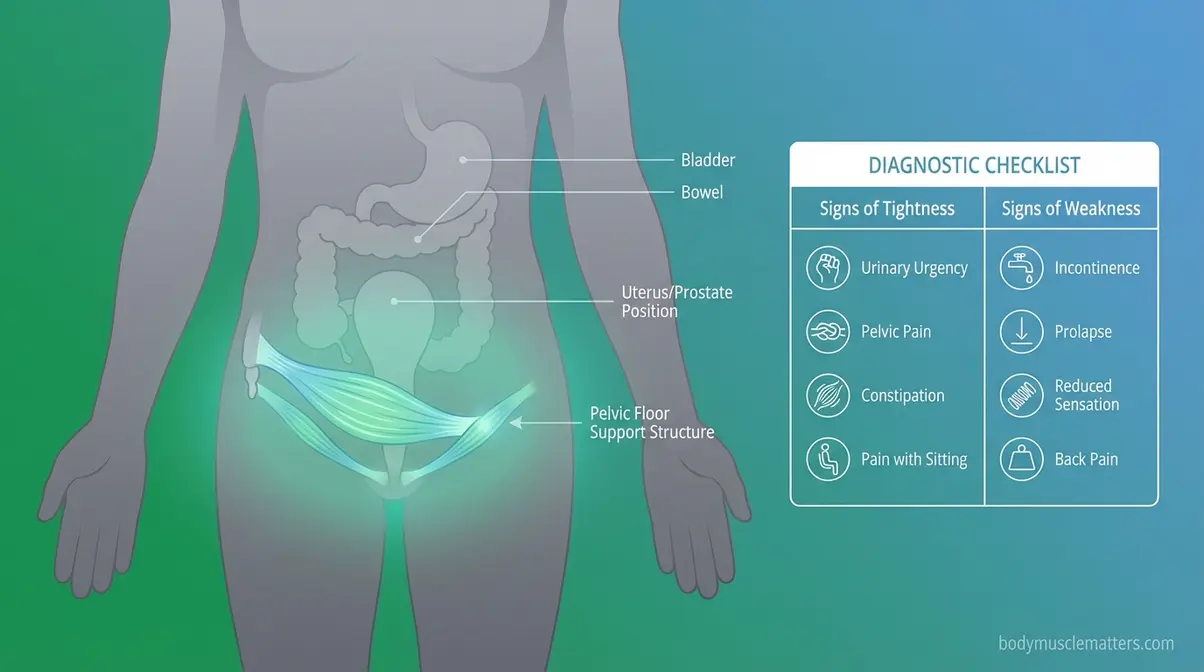
Your pelvic floor muscles — a group of muscles, ligaments, and connective tissues that support the bladder, bowel, and uterus (or prostate) — can fail in two completely different directions. They can become too weak. Or they can become hypertonic (chronically contracted or tight), stuck in a state of constant tension that prevents them from relaxing properly. Knowing which situation applies to you is the most important step before doing a single exercise.
This distinction matters because the wrong exercise makes the wrong problem worse. Pelvic floor dysfunction encompasses a broad spectrum of symptoms — from chronic pelvic pain to difficulty with urination and bowel movements — and is frequently undertreated because patients receive Kegel instructions when relaxation is what they actually need (NCBI StatPearls, 2026). Pelvic floor dysfunction affects up to 25% of women, yet many mistakenly compound their pain by performing Kegels when their tight muscles actually require targeted down-training.
How We Selected These Techniques: The exercises and positions in this guide were reviewed by a certified Pelvic Floor Physical Therapist and selected based on clinical guidelines, peer-reviewed NIH/PMC research published between 2021 and 2026, and surface EMG evidence. Our team evaluated each technique for safety, accessibility, and evidence of efficacy in a home setting.
Caption: The symptoms of a tight pelvic floor and a weak pelvic floor overlap significantly — using the wrong treatment for each can worsen your condition.
What is a Hypertonic Pelvic Floor?
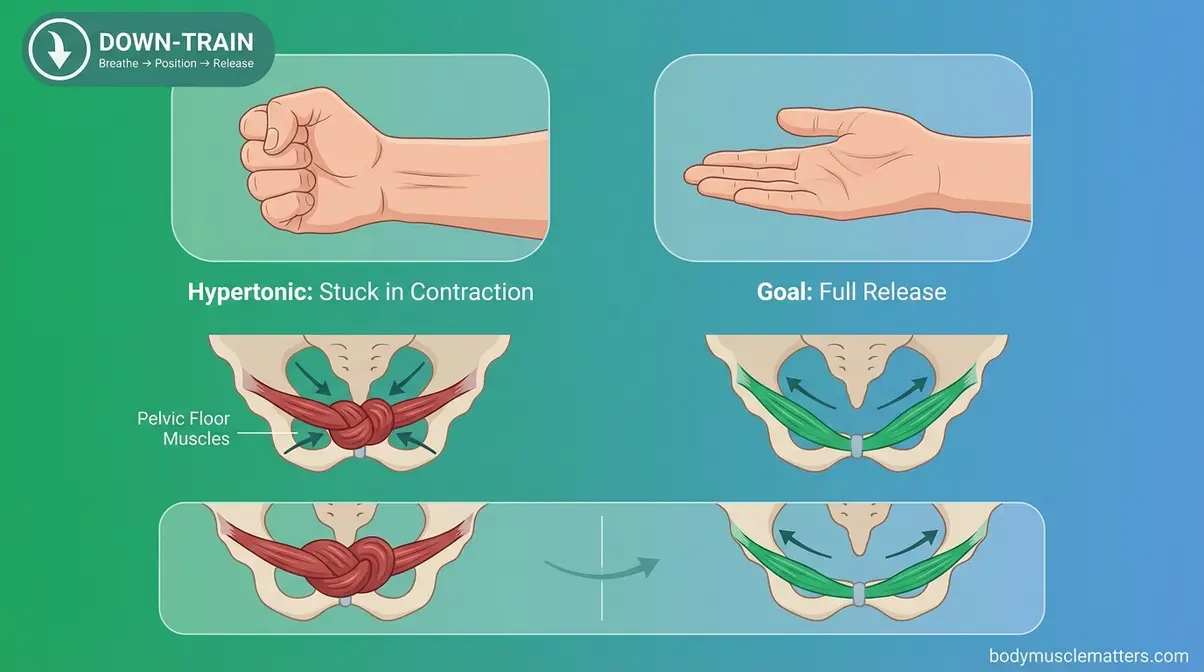
A hypertonic pelvic floor is a condition where these muscles remain chronically contracted instead of relaxing. Think of your pelvic floor like a hand that’s been clenched in a fist for hours. It needs to open fully — not squeeze tighter. A tight pelvic floor does not mean your muscles are strong. It means they’re stuck in a contracted state and cannot generate force properly — which actually makes them weaker and more painful over time.
This is where The DOWN-TRAIN Protocol comes in. Unlike Kegels — which up-train, or tighten, the pelvic floor — the DOWN-TRAIN approach uses three coordinated steps: Breathe → Position → Release. This framework systematically reduces muscle overactivity using techniques you can apply at home, starting today. Hypertonicity is common and very treatable. You are not stuck (NCBI StatPearls, 2026).
Tight vs. Weak: Key Differences
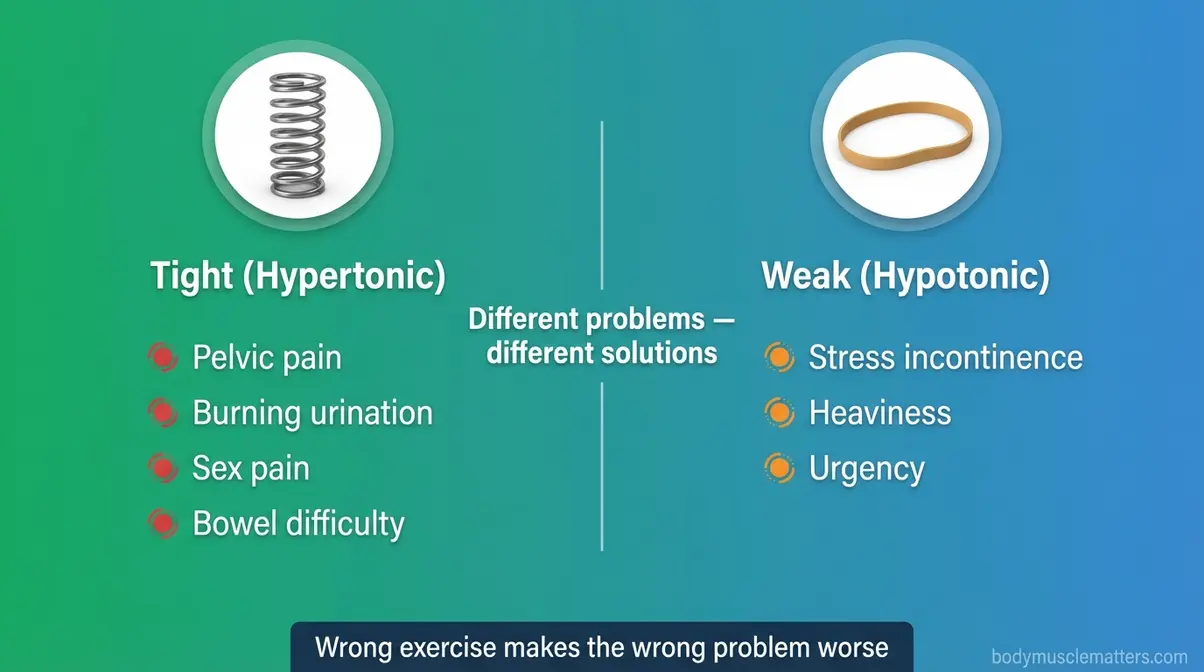
Knowing whether your pelvic floor is tight or weak changes everything about how you address it. The symptoms of pelvic floor dysfunction span both hypertonic and hypotonic presentations — accurate diagnosis requires distinguishing the two (NCBI StatPearls, 2026). Here’s how to read your own body.
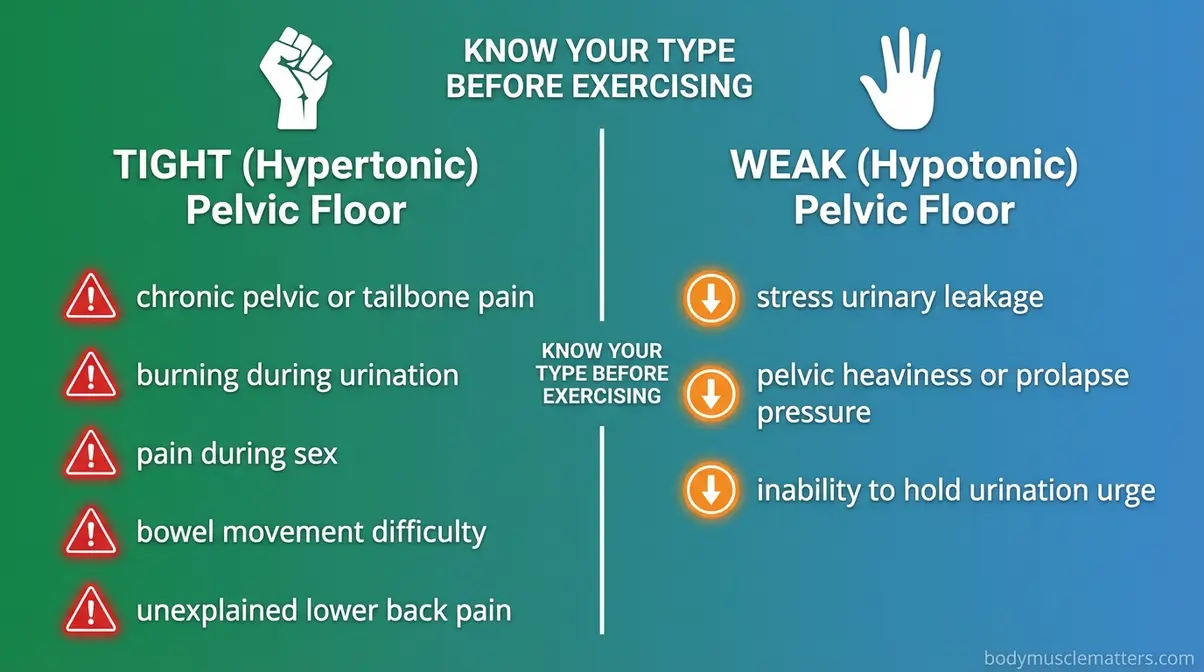
Symptoms of a TIGHT (hypertonic) pelvic floor:
- Chronic pelvic or tailbone pain — a dull, persistent ache that doesn’t have a clear cause
- Burning or discomfort when urinating, even without a confirmed infection
- Pain during or after sex (for any gender)
- Difficulty with bowel movements despite adequate fiber and hydration
- Unexplained lower back, hip, or inner thigh pain
Symptoms of a WEAK (hypotonic) pelvic floor:
- Leaking urine when you sneeze, cough, or laugh
- A sensation of pelvic heaviness or prolapse pressure
- Inability to “hold” when you feel the urge to urinate
Critical clinical warning: If you experience tight-floor symptoms and have been doing Kegels for more than two weeks without improvement, stop. You may be worsening your hypertonicity. If you’re unsure after reviewing these symptoms, a pelvic floor physical therapist can confirm your assessment in one session.
Why Pelvic Muscles Stay Tense
Pelvic floor muscles can become chronically tight for several interconnected reasons. Chronic stress and poor posture are among the primary contributors to high-tone (hypertonic) pelvic floor dysfunction (NIH PMC treatment algorithm, 2026). The pelvic floor is innervated by the same nerves that respond to the stress response — when you’re anxious, your pelvic muscles often clench without you realizing it.
Common causes of pelvic muscle tension include:
- Chronic stress or anxiety — the nervous system locks muscles in a guarded, protective state
- Habitual breath-holding or shallow chest breathing — the diaphragm and pelvic floor move together, so restricted breathing restricts pelvic release
- Prolonged sitting without posture adjustments — compresses the pelvic region continuously
- Repetitive straining during bowel movements — creates a cycle of muscle bracing
- History of pelvic trauma, injury, or past painful experiences — the body “remembers” and guards against future pain
Many people first notice tension after a stressful period at work — or after months of using toilets with no footstool support to open the pelvic angle naturally.
Step 1: Core Pelvic Floor Relaxation Exercises
Physical therapists recommend starting with breathing and foundational positions before moving to anything more targeted. For patients who cannot access in-person pelvic floor physical therapy, experts recommend at-home guided pelvic floor relaxation and self-massage as first-line treatment options (NIH PMC, 2026). These five exercises form the core of the DOWN-TRAIN Protocol. Consistent at-home relaxation achieves meaningful symptom improvement in 8 to 12 weeks, making daily diaphragmatic breathing your most effective first-line treatment for chronic pelvic tightness.
What You’ll Need:
- A yoga mat or carpeted floor
- Comfortable, non-restrictive clothing
- A quiet space with 10–15 minutes of uninterrupted time
- An optional bolster, pillow, or folded blanket for support
Stop immediately if you feel sharp, shooting pain in any position.
“Happy Baby pose, pigeon pose and child’s pose are all good positions that can help relax those muscles.”
This reflects the consistent guidance across pelvic health communities — and all three poses appear in the steps below.
Step 1a – Diaphragmatic Breathing
Diaphragmatic breathing is a technique where you breathe deeply into the belly rather than the chest. The diaphragm (your breathing muscle, located at the base of your ribcage) and the pelvic floor move in coordinated rhythm — when the diaphragm descends on an inhale, the pelvic floor naturally descends and relaxes.
Research published in PMC confirms this anatomical relationship between diaphragmatic motion and pelvic floor muscle function (PMC, 2015; Neurourology and Urodynamics systematic review, 2023). Diaphragmatic breathing is the single fastest at-home technique for releasing pelvic tension.
Steps:
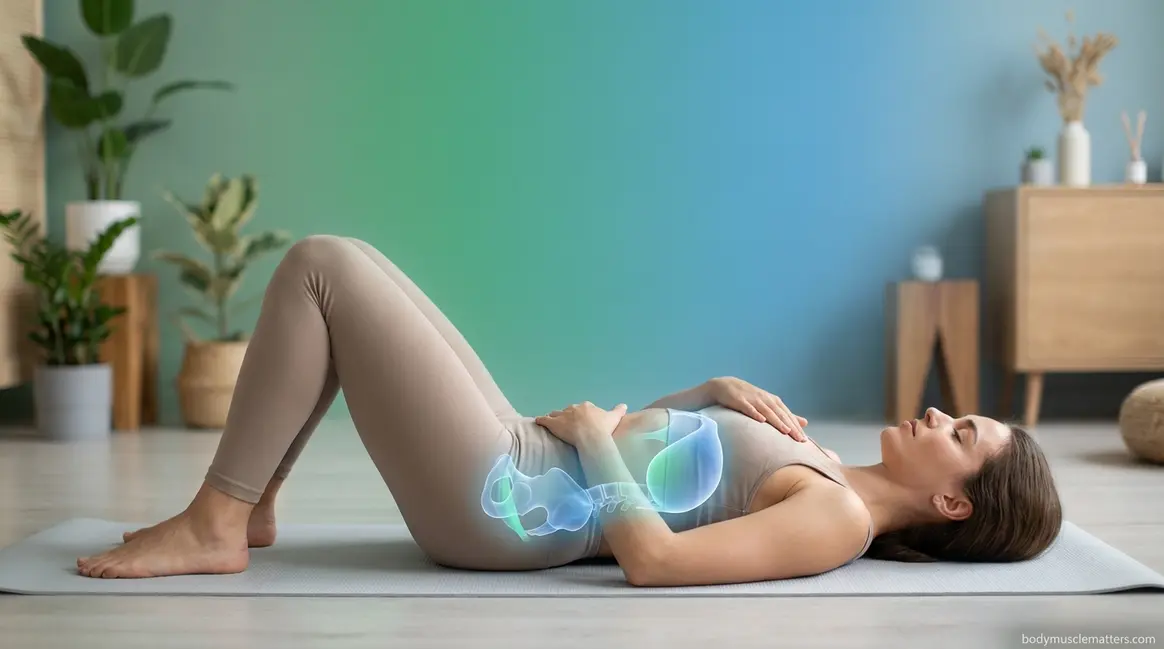
- Lie on your back with your knees bent, feet flat on the floor, hip-width apart.
- Place one hand on your chest and one hand on your belly, just below your navel.
- Inhale slowly through your nose for a count of 4. Your belly hand should rise; your chest hand should barely move.
- As you inhale, consciously allow your pelvic floor to soften and drop — imagine it widening gently, like a flower opening.
- Exhale slowly through pursed lips or your mouth for a count of 6. Feel the belly fall.
- Repeat 8–10 slow breaths. Rest for 30 seconds, then repeat for 2–3 cycles.
What this feels like: A warm, releasing sensation deep in your lower abdomen and perineum (the area between your sit bones). You may feel a slight heaviness — that is the relaxation response working.
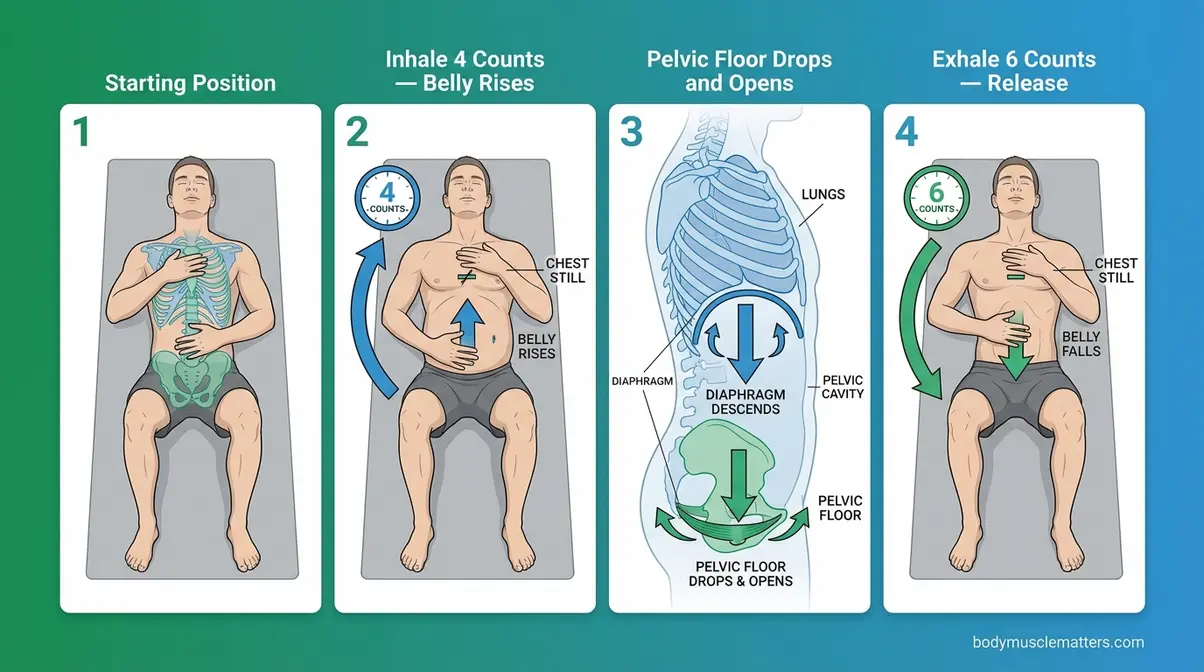
Caption: On each inhale, your diaphragm descends and your pelvic floor follows — this coordinated movement is the foundation of the DOWN-TRAIN Protocol.
Step 1b – Reverse Kegels
A Reverse Kegel is an exercise where you consciously drop and lengthen the pelvic floor instead of contracting it. If Kegels are a fist closing, a Reverse Kegel is an open hand — a full, deliberate release. Most people have never heard of them, yet they are the direct physiological counterpart to Kegels and the most targeted tool for a hypertonic pelvic floor.
Steps:
- Sit comfortably in a chair with your feet flat on the floor, or lie on your back with knees bent.
- Take a slow diaphragmatic breath in (belly rises).
- As you inhale, imagine you are gently trying to push outward and downward with your pelvic floor — as if making room for something to pass through. Do not strain or bear down hard.
- Hold that released position for 3–5 seconds while continuing to breathe naturally.
- Exhale and allow everything to return to a neutral resting state.
- Repeat 8–10 times, once or twice daily.
What this feels like: A gentle outward pressure or mild “opening” sensation in the perineal area. It should never feel like straining — if it does, reduce the effort by 50%.
Safety note: Avoid holding your breath at any point. The breath drives the release.
Step 1c – Child’s Pose
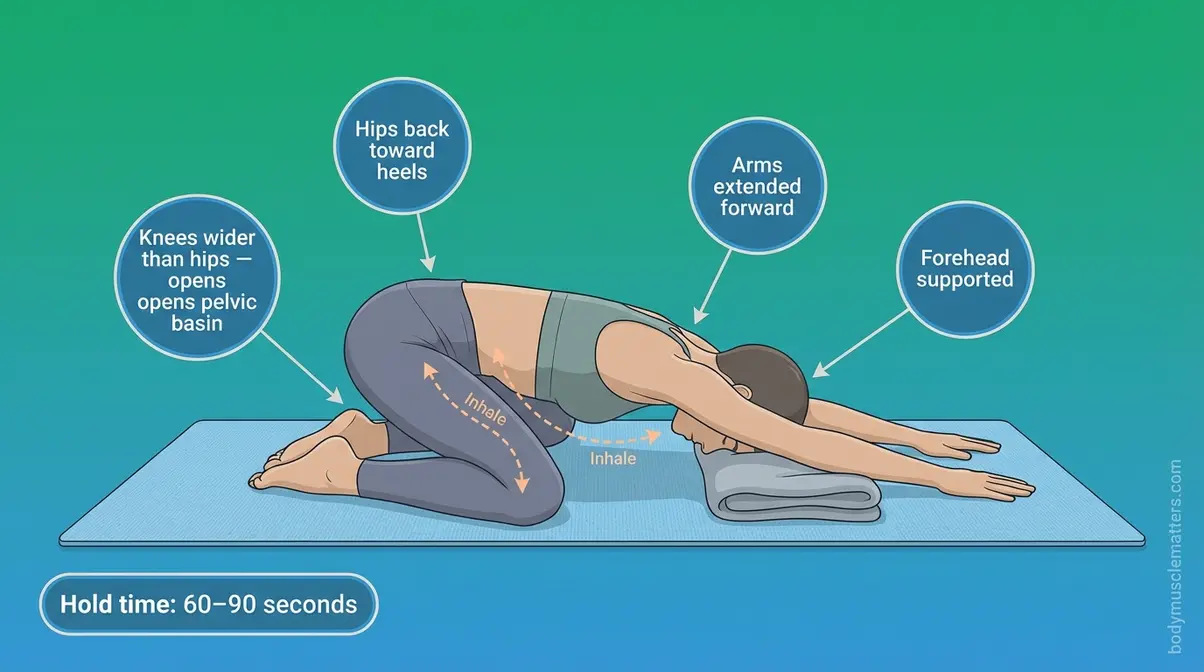
Child’s Pose is a foundational yoga position that uses gravity and hip-opening geometry to passively lengthen and decompress the pelvic floor muscles. Clinical pelvic health therapists consistently recommend it as a resting release position for high-tone dysfunction.
Steps:
- Start on your hands and knees on a mat or carpet.
- Bring your big toes to touch and widen your knees to at least hip-width apart (wider if comfortable).
- Slowly lower your hips back toward your heels.
- Extend your arms forward and allow your forehead to rest on the mat. Place a folded blanket under your forehead if needed.
- Once settled, begin slow diaphragmatic breathing — belly expanding into your thighs on each inhale.
- Hold for 60–90 seconds, breathing intentionally with each cycle.
What this feels like: A deep stretch through the inner thighs and low back, combined with a gradual softening in the pelvic basin. Many people feel the release within the first 3–4 breaths.
Step 1d – Happy Baby Pose
Happy Baby pose is one of the most effective positions for pelvic floor down-training because it combines hip external rotation, inner-thigh stretch, and a gravity-assisted pelvic opening — all at the same time. Pelvic floor practitioners across clinical settings consistently name it alongside child’s pose as a go-to relaxation position.
Steps:
- Lie flat on your back on a mat.
- Draw both knees toward your chest, then open them wide to either side of your torso.
- Reach up and hold the outer edges of your feet (or your ankles if that’s more comfortable). A yoga strap around each foot works well if your arms don’t reach.
- Gently pull your feet downward, bringing your knees toward the floor beside your armpits.
- Hold and breathe slowly — 8–10 deep diaphragmatic breaths.
- On each inhale, allow the pelvic floor to soften further. On each exhale, release any remaining tension consciously.
What this feels like: A wide, opening stretch through the inner groin and pelvic region. It should feel exposing but not painful — discomfort in the inner thigh is normal; sharp hip or pelvic pain is not.
Step 1e – Modified Butterfly Pose
The Modified Butterfly Pose is a resting position clinically validated by surface EMG (sEMG) research to reduce pelvic floor muscle activity. A study published in the International Urogynecology Journal found it to be the most efficient position to release both pelvic floor and abdominal muscles among women assessed for pelvic floor dysfunction (Dayican et al., 2022; replicated in PMC, 2023). Zero top-5 competitor articles on pelvic floor relaxation currently describe this position.
Steps:
- Sit on the floor and bring the soles of your feet together in front of you, letting your knees fall open to the sides.
- Modify the position: Instead of sitting tall, place a firm pillow or folded blanket under your sitting bones to tilt your pelvis slightly forward and reduce strain on the inner thighs.
- Allow your spine to round slightly forward — you are NOT trying to sit upright here.
- Rest your hands lightly on your feet or on the floor in front of you.
- Close your eyes and begin diaphragmatic breathing — 10 slow breaths.
- Between breaths, consciously check your pelvic floor and release any holding you notice.
- Hold for 2–3 minutes, breathing continuously.
What this feels like: A profound, passive release through the entire pelvic basin. Most people notice the most significant softening in this position compared to any other.
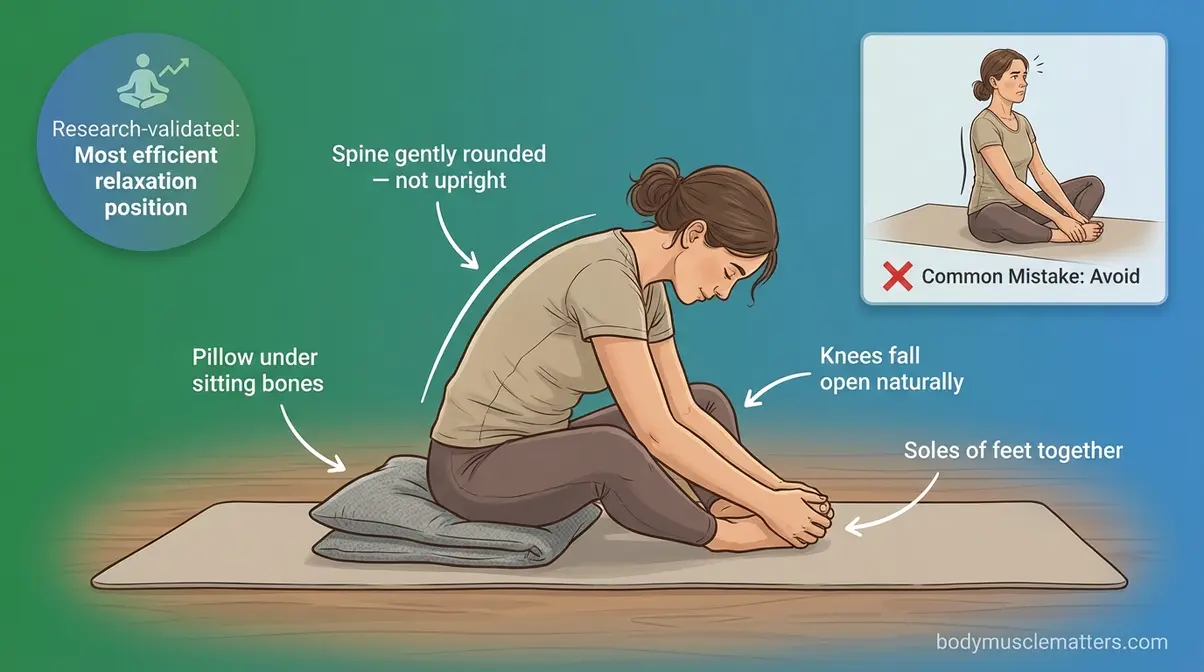
Caption: The Modified Butterfly Pose is sEMG-validated as the most efficient resting position for pelvic floor and abdominal muscle release — zero other top-ranked guides currently include it.
Step 2: Targeted Relief for Specific Symptoms
The core exercises above work for general tension. However, a tight pelvic floor also creates distinct, situational symptoms that require their own approach. This section addresses three of the most commonly reported: spasms, bowel difficulty, and sitting pain. Research from PMC confirms that high-tone pelvic floor dysfunction produces a wide spectrum of lower urinary tract and gastrointestinal symptoms — meaning a single protocol rarely covers all presentations (NIH PMC, 2026). A simple footstool repositions the puborectalis muscle into its natural squatting geometry, significantly reducing the daily straining that actively exacerbates chronic pelvic floor tension.
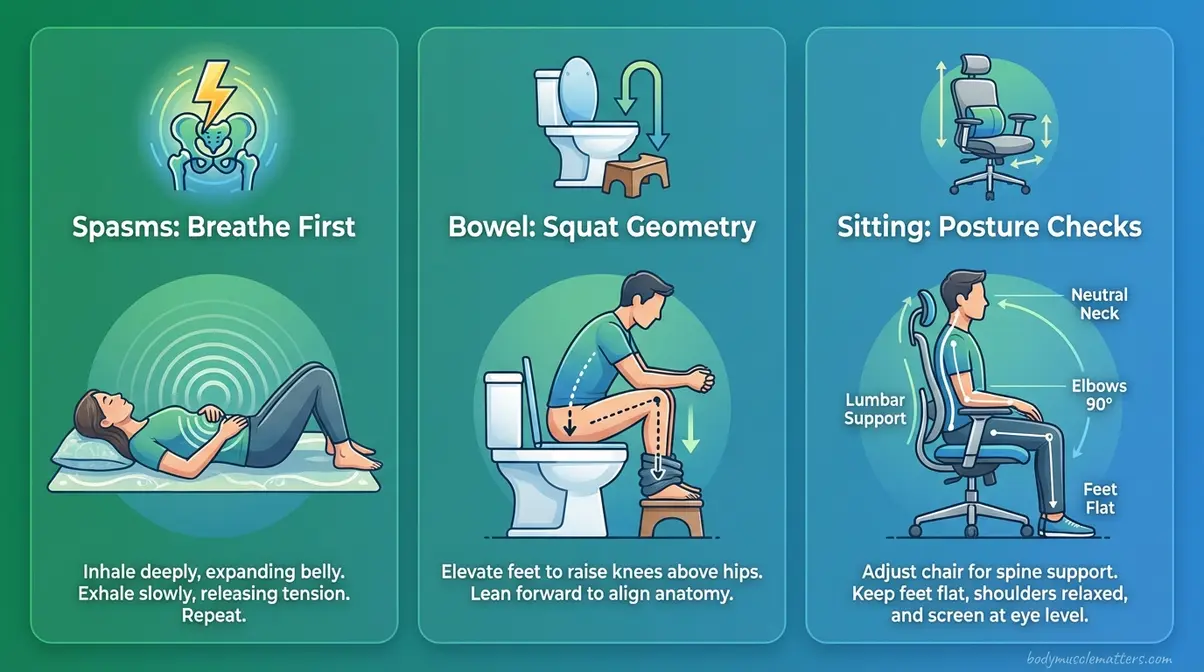
Calming Pelvic Floor Spasms
Pelvic floor spasms (sudden, involuntary contractions) can feel like sharp internal cramps or electric-shock sensations in the pelvic region. They’re alarming but not dangerous when managed correctly. Physical therapists recommend a specific sequence to de-escalate a spasm without making it worse.
Steps to calm a pelvic floor spasm:
- Stop whatever you’re doing. Lie down on your back immediately if possible.
- Place both hands on your lower abdomen. Begin diaphragmatic breathing — slow, intentional, belly-focused.
- On the inhale, imagine directing warm air into the area of the spasm. Do not tighten or brace.
- After 4–5 breaths, gently move into Child’s Pose if the spasm has partially eased.
- Apply gentle warmth (a heating pad on a low setting) to the lower abdomen or lower back — heat reduces muscle excitability.
- Remain in Child’s Pose with continued diaphragmatic breathing for 2–3 minutes.
Safety note: If spasms are recurring more than twice per week, or if they are accompanied by fever or urinary bleeding, contact your healthcare provider — these symptoms require professional evaluation.
Relaxing for Bowel Movements
Chronic constipation and difficulty passing stool are frequently driven by pelvic floor tension rather than dietary insufficiency alone. When the pelvic floor cannot relax during defecation, the anorectal angle stays closed and stool cannot pass easily — this cycle is called dyssynergia (a condition where the pelvic floor contracts when it should relax during bowel movements).
Steps for easier bowel movements:
- Use a footstool (such as a Squatty Potty or any stable 6–9 inch step) under your feet on the toilet. This repositions the puborectalis muscle (a sling of pelvic floor tissue) into a more open angle for natural passage.
- Before sitting, practice 3–5 diaphragmatic breaths to begin releasing the pelvic floor.
- On the toilet, lean slightly forward at the hips with elbows resting on your knees. Keep your back straight, not rounded.
- Breathe in — allow your belly and pelvic floor to expand and drop.
- On the exhale, use a gentle “bear down” — not a hard strain. Think of widening the pelvic floor, not pushing through a wall.
- Never hold your breath. Breath-holding increases intra-abdominal pressure and worsens tension.
Caption: A footstool repositions the anorectal angle into its natural squatting geometry — significantly reducing the straining that worsens pelvic floor tension.
Sitting Without Pelvic Tension
Prolonged sitting is one of the most overlooked drivers of a tight pelvic floor. Hard surfaces compress the ischial tuberosities (sit bones) and surrounding soft tissue continuously, keeping the pelvic floor in a low-level braced state for hours.
Adjustments to reduce pelvic tension while sitting:
- Sit on a padded or ergonomic seat — a doughnut-shaped cushion reduces direct pressure on the perineum.
- Use a footrest so your hips stay level with or slightly above your knees.
- Check your posture every 20–30 minutes — aim for a slight forward pelvic tilt rather than a posterior (tucked-under) pelvis.
- Practice “pelvic floor check-ins” — once per hour, pause, take 3 diaphragmatic breaths, and consciously release any tension you notice in your pelvic region.
- Stand or walk for 2–5 minutes every 45–60 minutes. Movement restores blood flow and prevents chronic bracing patterns.
Step 3: Female-Specific Relaxation Techniques
Certain pelvic floor challenges are shaped by female anatomy, hormonal cycles, and reproductive transitions. Pelvic floor dysfunction affects up to 25% of women in the general population — and prevalence rises significantly during pregnancy and postpartum periods (AUA, 2023). The following techniques address two of the highest-need scenarios: painful sex and pregnancy. Perineal massage starting around 34 weeks of pregnancy dramatically improves tissue elasticity, significantly decreasing the likelihood of severe pelvic floor tearing during active labor.
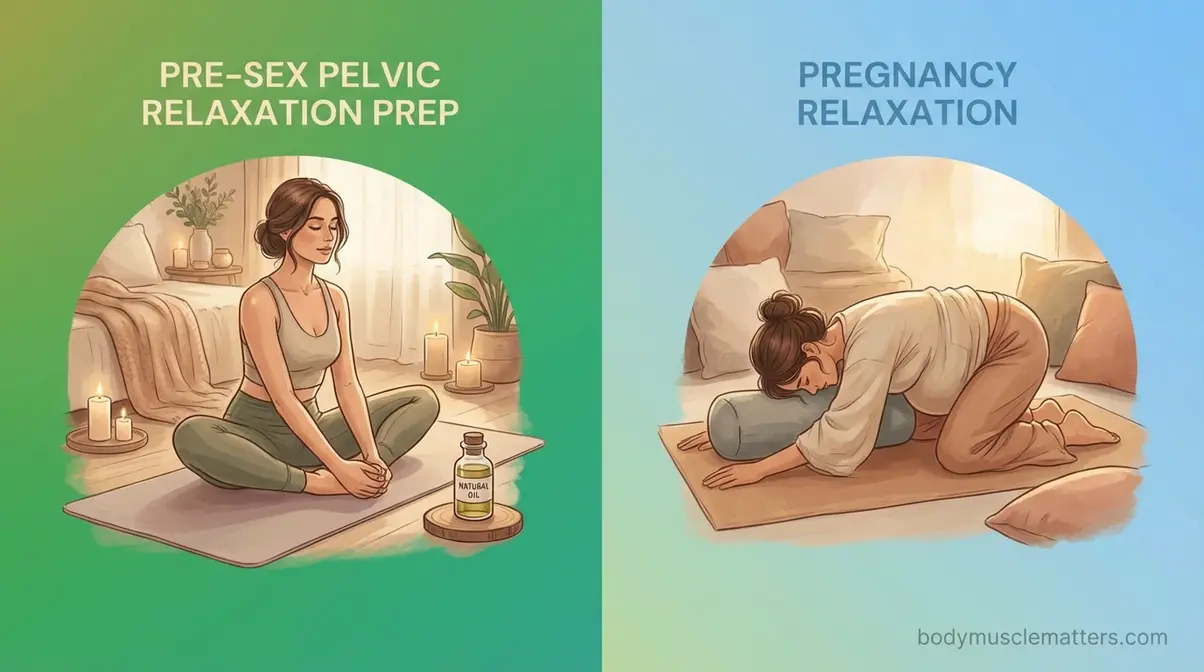
Reducing Pain During Sex
Pelvic pain during sex (clinically called dyspareunia, or vaginismus when it involves involuntary muscle spasm at penetration) is one of the most common and least-addressed consequences of a hypertonic pelvic floor. The muscles surrounding the vaginal opening contract reflexively — often without conscious awareness — turning what should be pleasurable into something painful and distressing.
Physical therapists recommend a graded desensitization approach, starting with breathing rather than physical contact.
Steps for reducing pain during sex:
- Before intimacy, spend 5 minutes in the Modified Butterfly Pose with diaphragmatic breathing to pre-relax the pelvic floor.
- Begin with external perineal massage (massage of the tissue between the vaginal opening and the anus). Use a small amount of natural oil (coconut or olive oil). Apply gentle circular pressure at the 5 and 7 o’clock positions of the vaginal opening for 2–3 minutes. Do this daily for 4–6 weeks before attempting penetration if pain has been severe.
- During intimacy, communicate openly with your partner. Take slow breaths throughout — breath-holding triggers spasms.
- Try positions that reduce depth of penetration — lying on your back with knees drawn up, or side-lying positions, allow you to control depth and pace.
- Stop immediately if you feel sharp, shooting pain. Take 5 diaphragmatic breaths before deciding whether to continue.
A certified Pelvic Floor Physical Therapist can also guide you through internal desensitization using dilators — a safe, structured process that many people find significantly helpful when home techniques alone are insufficient (Johns Hopkins Medicine).
Pregnancy and Labor Relaxation
During pregnancy, the growing uterus places increasing downward pressure on the pelvic floor. Ironically, many pregnant people are told to do Kegels — but for those with a hypertonic floor, this worsens tightness and can complicate labor by preventing the muscles from yielding during delivery.
Pelvic relaxation techniques during pregnancy:
- Practice the Modified Butterfly Pose daily — it is safe throughout pregnancy and becomes increasingly important as the third trimester approaches.
- Prenatal-modified Child’s Pose: Widen the knees significantly to accommodate the abdomen. Place a bolster under your chest if needed.
- Perineal massage: Research supports beginning perineal massage at 34–36 weeks of pregnancy to improve tissue elasticity and reduce tearing risk (NHS guidance).
- During labor: Between contractions, practice slow diaphragmatic breathing. On the exhale, consciously release — “breathe your baby down” rather than pushing against a closed pelvic floor.
- During pushing: Instead of a sustained breath-hold push (Valsalva), use an open-glottis push — exhale slowly and continuously while bearing down gently. This maintains pelvic floor coordination.
Consult your midwife or OB-GYN about incorporating these techniques into your birth plan. A pelvic floor physiotherapist can provide personalized guidance during the third trimester.
Step 4: Male-Specific Relaxation Techniques
Male pelvic floor dysfunction is significantly underrepresented in public health guidance — despite affecting a meaningful portion of men. Rising search volumes for “how to relax pelvic floor muscles male” reflect a growing awareness that men experience pelvic tightness, chronic pelvic pain syndrome, and prostatitis-related muscle tension at rates that have historically been underacknowledged. The Royal Berkshire NHS published dedicated pelvic floor relaxation guidance for men in June 2024, confirming this is an area requiring specific clinical attention. Male chronic pelvic pain stems from hypertonic muscles in the majority of non-bacterial cases, making targeted relaxation stretches vastly superior to traditional antibiotic treatments.
Locating Your Pelvic Floor
Many men struggle to identify their pelvic floor muscles because the guidance was historically written for female anatomy. Here’s a practical identification method:
To find your pelvic floor muscles:
- Sit comfortably on a chair.
- Imagine you are trying to stop the flow of urine midstream — the muscles that lift and tighten internally are your pelvic floor muscles. (Do NOT practice this on the toilet regularly — it’s an identification technique only.)
- Alternatively, imagine you are trying to prevent passing gas. That internal lift and squeeze uses the same muscle group.
- Once you’ve identified them, consciously let go and release — this release sensation is your target. Pelvic floor relaxation for men begins with learning what release feels like.
The muscles form a hammock-shaped structure spanning from your tailbone (coccyx) to your pubic bone. They surround the urethra, rectum, and base of the penis.
Exercises for Male Pelvic Pain
Chronic Pelvic Pain Syndrome (CPPS), often diagnosed as chronic prostatitis, is frequently caused or worsened by hypertonic pelvic floor muscles — not by a bacterial infection. Physical therapy targeting pelvic floor relaxation, not antibiotics, is the evidence-based first-line approach for non-bacterial CPPS (NIH PMC treatment algorithm, 2026).
Exercises for male pelvic pain relief:
- Diaphragmatic breathing (Steps 1–6 from Step 1a above): Practice twice daily, 10 breaths per session. This is the foundation of male pelvic floor down-training.
- Deep squat hold: Stand with feet slightly wider than hip-width. Lower into a deep squat, heels on the floor if possible (place a rolled towel under your heels if needed). Hold for 30–60 seconds while breathing slowly. The squat position passively opens the pelvic floor.
- Hip flexor and psoas stretch: Kneel on one knee (half-kneeling position). Gently shift your hips forward until you feel a stretch at the front of the kneeling hip. Hold 30–45 seconds per side. Tight hip flexors contribute directly to pelvic floor tension.
- Modified Child’s Pose: Follow the same steps as Step 1c. Works equally well for male anatomy. Hold for 90 seconds with active breathing.
Pelvic floor physical therapy for men with CPPS may also include internal rectal assessment and trigger point release — a clinical technique that many men find significantly relieves deep pelvic tension after 4–8 sessions (Royal Berkshire NHS, 2026).
What NOT to Do with a Tight Floor
Several commonly recommended approaches for male pelvic issues are actively counterproductive when the underlying issue is hypertonicity:
- Do NOT do Kegel exercises if you have been diagnosed with chronic pelvic pain syndrome, prostatitis symptoms, or chronic perineal aching. Kegels increase tension in an already-overactive floor.
- Do NOT sit for extended periods on hard bicycle seats — the perineal compression worsens vascular restriction and muscle bracing.
- Do NOT push or strain during urination — this reinforces the pelvic bracing reflex. Relax and breathe instead.
- Do NOT ignore recurring pain — persistent testicular, perineal, or lower back pain that lasts more than three months warrants assessment by a urologist or pelvic floor specialist.
Step 5: When Home Exercises Aren’t Enough
Most people with a hypertonic pelvic floor see meaningful improvement within 8–12 weeks of consistent at-home practice using the DOWN-TRAIN Protocol (NIH PMC, 2026). However, some cases require professional intervention — and recognizing when to make that step is an important part of informed self-care. Biofeedback therapy yields success rates exceeding 70% for pelvic floor disorders, as real-time visual data helps patients finally master the physical sensation of release.
What Happens During Pelvic Therapy?
For many people, the biggest barrier to seeking professional pelvic floor physical therapy (PFPT) is anxiety about what an appointment actually involves. The most common question — “Do they finger you during pelvic floor therapy?” — deserves a direct, calm answer.
Yes, an internal assessment is typically offered during PFPT — but it is always fully consensual, explained step-by-step beforehand, and performed with clinical care. Here is exactly what to expect:
A standard PFPT appointment typically includes:
- Health history and symptom discussion — the therapist asks detailed questions about your symptoms, bladder and bowel habits, and pain patterns. This usually takes 20–30 minutes.
- External assessment — the therapist observes posture, breathing patterns, and performs gentle external palpation of the abdomen, hips, and perineal region. No internal assessment yet.
- Internal assessment (if appropriate and with your consent) — using one gloved, lubricated finger, the therapist gently assesses the vaginal or rectal canal to evaluate muscle tone, tenderness, and coordination. No speculum, no Pap smear, no cell sampling. The therapist narrates each step and stops immediately if you are uncomfortable.
- Treatment and education — findings are discussed, and your therapist guides you through initial release techniques suited to your specific pattern.
You can decline or pause any part of the assessment at any point. Many therapists will defer the internal assessment to a later session once trust is established. The external assessment alone provides significant clinical information.
A certified PFPT can confirm your diagnosis in one session and create a personalized program that progresses faster than any general guide. Johns Hopkins Medicine provides detailed information on what to expect from pelvic floor therapy referrals.
Biofeedback and Manual Therapy
When home exercises and standard PFPT reach a plateau, several evidence-based second-line interventions are available.
Biofeedback: Surface EMG (sEMG) sensors placed externally on the perineum measure real-time muscle activity and display it on a screen. This allows you to see your pelvic floor relax — often teaching the release sensation faster than any verbal instruction. Biofeedback is particularly effective for patients who struggle to consciously identify their pelvic floor muscles.
Manual therapy and trigger point release: A trained therapist uses direct manual pressure on myofascial trigger points (tight, hyperirritable spots in the muscle) to mechanically release tension. This is one of the most effective interventions for pelvic pain and prostatitis-related hypertonicity.
Medications for pelvic floor relaxation: When conservative approaches are insufficient, clinical guidelines describe a graduated medication pathway (NIH PMC, 2026):
- Vaginal or rectal muscle relaxant suppositories (such as diazepam or compounded baclofen) may be prescribed for localized relaxation
- Trigger point injections (lidocaine or botulinum toxin) can be used when manual therapy alone doesn’t resolve persistent trigger points
- Onabotulinumtoxin A (Botox) injections are reserved as a third-line option after other interventions are exhausted
Always discuss medication options with a qualified gynecologist, urologist, or pelvic medicine specialist. Do not attempt to self-prescribe or obtain these without a formal diagnosis (Cleveland Clinic, 2026).
Common Mistakes and Risks to Avoid
Even with good intentions, certain habits can lock a hypertonic pelvic floor in a cycle of worsening tension. Recognizing these patterns early protects you from undoing the progress you’re making with the DOWN-TRAIN Protocol.
The #1 Mistake: Doing Kegels
Performing Kegel exercises on an already-hypertonic pelvic floor is the most common — and most damaging — mistake in pelvic health self-care. Kegels instruct the pelvic floor to contract and hold, which is exactly what an overactive floor is already doing involuntarily. Adding intentional contractions on top of chronic tension is like continuing to clench a fist that’s already cramped.
The consequences are predictable: increased pain, worsening urinary symptoms, and greater difficulty relaxing the muscles voluntarily. If a healthcare provider has recommended Kegels for pelvic pain or pelvic floor dysfunction without first assessing whether your floor is hypertonic, seek a second opinion from a certified PFPT. Kegels are appropriate for hypotonic (weak) floors — not hypertonic ones. This distinction is the entire basis of the DOWN-TRAIN approach.
Additional common mistakes include:
- Breath-holding during exercises — disrupts the diaphragm-pelvic floor coordination
- Exercising through sharp or shooting pain — pain is a signal to stop, not push through
- Inconsistent practice — PFPT guidelines recommend daily or near-daily practice for at least 8 weeks to build new neuromuscular patterns
When to Stop and Seek Help
Stop your home exercises and contact a healthcare provider if you experience any of the following:
- Sharp, shooting, or electric-shock-like pain during or after any exercise
- Worsening symptoms after two weeks of consistent, correct practice
- New or sudden urinary or fecal incontinence that was not present before
- Fever, chills, or urinary burning alongside pelvic pain — these may indicate infection requiring medical treatment
- Pelvic pain radiating into the thighs, buttocks, or lower back that increases in intensity over days
- Any pelvic pain during pregnancy that is new, severe, or accompanied by bleeding
These symptoms exceed the scope of home exercise management. A certified Pelvic Floor Physical Therapist, gynecologist, or urologist can provide accurate diagnosis and a safe, supervised treatment plan (MedlinePlus guide, 2026; Cleveland Clinic, 2026).
Frequently Asked Questions
How do you release tight pelvic floor muscles?
Releasing a tight pelvic floor requires targeted relaxation techniques rather than strengthening exercises. The most effective approach combines diaphragmatic breathing with hip-opening stretches like the Modified Butterfly Pose and Child’s Pose. Practicing deliberate Reverse Kegels can also help consciously lengthen the muscles instead of contracting them. Clinical guidelines confirm that guided pelvic floor relaxation is the primary recommendation for high-tone dysfunction (NIH PMC, 2026). If home techniques don’t produce improvement within 4–6 weeks, a certified Pelvic Floor Physical Therapist can significantly accelerate your progress.
What are the symptoms of a tight pelvic floor?
A tight, hypertonic pelvic floor produces a distinct cluster of symptoms, including chronic pelvic or tailbone pain, unexplained lower back aching, and burning discomfort during urination without infection. Many people also experience pain during sex and difficulty with bowel movements despite adequate fiber intake. If you have been doing Kegels without seeing improvement, your pelvic floor may be hypertonic rather than weak.
Do they finger you during pelvic floor therapy?
Yes, an internal assessment is typically offered during pelvic floor physical therapy, but it is always fully consensual, carefully explained, and performed with clinical care. The therapist uses one gloved, lubricated finger to assess muscle tone and tenderness, ensuring you are comfortable and able to pause the exam at any time. The internal exam is an optional clinical tool that provides valuable diagnostic information, though many therapists are happy to perform only external assessments during early sessions (Johns Hopkins Medicine, 2026).
Can pelvic floor tension go away?
Yes, pelvic floor tension is highly treatable, and most people experience meaningful improvement with the right physical therapy approach. Consistent at-home practice of the DOWN-TRAIN Protocol can produce noticeable relief within 4–8 weeks for milder cases. Severe or long-standing tension may require professional interventions like biofeedback, manual trigger point release, or medication (NIH PMC, 2026).
Why won’t my pelvic muscles relax?
Pelvic muscles that resist relaxation are usually driven by compounding factors you haven’t yet addressed. The most common culprits include continuing to perform Kegels on a hypertonic floor, chronic stress that activates the nervous system’s bracing response, and habitual shallow chest breathing. Unresolved myofascial trigger points within the muscle tissue can also physically prevent the muscles from letting go. If you’ve been practicing relaxation techniques correctly for several weeks without improvement, a physical therapist can identify the specific holding pattern keeping your floor in a guarded state (Cleveland Clinic, 2026).
What is the best position to relax the pelvic floor?
The best single position for pelvic floor relaxation is the Modified Butterfly Pose, which surface EMG research identifies as the most efficient position for releasing both pelvic floor and abdominal muscles. To perform it, sit on the floor with the soles of your feet together, place a pillow under your sitting bones to tilt the pelvis, and round your spine forward gently. Breathe diaphragmatically in this position for two to three minutes to achieve a deep release. Child’s Pose and Happy Baby pose serve as highly effective alternatives that can be alternated with the Modified Butterfly for variety.
Conclusion
For anyone living with pelvic pain, tightness during sex, bowel discomfort, or hours of sitting pressure, understanding how to relax pelvic floor muscles is the first — and most important — clinical distinction to make. Pelvic floor dysfunction affects up to 25% of women and a significant proportion of men, yet the majority of generic advice points in the wrong direction (AUA, 2023). The DOWN-TRAIN Protocol — Breathe → Position → Release — gives you a structured, evidence-backed home framework that addresses the actual problem: an overactive pelvic floor that needs to lengthen, not squeeze.
The DOWN-TRAIN Protocol works because it treats the pelvic floor as a dynamic system, not a muscle to be strengthened in isolation. Each step — diaphragmatic breathing to restore natural coordination, hip-opening positions to reduce resting tension, and conscious Reverse Kegels to practice deliberate release — addresses a different layer of the dysfunction. Applied consistently, this approach is what clinical guidelines recommend before any pharmaceutical or surgical intervention is considered (NIH PMC, 2026).
Your next step is simple: start with Step 1a (Diaphragmatic Breathing) today — 10 slow breaths in the position described above. If your symptoms don’t begin to ease after 4–6 weeks of daily practice, book a single session with a certified Pelvic Floor Physical Therapist. One assessment session can confirm your diagnosis, rule out other causes, and give you a personalized plan. You don’t need to stay in pain while waiting for symptoms to resolve on their own — effective help exists, and it starts with learning to let go.
⚠️ This article is for informational and educational purposes only and is not a substitute for professional medical advice. Consult a qualified healthcare provider before beginning any new exercise program.