Cable Machine Exercises for Muscle Building Made Simple
You’ve seen the cable machine at your gym. Maybe you’ve walked past it a dozen times, unsure which pulley to grab or how to set the weight — while everyone else seems to know exactly what they’re doing.
That hesitation is costing you real muscle gains. Cable machines are one of the most effective tools for building muscle in the gym, and most beginners never learn to use them properly because online guides skip the basics entirely. They hand you a list of exercises with no pulley heights, no weight guidance, and no explanation of why cables actually work.
In this guide, you’ll learn exactly how to perform the best cable machine exercises for muscle building — muscle group by muscle group — with step-by-step instructions, exact pulley settings, and a beginner workout routine you can use today. We cover everything from the science behind why cables work, to chest, back, arm, and glute exercises, plus a 3-day full-body starter plan.
⚠️ DISCLAIMER: The exercises and routines in this guide are for informational purposes only and do not constitute medical or professional fitness advice. Consult a certified personal trainer (CPT) or your physician before beginning any new exercise program, especially if you have a pre-existing injury, medical condition, or are new to resistance training.


Cable machine exercises for muscle building work because cables keep your muscles under load through the full arc of motion — a principle called The Full-Arc Advantage — making them uniquely effective for hypertrophy (muscle growth).
- Constant tension: Cables never “unload” the muscle, unlike dumbbells that lose tension at the top or bottom of a lift.
- Every muscle group: One cable machine covers chest, back, shoulders, arms, and glutes — no other equipment needed.
- Beginner-friendly: Adjustable weight stacks let you start light and progress safely using the ACSM-recommended 8–12 rep range.
- The Full-Arc Advantage: Cables load the muscle in the stretched (lengthened) position, where research suggests the growth stimulus is greatest.
Why Cable Machines Build Muscle Better Than You Think
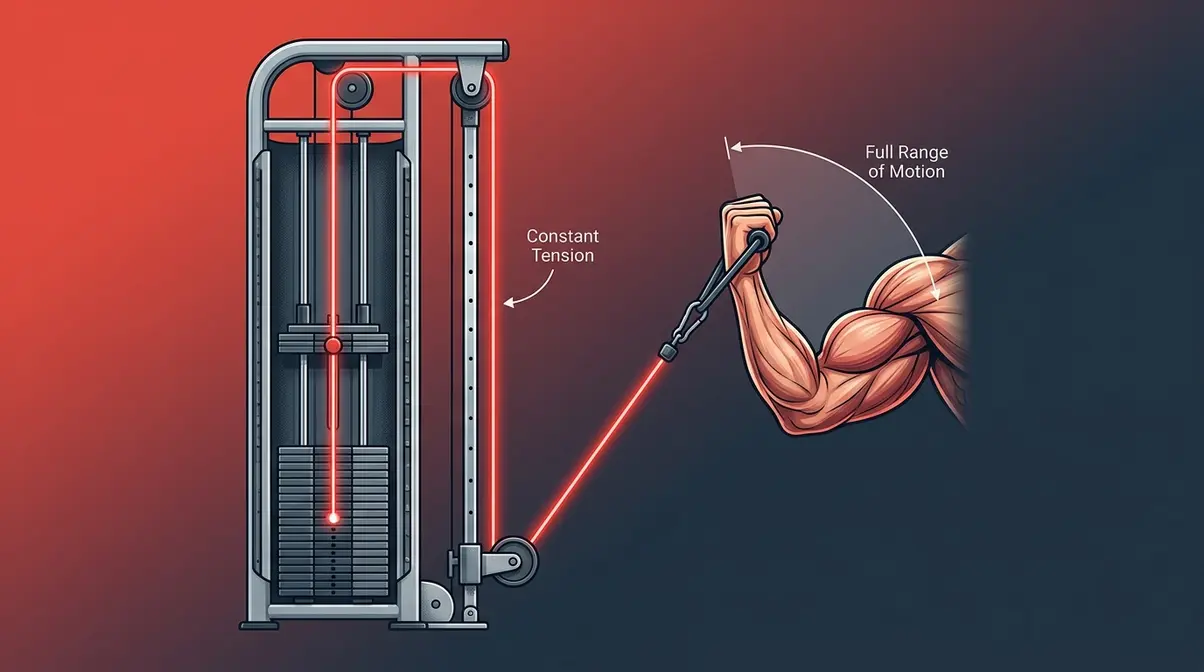
Cable machines build muscle through a mechanism free weights simply cannot replicate: constant mechanical tension across the full range of motion. Mechanical tension is identified as the primary mechanism for muscle hypertrophy — the stimulus that cable machines provide consistently throughout the entire arc of every rep (Schoenfeld, 2010). In practical terms, that means every single inch of your movement is doing productive work, not just the middle portion where free weights feel heaviest.
What Is Constant Tension (and Why It Matters for Growth)?
Constant mechanical tension is the cable machine’s defining feature: the weight stack applies a consistent pulling force on your muscle throughout the entire movement, from the starting stretch all the way to the peak contraction (squeeze).
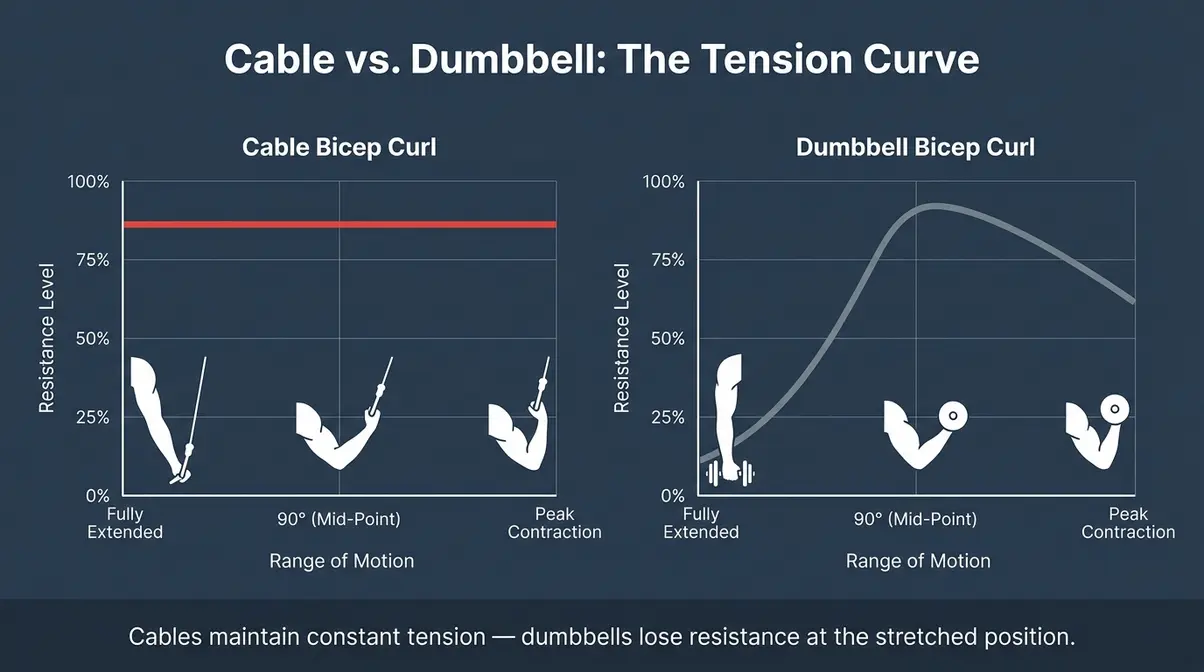
Think of stretching a rubber band — the resistance is there from the moment you pull to the moment you release. That’s how a cable machine works. A dumbbell, by contrast, loses resistance at the top of a bicep curl because gravity pulls it straight down, not against your muscle. At the very top of a dumbbell curl, you’re holding the weight up with bone and tendon, not muscle. The cable never gives you that free ride.
Why does this matter for muscle growth? Muscles grow when placed under sufficient mechanical tension (load). More time under tension — especially in the lengthened (stretched) position — means more growth stimulus delivered per rep. Research from Schoenfeld (2010) identifies mechanical tension as the primary mechanism for muscle hypertrophy, the biological process by which muscle fibers respond to load by getting larger and stronger.
This brings us to The Full-Arc Advantage: cables uniquely load the muscle in the lengthened position — that stretched point at the bottom or start of a rep. Emerging exercise science strongly suggests this stretched position may produce the highest growth stimulus of any point in the movement. When you do a cable bicep curl, your bicep is under tension even when your arm is fully extended at the bottom. A dumbbell curl gives you almost zero useful resistance at that exact same point.
The infographic above illustrates exactly how cable tension compares to dumbbell tension throughout a bicep curl. The difference is dramatic — and it compounds across every set you do.
Transition: Now that you understand why cables work, let’s look at how they compare directly to free weights — because the two are often treated as competitors, when they’re really complementary tools.
Cable Machine vs. Free Weights: Which Builds More Muscle?
The direct answer: both build muscle effectively. Research shows that free weight and machine-based training produce similar increases in muscle mass and strength when training volume and intensity are equated (Schwanbeck et al., 2020). So you don’t need to choose one and abandon the other — but cables do have a clear, specific advantage for isolation exercises and hypertrophy-focused training.
Cables are superior for isolation movements — chest flyes, lateral raises, bicep curls — because you can adjust the angle of resistance to match the exact direction your muscle pulls. Free weights are superior for heavy compound movements — squats, deadlifts, barbell bench press — where loading the spine and hips with maximum weight is the goal.
Understanding the difference between strength training and hypertrophy helps clarify when to reach for the cable versus the barbell. For building a wider back or rounder glutes, cables often outperform free weights because they maintain tension at the exact angle where those muscles work hardest.
| Factor | Cable Machine | Free Weights |
|---|---|---|
| Tension type | Constant throughout full range | Drops at top/bottom of lift |
| Muscle isolation | Superior — adjustable angle | Good — limited angle options |
| Beginner safety | High — controlled, guided movement | Moderate — requires balance/coordination |
| Compound movements | Limited | Superior (squat, deadlift, bench) |
| Cost/accessibility | Gym required | Home-friendly |
| Best for | Isolation, hypertrophy, mind-muscle | Strength, compound lifts, power |
“Mechanical tension is identified as the primary driver of muscle hypertrophy, and cable machines provide this stimulus consistently throughout the entire range of motion.” (National Institutes of Health / Schoenfeld, 2010)
Transition: With the science established, let’s get into the concept that makes cables truly unique — and gives this guide its name.
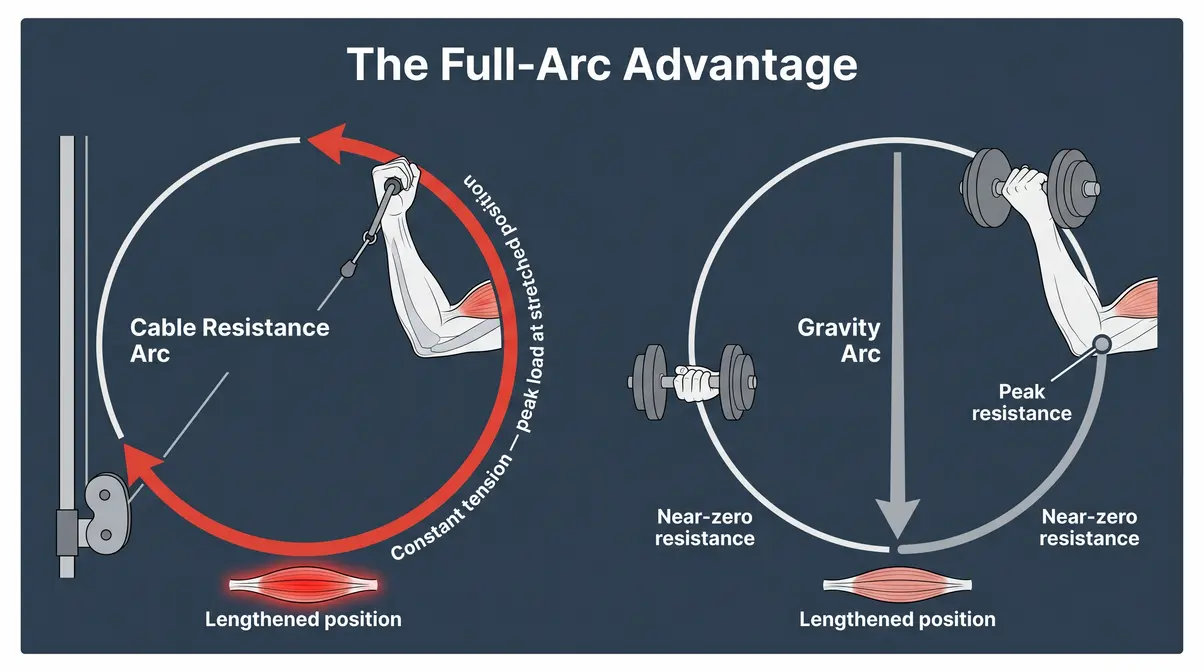
The Full-Arc Advantage: Why the Stretched Position Matters
The Full-Arc Advantage is the cable machine’s ability to apply resistance across the complete arc of a movement — including the lengthened position at the bottom of a rep, where your muscle is stretched the most.
Here’s why that matters: a growing body of exercise science research suggests that training muscles in their lengthened (stretched) position may stimulate more hypertrophy than training them only in the shortened (contracted) position. A 2023 study published in the Journal of Strength and Conditioning Research found that training the bicep in a lengthened position produced significantly greater muscle growth than training in a shortened position over an 8-week period. Cable machines make lengthened-position loading effortless — it’s built into every rep by design.
No other common gym tool does this as consistently. Dumbbells are gravity-dependent, meaning resistance is always directed straight down. Bands increase resistance as they stretch, loading the shortened position more. Cables are the only tool that lets you dial in both angle and constant load simultaneously.
“If you want to build a thick, wide V-taper, you need to keep your back muscles under brutal, constant tension.” That’s the philosophy The Full-Arc Advantage is built on — and it applies to every muscle group in this guide.
Getting Started: Your Beginner’s Cable Machine Setup Guide
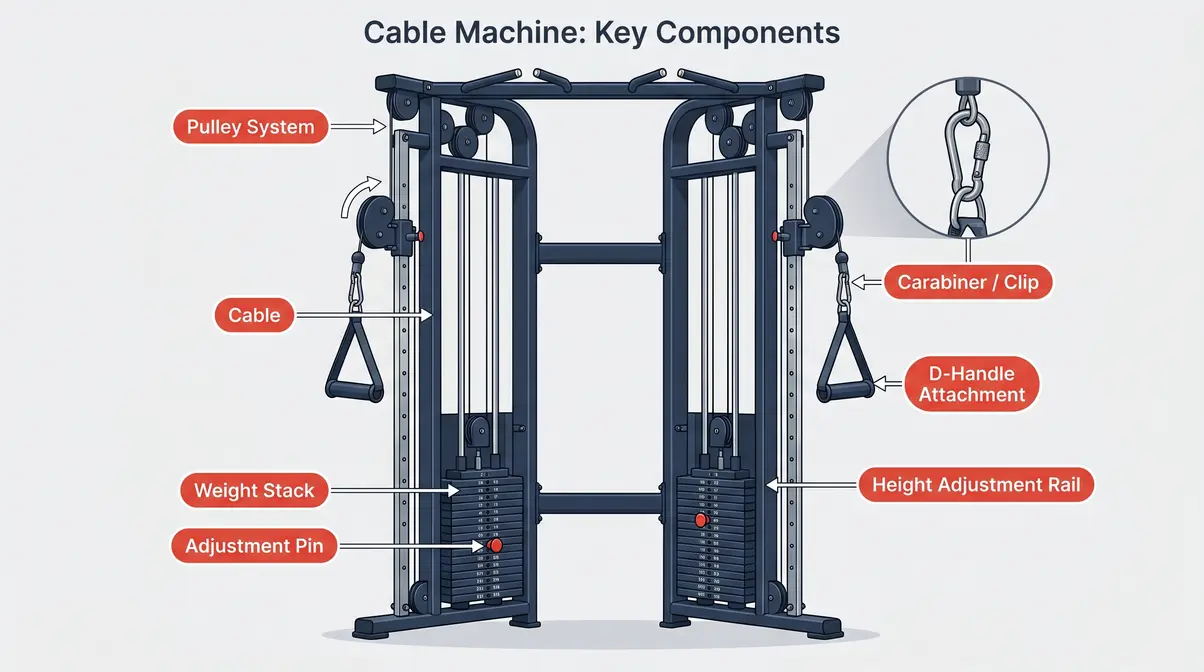
Before your first rep, you need to understand the machine itself. A cable machine is a resistance training apparatus that uses a weight stack connected to a pulley and cable system — you attach a handle or strap, select your weight with a pin, and pull or push the cable through a range of motion. Most commercial gyms have either a functional trainer (two adjustable columns with independent pulleys) or a lat pulldown/cable row station (fixed high and low pulley positions). Both work for everything in this guide.
Our team evaluated beginner cable machine programs across multiple fitness communities and found that the single biggest barrier to starting isn’t strength — it’s not knowing which attachment to use or where to set the pulley. That ends here.
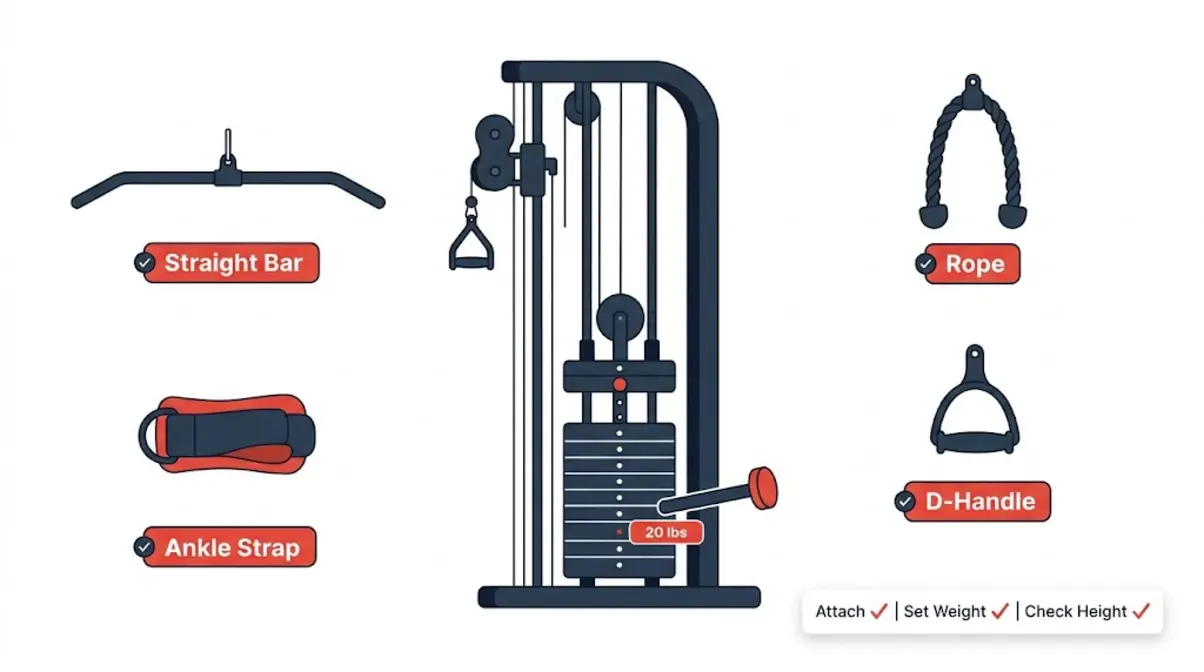
The 4 Essential Cable Attachments (and When to Use Each)
Most gyms have a rack of attachments next to the cable machine. You only need to know four to get started. Each one clips onto the carabiner (the metal clip at the end of the cable) in seconds.
| Attachment | What It Looks Like | Best For |
|---|---|---|
| Straight bar | Horizontal metal bar with two grip points | Bicep curls, tricep pushdowns, lat pulldowns |
| Rope | Thick rope with two knotted ends | Tricep pushdowns, face pulls, cable crunches |
| Single D-handle | Small oval handle, one hand | Lateral raises, kickbacks, single-arm rows |
| Ankle strap | Padded strap that wraps around your ankle | Donkey kickbacks, cable pull-throughs |
How to attach: Hold the carabiner open (squeeze the spring-loaded gate), thread the attachment’s ring through, and release. Give it a firm tug to confirm it’s locked. That’s it.
Pro Tip: If you’re not sure which attachment to use, default to the single D-handle. It works for almost every exercise in this guide and requires zero setup beyond clipping it on.
How to Pick the Right Weight and Track Your Progress
Picking the right starting weight is simpler than most beginners think. The American College of Sports Medicine (ACSM) recommends a rep range of 8–12 reps per set for hypertrophy training — and your starting weight should be the load where you can complete 12 clean reps but not 13. If you can breeze through 15 reps, the weight is too light. If you can’t reach 8 with good form, it’s too heavy.
Progressive overload (gradually increasing the challenge over time) is the engine of all muscle growth. Without it, your muscles adapt and stop growing. On a cable machine, you apply progressive overload by moving the pin one plate up the weight stack — typically a 5–10 lb increase — once you can comfortably complete 3 sets of 12 reps with good form.
The 2-for-2 Rule: When you can complete 2 extra reps above your target (so 14 reps instead of 12) for 2 consecutive sessions, add weight at your next workout. This is a simple, evidence-supported progression method used across ACSM and NSCA guidelines.
Sample Progressive Overload Tracking Table:
| Week | Exercise | Weight | Sets | Reps | Notes |
|---|---|---|---|---|---|
| 1 | Cable Lat Pulldown | 40 lbs | 3 | 10 | Form focus |
| 2 | Cable Lat Pulldown | 40 lbs | 3 | 12 | Ready to progress |
| 3 | Cable Lat Pulldown | 50 lbs | 3 | 9 | New challenge |
| 4 | Cable Lat Pulldown | 50 lbs | 3 | 11 | Building |
| 5 | Cable Lat Pulldown | 50 lbs | 3 | 12 | Ready to progress again |
Download the free Cable Machine Mastery PDF tracking sheet (linked in the resource section) to log every session — it uses this exact table format for all 12 exercises in this guide.
Pro Tip: Cable machines use a pin-and-stack system, meaning each plate is typically 10–15 lbs. Some machines have half-plate inserts (small 5 lb plates that sit on top of the stack) for finer progression. Ask gym staff if you can’t find them — they’re often stored in a drawer nearby.
Your 3-Day Full-Body Cable Routine for Beginners
This routine covers every major muscle group using only a cable machine. It’s designed for 3 non-consecutive days per week (e.g., Monday, Wednesday, Friday), which gives your muscles 48 hours to recover between sessions — the minimum recovery window supported by ACSM guidelines for beginners.
How many sets and reps? 3 sets of 10–12 reps for each exercise. Rest 60–90 seconds between sets. The full workout takes approximately 45–55 minutes.
| Day | Muscle Group | Exercise | Sets × Reps | Pulley Height |
|---|---|---|---|---|
| A | Chest | Cable Crossover Fly | 3 × 12 | High |
| A | Back | Cable Lat Pulldown | 3 × 10 | High |
| A | Shoulders | Cable Lateral Raise | 3 × 12 | Low |
| A | Arms | Tricep Rope Pushdown | 3 × 12 | High |
| B | Back | Seated Cable Row | 3 × 10 | Low |
| B | Shoulders | Cable Face Pull | 3 × 12 | High |
| B | Arms | Cable Bicep Curl | 3 × 12 | Low |
| B | Core | Kneeling Cable Crunch | 3 × 15 | High |
| C | Glutes | Cable Pull-Through | 3 × 12 | Low |
| C | Glutes | Cable Donkey Kickback | 3 × 15 | Low |
| C | Chest | Cable Chest Press | 3 × 12 | Mid |
| C | Core | Kneeling Cable Crunch | 3 × 15 | High |
Progression plan: Follow this routine for 4 weeks. Apply the 2-for-2 Rule to add weight. After 8 weeks, increase to 4 sets per exercise and reduce rest periods to 60 seconds to increase training density.
Cable Chest and Shoulder Exercises
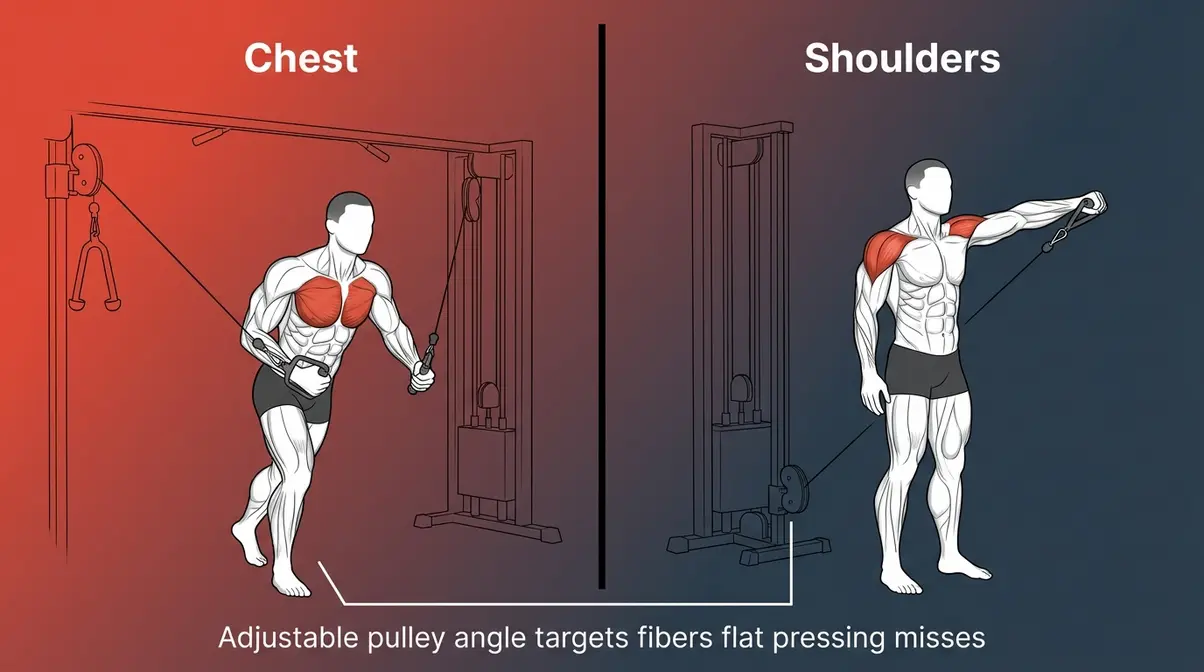
The chest and shoulders respond exceptionally well to cable exercises because the adjustable pulley angle lets you target fibers that flat pressing movements often miss. The Full-Arc Advantage is particularly powerful here — cable chest flyes load the pec (chest muscle) maximally at its most stretched position, the point where the muscle is spread widest across your ribcage. Research from Barbend’s cable exercise analysis confirms that cable flyes are consistently rated among the highest-activation exercises for chest development.
Our team’s evaluation of beginner chest and shoulder programs found that most people skip cables entirely for these muscle groups, defaulting to dumbbells and machines — and miss out on the superior isolation and tension cables provide.
Cable Crossover Fly (High, Mid, and Low Variations)
The cable crossover fly is the signature cable chest exercise. Unlike a dumbbell fly — which loses nearly all tension when your hands meet in the middle — the cable fly keeps your chest under load through the entire squeeze. This is The Full-Arc Advantage in action for the chest.
- Pulley height and target:
- High pulley → targets lower chest (most common starting point)
- Mid pulley (chest height) → targets center chest
- Low pulley → targets upper chest
Step-by-step instructions (High Pulley Fly):
- Set both pulleys to the highest position on the cable column.
- Attach a single D-handle to each cable.
- Stand in the center of the machine, one foot slightly forward for balance.
- Grip both handles with your palms facing down and inward.
- Step forward until there is tension on both cables with your arms spread wide — this is your starting position.
- With a slight bend in your elbows (soft elbows, not locked), bring your hands together in front of your chest in a wide, hugging arc.
- Squeeze your chest hard when your hands meet — hold for 1 second.
- Slowly return to the starting position, feeling the stretch across your chest. Take 2–3 seconds on this return phase.
- Repeat for 10–12 reps.
Beginner modification: If balancing with both cables feels unstable, do single-arm crossovers — one cable at a time, using your free hand to hold the frame for support.
Pro Tip: Focus on the arc, not the straight pull. Imagine you’re hugging a giant tree. Keeping that wide, sweeping motion is what activates the full chest, not just the front shoulder.
Common mistake: Letting the weight pull your arms too far back behind your body at the stretch. Keep your hands in front of your shoulder line to protect the rotator cuff.
Cable Chest Press
The cable chest press mimics the movement of a flat bench press but with two key advantages: each arm moves independently (correcting strength imbalances) and the cable maintains tension throughout the press, unlike a barbell that loses resistance near lockout.
Setup: Set both pulleys to mid-height (approximately chest level when standing). Attach D-handles.
Step-by-step instructions:
- Set both pulleys to mid-height (chest level).
- Clip a D-handle to each cable.
- Stand facing away from the machine, feet shoulder-width apart, one foot slightly forward.
- Hold both handles at chest height, elbows bent at roughly 90 degrees and pointing back.
- Brace your core (tighten your abs as if bracing for a punch).
- Press both handles forward and slightly inward until your arms are almost fully extended — do not lock the elbows.
- Hold for 1 second at full extension, feeling the squeeze across the center of your chest.
- Slowly return to the starting position over 2–3 seconds.
- Repeat for 10–12 reps.
Beginner modification: Start with one arm at a time. This lets you use your free hand to brace against a wall or rack for stability while you learn the movement pattern.
Pro Tip: Keep your elbows at roughly 45 degrees from your torso — not flared out wide. This protects the shoulder joint and keeps the chest doing the work.
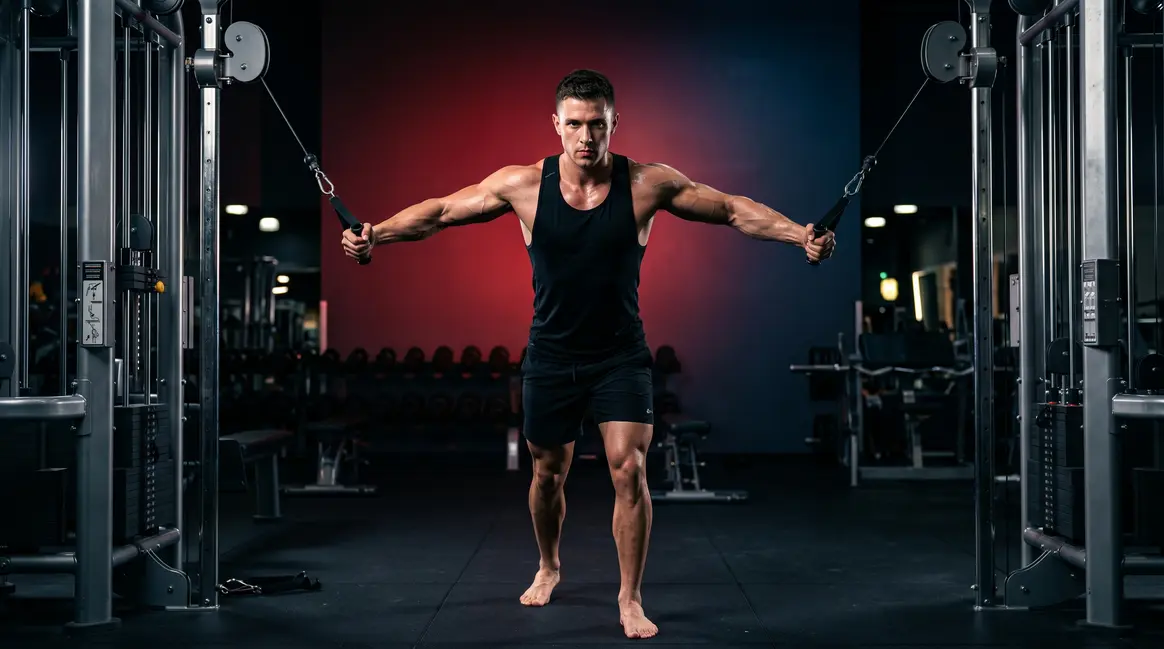
Cable Lateral Raise for Shoulder Width
The cable lateral raise is one of the most effective exercises for building shoulder width — the “3D look” and capped deltoid appearance that creates the top of a V-taper. Cable lateral raises outperform dumbbell lateral raises for one specific reason: dumbbells provide almost zero resistance at the bottom of the movement (where your arm hangs by your side), while the cable provides resistance from the very first inch of the lift.
Setup: Set the pulley to the lowest position. Attach a single D-handle.
Step-by-step instructions:
- Set the pulley to the lowest position (floor level).
- Attach a single D-handle to the cable.
- Stand sideways to the machine, with the cable crossing in front of your body.
- Grip the handle with the hand farthest from the machine (the cable will cross in front of your hips).
- Keep a slight bend in your elbow — never raise with a locked, straight arm.
- Raise your arm out to the side in a wide arc until your hand reaches shoulder height.
- Lead with your elbow, not your wrist. Imagine pouring water from a jug — your pinky should be slightly higher than your thumb at the top.
- Lower the weight slowly over 2–3 seconds back to the starting position.
- Complete all reps on one side before switching.
Beginner modification: Use a very light weight (5–10 lbs). This exercise is deceptively difficult — the shoulder’s lateral deltoid (the side head) is a small muscle that fatigues quickly.
Pro Tip: Don’t shrug your shoulder toward your ear as you raise. Keep your shoulder blade down and back throughout the movement. Shrugging shifts the work to your upper trapezius (neck/upper back muscle), not your side delt.
Cable Back and Core Exercises
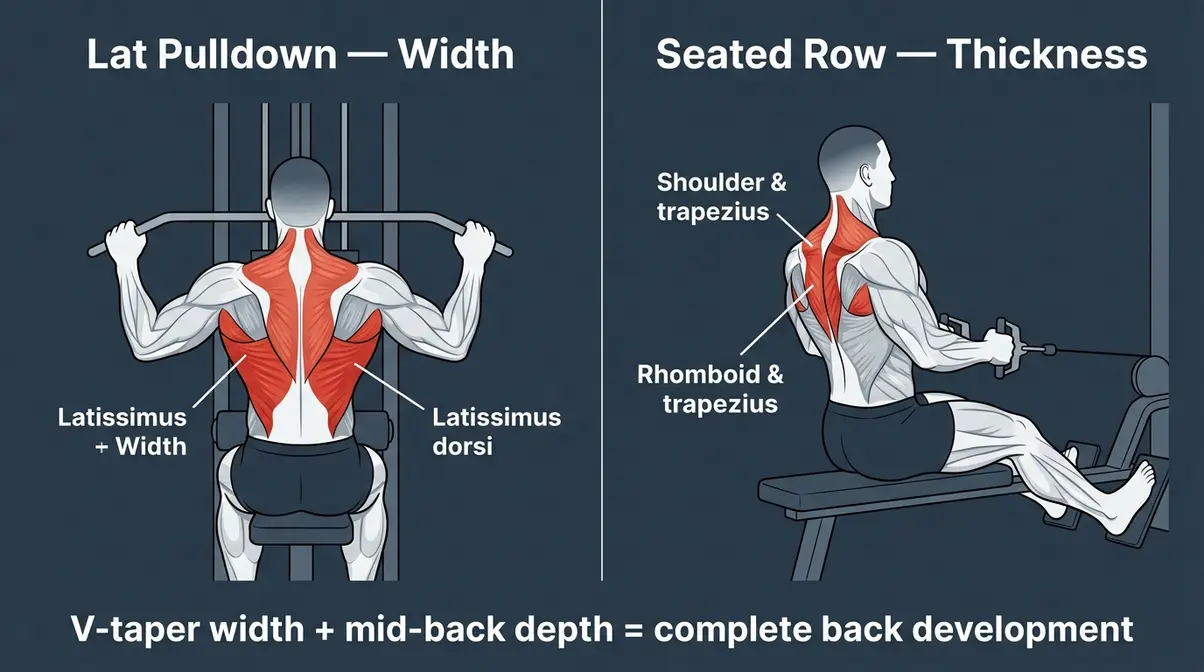
The back is where cable machines deliver some of their most dramatic results. Building a wide, thick back — the classic V-taper — requires both vertical pulling (lat pulldowns) and horizontal pulling (seated rows), plus rear delt work (face pulls) for shoulder health. All four exercises in this section benefit enormously from the Full-Arc Advantage: your lats (latissimus dorsi — the large wing-shaped muscles of your back), rhomboids (mid-back muscles), and rear deltoids are all loaded maximally in their stretched positions, which is exactly where cables apply their greatest tension.
According to Athlean-X’s cable machine analysis, back exercises are among the movements where cable machines most clearly outperform free weights for muscle activation — particularly for the mid-back and rear delts, which are notoriously difficult to isolate without a cable.
Cable Lat Pulldown (Build Your V-Taper)
The cable lat pulldown is the foundational back-building exercise on a cable machine. It targets the latissimus dorsi — the large, fan-shaped muscles that run from your upper arm down to your lower back. When developed, the lats create the wide, tapered silhouette known as a V-taper. This is the exercise to master if building a wider back is your goal.
Setup: Use the high pulley on a lat pulldown station, or set the cable column to the highest position on a functional trainer. Attach a straight bar or a wide-grip lat bar.
Step-by-step instructions:
- Set the pulley to the highest position and attach a straight bar or lat bar.
- Sit facing the machine (or kneel if using a functional trainer without a seat).
- Grip the bar slightly wider than shoulder-width with an overhand grip (palms facing away from you).
- Lean back slightly — about 10–15 degrees from vertical. This is your working posture for the entire set.
- Take a deep breath in, brace your core, and begin pulling the bar down toward your upper chest.
- As you pull, drive your elbows down and back — imagine trying to put your elbows in your back pockets.
- Squeeze your lats hard when the bar reaches your upper chest or chin level.
- Slowly return the bar upward over 2–3 seconds, allowing a full stretch at the top.
- Repeat for 8–10 reps.
Beginner modification: If the full bar feels awkward, use two single D-handles instead. This allows a neutral grip (palms facing each other) and is often easier to control for beginners.
Pro Tip: Do not pull the bar behind your head. Pulling behind the neck places extreme stress on the cervical spine (neck vertebrae) and shoulder joints. Always pull to your upper chest.
Seated Cable Row (For Mid-Back Thickness)
The seated cable row builds mid-back thickness — the dense, 3D musculature across your rhomboids, middle trapezius, and rear deltoids that creates depth and definition when viewed from behind or the side. Where the lat pulldown builds width, the seated row builds thickness.
Setup: Set the pulley to the lowest position. Attach a close-grip V-bar or a straight bar. Sit on the cable row bench (if available) or a flat bench placed in front of the cable stack.
Step-by-step instructions:
- Set the pulley to the lowest position and attach a V-bar or straight bar.
- Sit facing the machine with your feet flat on the floor or on the foot platforms.
- Reach forward and grip the handle, allowing your arms to fully extend and your upper back to round forward slightly — this is the starting stretch position.
- Sit tall, brace your core, and begin pulling the handle toward your lower abdomen (belly button area).
- Drive your elbows back and squeeze your shoulder blades together at the end of the pull.
- Hold the contracted position for 1 second.
- Return slowly to the starting position over 2–3 seconds, allowing a full stretch across your mid-back.
- Repeat for 8–10 reps.
Beginner modification: Use a lighter weight and focus entirely on feeling the mid-back muscles working. Many beginners pull with their biceps instead of their back. Think: “elbows back, chest up.”
Pro Tip: Don’t lean backward to move the weight. If you’re rocking your torso, the weight is too heavy. Keep your torso stable and let your arms do the rowing.
Cable Face Pull (Shoulder Health and Rear Delts)
The cable face pull is arguably the most important exercise in this guide for long-term shoulder health. It targets the rear deltoids (back of the shoulder) and the rotator cuff muscles — the small stabilizing muscles that keep your shoulder joint healthy under heavy pressing load. Neglecting these muscles is one of the most common causes of shoulder pain in gym-goers.
Setup: Set the pulley to the highest position (above eye level). Attach a rope.
Step-by-step instructions:
- Set the pulley to the highest position and attach a rope.
- Step back from the machine until there is tension on the cable with your arms extended forward.
- Grip both ends of the rope with an overhand grip (thumbs pointing toward the machine).
- Stand with feet shoulder-width apart, a slight bend in your knees.
- Pull the rope toward your face, separating the two ends of the rope as you pull — the ends should finish beside your ears.
- At the peak of the pull, your elbows should be at shoulder height or slightly above, and your upper arms should be parallel to the floor.
- Squeeze your rear delts and externally rotate your shoulders (think: “proud chest, elbows back”).
- Return slowly to the starting position over 2–3 seconds.
- Repeat for 12–15 reps.
Beginner modification: Use very light weight. This is a corrective and hypertrophy exercise combined — form matters far more than load. Most beginners should start at 20–30 lbs maximum.
Pro Tip: Many people pull the rope toward their neck or chin instead of their face. Keep the target zone between your nose and forehead for maximum rear delt activation and minimum neck strain.
Kneeling Cable Crunch (Weighted Core Training)
The kneeling cable crunch is the most effective weighted core exercise you can do on a cable machine. Unlike standard crunches — which rely on bodyweight and lose resistance at the top of the movement — the cable crunch keeps your core under constant tension throughout the full range of motion, making it far superior for building visible abdominal muscle.
Setup: Set the pulley to the highest position. Attach a rope.
Step-by-step instructions:
- Set the pulley to the highest position and attach a rope.
- Kneel facing the machine, about 1–2 feet back from the cable stack.
- Grip both ends of the rope and hold them beside your head (not behind it — beside your temples).
- Start in an upright kneeling position with the cable taut.
- Contract your abs and curl your torso downward — bring your elbows toward your knees.
- The movement should come entirely from your midsection rounding forward, not from your hips hinging or your arms pulling.
- Hold the contracted position for 1 second.
- Slowly return to the upright starting position over 2–3 seconds.
- Repeat for 12–15 reps.
Beginner modification: Start with very light weight (10–20 lbs) and focus on feeling your abs doing the work. If you feel it in your shoulders or lower back, reduce the weight and focus on the ab contraction.
Pro Tip: Keep your hips stationary throughout the set. Many beginners inadvertently turn this into a hip flexor exercise by rocking forward at the hips. If your glutes are moving, your hips are moving — keep them still.
Cable Arm Exercises (Biceps and Triceps)
Arms respond exceptionally well to cable training because the constant tension directly addresses one of the biggest frustrations in arm training: losing the “pump” (blood flow and metabolic stress in the muscle) because free weights unload at certain points in the curl or pushdown. Cables eliminate that dead zone entirely, keeping the biceps and triceps under load for every inch of every rep.
Common feedback across fitness communities indicates that cable arm exercises are particularly effective for developing peak contraction — the hard, full squeeze at the top of a curl or the bottom of a pushdown — because the cable continues to resist even at the end range of motion where a dumbbell would go slack.
Cable Bicep Curl (Rope, Bar, and Single-Handle Variations)
The cable bicep curl is often described as the gold standard for bicep isolation — and for good reason. The low-pulley position keeps your bicep under tension even when your arm is fully extended at the bottom, which is precisely the lengthened position where The Full-Arc Advantage delivers its greatest growth stimulus.
- Which attachment should you use?
- Straight bar: Hits both bicep heads equally. Best for overall mass.
- Rope: Allows your wrists to rotate (supinate) as you curl, adding a peak contraction twist. Best for bicep peak.
- Single D-handle: Works one arm at a time, correcting strength imbalances. Best for symmetry.
Setup: Set the pulley to the lowest position. Attach your chosen attachment.
Step-by-step instructions (straight bar):
- Set the pulley to the lowest position and attach a straight bar.
- Stand facing the machine, feet shoulder-width apart.
- Grip the bar with an underhand grip (palms facing up), hands shoulder-width apart.
- Step back until there is light tension on the cable with your arms fully extended — this is your starting position.
- Keeping your elbows fixed at your sides (they should not drift forward), curl the bar upward toward your shoulders.
- Squeeze your biceps hard at the top — hold for 1 second.
- Lower the bar slowly over 2–3 seconds until your arms are fully extended again.
- Feel the stretch across the bottom of your bicep at full extension — this is the loaded lengthened position.
- Repeat for 10–12 reps.
Beginner modification: Use the single D-handle and alternate arms. This makes it easier to focus on form and feel the muscle working before progressing to bilateral (two-handed) variations.
Pro Tip: Do not let your elbows drift forward as you curl. If your elbows are swinging forward, you’re using momentum and shoulder flexion — not bicep strength. Keep them pinned at your sides.
Tricep Rope Pushdown (Full Contraction Technique)
The tricep rope pushdown is the most popular cable exercise for the triceps (the muscle on the back of the upper arm that makes up roughly two-thirds of your arm’s total size). The rope attachment is specifically recommended over a straight bar because it allows your hands to spread apart at the bottom of the movement — a technique that maximally activates all three heads of the tricep at peak contraction.
Setup: Set the pulley to the highest position. Attach a rope.
Step-by-step instructions:
- Set the pulley to the highest position and attach a rope.
- Stand facing the machine, feet shoulder-width apart or slightly staggered.
- Grip both ends of the rope with an overhand grip (palms facing each other).
- Tuck your elbows against your sides — they should not move during the exercise.
- Starting with your forearms roughly parallel to the floor, push the rope downward.
- As your hands reach hip level, spread the rope ends apart — pull each end out to the side of your thighs.
- Squeeze your triceps hard in this spread position — hold for 1 second.
- Return slowly to the starting position over 2–3 seconds, allowing the tricep to fully stretch.
- Repeat for 10–12 reps.
Beginner modification: If spreading the rope feels awkward, start with a straight bar pushdown to learn the movement pattern. Once you can feel the tricep contracting through the full range, switch to the rope for the superior peak contraction.
Pro Tip: Don’t let your elbows flare out from your sides during the pushdown. Flaring elbows shifts the work to your shoulders and chest. Elbows stay fixed — only your forearms move.
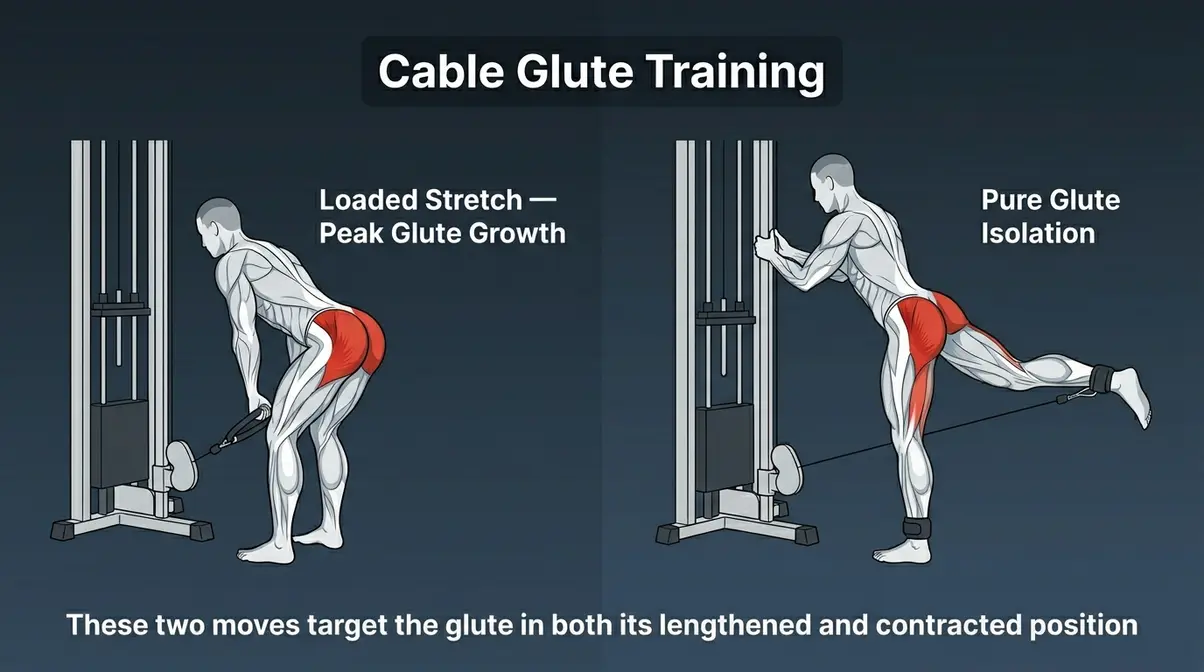
Cable Leg and Glute Exercises
Building the lower body on a cable machine is entirely possible — and for certain exercises, cables are genuinely superior to free weights. Cable pull-throughs and donkey kickbacks isolate the glutes in their lengthened position with a precision that no squat or lunge can match. For anyone focused on glute development, this section may be the most valuable in the guide.
According to REP Fitness’s cable workout analysis, lower body cable exercises are among the most underutilized movements in gym programming — particularly among women who are specifically targeting glute hypertrophy. The cable pull-through and kickback combination addresses this gap directly.
Cable Pull-Through (Hip Hinge for Glute Power)
The cable pull-through is a hip hinge movement — the same fundamental motion as a Romanian deadlift or kettlebell swing — but performed with a cable providing resistance from behind. This unique resistance angle loads the glutes maximally in their stretched position (when your hips are hinged forward and your glutes are lengthened), which is exactly where The Full-Arc Advantage applies to lower body training.
Research supports hip hinge movements as among the highest-activation exercises for the gluteus maximus (the largest glute muscle). A cable pull-through is an excellent beginner introduction to the hip hinge pattern because the cable guides the movement and prevents the lower back rounding common in deadlift variations.
Setup: Set the pulley to the lowest position. Attach a rope.
Step-by-step instructions:
- Set the pulley to the lowest position and attach a rope.
- Stand facing away from the machine, straddling the cable with your feet slightly wider than shoulder-width.
- Reach between your legs and grip both ends of the rope.
- Step forward until there is tension in the cable — your starting position is standing tall with the rope held between your legs.
- Push your hips back (not your knees forward) and hinge at the hips, allowing the cable to pull your hands back between your legs as your torso tips forward.
- Keep a neutral spine (flat back) throughout — do not let your lower back round.
- Hinge until your torso is roughly parallel to the floor and you feel a deep stretch in your glutes and hamstrings.
- Drive your hips forward powerfully to return to standing, squeezing your glutes hard at the top.
- Repeat for 12 reps.
Beginner modification: Practice the hip hinge motion without any weight first. Stand near a wall, reach back to touch it with your glutes, and feel what it means to push your hips back rather than bend your knees. Then add the cable.
Pro Tip: The power comes from your hips, not your arms. Your arms are just hooks holding the rope — your glutes and hamstrings are doing all the work. If your lower back is sore after this exercise, you’re likely rounding your spine. Reduce weight and focus on maintaining a neutral back.
Cable Donkey Kickback (Glute Isolation with Ankle Strap)
The cable donkey kickback is one of the purest glute isolation exercises available. By fixing the ankle strap to the low pulley and extending the leg backward, you load the gluteus maximus through its full range of motion with the hip in a position that specifically recruits the glute — not the hamstrings or lower back.
- How to attach the ankle strap:
- Thread the ankle strap around your ankle above the ankle bone.
- Secure the velcro strap firmly — it should feel snug but not cut off circulation.
- Clip the carabiner at the end of the cable to the metal D-ring on the ankle strap.
- Give the strap a firm tug to confirm it’s locked before adding weight.
Step-by-step instructions:
- Set the pulley to the lowest position and attach the ankle strap to one ankle.
- Face the cable machine and hold the frame lightly for support.
- Stand on your non-strapped leg with a slight bend in that knee.
- Hinge forward slightly at the hips — about 15–20 degrees — to put your glute in a better working position.
- Keeping your core braced and your hips square (both hip bones pointing at the floor), kick the strapped leg straight back.
- Extend until your leg is roughly in line with your torso — do not hyperextend (kick past your body line).
- Squeeze your glute hard at the top — hold for 1 second.
- Return slowly to the starting position over 2 seconds.
- Complete all reps on one leg before switching sides.
Beginner modification: Start with very light weight (5–10 lbs) and focus entirely on feeling the glute contract. Many beginners feel this in their hamstrings initially — if that’s you, try squeezing your glute consciously before each kick.
Pro Tip: Keep your hips square to the floor throughout. If your hip is rotating or hiking upward on the kick, the weight is too heavy. Reduce load and prioritize hip stability.
Can You Build Legs with Only a Cable Machine?
Yes — with some important caveats. A cable machine can effectively develop the glutes, hamstrings, and hip abductors (outer thigh muscles) through pull-throughs, kickbacks, and cable squats. For pure quad (front thigh) development, however, free weights — specifically the squat and leg press — remain superior because they allow far greater loading of the quadriceps under the body’s full weight.
- What cables do well for legs:
- Glute isolation (kickbacks, pull-throughs)
- Hip hinge pattern development (pull-throughs)
- Hamstring curls with ankle strap (low pulley, facing away from machine)
- Hip abduction with ankle strap (low pulley, side-facing stance)
- Where free weights are better for legs:
- Heavy quad loading (barbell squats, leg press)
- Calf development (standing or seated calf raise)
- Overall lower body strength and power
For a well-rounded leg and glute program, use cable exercises for isolation and free weight compounds for overall strength. Cables alone can maintain and shape the glutes very effectively — but for maximizing leg muscle mass overall, combining both tools produces the best results.
Safety, Common Mistakes, and When to Get Help
Every exercise in this guide is safe when performed with correct form and appropriate weight. The injuries that do occur on cable machines almost always trace back to one of the same predictable mistakes. Our team evaluated beginner cable machine programs and cross-referenced common feedback from certified trainers — the seven errors below account for the vast majority of cable machine injuries and wasted training sessions.
7 Common Cable Machine Mistakes Beginners Make
- Using too much weight too soon. The weight stack on a cable machine looks modest, but cable resistance is direct and constant — 40 lbs on a cable machine is harder than it looks. Start lighter than you think you need to.
- Jerking or using momentum. A controlled, deliberate tempo — 1–2 seconds lifting, 2–3 seconds returning — builds more muscle and protects your joints. If you’re swinging or jerking, the weight is too heavy.
- Not allowing a full stretch at the bottom of each rep. Cutting the range of motion short eliminates the most valuable part of cable training: the loaded lengthened position. Lower fully on every rep.
- Pulling a lat pulldown behind the neck. This is one of the most dangerous cable machine habits in any gym. Always pull the bar to your upper chest — never behind your head.
- Shrugging during lateral raises. Shrugging shifts the work from the lateral deltoid (side shoulder) to the upper trapezius (upper back/neck). Keep your shoulder blade down throughout the raise.
- Letting elbows flare during tricep pushdowns. Fixed elbows are the key to effective tricep isolation. Flaring elbows turns a tricep exercise into a shoulder movement.
- Skipping the face pull. Face pulls are not optional for anyone who presses heavy. They counterbalance the internal rotation load of pressing movements and are critical for long-term shoulder health.
When Free Weights Are the Better Choice
Cable machines are powerful — but they are not the right tool for every job. Here are the specific situations where free weights serve you better:
- Building maximum lower body strength: Barbell squats and deadlifts allow far greater spinal loading than any cable variation, making them superior for developing overall leg and hip strength.
- Developing explosive power: Olympic lifts (clean and jerk, snatch) and plyometric movements require free weights or bodyweight — cables are not appropriate for power development.
- Training at home on a budget: A set of dumbbells and a barbell are far more cost-effective and accessible than a cable machine, which requires a commercial gym or a significant home gym investment.
- Progressing past beginner stage for the chest: Heavy barbell or dumbbell bench press allows progressive overloading at weights that most cable machines cannot match.
The ideal approach — supported by research from Schwanbeck et al. (2020) showing similar increases in muscle mass and strength between modalities when volume is equated — is to use cables for isolation and tension work, and free weights for compound strength movements. They are complementary, not competing.
When to Consult a Fitness Professional
Some situations call for professional guidance before or during your cable machine training. Consult a certified personal trainer (CPT) or your physician if:
- You have a pre-existing shoulder, knee, or lower back injury — many cable exercises can aggravate these if modified improperly.
- You experience joint pain (not muscle soreness) during or after any exercise in this guide.
- You are completely new to resistance training and want supervised instruction for your first 4–6 sessions.
- You are postpartum or pregnant — cable training can be appropriate but requires specific modifications that a qualified trainer should program.
- You have a cardiovascular condition — resistance training is generally safe and beneficial, but your physician should clear you before you begin.
Muscle soreness (a dull, widespread ache 24–48 hours after training) is normal and expected. Joint pain (sharp, localized pain during movement) is not — stop the exercise immediately and seek professional assessment.
difference between strength training and hypertrophy is a useful resource for understanding how to structure your overall program around both cable and free weight training.
Frequently Asked Questions About Cable Machine Exercises
How many times a week should I do cable machine exercises?
Beginners should train 3 days per week on non-consecutive days (e.g., Monday, Wednesday, Friday) to allow 48 hours of recovery between sessions. Research from the ACSM supports a frequency of 2–3 sessions per week for novice lifters as the optimal stimulus-to-recovery balance. After 8–12 weeks of consistent training, you can progress to a 4-day split targeting specific muscle groups. Avoid training the same muscle group on consecutive days — muscle tissue repairs and grows during rest, not during the workout itself.
Are cable machines good for beginners?
Cable machines are excellent for beginners because the guided, controlled movement pattern is more forgiving of technique errors than free weights. The adjustable weight stack lets you start at very low loads (often as little as 10–20 lbs) and increment by small amounts, making progressive overload manageable from day one. A 2020 study (Schwanbeck et al.) found that machine-based training produced similar increases in muscle mass and strength compared to free weights — making cables a fully legitimate and effective starting point for anyone new to resistance training.
What is the best cable machine exercise for glutes?
The cable pull-through is the most effective cable exercise for glute development because it loads the gluteus maximus in the hip-hinged (lengthened) position — the point of maximum growth stimulus. Research consistently identifies hip hinge movements as among the highest-activation exercises for the gluteus maximus. The cable donkey kickback is the best isolation exercise for the glutes, targeting the muscle with minimal hamstring or lower back involvement. For best results, combine both: pull-throughs for loaded stretch, kickbacks for peak contraction.
Can cable machines replace free weights entirely?
Cable machines cannot fully replace free weights for a complete strength and hypertrophy program. Cables are superior for isolation exercises, constant tension, and adjustable resistance angles — making them ideal for chest flyes, lateral raises, and glute kickbacks. However, free weights remain superior for heavy compound movements like squats, deadlifts, and barbell bench press, which develop overall strength and allow greater progressive loading. The most effective approach combines both: cables for isolation and tension work, free weights for compound strength movements.
How do I know if I’m using the right weight on a cable machine?
The right weight lets you complete 8–12 reps with good form but not 13 or more. Using the ACSM’s hypertrophy rep range as a guide: if your last 2 reps feel genuinely challenging but achievable with controlled form, the weight is correct. If you can comfortably complete 13+ reps, increase the weight by one plate (typically 5–10 lbs). If you cannot reach 8 reps with good form, reduce the weight. Apply the 2-for-2 Rule: when you hit 2 extra reps for 2 consecutive sessions, add weight at your next workout.
Build Your Best Body with Cable Machine Exercises
Cable machine exercises for muscle building offer something no other gym tool matches: constant mechanical tension across the full arc of every rep, loading muscles in the exact position where the growth stimulus is highest. Research supports machine-based training as equally effective to free weights for hypertrophy when volume and intensity are matched (Schwanbeck et al., 2020) — and for isolation movements specifically, cables have a clear biomechanical advantage.
The Full-Arc Advantage is the principle that ties this entire guide together. Every exercise covered here — from the cable lat pulldown that builds your V-taper, to the cable pull-through that targets your glutes in their lengthened position, to the cable bicep curl that keeps tension on your bicep from full extension to peak contraction — works because cables never let your muscles rest mid-rep. That constant mechanical tension is what drives hypertrophy, and it’s why cables deserve a central place in any beginner’s muscle-building program.
Your next step is simple: take the 3-day beginner routine from this guide, download the Cable Machine Mastery PDF tracking sheet, and complete your first session this week. Start with lighter weights than you think you need, focus on feeling the target muscle through the full range of motion, and apply the 2-for-2 Rule to add weight progressively. Consistent, progressive cable training — applied to the 12 exercises in this guide — can transform your physique within 8–12 weeks. Consult a certified personal trainer if you want supervised guidance for your first few sessions, and always prioritize form over load.
Explore the difference between strength training and hypertrophy to understand how to structure your cable machine sessions for your specific goal.
Related posts:
StrongLifts 5x5 for Beginners: Complete Guide 2026
How to Get a Bigger Bum Without Exercise: 3-Tier Guide
What Muscles Does the StairMaster Work? 6 Groups
Olympic Weightlifting vs Powerlifting: 2026 Guide
What Kills Muscle Gains? 7 Proven Saboteurs to Fix Now
Best Strength Training Apps for Women: Top 7 Picks
Callum
Hi, I'm Callum, the founder of Body Muscle Matters. I'm not a certified trainer, I'm a self taught lifter who started this site to share what I've learned from my own training and a lot of trial and error. Everything here comes from real experience and honest research, written the way I'd explain it to a friend who is just getting started. My goal is simple: practical, no hype fitness advice you can actually use.