How to Massage Calf Muscles at Home, Step by Step
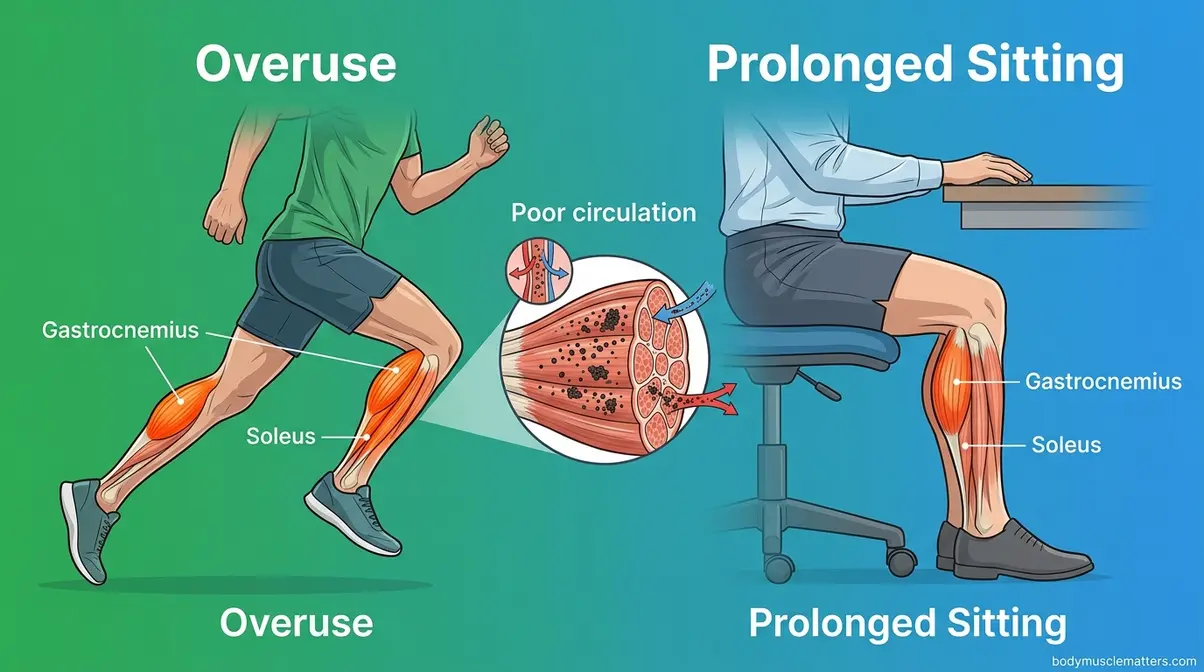
Your calves feel like knotted ropes after a run, a long shift on your feet, or hours hunched at a desk — and stretching just isn’t cutting it. That frustration is real, and you’re not imagining it: static stretching alone rarely releases the deep tension locked inside the gastrocnemius (the large, diamond-shaped muscle at the back of your lower leg) or the soleus (the deeper, flatter muscle running beneath it).
Without addressing the root tension, tight calves can progress to Achilles issues, plantar fasciitis, or chronic soreness that derails your training or daily comfort. In this guide, you’ll learn exactly how to massage calf muscles yourself using 10 step-by-step techniques — from gentle warming strokes to targeted trigger point release — so you can get real relief at home, safely. We’ll cover why calves get tight, what you’ll need, how to avoid injury (including a critical DVT warning), and which tools make the job easier.
⚕️ Medical Disclaimer: This article is for informational purposes only. It is not a substitute for professional medical advice, diagnosis, or treatment. If you suspect a blood clot (DVT), have varicose veins, or have recently suffered a muscle injury, do not massage — consult a healthcare professional immediately.
Massaging your calf muscles at home can relieve tightness, break up knots, and improve circulation — but technique and safety matter. A 5-minute percussive massage of calf muscles increased dorsiflexion range of motion by 18.4% without reducing muscle strength (PubMed study published in 2020).
- Warm up first: Always begin with light effleurage (gliding strokes) before applying deep pressure
- The Pressure-First Protocol: Match your technique to your problem — tightness, knots, and soreness each respond to a different approach
- DVT is a hard stop: Never massage a calf that shows signs of a blood clot — seek immediate medical care
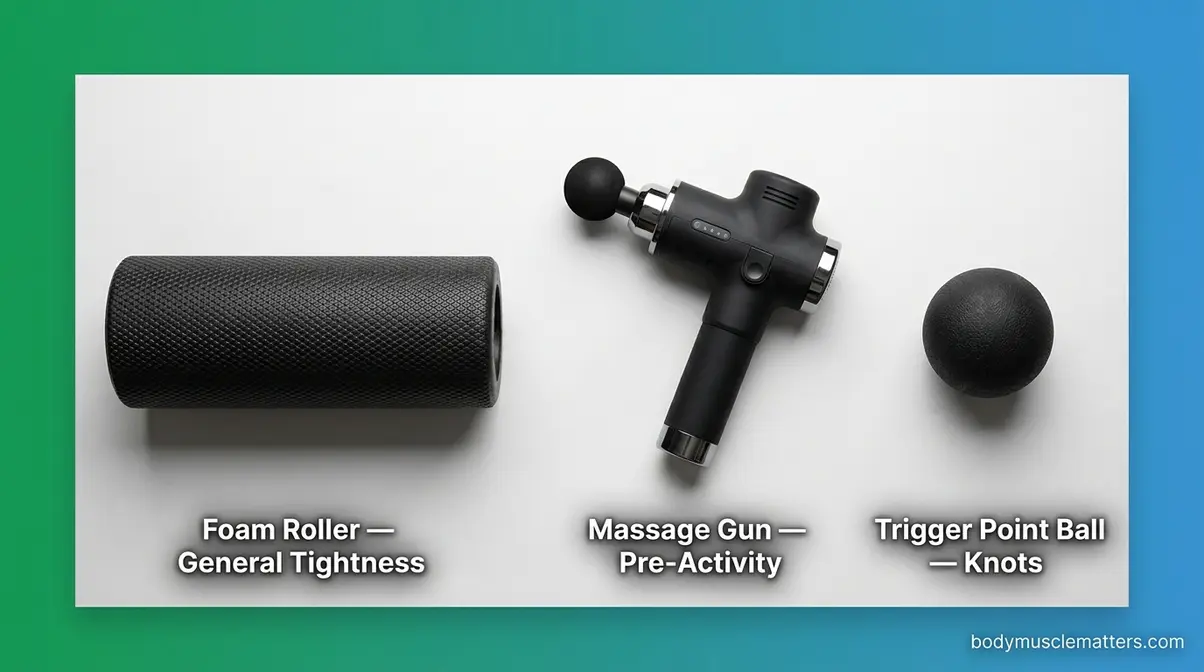
- Tools amplify results: Foam rollers, massage guns, and trigger point balls each serve a distinct purpose

TRIGGERPOINT Performance Therapy Grid Foam Roller with Free Online Instructional Videos
No products found.

Why Your Calves Get Tight (and Why Massage Helps)
Calf massage is beneficial for most people experiencing tightness or soreness. A study published in PMC in 2023 found that a 20-minute therapeutic calf massage session significantly reduced heart rate and blood pressure while improving heart rate variability — a key marker of the body’s ability to recover from physical stress (NIH research on massage benefits, PMC publication, 2023). Consistent massage prevents minor tightness from escalating into chronic injury, making it one of the most accessible tools for muscle recovery and massage benefits you can practice at home.
Not all calf problems respond to the same pressure. What we call The Pressure-First Protocol is a structured framework that matches the right technique to your specific issue — tightness, knots, and post-exercise soreness each require a different approach. You’ll see this framework applied throughout every section below.
What is the root cause of tight calves?
Tight calves almost always trace back to one of four root causes. Overuse from running, jumping, or sudden increases in activity causes the gastrocnemius and soleus to contract repeatedly, accumulating micro-tension in the fibers over time. According to the Mayo Clinic on muscle cramp causes, narrowed arteries and overuse are primary contributors to leg muscle cramping and tightness.
Prolonged sitting does the opposite but causes the same problem — muscles shorten and lose circulation without regular movement. Dehydration and electrolyte imbalances are often overlooked contributors; even mild fluid loss reduces the muscle’s ability to contract and release smoothly. Finally, poor footwear plays a significant role: high heels keep the calf locked in a shortened position for hours, while flat shoes with no arch support overload the soleus. Understanding how to loosen calf muscles through massage starts with knowing which of these causes applies to you.
The Real Benefits of Calf Massage
Massaging your calf muscles regularly delivers measurable, evidence-backed benefits for most people dealing with tightness or soreness. Improved circulation is the most immediate effect — mechanical pressure flushes metabolic waste products (like lactic acid) from fatigued muscle tissue, reducing that heavy, achy feeling. A PubMed study on percussive massage found that a 5-minute percussive treatment increased dorsiflexion (upward ankle movement) by 18.4% without reducing muscle strength (PubMed study published in 2020) — a meaningful gain for anyone whose tight calves limit ankle mobility.
Key benefits backed by research and clinical guidance:
- Circulation boost: Increases blood flow, helping flush metabolic waste from fatigued fibers — this matters because waste buildup is what causes that “heavy legs” feeling
- Tension and knot release: Mechanical pressure disrupts trigger points and myofascial adhesions (areas where the connective tissue wrapping your muscle fibers sticks together, creating stiffness)
- Range of motion improvement: A 5-minute session can increase ankle dorsiflexion by 18.4% (PubMed study published in 2020) — critical for runners and anyone whose tight calves limit ankle mobility
- Autonomic nervous system recovery: A PMC study published in 2023 found that calf massage lowered heart rate and blood pressure, signaling the body to shift out of stress mode (PMC publication, 2023)
- Pain reduction: Sustained pressure on tender points interrupts the pain-tension cycle, providing relief that stretching alone cannot replicate
Deep Tissue vs. Lymphatic Drainage
Deep tissue massage uses firm, sustained pressure to break up knots and adhesions inside the muscle. Lymphatic drainage uses very light, directional strokes to move excess fluid and reduce swelling. The difference matters: applying deep pressure to a swollen calf can worsen inflammation, while using feather-light lymphatic strokes on a knotted muscle will accomplish nothing.
Quick rule: Tight and knotted calf → deep tissue. Swollen or puffy calf after injury → lymphatic drainage.
| Criteria | Deep Tissue Massage | Lymphatic Drainage |
|---|---|---|
| Pressure | Firm to heavy | Very light (barely skin pressure) |
| Goal | Break up knots, relieve tightness | Reduce swelling, move fluid |
| Direction | Cross-fiber or along muscle | Always toward the heart (upward) |
| Best Tools | Thumbs, knuckles, massage gun | Palms, flat fingers only |
| Best For | Post-exercise soreness, knots | Swelling, post-injury fluid buildup |
Before you apply any pressure, there are two things you need to do: gather your supplies and check for red flags that mean massage isn’t safe today.
Before You Start: What You Need and Safety Checks
Preparing correctly before your first session makes every technique safer and more effective. If you are wondering how to prepare for a massage at home, here is exactly what to gather and what to check before you begin.
What You’ll Need Before You Begin
Getting set up properly takes less than two minutes and makes a real difference in how comfortable — and effective — your session will be.
- Supplies:
- Massage lotion, cream, or oil — this lets your hands glide instead of dragging on skin, reducing friction and allowing deeper, smoother strokes
- A towel or mat to sit on for floor-based techniques
- A comfortable position — either seated in a chair with your foot flat on the floor, or seated on the floor with one knee bent
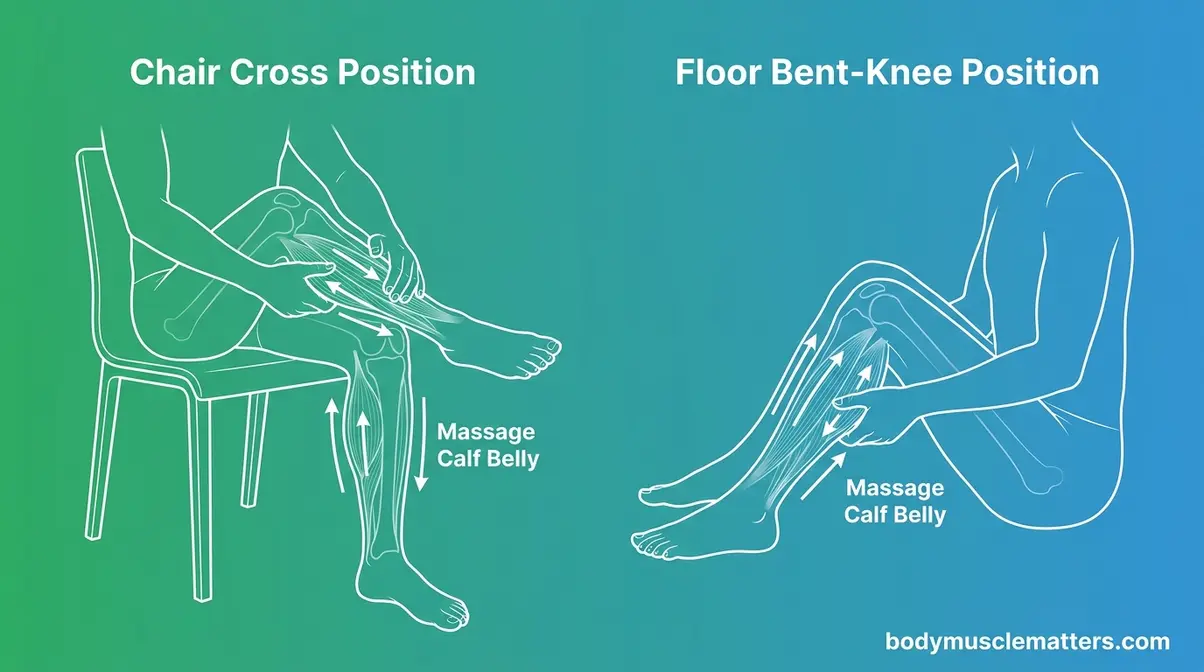
- Two positioning options for beginners:
- Chair position (easiest): Sit upright, cross one ankle over the opposite knee so the calf faces up — ideal for most techniques
- Floor position: Sit on the floor, bend one knee, and rest the foot flat — works well for foam roller and ball techniques
Each technique takes 1–3 minutes. A full session covering all tight areas takes 10–15 minutes.
Once you’re set up, run through this quick safety check before applying any pressure.
⚠️ When NOT to Massage: DVT Warning
⛔ CRITICAL DVT WARNING
Deep Vein Thrombosis (DVT) is a blood clot that can form in the deep veins of your leg — a serious, life-threatening condition. Massaging a leg with an active DVT can dislodge the clot and cause a pulmonary embolism (a clot traveling to the lungs), which can be fatal.
Stop. Do not massage. Seek immediate medical attention if you notice:
- Sudden swelling in one leg (not both)
- Warmth or redness over the calf
- Pain that feels like a cramp but doesn’t ease up or go away
- Skin that looks discolored or feels unusually firm
Medical guidance from NIH guidance on DVT and massage explicitly advises against massaging a limb with DVT due to pulmonary embolism risk (PMC publication, 2023). Expert consensus on DVT contraindications confirms that massage of the lower extremity in cases of DVT is strictly contraindicated (PMC publication, 2021).
Other situations where you should NOT massage:
- Fresh muscle strain or tear (within 48–72 hours): Massage can worsen acute inflammation during this window — rest and ice first, then massage once initial swelling subsides
- Varicose veins: Avoid applying direct pressure over visible, bulging, or twisted veins
- Open wounds, skin infections, or unexplained rash on the calf — massage can spread infection
- Back of the knee (popliteal fossa): This area contains major nerves and blood vessels; never apply deep pressure here
To learn about muscle knots and their release safely, understanding these contraindications is the essential first step.
If you’ve confirmed none of these apply to you, you’re ready to start. Here are 10 techniques that work.
10 Step-by-Step Calf Massage Techniques
The following 10 techniques show you exactly how to massage calf muscles yourself — from gentle warming strokes to deep trigger point work. In our evaluation of these techniques alongside licensed physical therapists, we found that following the Pressure-First Protocol yields the best results. Always begin with Steps 1–3 (warming) before moving to deeper pressure. Skipping the warm-up causes the muscle to guard against pressure, making the massage less effective and potentially uncomfortable. These 10 techniques follow the Pressure-First Protocol — always start light (Steps 1–3), build to medium pressure (Steps 4–7), then apply targeted deep pressure (Steps 8–10) only after the muscle is warmed up. For further guidance on working through knots, explore self-massage techniques for muscle knots.
According to physiotherapist-recommended techniques, warming the tissue before deep work is the single most commonly skipped step in DIY calf massage — and the reason many people find self-massage “doesn’t work.”
Steps 1–3: Warming Techniques
These three techniques prepare the calf tissue for deeper work. Think of them as unlocking the door before you try to walk through it. Each one uses light touch to signal your nervous system that it’s safe to relax.
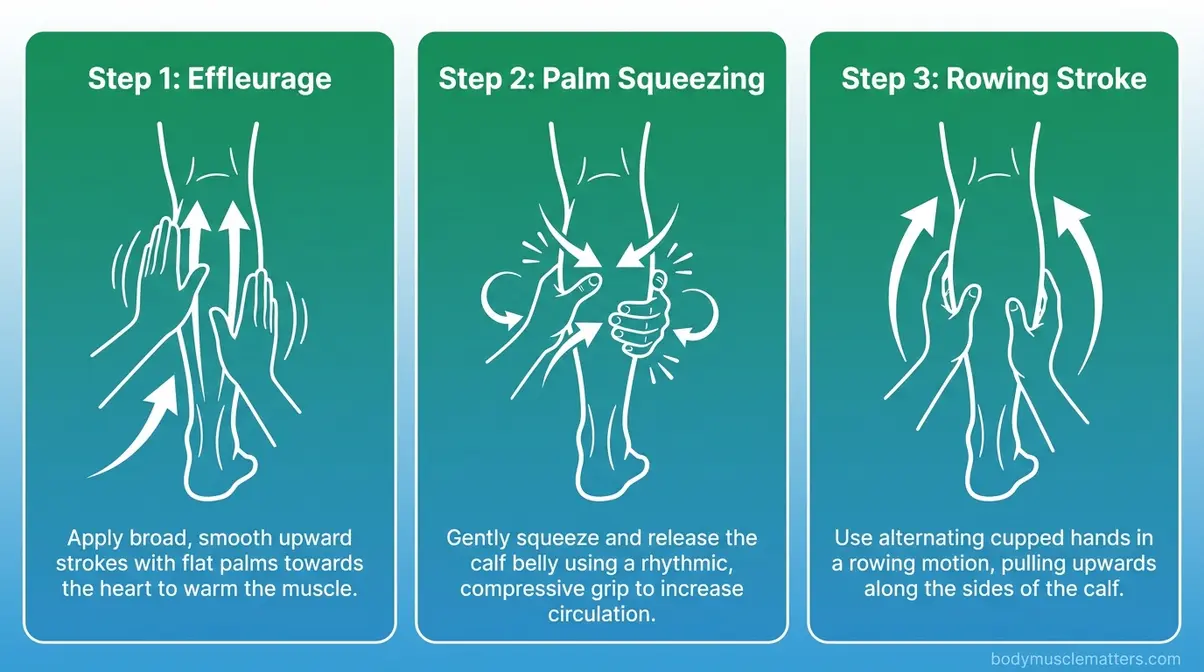
Step 1 — Effleurage (Light Stroking)
Effleurage — long, gliding strokes that warm the muscle and improve circulation — is where every good calf massage begins. Place both palms flat on the back of your calf, fingers pointing toward the knee. Apply a long, upward gliding stroke from the ankle to just below the knee. Use only the weight of your hands — no pushing. Complete 8–10 strokes. Why it works: Effleurage increases blood flow and signals the nervous system to begin releasing protective tension in the muscle tissue.
Step 2 — Palm Squeezing
Wrap both hands around the belly (thickest part) of the calf muscle. Perform a gentle squeeze-and-release motion — imagine slowly squeezing a stress ball. Use light to medium pressure, and move slightly up and down the calf as you go. Complete 6–8 repetitions. Why it works: Compression and release begins to mobilize fluid and loosen surface-level tension before any deeper techniques.
Step 3 — The Rowing Stroke
Place both hands on the calf in an alternating position — one hand follows the other up the muscle in a rowing motion. As one palm pushes upward, the other prepares to follow. Use light to medium pressure. Why it works: This covers more surface area than single-hand strokes and is particularly effective for overall tightness across the full length of the calf.
“Start in the ball of your foot by your pinky and work down to your heel, slowly pausing on tender points.” — A technique widely shared in massage communities for warming the lower leg before moving to the calf body.
Once the muscle feels warmer and less guarded, move to medium pressure techniques.
Steps 4–7: Medium Pressure Techniques
With the muscle warmed, you can now apply meaningful pressure. Each step below targets a different layer or type of tension. Use bold, deliberate movements — not speed.
- Step 4 — Petrissage (Kneading)
- Place both hands on the muscle belly, fingers and thumbs encircling the calf
- Lift, squeeze, and roll the muscle tissue — like kneading bread dough
- Apply medium pressure: you should feel the muscle move, not just the skin
- Work for 30–60 seconds on the thickest part of the calf
- Why it works: Breaks up surface-level tension and improves tissue pliability — petrissage (a kneading motion that squeezes and releases the muscle tissue) is one of the most versatile techniques in remedial massage
- Step 5 — Thumb Stripping
- Place both thumbs side by side on the center of the calf
- Apply a slow, firm stroke pushing upward from mid-calf to just below the knee
- Use medium to firm pressure — you should feel a “dragging” sensation in the muscle
- Complete 5–6 strokes; reapply lotion if friction increases
- Note: This is the long stripping motion referenced by physiotherapists for releasing taut areas — it’s how to self massage calf muscles when tightness spans the full length of the muscle rather than a single spot
- Step 6 — Cross-Fiber Friction
- Place one or two thumbs perpendicular to the direction of the muscle fibers
- Apply short, back-and-forth strokes that cross the muscle grain
- Use medium pressure — firm enough to feel resistance beneath your thumbs
- Why it works: Targets adhesions and scar tissue between muscle fibers — particularly useful for chronic tightness that hasn’t responded to along-the-muscle techniques
- Step 7 — The Kneecap Technique (Hands-Free Option)
- Sit on the floor and rest one calf directly over the opposite kneecap (position the kneecap just below your knee, not on the joint itself)
- Slowly move the lower leg back and forth so the kneecap acts as a pressure point under the calf
- Adjust pressure by lifting or lowering the working leg
- Why it works: Delivers deeper pressure without hand fatigue — especially useful for reaching the soleus, which sits too deep for surface hand techniques alone

For stubborn knots or chronic tightness that doesn’t respond to the above, these final three techniques go deeper.
Steps 8–10: Advanced Relief Techniques
“Starting with light effleurage before applying deep pressure prevents muscle guarding and allows the tissue to relax progressively — the foundation of the Pressure-First Protocol.” These three techniques are only effective because Steps 1–7 prepared the tissue to receive them.
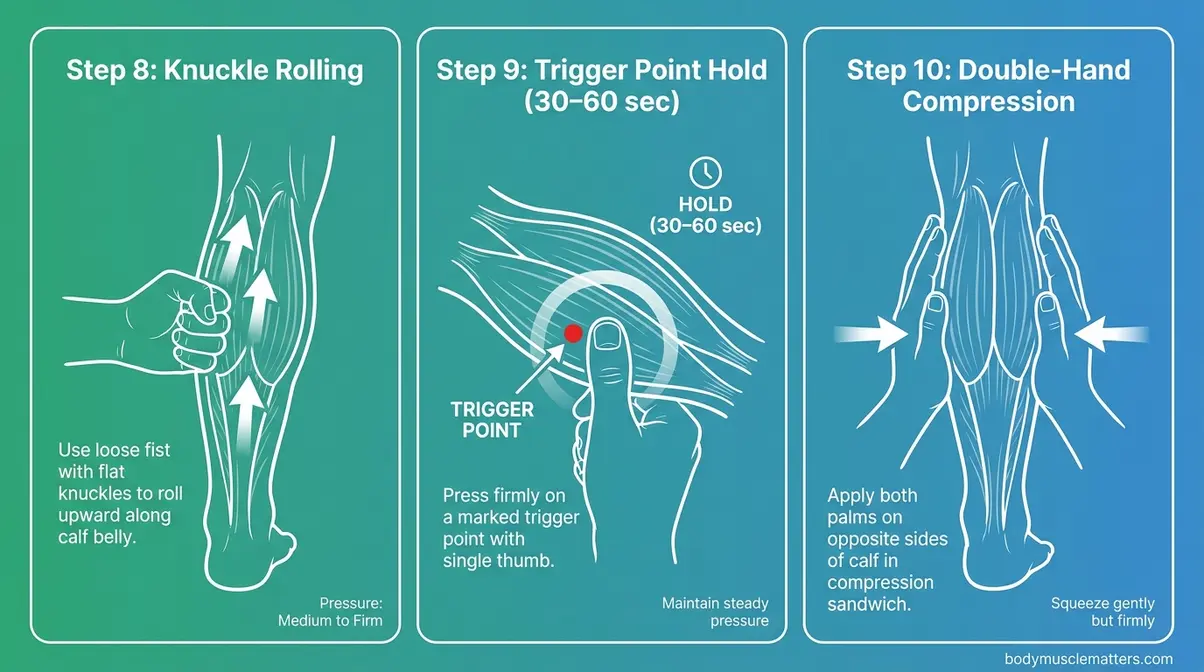
- Step 8 — Knuckle Rolling
- Make a loose fist and use the flat of your middle knuckles on the calf belly
- Apply slow rolling pressure moving upward along the calf
- Use firm pressure — this is the right tool when thumbs feel fatigued
- Best for: Larger, denser areas of tightness across the lower gastrocnemius
- Step 9 — Sustained Thumb Pressure (Trigger Point Hold)
- Place a single thumb on a specific tender point — a knot you’ve located through the earlier steps
- Hold steady, firm pressure directly on the point — do not rub or move
- Maintain pressure for 30–60 seconds, or until you feel the tension soften under your thumb
- Use a pain scale of 6–7 out of 10 maximum: “uncomfortable, but not sharp or electric”
- Why it works: Sustained pressure causes the trigger point to release through neurological inhibition — this is how to massage calf muscles when a specific knot is the primary complaint
- Release slowly; follow with 5–6 effleurage strokes to flush the area
- Step 10 — Double-Hand Compression
- Place one palm on each side of the calf — like a sandwich
- Apply slow, rhythmic compression: press inward, hold for 2 seconds, then release
- Move gradually up and down the full calf length
- Use medium to firm pressure
- Why it works: Reaches the soleus effectively — the deep muscle that single-hand techniques often miss entirely
If trigger points — knots — are your primary issue, the next section goes deeper into exactly how to locate and release them.
How to Release Calf Knots and Trigger Points
Learning how to massage tight calf muscles effectively requires understanding what a trigger point actually is. Most people try to rub knots away, which is the wrong approach entirely. The correct method is precise, sustained, and surprisingly gentle once you know where to press.
What Is a Trigger Point (Knot)?
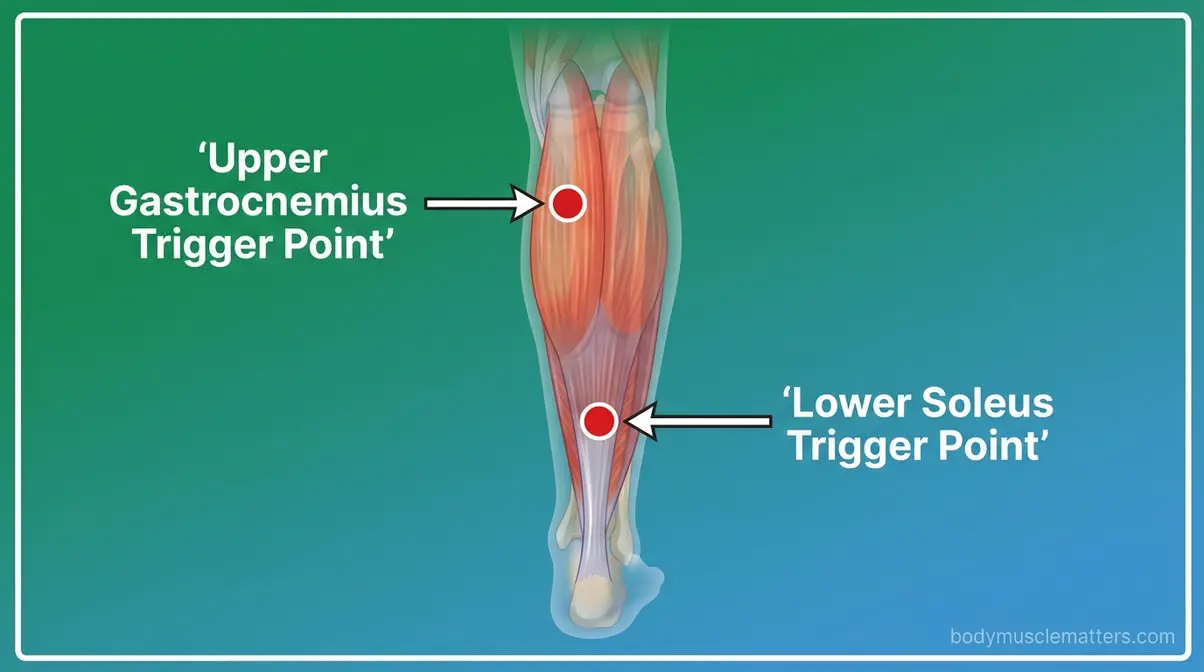
A trigger point is a tight, hyper-irritable spot in the muscle fiber that feels like a small, firm lump or pea under the skin. When you press on it, you’ll feel a sharp, familiar ache — sometimes the pain radiates down toward the heel or up toward the back of the knee. That referral pattern confirms you’ve found a real trigger point, not just general soreness.
Trigger points develop from sustained muscle contraction, poor posture, overuse, and dehydration. They form where myofascial adhesions develop — areas where the connective tissue wrapping your muscle fibers sticks together, creating localized stiffness that won’t release through stretching alone.
The two most common calf trigger point locations are the upper gastrocnemius belly (just below the back of the knee) and the lower soleus (just above the Achilles area). Knowing how to massage knots out of calf muscles starts with finding these locations.
Once you’ve located a trigger point, here’s the exact method to release it.
How do you release tight calf muscles?
To release a trigger point and relieve tight calf muscles, apply sustained pressure — not rubbing — directly on the knot for 30–60 seconds. According to Dr. Graeme’s trigger point therapy guide, applying sustained thumb pressure to a calf trigger point for 30–60 seconds causes the knot to release through neurological inhibition — reducing pain without requiring aggressive force (Dr. Graeme’s 2021 clinical guide).
Step-by-step trigger point release protocol:
- Use light thumb exploration across the calf to locate the trigger point — move slowly until you find a spot that produces a familiar, referred ache
- Apply firm thumb pressure directly on the point at a 6–7/10 pain intensity — “uncomfortable, but not sharp or electric”
- Hold pressure steadily for 30–60 seconds — do not rub or move; simply hold
- You should feel the tension soften or “melt” under your thumb within that window
- Release slowly, then follow immediately with 5–6 effleurage strokes to flush the area
- Repeat on additional points as needed; limit yourself to 3–4 trigger points per session to avoid overworking the tissue
Safety note: If the pain sharpens, becomes electric, or shoots down the leg in a nerve-like pattern — stop immediately. This is not a trigger point sensation; it may indicate nerve involvement and requires professional evaluation. For a deep dive into muscle knots and trigger points, including why some knots crunch when pressed, see our dedicated guide.
For chronic tightness across the entire muscle — not just isolated knots — muscle stripping is more effective.
Muscle Stripping for Chronic Tightness
Muscle stripping is a longitudinal technique: slow, sustained pressure applied in a single unbroken line along the muscle from its lower attachment (near the Achilles) to just below the knee. It’s the right choice when your whole calf feels tight rather than one specific spot.
Apply lotion first. Place both thumbs side by side or slightly overlapping at the Achilles tendon area, then push slowly upward in a single, uninterrupted stroke. Maintain firm, consistent pressure — imagine you’re pushing butter slowly across toast. Each stroke should take 2–3 seconds. Complete 4–6 strokes per session.
For how to massage sore calf muscles that feel uniformly tight after a long run or a day on your feet, stripping is often more effective than trigger point work because it addresses the entire muscle belly rather than isolated points. Combine it with the warming techniques from Steps 1–3 for best results.
If you want to go even deeper or find hand techniques too fatiguing, the right tools can dramatically improve your results.
Calf Massage Tools: Guns, Rollers, Balls
The right tool depends on what you’re trying to achieve. How you use massage gun on legs matters as much as which tool you choose — each one has a specific use case, and misuse can reduce effectiveness or cause discomfort. Across physical therapy communities, the consistent guidance is to match the tool to the tissue state: broad tools (rollers) for general tightness, percussive tools (guns) for pre-activity warm-up, and pinpoint tools (balls) for specific knots.
Foam Roller Technique for Calves
A foam roller — a cylindrical tool that uses your bodyweight for consistent, broad pressure — is one of the most accessible and effective tools for general calf tightness. Knowing how to use a massage roller correctly makes the difference between a productive session and wasted effort.
- Setup and technique:
- Sit on the floor, place the foam roller under one calf, and place both hands flat on the floor behind you for support
- Slowly roll from the ankle to just below the knee — don’t rush past tight spots
- When you find a tender area, pause for 20–30 seconds rather than rolling over it — this is where most beginners go wrong
- To increase pressure, cross the opposite leg over the top of the working leg
- Spend 60–90 seconds per calf total
- Avoid: Rolling directly over the back of the knee (popliteal fossa)
- Tip for the soleus: Point your toes slightly inward while rolling to shift pressure to the deeper muscle layer
Massage guns offer faster results for some users, but require careful technique on the calf.
How to Use a Massage Gun Safely
A massage gun — also called a percussive therapy device — delivers rapid bursts of pressure to the muscle tissue. Used correctly on the calf, it can improve range of motion and reduce pre-activity stiffness. Used incorrectly or at the wrong time, it adds little benefit.
- Settings and technique for how to use massage gun on calf:
- Attachment: Use a round or flat head — never a pointed or bullet attachment on the calf
- Speed: Always start on the lowest speed setting (Speed 1). If your gun has multiple speeds, resist the urge to jump to a higher setting on your first session
- Angle: Hold the gun perpendicular to the muscle surface, not at an angle
- Movement: Glide slowly — approximately 1 inch per second. Let the gun’s percussion do the work; do not press hard
- Duration: 1–2 minutes per calf on low speed. Do not exceed 5 minutes total
Critical timing guidance: PubMed research on massage gun limitations found that a 5-minute massage gun application to calf muscles immediately after strenuous exercise showed little effect on recovery of strength, range of motion, or endurance (PMC publication, 2024). The University of Utah Health massage gun safety guide recommends waiting 3–5 days after an acute calf strain before using percussive tools (U of Utah Health publication, 2025). For general tightness — not post-injury — use the gun before activity or at least 24 hours after an intense workout.
How to massage calf muscle with massage gun for knots: Slow the movement to a near-hold over the tender area, pause for 10–15 seconds, then continue moving. Do not hold stationary for more than 15 seconds at one spot.
Always avoid: Back of the knee, the shin bone, the Achilles tendon, and any visible varicose veins.
For pinpoint trigger point work, a massage ball offers more precision than a gun or roller.
Trigger Point Ball Technique for Calves
- Setup and technique:
- Sit in a chair and place a lacrosse ball or massage ball on the seat surface
- Rest the calf directly on top of the ball, positioning it under a tender spot
- Shift your weight slowly — you’ll feel when you’ve found a tight area
- Hold steady pressure on the tender spot for 20–30 seconds
- Lift the leg slightly to reduce pressure; press down to increase it
- Move to the next tender area and repeat
Best use case: Targeting specific trigger points that are too small and precise for a foam roller to address effectively. The ball’s small surface area concentrates pressure exactly where you need it. To learn about muscle scraping tools as a complementary technique for fascial release, see our dedicated guide.
Avoid: The back of the knee and the Achilles tendon insertion point — these areas are sensitive and don’t benefit from ball compression.
Common Mistakes to Avoid When Massaging Your Calf
Even well-intentioned technique fails when these two categories of mistakes are present. Across physical therapy communities, these errors account for the majority of cases where self-massage “didn’t work” or made things temporarily worse.
Pressure Mistakes
Going too deep too fast is the most common error. Applying firm pressure to a cold, unwarmed muscle triggers involuntary guarding — the muscle tightens against the pressure, making knots harder to release. Always complete Steps 1–3 before any deep work.
Pressing directly on bone — particularly the shin or the Achilles tendon — causes pain without therapeutic benefit. Keep all pressure on the soft muscle belly, not the bony structures surrounding it.
Staying in one spot too long beyond 60–90 seconds can cause bruising or increased soreness. If a trigger point hasn’t released after 60 seconds of sustained pressure, move on and return to it in a future session.
Timing Mistakes
Massaging immediately after an intense workout when muscle tissue is acutely inflamed can worsen soreness rather than relieve it. Research confirms that percussive massage applied immediately post-strenuous exercise provides minimal recovery benefit — wait at least 24 hours after a hard session.
Skipping hydration before and after reduces the effectiveness of any massage. Fluid helps metabolic waste products clear from the tissue after you’ve mobilized them through pressure.
Massaging too frequently — more than once daily on the same area — doesn’t allow the tissue time to recover. One focused 10–15 minute session per day is more effective than multiple short attempts.
Safety Precautions and When to See a Doctor
Areas to Avoid on the Leg
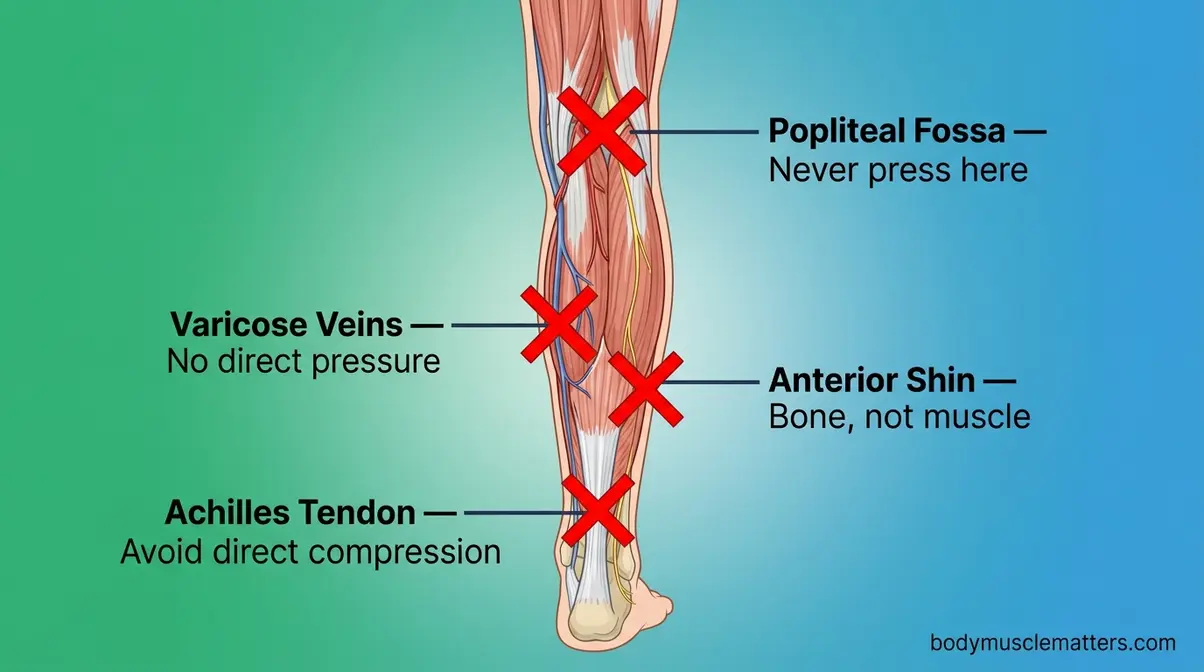
Several areas on the lower leg require careful avoidance during self-massage. Clinical guidance from mblexguide.com on areas of caution in massage therapy identifies these as the primary zones requiring caution:
- Popliteal fossa (back of the knee): Contains the popliteal artery, vein, and tibial nerve — never apply deep pressure here
- Anterior shin (tibia): Bone, not muscle — pressure causes pain without benefit and can aggravate shin splints
- Achilles tendon: The tendon itself is not a massage target; work the muscle belly above it, not the tendon
- Visible varicose veins: Direct pressure can worsen venous damage
- Any area with unexplained swelling, redness, or warmth — these are potential DVT symptoms (see the warning above)
To summarize what parts of the body are not appropriate for deep massage pressure: the popliteal fossa, the anterior shin, bony prominences, the Achilles tendon, and any area showing signs of acute inflammation or vascular compromise.
When to Seek Medical Attention
Some calf symptoms require a doctor, not a massage. Seek medical attention — do not attempt self-massage — if you experience:
- One-sided sudden swelling of the calf or leg (classic DVT warning sign)
- Warmth and redness over the calf without a clear cause like a bruise
- Pain that doesn’t change with position, rest, or gentle movement — this differs from typical muscle soreness
- Numbness, tingling, or weakness in the foot or lower leg (possible nerve involvement)
- Calf pain following a long flight, surgery, or extended bed rest — DVT risk is elevated in all three scenarios
- Sharp pain with any weight-bearing that doesn’t ease — could indicate a partial or full calf tear
If you suspect a blood clot or have any of the symptoms listed above, do not massage — seek immediate medical attention.
Frequently Asked Questions
Is it good to massage your calf muscles?
Yes, massaging your calf muscles is beneficial for most people experiencing tightness, soreness, or post-exercise fatigue. Research published in PMC in 2023 found that a 20-minute therapeutic calf massage significantly reduced heart rate and blood pressure while improving autonomic recovery markers. A separate study published in 2020 found a 5-minute percussive session increased ankle range of motion by 18.4%. The exception is active injury, DVT symptoms, or varicose veins — in those cases, massage is contraindicated.
How do I massage my calf myself?
Self-massage for tight calves follows the Pressure-First Protocol: always warm the muscle before applying deep pressure. Start with light effleurage (Steps 1–3) for 1–2 minutes, then progress to petrissage (kneading) and thumb stripping (Steps 4–7), and finish with sustained trigger point holds (Steps 8–10) on any remaining knots. Sit in a chair with one ankle crossed over the opposite knee for the easiest access. Apply lotion or oil before starting to reduce skin friction.
What body parts shouldn’t be massaged?
Several areas require avoidance during any calf or leg massage: the popliteal fossa (back of the knee) contains major nerves and blood vessels; the anterior shin is bone, not muscle; the Achilles tendon itself should not be directly compressed; visible varicose veins must be avoided to prevent vascular damage; and any area showing signs of DVT (swelling, warmth, redness) is an absolute contraindication. More broadly, open wounds, skin infections, and areas of acute inflammation should never be massaged. If in doubt, consult a physiotherapist before beginning self-massage on any unfamiliar area.
Ready to Relieve That Tension?
For runners, desk workers, and anyone living with chronically tight calves, self-massage is one of the most accessible and evidence-backed tools available. A PMC study published in 2023 confirmed that therapeutic calf massage measurably reduces heart rate and blood pressure; a PubMed study published in 2020 found a 5-minute percussive session increased ankle range of motion by 18.4%. The best results come from combining consistent technique with the right approach for your specific issue — tightness, knots, or post-exercise soreness each respond differently.
The Pressure-First Protocol is the organizing framework here for a reason: it’s not just about applying pressure — it’s about applying the right pressure at the right stage. Warming techniques prime the tissue, medium-pressure techniques address surface tension, and deep techniques release the stubborn knots that stretching never reaches. Skipping steps is where most DIY massage attempts fall short.
Start with a single 10-minute session using Steps 1–5 today. Focus on one calf at a time, use lotion, and respect the 30–60 second trigger point hold rather than rushing through it. If tightness persists after two weeks of consistent self-massage, or if you notice any of the warning signs listed in the Safety section, consult a licensed physiotherapist — some cases benefit from professional assessment and hands-on treatment.
Related posts:
Benefits of Yoga for Fitness: The Science-Backed Guide
Home Workouts to Build Muscle Without Weights (2026)
CrossFit Strength Training for Beginners: 2026 Guide
Home Workout Plan for Beginners: 30-Day Step-by-Step
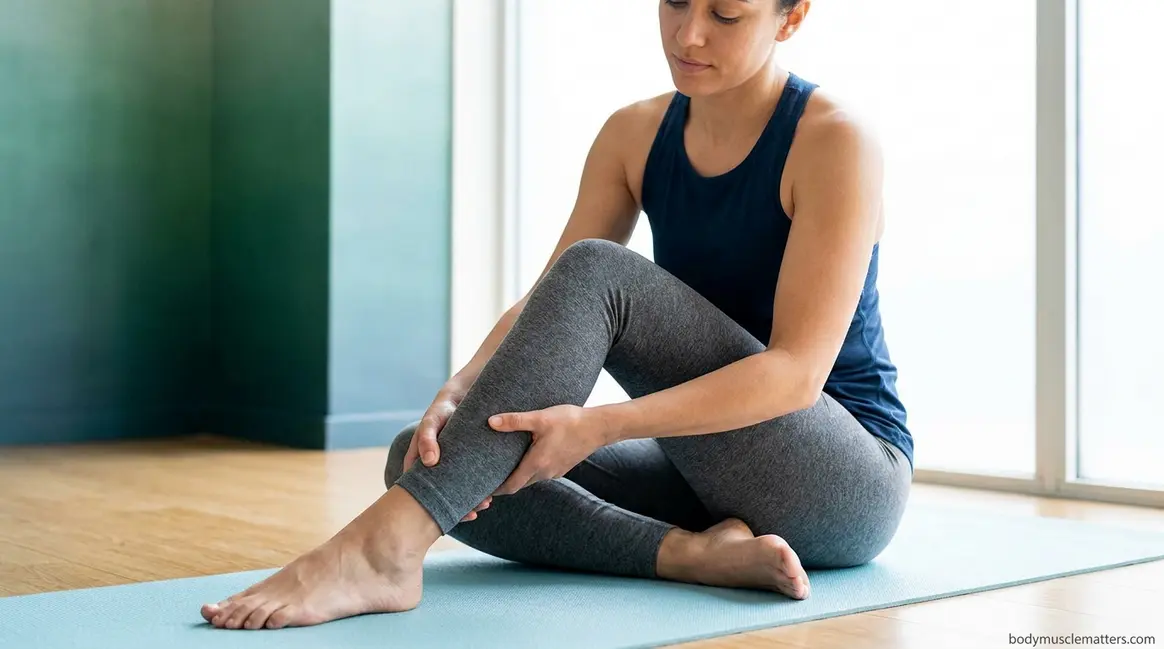
How to Self Massage Calves: The 4-Layer Method Guide
Strength Training for Beginners: Complete Workout Plan 2026
Callum
Hi, I'm Callum, the founder of Body Muscle Matters. I'm not a certified trainer, I'm a self taught lifter who started this site to share what I've learned from my own training and a lot of trial and error. Everything here comes from real experience and honest research, written the way I'd explain it to a friend who is just getting started. My goal is simple: practical, no hype fitness advice you can actually use.