How to Maintain Muscle While Injured: 4-Step Plan
⚠️ Medical Disclaimer
This article is for informational purposes only and is not a substitute for professional medical advice, diagnosis, or treatment. The protocols described — including cross-education training and isometric exercises — carry risk if performed incorrectly or on an unstable injury. Always consult a licensed physical therapist, sports medicine physician, or your doctor before attempting any of the steps in this guide. Individual results vary based on injury severity, age, and health status.
**
You’re injured, you can’t train, and every day away from the gym feels like another day of “killing your gains.” That fear is real — and completely understandable. But the science says it doesn’t have to come true.
Do nothing, and muscle atrophy — the gradual shrinking and weakening of muscle tissue — begins within two weeks. The wrong response, like cutting calories to “lean out” during recovery, actually accelerates it. Both outcomes are avoidable when you know exactly what to do.
This guide gives you a step-by-step blueprint — backed by research from the NIH and PubMed — showing precisely how to maintain muscle while injured through modified training, targeted nutrition, and hormonal management. Four concrete steps: understanding what’s happening to your muscles right now, modifying your training safely with 8 specific exercises, dialing in your nutrition, and managing hidden threats like cortisol elevation and GLP-1 medications.
You can maintain muscle while injured — research shows that three weeks of inactivity does not reduce muscle thickness, strength, or performance in previously trained individuals (PMC, 2026).
- Train the healthy side: Cross-education preserves the injured limb neurologically, attenuating weakness and atrophy in the immobilized limb
- Hit your protein target: 1.6–2.2g per kg of bodyweight daily — every single day of recovery
- Eat at maintenance: A calorie deficit forces your body to cannibalize muscle for fuel, accelerating atrophy
- Manage cortisol: Injury stress triggers a catabolic hormone that breaks down muscle protein — sleep, pain management, and adequate nutrition are your primary defences
- “PT Is Your Sport”: Physical therapy is your training discipline during recovery — treat it with the same commitment you’d give your regular programme
Prerequisites Before Starting
Before diving into the four steps, take 60 seconds to confirm this guide is right for your situation. The protocols below are designed for specific injury scenarios — and some injuries require you to skip certain steps entirely until cleared by a medical professional.
Who This Guide Is For
This guide is designed for individuals dealing with muscle strains (Grade 1–2 partial tears), ligament sprains (ankle, knee, wrist), post-surgery immobilization of a single limb (such as a wrist, ankle, or shoulder reconstruction), and general forced rest due to soft-tissue injury.
Stop and go directly to the Limitations section if you have: an active fracture with surgical hardware, an open wound, neurological symptoms (numbness, tingling, weakness spreading beyond the injury site), severe pain at rest, or any signs of infection (fever, redness spreading from the wound).
The “PT clearance rule” applies before Step 2: before attempting any exercise described here, get verbal confirmation from your physical therapist (PT) — a licensed medical professional specialising in injury rehabilitation — or your doctor that unilateral training is safe for your specific injury. For example, if you have a Grade 2 ankle sprain and your PT has cleared you for upper-body training, you can begin at Step 2 immediately. Muscle atrophy (the medical term for muscle shrinkage and weakening) is the enemy — but attempting exercises on an unstable injury creates a bigger problem.
What You’ll Need
You don’t need a gym. Most of the Step 2 protocols can be done at home with resistance bands or your own bodyweight. Here’s what to have ready:
- A food tracking app (MyFitnessPal, Cronometer) or kitchen scale to measure daily protein intake — this is non-negotiable
- Time: 20–30 minutes per session, 2–3 days per week for modified training; 5 minutes of daily meal-prep math
- Resistance bands (optional but helpful) for cross-education exercises at home
- Access to care: An active relationship with a physical therapist is ideal; at minimum, a doctor who has reviewed your specific injury
- A protein powder (optional) — whey or plant-based — to help hit daily gram targets without relying on volume of food alone
Now let’s look at what’s actually happening inside your muscles — because understanding the science is the first step to fighting back.
Step 1 – Understand Your Muscle Atrophy Timeline
- How to maintain muscle while injured — at a glance:
- Eat maintenance calories with 1.6–2.2g protein per kg of bodyweight
- Train the healthy limb using cross-education every 2–3 days
- Perform isometric holds for the injured area if cleared by your PT
- Prioritise deep sleep (7–9 hours) to combat injury-induced cortisol elevation
- Apply the P.R.I.C.E. protocol immediately in the first 48–72 hours
- Use creatine supplementation (3–5g/day) to support muscle cell energy
- Confirm PT clearance before returning to any load-bearing exercise
Three weeks of inactivity does not reduce muscle thickness, strength, or performance in previously trained individuals — a finding confirmed in a peer-reviewed study of adolescent athletes after 12 weeks of resistance training followed by three weeks of complete detraining (PMC, 2026). Your situation is less catastrophic than it feels right now. Here’s why — and exactly when you do need to act.
Will 2 Weeks Off Ruin Gains?
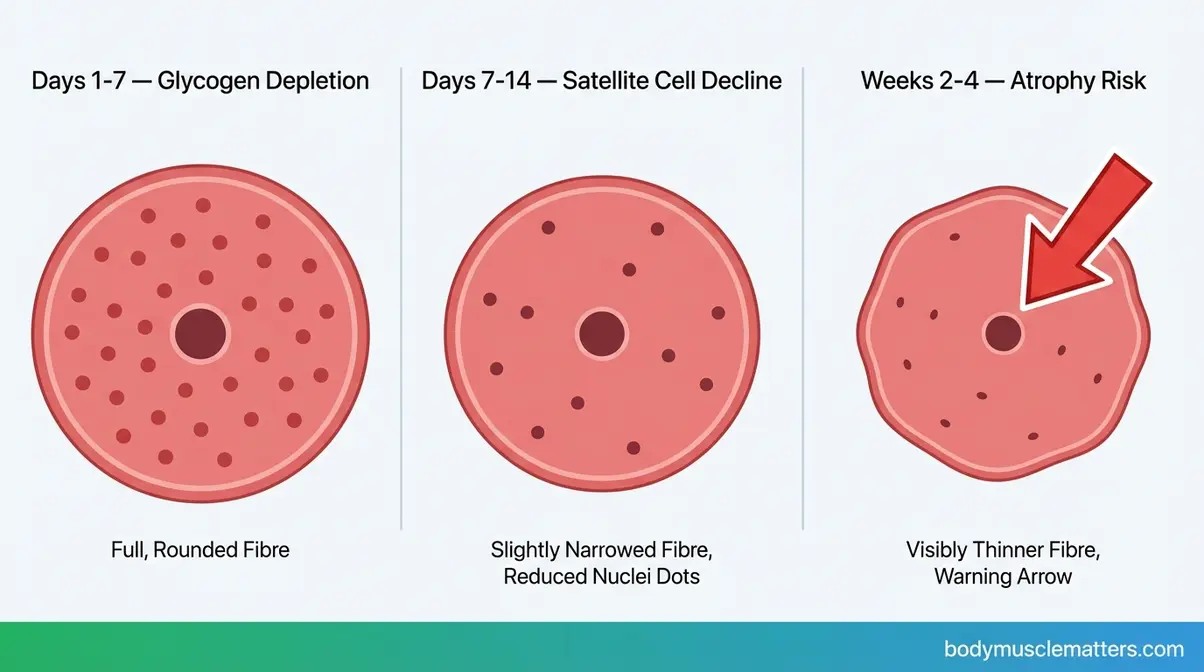
Two weeks off will not ruin your gains if you were previously trained. In the first 7 days of reduced activity, the most visible change inside your muscles isn’t actually muscle loss — it’s glycogen depletion. Glycogen (stored carbohydrate energy held inside muscle cells) drops rapidly when training stops, causing the muscle to lose its “pumped” appearance and feel softer. This is temporary. It reverses within days of returning to training and is not true atrophy.
Days 7–14 is where the biology becomes more serious under conditions of complete bed rest. Research from a 14-day bed-rest study in healthy middle-aged adults found a significant decline in satellite cell content — satellite cells are the muscle stem cells responsible for repair and growth — along with reduced capillary density and measurable fibre atrophy (14-day bed rest study, PMC, 2026). Muscle strength loss, importantly, outpaces visible atrophy early: strength can decline roughly 10% by day 14 while actual tissue loss is approximately 5%.
The P.R.I.C.E. protocol (Protection, Rest, Ice, Compression, Elevation) applied within the first 48–72 hours manages inflammation and slows early cellular damage. If you’re moving around on crutches rather than on complete bed rest, your muscle loss timeline is significantly slower than these bed-rest figures suggest. Follow the P.R.I.C.E. protocol first — then move to the active preservation steps below. Always consult your PT before advancing to Step 2.
You can read about the precise timeline of muscle loss in more detail to understand how the process unfolds week by week.
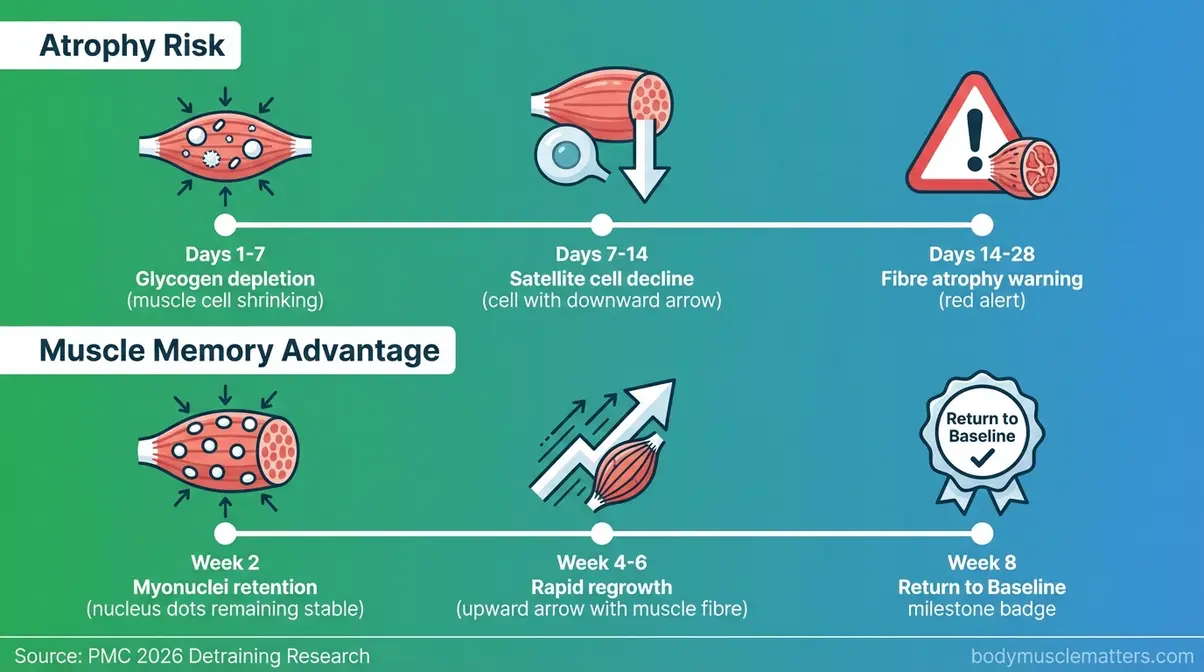
Weeks 2-4: Atrophy Acceleration
The inflection point arrives between weeks 2 and 4 — but only for those who aren’t following an active preservation protocol. With complete immobility and no nutritional strategy, untrained adults can experience meaningful strength losses approaching 10% per 10 days of bed rest (PMC, 2026). That sounds alarming. The contrast, however, is striking.
A three-week detraining study confirmed that previously trained individuals experienced no significant reduction in muscle thickness, strength, or sport performance across that entire window (PMC, 2026). This is exactly what the protocols below address: how to maintain muscle mass while injured through Weeks 2–4 — leveraging the biological advantages that prior training has already built into your muscle tissue.
The P.R.I.C.E. window is also closing at Week 2. It’s time to transition from pure inflammation management to the active preservation approach in Step 2. Note: these timelines apply to partial immobilisation or single-limb injury. Complete bed rest after major surgery accelerates atrophy considerably — always follow your surgical team’s guidance explicitly.
Muscle Memory Accelerates Recovery
Even if some atrophy occurs, a powerful biological mechanism is working in your favour: muscle memory. When you train consistently over months and years, your muscles accumulate myonuclei — permanent cellular nuclei embedded inside muscle fibres. Think of myonuclei like permanent staff at a factory: even if production slows down during your injury, the infrastructure stays fully intact. When training resumes, production ramps back up remarkably quickly.
The practical implication is significant. A trained athlete returning after 4–6 weeks of forced rest can frequently regain their baseline strength within 2–4 weeks of resumed training — compared to the 3–6 months it took to build that baseline initially. Across rehabilitation communities, the consistent message mirrors what clinical evidence supports: individuals who followed active recovery protocols returned to pre-injury strength levels in 2–4 weeks post-clearance. This is why your goal right now isn’t to build muscle — it’s to preserve the infrastructure. The gains come back fast once you’re cleared.
For more on this mechanism, see how muscle memory accelerates your recovery once you return to training.
The timeline below shows exactly what happens at each stage — and when the muscle memory mechanism kicks in.
Caption: A day-by-day breakdown of glycogen depletion, satellite cell decline, and the myonuclei mechanism that accelerates muscle regrowth once training resumes.
Now that you understand the timeline, let’s build your training modification protocol — including 8 specific exercises your PT would approve.
Step 2: Muscle-Preserving Exercises
“Do your PT. Never miss a day — PT is your sport if you’re injured.”
This is the “PT Is Your Sport” concept in action. When you can’t hit your regular training split, your protocol becomes something else entirely: cross-education training on the healthy side, isometric holds on the injured side, and active recovery — all within your PT’s guidelines. Maintaining muscle while injured means treating your rehabilitation sessions with the same focus and consistency you’d bring to a training block. Miss your PT exercises the way you’d miss a competition prep session — reluctantly, and rarely.
“The 8 exercises below were selected based on peer-reviewed evidence from the National Center for Biotechnology Information on cross-education efficacy and minimal-dose resistance training for injury rehabilitation. Always confirm with your physical therapist that these movements are appropriate for your specific injury before attempting them.”
The diagram below illustrates how the neurological transfer of cross-education works.
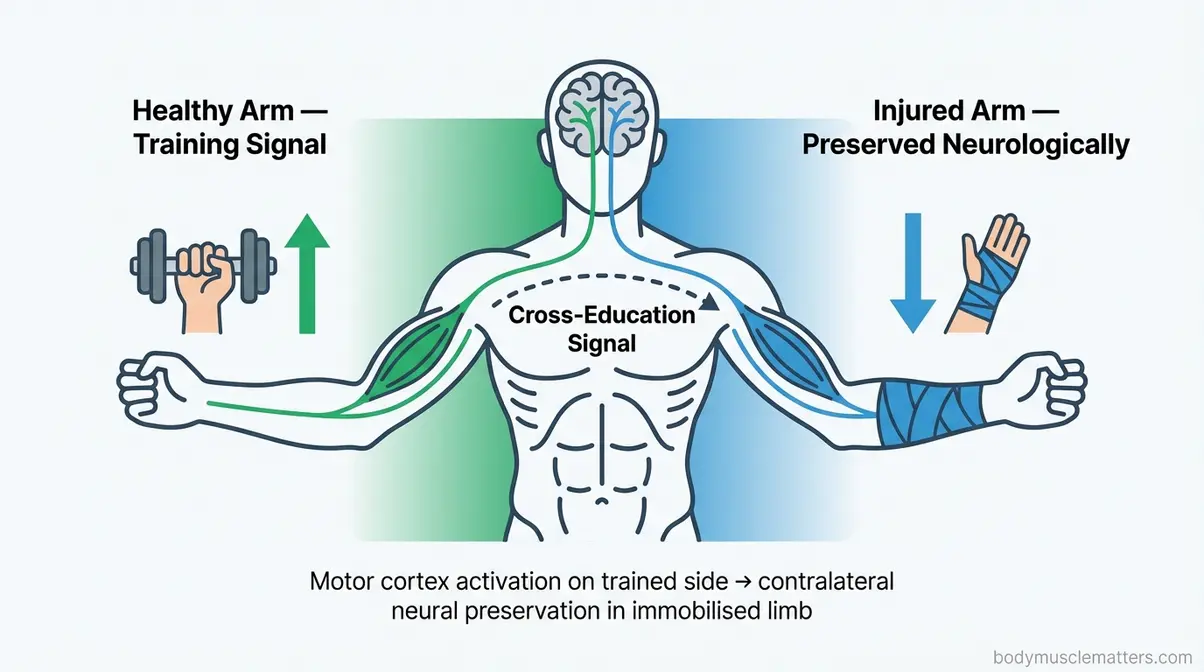
Caption: Cross-education works through the nervous system — strength signals from your healthy side travel neurologically to preserve the injured limb’s muscle architecture.
For a visual walkthrough of the training modifications and atrophy timeline, watch our video guide:
Training the uninjured side with resistance exercises can significantly attenuate muscle weakness and atrophy in the opposite, immobilised limb — a finding from a 2026 peer-reviewed study in Physiological Reports (PMC, 2026).
Cross-Education Protocol
Cross-education — a neurological phenomenon where training one limb sends preservation signals to the opposite, injured limb — is among the most evidence-supported tools in rehabilitation science. Cross-education training research confirms that resistance training of the non-immobilised arm attenuates muscle weakness and atrophy in the contralateral immobilised arm (PMC, 2026). A meta-analysis reported a large effect size (SMD 1.60) in attenuating strength loss during immobilisation. These are also the protocols most commonly recommended in physical therapy communities for upper-body injuries. See more on utilising unilateral training to prevent muscle loss.
Consult your physical therapist before beginning these movements. Technique precision matters for maximising the cross-education signal.
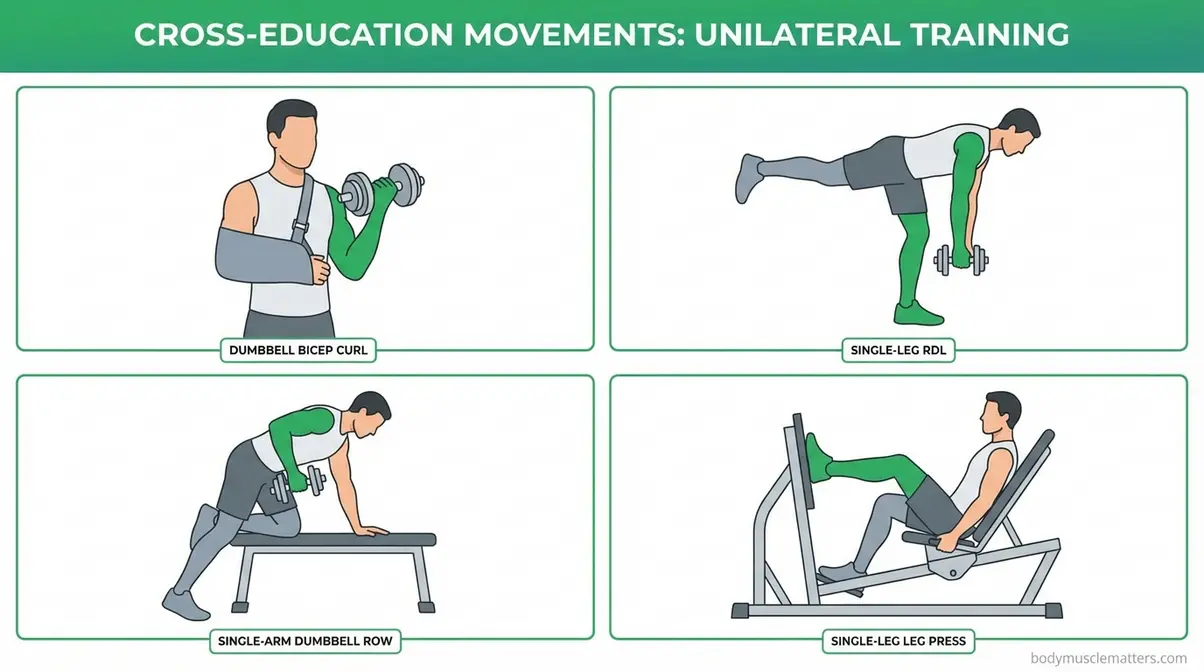
- Exercise 1: Dumbbell Bicep Curl (Healthy Arm)
- Sit or stand, holding a moderately challenging dumbbell in your uninjured arm.
- Curl the weight slowly upward, squeezing the bicep at the top for 2 seconds.
- Lower under control over 3 seconds.
- Perform 3 sets of 10–12 reps. Rest 90 seconds between sets.
The clinical rationale here is that controlled eccentric loading (the 3-second lower) maximises the neural cross-education signal delivered directly to the injured limb.
Exercise 2: Single-Leg Romanian Deadlift (Healthy Leg)
To execute this, stand on your healthy leg with a soft bend in the knee while holding a light dumbbell. Hinge at the hip, lowering the weight toward the floor while extending the free leg behind you. Maintain a neutral spine throughout the movement. Drive through the heel of the standing leg to return upright. Perform 3 sets of 10 reps on the healthy side. By completely unloading the injured limb, this single-leg hinge preserves hip hinge mechanics and posterior chain strength safely.
- Exercise 3: Single-Arm Dumbbell Row (Healthy Arm)
- Place your healthy-side hand and knee on a flat bench for support.
- Hold a dumbbell in the working arm, allowing it to hang at full extension.
- Pull the dumbbell toward your hip, leading with the elbow.
- Hold for 1 second at the top, then lower under control.
- Perform 3 sets of 10-12 reps.
Physical therapists favour unilateral pulling patterns like this because they build mid-back stability. This is essential for supporting your overall posture during a recovery period when your daily movement patterns become highly asymmetrical.
Exercise 4: Healthy-Side Leg Press (Single Leg)
Position yourself in a leg press machine, placing only the uninjured foot on the platform. Lower the weight slowly to a 90-degree knee angle, then safely press through the heel to full extension without locking out the knee entirely. Aim for 3 sets of 12-15 reps. This movement entirely removes spinal loading, making it an incredibly safe option for upper-body or core injuries while continuing to deliver a strong contralateral cross-education stimulus.
Where cross-education targets the healthy side, there’s a second method that directly engages the injured muscles themselves — without moving the joint at all.
Isometric Holds
Isometric exercises — muscle contractions that occur without joint movement — are often the first movements a physical therapist assigns immediately post-surgery. They maintain the nerve-to-muscle signalling pathway even during complete immobilisation. A minimal-dose resistance training study found that a single set performed 1–3 times per week is sufficient to preserve muscle strength and functional ability during recovery (PubMed, 2026). Begin hold durations at 20 seconds and progress to 45 seconds over 2–3 weeks. Confirm PT clearance before performing these on an injured limb.
See more strategies for training around injuries safely.
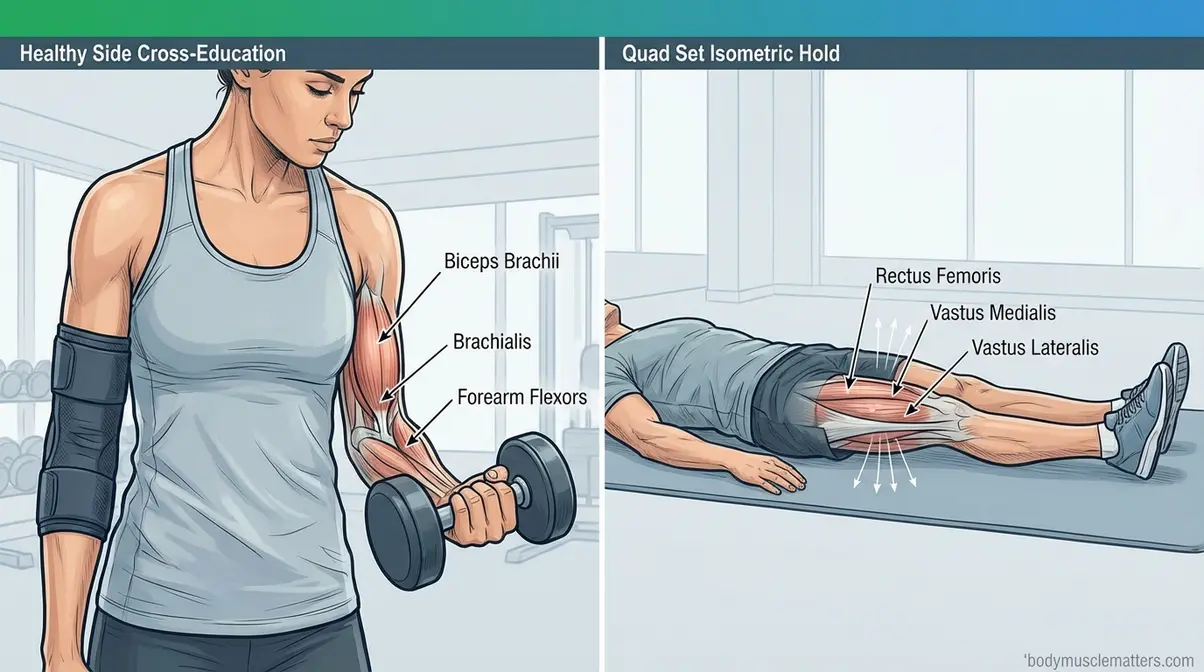
- Exercise 5: Quad Set (for knee/leg injuries)
- Sit or lie flat with your injured leg fully extended.
- Tighten the quadricep (the front thigh muscle) by pressing the back of your knee gently toward the floor.
- Hold the contraction for 30–45 seconds. Release slowly.
- Perform 3 sets with 30 seconds rest between sets.
Therapists assign isometric quad activation to prevent the rapid quad atrophy commonly seen after knee surgery, stimulating the muscle without applying dangerous compressive loads to the healing joint.
Exercise 6: Single-Leg Wall Sit (Healthy Leg)
Stand with your back flat against a wall, keeping your feet shoulder-width apart. Slide down until your healthy leg reaches a comfortable 90-degree angle. Lift the injured leg off the floor entirely so it bears no weight, and hold the position for 30-45 seconds. Complete 3 full sets. Sustained isometric loading of the healthy leg generates powerful cross-education output directly to the injured lower limb.
- Exercise 7: Glute Bridge Hold (for hip/lower back injuries – where cleared)
- Lie on your back, knees bent, feet flat on the floor.
- Press through your heels to lift your hips until your body forms a straight line from knees to shoulders.
- Hold at the top for 20–30 seconds, squeezing the glutes.
- Perform 3 sets of 5 holds. Requires explicit PT clearance first.
Glute bridges expertly preserve posterior chain activation patterns during periods of significantly reduced lower-body training. This activation proves essential for long-term return-to-sport readiness.
Exercise 8: Towel Bicep Isometric Squeeze (for arm injuries)
Fold a small towel into a tight roll and carefully place it in the hand of the injured arm. Squeeze the towel as hard as possible, intentionally activating the bicep without bending or moving the elbow joint itself. Hold this maximal squeeze for 30 seconds. Perform 3 sets of 5 holds, resting 30 seconds between each set. Generating isometric tension at zero joint movement remains the absolute safest form of muscle activation during early-stage arm immobilisation protocols.
For some injuries, two additional tools that sports medicine clinicians use take preservation further beyond bodyweight and isometric training.
BFR and EMS Modalities
Blood Flow Restriction training (BFR) — a technique using a light tourniquet-style cuff to restrict venous blood flow during low-load exercise, stimulating muscle adaptation at reduced weights (typically 20–30% of your one-rep maximum) — is an intermediate-to-advanced modality. It requires instruction from a certified PT or coach before attempting at home. BFR allows meaningful muscle stimulus at loads that don’t stress healing tissue, making it valuable for injuries where heavier loading is contraindicated.
Electrical Muscle Stimulation (EMS) — a device that delivers electrical impulses to trigger involuntary muscle contractions in an immobilised limb — is available at most physical therapy clinics. It’s most relevant for limbs in complete casts where no voluntary contraction is possible, helping maintain basic neuromuscular signalling during the acute immobilisation window.
Both modalities are best introduced after the first two weeks of injury, once the acute inflammatory phase resolves. If you’re in the first two weeks, focus on Steps 3 and 4 (nutrition and cortisol management) first. As a complement to isometric holds, gentle stretching and range-of-motion work prescribed by your PT helps maintain joint flexibility and tissue length alongside the strength-preservation work above. Always access BFR and EMS through a licensed PT rather than self-administering.
Training alone won’t hold your muscle together. What you eat during recovery is equally — some would argue more — critical. Step 3 gives you the exact numbers.
Step 3: Dial In Your Nutrition
When you can’t train at full capacity, nutrition becomes your primary lever for maintaining muscle. The single most important nutritional action during injury recovery is maintaining protein intake — your muscles use protein to repair tissue and slow the atrophy process that inactivity would otherwise accelerate. The second most critical action is avoiding a calorie deficit.
Use the comparison chart below as your quick reference for daily nutrition targets during recovery.
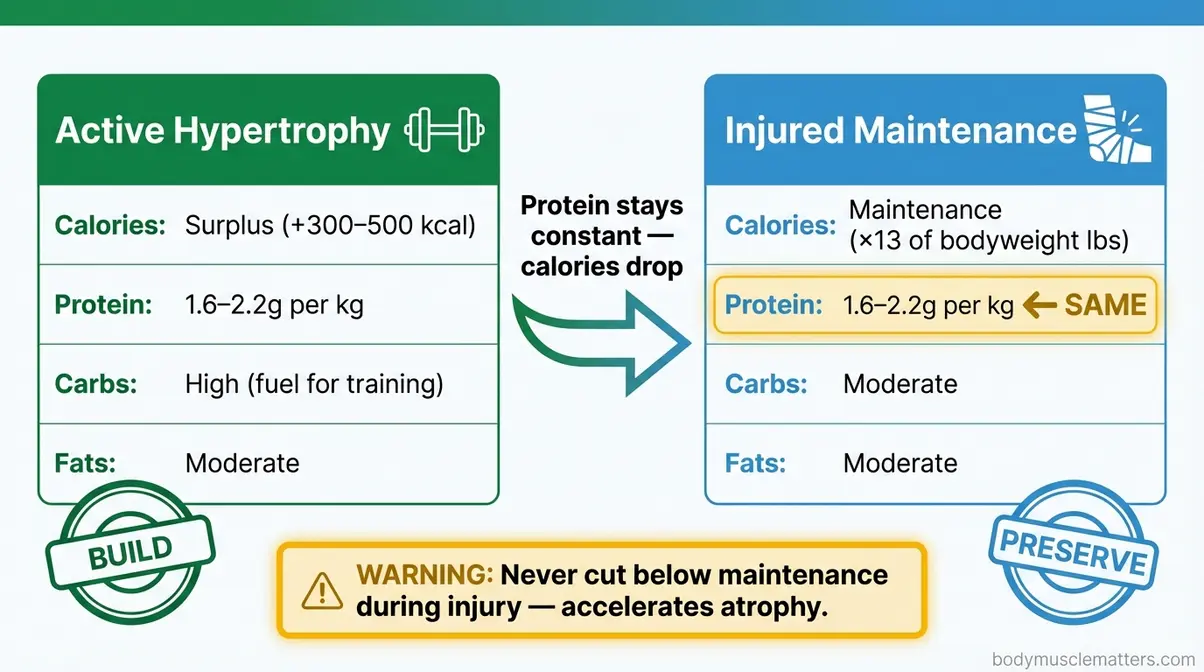
Caption: During injury recovery, your macro priorities shift — protein stays high, total calories match maintenance, and aggressive deficits become your biggest risk.
How Much Protein You Need
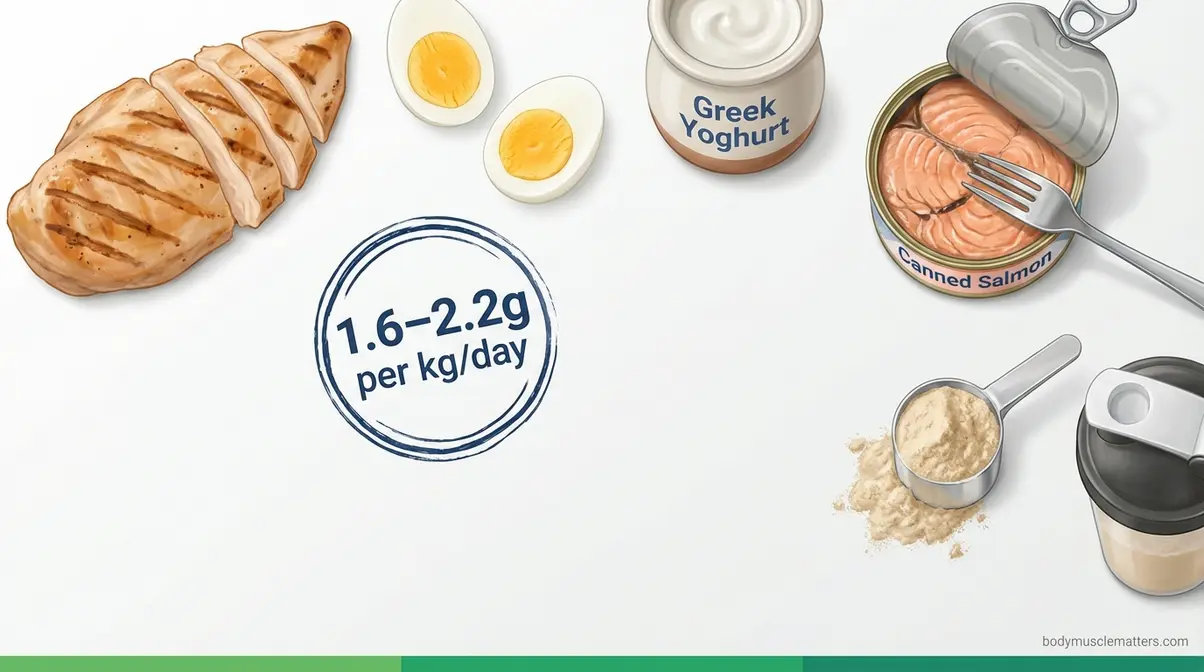
Protein synthesis — the biological process your muscles use to repair and grow — depends entirely on a consistent supply of dietary protein throughout the day. The evidence-based target for preserving muscle during injury recovery is 1.6–2.2 grams of protein per kilogram of bodyweight per day, with intake distributed across 4–6 meals every 3–4 hours (PubMed, 2026). BCAA and protein research confirms that maintaining daily protein intake — focusing on amount, timing, and type — significantly restricts muscle mass and strength loss during injury recovery (PubMed, 2026).
Here’s what that looks like in practice: if you weigh 70kg (154 lbs), your daily protein target is 112–154g. Split across 4 meals, that’s 28–38g per meal. Each meal needs enough protein to cross the “leucine threshold” — the minimum signal required to switch on muscle protein synthesis. Research on rehabilitation nutrition confirms that 20–35g of high-quality protein per meal is the optimal window to maximise that signal (PMC, 2026).
- A simple 4-meal example:
- Breakfast: 3 eggs + 1 cup Greek yoghurt = ~30g protein
- Lunch: 150g grilled chicken breast = ~35g protein
- Snack: 1 scoop whey protein (a fast-digesting dairy-based protein powder) = ~25g protein
- Dinner: 150g salmon = ~30g protein → Total: ~120g/day
Best sources: chicken breast, Greek yoghurt, eggs, canned tuna or salmon, whey protein powder, legumes (for plant-based eaters). These are general evidence-based ranges. Your actual needs may vary based on injury severity, age, and health status — consult a registered dietitian or sports medicine physician for personalised targets.
Protein targets are only half the equation. How many total calories you eat during recovery determines whether that protein gets used for muscle preservation — or burned for energy instead.
Maintenance Calories Explained
Maintenance calories — the number of calories your body needs each day to sustain its current weight without gaining or losing — are your nutritional floor during recovery. Eating below that floor is one of the most damaging mistakes an injured athlete can make. When the body enters a calorie deficit, it cannibalises muscle tissue for fuel, directly accelerating the atrophy process you’re trying to prevent. UW Health sports nutrition guidance advises increasing protein while maintaining total calorie intake during injury recovery to support tissue healing without muscle loss.
Estimating your maintenance is simpler than it sounds. Use this quick formula: multiply your bodyweight in pounds by 15 for a moderate activity level. While injured and less active, reduce this to ×13 — but do not go below ×13 under any circumstances during recovery.
Example: A 154 lb (70kg) person → 154 × 13 = ~2,000 calories/day as the injury-period maintenance floor.
If your doctor has approved continuing a weight-loss programme during injury, aim for the highest calorie level that still produces a small deficit — never aggressive cutting during recovery. The muscle you’d lose outweighs the fat you’d shed.
Key Supplements That Support Healing
Three supplements have meaningful evidence for injury-period muscle preservation:
- Creatine — a naturally occurring compound stored in muscle cells that supports cellular energy (ATP). At 3–5g per day (no loading phase required), research supports its role in slowing atrophy during reduced training. Safe for most adults — check with your doctor if you’re on medications. If you can only choose one supplement during injury, the evidence points to creatine.
- BCAAs (Branch-Chain Amino Acids: Leucine, Isoleucine, Valine) — essential amino acids that directly stimulate protein synthesis between meals. Most useful if you’re consistently falling short of your daily protein targets through food alone.
- Vitamin C + Collagen peptides — supports connective tissue healing (tendons and ligaments) alongside muscle preservation. Dose: 1g Vitamin C + 10–15g collagen peptides taken pre-PT session.
Hydration is the often-ignored foundation: aim for 2–3 litres of water daily. Dehydrated muscle cells are measurably more susceptible to atrophy during periods of inactivity. For those seeking to maintain, not grow: this same supplement protocol applies — there’s no special “maintenance-only” stack.
Nutrition and training can only protect your muscles so far — especially when your body is fighting a hidden hormonal threat that most injury guides completely ignore.
Step 4: Cortisol and GLP-1 Factors
Your recovery environment — sleep quality, stress levels, and any medications you take — is as much a part of your training protocol as the exercises in Step 2. Even your recovery environment (sleep, stress, medication) is part of your training protocol, in the same way that “PT Is Your Sport” frames the entire recovery process as a discipline to be optimised, not endured.
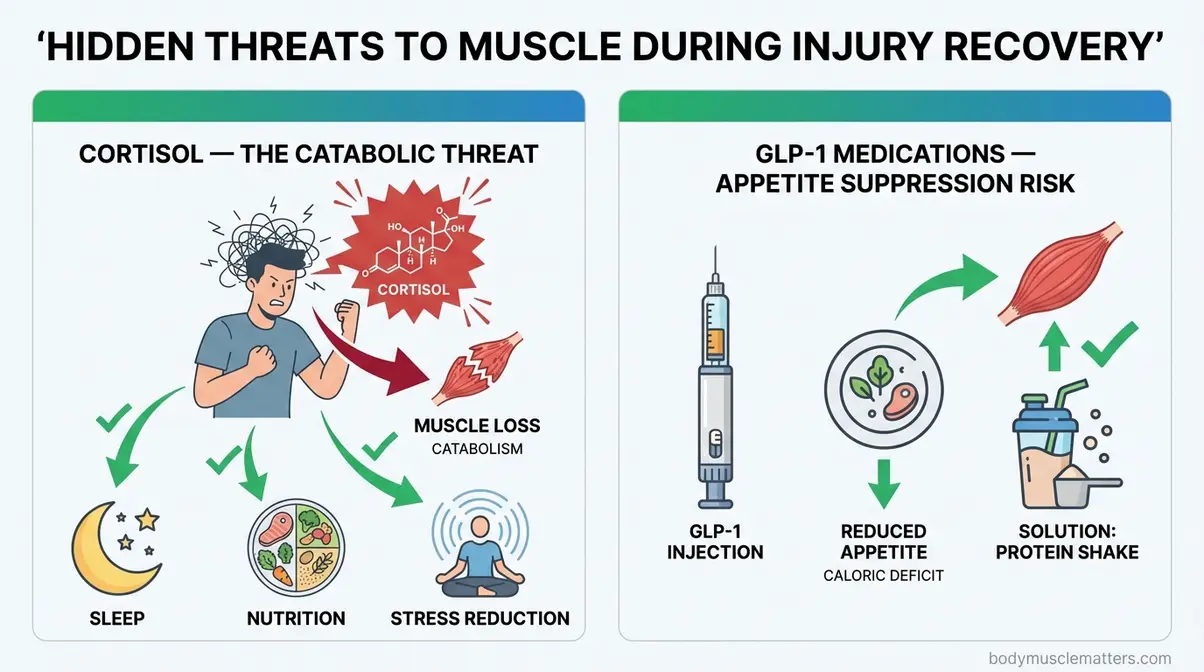
The Cortisol Problem
Cortisol — a catabolic stress hormone your body releases during injury, illness, and psychological stress — breaks down muscle protein for energy through a process called the ubiquitin-proteasome pathway (the cellular machinery that tags protein molecules for breakdown). Think of cortisol as your body’s emergency fuel system: in a physiological crisis, it dismantles muscle tissue to supply the brain and vital organs with energy. An injury is exactly that kind of crisis.
Research published in the Journal of Clinical Endocrinology & Metabolism (2026) found a causal link between elevated cortisol and reduced muscle strength and lean mass (PubMed, 2026). Critically, inactivity amplifies this effect: a landmark study showed that bed rest sensitises skeletal muscle to the catabolic effects of elevated cortisol, worsening negative amino acid balance and accelerating muscle breakdown beyond what inactivity alone causes (PubMed, 2026). This means injury-induced cortisol + inactivity is a compounding problem — not just an additive one.
- Your cortisol management protocol:
- Sleep 7–9 hours per night — sleep is when cortisol drops to its lowest and growth hormone peaks; cutting sleep below 7 hours acutely raises cortisol
- Apply P.R.I.C.E. consistently — active pain management reduces the physiological stress signal driving cortisol output
- Never cut calories aggressively — a calorie deficit itself elevates cortisol, creating a triple threat: deficit + injury + inactivity
- Manage psychological stress — anxiety about injury sustains cortisol elevation; address it directly with the data in Step 1, while actively managing high cortisol levels while recovering.
GLP-1 Medications & Zepbound
If you’re currently taking a GLP-1 medication — a class of injectable drugs including Ozempic (semaglutide) and Zepbound (generic name: tirzepatide) — that reduce appetite and lower blood sugar, your injury recovery requires specific additional attention. These medications work by suppressing appetite, which makes hitting your 1.6–2.2g/kg protein target significantly harder when you’re injured and already eating less.
A body-composition sub-study of the SURMOUNT-1 clinical trial found that tirzepatide participants experienced approximately 10.9% reduction in lean mass from baseline over 72 weeks — compared to 2.6% in the placebo group — with roughly 25% of total weight lost coming from lean tissue rather than fat (PubMed, 2026). When you layer injury-induced inactivity on top of GLP-1 appetite suppression, the risk of lean mass loss compounds meaningfully.
- GLP-1 mitigation strategy:
- Prioritise protein above all other foods — eat your protein sources first at every meal before any other macronutrient
- Use protein shakes as a tool — when appetite is suppressed, liquid protein is easier to consume than whole food portions
- Discuss resistance training clearance with your physician — any approved movement preserves lean mass and partially counters GLP-1-driven muscle loss
- Consider discussing your protein targets explicitly with your prescribing physician — they may adjust timing or dosing around your rehabilitation needs
Do not discontinue GLP-1 medications without medical guidance. Work with your prescriber and a registered dietitian together during injury recovery if possible.
Sleep and Hydration Foundations
Sleep and cortisol are directly linked through a feedback loop: poor sleep raises cortisol, elevated cortisol disrupts sleep quality, and the cycle compounds over a recovery period that may last weeks. Target 7–9 hours of quality sleep per night — not just hours in bed, but actual restorative sleep. Strategies that physical therapists and sports medicine physicians consistently recommend: a consistent sleep-wake schedule (even on rest days), keeping the bedroom cool and dark, and avoiding screens for 30 minutes before bed.
Adequate hydration — 2–3 litres daily — supports cellular repair, nutrient transport to healing tissue, and joint lubrication. Dehydration measurably impairs muscle protein synthesis. Neither sleep nor hydration is glamorous. Both are as impactful on your recovery timeline as any supplement.
Troubleshooting Common Mistakes
Physical therapists and rehabilitation specialists see the same errors repeatedly. Avoid these:
- Cutting calories to “lean out” during recovery. This is the single most counterproductive decision you can make. A deficit accelerates muscle catabolism, especially when cortisol is already elevated. Eat at maintenance — every day, without exception.
- Skipping PT sessions because they feel “too easy.” Isometric holds and range-of-motion work feel minor. They aren’t. Every skipped PT session is a missed preservation signal to your nervous system. PT is your sport — missing it is missing training.
- Attempting exercises without PT clearance. Cross-education and isometric exercises are safe when performed on stable injuries at appropriate loads. On an unstable injury or immediately post-surgery, the same exercises can extend your recovery timeline by weeks. Always get verbal clearance first.
- Ignoring the healthy side entirely. Many injured athletes assume they should rest completely. Cross-education evidence is clear: training the healthy limb preserves the injured one neurologically. Inaction on the healthy side wastes your primary preservation tool.
- Under-consuming protein on days when appetite is low. Appetite often decreases during injury, especially during the first 1–2 weeks. Protein targets don’t decrease with your appetite — they stay constant. This is exactly when protein shakes become most useful.
- Comparing your progress to a non-injured baseline. Your goal during recovery is not improvement — it’s preservation. If you finish your injury period at 90% of your pre-injury strength, that is an excellent outcome. The muscle memory mechanism handles the final 10% quickly once you’re cleared.
- Returning to full training before medical clearance. Premature return is the most common cause of re-injury. Re-injury resets the timeline entirely — often at a slower recovery rate the second time. Wait for clearance, then ramp up progressively.
Limitations – When DIY Recovery Isn’t Enough
Common Unsupervised Pitfalls
The protocols in this guide are designed for motivated individuals with access to some professional guidance. They are not a substitute for direct clinical supervision in complex cases. The most common pitfall is misidentifying your injury type: attempting cross-education training on a fracture (where the brief identifies as out-of-scope for this guide) or on a surgically repaired structure without explicit post-operative clearance can cause significant harm. Pain during any exercise described in Step 2 is a hard stop — it means that movement is not appropriate for your current injury stage. Pain-free is the minimum standard for every exercise attempted.
A second common pitfall is nutritional self-assessment error. Protein targets calculated without accounting for bodyweight in kilograms (rather than pounds) frequently result in targets that are 50% too low. Double-check your calculation: bodyweight in lbs ÷ 2.2 = bodyweight in kg. Then multiply by 1.6 and 2.2 to get your range.
Choosing Professional Supervision
Seek direct, in-person physical therapy supervision (not just this guide) if any of the following apply:
- Post-surgical recovery — surgical hardware, graft healing, or wound closure creates contraindications that require a PT’s eyes on the injury site at every session
- Neurological symptoms — any numbness, tingling, or weakness beyond the immediate injury site signals possible nerve involvement requiring specialist evaluation
- Bilateral injuries — the cross-education protocols in this guide assume a healthy, uninjured contralateral limb; bilateral injuries require a different rehabilitation architecture entirely
- No improvement or worsening at 2 weeks — if following Steps 1–4 produces no measurable stabilisation and you feel you’re declining, escalate to clinical supervision immediately
When to Seek Expert Help
Beyond a physical therapist, involve additional specialists in these scenarios:
- Registered Dietitian (RD): If you are on GLP-1 medications, have a diagnosed eating disorder, are post-bariatric surgery, or have conditions affecting protein metabolism (kidney disease, liver disease)
- Sports Medicine Physician: For return-to-competition clearance, PRP or other injection-based therapies, or when PT-prescribed exercises consistently produce pain
- Endocrinologist or prescribing physician: If cortisol management strategies (sleep, stress reduction, nutrition) are not producing improvement after 3–4 weeks — persistently elevated cortisol may indicate an underlying condition requiring medical management
This guide provides a strong foundation. Clinical professionals provide the ceiling.
Frequently Asked Questions
Can you maintain muscle while injured?
Yes — you can maintain meaningful muscle mass while injured when you follow an active preservation protocol. The key variables are protein intake (1.6–2.2g/kg/day), cross-education training, and cortisol management. Always obtain PT clearance before starting modified training, especially when identifying and stimulating the hardest muscles to grow.
Maintaining Muscle While Inactive
Maintain muscle when you can’t work out through three parallel actions. First, train the healthy side using cross-education exercises to preserve the injured limb neurologically. Second, eat 1.6–2.2g of protein per kg of bodyweight daily across 4–6 meals. Finally, eat at maintenance calories rather than entering a deficit. Isometric holds on the injured limb (where PT-cleared) add a direct preservation signal without joint loading.
Building Muscle on GLP-1 Drugs?
Building muscle while on Zepbound (tirzepatide) or other GLP-1 medications is possible but requires deliberate nutritional effort. These medications suppress appetite, making it significantly harder to hit your daily protein targets. A SURMOUNT-1 sub-study found approximately 25% of total weight lost on tirzepatide came from lean mass (PubMed, 2026). To counter this lean tissue reduction, prioritise protein at every single meal. You should eat your protein sources first and use liquid protein shakes to hit targets when your appetite is low. Always discuss resistance training clearance with your prescribing physician, as approved movement remains your strongest muscle-preservation tool.
Muscle Growth With High Cortisol?
Building muscle with chronically high cortisol is significantly harder — and during injury, cortisol is almost certainly elevated. Cortisol is a catabolic hormone that breaks down muscle protein for energy. Research confirms that inactivity amplifies skeletal muscle’s sensitivity to these catabolic effects (PubMed, 2026). The best mitigation strategy involves 7–9 hours of sleep per night, consistent pain management, adequate calorie intake, and stress reduction.
Start Your Recovery Protocol Today
For injured athletes and active individuals, the evidence is clear: the choice is not between recovering and maintaining muscle — it’s a question of whether you follow the right protocol to do both simultaneously. Protein at 1.6–2.2g/kg/day, cross-education training on the healthy side, maintenance calories, and cortisol management form a complete evidence-based system. A 2026 peer-reviewed study confirmed that resistance training of the non-immobilised limb attenuates muscle weakness and atrophy in the injured limb — a finding no generic “rest and recover” approach can match (PMC, 2026).
The “PT Is Your Sport” framework exists precisely because the mindset gap is as damaging as the nutritional and training gaps. Every PT session missed is a training session missed. Every protein target skipped is a meal that doesn’t count. The infrastructure for fast recovery — your myonuclei, your training history, your nutrition discipline — is already there. Your job during injury is to protect it.
Begin with Step 1 today: calculate your protein target (bodyweight in kg × 1.6 = daily minimum), download a food tracking app, and book or confirm your next PT appointment. Those three actions in the next 24 hours are the difference between a recovery that ends at 90% of your baseline — and one that ends right back where you started.
Related posts:
Benefits of Yoga for Fitness: The Science-Backed Guide
Home Workouts to Build Muscle Without Weights (2026)
CrossFit Strength Training for Beginners: 2026 Guide
Home Workout Plan for Beginners: 30-Day Step-by-Step
How to Self Massage Calves: The 4-Layer Method Guide
Strength Training for Beginners: Complete Workout Plan 2026
Callum
Hi, I'm Callum, the founder of Body Muscle Matters. I'm not a certified trainer, I'm a self taught lifter who started this site to share what I've learned from my own training and a lot of trial and error. Everything here comes from real experience and honest research, written the way I'd explain it to a friend who is just getting started. My goal is simple: practical, no hype fitness advice you can actually use.