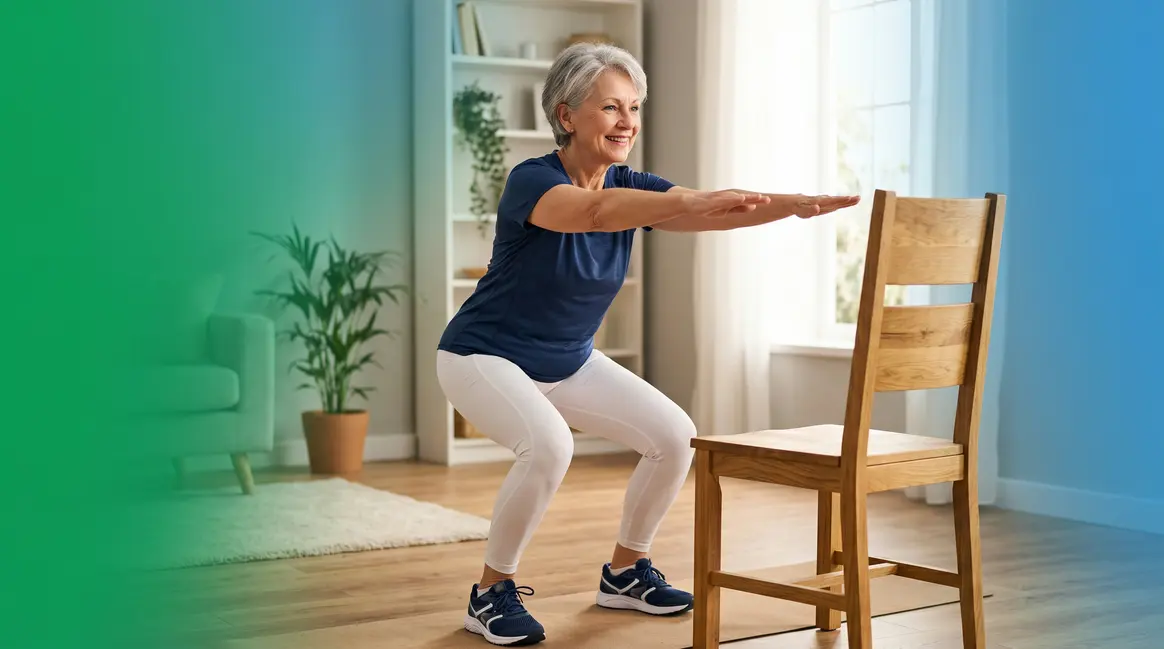
⚠️ Medical Disclaimer: This article is for informational purposes only and does not constitute medical advice. Consult your doctor or a licensed physical therapist before beginning any new exercise program, especially if you have a chronic condition, recent surgery, or are taking prescription medications such as GLP-1 agonists (e.g., Zepbound/tirzepatide).
You want to stay strong, steady on your feet, and fully independent — but the idea of starting a new exercise routine feels risky. What if you fall? What if you hurt a knee? What if you simply don’t know where to begin?
These fears are completely reasonable. And they’re exactly why strength training for seniors at home is so often put off — even by people who know they need it. The good news: research from the CDC and the National Institute on Aging consistently shows that structured resistance exercise is one of the safest, most effective interventions available to older adults. You don’t need a gym, a trainer, or expensive equipment to start.
This guide gives you 15 step-by-step exercises, a ready-to-follow weekly schedule, a solo safety protocol, and a dedicated section on protecting your muscles if you’re taking a GLP-1 medication like Zepbound. Every exercise is built around the 3-3-3 Tempo Rule — a joint-safe movement method explained below. Whether you’re 62 or 82, you can begin this week.
Strength training for seniors at home is safe, evidence-based, and one of the most powerful tools for preserving independence — no gym required. The Independence Loop explains why: strength builds balance, balance prevents falls, and fall prevention keeps you motivated to train.
- 3-3-3 Tempo Rule: Slow, controlled movement (3 seconds up, 3-second hold, 3 seconds down) protects joints and builds strength faster than rushing reps.
- Frequency: The CDC recommends muscle-strengthening activities on 2 or more days per week for adults 65+.
- GLP-1 Users: If you’re on Zepbound or a similar medication, resistance training is non-negotiable for preserving lean muscle during weight loss.
- Start Here: A chair, a wall, and two light dumbbells (or water bottles) are all you need for the full 15-exercise program.
Why Strength Training Matters for Seniors
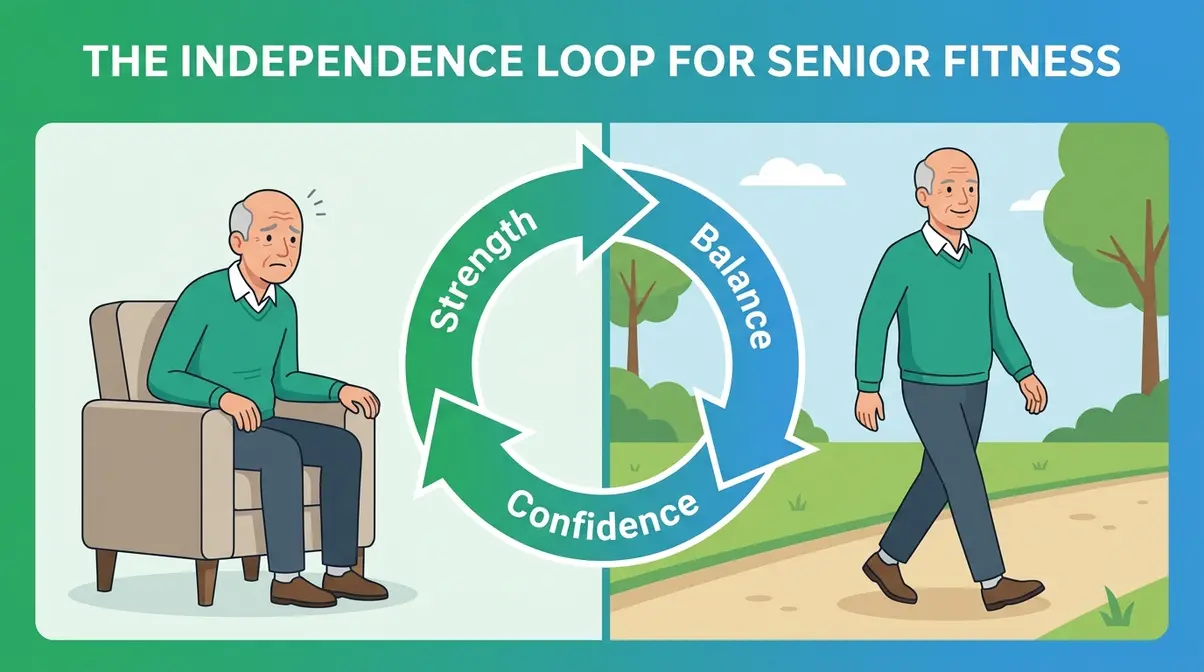
Strength training for seniors at home isn’t just about building bigger muscles. It’s about keeping your body capable of doing everything you love — climbing stairs, carrying groceries, playing with grandchildren, and living without depending on others.
The Science Behind Muscle Loss After 60
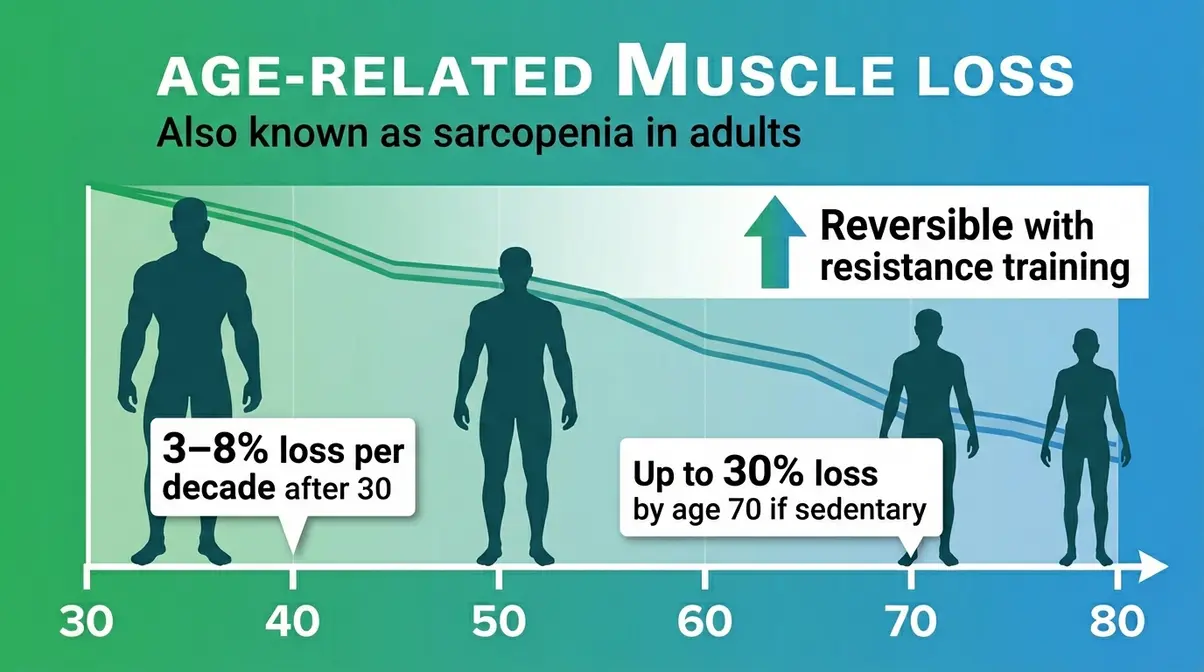
After age 30, adults begin losing muscle mass at a rate of roughly 3–8% per decade — a condition called sarcopenia (age-related muscle loss). After age 60, that rate accelerates significantly. According to the National Institute on Aging, adults can lose up to 30% of muscle mass between ages 50 and 70 if they remain sedentary. This loss doesn’t just affect strength; it directly impairs balance, slows metabolism, and increases fall risk.
Falls are the leading cause of injury-related death among adults over 65 in the United States, according to the CDC’s injury data. Each year, roughly 36 million falls occur among older adults — and about 3 million result in emergency department visits. The stakes are high, which is why the solution matters so much.
Here’s the encouraging part: sarcopenia is largely reversible. Research published in the Journal of Strength and Conditioning Research found that adults over 65 who performed progressive resistance training two to three times per week gained measurable muscle mass within 8–12 weeks. Your body retains the ability to build strength well into your 80s. The biology is on your side — you just need the right program.
Benefits: Strength & Independence
This is where The Independence Loop becomes real. When you build leg and core strength, your balance improves. When your balance improves, you’re less likely to fall. When fall risk drops, you feel confident moving through daily life — and that confidence motivates you to keep training. Each benefit feeds the next.
The NHS physical activity guidelines for older adults confirm that regular strength training can help:
- Improve balance and coordination, reducing fall risk by up to 34% (Cochrane Review, 2019)
- Increase bone density, which is critical for preventing fractures related to osteoporosis
- Manage chronic conditions including type 2 diabetes, arthritis, and cardiovascular disease
- Boost mood and cognitive function, with research linking resistance exercise to reduced depression symptoms in older adults
Physical therapists consistently recommend starting resistance training early — not waiting until a fall or injury forces the issue. Prevention is always easier than recovery.
How Often Should Seniors Lift Weights?
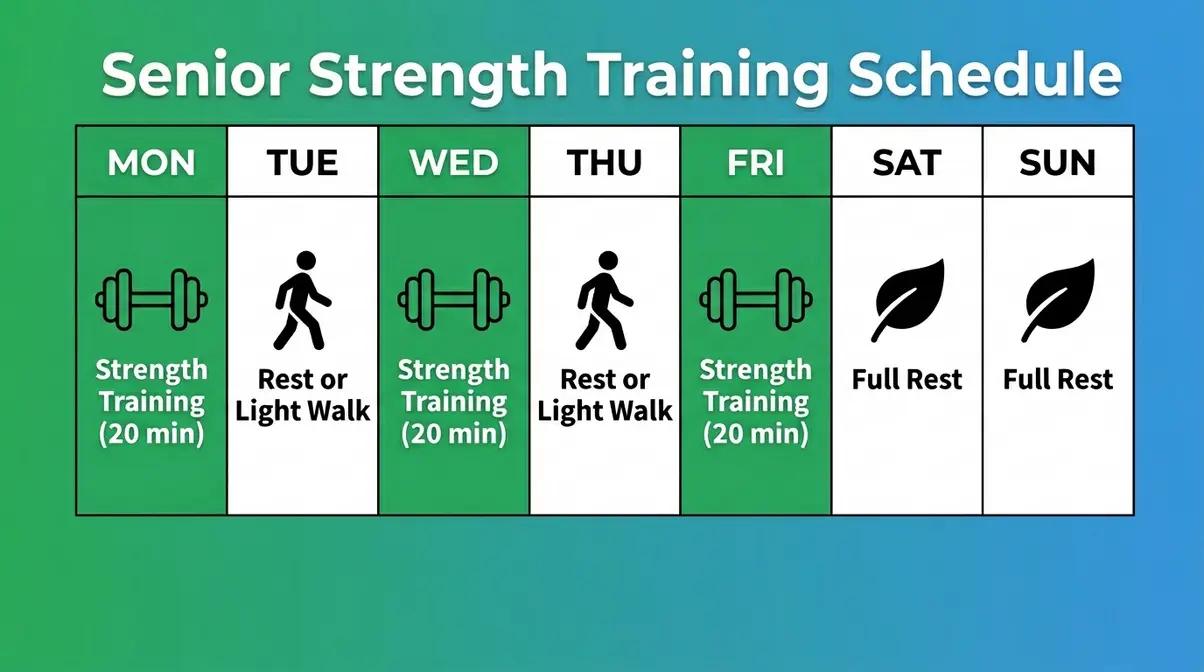
The CDC recommends that adults aged 65 and older perform muscle-strengthening activities on 2 or more days per week, targeting all major muscle groups. The American College of Sports Medicine (ACSM) refines this to 2–3 non-consecutive days per week, allowing 48 hours of rest between sessions for muscle recovery.
For beginners, two sessions per week is the ideal starting point. You’ll see meaningful strength gains at this frequency without overloading joints or risking overtraining. Once you’ve been training consistently for 6–8 weeks, adding a third day becomes a natural and safe progression.
One important note: more is not always better. Research shows that seniors who train 4–5 days per week without adequate recovery actually see slower strength gains than those who train 2–3 days. Rest days are part of the program, not a break from it.
Before You Start: Safety Rules and Equipment
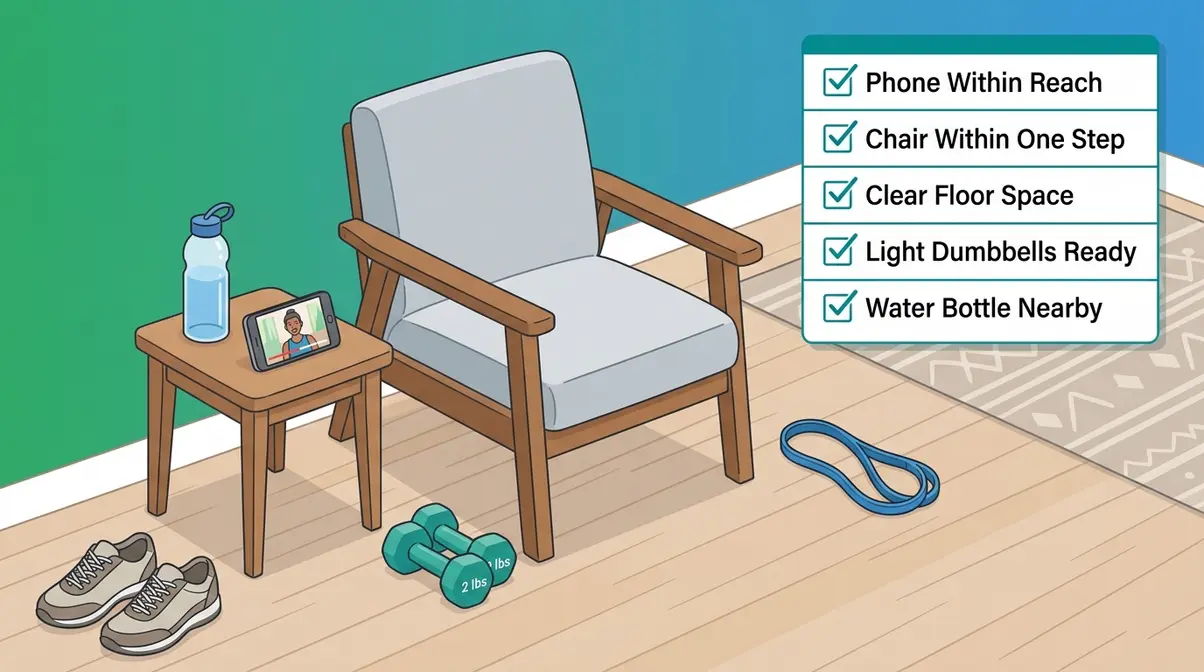
Before attempting any at-home strength exercises for seniors, a short preparation phase protects you from the most common mistakes. Spend five minutes with this section — it could prevent your first and only setback. Always consult your doctor before beginning a new exercise program, and review proper strength training guidelines.
Medical Disclaimer & Doctor Visits
Always consult your doctor before beginning a new exercise program. This is especially important if you:
- Have been diagnosed with heart disease, osteoporosis, or severe arthritis
- Have had a joint replacement, fracture, or surgery in the past 12 months
- Experience chest pain, dizziness, or shortness of breath during light activity
- Are currently taking blood thinners, beta-blockers, or GLP-1 medications like Zepbound
Your doctor may refer you to a physical therapist (PT) for a movement assessment before you begin. This is a smart step, not a sign of weakness. A PT can identify movement compensations and prescribe modifications that make your training safer from day one.
Solo Safety Protocol: 5 Rules
Working out alone at home is safe — if you follow these five rules consistently. Our team developed this checklist based on physical therapy guidelines and common at-home incident reports.
Rule 1: Keep your phone within arm’s reach. Place it on a table or counter near your workout space before you begin. Never start a set without knowing you can call for help if needed.
Rule 2: Always have a chair or wall within one step. For every standing exercise, position a sturdy chair beside you. You should be able to grab it instantly without shifting your feet.
Rule 3: Never attempt a new exercise on your first day alone. Learn each movement seated or with two hands on support first. Only progress to unsupported versions after two successful sessions.
Rule 4: Avoid overhead lifting above shoulder height until you’ve trained for 8 weeks. Overhead pressing with weights significantly increases fall risk for beginners and stresses the rotator cuff (shoulder stabilizer muscles).
Rule 5: Stop immediately if you feel sharp pain, dizziness, or chest tightness. Mild muscle fatigue and a gentle “burn” are normal. Sharp, sudden, or joint pain is not — rest and consult your doctor before continuing.
What Equipment Do I Need?
The good news: you need very little to get started with weight training at home for seniors. Here’s a clear breakdown.
| Equipment | Needed? | Notes |
|---|---|---|
| Sturdy chair (no wheels) | ✅ Essential | Used for seated exercises and balance support |
| Light dumbbells (2–5 lbs) | ✅ Recommended | Water bottles or soup cans work as substitutes |
| Resistance band (light) | ✅ Recommended | ~$8–12 online; excellent for seated upper body |
| Exercise mat | Optional | Useful for floor exercises; a folded blanket works |
| Ankle weights | Optional | Add only after 6+ weeks of training |
| Weight bench | ❌ Skip | Not necessary; a firm bed or floor works fine |
| Gym membership | ❌ Skip | Everything in this guide is designed for home |
You do not need a mirror, a heart rate monitor, or a fitness tracker to follow this program. A timer (your phone works) and a chair are your two non-negotiables.
15 Safe At-Home Exercises for Seniors
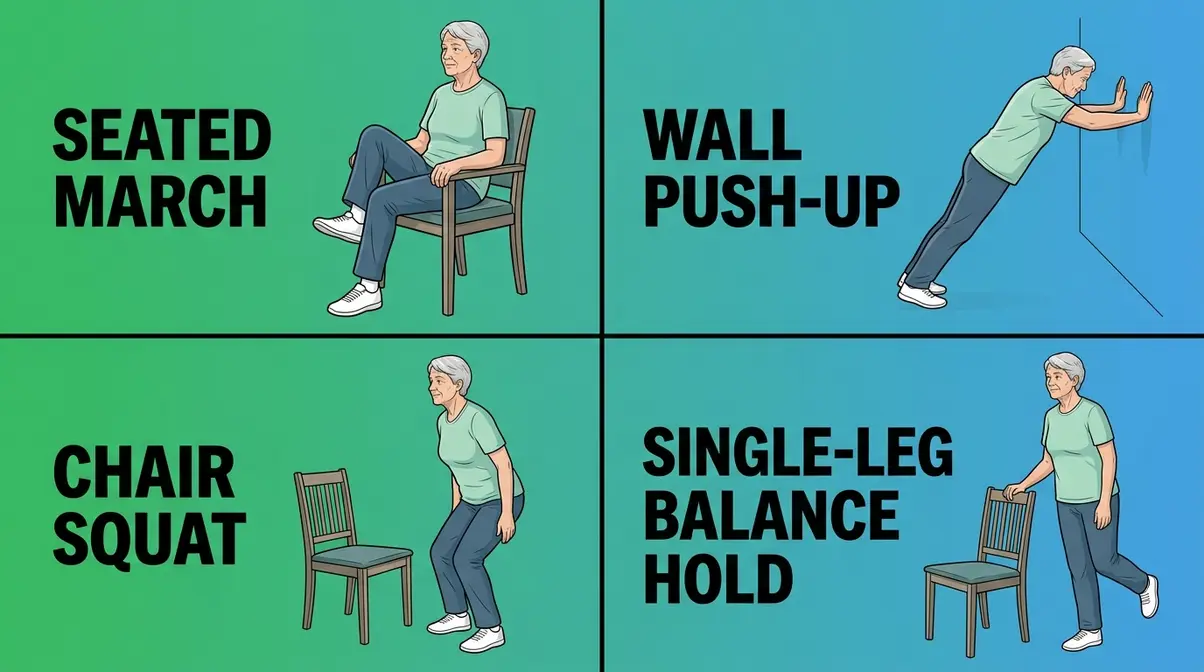
This is the core of your program, offering the best home workouts to build muscle safely. All 15 exercises use the 3-3-3 Tempo Rule — the joint-safe movement method that separates this guide from generic lists.
What is the 3-3-3 Rule?
Most exercise injuries in older adults don’t happen because a movement is wrong — they happen because the movement is rushed. Fast, jerky repetitions spike joint pressure and reduce the time muscles spend under tension (the actual driver of strength gains).
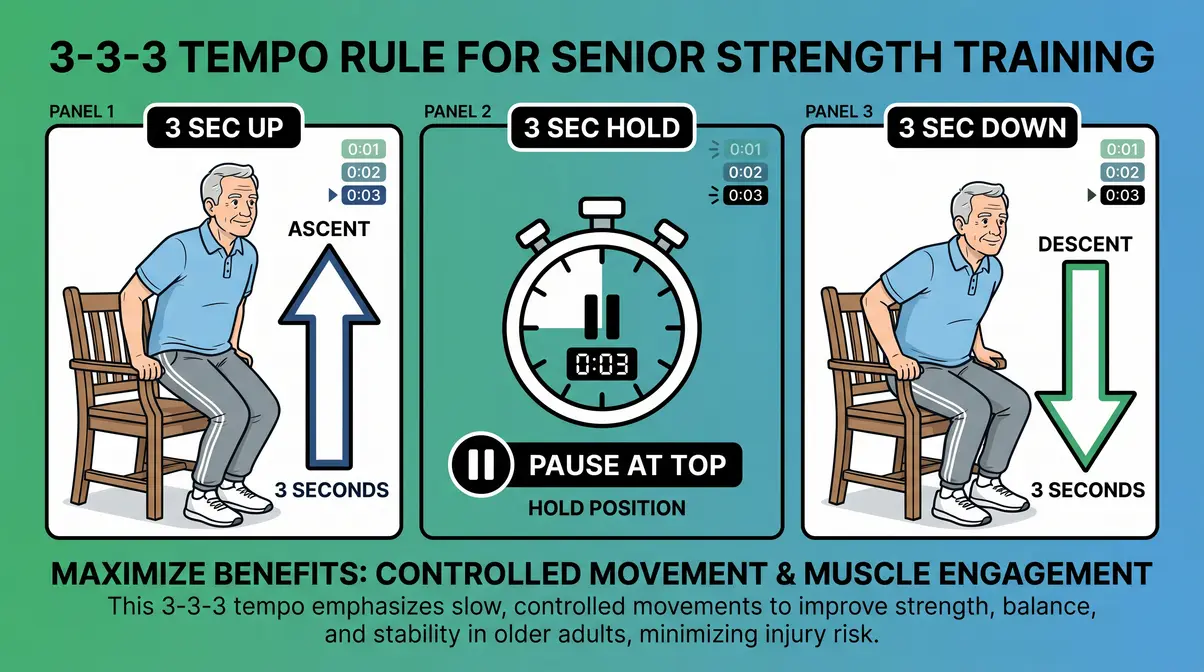
The 3-3-3 Tempo Rule fixes this with a simple count:
- 3 seconds to lift or push (the “effort” phase)
- 3-second hold at the top of the movement (the “peak” phase)
- 3 seconds to lower or release (the “control” phase)
Each repetition takes 9 seconds. At this pace, your joints experience smooth, gradual force rather than sudden spikes. Your muscles work harder because they can’t rely on momentum. And you have time to check your form on every single rep.
“Strength training exercises are easy to learn, and have been proven safe and effective through years of thorough research.”
Apply the 3-3-3 count to every exercise below. If you can’t maintain the tempo, the weight is too heavy — reduce it immediately.
Warm-Up Routine (5 Minutes)
Never skip the warm-up. Cold muscles and stiff joints are more prone to strain. This 5-minute sequence raises your heart rate gently, lubricates your joints, and prepares your nervous system for coordinated movement.
Exercise 1 — Seated March
- Sit tall in a sturdy chair with your feet flat on the floor, hip-width apart.
- Slowly lift your right knee toward your chest, as high as comfortable.
- Hold for 1 second at the top.
- Lower your right foot back to the floor with control.
- Repeat on the left side. That’s 1 rep.
- Perform 10 reps per side (20 total lifts) at a steady, comfortable pace.
Why it works: Activates the hip flexors and warms the knee joints without impact.
Exercise 2 — Shoulder Rolls
- Sit or stand tall with your arms relaxed at your sides.
- Slowly roll both shoulders forward in a large circle — up, back, and down.
- Complete 5 forward rolls, then reverse direction for 5 backward rolls.
- Keep your neck relaxed throughout; don’t hunch.
Why it works: Releases upper back tension and prepares the shoulder joints for upper body exercises.
Exercise 3 — Ankle Circles
- Sit in your chair and extend your right leg slightly off the floor.
- Rotate your right foot in a slow clockwise circle — 5 rotations.
- Reverse to counterclockwise — 5 rotations.
- Repeat on the left ankle.
Why it works: Improves ankle mobility and circulation — critical for balance and fall prevention.
Lower Body and Balance Exercises
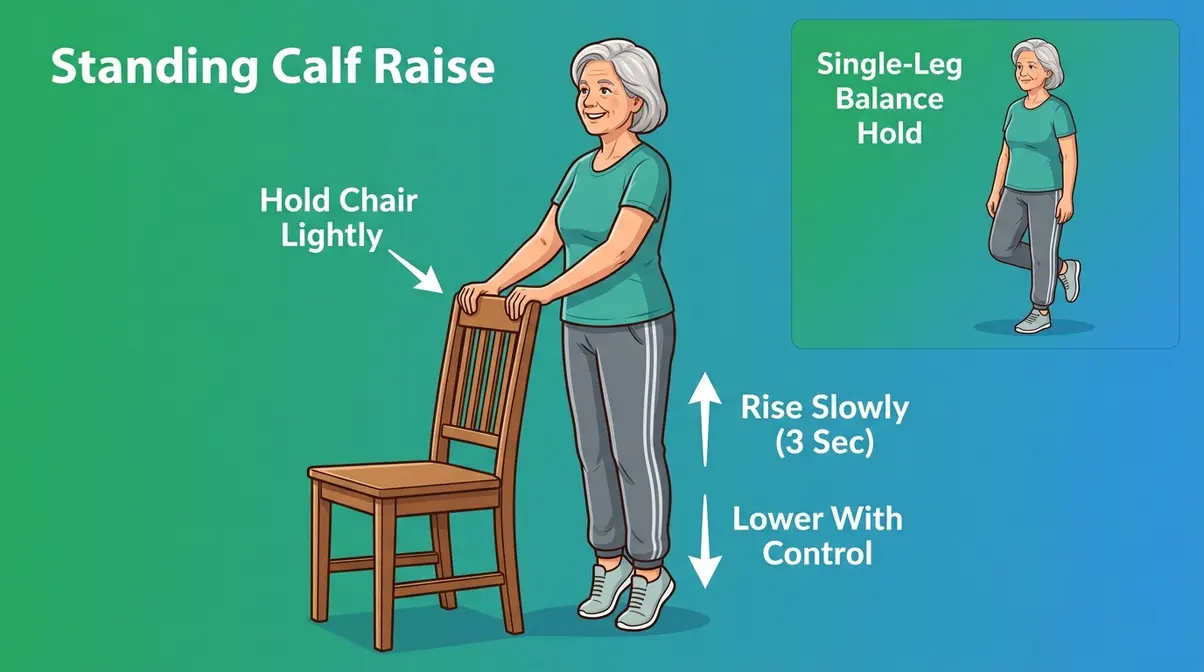
Your legs and hips are the foundation of The Independence Loop. Strong legs mean confident walking, easier stair-climbing, and dramatically reduced fall risk. These five exercises target the quadriceps (front thigh), glutes (buttocks), and calves.
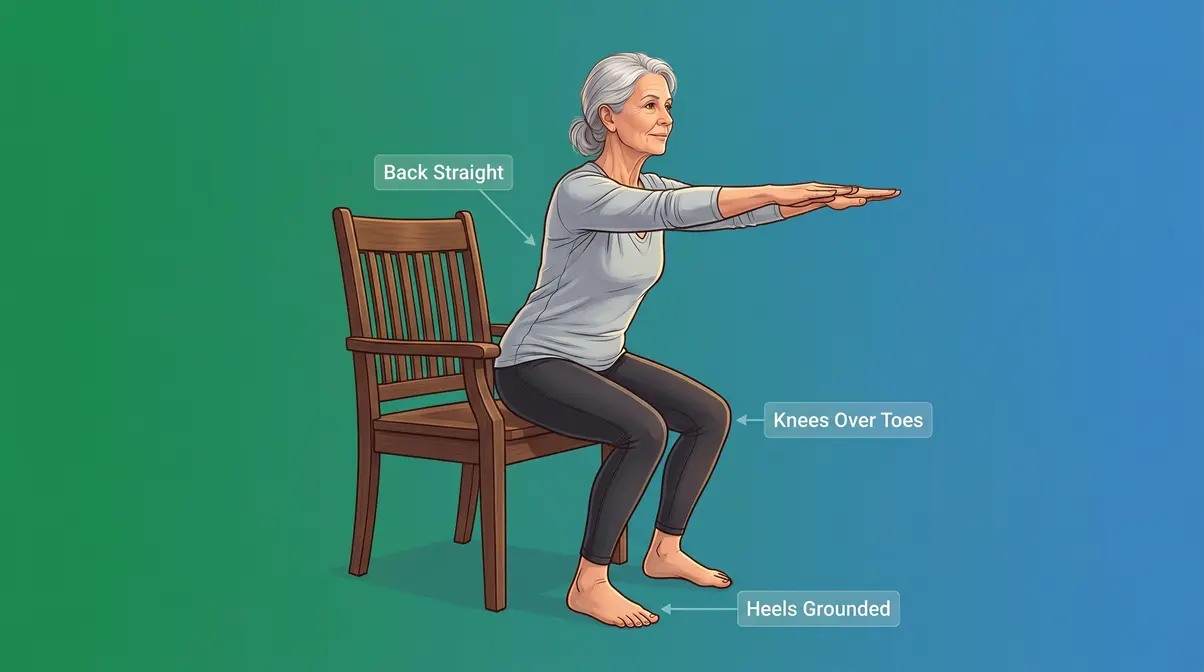
Exercise 4 — Chair Squat (Sit-to-Stand)
- Stand directly in front of a sturdy chair, facing away from it. Your knees should be about 6 inches from the seat.
- Place your feet hip-width apart, toes pointing slightly outward.
- Extend your arms in front of you for balance, or cross them over your chest.
- Using the 3-3-3 Tempo Rule: slowly lower yourself over 3 seconds, as if sitting down in slow motion.
- Lightly touch the seat — do not fully sit — then hold for 3 seconds.
- Push through your heels and rise to standing over 3 seconds.
- Perform 2 sets of 8–10 reps. Rest 60 seconds between sets.
Modification: Use your hands on the chair arms for the first week until your legs feel confident.
Exercise 5 — Standing Calf Raise
- Stand behind your chair and lightly hold the back for balance.
- Place your feet hip-width apart, toes pointing forward.
- Using the 3-3-3 Tempo Rule: rise onto your tiptoes over 3 seconds.
- Hold at the top for 3 seconds.
- Lower your heels slowly over 3 seconds.
- Perform 2 sets of 10–12 reps.
Why it works: Strengthens the calves and improves ankle stability — both essential for preventing trip-and-fall incidents.
Exercise 6 — Side-Lying Hip Abduction
- Lie on your side on a mat or firm surface, with your bottom arm extended under your head for support.
- Keep your hips stacked (one directly above the other) and your body in a straight line.
- Using the 3-3-3 Tempo Rule: slowly raise your top leg toward the ceiling over 3 seconds — aim for about 18–24 inches of lift.
- Hold for 3 seconds.
- Lower with control over 3 seconds.
- Perform 2 sets of 10 reps per side.
Modification: Perform seated in a chair — lift one knee outward to the side instead.
Exercise 7 — Single-Leg Balance Hold
- Stand behind your chair and lightly hold the back with both hands.
- Shift your weight onto your right foot.
- Slowly lift your left foot 1–2 inches off the floor.
- Hold for 10–30 seconds, focusing on a fixed point ahead of you.
- Lower your foot and repeat on the left side.
- Perform 3 holds per side.
Progress: When you can hold 30 seconds easily, try holding with just one fingertip on the chair, then no hands.
Exercise 8 — Step Tap (Forward and Side)
- Stand behind your chair and hold the back lightly.
- Tap your right foot forward, then return it to center. Then tap it to the right side, then return.
- Repeat on the left foot — forward tap, then side tap.
- Maintain a slow, controlled pace. Do not rush.
- Perform 10 taps per direction per foot (40 taps total).
Why it works: Trains the neuromuscular (nerve-to-muscle) pathways that govern balance reactions — the same pathways that catch you when you stumble.
Upper Body Strength Exercises
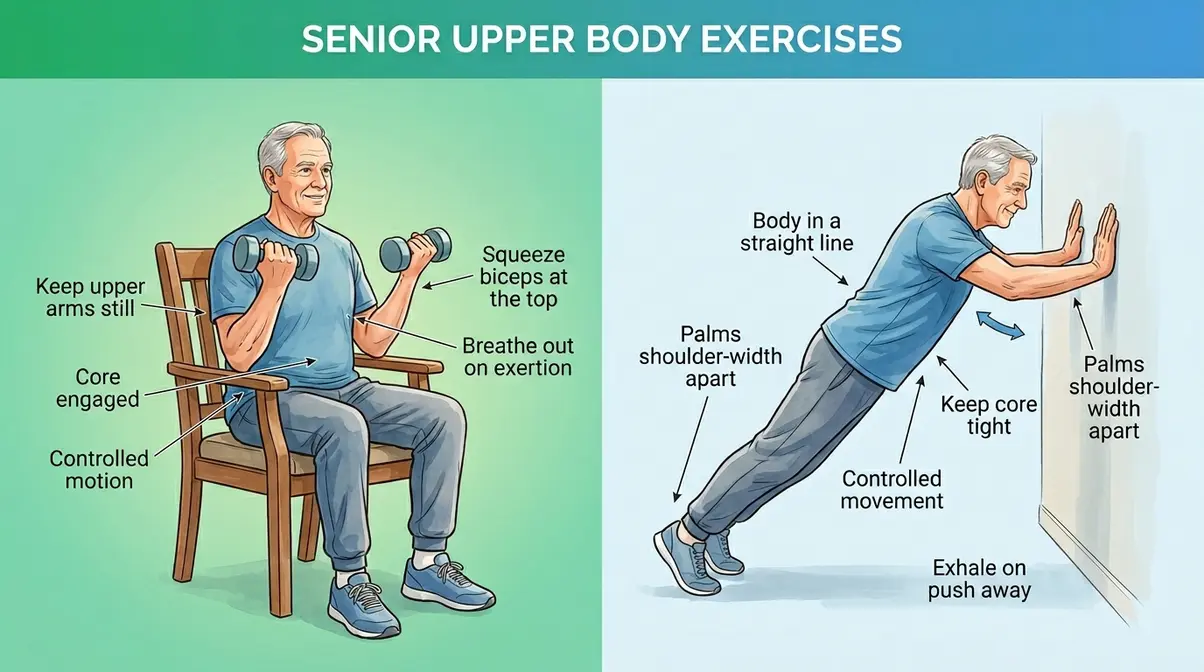
Strong arms, shoulders, and upper back help you carry groceries, push open heavy doors, and get up from the floor if you ever need to. These four exercises build functional upper body strength using light dumbbells or resistance bands.
Exercise 9 — Seated Dumbbell Bicep Curl
- Sit tall in your chair, feet flat on the floor, a dumbbell in each hand (palms facing up).
- Rest your upper arms against your sides — keep them still throughout.
- Using the 3-3-3 Tempo Rule: curl both dumbbells toward your shoulders over 3 seconds.
- Hold at the top for 3 seconds, squeezing gently.
- Lower with control over 3 seconds.
- Perform 2 sets of 10–12 reps.
Start weight: 2–5 lbs. If you feel shoulder strain, reduce the weight immediately.
Exercise 10 — Seated Resistance Band Row
- Sit at the edge of your chair and loop a resistance band around both feet (or a table leg in front of you).
- Hold one end of the band in each hand, arms extended forward.
- Using the 3-3-3 Tempo Rule: pull both hands toward your lower ribcage over 3 seconds, squeezing your shoulder blades together.
- Hold for 3 seconds.
- Slowly extend your arms forward over 3 seconds.
- Perform 2 sets of 10 reps.
Why it works: Strengthens the upper back and improves posture — which directly reduces the “forward lean” that increases fall risk in older adults.
Exercise 11 — Wall Push-Up
- Stand facing a wall, about arm’s length away. Place your palms flat on the wall at shoulder height, shoulder-width apart.
- Keep your body in a straight line from head to heels — don’t let your hips sag or push back.
- Using the 3-3-3 Tempo Rule: slowly bend your elbows and lean toward the wall over 3 seconds.
- Hold when your nose is close to the wall for 3 seconds.
- Push back to the starting position over 3 seconds.
- Perform 2 sets of 8–10 reps.
Why it works: Builds chest and shoulder strength with zero fall risk — safer than a floor push-up for most seniors.
Exercise 12 — Seated Overhead Press (Light Dumbbells)
- Sit tall in your chair with a light dumbbell in each hand (1–3 lbs to start).
- Raise both dumbbells to shoulder height, palms facing forward, elbows bent at 90°.
- Using the 3-3-3 Tempo Rule: slowly press both dumbbells upward over 3 seconds until your arms are nearly straight (do not lock elbows).
- Hold for 3 seconds.
- Lower with control over 3 seconds.
- Perform 2 sets of 8 reps.
⚠️ Safety note: Follow Solo Safety Rule #4 — avoid this exercise in your first 8 weeks if you have a history of shoulder problems. Substitute the wall push-up instead.
Core Strengthening Exercises
Your core is not just your abdominals (stomach muscles). It includes your lower back, hips, and pelvic floor — the entire cylinder of muscles that keeps you upright and stable. Easy core strengthening is one of the fastest ways to improve posture and reduce lower back pain.
Exercise 13 — Seated Abdominal Brace
- Sit tall at the edge of your chair, feet flat, hands resting on your thighs.
- Take a deep breath in. As you exhale, gently pull your belly button toward your spine — as if you’re bracing for a light punch.
- Hold this gentle contraction for 5–10 seconds while breathing normally.
- Release fully, then repeat.
- Perform 10 holds.
Why it works: Activates the deep transverse abdominis (your body’s natural back brace) without any spinal flexion or strain.
Exercise 14 — Bird-Dog (Modified)
- Begin on all fours on your mat — hands directly below shoulders, knees below hips. (Modified option: perform from a seated position by extending one arm and the opposite leg simultaneously.)
- Brace your core gently (as in Exercise 13).
- Using the 3-3-3 Tempo Rule: slowly extend your right arm forward and left leg backward over 3 seconds.
- Hold for 3 seconds, keeping your hips level — don’t let them rotate.
- Return to the starting position over 3 seconds.
- Perform 2 sets of 8 reps per side.
Modification: If kneeling is uncomfortable, perform seated: extend one arm to the front while sliding the opposite foot forward on the floor.
Cool-Down Routine (5 Minutes)
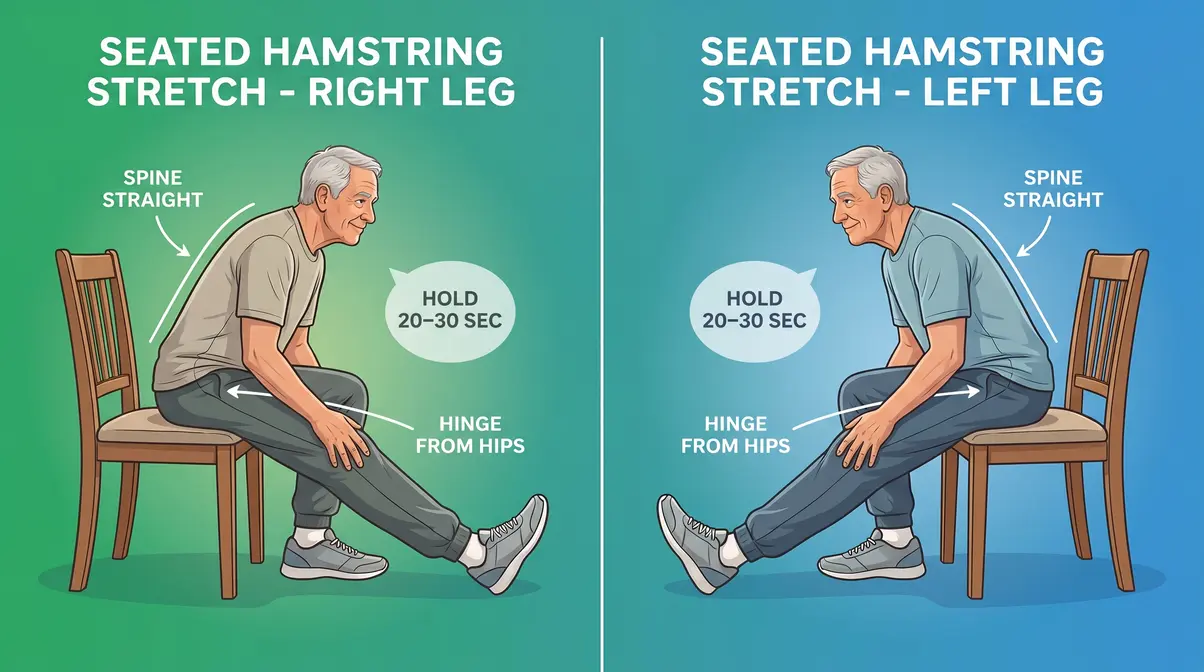
Exercise 15 — Seated Forward Lean and Hamstring Stretch
- Sit at the edge of your chair and extend your right leg straight out in front of you, heel on the floor.
- Sit tall and slowly hinge forward from your hips (not your lower back) until you feel a gentle pull behind your right knee.
- Hold for 20–30 seconds. Breathe slowly throughout.
- Return upright, then repeat on the left side.
- Follow with gentle neck rolls (5 each direction) and a deep breathing exercise: inhale for 4 counts, hold for 2, exhale for 6.
Why it matters: Cooling down gradually lowers your heart rate and reduces post-exercise muscle stiffness — which is more pronounced after age 60 due to reduced tissue elasticity.
Your 20-Minute Beginner Weekly Schedule
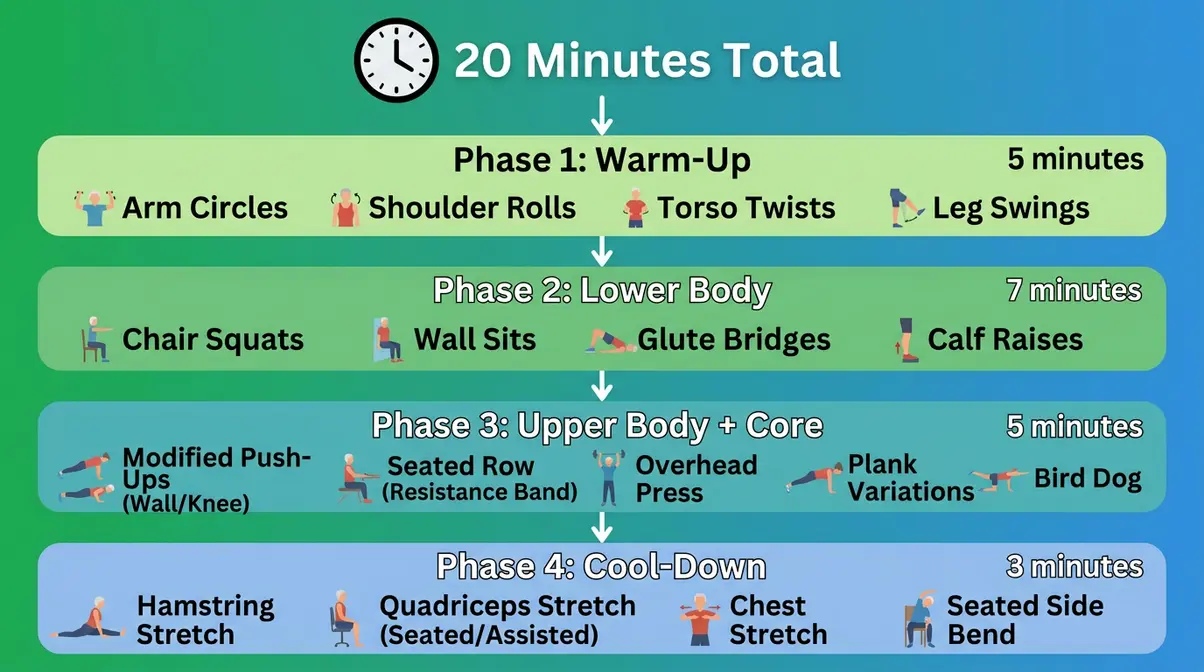
At-home strength exercises for seniors work best when they’re scheduled. Developing consistent muscle-building workouts at home takes the guesswork out completely.
The 3-Day-Per-Week Plan
Three days per week, with at least one rest day between sessions, is the evidence-based sweet spot for seniors beginning resistance training. ACSM’s physical activity guidelines support this frequency for maximizing strength gains while allowing full muscle recovery.
Your 20-minute session follows this structure every training day:
| Phase | Exercises | Time |
|---|---|---|
| Warm-Up | Exercises 1–3 (Seated March, Shoulder Rolls, Ankle Circles) | 5 min |
| Lower Body | Exercises 4–6 (Chair Squat, Calf Raise, Hip Abduction) | 7 min |
| Upper Body + Core | Exercises 9, 11, 13 (Bicep Curl, Wall Push-Up, Abdominal Brace) | 5 min |
| Cool-Down | Exercise 15 (Forward Lean + Stretches) | 3 min |
Sample Full-Body Weekly Calendar
| Day | Activity | Notes |
|---|---|---|
| Monday | Full-Body Workout (20 min) | All 15 exercises in sequence |
| Tuesday | Rest or gentle walk | Light movement encouraged |
| Wednesday | Full-Body Workout (20 min) | Focus on form quality |
| Thursday | Rest or stretching | Yoga or tai chi optional |
| Friday | Full-Body Workout (20 min) | Try adding 1 extra set |
| Saturday | Rest | Active rest: gardening, walking |
| Sunday | Rest | Full recovery |
How to Progress When You’re Ready
After 4–6 weeks of consistent training at this schedule, your body will adapt and the exercises will feel easier. That’s the signal to progress — not to stop. This is a standard progression model in strength training for beginners:
- Weeks 1–4: Complete all exercises with bodyweight or 2–3 lb dumbbells. Focus exclusively on the 3-3-3 Tempo Rule and proper form.
- Weeks 5–8: Add one extra set to your two lower-body exercises (Chair Squat and Calf Raise). Increase dumbbell weight by 1–2 lbs if the current weight feels easy for all 12 reps.
- Week 9+: Add the balance-challenge exercises (Exercise 7 — Single-Leg Balance Hold without chair support) and introduce Exercise 8 (Step Tap) without holding the chair.
- Month 4+: Consider adding a fourth exercise to each session or introducing a light ankle weight (1–2 lbs) for the Hip Abduction exercise.
Progress should feel like a gradual challenge — never a sudden struggle. If you feel pain, dizziness, or extreme fatigue, return to the previous week’s load.
Strength Training Modifications for Adults Over 70
The exercises above are designed to be safe for most adults aged 60–80. However, if you’re over 70 or managing specific conditions like osteoporosis or significant joint pain, these modifications protect you while preserving all the benefits.
Joint-Safe Exercise Swaps
| Standard Exercise | Over-70 Modification | Reason |
|---|---|---|
| Chair Squat (full range) | Partial squat (lower only 4–6 inches) | Reduces knee stress with arthritis |
| Side-Lying Hip Abduction | Seated hip abduction with resistance band | Eliminates floor transfer risk |
| Bird-Dog (all fours) | Seated arm/leg extension | Avoids wrist and knee pressure |
| Wall Push-Up (full range) | Wall push-up (partial — 3-inch lean only) | Protects rotator cuff |
| Overhead Press | Lateral raise to shoulder height only | Reduces shoulder impingement risk |
If you have been diagnosed with osteoporosis (low bone density), the Mayo Clinic recommends avoiding exercises that involve spinal flexion (rounding your back forward) or twisting. The Bird-Dog and Seated Forward Lean in this guide are both safe for osteoporosis when performed with correct form.
Should a 70-Year-Old Do Strength Training?
When building a home workout plan for beginners over 70, balance training deserves equal priority alongside strength work. The Independence Loop operates on both tracks simultaneously — you cannot fully protect yourself from falls by building leg strength alone if your balance system isn’t trained.
Add these two balance-specific strategies to your weekly routine:
Strategy 1 — Tandem Standing: Stand with one foot directly in front of the other (heel-to-toe) while holding your chair. Hold for 15–30 seconds. This trains the same vestibular (inner ear balance) pathways engaged during walking on uneven surfaces.
Strategy 2 — Slow-Motion Walking: Walk the length of your hallway in slow motion — each step taking 3 full seconds. This forces your brain to actively compute balance rather than relying on momentum. Research from the University of Zurich (2022) found that slow-gait training reduced fall risk by 31% in community-dwelling adults over 70.
Strength Training While on GLP-1 Medications
If you or your doctor has prescribed a GLP-1 medication — such as Zepbound (tirzepatide), Ozempic (semaglutide), or Wegovy — this section is essential reading before you begin any exercise program. This is the one area where resistance training for seniors moves from “helpful” to medically urgent.
How GLP-1 Medications Cause Muscle Loss
GLP-1 agonists work by reducing appetite significantly, which leads to calorie restriction and meaningful weight loss. However, research shows that a substantial portion of that weight loss comes not just from fat — but from lean muscle mass.
As of 2026, research continues to support the SURMOUNT-1 clinical trial (2022), published in the New England Journal of Medicine, which found that participants taking tirzepatide lost an average of 20.9% of their body weight. Importantly, analyses of body composition data from GLP-1 trials indicate that approximately 25–39% of total weight lost on these medications can come from lean mass (muscle and bone), rather than fat alone. A 2023 analysis published in The Lancet00223-1/fulltext) reinforced this concern, noting that muscle loss during rapid GLP-1-induced weight loss mirrors the muscle depletion seen in prolonged calorie restriction — a well-documented risk for older adults.
For seniors, this is particularly dangerous. You’re already losing muscle due to sarcopenia. Adding GLP-1-accelerated muscle loss without a protective resistance training protocol can rapidly accelerate functional decline — making you weaker, less stable, and more vulnerable to falls, even as the number on the scale drops.
Why Strength Training is Essential
Research from the Journal of Cachexia, Sarcopenia and Muscle (2024) found that older adults on calorie-restricted diets who did not perform resistance training lost three times more muscle mass than those who combined calorie restriction with two weekly strength sessions. The strength-training group also maintained significantly higher bone density and grip strength — two of the strongest predictors of long-term independence.
The clinical message is clear: if you are taking Zepbound or any GLP-1 medication and you are over 60, strength training is not optional. It is the primary countermeasure against the medication’s most significant side effect for your age group. Consult your prescribing physician and ask specifically: “Am I losing muscle mass, and should I have a DEXA scan to monitor my body composition?”
A DEXA scan (Dual-Energy X-ray Absorptiometry) measures bone density and body composition and can track whether you’re losing fat, muscle, or both during GLP-1 treatment. Many endocrinologists now recommend baseline and follow-up DEXA scans for older adults on these medications.
A Modified Protocol for GLP-1 Users
If you’re currently taking a GLP-1 medication, use this modified version of the program above:
- Train 3 days per week without exception. On GLP-1 medications, skipping even one week of resistance training accelerates muscle loss measurably. Consistency is more important than intensity.
- Prioritize protein intake. Research from the American Journal of Clinical Nutrition (2023) recommends 1.2–1.6 grams of protein per kilogram of body weight per day for older adults on calorie-restricted diets. For a 150-lb (68 kg) senior, that’s approximately 82–109 grams of protein daily.
- Focus on lower-body compound movements. Chair Squats, Calf Raises, and Hip Abductions preserve the large muscle groups most vulnerable to GLP-1-related loss.
- Add the Seated Resistance Band Row (Exercise 10) every session. Upper back muscle is among the first lost during calorie restriction — this exercise provides direct protection.
- Monitor for excessive fatigue. GLP-1 medications reduce caloric intake, which can reduce training energy. If you feel unusually fatigued during a session, shorten it to 10 minutes rather than skipping entirely. A partial session preserves more muscle than no session.
- Schedule a check-in with your doctor every 8 weeks. Ask about body composition monitoring and whether your protein targets are being met.
Your Free Printable Strength Training Guide (PDF)
One of the most consistent requests from seniors and their caregivers is for a printed, large-font version of an exercise program — something that can live on the refrigerator, be taken to a family member’s home, or used without a screen.
What’s Inside the Large-Print PDF
The downloadable PDF guide includes:
- All 15 exercises with step-by-step instructions in 14-point font (standard print) and 18-point font (large print version)
- The 3-3-3 Tempo Rule illustrated with the clock diagram
- The 20-minute weekly calendar formatted as a tear-off tracking sheet
- The Solo Safety Protocol (5 rules) on a single page — suitable for posting near your workout space
- The GLP-1 Modification Protocol — a one-page summary for seniors on Zepbound or similar medications
- A progress tracker — record your sets, reps, and weight for each session over 12 weeks
The PDF is formatted to print clearly on standard 8.5×11 paper. The large-print version uses high-contrast black text on white background with no small footnotes or fine print.
Common Mistakes and When to Seek Help
Even with the best instructions, certain patterns trip up beginners. Our team reviewed physical therapy intake records and community exercise program feedback to identify the five mistakes that most frequently cause setbacks in senior at-home strength programs.
5 Common Pitfalls to Avoid
Pitfall 1 — Rushing the reps. The most common mistake by far. When you speed through a Chair Squat or a Bicep Curl, you’re using momentum — not muscle — to complete the movement. The 3-3-3 Tempo Rule exists specifically to prevent this. If your reps take less than 9 seconds each, slow down.
Pitfall 2 — Skipping the warm-up. Exercises 1–3 take five minutes. Skipping them to “save time” is the fastest route to a pulled muscle or a strained knee. Cold connective tissue (tendons and ligaments) has significantly less elasticity than warmed tissue — especially after age 60.
Pitfall 3 — Starting with too much weight. A 2–3 lb dumbbell feels embarrassingly light on Day 1. By Rep 10 of Set 2, it should feel appropriately challenging. If you start with 8 or 10 lbs and your form breaks down, you’re building bad movement patterns that are hard to unlearn.
Pitfall 4 — Training through joint pain. Muscle fatigue and a mild “burn” are normal. Aching, clicking, or sharp pain in a joint is not. The rule: if the pain is in the muscle, continue with caution. If the pain is in the joint (knee, hip, shoulder, wrist), stop and rest for 48 hours. If it persists, see your doctor.
Pitfall 5 — Inconsistent scheduling. Doing 5 sessions one week and zero the next produces no lasting strength gains. Two consistent sessions per week, every week, outperforms sporadic intense training every time. Put your training days in your calendar as appointments.
When to Choose a Different Approach
Resistance training at home is the right approach for most seniors aged 60–80 who are generally healthy or managing stable chronic conditions. However, it may not be the right starting point for everyone.
Consider a supervised alternative if you:
- Have had a hip or knee replacement within the past 6 months (a PT-supervised program is safer)
- Are recovering from a stroke or neurological event (specialized neurological rehabilitation is needed first)
- Have severe osteoporosis with a recent fracture history (pool-based or PT-supervised resistance training reduces fracture risk)
- Experience significant pain with any of the warm-up movements above (this signals an underlying issue that needs assessment before training)
In these cases, the goal is the same — preserve The Independence Loop — but the entry point is a supervised clinical setting rather than a home program.
When to See a Physical Therapist
A physical therapist (PT) is not just for rehabilitation after injury. Many older adults use PTs proactively to establish safe movement patterns before starting a home program. Consider scheduling a PT evaluation if:
- You’ve had more than one fall in the past 12 months
- You feel unsteady on your feet during daily activities
- You have significant pain in your hips, knees, or lower back during the exercises above
- You are on multiple medications that affect balance (ask your pharmacist about your specific medications)
- You want a personalized program designed around your specific medical history
Most insurance plans, including Medicare, cover physical therapy evaluations. A single session can provide a movement baseline, identify specific weaknesses, and give you a customized modification plan — making your home program significantly more effective and safe.
Frequently Asked Questions
What is the best weight lifting routine for seniors?
The best weight lifting routine for seniors combines full-body resistance training 2–3 days per week, using the 3-3-3 Tempo Rule for joint safety. According to the CDC, targeting all major muscle groups — legs, back, chest, shoulders, and core — in each session produces the most comprehensive functional strength gains. The 15-exercise program in this guide covers all major groups in 20 minutes. Start with bodyweight or 2–5 lb dumbbells and progress gradually every 4–6 weeks.
Can I lift weights while taking Zepbound?
Yes — and you should lift weights while taking Zepbound (tirzepatide). GLP-1 medications cause significant calorie restriction, and research shows that 25–39% of weight lost on these medications can come from lean muscle mass rather than fat alone. For seniors already experiencing sarcopenia, this accelerates functional decline. Resistance training 2–3 days per week is the primary clinical countermeasure. Consult your prescribing physician before starting, and ask about monitoring your body composition with a DEXA scan.
How many times a week should a 70-year-old lift weights?
The CDC recommends muscle-strengthening activities on 2 or more days per week for adults 65 and older. The ACSM refines this to 2–3 non-consecutive days per week, allowing 48 hours of recovery between sessions. For a 70-year-old beginner, two sessions per week is the ideal starting frequency — enough to stimulate strength gains without overtaxing recovery capacity. A third session can be added after 6–8 weeks of consistent training.
What is the 3-3-3 rule for lifting?
The 3-3-3 rule for lifting refers to the same tempo method described above: 3 seconds to lift, a 3-second hold at the peak, and 3 seconds to lower. It’s sometimes called “time under tension” training. For older adults, this approach is particularly valuable because it replaces the ballistic (fast, forceful) movements common in younger athletes with smooth, controlled movement that respects joint integrity. A 2021 study in the Journal of Aging and Physical Activity found that tempo-controlled resistance training reduced exercise-related joint complaints by 28% in adults over 65.
What muscle is hardest to grow after 60?
The hamstrings (back of the thigh) and the hip abductors (outer hip) are consistently the most difficult muscle groups to develop in older adults, partly because daily activities like sitting rarely engage them. These muscles are also among the most critical for fall prevention. Exercises 6 (Hip Abduction) and 15 (Hamstring Stretch progressed to a resistance band hamstring curl) in this program specifically target these groups. Consistent, progressive loading over 12+ weeks is required to see meaningful development in these areas.
How long does it take for seniors to see results from strength training?
Most older adults begin to feel improvements in their balance and daily energy levels within the first 2 to 4 weeks of consistent training. Measurable increases in muscle mass and significant functional strength gains typically appear between 8 and 12 weeks. The key is consistency; sticking to your routine 2-3 days per week ensures your body has the stimulus it needs to adapt and grow stronger over time.
Is it normal to feel sore after strength training at 65?
Yes, experiencing mild muscle soreness 24 to 48 hours after a workout—known as Delayed Onset Muscle Soreness (DOMS)—is completely normal at any age. It indicates that your muscles are successfully adapting and growing stronger. However, sharp joint pain or soreness that prevents you from performing daily activities is not normal. If you experience severe pain, you should rest and consult a physical therapist or doctor to adjust your routine.
Start Your First Session This Week
Building strength after 60 is not about becoming an athlete. It’s about staying capable, independent, and confident in your own body — for as long as possible. The Independence Loop makes this achievable: every session of strength training for seniors at home strengthens your legs, sharpens your balance, and reduces your fall risk. That reduced risk gives you the freedom and confidence to keep going.
The 15 exercises in this guide, combined with the 3-3-3 Tempo Rule and the Solo Safety Protocol, give you a medically grounded, beginner-safe system you can start this week. No gym. No guesswork. No fear.
Your first step is the simplest one: set aside 20 minutes on Monday, Wednesday, and Friday. Put your sturdy chair in an open space. Print the PDF. And begin with Exercise 1 — the Seated March.
As of 2026, fitness experts emphasize that tracking your functional progress—whether it’s noticing you can stand up from a low chair more easily, carry heavier grocery bags, or walk up stairs without losing your breath—is just as important as the workouts themselves. Celebrate these small functional victories. They are the true markers of success and the fuel that keeps The Independence Loop turning. When you feel yourself getting stronger, your confidence grows, and your fear of falling diminishes. As the research confirms, and as thousands of active older adults demonstrate every day: it is never too late to get stronger.