You’ve caught your reflection in the gym mirror — one shoulder sitting slightly higher than the other, one bicep that looks fuller, or one side of your back that fills out your shirt more. It’s not your imagination. Those lopsided muscles are real, they’re frustrating, and ignoring them has real consequences beyond how you look. If your dominant side keeps overcompensating while your weaker side stays weak, the joints and tendons caught between them eventually pay the price.
The good news: knowing how to prevent muscle imbalances is not complicated. By the end of this guide, you’ll have a complete, step-by-step system — The Symmetry Stack — a three-layer prevention protocol that combines structured training, targeted recovery, and smarter daily habits working together. You’ll cover six steps: identifying your imbalances, training smarter with unilateral exercises, protecting your lower back and core, preventing sciatica, managing spasms, and building better daily habits you can start tonight.
⚠️ Medical Disclaimer: The information in this article is for educational purposes only and does not constitute medical advice. If you are experiencing acute pain, nerve symptoms, or a suspected injury, consult a licensed physical therapist (DPT) or physician before attempting any exercises described here.
Muscle imbalances occur when opposing muscle groups develop uneven strength or flexibility — a 2026 NIH review links uncorrected muscle asymmetry to significantly increased musculoskeletal injury risk. Use The Symmetry Stack — a three-layer prevention protocol — to stop them before they start:
- Unilateral training (single-side exercises) closes the strength gap fastest by forcing each side to work independently
- Core and posture work protects your lower back and sciatic nerve from the compensating load
- Daily habit corrections — like which side you carry your bag and monitor height — prevent imbalances from re-forming
- Electrolytes and sleep calm twitching, support nerve recovery, and keep muscles working as a balanced system
Before You Begin: Recognizing Muscle Imbalances
Understanding muscle imbalances is the first step toward preventing them. Imagine standing in front of the mirror one morning and noticing one shoulder sits a half-inch higher than the other. You hadn’t thought about it before, but now you can’t unsee it. That moment of recognition is exactly where this guide begins — because you cannot fix a problem you haven’t correctly identified.
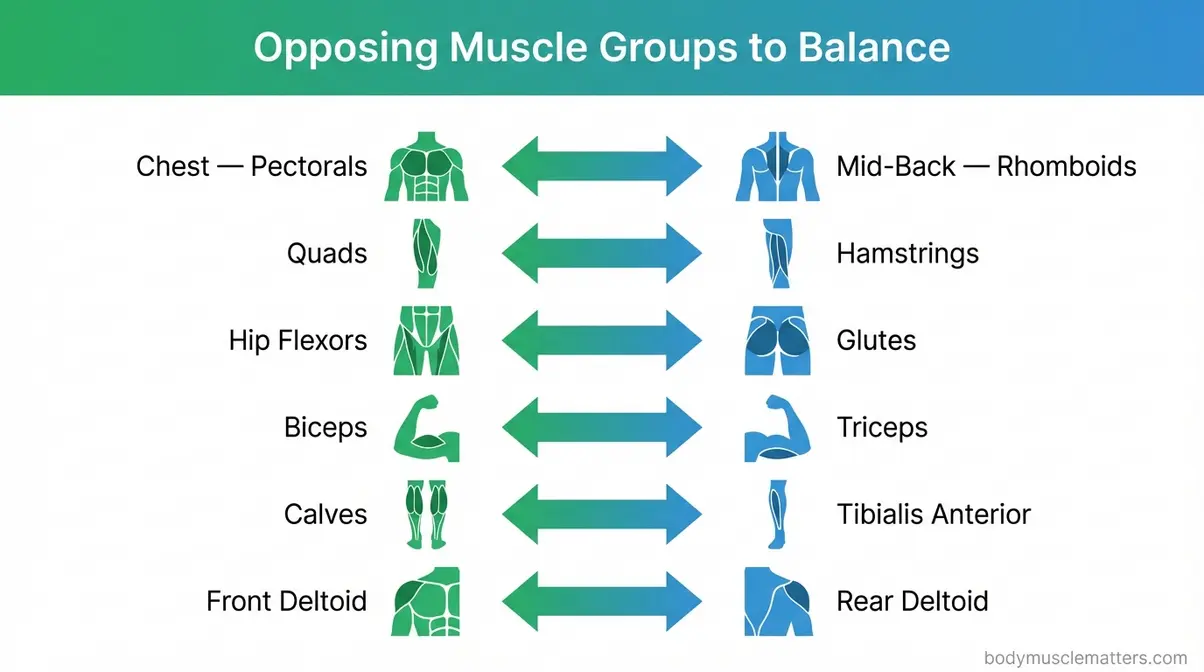
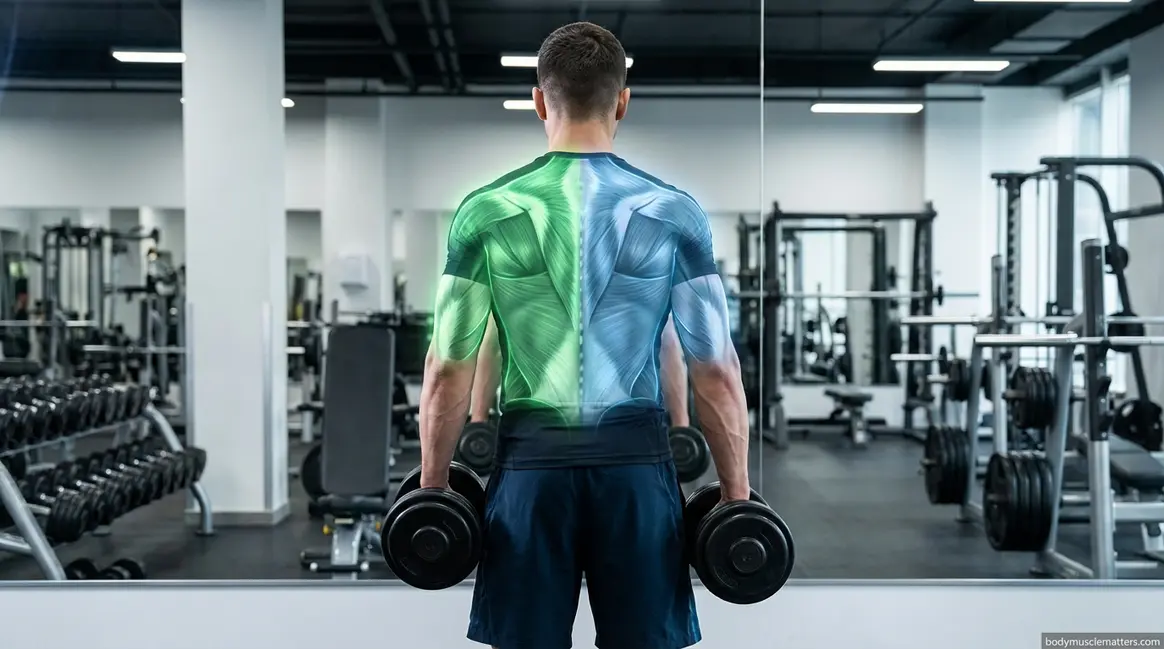
Caption: Opposing muscle groups — like your chest (pectorals) and mid-back (rhomboids) — must develop in balance to prevent joint stress and lopsided posture.
How This Guide Was Developed: The exercises and protocols throughout this guide are based on Tier 1 physical therapy recommendations and peer-reviewed research. All citations link to sources from the NIH, OSHA, ACE Fitness, and licensed physical therapy institutions. This is not a collection of gym folklore — every recommendation meets the standard used in clinical corrective exercise programs.
What Is a Muscle Imbalance?
A muscle imbalance occurs when one side of a muscle pair is significantly stronger or tighter than its opposing muscle, increasing joint stress and injury risk (NIH, 2026). Preventing muscle imbalances starts with understanding what causes them in the first place. Research confirms this is not just a cosmetic concern — uncorrected imbalances measurably raise the likelihood of overuse injuries.
Think of your muscles as working in pairs called agonist and antagonist muscles — the paired opposing muscle groups that work together in every movement. Your chest muscles (pectorals) and upper back muscles (rhomboids) are supposed to pull with equal force, like two equally matched sides of a seesaw. When one side dominates, the seesaw tips — and your joints carry the uneven load. This is why one bicep may look bigger, or why one shoulder sits higher in the mirror. Your dominant side has been quietly overcompensating, and your weaker side has been along for the ride.
Transition: Now that you know what a muscle imbalance is, here’s the distinction most articles skip — there are actually two distinct types, and knowing which you have changes how you approach it.
Two Types of Muscle Imbalances
Understanding the two types of muscle imbalances clarifies exactly where to focus your effort.
| Type | Definition | Common Example | Main Cause |
|---|---|---|---|
| Body Muscular Imbalance | One entire side of the body is stronger or larger than the other | Dominant arm noticeably bigger; one quad visibly fuller | Habitual side dominance in daily life and sport |
| Joint Muscular Imbalance | Muscles around a single joint are uneven in strength | Quads much stronger than hamstrings at the knee | Training “mirror muscles” (chest, biceps) while neglecting opposing groups (back, triceps) |
Consider someone who bench presses three days a week but never rows. They develop a joint muscular imbalance at the shoulder — the chest becomes tight and overactive, pulling the shoulders forward into a rounded position. That is a textbook joint imbalance that looks and feels different from a body imbalance, but both respond well to The Symmetry Stack. Most people have both types simultaneously without realizing it.
Transition: Once you know which type you’re dealing with, the next step is spotting the specific warning signs in your own body.
Warning Signs: Is Your Body Lopsided?
What are the signs of muscle imbalance? Physical therapists consistently point to five observable patterns that show up before any pain begins. Check yourself against this list:
- Visual asymmetry: One muscle group visibly larger or more defined — one bicep bigger, one calf more developed. These are the lopsided muscles most people notice first in the mirror.
- Movement compensation: During compound exercises like squats or presses, one side works harder or moves first. A barbell tilts during overhead work. The dominant side quietly takes over.
- Chronic joint discomfort: Persistent aches in one hip, knee, or shoulder that weren’t caused by a specific injury. This is not normal post-workout soreness — it’s the joint under repeated, uneven load.
- Postural cues: One shoulder sitting higher, a forward head position (“tech neck”), or hips that aren’t level when standing. These are visible signs of upper crossed syndrome — a common imbalance pattern where tight chest and neck muscles pull against weak upper back muscles — or its lower body equivalent.
- Muscle twitching or spasms: Persistent muscle twitches, especially in overworked dominant-side muscles, signal a muscle under chronic stress. The overactive, tight ones are usually the culprits. (Step 5 covers this in depth.)
Stand in front of a mirror. Drop your arms to your sides. If one shoulder is even half an inch higher, that’s a postural signal worth acting on — not panicking over, but addressing.
Transition: If any of those warning signs resonate, the next test will help you pinpoint exactly where your imbalance lives — no gym equipment required.
A Simple At-Home Self-Assessment
How to identify a muscle imbalance before your next workout takes less than five minutes. Run through this three-part screen:
- Single-Leg Balance Test: Stand on one leg for 30 seconds, then switch. If you cannot hold for 20 seconds on your weaker side without grabbing something — without wobbling, arms flailing, or touching the wall — you likely have a lower body imbalance. Note which side struggles more.
- Wall Angel Test (upper body): Stand with your entire back flat against a wall, arms bent at 90 degrees with your elbows and wrists touching the wall. Slowly slide your arms overhead like a snow angel. If your lower back peels away from the wall, or if your arms cannot travel fully overhead symmetrically, you have a shoulder or upper back imbalance worth addressing.
- Mirror Observation: Stand naturally with your arms relaxed. Take a phone photo from the front. Check shoulder height, hip level, and where each arm hangs. If one arm hangs noticeably further from your body, the lat or pectoral on that side is tighter than the other.
If any test reveals significant asymmetry, note it before moving forward — you’ll want to give extra attention to your weaker side throughout Steps 1 and 2.
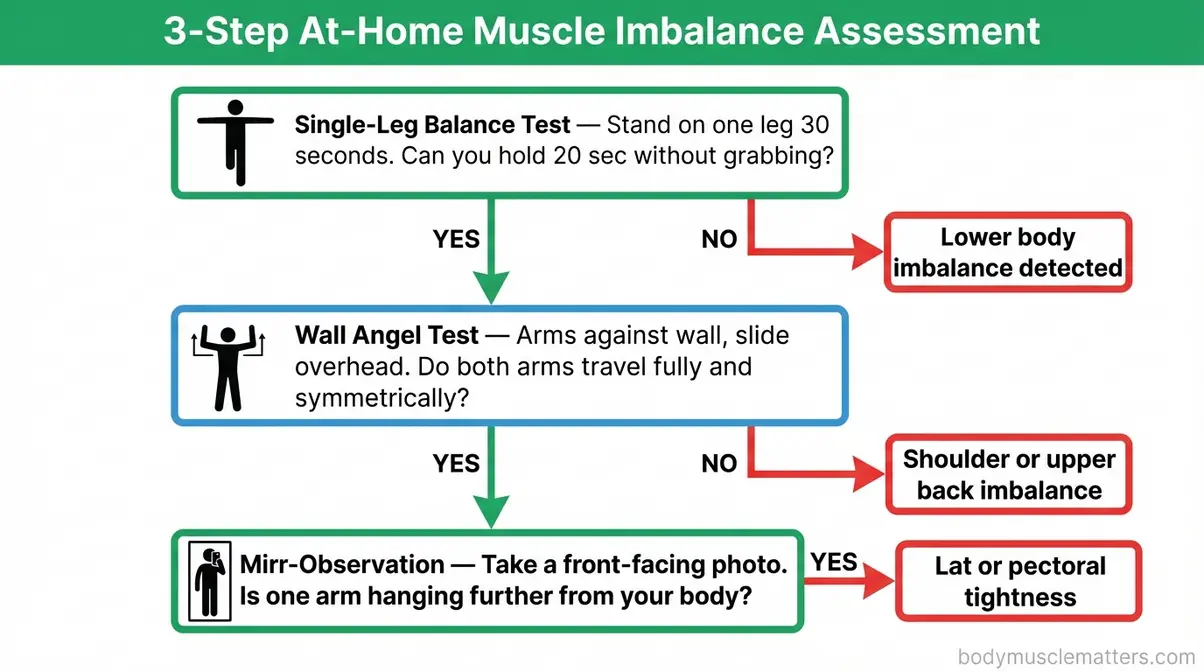
Caption: Run this three-step screen before your next workout to pinpoint which side needs more targeted attention.
- Estimated Time: 15-20 minutes per day
- What You Need:
- A clear floor space or exercise mat
- A foam roller or massage ball
- Light to medium dumbbells or resistance bands
- A mirror for self-assessment
Step 1: Build a Symmetry-First Training Program
Building a symmetry-first training program is the most direct way to prevent muscle imbalances from taking hold. Corrective exercises targeting opposing muscle groups have been shown to restore functional balance and reduce injury risk in individuals with musculoskeletal asymmetries (Fitness Education Australia, 2026). This is Layer 1 of The Symmetry Stack — structured, single-side training that closes the gap your bilateral workouts have been quietly widening.
Many people who have successfully corrected their asymmetries describe it the same way:
“It seems that the best way to correct muscle imbalances is to do unilateral exercises and add more volume to your weaker side.”
This advice, shared widely across fitness communities, is exactly right — and what follows is the exact protocol to make it work.
Why Unilateral Training Works
Unilateral exercises — movements that train one side of the body at a time, forcing your weaker side to work without help — solve a problem that most gym-goers don’t realize they have.
During bilateral exercises (both arms curling simultaneously, both legs pressing at once), your dominant side quietly recruits more. The brain fires its strongest motor pathways first. You may feel like you’re working symmetrically, but the stronger side is always doing slightly more. Over months and years, that small gap becomes the lopsided body you see in the mirror.
When you train one limb in isolation, the dominant side cannot compensate. Your weaker side is forced to recruit, activate, and grow independently. Physical therapists recommend that over four to eight weeks of consistent unilateral work, the strength gap measurably closes. The protocol is simple: always start every unilateral exercise on your weaker side, and stop at the same rep count on both sides. If you can perform 10 single-arm curls with your right arm but only 8 clean reps with your left, start with the left. Stop at 8 on both sides. Equal reps — not extra reps — is the standard corrective protocol.
unilateral exercises to correct bodily lopsidedness
Transition: Here are the 10 specific exercises — with exact sets and reps — that physical therapists and certified trainers recommend for closing the strength gap.
5 Upper Body Unilateral Exercises
Always start every exercise on your weaker side. Stop at the same rep count on both sides. Sets (the number of groups of repetitions you perform) and reps (individual repetitions within each set) are noted for each.
- Single-Arm Dumbbell Row — Targets: lats, rhomboids, rear deltoid | Dosing: 3 sets × 10–12 reps per side | Beginner tip: Rest your supporting hand and knee on a bench; keep your back flat, not rounded.
- Single-Arm Overhead Dumbbell Press — Targets: deltoid, tricep, upper trap | Dosing: 3 sets × 10 reps per side | Beginner tip: Start seated for better core support; press directly overhead without leaning to the side.
- One-Arm Cable Fly — Targets: pectorals, anterior deltoid | Dosing: 3 sets × 12 reps per side | Beginner tip: Keep a slight bend in the elbow throughout — this isolates the chest without stressing the elbow joint.
- Single-Arm Bicep Curl — Targets: biceps brachii | Dosing: 3 sets × 12 reps per side | Beginner tip: Don’t let the elbow swing forward; keep it pinned to your ribs for an honest rep.
- Single-Arm Tricep Pushdown (Cable) — Targets: triceps | Dosing: 3 sets × 12 reps per side | Beginner tip: Start with a lighter weight than you expect — most people are surprised how weak their non-dominant tricep feels.
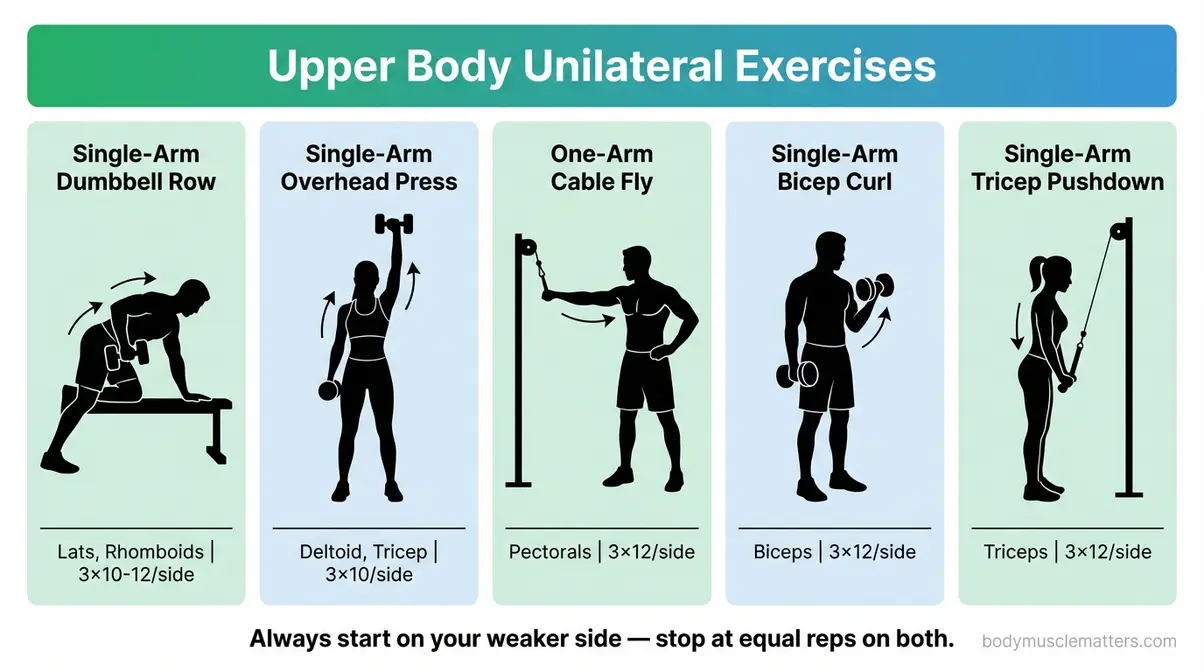
Caption: These five upper body movements isolate each side independently, preventing your dominant arm from masking your weaker side’s deficit.
Transition: Now move to the lower body — where most gym-goers carry their worst side-to-side imbalances, particularly after years of bilateral squats and leg presses.
5 Lower Body Unilateral Exercises
To prevent muscle imbalances in legs, unilateral loading is non-negotiable. Apply the same weaker-side-first rule from the upper body list above.
- Single-Leg Romanian Deadlift (Single-Leg RDL) — the single-leg Romanian deadlift, or single-leg RDL, is a hinged movement that isolates each glute and hamstring independently | Dosing: 3 sets × 10 reps per side | Beginner tip: Hold one dumbbell in the opposite hand to your standing leg for counterbalance; hinge at the hip, don’t bend the knee like a squat.
- Bulgarian Split Squat — the Bulgarian split squat is a lunge variation with your rear foot elevated, one of the most effective tools for equalizing leg strength | Targets: quads, glutes, hip flexors | Dosing: 3 sets × 10 reps per side | Beginner tip: Keep your torso upright to avoid lower back stress.
- Step-Up — Targets: quads, glutes | Dosing: 3 sets × 12 reps per side | Beginner tip: Use a box or step 12–18 inches high; drive through the heel of the lead foot, not the toe.
- Single-Leg Glute Bridge — Targets: glutes, hamstrings, core | Dosing: 3 sets × 15 reps per side | Beginner tip: If your hips drop to one side during the bridge, your weaker glute needs more work — this exercise diagnoses and fixes the problem at the same time.
- Lateral Lunge — Targets: inner thigh (adductors), glutes | Dosing: 3 sets × 12 reps per side | Beginner tip: Push your hips back as you step to the side — don’t let the knee cave inward over the foot.
What is the #1 exercise for balance? Among these, physical therapists most frequently recommend the Single-Leg RDL as the foundational balance exercise — it trains stability, hip strength, and proprioception (your body’s sense of its own position in space) simultaneously.
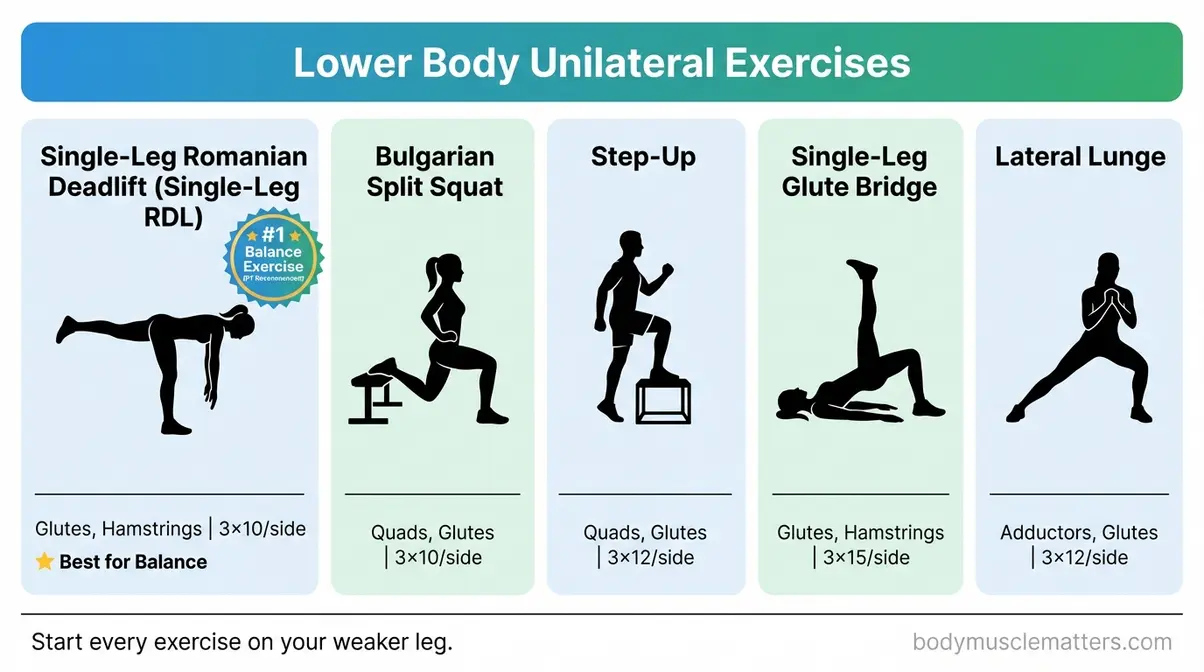
Caption: The Single-Leg RDL (exercise #6) is widely regarded by physical therapists as the single most effective balance and symmetry exercise for the lower body.
Transition: These 10 exercises build individual-side strength. The next technique amplifies that effect by pairing opposing muscle groups in the same set — this is a corrective superset.
How to Program Corrective Supersets
A corrective superset pairs an agonist (the muscle doing the primary work) and an antagonist (its opposing muscle) back-to-back with minimal rest between them. This forces balanced development of both sides of a joint within a single training session.
The protocol: rest 60 seconds after completing both exercises in the pair, then repeat for 3 rounds. Here are two superset pairs to add immediately:
| Superset Pair | Agonist Exercise | Antagonist Exercise | Rest Between Pairs |
|---|---|---|---|
| Shoulder Joint | Chest Press | Band Pull-Apart | 60 seconds |
| Knee Joint | Quad Extension | Hamstring Curl | 60 seconds |
Add one corrective superset pair per workout for the first four weeks. This is Layer 1 of The Symmetry Stack in action — and no competitor currently programs it this way.
Step 2: Strengthen Your Core to Protect Your Back
A weak core is one of the most underestimated drivers of lower back pain and muscle imbalances across the entire body. When your core fails to stabilize the spine, surrounding muscles are recruited to compensate — and that compensation creates exactly the kind of asymmetry you’re trying to prevent. This is the link between core strength and how to prevent lower back pain that most programs overlook.
Why a Weak Core Drives Lower Back Pain
Think of your core muscles — the deep stabilizing muscles of your abdomen, lower back, and pelvis that hold your spine in alignment during movement — like the frame of a bridge. If the frame is weak, the entire structure shifts and buckles under load. Specifically, when the transverse abdominis (your deepest abdominal layer) and multifidus (the small muscles along your spine) are weak or inactive, your lower back muscles take over a job they were never designed for. They fatigue, tighten, and develop imbalances.
OSHA guidelines on cumulative lifting injuries confirm that manual lifting without core activation creates cumulative micro-injuries to the spinal discs — injuries that may not appear for weeks but accumulate into debilitating lower back conditions (OSHA). This is why your lower back aches after a long day of moving furniture even when nothing went obviously wrong. Your core simply was not engaged.
Transition: Here are the core and hip flexor exercises that directly address this weakness.
Core and Hip Flexor Exercises That Help
For how to prevent lower back pain when lifting, these three movements build the stability your spine needs:
- Dead Bug: Lie on your back, arms pointing toward the ceiling, knees bent at 90 degrees. Slowly lower your right arm and left leg toward the floor simultaneously while keeping your lower back pressed flat. Return and alternate. Dosing: 3 sets × 10 alternating reps. Beginner tip: If your lower back arches off the floor, your core is not engaging — slow down and reduce the range of motion.
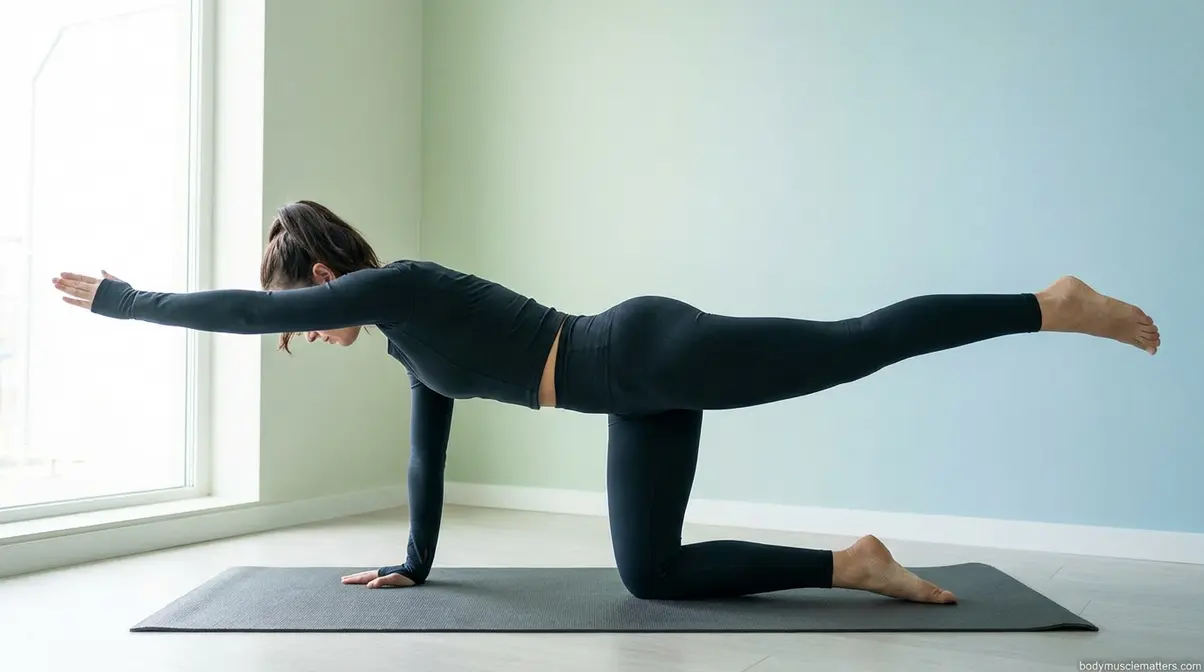
- Bird-Dog: Start on all fours. Extend your right arm and left leg simultaneously, hold for two seconds, then return. Dosing: 3 sets × 10 per side. Beginner tip: Keep your hips level — don’t let them rotate toward the extended leg.
- Kneeling Hip Flexor Stretch: Kneel on one knee with the other foot forward in a lunge. Lean forward gently until you feel a stretch at the front of the hip of the kneeling leg. Hold 30 seconds × 3 per side. This directly counteracts the tight hip flexors — the muscles at the front of the hip that connect your thigh to your lower spine — that become chronically shortened in people who sit for long periods.
Transition: Even the best core exercises won’t protect your back if your lifting form breaks down under load. Use this checklist before every workout.
A 5-Point Safe Lifting Posture Checklist
Before lifting anything heavy — in the gym or at home — run through these five checks to avoid muscle tears and cumulative spinal stress:
- ☐ Brace your core — inhale, expand your belly, create intra-abdominal pressure before the lift begins
- ☐ Hinge at the hips, not the waist — push your hips back first, then bend your knees; your spine stays neutral
- ☐ Keep the load close to your body — the further the weight is from your center, the greater the spinal lever arm
- ☐ Neutral spine throughout — no excessive rounding or arching of the lower back at any point in the movement
- ☐ Exhale through the sticking point — release your breath as you drive through the hardest part of the lift

Caption: The five-point checklist targets the exact breakdown patterns that create cumulative lower back imbalances over months of training.
For a complete protocol specifically designed for heavy compound lifting, see our dedicated lower back pain prevention guide.
Step 3: Prevent Sciatica and Sciatic Nerve Pain

Core and lifting mechanics protect your spine from above. But imbalances that develop in the hips and glutes create a different problem — one that travels down the leg. This step targets that specific pattern.
How Imbalances Affect Your Sciatic Nerve
The sciatic nerve — the longest nerve in the body, running from your lower spine through the glutes and down each leg — can become compressed when surrounding muscles are tight and imbalanced. The most common culprit is the piriformis (a small, deep muscle in the buttock that rotates the hip) becoming tight and inflamed, squeezing the sciatic nerve that runs beneath or through it. The result: sharp, shooting pain down the leg that seems to appear out of nowhere.
Muscle imbalances drive this directly. When one glute is weaker than the other, the piriformis on the stronger side works harder and chronically tightens. Sitting for prolonged periods without adequate hip stretching accelerates this pattern. Physical therapists consistently recommend targeted stretching of the piriformis and surrounding hip rotators as a frontline strategy for how to prevent sciatica (Cleveland Clinic, 2026).
Transition: These three stretches address the muscle tightness that creates nerve compression — perform them daily for best results.
Three Targeted Stretches for Sciatica
- Figure-Four Piriformis Stretch (Supine): Lie on your back with knees bent. Cross your right ankle over your left knee, forming a figure-4 shape. Gently pull your left thigh toward your chest until you feel a stretch deep in your right glute. Hold 30 seconds × 3 per side. This is the most consistently recommended piriformis stretch across physical therapy clinics.
Seated Piriformis Stretch (office-friendly): Sit in a chair, cross your right ankle over your left knee, and lean forward gently. Hold 20–30 seconds. This variation requires no floor space and can be done at a desk every hour.
Standing Piriformis Stretch: Stand and cross one foot over the opposite knee in a figure-4 position while bending the standing knee to lower into a partial squat. Hold 20–30 seconds per side.
Physical therapists recommend holding piriformis stretches for a minimum of 20–30 seconds and performing them on both sides — even if only one side is symptomatic — to prevent the imbalance from shifting to the other hip.
Transition: Stretching the piriformis solves the muscular side of sciatica prevention. The other piece is reducing the compressive forces your sitting posture creates throughout the day.
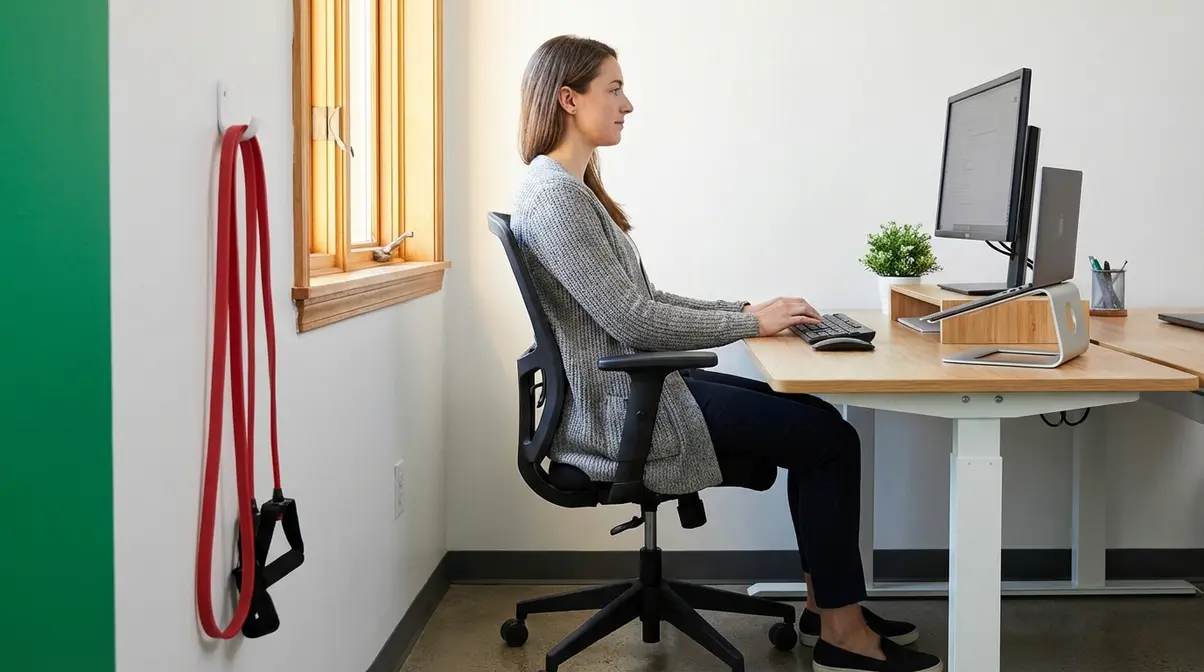
Ergonomic Tweaks for Nerve Pain
How to prevent muscle imbalances at home — and at your desk — starts with small adjustments that add up over eight hours of sitting:
- Monitor height: Position your screen so the top third sits at eye level. Research on upper crossed syndrome confirms that screens set too low pull the head forward, compressing the cervical spine and contributing to a chain of imbalances that reaches the lower back (NIH, 2026).
- Chair height: Your hips should sit at or slightly above knee height with feet flat on the floor — this keeps the piriformis in a lengthened, non-compressed position.
- Movement breaks: Stand and take 5–10 steps every 30–45 minutes. Prolonged compression of the sciatic nerve in a single seated position is a primary trigger for piriformis irritation. Set a timer if needed.
- Bag-carrying side: Alternate which shoulder carries your bag daily. Consistently carrying weight on one side tilts the pelvis and tightens the hip muscles on that side — a small daily habit that, over years, creates significant structural asymmetry.
For more detailed strategies, read our guide on preventing sciatica flare-ups.
Step 4: Lift Safely to Prevent Muscle Strain
Corrective training and core work prepare your body over weeks. But every individual session carries its own injury risk if you skip preparation and push past your actual capacity. Step 4 covers the acute session-level habits that protect your muscles before, during, and after lifting.
The 4-Move Dynamic Warm-Up
A dynamic warm-up — a series of controlled, movement-based exercises that prepare your muscles and joints before lifting — has been shown to reduce injury risk by improving blood flow, increasing muscle temperature, and activating neuromuscular pathways that static stretching alone does not (PubMed, 2026). Unlike holding a stretch in place, dynamic movements mimic what you’re about to ask your body to do. Spend 5–8 minutes on these four movements before every session:
- Leg Swings: Stand next to a wall for support. Swing one leg forward and back in a controlled arc for 10–15 repetitions, then side to side for 10 reps. Switch legs. Activates hip flexors, hamstrings, and glutes.
- Walking Lunges with a Twist: Step forward into a lunge, then rotate your torso toward the front leg. 8–10 reps per leg. Builds hip stability and warms up the spine.
- Inchworm to Cobra: Bend at the hips, walk your hands out to a plank, lower into a cobra stretch, walk your hands back, and stand. 5 reps. Targets hamstrings, shoulders, and thoracic spine.
- Hip Circles: Stand with feet hip-width apart and draw large circles with your hips — 10 clockwise, 10 counterclockwise. Prepares the hip joint capsule and piriformis for load.
Transition: A proper warm-up is one side of the lifting-safety equation. The other is not letting ambition override reality in how much weight you add.
Progressive Overload Without Ego Lifting
Progressive overload — gradually increasing the training stimulus (weight, reps, or sets) over time — is the fundamental mechanism by which muscles grow stronger. The key word is gradually. Adding too much weight too quickly, before your connective tissue has adapted, is how to avoid muscle tears when lifting.
The standard protocol physical therapists and strength coaches recommend: increase weight by no more than 5–10% per week on any given exercise. More important, never add weight on a session where your form degraded. A slightly lighter lift done with full control produces more corrective benefit — and far less injury risk — than a heavier lift done with compensatory movement. If your left shoulder starts hiking up during an overhead press, reduce the weight until both sides move identically.
Check out our complete resource on safe lifting techniques to avoid strains for more details.
Transition: After the session ends, the work isn’t finished — active release is what prevents tomorrow’s stiffness from becoming next week’s imbalance.
Active Release Post-Workout
Active release refers to techniques that restore normal movement to overworked muscles by addressing the adhesions (knots) that form with repeated loading. Unlike passive rest, active release uses movement combined with pressure to break up restrictions before they become chronic tightness.
Two accessible methods to use within 30 minutes of finishing your workout:
- Foam rolling (Self-Myofascial Release): Slowly roll the target muscle over the foam roller, pausing on tender spots for 20–30 seconds. Focus on the dominant side’s most overworked muscles — typically the lats, quads, and hip flexors. Spend 60–90 seconds per muscle group.
- Contract-Relax Stretching: Flex the target muscle against resistance for 5 seconds, then immediately relax into a deeper stretch. Repeat 3–4 times. This technique, used by physical therapists, is more effective than static stretching alone at releasing chronically tight muscle groups.
Step 5: Calm Muscle Twitching and Spasms

A persistent muscle twitch is your body’s way of sending a signal. More often than not, that signal comes from two interrelated sources: electrolyte imbalance and inadequate nervous system recovery. This step addresses both.
Electrolytes and Hydration
Electrolytes — minerals including magnesium, potassium, sodium, and calcium that carry electrical charges and enable muscle contractions and relaxation — play a direct role in muscle twitching and spasms. When levels fall out of balance, neuromuscular irritability increases. The NIH confirms that as magnesium deficiency progresses, numbness, tingling, muscle contractions, and cramps follow (NIH Office of Dietary Supplements, 2026). Potassium deficiency similarly impairs the muscle relaxation cycle that follows each contraction.
Practical targets for anyone training regularly:
- Water: 0.5–1 oz per pound of bodyweight daily, increasing by 16–20 oz for every hour of training
- Magnesium: Found in leafy greens, nuts, seeds, and dark chocolate — prioritize dietary sources; supplementation is most relevant for those with confirmed deficiency
- Potassium: Found in bananas, sweet potatoes, avocado, and beans — support the post-exercise relaxation cycle
- Sodium: Replenish after sweaty workouts through food or electrolyte drinks, not plain water alone — pure water intake after dehydration can paradoxically increase muscle cramping susceptibility (Cadence, 2026)
Electrolyte disturbances — including abnormal levels of sodium, potassium, magnesium, and calcium — are among the most commonly identified causes of muscle cramps and twitching (Practical Neurology, 2026).
If symptoms persist, explore our deep dive on treating muscle spasms with magnesium.
Transition: Even perfect hydration doesn’t prevent twitching if your nervous system never fully recovers between sessions — and sleep is the primary window where that recovery happens.
Sleep and Nervous System Recovery
Most gym-goers optimize their training but neglect the recovery side of the equation. During sleep — particularly deep sleep stages — your nervous system consolidates motor patterns, repairs micro-damaged muscle fibers, and resets the sensitivity of neuromuscular junctions. When sleep is shortened or fragmented, muscles remain in a state of low-grade hyperexcitability. That’s the physiological basis for the persistent twitches and spasms that many people experience after high-volume training weeks.
Physical therapists recommend a minimum of seven to nine hours of sleep per night for anyone in active training. Two habits that directly support neuromuscular recovery:
- Consistent sleep timing: Going to bed and waking at the same time seven days a week stabilizes your circadian rhythm, which governs growth hormone release — a key driver of overnight muscle repair.
- Magnesium-rich foods before bed: A small serving of nuts or dark chocolate in the evening supports the muscle relaxation that allows deep sleep to deepen.
Transition: For twitches that persist despite good hydration and sleep, targeted self-massage addresses the mechanical component directly.
Self-Massage to Stop Muscle Twitches
Persistent twitching in a specific muscle — especially after a hard session — often indicates localized tension and impaired circulation rather than a systemic electrolyte issue. Self-massage techniques for how to treat muscle twitching in a targeted area:
- Thumb pressure on the trigger point: Identify the twitching spot and apply steady, moderate pressure with your thumb for 30–60 seconds. Do not rub — hold. This interrupts the local nervous feedback loop sustaining the twitch.
- Ice followed by gentle movement: Apply ice for 10 minutes to reduce local inflammation, then take the muscle through its gentle range of motion. This sequence is preferred over heat for acute post-training twitching.
- Percussion massage (massage gun): Use at a low intensity setting (not high) — the goal is increased circulation, not aggressive tissue work. Spend 60 seconds on the affected area.
Step 6: Build Muscle-Protective Daily Habits
The training you do in the gym accounts for roughly one hour of your day. The other 23 hours determine whether that training holds — or whether daily habits quietly undo it. This is Layer 3 of The Symmetry Stack, and it’s the gap that every competitor article misses entirely.
Posture Fixes for Desk Workers
Upper crossed syndrome develops when tight chest and neck muscles (specifically the pectorals, levator scapulae, and sternocleidomastoid) dominate against weak deep cervical flexors and scapular stabilizers. It is the most common postural imbalance among desk workers. Tech neck — the forward head position caused by looking at screens set too low — is both a symptom and a driver.
A 2026 NIH narrative review found that workplace ergonomic interventions specifically targeting monitor height and chair setup reduced forward head posture angles by an average of 3.89 degrees and rounded shoulder angles by 4.05 degrees in desk workers (NIH, 2026). Small adjustments, meaningful structural change.
Four daily habits worth building immediately:
- Raise your monitor to eye level — the top third of the screen at eye height, not the center
- Set a 30-minute posture reminder — a phone alarm to check whether your head has drifted forward and your shoulders have rounded
- Alternate your bag-carrying side daily — consistently loading one shoulder compresses that side’s trapezius and creates a lateral tilt that persists into training
- Perform 5 band pull-aparts or wall angels before each workday — two minutes of scapular activation counteracts hours of chest-dominant desk posture
Muscle Group Oppositions to Monitor
Beyond the gym exercises, keep these five common muscle group imbalances on your radar. Each pair needs balanced development — strong on both sides of the joint:
| Primary Mover | Opposing Muscle | Classic Imbalance Pattern |
|---|---|---|
| Chest (Pectorals) | Upper back (Rhomboids, Mid-trap) | Rounded shoulders, forward chest |
| Quadriceps | Hamstrings | Knee instability, anterior pelvic tilt |
| Hip Flexors | Glutes | Lower back pain, flat glutes |
| Biceps | Triceps | Elbow joint stress, limited extension |
| Calves | Tibialis Anterior | Ankle instability, shin splints |
If you’re investing three sets per week in one column, invest three sets in the other. The Symmetry Stack depends on this bilateral accounting.
When to Stop Self-Treating and See a Professional
The steps in this guide are designed for prevention and mild corrective work. There are situations where self-treatment is not enough — and continuing without professional guidance can make things significantly worse.
Warning Signs Beyond DIY Fixes
Stop self-treating and consult a licensed physical therapist (DPT) or physician if you experience any of the following:
- Sharp, shooting, or burning pain during any exercise — not muscle fatigue, but nerve-type pain
- Radiating pain into an arm or leg that did not improve after 48 hours of rest
- Loss of strength on one side that appeared suddenly rather than as a gradual imbalance
- Numbness or tingling in the hands, fingers, feet, or toes
- Pain that worsens after exercise rather than resolving within 24 hours
These symptoms may indicate nerve compression, disc involvement, or structural injury that requires clinical evaluation. Do not attempt to train through them.
When Physical Therapy Helps
Physical therapy is not only for acute injuries. A licensed DPT can perform clinical muscle testing that goes significantly beyond the at-home self-assessment in this guide — identifying the precise degree of strength asymmetry, locating fascial restrictions, and programming corrective exercises at the exact intensity your body needs. Physical therapists recommend considering a clinical evaluation when:
- Your at-home self-assessment shows significant asymmetry (unable to hold the single-leg balance for more than 10 seconds on the weaker side)
- You have chronic one-sided pain that has persisted for more than four weeks despite following corrective protocols
- You are returning to training after an injury and want a structured reintroduction
For chronic or acute pain, consulting a physical therapist before proceeding with any exercise protocol in this guide is always the safer choice.
Other Approaches Worth Considering
If self-treatment and physical therapy have not resolved your asymmetries within 8–12 weeks of consistent effort, consider these additional modalities:
- Sports massage or myofascial release therapy: A licensed therapist can address deep tissue restrictions that foam rolling cannot reach
- Chiropractic assessment: For joint-level asymmetries, particularly in the pelvis and thoracic spine
- Functional movement screen (FMS): A standardized clinical assessment that scores seven fundamental movement patterns and identifies compensations before they cause injury
- Registered dietitian consultation: If persistent muscle twitching and fatigue suggest an underlying nutritional deficiency despite correcting hydration habits
What happens if a muscle imbalance goes untreated? Research and clinical experience consistently show the pattern: the dominant side progressively overloads, the joint between the two sides absorbs uneven stress, and eventually a tendon, ligament, or disc gives way. Prevention costs far less than treatment.
Frequently Asked Questions
How do you avoid muscle imbalances?
The most effective way to avoid muscle imbalances is to use unilateral exercises — movements that train one side of the body at a time — as the foundation of your training program. Always start each exercise on your weaker side. Then, stop at the same rep count on both. Pair this with daily posture habits (monitor height, bag-carrying alternation) and adequate electrolyte intake. Across certified fitness communities, the consistent guidance is that no single tip prevents imbalances — a layered approach combining training, recovery, and daily habits is required.
What vitamin is best for muscle repair?
Magnesium is the mineral most directly linked to muscle function, relaxation, and repair. As documented by the NIH Office of Dietary Supplements, low magnesium levels produce twitching, cramping, and impaired muscle contraction. Vitamin D supports calcium absorption and plays a role in muscle protein synthesis — a deficiency is associated with general muscle weakness. Potassium supports the relaxation phase of the contraction cycle. Prioritize dietary sources (leafy greens, nuts, fish, bananas) before considering supplementation, and consult a physician before adding supplements, as needs vary by individual.
Why is my body lopsided?
Your body is lopsided because one side has been consistently recruited more than the other, creating a strength and size difference over time. The most common causes include side dominance in daily activities, training primarily bilateral exercises, and prolonged sitting that tightens muscles asymmetrically. A body muscular imbalance affects an entire side, while a joint muscular imbalance affects one specific joint’s surrounding muscles, and most people have both simultaneously.
Will Muscle Imbalance Go Away?
Muscle imbalances rarely resolve without deliberate intervention. Because the dominant side continues to overcompensate in every bilateral movement — squats, presses, rows — the gap typically widens rather than self-corrects. Physical therapists recommend four to eight weeks of consistent unilateral corrective work before expecting measurable improvement. Minor postural asymmetries may improve with ergonomic changes alone, but structural strength differences require targeted exercise. Without intervention, imbalances tend to accumulate until a joint or tendon reaches a breaking point.
What are signs of muscle imbalance?
The five most identifiable signs of a muscle imbalance are: (1) visible asymmetry — one bicep bigger, one shoulder higher, (2) movement compensation during compound exercises where the dominant side takes over, (3) chronic one-sided joint discomfort not caused by acute injury, (4) postural cues like tech neck, uneven shoulder height, or tilted hips that indicate upper or lower crossed syndrome, and (5) persistent muscle twitching or spasms in overworked dominant-side muscles. The wall angel test and single-leg balance test can help you pinpoint the location and severity of the imbalance before you begin corrective work.
What is the #1 exercise for balance?
Physical therapists most consistently recommend the Single-Leg Romanian Deadlift (Single-Leg RDL) as the foundational balance exercise. It simultaneously trains proprioception (your body’s positional awareness), hip strength, hamstring flexibility, and core stability — all in one movement that requires each leg to work independently. For beginners, holding a light dumbbell in the opposite hand to the standing leg provides counterbalance. Perform 3 sets of 10 reps per side, starting with your weaker leg, before adding load. For upper body balance, the Single-Arm Dumbbell Row provides an equivalent isolated training stimulus.
Your Symmetry Stack Starts Tonight
Preventing muscle imbalances is not a matter of finding the one right exercise. The Symmetry Stack works because it addresses the problem at every level simultaneously — structured unilateral training closes the strength gap, core and sciatica prevention protocols protect the joints that absorb uneven load, and daily posture and recovery habits stop the imbalances from re-forming between sessions.
The Symmetry Stack is the framework connecting every step in this guide. Layer 1 (unilateral training) builds the structural foundation. Layer 2 (core, recovery, and nerve health) protects what the training builds. Layer 3 (daily habits) is the difference between a body that stays balanced and one that reverts to its old asymmetric patterns the moment you step away from the gym. Most people try one layer and wonder why results don’t stick. All three layers, applied consistently, is what changes the mirror.
Your next step is concrete: before your next workout, run the three-part at-home self-assessment — single-leg balance test, wall angel, and mirror observation. Note which side is weaker. Then open Step 1 and start your first unilateral session with your weaker side leading. Add one corrective superset pair. Raise your monitor tonight. Drink water with your dinner. The system is designed to start small and compound — and the first session is the most important one you’ll take.
For a complete progression plan and additional unilateral exercise variations, see our full guide to unilateral exercises for balance.