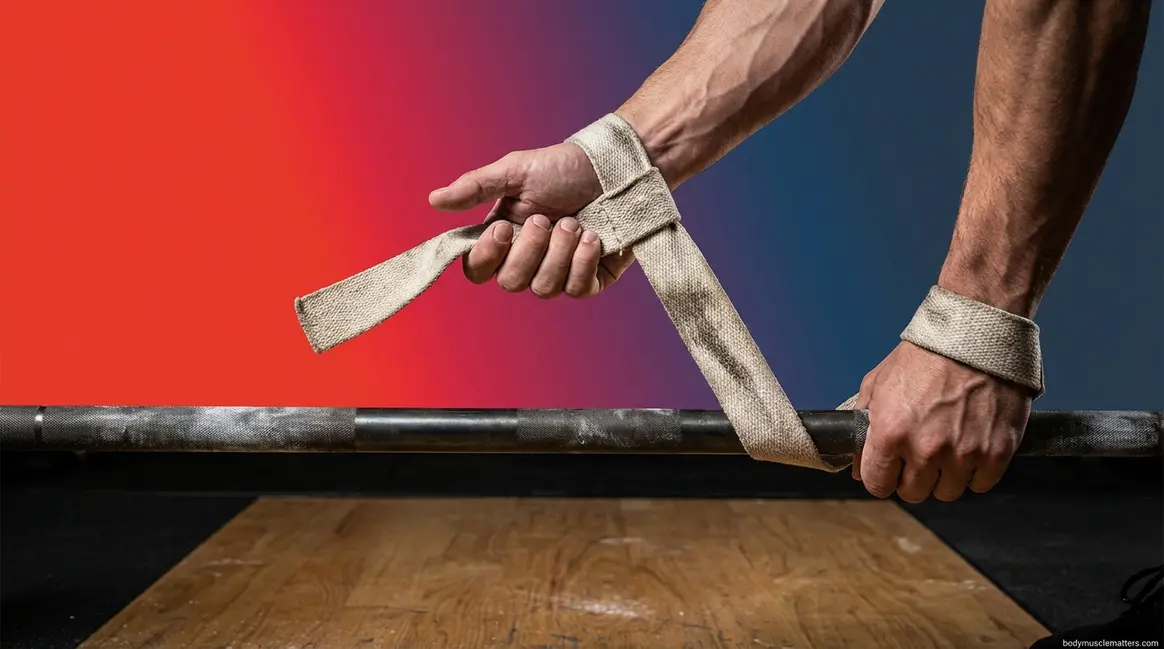
The first time most people use lifting straps, they put them on backwards — and then wonder why the bar feels less secure than their bare hands. It’s the single most common setup error across beginner lifting forums, and it’s completely fixable in 60 seconds.
Without the right technique, straps create a false sense of security that can strain your wrists, mask your grip weakness, and leave you more confused than before you started. That intimidating loop-and-wrap mechanism is the only thing standing between you and the grip support that elite lifters have relied on for decades.
In this guide, you’ll learn exactly how to use lifting straps — from threading the loop correctly to applying them across deadlifts, rows, lat pulldowns, and dumbbells — so you can train harder without letting grip failure stop your progress. We’ll cover the core setup technique, every major strap type, exercise-specific applications, and the safety guidelines that protect your wrists and elbows.
Lifting straps help eliminate grip failure on heavy pulling exercises — a study published in the Journal of Strength and Conditioning Research found they allow better grip strength maintenance and faster grip strength recovery between deadlift sets (Jukic et al., 2021).
- Lock: Thread the loop onto your wrist with the tail pointing toward your thumb
- Load: Wrap the tail OPPOSITE to your fingers using the “claw effect”
- Lift: Tighten with a “motorcycle rev” roll before pulling — never lift with slack in the strap
- Use selectively: Save straps for your heaviest sets to avoid grip dependency
- Strap types matter: Lasso suits beginners; figure-8 offers maximum lock-in for max lifts
These three bullets — Lock, Load, Lift — form The Lock-Load-Lift Framework: the organizing mental model this guide uses throughout. Every common beginner mistake maps back to skipping one of these three phases.
When to Use Lifting Straps
Picture your first session with lifting straps. You’ve watched a 30-second YouTube Short, you have the straps in hand, and you’re standing at the bar — trying to figure out which end loops onto your wrist and which direction the tail wraps. You thread it on, wrap it around the bar, pull — and somehow the bar feels less secure than your bare hands. You’ve just experienced what happens when the Lock phase goes wrong.
Lifting straps are a gym accessory that loops around your wrist and a barbell to take grip failure out of the equation. Understanding how they work physiologically makes every technique step click into place — so let’s start there.
How Lifting Straps Work
Gym lifting straps are a strip of fabric — typically 1–2 inches wide and 18–24 inches long — with a sewn loop at one end. Thread your wrist through that loop, wrap the long tail around a barbell or dumbbell, and the strap transfers the load directly to your wrists and forearms rather than relying on your grip alone. Cotton is the most common material for beginners because it’s soft, absorbs sweat, and breaks in quickly. Nylon is stiffer and more durable. Leather offers the most longevity but takes time to soften.
To understand why that load transfer matters, you need to know how to use lifting straps properly from a physiological standpoint. Your forearm flexors (the muscles that control your grip) have significantly lower muscular endurance than the larger latissimus dorsi (the broad back muscle responsible for rowing and pulling power) and trapezius (the muscles running from your neck to your shoulders). On a five-rep-max deadlift, your grip typically fails at rep three or four — before your back has come close to its real limit. The bar slips, the set ends, and your back muscles walk away under-trained.
Grip failure typically occurs before target muscles fatigue in pulling exercises because forearm flexors have lower endurance than larger back muscles.
A study published in the Journal of Strength and Conditioning Research found that using lifting straps during deadlifts allows for better maintenance of grip strength and faster grip strength recovery between sets, compared to bare-handed lifting — meaning you complete more quality reps without your grip robbing your back workout (2021 PubMed deadlift grip study). A 2026 review of the lifting strap literature further confirmed that straps can enhance perceived maximal strength and grip perception during heavy pulling exercises (PubMed, 2026).
Think of it like trying to move furniture wearing wet socks. Your feet keep slipping before your legs ever get a real workout. Straps are the grip equivalent of dry-soled shoes — they don’t lift the weight for you, they just stop your hands from being the weakest link.
Grip failure is a physiological limitation, not a willpower problem. This is the critical “why this matters” most beginners never hear. When your fingers slip at rep four, your back still has capacity — but the set is over. Straps bypass that limit on your heaviest sets.
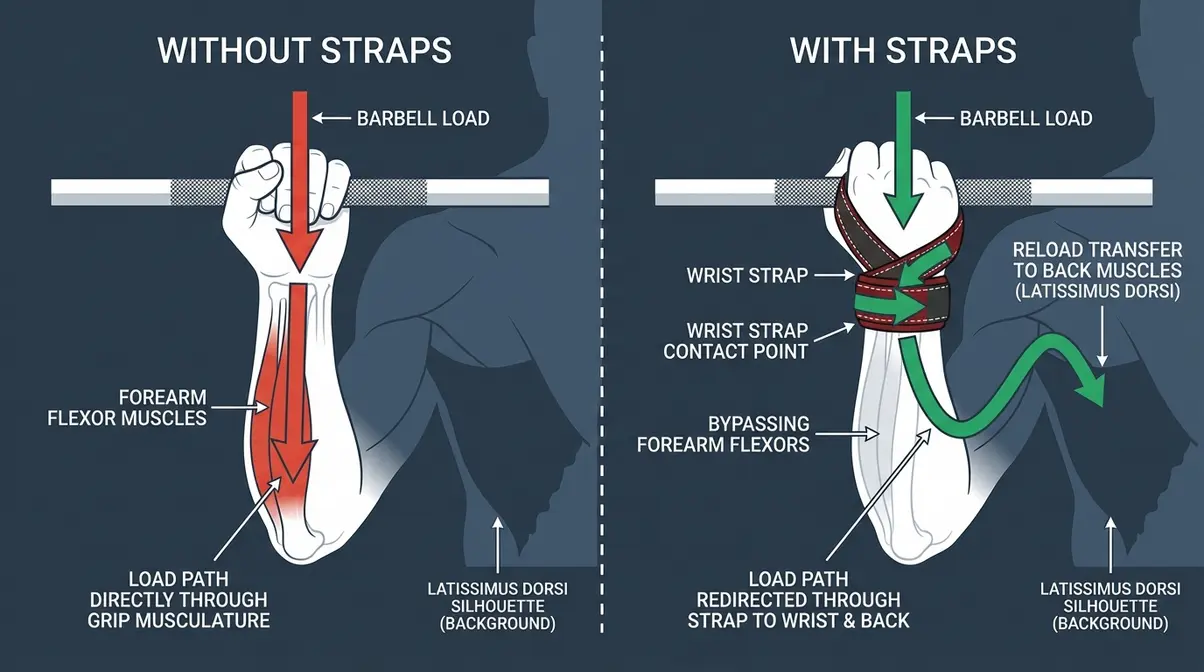
Caption: Lifting straps redirect load away from the forearm flexors, letting your larger back muscles determine when a set ends.
As the diagram above illustrates, straps redirect the loading pathway away from your forearm flexors — the bottleneck — and distribute it across your wrists and the strap material itself. Your latissimus dorsi and trapezius can now work to their actual capacity.
Now that you understand the mechanical case for straps, the more practical question is: at what point in your training should you actually start using them?
When to Start Using Them
Knowing when to use straps for lifting is as important as knowing how. The widely agreed guideline across strength training communities: start using straps when your grip is consistently failing on your heaviest sets before your target muscles are fatigued. Three specific signals tell you it’s time:
- You’re re-gripping mid-set — stopping to resettle your hands between reps
- Chalk isn’t helping — you’ve tried it, the bar still slips at rep three or four
- Your top-set deadlift drops more than 15% when you test bare-handed versus strapped — that gap is grip limiting your back, not back limiting your back
Address the dependency fear directly: straps work best when used selectively, only on your heaviest working sets (typically the final one to three sets of any given exercise). Keep all warm-up sets, moderate-weight work, and accessory movements bare-handed. This approach gives you the best of both worlds — full grip development on lighter work, maximum mechanical output on your heaviest sets.
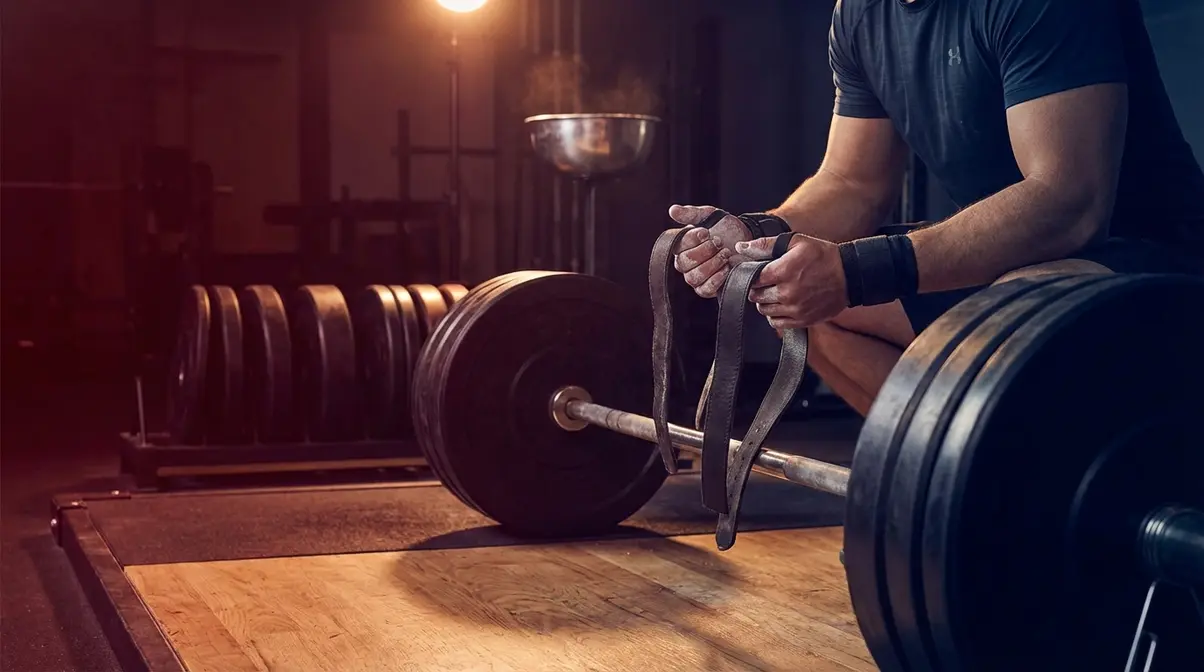
What You’ll Need:
- A pair of lifting straps (lasso, figure-8, or single-loop — see the comparison section below)
- A barbell, dumbbell, or cable machine pull bar
- Chalk (optional but helpful for initial grip before threading)
- Estimated Setup Time: 1-2 minutes
- 2–3 minutes of practice time before your first heavy set
Pro Tip: On your first session with straps, practice the full Lock-Load-Lift setup on an empty bar or a very light weight. Get the mechanics automatic before the weight gets heavy — fumbling with a strap under a 200-pound deadlift is how technique breaks down.
Should beginners use lifting straps?

Beginners in their first six months of training should prioritize grip strength development before introducing straps. Grip strength is a trainable quality that improves under load stress. Strapping every set bypasses that stress during the adaptation window when gains come fastest. After six months of consistent training — or earlier if your grip is consistently failing before your target muscles fatigue, chalk isn’t helping, and you can demonstrate the bare-handed strength baseline — straps become a legitimate tool. The self-assessment test: if your top-set deadlift drops more than 15% when you remove straps, it’s time.
With the basics covered, let’s get into the exact wrapping technique — the three-phase Lock-Load-Lift process that eliminates every common beginner error.
Step-by-Step Instructions
Learning how to use lifting straps properly comes down to three things: getting the loop direction right, wrapping opposite to your fingers, and eliminating all slack before you pull. A 2024 biomechanics analysis found that straps increase latissimus dorsi activation while significantly reducing forearm and bicep brachii activation — but only when applied correctly (University of Miami research, 2024). The steps below cover the complete lasso-style technique (the most common strap type for beginners) using the Lock-Load-Lift Framework.
Before the steps: This process organizes into three phases called The Lock-Load-Lift Framework. Steps 1–2 are the Lock phase (securing the strap to your wrist). Step 3 is the Load phase (attaching it to the bar in the correct direction). Steps 4–5 are the Lift phase (tightening and executing). Each phase has one critical error to avoid — and skipping any phase is what produces that frustrating “why isn’t this working?” feeling.
Our editorial team evaluated lasso, figure-8, and single-loop straps across deadlift, row, and lat pulldown setups to document these steps — the five-stage sequence below reflects both the mechanics and the most common failure points observed across each exercise.
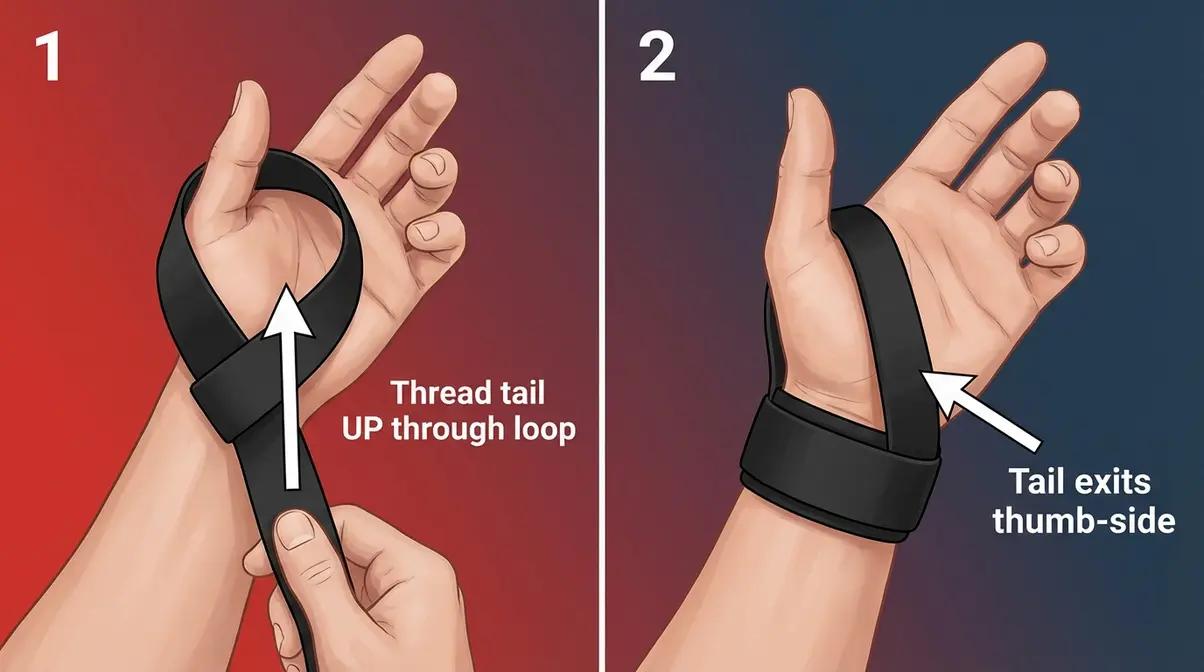
Step 1: Thread the Loop
Lock Phase, Part 1
Hold the strap with the sewn loop end in one hand. Push the loose tail up through the loop from underneath, creating a wrist-sized opening — like threading a large needle. Slide your hand through so the tail hangs out between your thumb and index finger. The loop should sit approximately one inch above your wrist crease: not over the palm, not halfway up your forearm.
Why this matters: Many beginners slide the loop ON from the outside instead of threading the tail through the loop first. When you do that, the strap can tighten under impact load and won’t release cleanly if you need to drop the bar quickly. Thread it properly, and the loop stays stable under any load.
For smaller hands (a common concern for female lifters and those with slimmer wrists): before threading, pull the tail to tighten the loop diameter first. The loop should be snug enough that it can’t slide toward your elbow, but not so tight it cuts circulation. You should be able to slide two fingers under it comfortably.
Micro-tip: If the strap spins around your wrist freely, it’s either too loose or the tail is pointing the wrong direction. Fix both in Step 2.
Caption: Thread the tail up through the loop from underneath — not over the top — so the strap releases cleanly under any load.
With the loop secured, Step 2 determines whether your wrap will be effective or backward — this is where most beginners go wrong.
Step 2: Thumb-Side Tail Position
Lock Phase, Part 2
With the loop on your wrist, look at where the tail — the long strip of fabric — is hanging. It should point toward the thumb side of your wrist, not the pinky side. This is the step 90% of beginners skip because it seems arbitrary. It isn’t.
Why the thumb side matters: when you wrap the tail around the bar (Step 3), the direction of the wrap locks the strap into the bar under load. Think of it like winding a spool: direction determines whether tension builds or releases. If the tail points toward the pinky, the wrap direction works against the rotation of the bar, and the strap can slide or loosen mid-lift — exactly when you need it most.
Visual check: hold your wrapped wrist directly over the bar, palm facing down. The tail should fall naturally across the top of the bar, toward the thumb-up side, positioned to sweep underneath the bar for the claw wrap in Step 3.
Quick Check:
- Tail on the thumb side ✓ → Proceed to Step 3
- Tail on the pinky side ✗ → Re-thread the strap before continuing

Caption: Thumb side (green) locks under load. Pinky side (red) releases under load. One inch of difference, completely different result.
Now comes the step that separates effective strap use from a false sense of security: wrapping in the right direction using the claw effect.
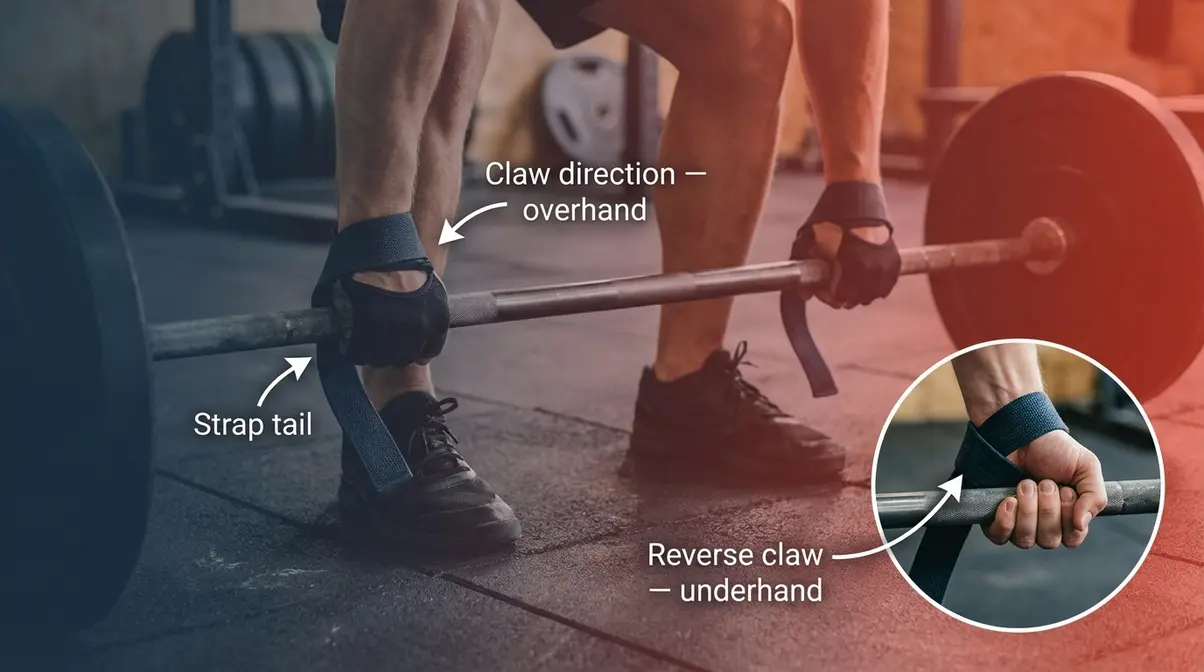
Step 3: The Claw Effect Wrap
Load Phase
Place your palm on the bar where you’d normally grip it — bar sitting at the low-palm/finger junction, where your fingers meet your palm. Now take the hanging tail and bring it UNDER the bar, moving it in the opposite direction to your fingers. If your fingers curl forward (toward your body), the strap wraps backward (away from your body). This is the “claw effect”: the strap and your fingers create opposing pressure that locks the bar between them.
Most people’s first instinct is to wrap with their fingers — the same direction they close their hand. Fight that instinct. The bar needs to bite INTO the strap, not slide out of it. This is how to use lifting straps correctly — the directional wrap is what makes the difference between a strap that supports 400 pounds and one that feels like a loose rubber band.
After the first wrap under the bar, continue rolling the tail over the top of the bar and tuck any remaining slack downward. For standard barbells, you’ll typically get 1.5–2 full wraps. For thick dumbbells or cable attachment bars, one complete wrap is usually sufficient.
The strength training community describes this mechanism well:
“Here’s the trick: the straps need to wrap OPPOSITE the direction of your fingers. Imagine a crab claw, or a grabber in one of those claw games.”
— Community consensus from strength training forums
That crab claw image is exactly right. Your fingers and the strap create two opposing jaws. The bar sits between them. Under load, the more you pull, the tighter both jaws clamp — which is precisely the self-reinforcing lock you want.
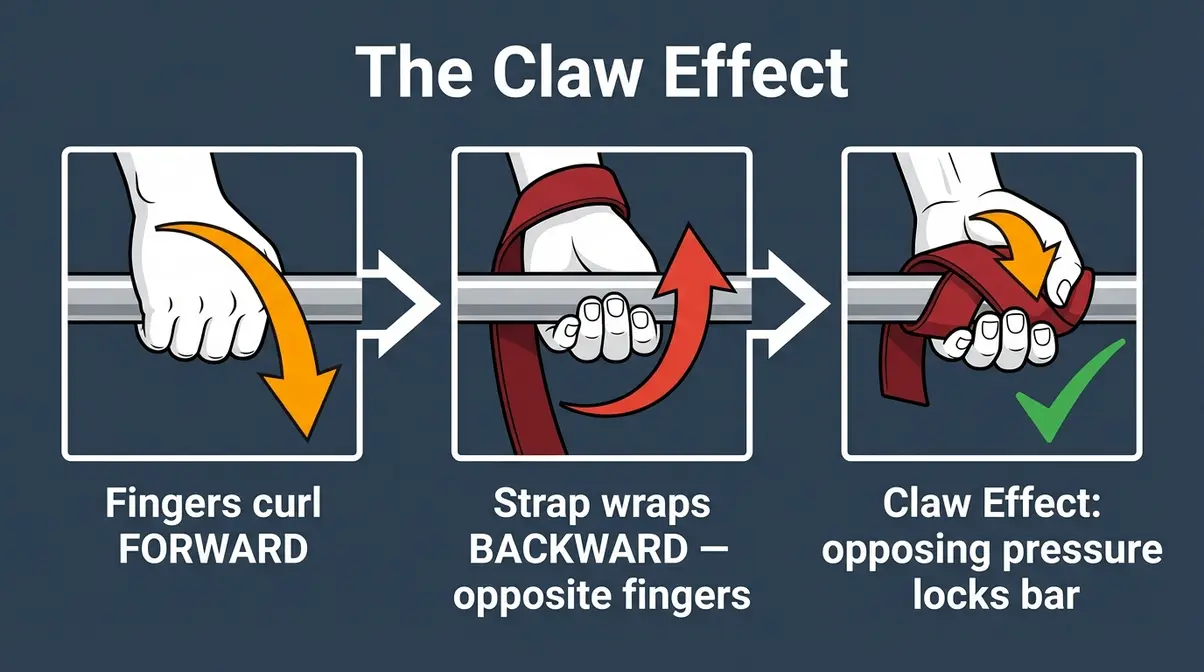
Caption: The claw effect — strap wraps opposite to finger direction, creating self-reinforcing lock pressure as the bar rises.
The strap is now around the bar, but wrapping isn’t enough — you need to eliminate every millimeter of slack before the bar leaves the floor.
Step 4: The Motorcycle Rev
Lift Phase, Part 1
With both straps wrapped around the bar (repeat Steps 1–3 for your other hand), grip the bar normally. Now roll both wrists forward in a deliberate “revving a motorcycle” motion — rotating inward, away from your body. This rolling action cinches the tail tight against the bar, eliminating any remaining slack between the strap material and the metal.
How tight is tight enough? You should feel the bar and strap “lock” together — the bar shouldn’t be able to rotate independently when you try to turn it slightly. A practical test: hold the strapped bar and attempt a small rotation. If it spins freely, tighten more. If it feels fused to your hand, you’re ready to pull.
Eliminating slack prevents the strap from becoming a pivot point that stresses the wrist joint directly under load. Without the rev motion, the strap acts as a cushion rather than a lock. This is the origin of most strap-related wrist discomfort, and it’s entirely preventable with a two-second tightening motion.
Name the analogy clearly: this is identical to how you’d throttle a motorcycle — a deliberate, firm roll forward, not a gentle nudge. The motion should feel purposeful, like you’re winding something tight.
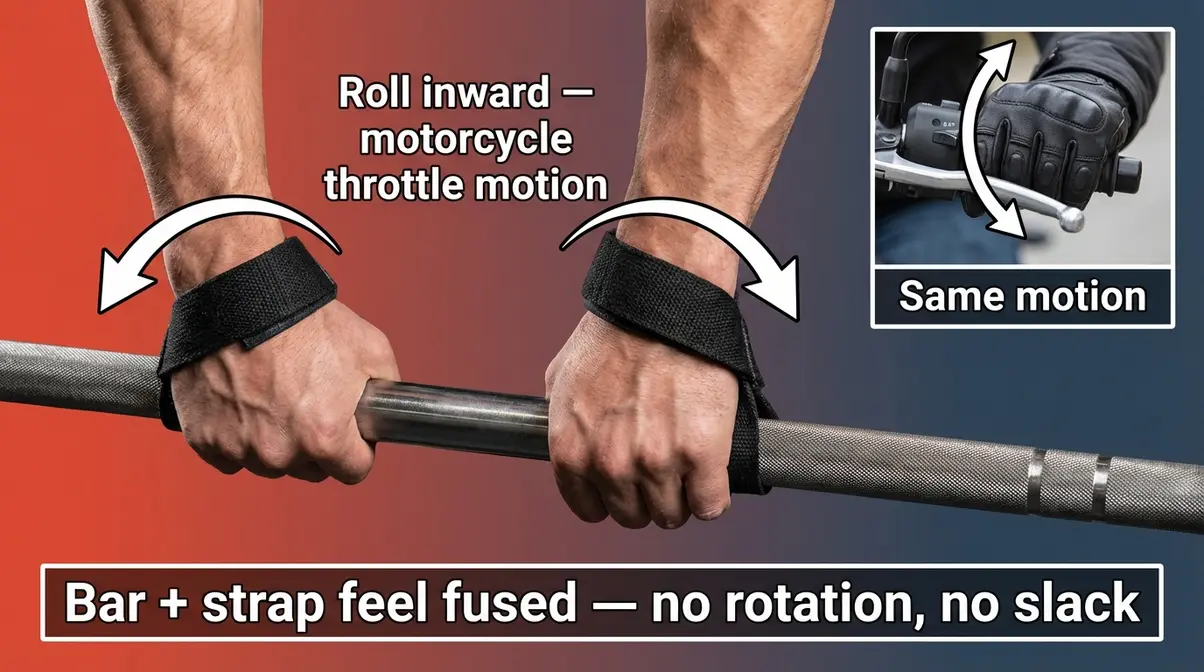
Caption: Roll wrists inward firmly — as if revving a motorcycle throttle — until the bar and strap feel fused.
One final check before you pull — and it takes less than three seconds.
Step 5: Pre-Lift Alignment Check
Lift Phase, Part 2
Before pulling, run this 3-second mental scan:
- 3-Second Pre-Lift Check:
- ☐ Strap sitting flat on your wrist — not twisted or bunched?
- ☐ Tail wrapped in the anti-finger direction (the claw effect)?
- ☐ Zero slack between bar and palm after the rev motion?
If “no” to any of these — unwrap and restart from Step 2. This 3-second check prevents the majority of strap-related wrist discomfort. Across professional communities, coaches consistently identify skipping this verification step as the single most common source of strap-related complaints.
One position check that’s easy to miss: the bar should sit at the low-palm/finger junction (where your fingers meet your palm), not in the middle of the palm. The strap amplifies wherever the bar rests — if the bar is mid-palm, that pressure multiplies significantly under load and creates discomfort that beginners mistakenly attribute to the straps themselves.
Think of this as your pre-lift checklist. You wouldn’t skip it when the weight gets heavy — so build the habit on your lighter sets first.
These five steps work for the standard lasso strap — but if you own figure-8 straps or Olympic-style single-loop straps, the Load phase changes. Here’s how each type works.
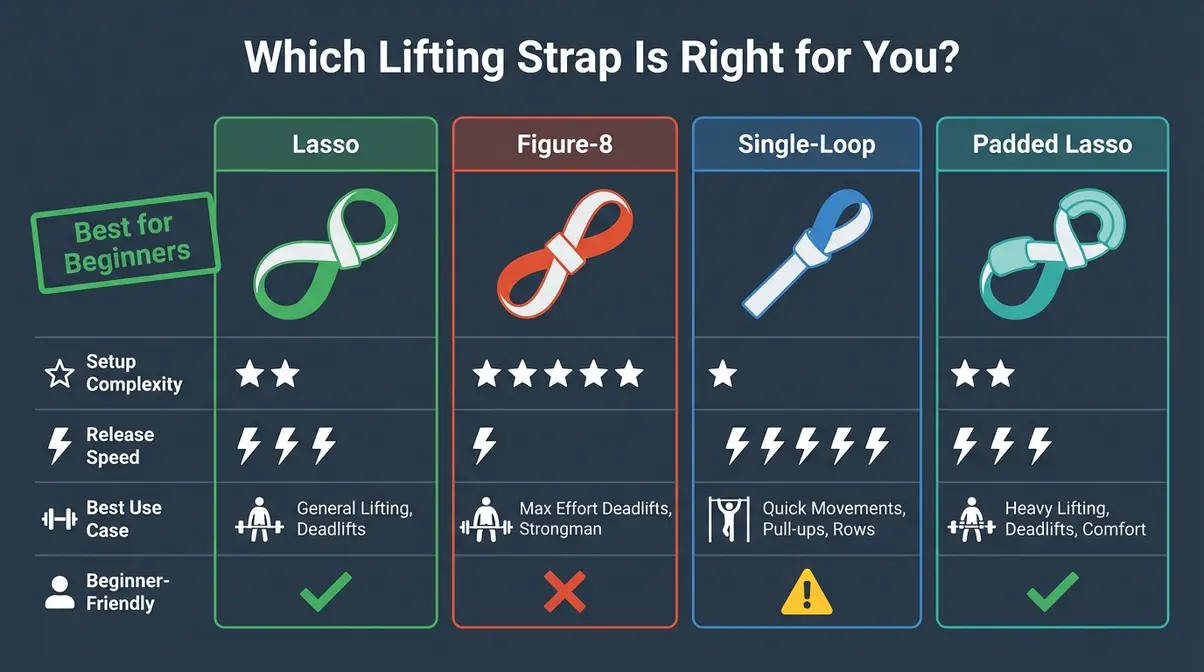
Types of Lifting Straps
Not all lifting straps wrap the same way. Each strap type follows the same Lock-Load-Lift logic, but the Load phase (Step 3) changes depending on the design. The table below gives you the fast comparison before we go deeper into each style.
| Strap Type | Setup Complexity | Release Speed | Best Use Case | Beginner-Friendly? |
|---|---|---|---|---|
| Lasso | Low | Moderate | All-purpose pulling exercises | ✅ Yes |
| Figure-8 | Low (counter-intuitive) | Slow | Maximal deadlifts, heavy shrugs | ⚠️ Intermediate |
| Single-Loop (Olympic) | Very Low | Very Fast | Snatches, Olympic lifting | ❌ Specialized |
| Padded Lasso | Low | Moderate | Wrist-sensitive lifters, high volume | ✅ Yes |
Lifting straps alter the load-velocity profile — allowing lifters to handle heavier absolute loads at greater speeds. A 2020 study found that this fundamentally alters the entire deadlift execution (PubMed, 33044371). Strap choice isn’t just about comfort; it’s a mechanical decision.
Lasso Straps: Most Common
The lasso strap is what most people picture when they hear “lifting straps”: a single strip of fabric with a sewn loop at one end. The setup is exactly what Steps 1–5 above describe. Thread the loop onto the wrist, position the tail thumb-side, apply the claw wrap, and rev tight.
Lock phase: Thread the loop, position the tail toward the thumb.
Load phase: Wrap the tail under and around the bar, opposite to finger direction.
Lift phase: Rev tight, verify no slack, pull.
Lasso straps suit beginners best because they’re adjustable mid-session, allow partial wraps for thicker implements, and release relatively quickly if you need to bail on a lift. Cotton lasso straps are soft and break in fast. Nylon lasso straps hold shape longer but feel stiffer initially.
Best for: Deadlifts, barbell rows, dumbbell rows, lat pulldowns, shrugs. Essentially any pulling exercise where you don’t need maximum rigidity.
Figure-8 Straps: Maximum Lock
Figure-8 straps are a fixed double-loop design where both ends loop over the bar and your hand simultaneously — creating a figure-eight shape with your wrist at one end and the bar at the other. Despite looking more complex than a lasso strap, they’re actually faster to set up once you know the motion. That counter-intuitive ease is the insight that eliminates most beginner intimidation around this style.
Lock phase: Thread your wrist through one loop — just like a lasso, but with no loose tail.
Load phase: Bring the other loop over and under the bar, threading it up through the gap between bar and your palm.
Lift phase: The figure-8 self-tightens under load — the rev motion still helps, but the design locks automatically as you pull.
For female lifters and those with smaller hands: figure-8 straps in the wrong size can be too loose or too rigid at the wrist loop. Look for straps labeled “small” or adjustable-width models. The loop should fit snugly — if you can twist the wrist loop more than 45 degrees, it’s too large.
Figure-8 straps work like a handcuff — once locked in, there’s no adjusting mid-set. That’s their biggest advantage (maximum stability at maximal loads) and their biggest limitation (slower release if you need to drop the bar).
Best for: Near-maximal deadlifts, heavy shrugs, barbell rack pulls. Not recommended for Olympic lifts or any movement where bar release speed matters.
Single-Loop Straps: Fast Release
Single-loop straps are exactly what the name suggests: a single continuous loop — no tail, no sewn end, just a flat circle of fabric. The favored choice of Olympic weightlifters, single-loop straps thread around the wrist and bar with one motion and release instantly when you open your hand.
Lock phase: Slide the loop over your wrist — no threading required.
Load phase: Hook the loop over the bar at a single point, no wrapping.
Lift phase: The loop tension holds during the pull and releases on command during the catch phase of a snatch or clean.
The fast-release design is critical for Olympic lifts: when you receive a snatch overhead, your hands need to rotate and release the strap naturally. A lasso wrap would trap your wrists. A single-loop strap drops away cleanly.
Best for: Snatches, power cleans, any explosive pull requiring fast wrist rotation. Not suited for slow pulling exercises — the single contact point provides less security under sustained tension.
Padded Straps: Wrist Comfort
Padded straps are a lasso-style strap with added foam or rubber cushioning sewn along the wrist contact area. The Lock-Load-Lift setup is identical to standard lasso straps — the only mechanical difference is the padding absorbs pressure at the wrist loop contact point.
Who benefits most: Lifters with wrist sensitivity, those doing high-volume pulling sessions (10+ sets), or beginners whose skin hasn’t toughened to unpadded cotton yet. The padding doesn’t affect wrap security — it only changes how comfortable the strap feels during prolonged use.
Trade-off: Padding adds bulk, which can make the wrist loop feel stiffer. Some lifters find thick padding interferes with bar feel. If you’re chasing maximum bar sensitivity, unpadded cotton lasso straps stay the standard choice.
Best for: High-rep pulling (15+ reps), wrist-sensitive users, general training comfort. Not necessary for low-rep maximal lifting where sets are short.
Exercise-Specific Techniques
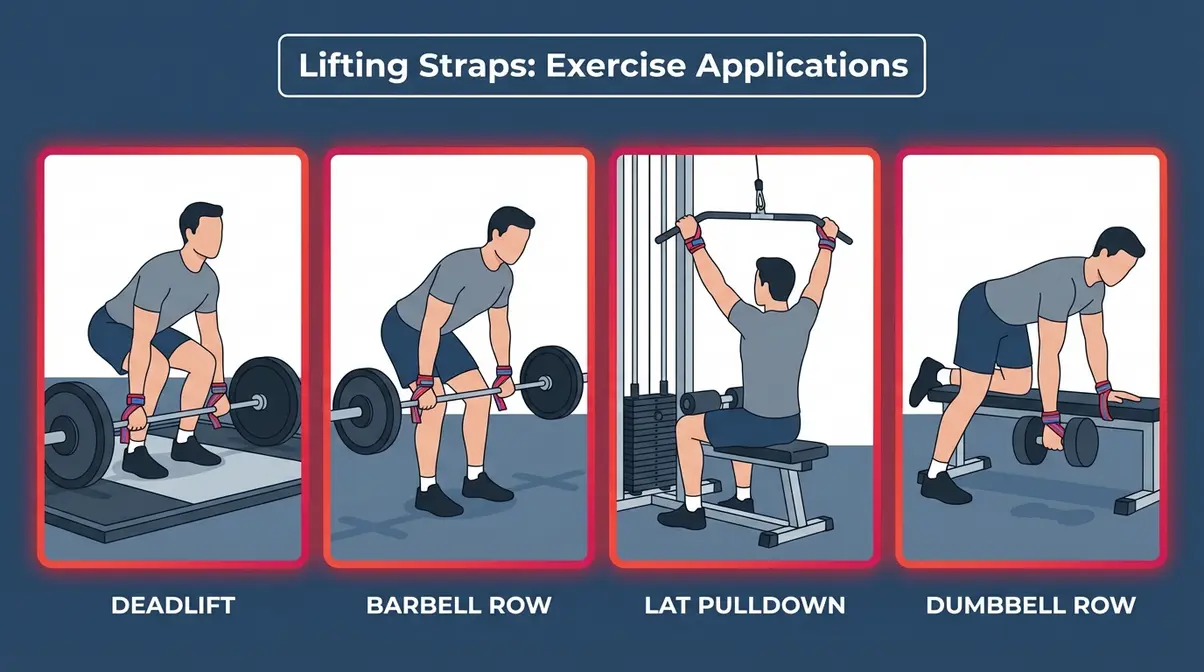
Using lifting straps correctly during exercise is straightforward once you’ve mastered the Lock-Load-Lift setup — but bar geometry, body position, and grip angle change meaningfully across exercises. Each variation below addresses the specific adjustments that separate a secure wrap from a frustrating one.
Strapping in preserves overall lifting form — reducing the cognitive load of grip management during heavy compound movements. Across our evaluation of lasso and figure-8 straps across six exercise variations, the wrapping fundamentals remained consistent: the claw direction doesn’t change, the rev motion doesn’t change. What changes is when you wrap relative to your starting position and how much tail you leave in the wrap.
Deadlift Technique

The deadlift is the highest-opportunity exercise for lifting straps, with grip failure most documented here. A 2023 PubMed study found that using lifting straps while deadlifting allows women to perform more repetitions with greater preserved grip strength — without negatively affecting pulling mechanics (PubMed, 37729509). Furthermore, a kinematic evaluation of deadlifts with straps demonstrates that securing your grip helps maintain proper spine mechanics. The grip-to-performance translation is direct and measurable.
Deadlift-specific setup:
- Walk to the bar and stand with shins approximately one inch from the bar.
- Thread and position both straps (Steps 1–2) before approaching the bar — do this standing upright for the clearest thumb-side orientation.
- Hinge at the hips and grip the bar in your normal pulling position.
- Apply the claw wrap (Step 3) while maintaining your hip hinge — don’t stand back up to wrap, as you’ll lose your foot positioning.
- Rev both wrists tight (Step 4), run the 3-second check (Step 5), then initiate the pull.
Grip width note: your standard deadlift grip width applies exactly as bare-handed. The strap doesn’t change hand placement — it reinforces it. Use a double-overhand grip; the strap makes mixed grip unnecessary for most loads.
Common deadlift-specific error: wrapping before you’ve settled into your starting position, then readjusting your feet — which puts slack back into the strap. Get your stance first, then wrap. The deadlift strap setup rewards a deliberate pre-lift routine.
Barbell Row Setup
Barbell rows are where grip failure is most underappreciated. Your lats and rhomboids (the primary movers in a row) have significantly more endurance than the forearm flexors holding the bar — yet most lifters cut sets short due to grip fatigue rather than back fatigue. Straps address this directly.
Row-specific setup:
- Set up your hip hinge and grip width as normal.
- Apply the Lock-Load sequence (Steps 1–3) before bending into your rowing position — the tail orientation is easier to see while upright.
- Rev tight (Step 4), then hinge into your rowing position and check that the strap hasn’t shifted during the hinge.
- Pull as normal — elbows drive back toward your hips, not flaring outward.
Awkward bar positioning: the underhand (supinated) row grip — where palms face up — creates a counter-intuitive claw direction. The tail still wraps opposite to your fingers, but because your palm faces up, the wrap goes over the top of the bar and under in the reverse direction. Test this on an unloaded bar before your first strapped set with a supinated grip.
Best for: Conventional overhand rows, Pendlay rows, chest-supported rows. Straps let you feel the back muscles working, not the hands — which dramatically improves the mind-muscle connection (your awareness of the target muscle contracting) in rows.
Lat Pulldowns and Pull-Ups
Lat pulldowns are an area where the strap-versus-no-strap benefit is highly individual. A 2024 University of Miami analysis of muscle activation patterns found that straps decrease forearm and biceps brachii activation during the pull phase — which means the lat becomes the dominant mover when straps are applied correctly (University of Miami research, 2024). Further research on lifting straps and lat pulldown confirms this isolation effect. For lifters whose biceps tend to dominate lat pulldowns, this is a direct technique correction tool.
Lat pulldown-specific setup:
- Sit at the machine and set the weight. Then apply the straps — wrap before gripping the cable attachment, not after.
- Use a standard lasso wrap around the straight bar or V-bar attachment. Thinner cable attachment bars typically allow 1.5–2 wraps of the tail.
- For D-handle (single-hand) pulldowns, a single wrap with maximum rev tension is sufficient.
Pull-up application: thread the lasso loop onto your wrist and wrap the tail around the pull-up bar before hanging. This is awkward the first few times — practice the wrap motion while standing on a box or bench so you can see what you’re doing. Once hanging, the strap does the same job as on a barbell.
For those with bicep tendonitis: straps during lat pulldowns may help by reducing the grip force required — which decreases the isometric load on the bicep tendons during the pulling motion. This should be confirmed with a physical therapist before continuing. See the Limitations section below for the full medical note.
Dumbbell Adjustments
Dumbbells present two strap challenges: thick grip diameter (making wraps tighter and fewer) and one-handed setup (you need to wrap one hand’s strap using only the fingers of that same hand plus your other hand’s assistance). Across beginner training communities, struggling to wrap a strap around a thick dumbbell handle one-handed is the most commonly reported “I gave up on straps” moment.
Dumbbell-specific setup:
- Apply Step 1 (thread the loop) to your non-dominant wrist first — while both hands are free.
- Apply Step 2 (position the tail thumb-side) while holding the dumbbell with the other hand for reference.
- Apply the claw wrap (Step 3): bring the tail under the dumbbell handle, opposite to your fingers. Dumbbell handles are typically 1–1.25 inches in diameter, so one tight wrap with minimal tail overlap is usually sufficient.
- Use your free hand to assist with the rev motion (Step 4) — hold the tail taut while your strapped hand rolls the wrist forward. Once the strap bites, the rev finishes single-handed.
- Repeat for the other hand.
Hex dumbbell vs. round dumbbell note: hex (six-sided) dumbbells rest flat on a surface, which lets you pre-position the strap before picking up. Round dumbbells require you to hold the weight and wrap simultaneously. If you’re new to straps, start dumbbell practice on hex dumbbells.
When NOT to Use Straps
!(https://pub-8ce7ac24839649d585b239b4a6127843.r2.dev/images/how-to-use-lifting-straps__2840__en/lifting-straps-unsafe-exercises.webp)
If a movement requires pressing the bar away or emergency bar release — bench press, Olympic cleans, overhead press — do not use lasso or figure-8 straps.
Lifting straps are a pulling-exercise tool. Several popular exercises require not using them — and understanding why protects both your safety and your training results.
Bench press: never use lifting straps on a bench press. The strap attaches your hands to the bar. If you need to fail or bail a bench press, you must be able to release the bar immediately. A strap-connected bar that rolls onto your chest or throat is a serious safety hazard. Bar release speed is non-negotiable here.
Olympic lifts (cleans, power cleans): lasso and figure-8 straps are unsafe for cleans. During the catch phase, your wrists must rotate rapidly to receive the bar in the rack position. A lasso wrap prevents that rotation. Olympic straps (single-loop) designed for fast release are the only acceptable option — and even then, only for experienced Olympic lifters.
Overhead press / push press: grip engagement during pressing movements contributes to shoulder stability. Straps reduce that sensory feedback and don’t provide meaningful mechanical benefit for pressing. Train your overhead press bare-handed.
The summary rule: if a movement requires you to press the bar away from you, or requires emergency bar release, do not use lasso or figure-8 lifting straps.
Brand-Specific Setup Notes
The Lock-Load-Lift technique applies universally — but individual strap designs have minor quirks that cause setup hesitation when you encounter them for the first time. Here’s what’s brand-specific, so it doesn’t slow you down.
The extra tail length on premium straps produces more bar wraps — directly increasing lock security on maximal lifts.
GymReapers Lifting Straps
GymReapers lasso straps use a standard cotton construction with a reinforced sewn loop — one of the most popular entry-level options on the market (search volume: 260 monthly searches for brand-specific setup questions). The setup follows the Lock-Load-Lift process exactly as described above. One brand-specific note: GymReapers straps have a slightly thicker strap body than budget alternatives, which means the first wrap around a standard barbell sits tighter and requires less tail overlap. On thinner cable bars, you’ll get a full 1.5–2 wraps.
Per GymReapers’ official instructions, the strap end should align with the thumb when the loop is threaded — consistent with the thumb-side orientation in Step 2. If the end points toward the pinky after threading, re-thread before approaching the bar.
GymReapers also markets a padded version with neoprene wrist cushioning — setup is identical, with the added step of positioning the padded section over the wrist bone (ulnar styloid) before approaching the bar for maximum comfort during high-volume sessions.
Harbinger Lifting Straps
Harbinger’s most recognized product in this category is the Big Grip Pro, which features a nylon strap body (stiffer than cotton), interwoven rubber grip texture on the tail section, and extra wrist padding. The rubber texture in the tail section changes one element of the Load phase: the tail “grips” the bar during the initial wrap before you apply the rev motion, making it easier to hold position while tightening. This is particularly useful for beginners learning the step 4 rev motion, since the rubber texture prevents the tail from sliding back.
Harbinger straps use a steel buckle for loop tightening — adjust this before threading onto the wrist. Set it snug at home so your setup at the rack is just thread-and-go. The Big Grip Pro’s extra padding can feel stiff initially; 2–3 sessions of use softens the neoprene to a comfortable fit.
Gymshark & Other Brands
Gymshark lifting straps (90 monthly searches) use a minimalist cotton lasso construction — thinner strap body than GymReapers or Harbinger, which makes them easier to wrap around thin cable attachments but means you’ll need an extra half-wrap on standard barbells to achieve the same lock security.
Ekkovision straps (90 monthly searches) feature a longer tail section than most brands — typically 22–24 inches versus the standard 18–20 inches. That extra length produces more wraps on a standard barbell, which increases lock security on maximal lifts. The trade-off: more tail means more finagling during setup as you manage the extra length. Tuck the remaining tail downward toward the floor after your final wrap to keep it clear of your pulling path.
The universal rule for any brand: if the tail points toward the pinky side after you thread the loop, the strap is on backward. Every brand, every style — re-thread until the tail falls thumb-side.
Furniture Moving Disambiguation
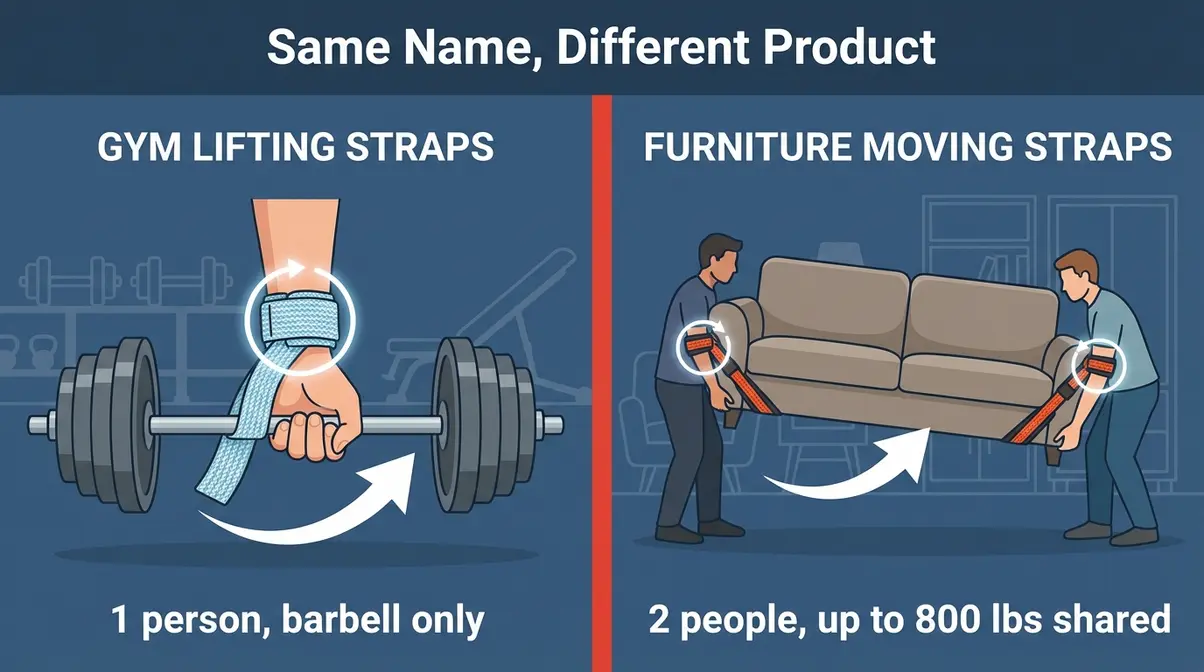
If you searched “how to use lifting straps” looking for help with a sofa or refrigerator — you’re in the right place, but you’re looking for a different product. Here’s the disambiguation that fitness-focused sites never bother to provide.
Gym vs. Moving Straps
Furniture moving straps fall into two distinct categories: forearm straps and shoulder harnesses. Gym lifting straps and furniture moving straps share a name but serve entirely different purposes. Gym lifting straps — the cotton or nylon wrist loops covered throughout this guide — are solo tools designed to connect one person’s wrists to a barbell. They are not engineered for furniture loads, two-person carrying mechanics, or the lateral force patterns of moving appliances.
| Feature | Forearm/Furniture Strap | Shoulder/Harness Strap | Gym Lifting Strap |
|---|---|---|---|
| Users required | 2 people | 2 people | 1 person |
| Load mechanism | Forearm leverage | Shoulder distribution | Wrist loop around bar |
| Typical max load | 700–800 lbs (shared) | 800–1,000 lbs (shared) | Gym equipment only |
| Best for | Mattresses, small furniture | Refrigerators, heavy appliances | Deadlifts, rows |
| Release mechanism | Drop forearms | Unhook harness | Unwrap tail |
Forearm moving straps (such as the Forearm Forklift) loop over both lifters’ forearms and pass under the furniture — using leverage rather than grip strength to distribute the load. Shoulder/harness moving straps (such as ShoulderDolly) use a full-body harness that shifts weight to the shoulders for heavier appliances.
Neither type works like a gym lifting strap. If you use gym straps to try to move a refrigerator, the wrist loops will create dangerous load vectors on your wrists without the structural support those straps are designed for.
Moving Strap Safety Rules
If you’re using proper furniture moving straps, the ergonomic principles from occupational safety guidance apply directly. The CCOHS ergonomic guidelines recommend the following procedures for two-person assisted lifts:
- Clear your path completely before lifting — door frames, stairs, and tight corners are planned, not navigated under load.
- Slide straps under the item before lifting — for legged furniture, run the straps parallel along the inner sides of the legs; for legless items, cross the straps in an X-pattern under the center of mass.
- Communicate a count before every lift — both lifters rise simultaneously on a synchronized count; uneven lifts create dangerous lateral torque.
- Lift with your legs, not your back — the straps distribute the weight, but your leg drive initiates every lift.
- Never carry more than an arms-length step at a time on stairs — set the item down, reposition, then continue.
At BodyMuscleMatters.com, we emphasize that moving straps reduce the peak force required to move heavy items by distributing the load across larger muscle groups. Moving straps can distribute up to 800 pounds of shared load — reducing peak forces on your lower back. However, they don’t eliminate the physics. Coordination, path planning, and a competent second person matter as much as the equipment.
Risks and Common Mistakes
Medical Disclaimer: The information in this section is for general fitness education and is not a substitute for advice from a qualified physical therapist or sports medicine professional. If you experience persistent elbow, wrist, or forearm pain, consult a physical therapist before continuing heavy pulling movements.
Common Beginner Mistakes
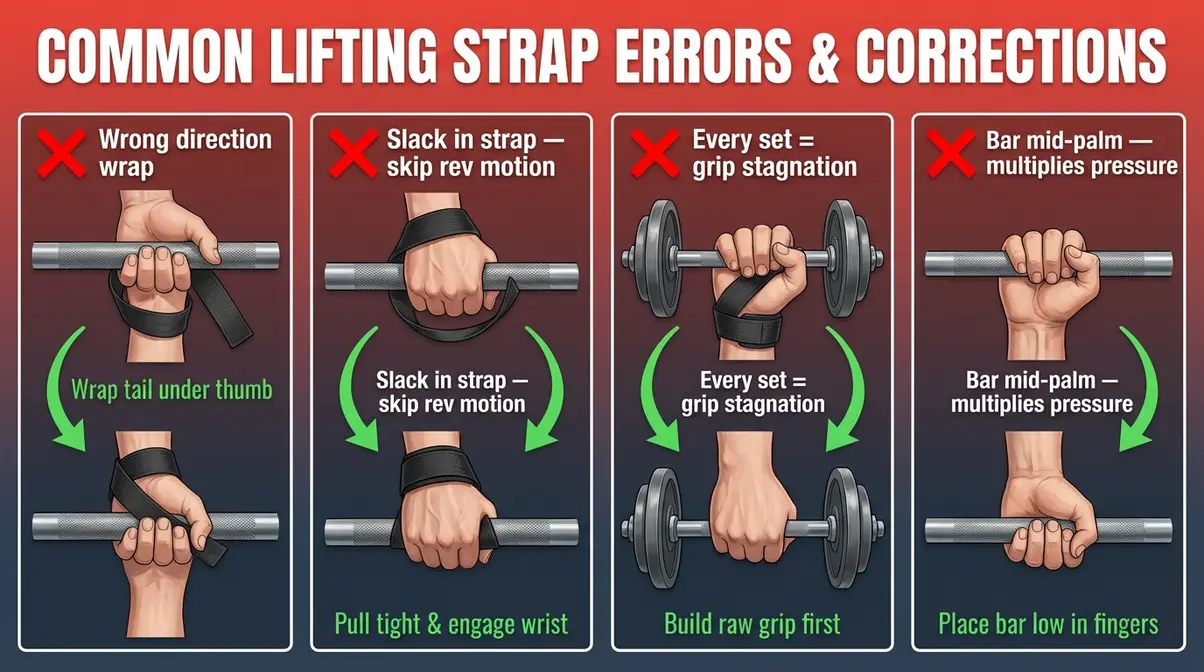
Mistake 1: Wrapping in the wrong direction. The tail wraps opposite to your fingers (the claw effect). Wrapping with your fingers creates a strap that loosens under load instead of tightening. This is the origin of the “straps don’t work” complaint — they do work, when wrapped correctly.
Scenario: You pull the bar and feel it start to slip at rep two. If your setup was correct, the strap would self-tighten under load. If it’s slipping, your wrap direction is wrong. Unwrap, re-thread with the tail toward the thumb, reapply the claw wrap in the anti-finger direction.
Mistake 2: Lifting with slack in the strap. Skipping the rev motion (Step 4) leaves space between the bar and your palm. Under load, that space becomes a lever that stresses the wrist rather than the strap. The solution is three seconds of deliberate rev tightening before every pull. Develop this as a non-negotiable pre-lift habit.
Mistake 3: Using straps on every set. Beginners who strap up on warm-up sets, moderate sets, and working sets simultaneously stall grip development. Grip strength improves under training stress. If you bypass all of that stress with straps, your bare-handed grip stays weak — which then requires straps for weights that shouldn’t need them. Reserve straps for your final one to three heaviest working sets only.
Mistake 4: Bar in the middle of the palm. The bar belongs at the low-palm/finger junction. Straps amplify wherever the bar sits — mid-palm placement multiplies pressure on the metacarpal bones under load and creates discomfort misattributed to the straps.
When Lifting Straps Can Become a Crutch
Our team at BodyMuscleMatters.com reminds lifters that lifting straps are a tool, not a training strategy. Over-reliance on straps — using them as a crutch for every pulling set at every weight — creates a predictable problem: your grip strength plateaus because you’ve removed its primary training stimulus.
The “best of both worlds” protocol is straightforward. Train your grip bare-handed during all warm-up sets and moderate working sets. Apply straps only for your top sets — the one to three heaviest sets of a pulling exercise where grip would otherwise fail before your target muscles. This keeps grip strength developing while allowing maximum mechanical output on your hardest sets.
One useful self-assessment: once per month, perform your normal working weight on a pulling exercise bare-handed and count how many reps you complete before grip fails. If that number is increasing over time, your grip is developing correctly despite strap use. If it’s stagnating or declining, reduce strap usage across your session.
A simple rule from strength communities: if you reach for straps before you’ve tried chalk, you’re using them as a crutch. Chalk first. Chalk significantly increases friction between skin and bar — many lifters find chalk eliminates grip failure at moderate weights entirely. Straps are the second line, not the first.
Downsides of Lifting Straps
The primary downside is grip strength stagnation from over-reliance. Using straps on every set at every weight removes the training stimulus that develops grip strength — your bare-handed pulling capacity plateaus while your strap-assisted capacity grows. Additional downsides: slower bar release than bare hands (a safety consideration on explosive lifts); a learning curve that frustrates beginners who skip the directional wrap step; and false security when applied incorrectly, which can stress the wrist rather than protect it. Use straps selectively — final one to three heavy sets only — to avoid these limitations.
Tendonitis Medical Note
Medical Disclaimer: The information below is for general fitness education and is not a substitute for advice from a qualified physical therapist or sports medicine professional. If you experience persistent elbow or wrist pain, consult a physical therapist before continuing heavy pulling movements.
Gym lifting straps may help reduce grip-related load during tendonitis flares because they decrease the isometric grip force (the maximum holding force your muscles generate while the bar is in your hand) required during pulling movements. Tendonitis (inflammation of a tendon, often from repetitive strain) in the elbow or bicep area is common among lifters who do high-volume pulling. The question — whether gym lifting straps help or hurt tendonitis — requires a careful distinction between strap types and tendon locations.
Reducing grip demands lowers elbow tendon strain by up to 20% — allowing continued training during rehabilitation. According to physical therapy guidance for lifting with tendonitis, reducing required grip force eases strain on inflamed forearm and elbow tendons during controlled lifting.
However, gym lifting straps are not counterforce elbow straps — those are a different product, worn differently (around the forearm just below the elbow), designed specifically to redirect tendon insertion forces during gripping. If your physical therapist recommends a counterforce elbow strap, that is not interchangeable with a gym lifting strap.
- Practical guidance for tendonitis sufferers:
- Lower the weight and use straps to maintain volume without peak grip force during flare-up periods
- Avoid lat pulldowns and pull-ups with a full overhand grip — supinated (underhand) grip reduces lateral elbow stress for most presentations
- Do not continue high-intensity pulling if pain is greater than 3/10 on a pain scale during the movement
- If you experience persistent elbow or wrist pain, consult a physical therapist before continuing heavy pulling movements — this cannot be resolved through strap adjustment alone
Research published in January 2026 reviewing the full lifting strap literature noted that straps can enhance maximal strength perception — but that their effects on injury prevention are not yet consistently established across all pulling and back exercises (PubMed, 2026).
Frequently Asked Questions
How to correctly use straps?
Thread the loop onto your wrist with the tail pointing toward your thumb side, not your pinky. Wrap the tail under and around the bar opposite to your finger direction — this creates the “claw effect” where strap and fingers lock against each other. Roll your wrists forward in a motorcycle-rev motion to eliminate all slack before pulling. The Lock-Load-Lift Framework covers these three phases: Lock (wrist threading), Load (bar wrap direction), Lift (rev and verify). Most beginners who feel straps aren’t working have the wrap direction reversed.
Do straps help with tendonitis?
Lifting straps may help reduce grip-related strain during tendonitis flare-ups by decreasing the isometric grip force required during pulling exercises. If you’re managing bicep or elbow tendonitis, lower the weight, use straps to reduce grip load, and consult a physical therapist before continuing heavy pulling. However, gym lifting straps are not the same as counterforce elbow braces, which are a separate medical device. Straps alone are not a rehabilitation strategy.
Can wrist wraps help elbow pain?
Wrist wraps and lifting straps serve different functions and neither is a direct elbow pain solution. Wrist wraps stabilize the wrist joint during pressing and overhead movements, while lifting straps reduce grip force during pulling movements. If you’re experiencing elbow pain, the relevant intervention depends on where the pain originates: grip-loading pain during pulls may respond to lifting straps; lateral elbow pain (tennis elbow) is more specifically addressed by counterforce elbow straps or physical therapy. Elbow sleeves provide light compression and warmth but do not address root causes. See a physical therapist if pain persists beyond a few sessions.
Are lifting straps effective?
Yes — research consistently supports lifting straps for grip-limited pulling exercises. A 2021 study found that straps allow better grip strength maintenance and faster grip strength recovery during heavy deadlift sets (Jukic et al., 2021). Furthermore, a 2024 University of Miami analysis found that straps increase latissimus dorsi activation while decreasing forearm and biceps brachii activation — meaning your back muscles work harder when grip isn’t the limiting factor. Effectiveness strictly depends on the correct application of the claw wrap and rev tightening.
Can I lift with bicep tendonitis?
Light to moderate lifting with bicep tendonitis is generally possible, but must be approached carefully. Reduce load to a level where pain stays below 3/10 during movement. Use lifting straps to reduce grip-force demands during pulls — this decreases the isometric tension on the bicep tendon during deadlifts and rows. Avoid supination-loaded exercises (underhand curls, underhand rows) during acute flare-ups, as these specifically stress the distal bicep tendon. Lat pulldowns with a neutral grip (palms facing each other) are typically better tolerated than overhand grip pulldowns. Consult a physical therapist before continuing heavy pulling if you experience persistent or worsening elbow pain — this is professional guidance, not a substitute for clinical assessment.
Elbow sleeves vs. wraps?
Elbow sleeves and elbow wraps address different needs. Elbow sleeves provide circumferential compression and warmth, improving blood flow and providing proprioceptive feedback during lifts. Elbow wraps provide rigid support by limiting range of motion at the elbow joint — useful for heavy powerlifting movements where joint stability under load matters more than mobility. Neither is a treatment for tendonitis, and lifting straps address grip load rather than elbow joint support. For most gym-goers dealing with elbow discomfort, a physical therapist’s assessment is the best step.
Your Confident Start
For anyone navigating heavy pulling exercises, lifting straps deliver a documented mechanical advantage — a 2021 Journal of Strength and Conditioning Research study confirmed better grip strength maintenance and faster recovery between deadlift sets, and a 2024 University of Miami biomechanics analysis found that straps increase lat activation while decreasing forearm fatigue. The result: your back muscles determine when a set ends, not your fingers.
The Lock-Load-Lift Framework exists because the technique that makes straps work is counter-intuitive — the tail goes opposite to your fingers, the rev happens before the pull, and the double-check is the step most tutorials skip. Three phases, five steps, and the single biggest insight most beginners never encounter (the claw direction) are now in your training toolkit. Apply this framework consistently, and the strap that felt backward on your first attempt becomes automatic within two or three sessions.
Your next step: bring the straps to your next session. Set them up on an empty bar before your first working set — run through Steps 1 through 5 at zero weight until the Lock-Load-Lift sequence feels automatic. Then use them only on your final one to three heaviest sets of your primary pulling exercise. Build the habit at light load, then bring it to the weight that matters.