How to Speed Up Muscle Strain Recovery: Fast 4-Step Guide
⚠️ Medical Disclaimer: This article is for informational purposes only and is not a substitute for professional medical advice, diagnosis, or treatment. Always seek the guidance of a qualified healthcare provider — such as a physician or licensed physical therapist — regarding any medical condition or injury. Do not disregard professional medical advice based on information you read here.
A muscle strain can stop you in your tracks — and the worst part isn’t the pain. It’s not knowing whether you’ll be back to normal in three days or three months. That anxious, frustrated feeling of lying on the couch wondering whether you’re doing the right thing is something almost everyone who has pulled a muscle understands.
Here’s the uncomfortable truth: most people default to the outdated RICE method — Rest, Ice, Compression, Elevation — because it’s what they’ve always heard. But research now suggests that following RICE alone may actually slow your recovery, because complete rest and aggressive icing can suppress the inflammatory response your body needs to repair tissue. According to MedlinePlus, a muscle strain is the stretching or partial tearing of muscle fibers or their connecting tendons — a fundamentally different injury from a sprain (which involves ligaments) — and it responds best to a more nuanced, phase-based approach.
In this guide, you’ll learn exactly how to speed up muscle strain recovery using the modern P.E.A.C.E. & L.O.V.E. protocol, with a clear, phase-by-phase plan you can start right now. You’ll move through four steps: immediate care in the first 72 hours, active recovery from Days 3–7, body-part-specific exercises, and the nutrition and lifestyle support that accelerates healing from the inside out.
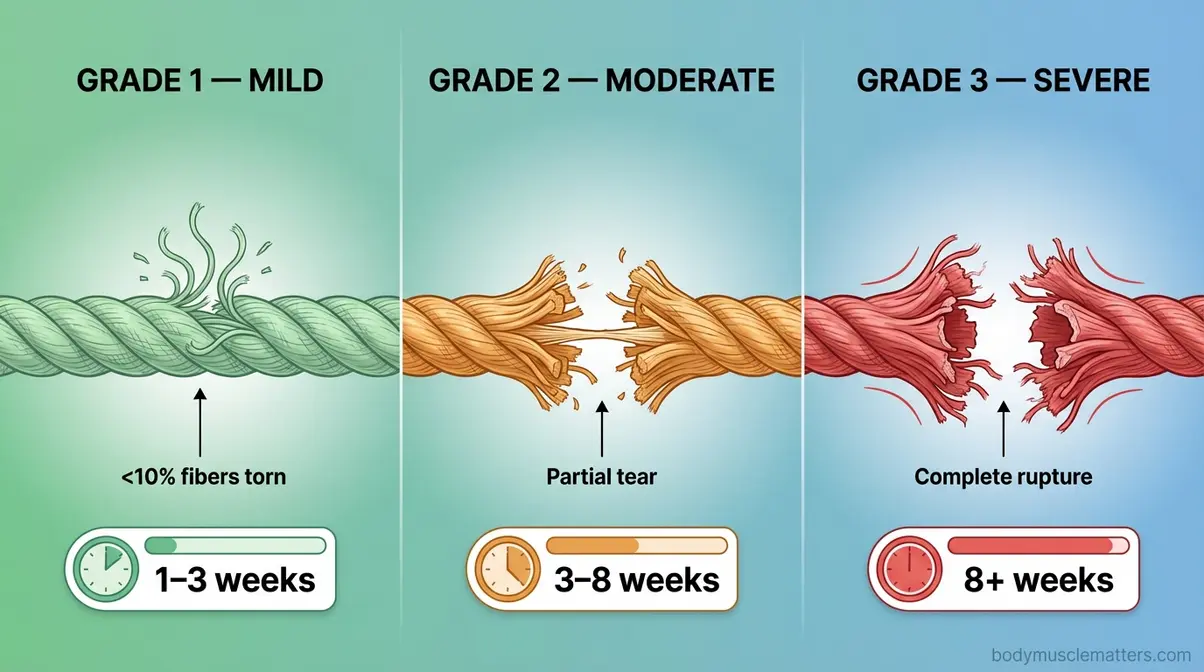
You can learn how to speed up muscle strain recovery by acting fast in the first 72 hours and switching from the outdated RICE method to the modern P.E.A.C.E. & L.O.V.E. protocol. Grade 1 strains heal in 1–3 weeks; Grade 2 in 3–6 weeks; Grade 3 may take 3+ months (Cleveland Clinic).
- Act immediately: Apply P.R.I.C.E. in the first 48–72 hours to limit swelling
- Avoid H.A.R.M.: Heat, Alcohol, Running, and Massage worsen acute injuries
- The Protocol Upgrade: Modern PEACE & LOVE replaces outdated RICE for faster healing
- Move early: Gentle mobility (after 72 hours) prevents scar tissue buildup
- Fuel recovery: 1.5–2g protein per kg of body weight daily supports tissue repair
Understand Your Strain Grades
Before you can speed up muscle strain recovery, you need to know what you’re dealing with — not all strains are created equal. The Grade 1, 2, and 3 classification system tells you how severely your muscle fibers are damaged, which directly determines your recovery timeline. Most importantly, your grade determines whether home care is appropriate, whether you need a physical therapist, or whether you should head to urgent care today.
What helps muscle strains heal faster? Here’s the short answer:
- Apply P.R.I.C.E. within the first 48–72 hours
- Avoid H.A.R.M. factors (Heat, Alcohol, Running, Massage)
- Transition to gentle movement after 72 hours
- Prioritize protein, sleep, and hydration throughout
- Match your treatment intensity to your strain grade
For a personalized view of your healing trajectory, review the science-backed muscle recovery timeline to understand what to expect week by week.
Caption: Recovery timelines vary significantly by strain grade — knowing yours sets realistic expectations and guides treatment decisions.
Muscle Strain vs. Pulled Muscle
A muscle strain and a pulled muscle are the same injury — just different names for the stretching or partial tearing of muscle fibers or their connecting tendons. Many people confuse a strain with a sprain, but these are distinct injuries: a sprain involves ligaments (the connective tissue joining bones), while a strain involves muscles or tendons. A third term worth knowing is muscle contusion — that’s a bruise caused by direct impact, not a stretch or tear, and it follows a different treatment path.
Delayed onset muscle soreness (DOMS), the familiar ache you feel 24–48 hours after a hard workout, is also different from a strain. DOMS reflects microscopic exercise-induced stress across many fibers; a strain is a concentrated injury event. According to MedlinePlus, the clinical distinction matters because strains and sprains require different management approaches.
If you felt a sudden sharp pain during a sprint or while lifting something heavy — especially if there was a sensation of tearing — that’s a strain, not soreness that will fade by morning.
Once you know you have a strain — not just soreness — the next step is identifying how severe it is, because that determines your entire recovery plan.
The 3 Grades of Muscle Strain
Understanding muscle strain grades is the entry point for choosing the right phase of The Protocol Upgrade — the modern evidence-based approach that replaces one-size-fits-all RICE advice with targeted, grade-specific care.
| Grade | Key Symptom | Recovery Timeline | Recommended Action |
|---|---|---|---|
| Grade 1 | Dull ache, full strength maintained, mild tenderness | 1–3 weeks | Home treatment appropriate |
| Grade 2 | Noticeable weakness, swelling, possible “popping sound” at injury | 3–6 weeks | Consider physical therapy |
| Grade 3 | Severe pain, complete loss of function, possible visible deformity | 3+ months (may require surgery) | See a doctor immediately |
Grade 1 involves only microscopic fiber tears. You’ll feel a dull ache and some tenderness, but you can still move the limb and maintain most of your strength. These respond well to home treatment.
Grade 2 is a partial tear — there’s real structural damage. Noticeable weakness, swelling, and sometimes a “popping sound” at the moment of injury are hallmarks. If you heard or felt a popping sound when you were hurt, this may indicate a Grade 2 or Grade 3 strain — consult a doctor before beginning any home treatment. Imaging (ultrasound or MRI) may be needed to confirm severity.
Grade 3 is a complete rupture. Pain is immediate and severe, and you may see visible deformity or bruising. Do not attempt home treatment — seek orthopedic evaluation right away, as surgery may be necessary. According to the Cleveland Clinic, Grade 3 strains can take 3+ months to recover, even with optimal care.
“Grade 1 muscle strains typically heal within 1–3 weeks, while Grade 3 complete tears may require surgery and 3+ months of recovery” (Cleveland Clinic, 2026).
With your grade in mind, here’s the step-by-step protocol to follow starting the moment you’re injured.
What Are the 4 Stages of Muscle Healing?
The four stages of muscle healing are: (1) the acute inflammatory phase (0–72 hours), (2) the subacute repair phase (Days 3–7), (3) the remodeling phase (Weeks 1–6), and (4) the return-to-activity phase (Weeks 4–12+, depending on grade). During the acute phase, the body floods the injury site with inflammatory cells to remove damaged tissue — this process is necessary and should not be fully suppressed with aggressive icing or NSAIDs.
The subacute phase is when new collagen fibers begin forming, making gentle movement critical for ensuring they align correctly rather than forming disorganized scar tissue. The remodeling phase involves progressive strengthening to restore full function and reduce re-injury risk. Proper care during each stage — especially avoiding premature return to full activity — is what determines the quality of long-term recovery.
Time Required: 30-45 minutes for initial assessment and care setup
Tools Needed: Ice pack, compression bandage, comfortable clothing, supportive pillows
Step 1: Immediate Care (First 48-72 Hours)

“Your muscle needs a minute after an injury. Giving the muscle time to settle down early helps prevent further damage.”
When figuring out how to speed up muscle strain recovery, the first 48–72 hours after an injury are the most important window of your entire recovery. What you do — and what you avoid — in this period directly determines how quickly you heal. Most articles will tell you to do RICE. That’s incomplete. Here’s what modern sports medicine actually recommends.
Caption: The PRICE method and H.A.R.M. factors are two sides of the same coin — knowing both is what separates a 1-week recovery from a 3-week one.
The P.R.I.C.E. Method (48-72 Hours)
The P.R.I.C.E. method — standing for Protection, Rest, Ice, Compression, and Elevation — remains the foundation of immediate muscle strain care. The key is applying it with precision: right timing, right duration, right technique.
- Protect — Stop the activity immediately. Use a brace, support wrap, or athletic tape to prevent further stress on the injured muscle. Continuing to push through pain causes micro re-tears.
- Rest — This means relative rest, not complete immobilization. Avoid the specific movement that caused the injury; light, non-painful activity elsewhere is fine and actually beneficial for circulation.
- Ice — Apply for 15–20 minutes every 2–3 hours during the first 48–72 hours. Always wrap ice in a cloth or thin towel — never apply directly to skin, as this risks frostbite. Per NHS guidelines, this is the recommended window for cold therapy.
- Compress — Use an elastic bandage to reduce swelling. Wrap firmly but not so tightly that it causes numbness, tingling, or color change in the skin.
- Elevate — Raise the injured area above heart level whenever possible. For a lower back strain, this looks different: lie on your back and place a pillow under your knees to reduce lumbar pressure rather than trying to elevate the torso.
NIH clinical guidelines confirm that in the first 2–3 days following muscle injury, cold therapy combined with moderate activity and active stretching — as tolerated — supports healing better than strict immobilization.
Just as important as what to do is what to avoid. The H.A.R.M. factors are the four most common mistakes that silently extend your recovery — and most people don’t even know they’re making them.
What Not to Do After a Muscle Strain?
What not to do after a muscle strain matters just as much as what you do. The NHS guidelines specifically identify H.A.R.M. — Heat, Alcohol, Running, and Massage — as the four factors most likely to prolong recovery in the first 72 hours.
- H — Heat: Applying heat in the first 48 hours increases blood flow and amplifies inflammation in damaged tissue — the opposite of what you need. Heat therapy becomes beneficial after Day 3, but not before.
- A — Alcohol: Alcohol dilates blood vessels, increases internal bleeding in the injured area, and directly impairs the body’s cellular repair response. Avoid for at least 48–72 hours after injury.
- R — Running (or strenuous exercise): Re-engaging the damaged muscle before it stabilizes causes micro re-tears that significantly extend your timeline. Even “gentle” exercise on the specific injured muscle is harmful in this window.
- M — Massage: Applying pressure to acutely inflamed tissue increases local swelling and can damage fragile, newly forming cells. Massage becomes appropriate in the subacute phase (Days 3–7) — not immediately after injury.
Most people know what to do after a strain. Far fewer know what NOT to do — and that gap is what keeps injuries lingering for weeks.
Now you know what to do and what to avoid. But there’s one more thing most recovery guides miss entirely — and it’s the reason modern sports medicine has moved beyond RICE altogether.
Why Medicine Moved Beyond RICE
The RICE method was developed in 1978 and dominated sports medicine for decades. However, research now suggests that complete rest and aggressive icing can actually impair healing by suppressing the inflammation your body needs to initiate tissue repair. This is the core insight behind The Protocol Upgrade — the deliberate, evidence-based shift from passive suppression to active recovery support.
The modern replacement is P.E.A.C.E. & L.O.V.E. — a two-phase framework published in the British Journal of Sports Medicine (PEACE and LOVE protocol research, PubMed, 2019):
- P.E.A.C.E. (immediate phase): Protect, Elevate, Avoid anti-inflammatory modalities, Compress, Educate
- L.O.V.E. (recovery phase): Load, Optimism, Vascularization, Exercise
Here’s the key philosophical difference:
| Approach | Philosophy | On Ice | On Rest |
|---|---|---|---|
| RICE | Suppress the injury | Ice aggressively | Rest completely |
| PEACE & LOVE | Support the biological process | Avoid anti-inflammatory modalities | Protect, then load gradually |
“Modern sports medicine now recommends the P.E.A.C.E. & L.O.V.E. protocol over the traditional RICE method, as early gentle movement — not complete rest — is shown to accelerate soft-tissue healing” (PubMed, 2019).
If you’re still following the RICE method alone, you may be leaving recovery time on the table. That said, this is an evolution, not a rejection — the PRICE steps above remain valid for the acute phase. The upgrade is in what comes after those first 72 hours.
Once the acute window has passed, it’s time to make the most important shift in your recovery: moving from protection to active healing.
Step 2: Shift to Active Recovery (Days 3-7)
Once 72 hours have passed and acute swelling has stabilized, the most powerful thing you can do to speed up muscle strain recovery is to start moving — carefully and deliberately. Controlled movement triggers mechanotransduction — a biological process by which mechanical forces signal damaged muscle cells to repair and realign, reducing the risk of scar tissue buildup. This is the L.O.V.E. phase of The Protocol Upgrade, and it’s where most of your healing acceleration actually happens.
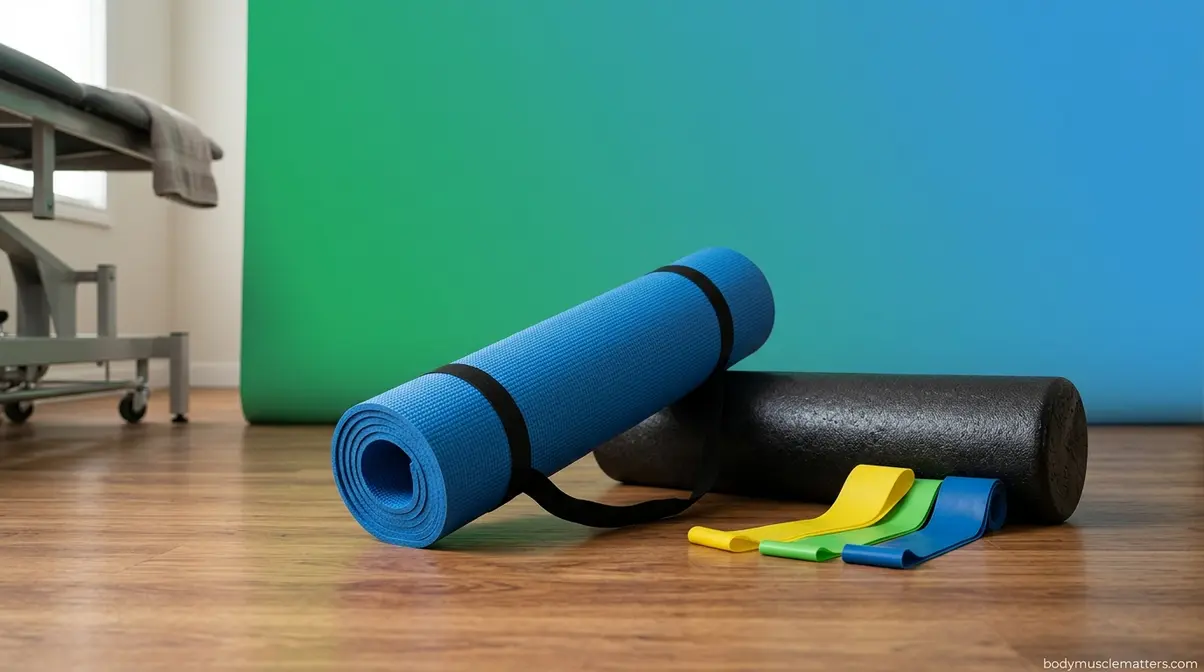
Caption: A structured exercise progression — from gentle mobility to isometric loading — is the foundation of the active recovery phase.
According to NIH clinical guidelines, early pain-guided movement in the subacute phase prevents scar tissue adhesions and restores functional range of motion faster than passive rest alone.
Gentle Mobility Exercises
Active recovery starts with controlled, pain-free movement. The governing rule for all exercises in this phase: stay below 3 out of 10 on a pain scale. If pain increases during a movement — not just at the start, but progressively during the rep — stop and rest. Constant mild discomfort at the start that fades as you move is generally acceptable; escalating pain is not.
Before beginning, a warm compress or warm shower (10–15 minutes) is now appropriate to increase tissue pliability. This is the direct contrast to the H.A.R.M. section — heat is beneficial from Day 3 onward.
Try these three exercises twice daily:
- Ankle circles (for calf and leg strains) — Seated or lying down, rotate the foot in slow, controlled circles. 10 rotations clockwise, 10 counterclockwise. Focus on the full range of motion without forcing.
- Cat-cow stretch (for lower back strains) — On hands and knees, alternate between arching the spine upward (cat) and letting it sag downward (cow). 10 slow reps; stop at the first point of resistance or pain.
- Pendulum swing (for shoulder strains) — Lean forward and let the arm hang freely. Gently initiate small 6-inch circles with gravity doing most of the work. 10 reps, 2x daily.
For additional guidance on relieving tight lower back muscles during this phase, structured mobility protocols can complement these exercises safely.
Once basic range of motion is restored, the next step is rebuilding muscle strength — using isometric exercises that activate the muscle without risking re-injury.
Isometric Strength Exercises
Isometric resistance — contracting the muscle without changing its length — is the bridge between rest and full activity. Because there’s no joint movement involved, you build strength and maintain neural connection to the damaged muscle while the fibers continue to repair. Think of it as keeping the muscle “awake” without stressing the injury.
NIH research supports early loading and isometric exercise in the subacute phase as a driver of tissue remodeling and functional recovery.
Try these three isometric exercises once daily:
- Isometric quad set (for quadriceps and leg strains) — Lying on your back, place a rolled towel under the knee. Press the back of the knee gently into the towel, contracting the quadriceps. Hold 5 seconds, release. 10 reps.
- Wall push (for chest and shoulder strains) — Stand facing a wall, place your palm flat against the surface. Apply gentle, steady pressure without moving. Hold 5 seconds. 10 reps.
- Prone back extension hold (for lower back strains) — Lying face down, lift your chest approximately 1 inch off the floor using your back muscles. Hold 3 seconds, lower slowly. 8 reps.
If these exercises feel pain-free for two consecutive days, progress to light dynamic movement: resistance bands, bodyweight squats, or gentle loaded stretches. Progression is the goal — stagnation is not.
Beyond exercise, the recovery community has developed some practical insights about what actually works — and what doesn’t — in the real world.
What the Recovery Community Gets Right
Across physical therapy communities and recovery forums, the consistent feedback from people recovering from pulled muscles aligns closely with clinical guidelines — with a few practical additions worth knowing. For real recovery transformations and community accounts of what worked, the patterns are remarkably consistent.
Three community insights that are both widely reported and clinically supported:
- “Sleep more than you think you need.” Human growth hormone — the primary driver of tissue repair — is released during deep sleep. Community consensus and clinical research both point to sleep as an underrated accelerator.
- “Rotate muscle groups, don’t stop training entirely.” Training uninjured areas maintains circulation, supports mood, and prevents the deconditioning that makes return-to-activity harder. This aligns with Healthline’s sample workout rotation approach for injury recovery.
- “The ‘feels fine’ test is unreliable.” Pain disappears before tissue fully heals. Returning to full activity because something “feels okay” is the #1 reported cause of re-injury in online recovery communities — and it’s backed by the biology of the remodeling phase.
Now let’s look at the part of recovery most guides overlook entirely: what you eat and how you live during healing can speed up — or silently delay — your recovery by days.
Step 3: Target Your Specific Muscle Group
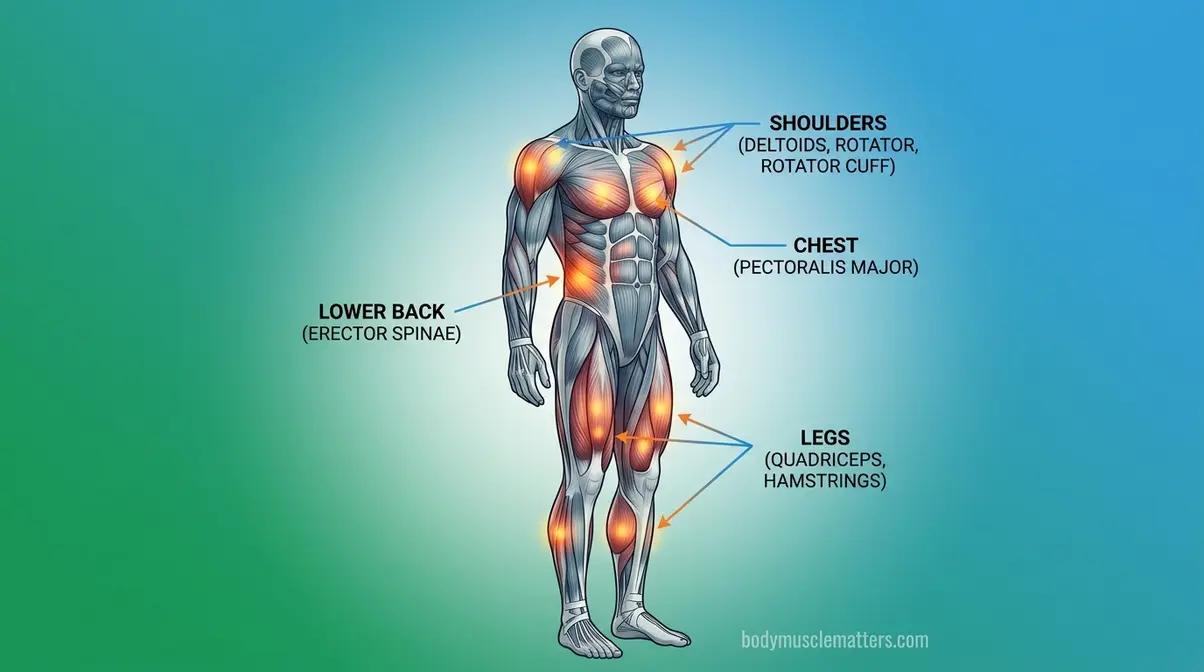
Recovery isn’t one-size-fits-all. A lumbar strain — a muscle strain affecting the lower back muscles and their attachments — requires completely different positioning, exercises, and cautions than an intercostal strain, a tear in the muscles between the ribs. The body-part-specific guidance in this section is the L.O.V.E. framework’s “Exercise” component applied with individual precision — a key element of The Protocol Upgrade that generic RICE advice never addresses.
According to Johns Hopkins Medicine, “for lumbar strains, clinical guidelines recommend ice for the first few days followed by heat therapy, combined with gentle range-of-motion exercises to prevent stiffness.”
Caption: Different muscle strain locations require distinct recovery postures and exercises — one approach does not fit all.
Lower Back Muscle Strain Recovery
Lower back strains are among the most common — and most frustrating — muscle injuries because nearly every movement seems to aggravate them. The good news is that more than 90% of patients recover completely from lumbar muscle strain within one month with appropriate care (American Association of Neurological Surgeons, 2026).
Best resting posture: Lie on your back with knees bent and a pillow placed under the knees. This position reduces lumbar disc pressure significantly compared to lying flat. Avoid prolonged sitting, which compresses the lumbar spine.
Two specific exercises for Days 3–7:
- Pelvic tilts — Lying on your back with knees bent, gently flatten your lower back against the floor by tightening your abdominals. Hold 5 seconds, release. 10 reps, twice daily.
- Cat-cow stretch — On hands and knees, alternate between arching and rounding the spine slowly. 10 reps; stop at first resistance.
Per Johns Hopkins Medicine, apply ice for the first 48–72 hours, then transition to a warm compress (15–20 minutes) to ease muscle spasm. For more targeted guidance on relieving lower back muscle tension, a structured protocol can accelerate the return to daily function. If your strain makes desk work difficult, use a lumbar support cushion and take a 5-minute standing break every 30 minutes.
Chest strains present a unique challenge — every breath engages the injured muscle, making rest feel impossible.
Chest and Intercostal Strains
Intercostal strains are uniquely uncomfortable because breathing itself activates the injured tissue. The priority here is maintaining lung capacity while minimizing mechanical stress on the ribcage.
Breathing exercise: Practice diaphragmatic (belly) breathing to expand the lungs without straining the intercostal muscles. Inhale through the nose for 4 counts, letting the belly rise rather than the chest. Exhale slowly through the mouth for 6 counts. Repeat 10 times, 3x daily.
For practical guidance on sleeping comfortably with intercostal strain, elevating the upper body with 2–3 pillows reduces chest muscle tension overnight and is one of the most consistently recommended adjustments.
Additional tips:
- Avoid twisting movements and overhead reaches for the first 1–2 weeks.
- When sneezing or coughing, press a pillow gently against your chest to brace the ribcage — this significantly reduces pain and prevents micro re-tears.
- Sleep on the uninjured side, not the injured one.
Shoulder strains require special attention because the shoulder joint has the greatest range of motion of any joint in the body — making it both vulnerable to re-injury and responsive to early movement.
Shoulder Muscle Strain Recovery
Shoulder strains, particularly rotator cuff strains, tend to linger longer than most other muscle injuries. Grade 2 injuries may take 6 weeks or more, and rotator cuff tears can extend to several months (Cleveland Clinic). Early, targeted movement is what separates a smooth recovery from a chronic issue.
Two safe exercises for Days 3–7:
- Pendulum swing — Lean forward at the waist and let the arm hang freely. Allow gravity to initiate small 6-inch circles — clockwise and counterclockwise. 10 reps each direction, 2x daily. Do not use shoulder muscles to drive the movement.
- Shoulder blade squeeze — Sit upright. Gently draw the shoulder blades together toward the spine. Hold 5 seconds, release slowly. 10 reps. This activates the mid-back stabilizers without loading the injured shoulder.
Avoid all overhead reaching until you are pain-free — this includes putting on shirts and reaching for shelves. If your Grade 2 shoulder strain involves significant weakness, a sling can reduce daily re-aggravation during the acute-to-subacute transition.
Leg muscle strains — hamstrings, quads, and calves — are among the most common sports injuries, and also among the most frequently re-injured due to premature return to activity.
Leg Muscle Strain Recovery
Leg strains respond well to the “keep moving” principle — but timing matters enormously. For Grade 1 strains, walking at a comfortable pace (without a limp) is appropriate from Day 2–3. A pronounced limp signals you’re moving too fast; it also creates compensatory movement patterns that can injure adjacent muscles.
Immediate care: Elevate the leg above heart level using pillows during rest. For calf and ankle strains, a compression sock or wrap reduces swelling effectively throughout the day.
Two safe exercises for the subacute phase, supported by NIH guidelines on early mobilization for leg strains:
- Straight leg raise — Lying on your back, brace the core and raise the straight leg to approximately 45°. Hold 3 seconds, lower slowly. 10 reps, once daily.
- Seated calf raise — Seated in a chair with feet flat, raise both heels off the floor slowly. Hold 2 seconds at the top. 15 reps.
The biggest mistake with hamstring strains is returning to running before the muscle can handle the eccentric load of a full stride. Premature loading is the leading cause of hamstring re-injury — and the “feels fine” test is notoriously unreliable for this muscle group.
Physical recovery is only half the equation. What you put into your body during healing can either accelerate or undermine everything you’re doing externally.
Step 4: Nutrition and Lifestyle

If you want to know how to speed up muscle strain recovery from the inside out, your physical protocols you follow externally are only as effective as the internal environment your body creates for healing. That environment is built from what you eat, how you sleep, and how well you stay hydrated. Research indicates that specific nutritional interventions, including protein, amino acids, and antioxidants, play a vital role in accelerating muscle recovery (NIH nutrition research, 2026). Here’s exactly what to prioritize during recovery — and what to avoid.
Foods for Muscle Repair
Protein is the raw material your body uses to rebuild torn muscle fibers. According to U.S. Army nutrition guidelines, research supports protein intake of 1.5–2 grams per kilogram of body weight per day during injury recovery to support tissue repair. For a 70kg (154 lb) person, that translates to 105–140g of protein daily — roughly double the standard sedentary recommendation.
Best protein sources during recovery: chicken breast, eggs, Greek yogurt, salmon, legumes (lentils, chickpeas), and cottage cheese. Spread intake across 3–4 meals rather than front-loading it.
Anti-inflammatory foods that actively support healing:
| Food | Key Nutrient | Recovery Benefit |
|---|---|---|
| Salmon / mackerel | Omega-3 fatty acids | Reduces inflammatory cytokines |
| Blueberries / tart cherries | Antioxidants (anthocyanins) | Neutralizes oxidative stress in damaged tissue |
| Turmeric | Curcumin | Modulates inflammatory pathways |
| Spinach / kale | Vitamins C, K, magnesium | Supports collagen synthesis and muscle function |
| Cucumber / watermelon | High water content | Hydrates tissue and supports cellular repair |
Limit alcohol (reinforcing the H.A.R.M. principle) and processed foods high in omega-6 fatty acids — vegetable oils and fast food — which promote the very inflammation you’re trying to resolve. For a deeper look at targeted supplementation, the best supplements for muscle recovery guide covers evidence-based options that complement a whole-food approach.
“Research indicates that increasing protein intake to 1.5–2 grams per kilogram of body weight per day supports tissue repair and accelerates muscle recovery following injury” (U.S. Army nutrition guidelines, 2026).
Alongside diet, the medications you choose — or avoid — in the first 48 hours can make a significant difference in how quickly your tissue repairs.
NSAIDs vs. Acetaminophen
Choosing the right OTC pain reliever is a decision most people make without thinking — but for muscle strain recovery, timing matters. This is also a key nutritional dimension of The Protocol Upgrade: the “Avoid anti-inflammatory modalities” component of PEACE applies to medications as well.
NSAIDs (non-steroidal anti-inflammatory drugs such as ibuprofen or naproxen) are effective for reducing pain and swelling. However, a PubMed analysis of NSAIDs found that while they reduce soreness and strength loss after acute muscle injury, their effect on long-term tissue healing is complex — they can impair the inflammatory signaling that initiates repair. Use with caution, especially in the first 48 hours.
Acetaminophen (a pain reliever that works without suppressing inflammation) is generally the preferred choice for the acute phase. It manages pain without disrupting the healing cascade.
| Time Window | NSAIDs (Ibuprofen/Naproxen) | Acetaminophen |
|---|---|---|
| First 48 hours | Avoid if possible — may impair healing | ✅ Preferred — pain relief without suppressing repair |
| After 48 hours | Short-term use (3–5 days) generally acceptable | ✅ Continue as needed for pain |
Do not exceed recommended doses of either medication. If you have kidney disease, liver conditions, or are taking blood thinners, consult your doctor before taking any OTC pain reliever. Always consult a pharmacist or physician before starting any medication regimen, particularly for strains involving significant swelling or suspected Grade 2/3 severity.
The final piece of the recovery puzzle — and the most overlooked — is what happens when you’re not doing anything at all: sleep and hydration.
Sleep, Hydration, and Recovery
Sleep is not passive downtime during muscle strain recovery. During deep sleep, your body releases human growth hormone (HGH) — the primary driver of tissue repair and protein synthesis. Even one night of poor sleep measurably slows the recovery process. Target 7–9 hours per night, and protect sleep quality by avoiding alcohol and limiting caffeine after 2pm (both directly impair deep sleep architecture).
Hydration is equally non-negotiable. Muscle tissue is approximately 75% water — and dehydration reduces nutrient delivery to injured cells while slowing the removal of inflammatory waste products from damaged tissue. Aim for at least 2 liters (8 glasses) of water daily during recovery, more if you’re physically active or in a warm environment. Prioritizing water-rich foods — cucumber, watermelon, celery — alongside adequate fluid intake supports cellular repair from multiple angles.
Even with the best protocols, nutrition, and rest, some muscle strains require professional medical intervention — and knowing when to make that call can prevent a minor injury from becoming a major one.
When to Stop Home Treatment and See a Doctor
Home treatment works well for Grade 1 strains and many Grade 2 injuries — but there are clear thresholds where continuing without professional evaluation becomes a risk. This section gives you measurable criteria, not vague language.
Caption: Recognizing these warning signs early prevents a manageable strain from becoming a chronic or surgical injury.
Warning Signs for Medical Care
Stop home treatment and consult a physician or visit urgent care if any of the following are present (Cleveland Clinic):
- Severe swelling that does not reduce within 72 hours despite consistent P.R.I.C.E. application
- Visible deformity, significant bruising, or a palpable “gap” in the muscle (possible complete tear)
- Complete loss of function — inability to bear weight or move the limb at all
- Numbness, tingling, or shooting pain radiating from the injury site (possible nerve involvement)
- Pain that is worsening — not improving — after 72 hours of home treatment
- A “popping sound” was heard or felt at the moment of injury (Grade 2/3 indicator requiring imaging)
“A muscle strain that does not show improvement within 3 weeks of consistent home treatment, or that involves complete loss of function, warrants immediate evaluation by a physical therapist or physician.”
Beyond acute warning signs, there are situations where home treatment simply isn’t enough — even when nothing feels alarming.
When Home Treatment Is Not Enough
Even without dramatic warning signs, certain scenarios call for professional guidance (Cleveland Clinic guidelines):
- Grade 1 not improving after 3 weeks — If you’ve followed the full protocol and symptoms persist, a physical therapist can assess movement quality and identify compensatory patterns that are slowing recovery.
- Grade 2 (partial tear) — Physical therapy is recommended from the outset for Grade 2 strains. Self-managed recovery risks incomplete healing and significantly elevated re-injury risk, particularly for hamstrings, rotator cuffs, and lower back muscles.
- Grade 3 (complete rupture) — Requires orthopedic evaluation without exception. Surgery may be necessary, and attempting home treatment delays the intervention window that affects long-term outcomes.
If you’re unsure whether your strain is Grade 2 or Grade 3, a physiotherapist can assess range of motion and strength to guide the appropriate care pathway — this is far more reliable than self-assessment alone.
This article is for informational purposes only. If you are in significant pain or have any of the warning signs above, please consult a qualified healthcare provider.
Frequently Asked Questions
What Helps Muscle Strains Heal Faster?
To speed up muscle strain recovery, apply the P.R.I.C.E. method — Protection, Rest, Ice, Compression, Elevation — within the first 48–72 hours to minimize swelling and prevent further damage. Once acute pain subsides after 72 hours, transition to gentle, pain-free mobility exercises to prevent scar tissue buildup and restore range of motion. Supporting your body internally matters just as much — prioritize a high-protein diet (1.5–2g per kilogram of body weight daily), stay well-hydrated, and aim for 7–9 hours of sleep each night.
Modern sports medicine now recommends the P.E.A.C.E. & L.O.V.E. protocol over the outdated RICE method, as early, guided movement accelerates healing more effectively than complete rest. Results vary based on strain grade — Grade 1 strains may improve significantly within 1–2 weeks, while Grade 2 injuries typically require 3–6 weeks of consistent care (according to Cleveland Clinic data).
Can a Pulled Muscle Heal in 3 Days?
A mild Grade 1 pulled muscle can start to feel significantly better within 3 days, but full tissue healing typically takes 1 to 3 weeks (based on Cleveland Clinic timelines). During the first 72 hours, the body is in the acute inflammatory phase — swelling and pain may actually peak before they improve, so early improvement is not a reliable sign that healing is complete.
Focusing on the P.R.I.C.E. method and avoiding the H.A.R.M. factors in this window gives the injury the best chance of rapid recovery. A Grade 2 partial tear typically requires 3–6 weeks, while a Grade 3 complete rupture may take 3 months or longer and may require surgery. If your pain is not improving after 72 hours of home treatment, consult a healthcare provider to rule out a more severe strain.
Which Strain Heals Slowest?
Grade 3 muscle strains — complete ruptures of the muscle or tendon — take the longest to heal, often requiring 3 months or more even with optimal treatment, and sometimes necessitating surgical repair. Among specific muscle groups, rotator cuff tears and hamstring Grade 3 strains are particularly slow to recover, with rotator cuff surgical recovery potentially extending to 12–18 months (Cleveland Clinic).
Grade 2 shoulder strains also tend to linger longer than comparable strains elsewhere due to the shoulder’s complex range of motion and the difficulty of adequately resting it during daily activities. Grade 1 strains of any muscle group typically resolve within 1–3 weeks with proper care. The best predictor of prolonged recovery is returning to full activity too soon — re-injury resets the healing clock entirely.
The Path Back to Full Strength
For adults dealing with a muscle strain, the difference between a 1-week recovery and a 3-week one almost always comes down to the same three factors: acting correctly in the first 72 hours, transitioning to active recovery at the right time, and fueling the body with what it needs to rebuild. Research consistently shows that early, pain-guided movement — the foundation of the P.E.A.C.E. & L.O.V.E. protocol — accelerates soft-tissue healing more effectively than passive rest (PubMed, 2019). Grade 1 strains heal in 1–3 weeks; Grade 2 in 3–6 weeks — but both timelines shorten considerably when the protocol is followed correctly from day one.
The Protocol Upgrade isn’t just a framework swap — it’s a shift in how you think about your injury. Understanding how to speed up muscle strain recovery means shifting from passive rest to active healing. RICE treated healing as something to suppress; P.E.A.C.E. & L.O.V.E. treats it as a biological process to guide. That distinction — between passive patient and active participant — is what separates people who recover fully from those who deal with recurring strains and chronic stiffness.
Your next step is straightforward: identify your strain grade using the table in this guide, apply P.R.I.C.E. immediately if you’re in the acute phase, and set a 72-hour checkpoint to begin your mobility exercises. If symptoms aren’t improving within 3 weeks of consistent home treatment, book an appointment with a physical therapist — a single assessment session can identify exactly what’s holding your recovery back and put you on the right path forward.
Related posts:
Benefits of Yoga for Fitness: The Science-Backed Guide
Home Workouts to Build Muscle Without Weights (2026)
CrossFit Strength Training for Beginners: 2026 Guide
Home Workout Plan for Beginners: 30-Day Step-by-Step
How to Self Massage Calves: The 4-Layer Method Guide
Strength Training for Beginners: Complete Workout Plan 2026
Callum
Hi, I'm Callum, the founder of Body Muscle Matters. I'm not a certified trainer, I'm a self taught lifter who started this site to share what I've learned from my own training and a lot of trial and error. Everything here comes from real experience and honest research, written the way I'd explain it to a friend who is just getting started. My goal is simple: practical, no hype fitness advice you can actually use.