How to Do Muscle Ups: Get Your First Clean Rep
You’ve hit a wall. You can bang out 8 solid pull-ups, your dips feel strong, and yet every time you attempt a muscle up, something goes wrong right at the top — your elbows flare, your hips drop, and you’re dangling there like the bar won. That moment has a name: The Transition Ceiling.
This guide is built around one core truth: learning how to do muscle ups isn’t just about getting stronger. It’s about understanding the exact mechanical sequence your body needs to move through, phase by phase, so that the transition from pulling to pushing above the bar stops feeling impossible. Every section below feeds into that system — from the strength benchmarks you need before you start, through the four progressions that build the right motor patterns, to a phase-by-phase technique breakdown of how to do a muscle up with control and confidence.
Whether you’re training on a pull-up bar at the park, rings in a CrossFit box, or a doorframe bar at home, this guide gives you a clear, numbered path forward.
⚠️ Safety Disclaimer: The muscle up is a demanding overhead movement that places significant load on the shoulders, wrists, and elbows. Before attempting any drill in this guide, ensure you meet the strength prerequisites outlined in Section 1. If you experience shoulder, wrist, or elbow pain during any exercise — stop immediately and consult a certified physiotherapist or sports medicine physician. Individuals with a history of rotator cuff injury, shoulder impingement, or wrist instability should seek professional clearance before beginning. This guide does not replace personalized medical or coaching advice.
Mastering how to do muscle ups requires breaking through The Transition Ceiling — the pull-to-push transition where most beginners fail — using a structured, progressive system.
- Prerequisite strength matters: Most coaches recommend 10–15 strict pull-ups and 15–20 controlled dips before attempting your first muscle up (CrossFit, 2024).
- The false grip is non-negotiable: Positioning the heel of your hand above the bar is what makes the transition mechanically possible.
- Four drills build the foundation: Negatives, jumping muscle ups, band-assisted reps, and Russian dips each target a specific weakness in the movement chain.
- The chicken wing is fixable: Asymmetrical transitions are caused by weak lat engagement on one side — targeted drills correct it.
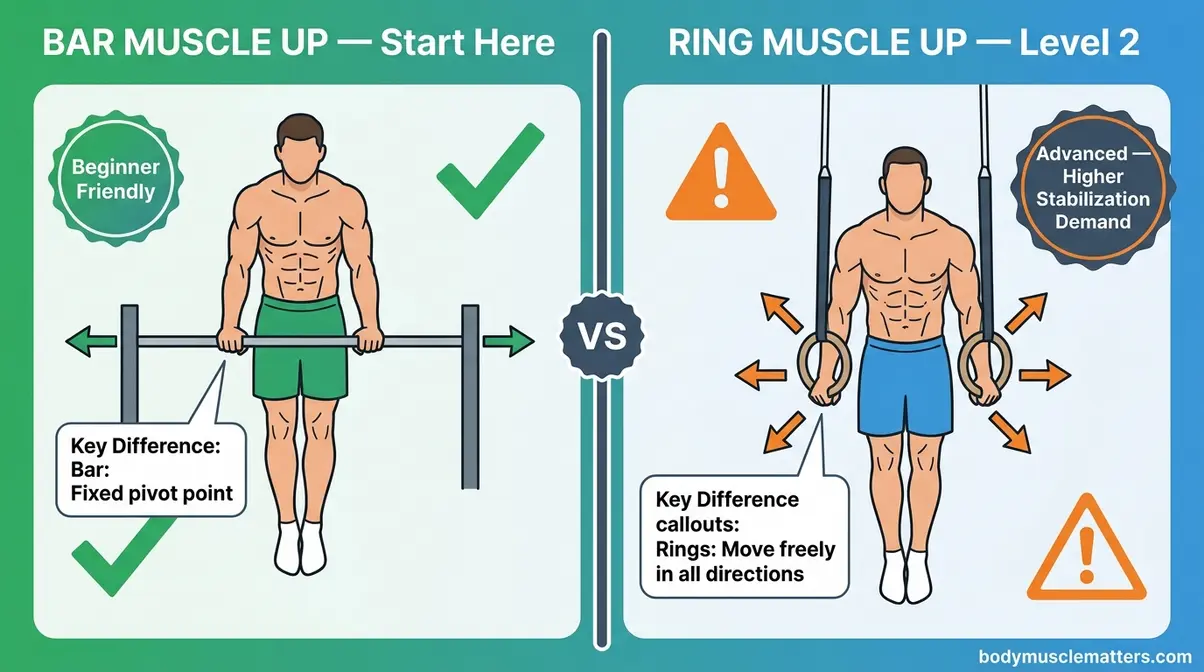
- Bar before rings: Start on the fixed bar; rings demand significantly more shoulder stabilization and should come second.
Are You Ready? Strength Prerequisites for Muscle Ups
Most beginners attempt the muscle up too early — not because they lack motivation, but because no one gave them a clear go/no-go gate. The result is frustration, poor technique habits, and in some cases, avoidable shoulder strain. Before you do a single muscle up attempt, meet these benchmarks.
Research and coaching consensus are clear: the muscle up is a compound skill movement, not just a strength test. According to CrossFit’s official coaching curriculum (updated April 2026), athletes should develop solid strict pull-ups and ring or bar dips before progressing to the muscle up. The transition phase — The Transition Ceiling — demands that your pulling and pushing muscles are strong enough to carry you through a mechanically complex handover. Without that base, the movement collapses into a dangerous flail.
The Exact Strength Benchmarks You Need
Across calisthenics coaching programs, the consistent recommendation is:
| Movement | Minimum Benchmark | Notes |
|---|---|---|
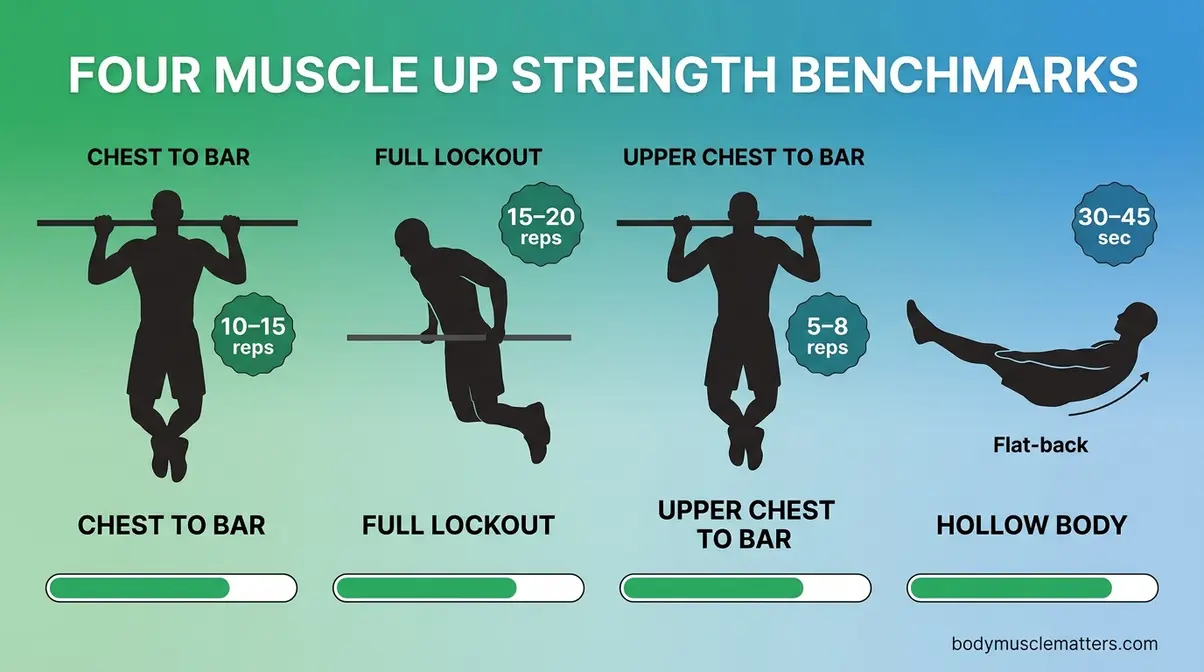
| Strict Pull-Ups | 10–15 clean reps | Chest to bar, full dead hang each rep |
| Bar or Ring Dips | 15–20 controlled reps | Full lockout at top, chest between bars at bottom |
| Chest-to-Bar Pull-Ups | 5–8 reps | Pulls your upper chest to the bar, not just chin |
| Hollow Body Hold | 30–45 seconds | Flat lower back, ribs down, toes pointed |
CrossFit’s coaching guidelines (crossfit.com, updated 2026) specifically note that the muscle up begins where a strict pull-up ends — so if your pull-ups stop at the chin, you lack the pulling range the transition demands. Aim for chest-to-bar quality on every rep before you move forward.
Why this matters: Each benchmark targets a specific phase of the movement. Pull-up volume builds lat and bicep pulling strength. Dip volume builds tricep and chest pressing strength. Chest-to-bar range teaches your body to pull high enough to reach the transition zone. The hollow body hold trains the core tension that keeps your body rigid through the swing.
A Quick Self-Assessment Test
Run through this before your next training session. You need all four to pass:
- Pull-up quality check: Hang from the bar with a shoulder-width grip. Perform 5 pull-ups. At the top of each rep, is your upper chest touching the bar? If not, you need more range.
- Dip depth check: Lower yourself slowly between parallel bars until your shoulders are below your elbows. Can you control the descent without pain? If you feel shoulder pinching, address mobility first.
- Hollow body check: Lie on your back. Press your lower back into the floor, raise both legs to 45 degrees, and raise your shoulders off the ground with arms extended overhead. Hold for 30 seconds. If your lower back peels off the floor, your core isn’t ready.
- Explosive pull check: From a dead hang, perform one pull-up as fast as possible. Does your chest reach the bar? Does the movement feel powerful, not grinding?
Pass all four? You’re ready to train the progressions. Fail one? Spend 4–6 weeks on that specific weakness before moving on.
Why These Numbers Protect Your Shoulders
This isn’t arbitrary gatekeeping. A 2021 NIH study on injury profiles among street workout practitioners (PMC8209839) found that wide-grip and reverse-grip pulling movements increase the risk of shoulder impingement through rotator cuff compression and reduced subacromial space. A 2020 PubMed study on rotator cuff loading during pull-up variants (pubmed.ncbi.nlm.nih.gov/32715526) confirmed that explosive overhead pulling without adequate shoulder preparation creates high rotator cuff loading patterns.
The muscle up amplifies both risks. You’re pulling explosively and then transitioning your shoulder through a large range of motion while fatigued. Building prerequisite strength first isn’t optional — it’s how you protect the joint. If you experience any shoulder or wrist pain during the self-assessment, stop and consult a physiotherapist before continuing.
Shoulder Mobility Benchmarks Before You Begin
Strength is only half the equation. You also need adequate shoulder mobility to execute the false grip turnover safely. Check these before your first session:
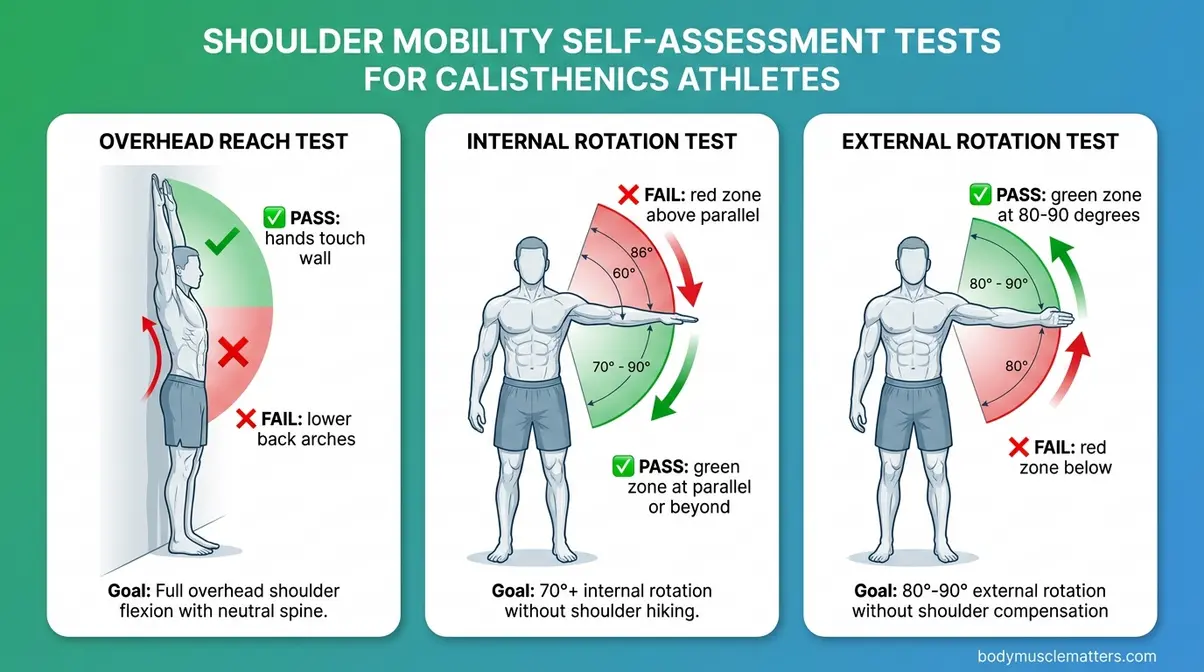
Overhead reach test: Stand with your back flat against a wall. Raise both arms overhead and try to touch the wall with the back of your hands. Your lower back should stay in contact with the wall. If it arches away, your lat and thoracic mobility is limiting your overhead range — a direct risk factor for impingement during the transition.
Internal rotation test: With your shoulder at 90 degrees of abduction (arm out to the side), rotate your forearm toward the floor. Research on shoulder mobility in overhead athletes suggests a minimum of 60–86 degrees of internal rotation is needed for safe overhead pulling mechanics (Hooper’s Beta, citing published range norms). If you can’t reach parallel with the floor, address internal rotation mobility with targeted stretching before progressing.
External rotation test: From the same position, rotate your forearm toward the ceiling. A minimum of 80–90 degrees of external rotation is the clinical norm for overhead athletes. Restricted external rotation forces compensatory movement patterns — one of the primary contributors to the chicken wing fault discussed in Section 4.
Muscle Up Progressions for Beginners: 4 Drills to Build Up Safely
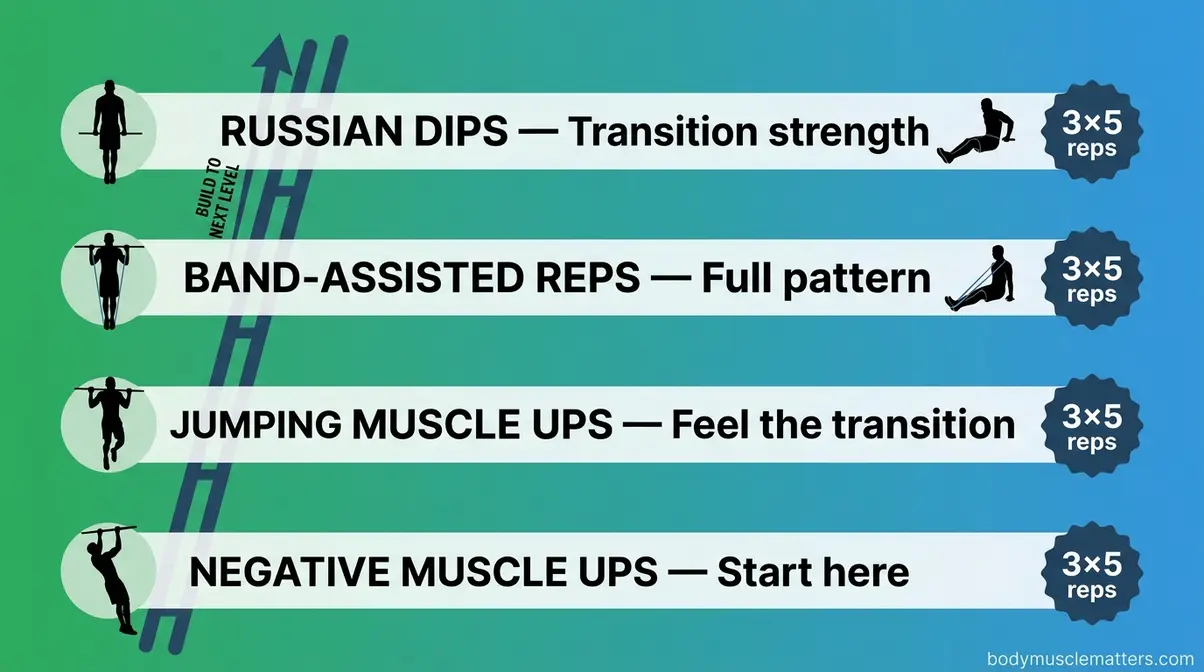
You don’t train a muscle up by attempting muscle ups. That’s the trap most beginners fall into. Instead, you use targeted progressions that isolate the weakest link in the movement chain and build it systematically. The four drills below are sequenced deliberately — each one prepares you for the next.
Before starting these drills, here’s how to know you’re ready to progress from one to the next: master the current drill for 3 sets of 5 clean, controlled reps before advancing. Quality over quantity, always.
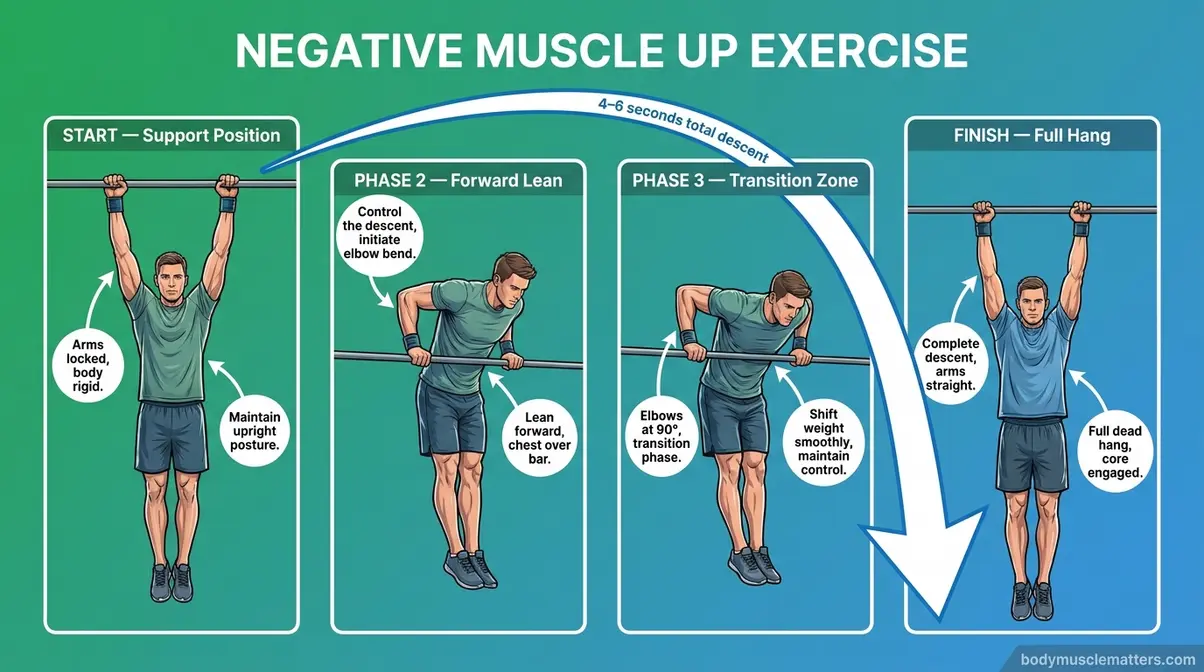
Drill 1 — Negative Muscle Ups
What it is: A negative (or eccentric) muscle up starts at the top of the movement — in the support position with your arms locked out above the bar — and lowers you slowly through every phase back to a dead hang.
- How to perform it:
- Use a box or jump to get yourself above the bar in the support position, arms extended.
- Slowly lean forward and lower your chest toward the bar, bending your elbows.
- Pass through the transition zone (this is the Transition Ceiling) — let your body sink below the bar level, keeping control.
- Continue lowering into a full pull-up hang, arms extended.
- Aim for a 4–6 second descent throughout.
Why this matters: Eccentric training builds strength through the exact range of motion you need, at a higher load than concentric movements. Negatives teach your nervous system the transition path before your pulling muscles are strong enough to drive you through it concentrically. This is the fastest single drill for cracking The Transition Ceiling.
Progression target: 3 sets × 5 reps with a minimum 4-second lowering phase.
Drill 2 — Jumping Muscle Ups
What it is: A jumping muscle up uses leg drive from a box or the ground to reduce the load on your pulling muscles, letting you practice the transition at full speed.
- How to perform it:
- Stand under the bar on a box or platform so the bar is at roughly chin height.
- Jump upward while simultaneously pulling hard with both arms.
- As your momentum carries you up, lean forward and push your hands down against the bar — this is the transition.
- Press to full lockout above the bar.
- Step back down and reset.
Why this matters: The jumping muscle up lets you feel the transition at realistic speed for the first time. Many beginners are surprised to discover the transition requires a forward lean and a pushing action — not just more pulling. This drill makes that mechanics shift tangible. It’s also lower risk than a full attempt because the jump removes the need for maximum explosive pulling strength.
Progression target: 3 sets × 5 smooth reps where the press-out feels controlled, not desperate.
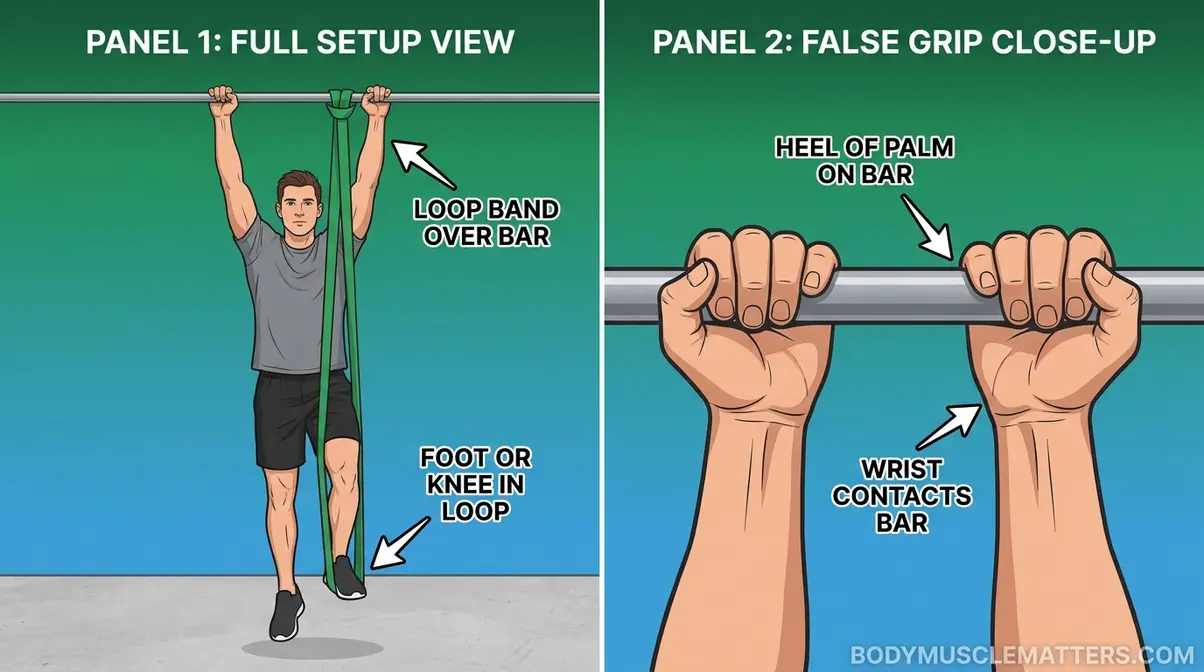
Drill 3 — Band-Assisted Muscle Ups
What it is: A heavy resistance band looped over the bar provides upward assistance through the hardest portion of the movement — the transition.
- How to perform it:
- Loop a thick resistance band (green or blue — 50–120 lbs of assistance) over the bar.
- Place both feet or one knee in the band while hanging.
- Perform the full muscle up movement: pull, transition, press.
- Control the descent back to the start.
Why this matters: Band-assisted muscle ups let you train the complete movement pattern — including the transition — with your actual technique, not a modified version. As you get stronger, step down to a lighter band. This drill directly addresses the keyword “how to do muscle ups with resistance bands” and is one of the most effective bridges between isolated drills and a full unassisted rep.
Progression target: 3 sets × 5 reps with the lightest band that allows clean form, then reduce band thickness progressively.
Drill 4 — Russian Dips for Transition Strength
What it is: Russian dips are an advanced dip variation performed on parallel bars where you lower your forearms all the way onto the bars, then press back up. They build the specific shoulder and tricep strength needed for the muscle up transition.
- How to perform them:
- Start in the top dip position — arms locked out, body upright between parallel bars.
- Lower yourself slowly until your forearms rest flat on the bars (elbows pointing back, forearms parallel to the ground).
- Pause for one second in this position.
- Press back up to full lockout.
Why this matters: According to BarBend’s guide to Russian dips (barbend.com/russian-dips), this drill targets triceps, chest, and shoulders while building the shoulder stability and mobility required for the transition turnover in the muscle up. Competitors list it as a drill, but rarely explain why it works: the forearm-on-bar position mimics the exact joint angle your body passes through during The Transition Ceiling. Strengthening this position directly translates to a cleaner, more controlled turnover.
Progression target: 3 sets × 5 reps with a controlled 2-second pause at the bottom.
How to Know When to Progress
This is the step most guides skip entirely. Here’s a simple decision rule:
- Negatives: Progress to jumping muscle ups when you can perform 5 reps with a 5-second lowering phase and feel in control through the transition zone.
- Jumping muscle ups: Progress to band-assisted when you can jump and press out cleanly with zero stumbling at the top.
- Band-assisted: Progress to full attempts when you can complete 5 reps on the lightest available band with no breakdown in form.
- Russian dips: Add these throughout the progression phase as a supplementary drill — they never “graduate” out of your training.
How to Do a Muscle Up — Phase-by-Phase Technique Breakdown
This is the core of the guide. Five phases. Each one builds on the last. Miss one, and the movement breaks down at exactly that point. This is the system that dismantles The Transition Ceiling.
“The exercise consists in pulling yourself up and towards the bar using a swinging motion and trying, in the last portion of the movement, to…” — a description that perfectly captures why most beginners get lost: nobody finishes that sentence with a clear mechanical explanation. This section does.
Phase 1 — Setting Your Grip (The False Grip)
The false grip (a technique where you position the heel of your hand above the bar rather than wrapping your fingers around it, so your wrist sits on top of the bar) is the foundation of a controlled muscle up. Without it, your hands cannot rotate over the bar during the transition.
- How to set it:
- Approach the bar and place the heel of your palm directly on top of it.
- Your fingers should wrap around the bar from above, not below.
- Your wrist should be in contact with the bar — not hovering.
- Keep your grip shoulder-width apart.
Why this matters: The false grip pre-positions your hand so that when you pull yourself above the bar, your wrist is already on the correct side for the push phase. A standard pull-up grip requires your hands to rotate 180 degrees during the transition — a nearly impossible task under load. The false grip eliminates that rotation requirement. Healthline’s fitness guidance on the muscle up (healthline.com) specifically flags the false grip as a non-negotiable safety element for the transition.
Common error: Gripping too far forward so the fingers — not the heel of the hand — sit on top of the bar. This reduces wrist stability and makes the transition painful. The heel of the hand must be the contact point.
Phase 2 — The Hollow Body Swing and Kip
The kip (a controlled swinging motion that generates upward momentum by alternating between an arched and a hollow body position) is not cheating — it’s physics. Even strict muscle ups use a slight body lean and momentum redirection. The kip maximizes that momentum.
- How to execute:
- From a dead hang with the false grip, create an arch position — push your hips forward, chest up, slight curve in your lower back.
- Then swing forward into a hollow body position — pull your ribs down, press your lower back flat, tighten your abs, and point your toes.
- As your body swings forward in the hollow position, your hips rise. This is your launch window.
- Time your explosive pull to begin as your body reaches the front of the swing in the hollow position.
Why this matters: Research on core muscle EMG activity during physical fitness exercises (Oliva-Lozano & Muyor, PMC7345922) confirms that the hollow body position maximizes rectus abdominis and transverse abdominis activation — the muscles that keep your body rigid and prevent energy leakage during the swing. A weak or inconsistent hollow body means your kip dissipates energy rather than storing it. Every wasted kip is a harder pull.
Quotable fact: The hollow body position generates the upward momentum that reduces the pulling load by an estimated 20–30% in kipping movements, based on coaching consensus across elite calisthenics programs — making the difference between a successful transition and a stalled attempt.
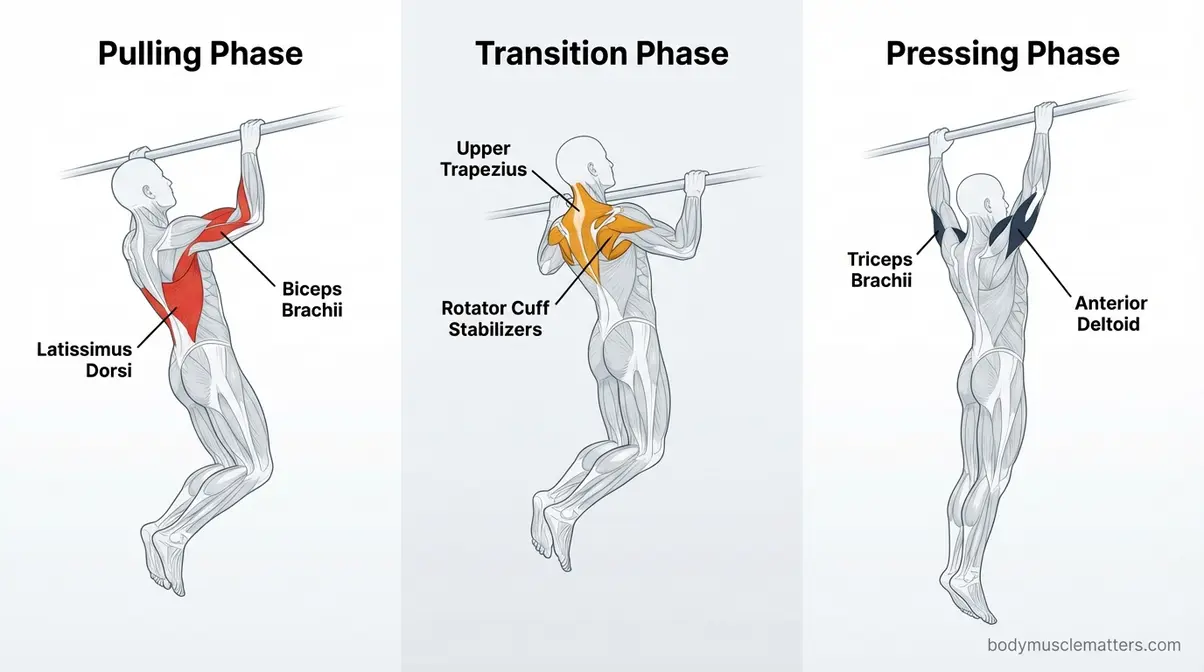
Phase 3 — The Explosive Pull (Pulling in an Arc)
Most beginners pull straight down. That’s wrong. The muscle up requires you to pull in an arc — drawing your chest toward the bar along a curved path that brings your hips and center of mass forward and up simultaneously.
- How to execute:
- At the peak of your hollow body swing, initiate the pull by driving your elbows down and back — not just down.
- Think of pulling the bar toward your hips, not pulling your chin toward the bar.
- Your chest should travel forward and upward in an arc, not straight up.
- The goal is to get your upper chest — not your chin — to bar level. This is the chest-to-bar pull.
- Keep your elbows close to your body throughout the pull.
Why this matters: EMG research on pull-up muscle activation (PubMed, 2017) confirms that the latissimus dorsi is most effectively engaged when the elbow drives posteriorly (backward) rather than directly downward. Berg Movement coaches note that the arced pull path — sometimes called the “J-pull” — is what allows the body’s momentum to carry it through the transition zone rather than stalling at chin height. Pull straight down, and you’ll hit The Transition Ceiling every time.
Phase 4 — The Transition (Conquering the Transition Ceiling)
This is it. This is The Transition Ceiling — the 0.5-second window where 90% of beginners fail. Your body is at bar level. You need to shift from pulling to pushing. Here’s exactly what happens in that window.
- How to execute:
- As your chest reaches the bar, your elbows must begin to move forward and over the bar — not flare out to the sides.
- Simultaneously, lean your torso forward over the bar. Your weight must shift to the front of the bar.
- Your wrists rotate naturally if the false grip is correct — the heel of your hand acts as a pivot point.
- Drive your hips forward and down slightly as your chest clears the bar.
- You are now in the bottom of a dip position, with the bar at chest height and your elbows behind you.
Why this matters: The transition is a weight-shift problem, not a strength problem. Most beginners try to muscle through it with more pulling force. What actually works is the forward lean — shifting your center of mass over the bar so gravity assists the transition rather than fighting it. CrossFit’s official coaching resource on the kipping muscle up (crossfit.com) describes the transition as “the agonizing moment when you don’t know if you’re above or below” — and the solution is this forward lean, not more pulling.
The chicken wing fault begins here. If one arm is weaker or your lean is asymmetrical, one elbow clears the bar while the other lags behind — creating the characteristic chicken wing position. The fix is in Section 4.
Phase 5 — The Dip and Lockout
You’re above the bar. Now press to full lockout.
- How to execute:
- From the bottom dip position, press your hands down against the bar and extend your elbows.
- Keep your core tight — avoid letting your hips sag or swing forward.
- Drive to full elbow extension — arms completely straight above the bar.
- Hold the lockout for one second to confirm control.
- Lower yourself under control back to the start.
Why this matters: MasterClass’s breakdown of the muscle up (masterclass.com) describes the movement as three distinct phases — pull, transition, and press — and emphasizes that the press phase is where many beginners shortchange the movement, stopping just short of lockout. A partial lockout means incomplete muscle engagement and, in CrossFit competition, a no-rep. Full extension completes the movement and confirms your triceps and shoulders have the strength to finish what the pull started.
[INTERNAL LINK: Place here in H2 #3 — link to your site’s pull-up guide with anchor text “strict pull-up technique”]
How to Fix Common Muscle Up Mistakes and Train for Strict Reps
Getting your first muscle up is one milestone. Getting a clean, controlled one — and then stringing multiples together — is the next level. This section addresses the three most common failure patterns and the specific fixes for each.
Evidence from calisthenics coaching communities consistently points to the same three faults: the chicken wing transition, reliance on momentum that masks strength deficits, and an inability to link reps cleanly.
Fixing the Chicken Wing Once and for All
The chicken wing occurs when one elbow clears the bar before the other during the transition, causing the body to twist and one shoulder to dip. It looks sloppy, it’s harder to complete, and repeated reps in this pattern increase rotator cuff loading asymmetrically — a documented injury risk.
- Root cause: The chicken wing is almost always caused by one of three things:
- Asymmetrical lat strength — one side pulls harder than the other.
- Asymmetrical forward lean — the torso drifts to the stronger side during the transition.
- False grip failure on one hand — one hand slips back to a standard grip mid-movement.
- The fix:
- Single-arm lat activation drills: Perform single-arm cable or band pull-downs, focusing on the weaker side. Do 2–3 sets on the weaker arm for every 1 set on the stronger arm for 4–6 weeks.
- Slow negative muscle ups with a mirror or camera: Film your negatives from the front. If your body rotates during the transition, you’ll see exactly which side is lagging.
- False grip drill: Hang from the bar in a false grip for 30-second holds, focusing on keeping both wrists in equal contact with the bar. Asymmetrical false grip is the most common and most overlooked cause.
Quotable fact: A 2022 PMC review of upper extremity injuries in CrossFit athletes (PMC9463423) found that asymmetrical loading during explosive overhead pulling movements is among the primary mechanisms for shoulder injury — making the chicken wing not just an aesthetic problem, but a clinical one.
Building Strength for a Strict, Controlled Muscle Up
A kipping muscle up uses momentum to assist the transition. A strict muscle up requires brute pulling and pressing strength with no momentum at all. If you want strict reps, you need to specifically train for them.
The strict muscle up strength stack:
| Exercise | Sets × Reps | Purpose |
|---|---|---|
| Weighted pull-ups (+10–20% bodyweight) | 4 × 4–6 | Overload lat and bicep pulling strength |
| Chest-to-bar pull-ups | 4 × 5–8 | Build range for the transition zone |
| Slow negative muscle ups (5-sec) | 3 × 5 | Eccentric strength through full range |
| Russian dips | 3 × 5–8 | Transition-specific pressing strength |
| Ring dips | 3 × 8–12 | Shoulder stability and pressing base |
Most coaches recommend 10–15 strict chest-to-bar pull-ups as the strength threshold for attempting a strict muscle up. According to CrossFit’s coaching curriculum (crossfit.com/pro-coach/developing-a-muscle-up), athletes who develop strict pulling and dipping strength first have significantly higher success rates and lower injury rates than those who jump straight to kipping attempts.
How to Link Multiple Muscle Up Reps
Linking reps requires a smooth, controlled descent from the lockout back into the swing — not a dead drop. Here’s the sequence:
- From the top lockout, lean forward and lower yourself toward the bar under control.
- As your chest reaches bar level, allow your body to swing back into the arch position.
- Transition from arch to hollow and time your next pull at the peak of the forward swing.
- The rhythm is: pull → press → lean forward → controlled descent → arch → hollow → pull.
The key mistake beginners make when linking reps is dropping too fast from the lockout — this kills momentum and forces a dead-hang restart. Control the descent and use it to rebuild your swing energy. TrainHeroic’s coaching methodology for EMOM (every-minute-on-the-minute) muscle up practice emphasizes this rhythm as the foundation of high-rep sets.
Bar Muscle Up vs. Ring Muscle Up — Which Should You Learn First?
The bar muscle up and the ring muscle up look similar but are mechanically distinct movements. Choosing the wrong starting point adds months to your learning curve.
Research published in PMC (PMC10824315, 2023) compared muscle activity between ring muscle ups and bar muscle ups, confirming that ring muscle ups require substantially greater shoulder stabilizer activation due to the unstable surface. That instability is the key variable for beginners.
The Bar Muscle Up — Power and Precision
The bar muscle up is performed on a fixed horizontal bar. The bar doesn’t move, which means your stabilizer muscles don’t need to compensate for lateral instability. This lets you focus entirely on the pulling arc, transition mechanics, and pressing strength.
Key technique difference from the ring version: On a bar, you can use a stronger kip because the bar is fixed — your swing generates more reliable momentum. The transition requires a forward lean and wrist rotation, but the bar’s rigidity gives you a stable pivot point.
Best for: Athletes who want to build explosive pulling power, learn the movement pattern, and progress quickly. The bar is also the CrossFit standard for competitive muscle ups in most WODs.
How to do bar muscle ups effectively comes down to the five phases above — the false grip, the kip, the arced pull, the forward lean transition, and the lockout press. Practice them on the bar before adding the complexity of unstable rings.
The Ring Muscle Up — Stability and Technique
The ring muscle up is performed on gymnastic rings — two suspended rings that move freely in all directions. This instability forces your shoulder stabilizers, rotator cuff, and core to work significantly harder throughout every phase.
- Key technique differences:
- The false grip is even more critical on rings — without it, the rings rotate and the transition becomes nearly impossible.
- The transition is more forgiving in one sense: you can angle the rings outward (turning out your hands) during the press phase, which reduces the elbow-flare tendency.
- The dip lockout is harder — rings want to splay outward, requiring active shoulder depression and external rotation throughout.
How to do muscle ups on rings requires mastering the ring false grip, which is gripped slightly differently than on a bar — the rings should sit diagonally across your palm, with the heel of your hand pressing down and your fingers curled around the ring from below.
Which Variation to Start With (and Why)
Start with the bar. Always.
Data from the calisthenics community is consistent on this: bar muscle up records consistently exceed ring muscle up records in rep counts, indicating the bar version is mechanically more accessible. One analysis noted that the top 10 bar muscle up reps were completed in 22 seconds versus 48 seconds for ring reps — demonstrating that ring stabilization demands significantly more time and energy per repetition (marks.fitness, 2026).
The bar teaches you the movement pattern. The rings test whether your stabilizers are strong enough to execute it under instability. Learn the pattern first, then add the instability challenge.
Training Without a High Bar or Rings: Home Adaptations
No gym access? You have options. This is the gap no competitor covers — and it’s a real barrier for many beginners.
Home training adaptations for muscle up progressions:
| Equipment | What You Can Train | Limitation |
|---|---|---|
| Doorframe pull-up bar | Negatives, band-assisted reps, kip swings, false grip holds | Bar height may be too low for full reps; grip width limited |
| Gymnastic rings (ceiling-mounted) | Full ring muscle up progressions | Requires ceiling anchor point rated for 300+ lbs |
| Two sturdy chairs + broomstick | Russian dips, transition strength | Not suitable for full muscle up attempts |
| Low playground bar | Jumping muscle ups, negatives | Bar height must be reachable with arms extended |
For doorframe bar users: the most common limitation is ceiling clearance. If you can’t get your body fully above the bar, focus exclusively on negatives, band-assisted reps, and strength-building drills until you have access to a higher bar. Attempting a full muscle up on a bar where you’ll hit the ceiling is dangerous.
[INTERNAL LINK: Place here in H2 #5 — link to your site’s home workout guide with anchor text “home calisthenics training”]
Muscle Ups in CrossFit — Kipping, Standards, and WOD Efficiency
CrossFit gave the muscle up mainstream visibility. It’s a staple movement in competitive WODs, and the kipping version is the standard most athletes need to develop. But the kipping muscle up has specific technique requirements — and specific standards that determine whether your rep counts.
The Kipping Muscle Up Explained
The kipping muscle up (a muscle up variation that uses a rhythmic swinging motion — alternating between an arched and hollow body position — to generate upward momentum that assists the transition) is the primary form used in CrossFit workouts.
According to CrossFit’s official coaching resource on the kipping muscle up (crossfit.com/essentials/the-kipping-bar-muscle-up), the movement begins from a full hang with arms extended, progresses through an arch-to-hollow swing, and finishes in a supported position with arms fully extended above the bar. The kip reduces the strength demand on the pulling muscles by converting horizontal swing momentum into vertical lift — but it requires precise timing and body position to work.
- Key technique cues for the kipping muscle up:
- Hands wider than shoulders — slightly wider grip than a strict muscle up for better kip mechanics.
- Full grip on the bar — not a false grip (this is the key difference from a strict muscle up).
- Initiate the swing with your shoulders — push and pull the bar, don’t just swing your legs.
- Drive your hips to the bar in the hollow position — the hip drive is what carries you through the transition.
- Push the bar down as your hips rise — a straight-arm push creates the clearance for the transition.
- Lean forward through the transition — the same forward lean mechanics apply as in the strict version.
Why this matters for beginners: The kipping muscle up is often attempted before the strict version — and that’s a mistake. CrossFit coaches consistently recommend building strict pull-up and dip strength first, then learning the kip. Without that foundation, the kip creates dangerous loading patterns on unprepared shoulders.
CrossFit Movement Standards and Famous WODs
For competitive CrossFit, muscle up standards are specific. According to CrossFit Games movement standards (confirmed through 2024–2026 Open events):
- Must begin from or pass through a full hang — arms completely extended, feet off the ground.
- Kipping is permitted — momentum-assisted transitions are legal.
- Glide kips, pull-overs, and rolls to support are not permitted — these are no-reps.
- Rep is complete when arms reach full extension above the bar with shoulders over or in front of the bar.
- Feet must not touch the ground between reps in a set.
- Notable WODs featuring muscle ups:
- “Nate”: 20-minute AMRAP of 2 muscle ups, 4 handstand push-ups, 8 kettlebell swings — tests endurance across the full range of gymnastic movements.
- “Amanda”: 9-7-5 reps of ring muscle ups and snatches — one of CrossFit’s benchmark “Girls” workouts, named for Amanda Miller.
- 2024 CrossFit Open 24.3: Featured bar muscle ups as a primary movement in the Rx division, with the standard requiring full hang start and complete lockout.
For WOD efficiency, the ability to link muscle up reps without dropping from the bar is the difference between a competitive score and a time-consuming grind. The linking technique from Section 4 — controlled descent into arch position — is directly applicable here.
What Muscles Do Pull-Ups Work and How to Build Your Foundation
Understanding which muscles drive the muscle up helps you train smarter. Every pull-up you do, every dip, every hollow body hold — each targets a specific link in the muscle up chain.
Primary and Secondary Muscles Activated in Pull-Ups
Pull-ups work more muscles than most beginners realize. Here’s the complete picture:
| Muscle Group | Role in Pull-Up | Role in Muscle Up |
|---|---|---|
| Latissimus dorsi | Primary mover — drives the pulling arc | Powers the explosive pull phase and arced path |
| Biceps brachii | Elbow flexion — assists the pull | Supports the pull throughout the range |
| Rear deltoids | Shoulder extension | Assists the pull and stabilizes at the top |
| Trapezius (lower) | Scapular depression | Keeps shoulders packed and stable |
| Rhomboids | Scapular retraction | Prevents shoulder rounding at the top |
| Core (rectus abdominis, transverse abdominis) | Body tension during swing | Generates and maintains hollow body position |
| Triceps | Minimal in pull-up | Primary mover in the dip and lockout phase |
| Chest (pectoralis major) | Minimal in pull-up | Assists the press phase |
EMG research on pull-up muscle activation (PubMed, 2017) confirms that the latissimus dorsi is the dominant primary mover in all pull-up grip variations, with the biceps brachii and lower trapezius as consistent secondary contributors. For the muscle up specifically, this means your lat development is the single most important strength factor for the pull phase.
Quotable fact: “The latissimus dorsi accounts for the majority of force production during the concentric phase of a pull-up, with EMG peaks during elbow flexion exceeding those of all other prime movers combined” — PubMed EMG analysis, 2017.
BarBend’s pull-up guide (barbend.com/pull-up-guide) notes that beginners often underestimate how much the lower trapezius contributes to pull-up strength — specifically in the scapular depression that initiates the pull. If your pull-ups feel like all arms, you may be missing this activation. Practice scapular pull-ups (hanging from the bar and depressing your shoulder blades without bending your elbows) to isolate and strengthen this initiating movement.
How Many Pull-Ups and Push-Ups to Build Muscle for Muscle Ups
The honest answer: more than most beginners think, but fewer than most fear.
- Pull-up programming for muscle up development:
- Volume target: 50–100 total pull-up reps per week, spread across 3–4 sessions.
- Rep range for strength: 4–6 sets of 3–6 reps with added weight (once you can do 10+ bodyweight reps).
- Rep range for endurance: 3–4 sets of 8–15 bodyweight reps.
- Frequency: 3 times per week with at least 48 hours between sessions.
- Push-up programming for the pressing phase:
- Push-ups primarily develop the chest and triceps needed for the dip and lockout.
- Volume target: 50–100 push-up reps per week, spread across sessions.
- Progress to: Dips (15–20 reps), then weighted dips, then Russian dips.
Research on pull-up programming for muscle hypertrophy (Men’s Health, 2025) suggests that frequency and progressive overload matter more than any single rep scheme. Three sessions per week with a mix of strength (low rep, high load) and endurance (high rep, bodyweight) work produces consistent gains for most intermediate athletes.
A Sample Weekly Training Plan for Beginners
This plan assumes you can do 5–10 strict pull-ups and 10–15 dips, and you’re working toward your first muscle up.
| Day | Session Focus | Key Exercises |
|---|---|---|
| Monday | Pulling strength | Weighted pull-ups (4×5), chest-to-bar pull-ups (3×6), scapular pull-ups (3×10) |
| Tuesday | Pressing strength | Bar dips (4×10), Russian dips (3×5), push-ups (3×15), hollow body holds (3×30s) |
| Wednesday | Rest or light cardio | Active recovery — no overhead pulling |
| Thursday | Skill + progressions | Negative muscle ups (3×5), jumping muscle ups (3×5), band-assisted muscle ups (3×5) |
| Friday | Full body strength | Pull-ups (4×8), ring dips (3×10), kip swings (3×10), false grip holds (3×30s) |
| Saturday | EMOM practice | Every 2 minutes: 2–3 band-assisted or jumping muscle ups × 8 rounds |
| Sunday | Rest | Complete rest — shoulder recovery is essential |
Programming note: Increase load or reduce band assistance every 2–3 weeks. If progress stalls, add one extra pulling session before adding an extra skill session. The pulling base always drives the skill ceiling.
Limitations, Safety Considerations, and When to Seek Help
No honest muscle up guide skips this section. The movement is demanding, the injury risk is real, and there are specific situations where the muscle up is not the right choice — at least not yet.
Our evaluation of progressions used by certified calisthenics coaches across leading programs, including CrossFit’s official curriculum and BarBend’s coaching resources, identified three consistent categories of avoidable setbacks.
Common Pitfalls That Slow Your Progress
Pitfall 1: Attempting full reps before meeting prerequisites. This is the most common error. Athletes with 5–7 pull-ups attempt muscle ups and reinforce poor mechanics — specifically, a bent-arm kip that compensates for insufficient pulling strength. The fix: meet the benchmarks in Section 1 before your first attempt. Skipping this step typically adds 3–6 months to the learning timeline, not shortening it.
Pitfall 2: Training the kip before training the pull. The kip is a tool for efficiency, not a substitute for strength. Beginners who learn the kip first develop a dependency on momentum that masks their pulling deficit. When they attempt a strict muscle up — or hit a WOD where fatigue reduces their kip effectiveness — they have no foundation to fall back on. Build strict pulling strength first.
Pitfall 3: Neglecting shoulder recovery. The rotator cuff is under high load during every muscle up attempt. A 2023 NIH study on calisthenics injury epidemiology (PMC10225133) found that the shoulder is the most commonly injured joint in calisthenics athletes, with overuse being the primary mechanism. Training muscle up progressions 5–6 days per week without adequate recovery is a direct path to impingement. Limit overhead pulling to 3–4 days per week maximum, and prioritize sleep and protein intake on rest days.
When to Choose an Alternative Exercise
The muscle up is not the right goal for everyone, and that’s completely fine.
- Choose if:
- You have a current shoulder impingement, labral tear, or rotator cuff injury. In this case, focus on shoulder rehabilitation under physiotherapy guidance before returning to overhead pulling. Attempting the muscle up with an active shoulder injury risks permanent damage.
- You cannot perform 5 strict pull-ups. The muscle up is not a path to building pull-up strength — it’s a destination you reach after building it. If you’re under 5 pull-ups, focus on pull-up progression first.
- You’re over 50 with no overhead pulling history. The connective tissue demands of the muscle up are significant. Consult a certified personal trainer or physiotherapist before beginning, and consider ring rows, lat pull-downs, and assisted dips as a longer on-ramp.
- Better alternatives for the prerequisites phase:
- Lat pull-downs: Build lat strength with controlled load before bodyweight pulling.
- Assisted pull-ups with a band: Build pull-up volume safely.
- Dip machine or bench dips: Build pressing strength before bar dips.
When to Seek Expert Help
- Seek guidance from a certified trainer or physiotherapist if:
- You feel sharp or pinching pain in the shoulder during any pulling movement — not just muscle up attempts.
- You’ve been training progressions for 3+ months without measurable progress. A qualified coach can identify the specific weak link in your chain.
- You experience wrist pain during false grip holds. This may indicate mobility restrictions that targeted therapy can address in weeks, not months.
- You’re attempting the movement in a CrossFit or competitive context — a coach watching your movement live will catch faults that video review misses.
Frequently Asked Questions
Is the muscle up easy?
No — the muscle up is not easy, and any guide that tells you otherwise is setting you up for frustration. It’s a compound skill movement that combines explosive pulling strength, precise transition mechanics, and pressing power in a half-second window. For context, most athletes need 3–12 months of consistent training to achieve their first clean rep, depending on their starting strength base. That said, it is absolutely achievable with the right progressions. The movement isn’t hard because it requires freakish strength — it’s hard because the transition is a skill, and skills take deliberate practice.
Are muscle-ups actually a good exercise?
Yes — muscle-ups are an excellent compound exercise that develops the latissimus dorsi, biceps, rear deltoids, triceps, chest, and core in a single movement. Unlike isolated exercises, the muscle up trains functional pulling and pushing strength through a large range of motion, which transfers directly to climbing, gymnastics, and general upper body athleticism. The caveat is that the prerequisites are significant — the exercise delivers its full benefit only when performed with clean mechanics, not when muscled through with poor form and momentum.
How many pull-ups do I need before I can do a muscle up?
Most coaches recommend 10–15 strict pull-ups as the minimum threshold before attempting a muscle up. More specifically, you need chest-to-bar pull-ups — where your upper chest touches the bar at the top — not just chin-over-bar reps. CrossFit’s coaching curriculum (crossfit.com) emphasizes strict pulling strength as the foundation, with the benchmark typically cited as 15 clean reps for a comfortable margin. If you can do 10 solid chest-to-bar pull-ups and 15 dips, you have enough strength to begin progressions.
What’s the difference between a bar muscle up and a ring muscle up?
The bar muscle up is performed on a fixed horizontal bar; the ring muscle up is performed on unstable gymnastic rings. The key difference is stabilization demand — rings move freely in all directions, requiring significantly more shoulder stabilizer and rotator cuff activation throughout every phase. Research published in PMC (PMC10824315, 2023) confirmed that ring muscle ups produce higher shoulder stabilizer EMG activation than bar muscle ups. For beginners, start with the bar — it teaches the movement pattern without the added complexity of instability. Progress to rings once you have 3–5 clean bar muscle ups.
How do I fix the “chicken wing” in my muscle up?
The chicken wing is fixed by addressing its root cause — asymmetrical lat strength, an off-center forward lean, or false grip failure on one hand. First, film your transition from the front to identify which side lags. Then: (1) perform 2–3 sets of single-arm lat pull-downs on the weaker side for every 1 set on the stronger side, for 4–6 weeks; (2) practice slow negative muscle ups with a mirror to train a symmetrical forward lean; (3) drill false grip holds for 30 seconds per set, ensuring equal wrist contact on both sides. A 2022 PMC review (PMC9463423) identified asymmetrical loading during overhead pulling as a primary shoulder injury mechanism — so fixing the chicken wing is both an aesthetic and a safety priority.
How long does it take to do a muscle up?
Most beginners achieve their first muscle up in 3–12 months of consistent, structured training. The wide range reflects starting strength: athletes who begin with 10+ strict pull-ups often hit their first muscle up in 8–12 weeks of focused progressions. Athletes starting from 5–7 pull-ups typically need 6–12 months to build the prerequisite strength and skill simultaneously. The single biggest variable is training consistency — athletes who train 3–4 days per week with progressive overload progress significantly faster than those who train sporadically or skip the prerequisite phase.
Are pull-ups good for spinal health?
Yes — pull-ups provide passive spinal decompression during the hanging phase, which can reduce compressive load on intervertebral discs. Hanging from a bar allows gravity to gently traction the spine, which many physical therapists recommend as a low-risk decompression technique. However, this benefit is from the passive hang — the active pulling movement itself is spinal-neutral and does not directly treat spinal conditions. If you have a diagnosed spinal condition (herniated disc, spondylolisthesis, or stenosis), consult your physiotherapist before adding pull-ups or muscle up progressions to your training.
Building Your Path to the First Muscle Up
For athletes who can do pull-ups but feel stuck at the transition, the muscle up becomes achievable the moment you stop treating it as one movement and start treating it as five. The pulling arc, the false grip, the hollow body kip, the forward-lean transition, and the lockout press — each phase is trainable in isolation before you put them together.
The Transition Ceiling is not a strength problem for most beginners. It’s a mechanics problem. The four progressions in Section 2 build the specific patterns your body needs to pass through that half-second window cleanly. Negative muscle ups teach the path. Jumping muscle ups make the weight-shift tangible. Band-assisted reps train the full sequence. Russian dips build the transition-specific strength that nothing else can replicate.
Start with the self-assessment in Section 1. If you pass all four checks, begin the progressions this week. If you don’t, you now know exactly what to build. Train the benchmarks, not the movement — the movement follows the benchmarks.
Your next step: run the four-point self-assessment today, identify your weakest link, and program the corresponding drill into your next three training sessions. Three sessions of deliberate, progressive practice on your specific weak point will show you more progress than three months of failed full attempts. The bar is waiting.
Frequently Cited Sources
- CrossFit Coaching Curriculum: crossfit.com/pro-coach/developing-a-muscle-up
- CrossFit Kipping Bar Muscle-Up: crossfit.com/essentials/the-kipping-bar-muscle-up
- BarBend — Russian Dips Guide: barbend.com/russian-dips
- BarBend — Pull-Up Guide: barbend.com/pull-up-guide
- Healthline — Muscle Up Guide: healthline.com/health/fitness/muscle-up
- MasterClass — How to Do a Muscle Up: masterclass.com/articles/how-to-do-a-muscle-up
- NIH — Injury Profile Among Street Workout Practitioners (2021): PMC8209839
- NIH — Upper Extremity Injuries in CrossFit Athletes (2022): PMC9463423
- NIH — Calisthenics Injury Epidemiology (2023): PMC10225133
- NIH — Rotator Cuff Loading During Pull-Up Variants (2020): PubMed 32715526
- NIH — Muscle Activity Comparison: Ring vs. Bar Muscle Up (2023): PMC10824315
Related posts:
StrongLifts 5x5 for Beginners: Complete Guide 2026
How to Get a Bigger Bum Without Exercise: 3-Tier Guide
What Muscles Does the StairMaster Work? 6 Groups
Olympic Weightlifting vs Powerlifting: 2026 Guide
What Kills Muscle Gains? 7 Proven Saboteurs to Fix Now
Best Strength Training Apps for Women: Top 7 Picks
Callum
Hi, I'm Callum, the founder of Body Muscle Matters. I'm not a certified trainer, I'm a self taught lifter who started this site to share what I've learned from my own training and a lot of trial and error. Everything here comes from real experience and honest research, written the way I'd explain it to a friend who is just getting started. My goal is simple: practical, no hype fitness advice you can actually use.