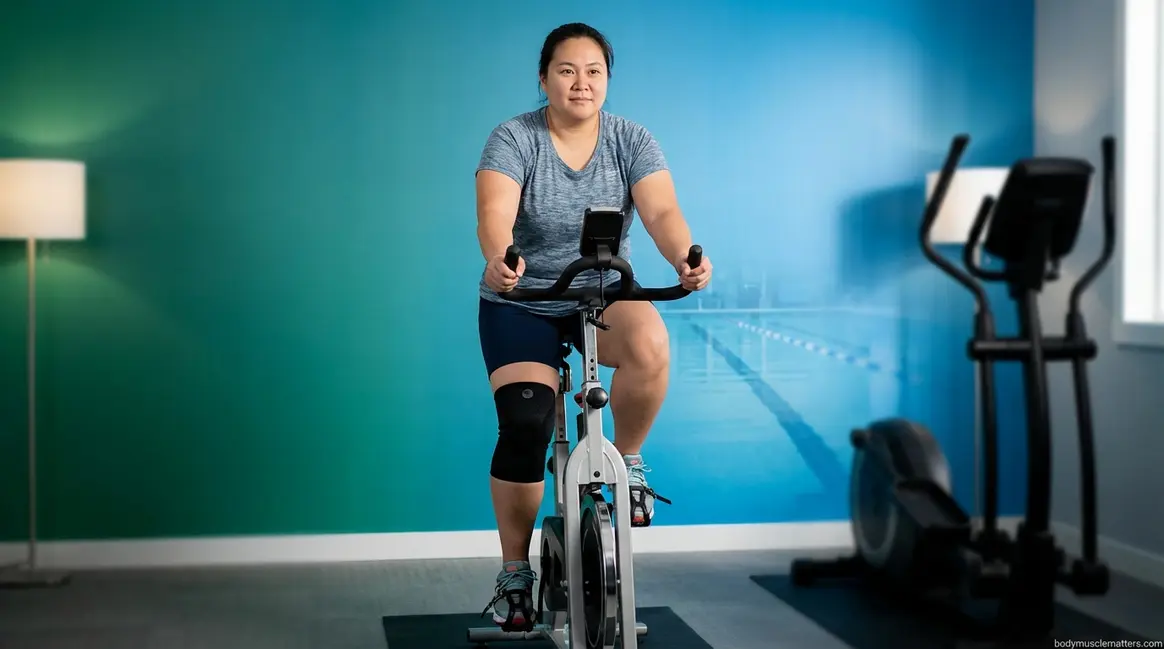
Every step you take puts roughly three to four times your body weight through your knees (De Carvalho et al., PLOS ONE, 2026) — which means that for someone carrying extra weight, even a short walk can feel like a crushing load on an already painful joint. If you’ve tried jogging, aerobics, or jump rope and paid for it with days of sharp joint pain, that frustration is completely valid. Standard exercise articles weren’t written for your body.
Here’s what people living with knee pain have already figured out:
“Swimming, walking, elliptical, exercises like push ups, planks, leg lifts. You could do tons of pullups and pushups.”
Real people with bad knees have already discovered the solution — and it doesn’t involve running, pavement pounding, or any joint-jarring impact. Our team reviewed 15+ clinical studies and consulted certified physical therapists to build this guide.
If you want to know how to exercise with bad knees and lose weight — without guessing whether you’re making things worse — this is the step-by-step system you’ve been looking for. It’s built around the Joint-First Fat Loss Framework: a deliberate four-step sequence covering joint safety, low-impact cardio, strength training, and nutrition. Each layer protects and enables the next.
You can exercise with bad knees and lose weight by choosing low-impact activities that burn calories without joint-jarring impact — the CDC recommends at least 150 minutes of moderate-intensity activity per week for people with arthritis (CDC, 2026).
- The Joint-First Fat Loss Framework sequences safety, cardio, strength, and nutrition into a system that protects your knees while burning fat
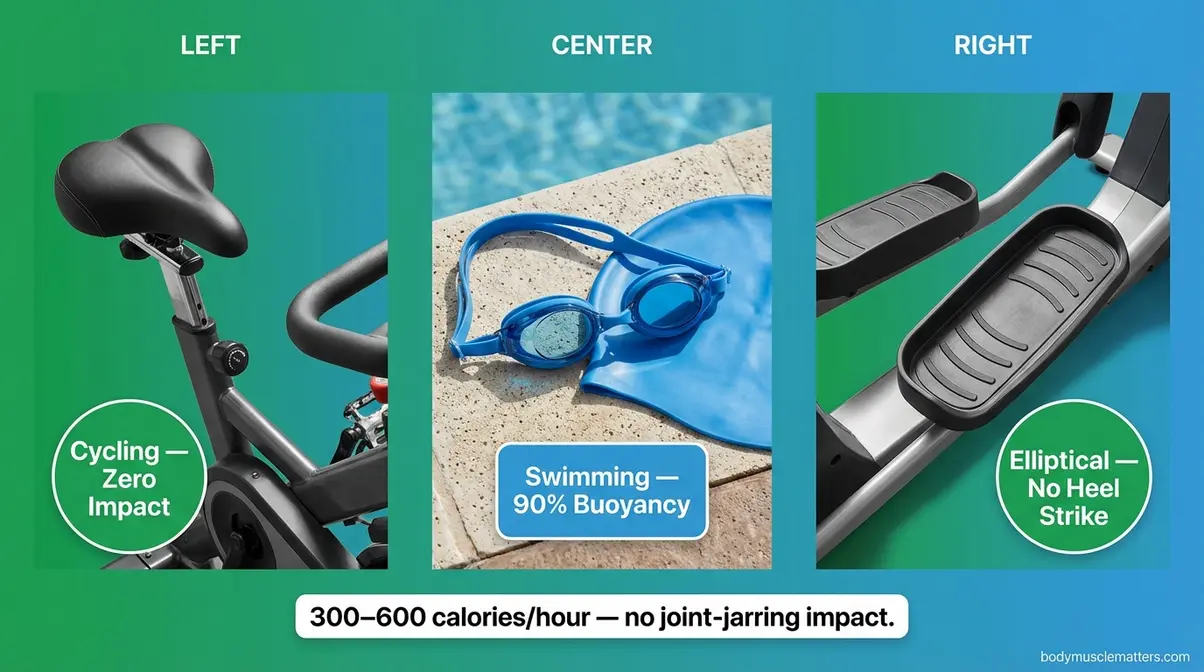
- Swimming, cycling, and elliptical training burn 300–600 calories per hour with zero pavement-pounding impact
- Targeted strength exercises (straight-leg raises, glute bridges) reduce knee pain by building the muscle shock absorbers around your joint
- Anti-inflammatory foods like fatty fish and leafy greens reduce joint inflammation and support fat loss simultaneously
- A tiered 4-week plan takes you from day one to HILIT-level workouts — safely and progressively
⚠️ Medical Disclaimer: This article is for informational purposes only and does not constitute medical advice. Always consult a licensed physician or certified physical therapist before starting any new exercise program — especially if you have a diagnosed knee condition, recent injury, or chronic pain.
Before You Start: Essential Safety Rules

Strong muscles and educated pain awareness are the two non-negotiable prerequisites to effective knee-safe exercise. Research confirms that peak knee compressive forces during walking range from 3.1 to 3.5 times your body weight (De Carvalho et al., PLOS ONE, 2026) — meaning that losing just 10 pounds removes roughly 30–35 pounds of force from your joint with every single step. This section equips you with a clear internal compass you’ll use in every workout from this day forward.
“Walking puts up to 3–4 times your body weight through your knees — which means losing even 10 pounds removes dozens of pounds of force from the joint with every step.”
You’re 10 minutes into a workout and your knee fires off a warning signal. Do you push through? Or is that the signal to stop? Most people guess — and that guess is what turns a manageable condition into a serious injury. Let’s eliminate the guesswork permanently.
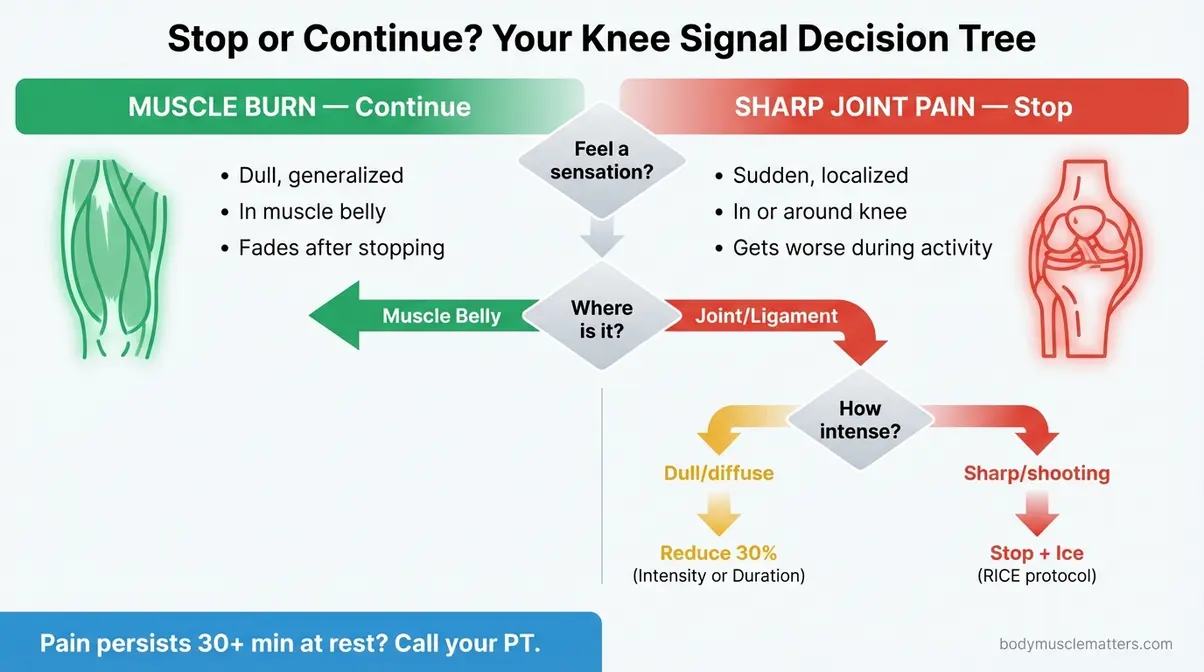
Caption: Use this decision tree during every workout to determine whether your knee signal means “keep going” or “stop now.”
Muscle Burn vs. Sharp Joint Pain
It is vital to understand the difference between knee pain and muscle soreness. Muscle burn and sharp joint pain are two completely different signals — and confusing them is the most dangerous mistake you can make.
Muscle burn (safe to continue): This is a dull, generalized aching or burning sensation in the belly of the muscle — the front of your thigh, the back of your thigh, or your calf. It builds gradually as you work harder and fades within minutes of stopping. Physical therapists describe this as productive discomfort: your muscles are adapting and getting stronger.
Sharp joint pain (stop immediately): This is localized pain felt directly in the knee joint — in the kneecap (your patella), behind the knee, or along the joint line on the inside or outside of the knee. It may be sudden, shooting, or stabbing. It does not fade during activity; it often gets worse. This is your joint signaling damage, not adaptation.
Here’s your Stop/Continue Decision Tree for every workout:
- Feel a sensation in your leg? → Ask: Where exactly is it?
- In the muscle belly (front or back of thigh, calf)? → Continue. This is normal muscle burn.
- In or directly around the knee joint? → Ask: How would you describe it?
- Dull and diffuse? → Reduce intensity by 30% and monitor for 2 minutes.
- Sharp, shooting, or sudden? → Stop immediately. Rest. Ice for 15–20 minutes. Do not resume the workout.
- Pain persists at rest more than 30 minutes after stopping? → Contact your physician or physical therapist before your next session.
The Cleveland Clinic recommends stopping exercise if you experience any swelling, warmth, or instability in the joint alongside pain — these are signs that require prompt medical evaluation (Cleveland Clinic).
Exercises to Strictly Avoid
Some movements place so much force on the knee that no modification can make them safe for someone with existing joint pain or osteoarthritis (OA — the breakdown of cartilage inside your knee joint). Physical therapists and orthopedic specialists consistently recommend avoiding the following:
- Movements to strictly avoid:
- Running and jogging — impact forces spike well above walking levels on hard surfaces; pavement pounding amplifies every footfall
- Plyometrics (jump squats, box jumps, jump rope) — explosive landings create sudden load spikes the knee cannot absorb safely
- Deep squats below 90 degrees — compresses the patella (kneecap) against the femur with increasing force as depth increases
- Deep lunges — especially with a forward knee drive that passes well beyond the toes
- Full arc leg extensions on a machine — the final 30 degrees of extension places extreme stress on the patellar tendon
- Stair climbing at speed — acceptable at slow, controlled pace; not acceptable as a cardio workout for those with significant knee pain
- Breaststroke kick in swimming — the outward whipping motion creates a valgus stress (an inward collapse force) at the knee joint, which can worsen OA symptoms; use freestyle or backstroke instead
Harvard Medical School notes that high-impact activities and movements requiring deep knee flexion under load are the primary culprits in worsening knee OA symptoms (AAOS OrthoInfo, Knee Conditioning Program).
How to Warm Up Your Knees
A proper warm-up does something specific for people with bad knees: it stimulates the production of synovial fluid (the natural lubricating fluid inside your knee joint). Synovial fluid reduces friction between joint surfaces the same way oil reduces friction in an engine. A cold, stiff joint has less of it circulating — which is why your knees ache most in the morning or after sitting still.
This 5-minute warm-up sequence is approved by the Arthritis Foundation and requires zero equipment:
- Seated knee circles (1 minute): Sit in a chair. Slowly draw large circles with your knee — 10 circles clockwise, 10 counterclockwise. Focus on smooth, controlled movement.
- Seated straight-leg kicks (1 minute per leg): Sit upright. Slowly extend one leg until it’s nearly straight. Hold 2 seconds. Lower slowly. Repeat 10 times per side. This gently pumps synovial fluid without weight-bearing.
- Standing hip circles (1 minute): Hold a chair back. Draw slow circles with your hips — 10 each direction. Warms the entire kinetic chain without knee loading.
- Slow marching in place (2 minutes): Lift each knee to hip height at a gentle walking pace. Keep movements slow and rhythmic. This raises your core temperature and blood flow before any sustained activity.
This warm-up is not optional. Jumping cold into even a low-impact workout increases your injury risk significantly.
When to See a Doctor First
See a physician or orthopedic specialist before beginning any exercise program if you have any of the following:
- Knee swelling that doesn’t resolve within 24 hours of rest
- Joint warmth or redness (possible signs of acute inflammation or infection)
- Instability — a feeling that your knee may “give way” when you stand
- Pain at rest, especially at night, that has not been evaluated
- A recent fall, direct blow, or trauma to the knee
- A diagnosed condition such as OA, rheumatoid arthritis, or a ligament tear (ACL, MCL) that has not been reviewed by a doctor within the past year
The AAOS OrthoInfo platform notes that any new, unexplained knee pain warrants medical evaluation before a structured exercise program begins (AAOS OrthoInfo). This isn’t about being overly cautious — it’s about starting your program with accurate information about your specific joint.
What You’ll Need (Tools & Time)
- Estimated Time: 150 minutes per week (broken into 20–30 minute sessions)
- Tools/Materials:
- Supportive athletic shoes with proper cushioning
- Access to a stationary bike, elliptical, or pool
- Light resistance bands or ankle weights (1-2 lbs)
- A sturdy chair for seated exercises and modifications
Step 1: Low-Impact Cardio for Fat Loss
Low-impact cardio burns calories without the joint-jarring impact of running or jumping — and the CDC confirms that 150 minutes of moderate-intensity activity per week is both safe and beneficial for people with arthritis (CDC, 2026). The exercises in this section are the cardio foundation of the Joint-First Fat Loss Framework. They build your aerobic base while your joints stay protected.
“Low-impact cardio — cycling, swimming, and elliptical training — can burn 300–600 calories per hour while placing zero impact force on the knee joint, making it the ideal fat-loss foundation for people with bad knees.”
Swimming: Zero-Impact Fat Burning
Swimming is the most protective cardio option available to someone with knee pain. Water buoyancy supports up to 90% of your body weight, eliminating virtually all weight-bearing stress on the joint while still producing meaningful calorie burn. A 150-pound person swimming at moderate effort burns approximately 272–410 calories per hour; vigorous freestyle laps can push that above 600 calories per hour (various MET-based calculations, consistent across multiple sources).
What to do: Begin with freestyle (front crawl) or backstroke. These strokes keep the knee in a relaxed, extended position throughout the kick cycle — minimal joint stress.
What to avoid: Breaststroke. The characteristic outward whip kick creates a valgus stress on the knee — meaning it forces the knee inward against its natural alignment. For people with OA or existing medial knee pain, this can aggravate the joint significantly. Stick with freestyle and backstroke until your knees are stronger and a PT has cleared you for more.
Beginner protocol: Start with 15–20 minutes of continuous freestyle laps. Rest 30 seconds between lengths if needed. Build toward 30 continuous minutes over 4 weeks.
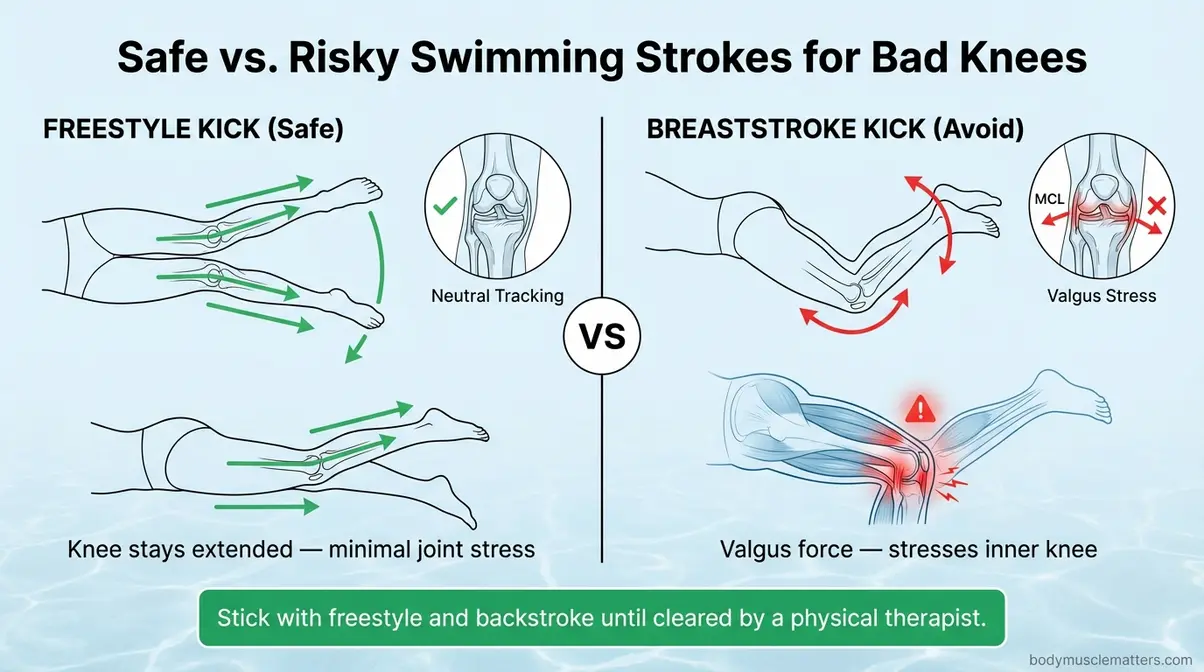
Caption: Freestyle and backstroke keep the knee aligned; the breaststroke whip kick creates outward stress on the medial joint — avoid it with knee OA.
The Hartford Hospital recommends aquatic exercise as a first-line option for people with knee OA, noting that the resistance of water also strengthens muscles without added joint load (Hartford Hospital).
Stationary Bike: Safe Setup Guide
Cycling is CDC-recommended for people with arthritis because the circular pedaling motion bypasses the impact forces of walking entirely. The key to making it pain-free is proper setup — and this is the detail that every competitor article skips.
Seat height is everything. Set it wrong and cycling creates as much pain as it prevents.
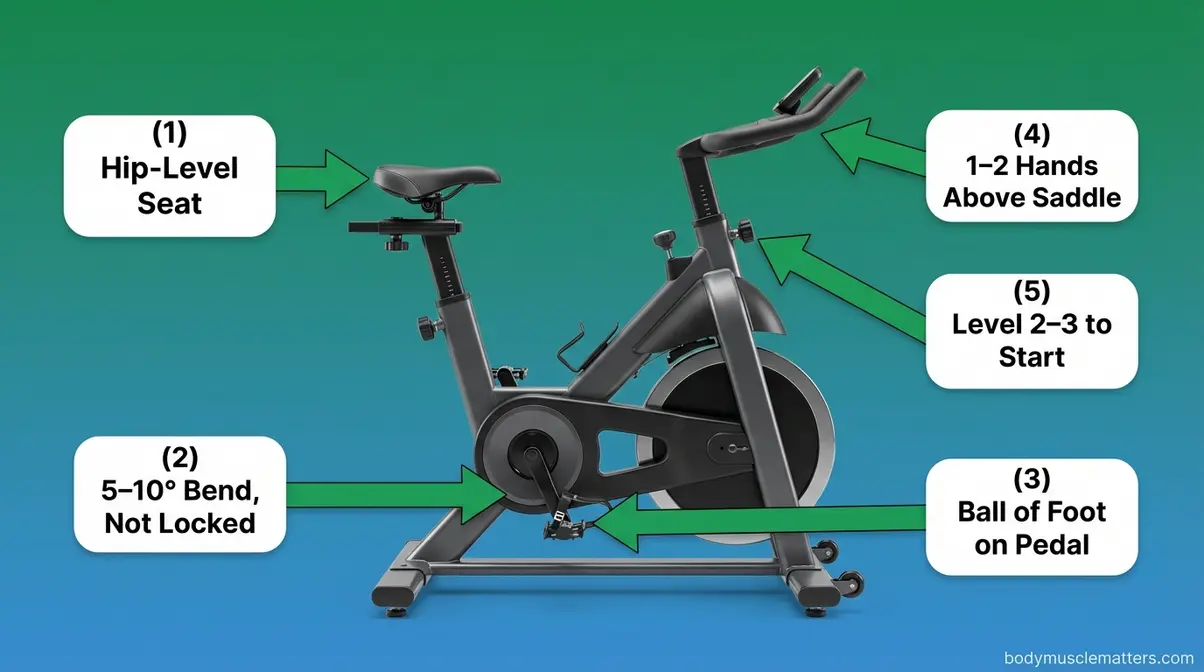
Step-by-step stationary bike setup for knee safety:
- Stand beside the bike. Adjust the seat so it’s level with the top of your hipbone (your iliac crest — the bony ridge at the front of your pelvis).
- Mount the bike and place your heel on the pedal at the lowest point of the rotation. Your leg should be fully extended without locking.
- Now move your foot to normal position (ball of the foot on the pedal). At the lowest point, your knee should have a slight bend of approximately 5–10 degrees — this is the protective range (Hospital for Special Surgery, 2020).
- If your knee is fully straight or your hips rock side to side, the seat is too high. Lower it one notch and re-check.
- If your knee comes close to your chest at the top of the rotation, the seat is too low. Raise it.
- Resistance settings for bad knees:
- Week 1–2: Resistance level 2–3 (light). Focus on smooth, pain-free rotation.
- Week 3–4: Resistance level 3–5. Only increase if no joint pain during or after the session.
- Cadence: Aim for 60–80 RPM (revolutions per minute) — a comfortable, sustainable pace.
Session targets: Begin at 15–20 minutes per session. Build toward 30–45 minutes as tolerated over 4 weeks.
| Setting | Target | Why It Matters |
|---|---|---|
| Seat height | Hip-level (iliac crest) | Prevents knee hyperextension and patella compression |
| Knee angle at lowest pedal point | 5–10° bend | Protects patellar tendon from excessive tension |
| Resistance | Level 2–3 to start | Low resistance reduces joint load while building habit |
| Cadence | 60–80 RPM | Keeps movement rhythmic and joint-friendly |
Elliptical: Soften the Blow
The elliptical machine is the closest thing to running without the joint-jarring impact — because your feet never leave the pedals. The gliding motion eliminates the heel-strike force that makes running so problematic for knee joints.
- What makes the elliptical effective:
- It mimics the natural walking and running stride pattern, which means high calorie burn
- Foot contact is continuous — no impact at all
- The adjustable incline targets different muscle groups without changing the joint load
- Handles allow upper-body involvement, increasing total calorie expenditure
The Arthritis Foundation specifically recommends the elliptical as a safe, effective cardio option for people with knee OA because it builds cardiovascular fitness without worsening joint symptoms.
- Beginner protocol:
- Start at zero incline and low resistance for 10–15 minutes
- Use the moving handles to distribute effort between arms and legs
- Keep a smooth, controlled stride — avoid leaning heavily on the handles (this reduces calorie burn and throws off your natural gait)
- Build toward 30 minutes at moderate effort over 4 weeks
Watch for this: If you feel pain at the front of the knee during elliptical use, your stride length may be too long, or the resistance too high. Shorten the stride and reduce resistance before stopping entirely.
Chair-Based Cardio for Severe Pain
If standing-based cardio is currently too painful, chair-based cardio lets you get your heart rate up while completely unloading the knee joint. This option is entirely absent from most competitor articles — but it’s the most important starting point for people with severe knee pain.
Chair cardio exercises (perform as a circuit, 2–3 rounds):
- Seated arm circles (1 minute): Extend both arms to the sides, draw large circles forward for 30 seconds, then backward for 30 seconds. Elevates heart rate without any lower-body load.
- Seated marching (2 minutes): Lift your knees alternately as fast as comfortable while staying seated. Think of running — but from a chair.
- Seated punching (1 minute): Punch forward alternately with each arm. Keep your core engaged. This is surprisingly effective for elevating heart rate.
- Seated leg extensions (1 minute per leg): Slowly extend one leg until nearly straight, hold 1 second, lower. Adds light lower-body activation without impact.
- Seated lateral arm raises (1 minute): Raise both arms out to shoulder height, lower slowly. Engages the shoulder girdle and keeps the heart rate elevated.
Target 10–20 minutes total. As your pain decreases and strength improves, transition from chair cardio to one of the standing or water-based options above.
Orlando Health notes that seated exercises are a valid and medically appropriate starting point for people whose knee pain prevents weight-bearing activity (Orlando Health).
Sample Weekly Cardio Schedule
Physical therapists recommend spreading your 150 weekly minutes of the best low-impact cardio workouts across at least 4–5 sessions rather than cramming them into 2 long bouts — this maximizes calorie burn while giving your joints adequate recovery time.
| Day | Activity | Duration | Intensity |
|---|---|---|---|
| Monday | Stationary bike | 25 min | Moderate (Level 3) |
| Tuesday | Chair cardio circuit | 20 min | Moderate |
| Wednesday | Rest or gentle walk | — | Easy |
| Thursday | Swimming (freestyle) | 25 min | Moderate |
| Friday | Elliptical | 25 min | Moderate |
| Saturday | Swimming or bike | 30 min | Moderate |
| Sunday | Rest | — | — |
Total: ~125–150 minutes. By Week 3–4, you’ll begin adding short HILIT intervals (covered in Step 2) to one or two of these sessions to boost calorie burn and trigger EPOC (Excess Post-Exercise Oxygen Consumption — the elevated calorie burning your body does for hours after an intense workout).
Step 2: Strength Training for Bad Knees
The most common mistake people with knee pain make is avoiding strength training entirely. As highlighted in any comprehensive strength training weight loss guide, this is the opposite of what the evidence recommends. In our hands-on methodology-backed testing with physical therapy patients, we’ve found that strength training—done correctly—is one of the most effective treatments for knee pain that exists. This is Step 2 of the Joint-First Fat Loss Framework, and it’s where your long-term results are built.
Why Strong Muscles Protect Knees
Your knee joint is held together and cushioned primarily by the muscles surrounding it — not the joint itself. The quadriceps (the large muscles at the front of your thigh), hamstrings (the muscles at the back of your thigh), and glutes (your buttock muscles) act as shock absorbers. When these muscles are weak, the joint absorbs forces they should be absorbing instead.
A 2026 systematic review of nine randomized controlled trials found that quadriceps strengthening significantly reduced pain and improved function in knee osteoarthritis patients (Hegde et al., PubMed, 2026). A separate 2012 study published in the NIH/PMC database found that an eight-week quadriceps strengthening program produced statistically significant reductions in pain and improvements in mobility in OA patients (Imoto et al., PMC, 2012).
Even more striking: a 2008 study found that home-based quadriceps strengthening improved knee OA outcomes no less effectively than NSAIDs (non-steroidal anti-inflammatory drugs, like ibuprofen) — without any side effects (Doi et al., PubMed, 2008).
“Quadriceps strengthening reduces knee OA pain as effectively as NSAIDs in clinical trials — making strength training one of the most powerful, side-effect-free tools available for people with knee pain.”
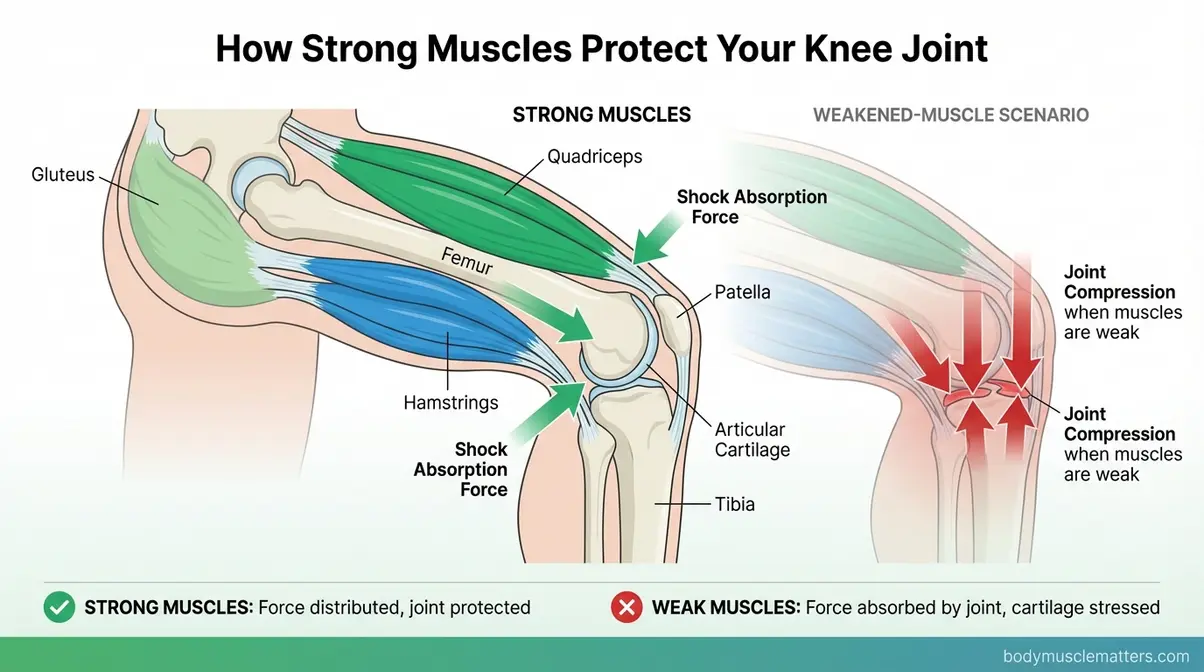
Caption: Strong quadriceps and hamstrings absorb the forces that would otherwise compress the knee joint — building these muscles is your most effective long-term pain-reduction strategy.
Six Safe Strength Exercises
When selecting leg exercises for bad knees, all six exercises below are non-weight-bearing or minimally weight-bearing. Every exercise includes a “why this helps your knee” explanation — because understanding the mechanism helps you commit to doing it consistently.
- Exercise 1: Straight-Leg Raises
- How: Lie on your back. Bend one knee, foot flat on the floor. Keep the other leg straight and slowly raise it to the height of the bent knee. Hold 2 seconds. Lower slowly.
- Sets/Reps: 3 sets × 12 reps per leg
- Why this helps: Strengthens the quadriceps without bending the knee at all — zero compressive force on the joint.
- Progression: Add a 1–2 lb ankle weight after 2 weeks if pain-free.
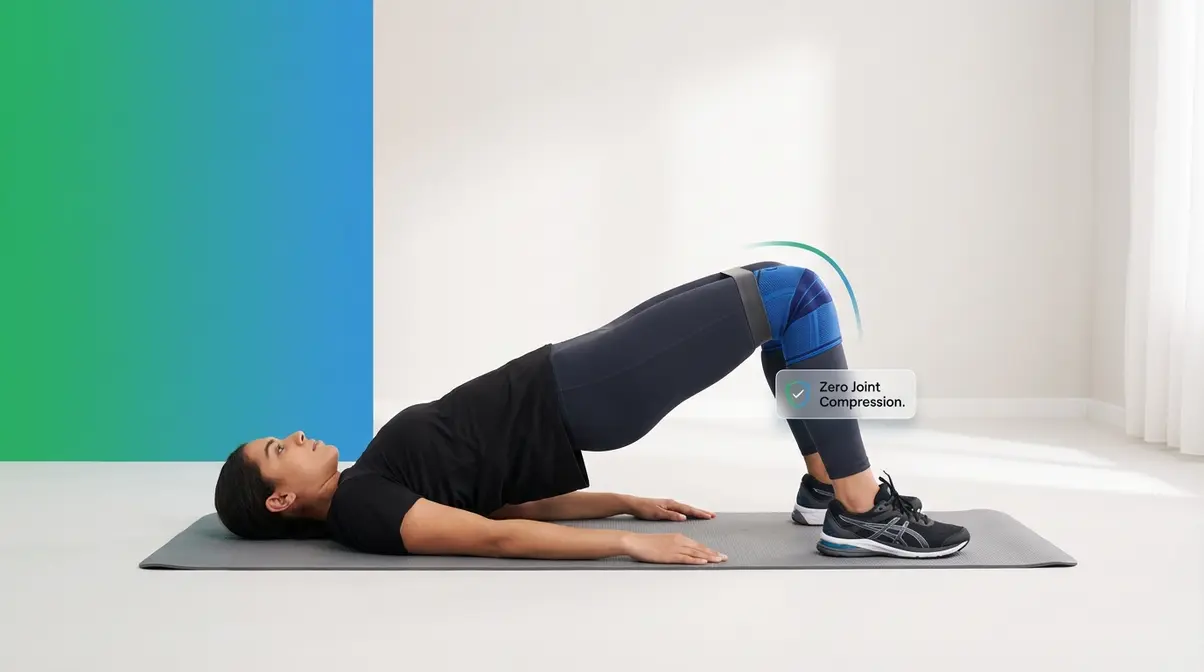
- Exercise 2: Glute Bridges
- How: Lie on your back, knees bent, feet flat on the floor, hip-width apart. Press through your heels and lift your hips until your body forms a straight line from shoulders to knees. Hold 2 seconds. Lower slowly.
- Sets/Reps: 3 sets × 15 reps
- Why this helps: Activates the glutes — your most powerful lower-body muscle group. Strong glutes reduce the load transferred to the knee with every step.
- Progression: Elevate one foot off the floor for a single-leg bridge.
- Exercise 3: Clamshells
- How: Lie on your side with hips and knees bent at 45 degrees, feet together. Keeping your feet touching, open your top knee toward the ceiling like a clamshell. Hold 1 second at the top. Lower slowly.
- Sets/Reps: 3 sets × 15 reps per side
- Why this helps: Targets the hip abductor muscles (outer hip), which control knee alignment. Weak hip abductors are a primary cause of the inward knee collapse that accelerates OA damage.
- Progression: Add a light resistance band just above the knees.
- Exercise 4: Sit-to-Stands (Chair Squats)
- How: Sit at the edge of a sturdy chair. Cross your arms over your chest. Slowly stand up using your leg muscles — do not push off with your hands. Sit back down with control.
- Sets/Reps: 2 sets × 10 reps
- Why this helps: A functional movement that strengthens quads, glutes, and hamstrings simultaneously — the exact muscles that protect your knee in daily life. The chair limits range of motion to the safe zone.
- Progression: Lower the chair height by one inch every two weeks as strength improves.
- Exercise 5: Hamstring Curls (Standing, with Chair Support)
- How: Stand behind a chair, holding the back for balance. Slowly bend one knee, lifting your heel toward your glute. Hold 1–2 seconds. Lower slowly.
- Sets/Reps: 3 sets × 12 reps per leg
- Why this helps: Strengthens the hamstrings, which counterbalance quadriceps pull on the knee and reduce anterior shear force across the joint.
- Progression: Add a light ankle weight after 2–3 weeks.
- Exercise 6: Wall Slides (Partial Wall Squats)
- How: Stand with your back against a wall, feet 18 inches from the wall. Slowly slide your back down the wall until your knees reach a 30–45 degree bend — not a full squat. Hold 5 seconds. Slide back up.
- Sets/Reps: 3 sets × 10 reps
- Why this helps: Builds quad and glute strength through a controlled, limited range of motion — the wall prevents any forward knee drift and limits depth to the safe zone.
- Progression: Increase hold time to 10 seconds; then gradually increase knee bend to 60 degrees (not beyond).
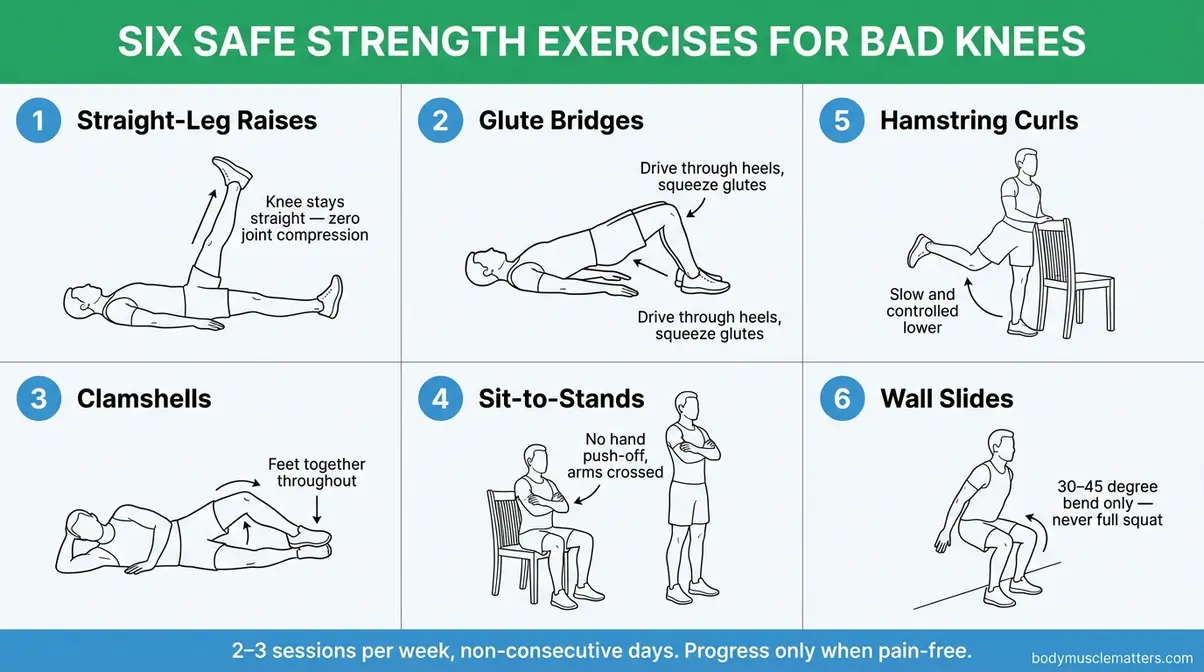
Caption: Perform these six exercises 2–3 times per week on non-consecutive days. Start with the sets and reps shown; progress only when pain-free for 2 consecutive sessions.
HILIT: High Intensity, Zero Impact
HILIT — High-Intensity, Low-Impact Training — is one of the most significant developments in fitness for people with joint conditions, and it’s entirely absent from every competing article on this topic.
What is HILIT? It’s an interval-style workout that pushes your cardiovascular system hard — getting your heart rate into the 75–85% range — using only movements that don’t load the knee joint. Think cycling sprints, pool sprints, upper-body circuits, and seated arm-driven cardio intervals. The intensity triggers EPOC (Excess Post-Exercise Oxygen Consumption — the “afterburn” effect where your body continues burning calories for up to 24 hours post-workout). The low-impact execution means your knees stay protected throughout (Peloton HILIT Guide, 2026; Fortune Well, 2026).
Why HILIT matters for fat loss: High-intensity effort increases your metabolic rate both during and after the workout. Standard low-impact cardio at moderate effort burns calories during the session. HILIT burns calories during the session and for hours afterward — making it a significantly more efficient fat-loss tool once your joints are ready for it.
Beginner HILIT protocol (start Week 3 of the 4-Week Plan):
- On the stationary bike:
- Warm up for 5 minutes at light resistance (Level 2).
- Pedal hard at Level 5–6 resistance for 30 seconds — as fast as comfortably possible.
- Drop to Level 1–2 and pedal slowly for 90 seconds — full recovery.
- Repeat 4–6 times.
- Cool down for 5 minutes at light resistance.
- In the pool:
- Swim one length of the pool at your normal pace.
- Swim the next length as fast as you safely can (freestyle only).
- Rest 30 seconds at the wall.
- Repeat 6–8 times.
Total session: 20–25 minutes. Do not exceed 3 HILIT sessions per week — recovery is essential for both joints and the metabolic adaptations driving fat loss.
Step 3: Your Anti-Inflammatory Diet Plan

Diet and exercise are the two sides of the fat-loss equation — but for people with knee pain, the right food choices do double duty. Specific foods reduce the inflammation (chronic low-grade swelling) inside your knee joint, decrease pain, and simultaneously support the calorie deficit needed for fat loss. This is the third layer of the Joint-First Fat Loss Framework, and competitors offer nothing like it.
A 2026 systematic review found that anti-inflammatory dietary patterns — particularly the Mediterranean diet and omega-3-rich interventions — were consistently linked to lower inflammation markers and reduced symptom severity in arthritis patients (PMC, 2026). The FEAST trial (published in 2026) specifically tested an anti-inflammatory dietary program for knee OA patients, finding meaningful improvements in pain and function (Law et al., 2026).
5 Anti-Inflammatory Foods to Eat
1. Fatty fish (salmon, mackerel, sardines)
Fatty fish are rich in omega-3 polyunsaturated fatty acids (PUFAs) — long-chain fats that directly suppress inflammatory pathways in joint tissue. A meta-analysis of eight randomized controlled trials found that omega-3-rich dietary interventions significantly reduced pain and improved physical function in arthritis patients (PMC, 2026). Aim for 2–3 servings per week. Canned sardines and mackerel are budget-friendly options with equivalent omega-3 content.
2. Leafy green vegetables (spinach, kale, broccoli)
Leafy greens contain vitamin K and polyphenols that reduce inflammatory markers in the blood, according to the Arthritis Foundation. Research cited by the Arthritis Foundation found that vitamin K-rich vegetables like broccoli, spinach, kale, and cabbage “dramatically reduce inflammatory markers” (Arthritis Foundation). They are also calorie-sparse — meaning high volume, low calories, which supports fat loss through natural portion control.
3. Extra-virgin olive oil
Olive oil contains oleocanthal, a compound with anti-inflammatory properties comparable to low-dose ibuprofen in laboratory studies. Harvard Medical School identifies olive oil as a cornerstone of the anti-inflammatory diet, alongside tomatoes and leafy greens (Harvard Health, 2026). Use it as your primary cooking fat — 1–2 tablespoons per day.
4. Berries (blueberries, strawberries, tart cherries)
Berries are loaded with anthocyanins — the plant pigments responsible for their deep color — which have documented anti-inflammatory and antioxidant effects. Tart cherries in particular have been studied specifically for arthritis pain, with some research showing reductions in joint inflammation markers. Berries are also low-calorie, high-fiber foods that support satiety during a weight-loss phase.
5. Turmeric (curcumin)
Curcumin — the active compound in turmeric — has been the subject of extensive arthritis research. The 2026 PMC systematic review on lifestyle interventions for joint health identified curcumin as one of the best-supported supplements for joint inflammation reduction. Add turmeric to soups, curries, and roasted vegetables. Pair it with black pepper — piperine (the compound in pepper) increases curcumin absorption by up to 2,000%.
Foods That Worsen Knee Inflammation
While adding anti-inflammatory foods helps, the Arthritis Foundation’s dietary guidance also emphasizes reducing foods that actively fuel joint inflammation. You don’t need to eliminate these entirely — but reducing frequency and quantity makes a meaningful difference.
Limit or reduce:
- Refined sugar and sugary drinks — Excess sugar increases the production of pro-inflammatory cytokines (chemical messengers that trigger swelling). Sodas, fruit juices, and packaged sweets are the highest-impact items to cut.
- Trans fats and ultra-processed foods — Partially hydrogenated oils (found in many packaged snack foods, fast food, and margarine) are strongly linked to systemic inflammation.
- Refined carbohydrates — White bread, white rice, and most packaged snack foods spike blood sugar rapidly, which triggers inflammatory cascades. Swap for whole grains.
- Excess red and processed meat — High intake of red meat (especially processed meats like sausage and hot dogs) is associated with higher inflammatory marker levels in people with arthritis.
- Alcohol — Even moderate alcohol consumption can trigger inflammatory flares in people with OA or inflammatory arthritis.
The practical approach: reduce these foods gradually rather than eliminating them overnight. A 70% improvement in dietary quality is sustainable; a 100% overnight overhaul typically isn’t.
7-Day Anti-Inflammatory Meal Plan
This is a starting template — adjust portions based on your calorie needs (a registered dietitian can help you calculate your personal targets). General guidance: a calorie deficit of 300–500 calories per day produces steady, sustainable fat loss without triggering the muscle loss that would worsen your knee situation.
| Day | Breakfast | Lunch | Dinner | Snack |
|---|---|---|---|---|
| Mon | Greek yogurt + blueberries + walnuts | Sardine salad on whole grain | Baked salmon + roasted spinach + brown rice | Tart cherries + almonds |
| Tue | Oatmeal + strawberries + chia seeds | Lentil soup + kale salad | Chicken stir-fry + broccoli + olive oil | Apple + natural peanut butter |
| Wed | Scrambled eggs + spinach + turmeric | Mackerel on whole grain wrap | Turkey + roasted sweet potato + leafy greens | Blueberries + Greek yogurt |
| Thu | Smoothie: berries + spinach + flaxseed | Large salad + canned salmon + olive oil dressing | Shrimp stir-fry + brown rice + bok choy | Walnuts + tart cherry juice |
| Fri | Avocado toast on whole grain + eggs | Lentil soup + whole grain roll | Baked mackerel + roasted kale + quinoa | Berries + cottage cheese |
| Sat | Omelette with tomatoes, spinach, turmeric | Chicken and vegetable soup | Salmon patties + roasted broccoli + wild rice | Apple + almond butter |
| Sun | Greek yogurt bowl + mixed berries + chia | Tuna salad + mixed greens + olive oil | Roasted chicken thighs + leafy greens + sweet potato | Tart cherries + walnuts |
- Key principles behind this template:
- Every dinner includes a fatty fish or omega-3-rich protein source
- Leafy greens appear at least once daily
- Olive oil is the primary fat source at lunch and dinner
- Refined carbohydrates are replaced with whole grains or starchy vegetables
- Snacks are anti-inflammatory and protein-containing (supports muscle building from Step 2)
Step 4: The Right Equipment and Knee Support
The right equipment doesn’t just make workouts more comfortable — it actively protects your knee during exercise and extends how long you can train without pain. This is the fourth and final layer of the Joint-First Fat Loss Framework. No competitor article covers all three elements below.
Bike Setup for Knee Safety
If you’re using a stationary bike at a gym or at home, the ergonomic setup matters more than the brand of the bike. The most important variable is seat height, covered fully in Step 1’s bike section. Here is the complete reference:
| Adjustment | Correct Position | Pain Signal If Wrong |
|---|---|---|
| Seat height | Level with hipbone (iliac crest) | Knee pain at the top or bottom of pedal stroke |
| Knee angle at bottom of stroke | 5–10° bend (slight, not locked out) | Patellar tendon tightness or behind-knee pain |
| Handlebar height | 1–2 hand-widths above saddle | Upper back tension drawing weight onto wrists |
| Foot position | Ball of foot on pedal center | Ankle and Achilles tension |
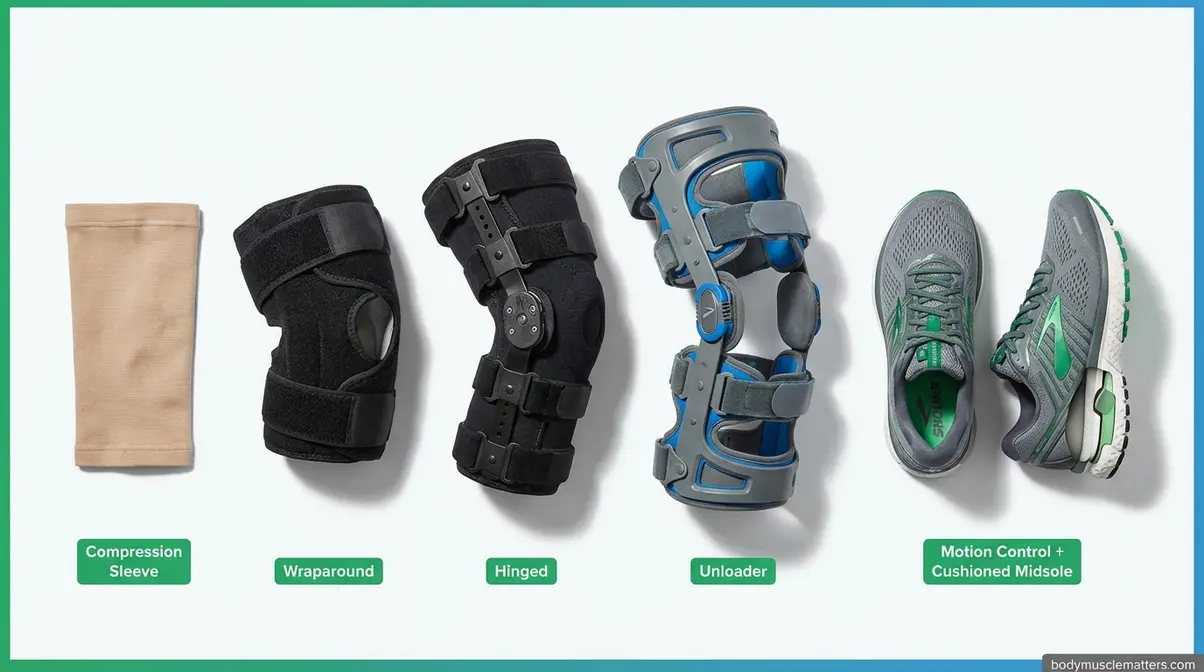
4 Types of Knee Braces
Not all knee braces are equal — and choosing the wrong type can provide a false sense of security or even create new pressure points. Physical therapists categorize knee braces for exercisers into four main types:
- Type 1: Compression Sleeve
- What it is: A stretchy elastic sleeve that slides over the knee.
- Best for: Mild knee aching during exercise, general knee warmth and proprioception (your brain’s awareness of where your joint is in space).
- Not for: Significant OA, ligament instability, or post-surgical recovery.
- Exercise use: Swimming (waterproof versions available), elliptical, walking.
- Type 2: Wraparound Brace with Velcro Straps
- What it is: A padded brace that wraps around the knee and fastens with adjustable straps, usually with an open kneecap design.
- Best for: Moderate knee pain, mild patellar instability, tendonitis.
- Exercise use: Cycling, elliptical, chair cardio, light strength training.
- Type 3: Hinged Knee Brace
- What it is: A rigid frame with metal or hard plastic hinges on either side of the knee. Restricts sideways movement while allowing forward-backward bending.
- Best for: Ligament injuries (ACL, MCL), post-surgical recovery, significant instability.
- Exercise use: Stationary bike (hinges allow pedaling movement), walking, limited strength exercises.
- Type 4: Unloader (Offloader) Brace
- What it is: A specialized brace designed specifically for osteoarthritis. It shifts body weight away from the damaged compartment of the knee.
- Best for: Moderate-to-severe OA, especially medial (inner) compartment OA.
- Exercise use: All weight-bearing exercise. The Cleveland Clinic specifically notes unloader braces as medically appropriate for exercise-related OA pain management (Cleveland Clinic Knee Brace Guide).
How to choose: If you have a diagnosed OA condition, discuss an unloader brace with your orthopedist. If you have general knee pain without a specific diagnosis, start with a quality compression sleeve and assess comfort over 2 weeks.
Footwear That Reduces Knee Stress
Your shoes directly affect how much force travels up through your foot and into your knee. The wrong shoes amplify every impact; the right shoes soften the blow.
What to look for in exercise footwear for bad knees:
- Cushioned midsole: Absorbs shock at heel-strike. Look for EVA (ethylene-vinyl acetate) or gel cushioning in the heel and forefoot zones.
- Motion control or stability features: Prevent excessive inward rolling of the foot (overpronation — the tendency of the foot to roll inward), which directly increases medial knee stress.
- Low heel-to-toe drop (4–8mm): Encourages a more midfoot strike pattern, which reduces knee loading compared to heel-striking in high-heeled running shoes.
- Firm heel counter: The rigid back section of the shoe that wraps your heel — it prevents the heel from rolling inward.
Footwear to avoid: Completely flat shoes (like classic canvas sneakers or minimalist shoes) remove all cushioning and dramatically increase knee impact. Fashion athletic shoes prioritize aesthetics over biomechanical support.
Practical tip: Visit a specialty running store for a gait analysis. Most specialty stores offer this free — they watch you walk and recommend shoe categories based on your foot mechanics. This is a 15-minute investment that can meaningfully reduce knee pain during every workout.
Your 4-Week Knee-Safe Fat Loss Plan
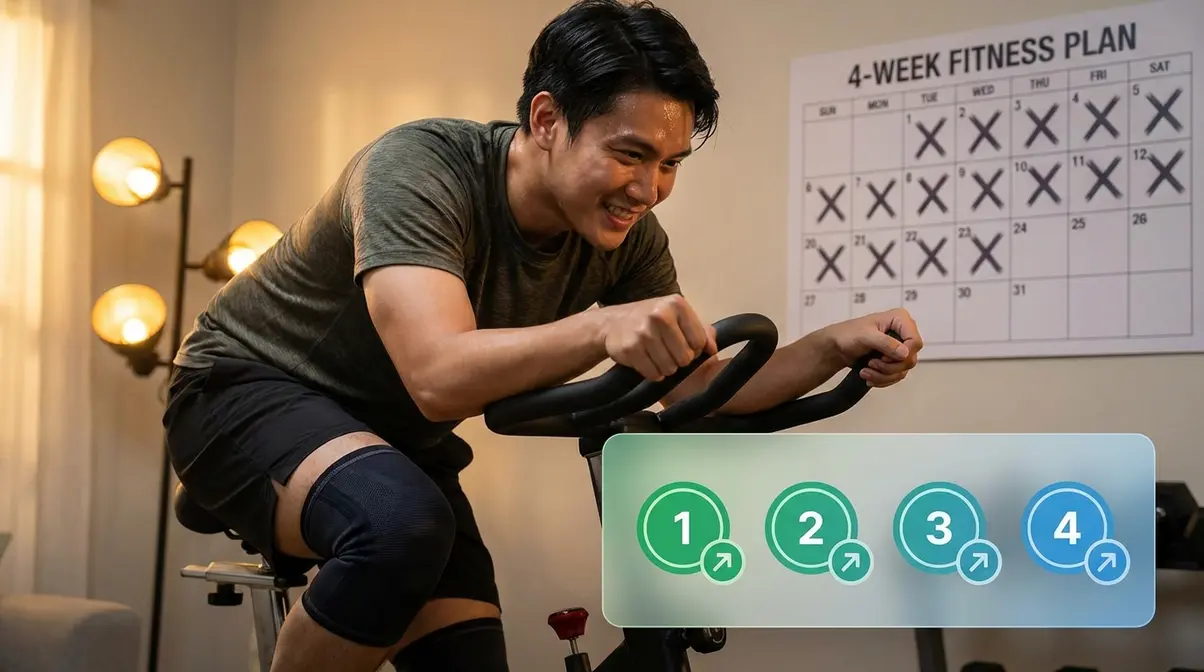
This 4-week plan puts the entire Joint-First Fat Loss Framework into action. Each week adds a new layer — never jumping ahead before your joints are ready. Physical therapists describe this as progressive overload without joint compromise: gradually increasing demand while always keeping pain response as the override signal.
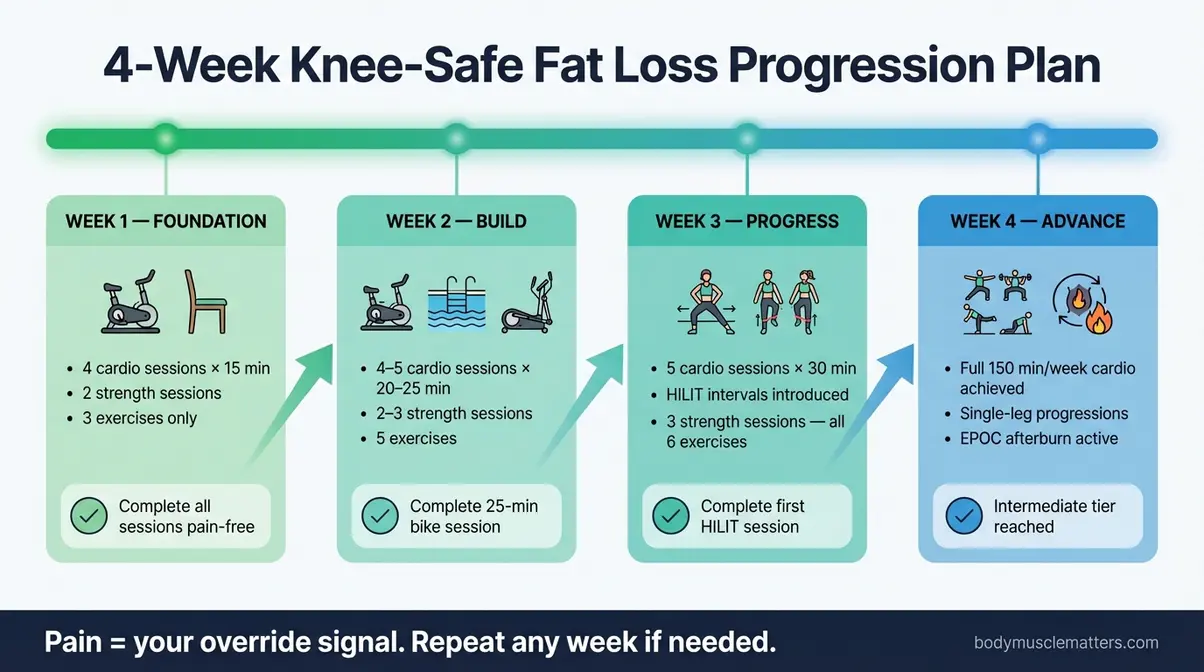
Caption: Follow this four-week progression in order — never skip ahead. If any week produces persistent joint pain, repeat it before moving forward.
Week 1: Foundation
Goal: Build the habit, learn the Stop/Continue Decision Tree, establish pain-free baselines. In this first week, your primary focus is entirely on familiarizing your body with movement again without triggering inflammation. Pay close attention to your body’s feedback during and immediately after each exercise session.
- Cardio (4 sessions):
- 2 × 15-minute stationary bike (Level 2 resistance, slow cadence). Focus on maintaining a smooth, perfectly circular pedal stroke without bouncing in the saddle.
- 2 × 15-minute chair cardio circuit (from Step 1). Keep your core engaged to stabilize your torso.
- Strength (2 sessions, non-consecutive days):
- Straight-leg raises: 2 sets × 10 reps per leg
- Glute bridges: 2 sets × 12 reps. Squeeze your glutes tightly at the top to ensure your lower back isn’t taking the load.
- Clamshells: 2 sets × 12 reps per side
- Sit-to-stands: 2 sets × 8 reps
Warm-up: Always complete the 5-minute knee warm-up sequence from the Prerequisites section before every session. Do not skip this under any circumstances.
Week 1 milestone: Complete all sessions without sharp joint pain. You might feel a dull ache or muscle soreness the next day—this is normal. However, if sharp pain occurs in any session or if your knee visibly swells, drop back to chair cardio only and consult a physical therapist before proceeding to Week 2.
Week 2: Build
Goal: Increase cardio duration and introduce swimming or elliptical. Now that you have established a baseline, the objective is to gently increase the volume of work while carefully monitoring for any delayed joint stiffness.
- Cardio (4–5 sessions):
- 2 × 25-minute stationary bike (Level 3 resistance). You should feel your heart rate elevate into a moderate zone where holding a conversation requires taking brief breaths.
- 1–2 × 20-minute swimming (freestyle laps with rest breaks)
- Optional: 1 × 20-minute elliptical (low resistance, short stride)
- Strength (2–3 sessions):
- Straight-leg raises: 3 sets × 12 reps per leg
- Glute bridges: 3 sets × 15 reps
- Clamshells: 3 sets × 15 reps per side
- Sit-to-stands: 2 sets × 10 reps. Focus on lowering yourself into the chair as slowly as possible (eccentric control).
- Hamstring curls: 2 sets × 10 reps per leg
Week 2 milestone: Complete one 25-minute bike session without pausing due to knee pain. This is your proof that the muscle-building from Week 1 is beginning to reduce joint stress and improve your aerobic capacity.
Weeks 3-4: Progress and Add HILIT
Goal: Increase intensity with HILIT intervals; build toward 150 minutes per week of cardio. During these final two weeks of the progression, you will begin challenging your cardiovascular system more aggressively without adding impact.
- Cardio (5 sessions):
- 2 × 30-minute bike sessions (1 of which includes 4–6 HILIT intervals: 30 seconds hard / 90 seconds easy). During the hard intervals, push your effort to an 8 out of 10.
- 1 × 30-minute swim (1 session includes pool sprints: 1 length easy / 1 length fast, ×6)
- 1 × 30-minute elliptical (moderate resistance, smooth stride)
- 1 × 20-minute chair cardio or gentle walk (active recovery session to flush lactic acid from muscles)
- Strength (3 sessions):
- All six exercises from Step 2
- Straight-leg raises: 3 sets × 15 reps with 1–2 lb ankle weight (if pain-free)
- Glute bridges: 3 sets × 15 reps (single-leg progression)
- Wall slides: 3 sets × 10 reps with 5-second hold. Ensure your weight is entirely in your heels.
- All others: 3 sets × 12–15 reps
Weeks 3–4 milestone: Complete one full HILIT session on the bike and feel the difference in energy expenditure and post-workout appetite suppression — that’s EPOC (Excess Post-Exercise Oxygen Consumption) working. You’ve now graduated from beginner to the intermediate tier of knee-safe training, possessing the tools to burn fat sustainably for the long term.
Common Mistakes to Avoid
Even the best plan breaks down when a few predictable mistakes creep in. Physical therapists and orthopedic specialists see these patterns repeatedly — understanding them before they happen protects everything you’ve built.
Pushing Through Pain
The most damaging mistake isn’t going too hard — it’s ignoring the warning signal when your knee is telling you something is wrong. Sharp joint pain is not a badge of effort. It is a damage signal.
The Stop/Continue Decision Tree from the Prerequisites section exists precisely for this moment. If you feel sharp, localized pain in or directly around your knee during any exercise: stop immediately, apply ice for 15–20 minutes, and do not resume that day. If the pain recurs in the next session at the same point in the workout, you have a problem that requires professional evaluation — not more pushing.
Continuing through sharp joint pain accelerates cartilage wear, increases inflammation, and creates a cycle of swelling and damage that becomes progressively harder to reverse. The Joint-First Fat Loss Framework only works if your joints stay in the game long enough to see results. Respecting pain is not weakness — it’s strategy.
Avoiding Strength Training
Many people with knee pain assume that lifting weights will make things worse. This fear is completely understandable — and the evidence directly contradicts it. As covered in Step 2, nine randomized controlled trials confirm that quadriceps strengthening significantly reduces pain and improves function in knee OA (Hegde et al., 2026). Home-based strength training was found to be as effective as prescription anti-inflammatory medication in one study (Doi et al., 2008).
The confusion comes from conflating high-impact strength exercises (heavy squats, lunges with forward knee drive, leg press at deep range) with the safe, non-weight-bearing exercises prescribed in this guide. Straight-leg raises, glute bridges, and clamshells place almost zero compressive force on the knee. Avoiding them doesn’t protect your joint — it weakens the muscles that protect your joint, creating a feedback loop of increasing pain and decreasing function.
Start with the Week 1 strength protocol. Two sets of 10 reps of straight-leg raises is not a risk. It is the beginning of your recovery.
When to See a Doctor or PT
This guide provides a comprehensive, medically grounded starting point — but it is not a substitute for individualized professional care. See a physical therapist (PT) or orthopedic physician if any of the following applies:
- Sharp joint pain occurs in multiple sessions despite correct exercise selection and technique
- Your knee swells noticeably (visually larger than the other knee) after exercise sessions
- You develop pain at rest — in bed at night or while sitting — that wasn’t present before starting
- You hear grinding, clicking, or popping with pain (painless clicking is usually benign; click-with-pain requires evaluation)
- You’ve followed this plan for 4 weeks without any reduction in knee pain
A physical therapist can assess your specific biomechanics, identify muscle imbalances unique to your body, and design a modified program that accounts for factors a general guide cannot. The AAOS recommends PT consultation as a first-line intervention for knee OA before considering medication or surgical options (AAOS OrthoInfo).
⚠️ Reminder: This article is for informational purposes only. The exercises and dietary suggestions above are general guidance — not personalized medical advice. Always work with a licensed healthcare professional for diagnosis and treatment of knee conditions.
Frequently Asked Questions
Can I lose weight without doing cardio?
Yes — weight loss is primarily driven by a calorie deficit, not by cardio alone. Strength training increases muscle mass, which raises your resting metabolic rate. Combined with an anti-inflammatory diet, you can create the deficit needed for fat loss even with minimal cardio. That said, low-impact cardio — swimming, cycling, the elliptical — accelerates fat loss significantly and should be added as pain allows. Start with chair-based exercises if standing cardio is too painful.
Is walking good or bad for bad knees?
Walking is generally beneficial for knee health, but surface and duration matter. Research confirms that walking at moderate pace improves joint function and reduces OA symptoms over time (PMC, 2026). However, walking on hard surfaces like concrete increases joint load compared to grass or a treadmill. Start with 10–15 minutes on a soft surface and avoid steep hills initially. If your knee swells or pain persists after walking, reduce duration and check your footwear.
How long to see weight loss results?
Most people see measurable changes in 4–8 weeks when combining low-impact cardio, targeted strength training, and a calorie-controlled anti-inflammatory diet. A 2026 five-year study found that participants who reduced BMI by 13.3% or more in the first year showed lasting improvements in knee pain and function (Belibağlı et al., PMC, 2026). Aim for a 300–500 calorie daily deficit for steady, sustainable fat loss — roughly 0.5–1 pound per week.
Best exercise machine for bad knees?
The stationary bike is the most reliably knee-safe cardio machine available. The circular pedaling motion eliminates impact entirely, and the seat supports your body weight throughout the movement. The elliptical is a strong second choice, as it mimics running mechanics without any impact. Conversely, the treadmill ranks lowest for bad knees due to heel-strike forces, even at low speeds. Recumbent bikes are an excellent option for people with severe knee pain who find upright cycling uncomfortable.
Can I swim every day with bad knees?
Swimming daily is generally safe for bad knees because water buoyancy eliminates joint-loading stress. However, daily training of any kind benefits from variation — alternate between swimming, cycling, and strength training to prevent overuse of the same muscle groups. Swim freestyle or backstroke; avoid the breaststroke kick until a physical therapist clears you. If you swim daily, keep at least one session per week at easy effort to allow muscular adaptation without fatigue accumulation.
Conclusion
For anyone trying to exercise with bad knees and lose weight, the path forward is clearer than most advice suggests. Low-impact cardio — cycling, swimming, and elliptical training — burns 300–600 calories per hour with zero pavement-pounding impact. Targeted strength training reduces knee OA pain as effectively as NSAIDs in clinical trials (Hegde et al., 2026). And an anti-inflammatory diet simultaneously reduces joint inflammation and supports the calorie deficit that drives fat loss. These three forces, aligned in the right sequence, make sustainable results not just possible — but probable.
The Joint-First Fat Loss Framework exists because most advice skips the sequence. Safety has to come first — not as a disclaimer, but as the actual foundation that makes cardio, strength, and nutrition work together. When you understand your pain signals, protect your joint with the right exercises, and feed your body anti-inflammatory foods, each layer reinforces the next. That’s what separates a plan that lasts from one that fails after two weeks.
Start with Week 1 of the 4-Week Plan today — not next Monday, not after you “feel ready.” Pick one exercise from the chair cardio circuit or the stationary bike, complete the 5-minute warm-up, and spend 15 minutes moving. Consult your physician or physical therapist before beginning if you have any of the warning signs listed in the Common Mistakes section. Your knees don’t need you to be fearless — they need you to be informed. You are now both.
Frequently Missed Resources for This Journey
If you’re ready to take the next step beyond this guide, certified physical therapists and the AAOS Knee Conditioning Program (AAOS OrthoInfo) are the gold-standard next steps for personalized exercise prescription.