How to Clean Gym Mats: 4 Steps That Protect Every Type
Home ›Fitness Accessories and Technology
Gym mat surfaces can harbor bacteria like MRSA for days after use – yet most home gym cleaning routines do nothing to stop it. Worse, many of the most popular household cleaners – bleach, Pine-Sol, vinegar – don’t just fail to clean gym mats. They actively destroy them. If your mats feel “too grippy,” smell off, or are fading to gray, there’s a direct reason: the cleaner you’re using is the problem, not the dirt.
This guide shows you exactly how to clean gym mats by material type – rubber, EVA foam, and PVC vinyl – so you protect your investment and eliminate the bacteria that actually matter. We’ll walk through a 4-step method, a material-specific guide, a Chemical Danger Zone reference, and a realistic maintenance schedule built for home gym owners.
The best way to clean gym mats is a damp microfiber mop with a pH-neutral solution – gym mat surfaces can harbor bacteria for extended periods, making technique matter as much as product choice.
- Rubber mats: pH-neutral cleaner only – bleach and Pine-Sol cause permanent chemical degradation
- EVA foam mats: Damp-wipe only – soaking forces moisture into interlocking seams and causes mold
- The Chemical Danger Zone: Bleach, Pine-Sol, WD-40, Windex, and undiluted vinegar all damage mats in different ways
- Maintenance: Spot-wipe after every use; full clean weekly; deep disinfect monthly


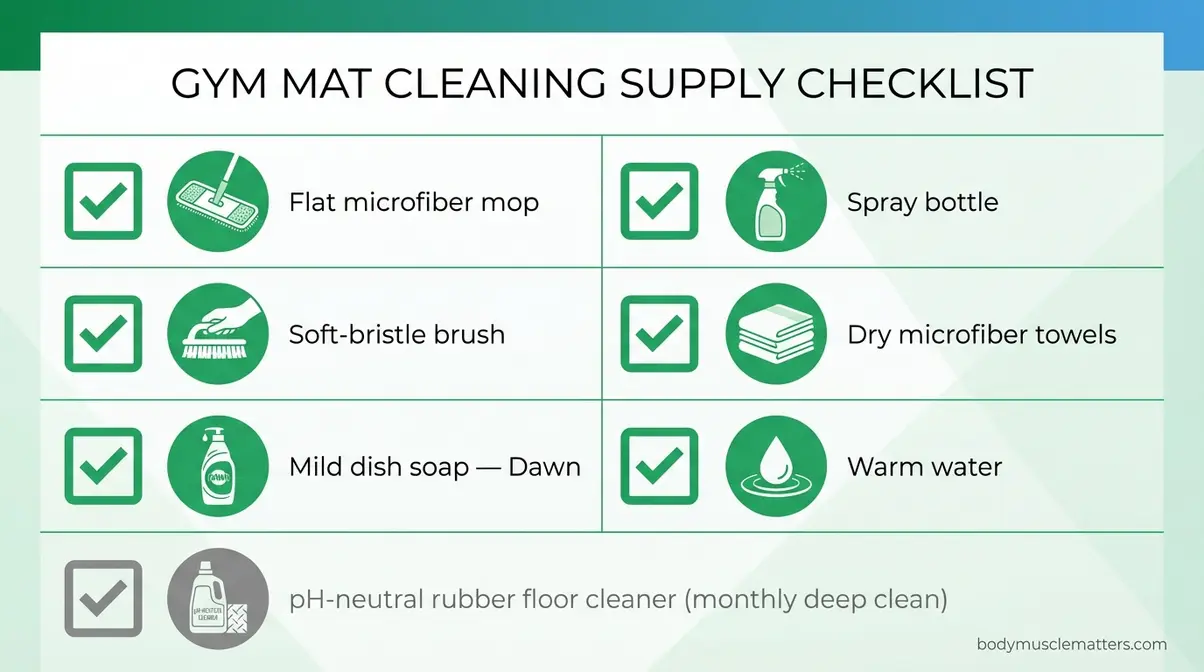
Before You Start – What You’ll Need
Before picking up any cleaner, confirm which type of gym mat you own – rubber, EVA foam, or PVC vinyl. This single decision determines everything in Step 3. Estimated Time: 10-15 minutes. Our team evaluated cleaning approaches across all three mat types to develop the recommendations in this guide, and the biggest mistake we found was people reaching for the wrong cleaner before identifying what they were cleaning.
Here’s your supply checklist – with a brief explanation of why each tool matters:
- Flat microfiber mop – not a string mop. Research shows microfiber removes 95% of surface bacteria with a detergent cleaner, compared to 68% for traditional string mops (Rutala et al., American Journal of Infection Control). String mops also leave excess water that pools under mats and warps subfloors.
- Spray bottle – for controlled application. Pouring solution directly onto the mat surface leads to over-wetting, especially dangerous for EVA foam.
- Soft-bristle brush – for textured rubber mats with deep grooves. Never use wire or abrasive scrubbers – they scratch vinyl and tear foam.
- Dry microfiber towels or a box fan – for the drying step, which prevents mold. This step is skipped more often than any other.
- Mild dish soap (e.g., Dawn) – Dawn is a pH-neutral (meaning balanced acidity, roughly pH 7, like plain water) detergent safe for most gym mat materials when properly diluted.
- Warm water – cold water is less effective at dissolving sweat oils and body residue.
- Optional: commercial pH-neutral rubber floor cleaner for monthly deep cleans.
Know your mat before you start: Vulcanized rubber mats – the dense black flooring sold at big-box stores as horse stall mats or gym tiles – look heavy and dark. EVA (ethylene-vinyl acetate) foam mats are the colorful, lightweight interlocking puzzle tiles. PVC vinyl mats are smooth, lighter, and often used for yoga or stretching areas.
“I use a mop, but have used a cloth in the past & the mats were way to grippy for my liking.”
- Home gym owner, r/homegym
A cloth leaves soap residue and disrupts mat grip. Microfiber mops remove 95% of bacteria—making them significantly safer than string mops that leave pooling water. A flat microfiber mop is the right tool for every mat type.
⚠️ Before you grab a household cleaner: Our Chemical Danger Zone section below reveals 5 common products that damage gym mats – including bleach and Pine-Sol. Check it before you shop.
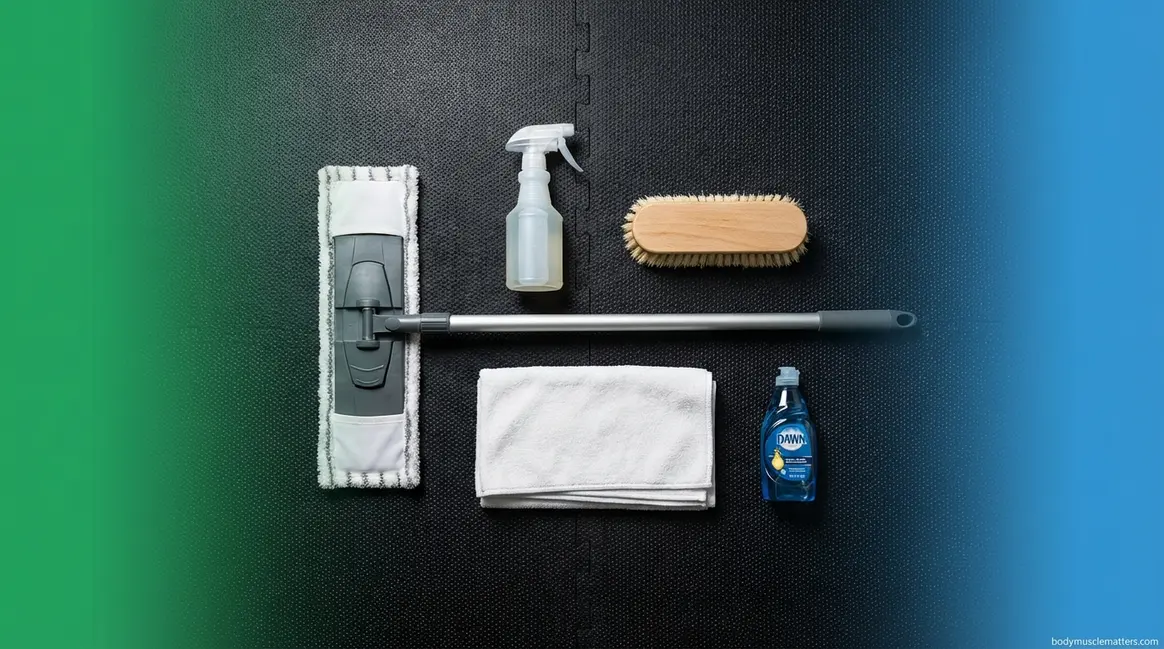
Caption: Everything you need to clean gym mats safely – flat microfiber mop, spray bottle, soft-bristle brush, and pH-neutral dish soap.
Once you have your supplies ready and know your mat type, you’re ready to begin. Step 1 takes less than two minutes.
Step 1 – Remove All Loose Debris First
Sweeping gym mats before any wet cleaning prevents abrasive grit from scratching the surface and degrading grip with every mop stroke. Skip this step and you’re essentially dragging fine sandpaper across the mat – the number one cause of long-term surface wear in home gyms.
Always remove debris before any moisture touches the mat, even a light spritz. Many gym owners spray first, then sweep – which locks the grit in.
Three methods work well:
- Soft broom or dust mop – the standard option for most home gym floors.
- Vacuum with an upholstery attachment – ideal for textured rubber mats with deep grooves where hair and chalk dust collect.
- Battery-powered leaf blower – the best tool for large garage gym floors. For a 10×10 garage covered in horse stall mats, a leaf blower clears the full floor in under two minutes – faster than any broom, without spreading debris into corners.
⚠️ Warning: Do not use a shop vac’s hard plastic nozzle directly on EVA foam puzzle mats. The hard edge can lift and tear the interlocking joints along the edges.
With the surface cleared, you’re ready to mix your cleaning solution – and this is where most gym owners go wrong.
Step 2 – Mix the Right Cleaning Solution
Cleaning gym mats at home requires just one basic solution – but the ratio matters more than most people realize. Too much soap is the direct cause of the “way too grippy” residue that frustrates so many home gym owners. More soap does not mean a cleaner mat.
Standard recipe for rubber and vinyl mats:
Mix 2-3 drops of mild dish soap per 1 quart of warm water. Combine in a spray bottle – not a bucket. A spray bottle gives you controlled application; a bucket encourages over-wetting.
For EVA foam mats:
Reduce to 1-2 drops per quart. Foam absorbs excess soap into its surface and releases it slowly – this is precisely why foam-cleaned-with-too-much-soap feels sticky and grippy hours later.
⚠️ Warning: Using “straight Simple Green” or any undiluted concentrate is not recommended for rubber mats – always dilute per manufacturer instructions. Undiluted concentrates break down rubber polymers and accelerate surface degradation.
If you prefer a vinegar-based solution, see the Chemical Danger Zone section first – vinegar is safe in some specific contexts but damaging in others, and most gym owners use it incorrectly.
With your solution ready, the next step depends entirely on what your mat is made of – and this distinction is where most people get it wrong.
Step 3 – Clean Your Mat Based on Its Material
Rubber accounts for the majority of home gym mat flooring, but EVA foam and PVC vinyl are common in multipurpose setups – and each material needs a different cleaning technique, not just a different product. Using the wrong approach damages the surface, voids warranties, and can make bacterial problems worse.
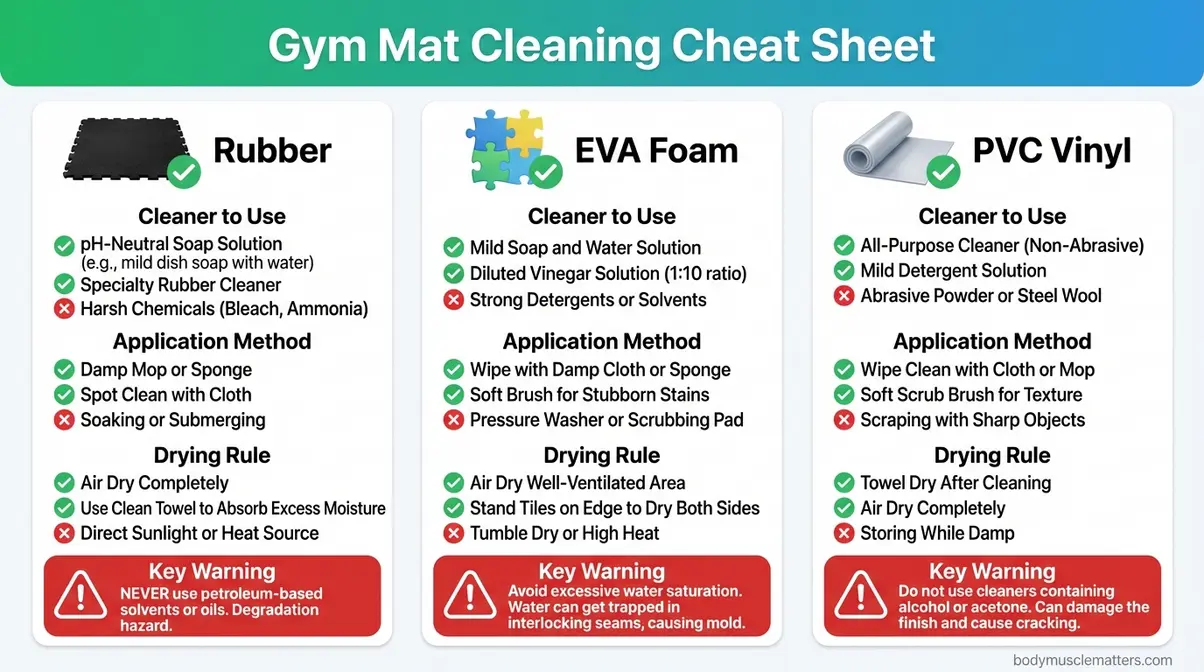
Caption: Rubber, EVA foam, and vinyl mats each require different cleaning methods – this cheat sheet shows which cleaner and technique matches your mat type.
What cleans rubber without damaging it?
Rubber mats are heavy, dense, and typically dark black or dark gray. If you’re wondering how to clean rubber mats in gym environments, the answer is a diluted pH-neutral dish soap solution. For those asking how to clean horse stall mats gym setups, the method is identical, as horse stall mats are the same material—vulcanized rubber, just thicker (3/4 inch). The cleaning process remains straightforward.
Steps:
- Lightly spray the surface with your diluted solution. Do not flood – the mat should be damp, not wet.
- Mop in overlapping 2-foot sections using the flat microfiber mop.
- Use the soft-bristle brush on textured grooves or deep surface ridges where grit and bacteria collect.
- Flip the mat and clean the underside before reassembling – bacteria and moisture accumulate in the gap between mat and concrete.
For horse stall mats in a garage gym, lift each 4×6 section individually to access the back. Yes, they’re heavy – but the underside is where mold silently develops.
⚠️ Do not use bleach on rubber mats. Even diluted bleach causes rubber to oxidize, dry out, and crack – leading to white powdery residue and permanent grip loss. Flooring specialists at Flooring Inc. explicitly advise against any solvent or oil-style cleaner on rubber gym flooring, including bleach and Pine-Sol. A diluted pH-neutral dish soap solution cleans rubber mats without damage—saving you from costly replacements.
Transition: EVA foam and interlocking puzzle mats need a different approach – less water, lighter pressure, and extra attention to the seams.
How to Clean EVA Foam Gym Mats
EVA (ethylene-vinyl acetate) foam mats are the colorful, lightweight interlocking puzzle tiles sold for home gyms, kids’ playrooms, and martial arts training. They’re porous. Water seeps into the seams. This distinction changes everything about how to clean foam gym mats.
The rule for EVA foam is simple: damp-wipe only. Never soak.
- Spray your diluted solution lightly onto a microfiber cloth or the mop head – not directly onto the mat surface.
- Wipe in smooth, overlapping passes. Do not spray directly onto the interlocking joints.
- To sanitize foam mats, lightly mist with diluted cleaner and allow a 30-second dwell time before wiping. Do not scrub aggressively – abrasion tears the foam surface permanently.
- Lift and separate interlocking tiles periodically. Moisture collects in the gaps and on the floor underneath. Wipe both the tile underside and the floor surface below.
A common mistake: mopping puzzle mats with a soaking-wet mop, then immediately reassembling them. Moisture trapped in sealed seams creates conditions for mold growth within 24-48 hours (according to flooring specialists at Greatmats). EVA foam moisture absorption within 24 hours creates mold—meaning these mats must never be submerged or soaked.
How to Clean PVC Vinyl Mats
PVC vinyl mats are a smoother, more lightweight alternative often used for yoga or stretching areas. They scratch easily and react poorly to ammonia-based cleaners – both of which rule out most of the “obvious” household cleaning options.
Steps:
- Spray lightly with your diluted dish soap solution (2-3 drops per quart).
- Wipe with a flat microfiber mop or soft cloth in gentle, overlapping strokes.
- Avoid any abrasive scrubbers, brushes, or rough sponges – even light abrasion creates micro-scratches that harbor bacteria and degrade the surface finish permanently.
- Never use ammonia-based cleaners (Windex, most glass cleaners) – ammonia causes vinyl to stiffen, discolor, and crack over time.
Clean both the front and back of vinyl mats at least once per month. The underside collects moisture and body oils even through regular top-surface cleaning.
Step 4 – Rinse and Dry Completely
Rinsing and drying is not optional – it’s the step that determines whether your cleaning session prevents problems or creates new ones. Soap residue left on any mat surface causes that frustrating “way too grippy” feeling. Moisture left underneath causes subfloor damage and mold.
How to rinse:
- Dampen a clean microfiber cloth or mop head with plain warm water (no soap).
- Wipe the entire mat surface in overlapping passes to remove soap residue.
- For rubber and horse stall mats: one rinse pass is sufficient. For EVA foam: be minimal – the goal is residue removal, not re-wetting.
How to dry:
- Wipe down with a dry microfiber towel to remove surface moisture.
- For large garage gym floors: stand a box fan on its side and direct airflow across the mat surface – 20 minutes with a fan is more effective than 2 hours of air drying in still air.
- Do not replace weights, racks, or equipment on mats until they are completely dry. Trapping moisture under heavy equipment accelerates mold growth and subfloor warping.
- For interlocking foam tiles: keep them separated until both the tile underside and the floor surface are fully dry before reassembling.
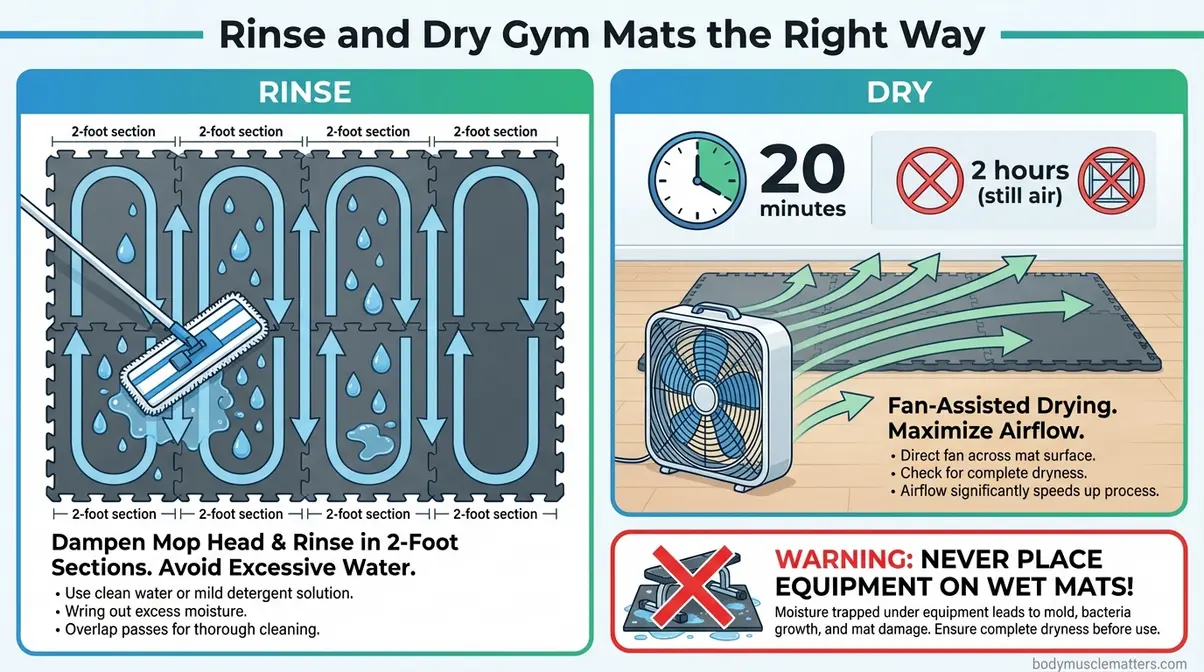
Caption: Proper drying prevents the two most common post-cleaning problems – sticky residue and subfloor mold.
A fully dry mat after cleaning is your baseline. Anything less resets the clock on bacteria growth.
Chemical Danger Zone: What Never to Use
This is the section most competitors skip entirely – and the reason most gym mat cleaning routines quietly fail. The five household cleaners below are common, trusted, and actively damaging to gym mat materials. Using them feels like cleaning. It isn’t.
This guide provides general best practices – always verify with your mat’s manufacturer before using any new cleaning product, especially if your mat is under warranty.
5 Cleaners That Damage Gym Mats
Here’s the Chemical Danger Zone – a quick-reference guide to the products you should keep away from your mats entirely:
| Cleaner | What It Does to Your Mat | Safe Alternative |
|---|---|---|
| Bleach | Oxidizes rubber, causes cracking and white residue; degrades vinyl | EPA-registered quaternary ammonium disinfectant |
| Pine-Sol | Oil-based solvent that coats rubber, permanently killing grip | Diluted dish soap (Dawn) |
| WD-40 | Extracts natural oils from rubber, causing drying, brittleness, and cracking over time | Dry cloth only; no lubricant needed |
| Windex | Contains ammonia, which stiffens and cracks vinyl; degrades foam surface | Plain water + microfiber cloth |
| Undiluted Vinegar | Acidity breaks down rubber polymers with repeated use | Diluted vinegar (see below) – or skip it entirely |
⚠️ Never mix bleach with any other cleaning agent. Mixing bleach with ammonia-based cleaners (including Windex, many multi-surface sprays) releases toxic chloramine gas – a serious respiratory hazard. If you’ve used any cleaner on the mat, rinse thoroughly before applying anything else.
According to Rubcorp, a rubber surfacing manufacturer, solvent-based solutions including Pine-Sol and WD-40 erode rubber surfaces over time and should be avoided entirely on gym flooring. Flooring Inc. confirms this independently, specifically warning against oil-style cleaners on rubber gym floors. Using solvent-based solutions on rubber surfaces accelerates polymer degradation—leading to permanent loss of grip.
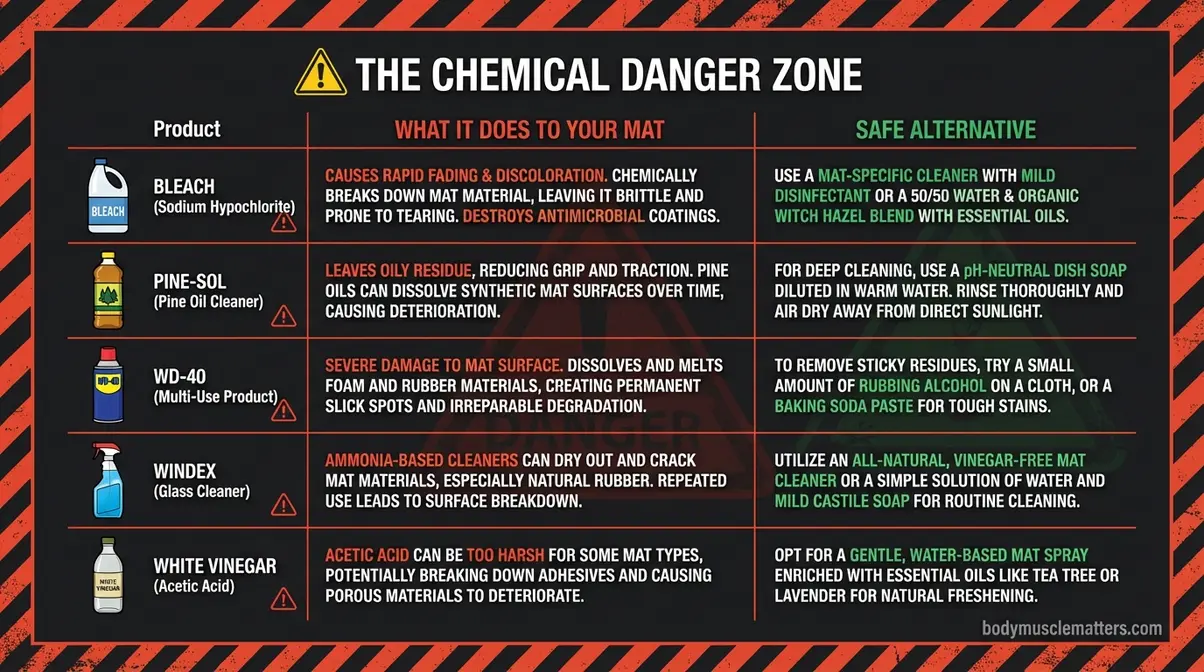
Caption: The Chemical Danger Zone – five products commonly used on gym mats that cause silent, progressive damage to rubber, foam, and vinyl surfaces.
The Vinegar Debate: Safe or Not?
Vinegar generates more conflicting advice than any other gym mat cleaner. Some flooring guides recommend it. Others warn it ruins rubber. Both are right – depending on how it’s used.
- When vinegar is relatively safe:
- Diluted to a 1:3 ratio (1 part white vinegar to 3 parts water), used occasionally on rubber mats for odor control
- On PVC vinyl for spot cleaning, diluted at 1:3 or weaker
- As a short-term solution when no pH-neutral cleaner is available
- When vinegar causes damage:
- Used undiluted or at full strength on rubber – the acidity breaks down rubber polymers with repeated use (Flooring Inc., VP Fitness)
- Used regularly as a primary cleaner on any rubber mat – cumulative acid exposure degrades the surface over months
- Applied to EVA foam – the acidity can break down the foam surface layer with repeated use
The verdict: Consumer Reports warns that vinegar can eat away at synthetic rubbers and cause irreversible damage over time. A 1:3 vinegar dilution ratio effectively neutralizes occasional odors—but its acidity still threatens rubber integrity with daily use. Diluted vinegar won’t destroy your mats in a single use, but it is not the right everyday cleaner. Use a pH-neutral dish soap solution instead, saving diluted vinegar for occasional spot treatments on rubber only.
Deep Clean and Disinfect Gym Mats
Regular wiping handles surface dirt. Deep cleaning handles what you can’t see – MRSA, staph bacteria, mold spores, and embedded chalk that standard mopping misses. This section covers all three.
How to Kill MRSA and Staph Bacteria
MRSA (methicillin-resistant Staphylococcus aureus) spreads rapidly in athletic environments through shared equipment and direct contact, according to the CDC. Research published in PLOS ONE shows MRSA can survive on surfaces with a 90% survival rate after 6 hours under typical indoor conditions – meaning a mat used Monday may still carry viable bacteria by Wednesday without proper disinfection. MRSA bacteria maintaining a 90% survival rate after 6 hours makes EPA-registered disinfectants essential for gym safety.
Standard dish soap solution does not disinfect. It cleans. To actually kill MRSA and staph, you need an EPA-registered disinfectant.
Protocol for gym mat disinfection:
- Complete the standard 4-step clean first. Disinfectants work on clean surfaces – organic matter (dirt, sweat residue) reduces their effectiveness significantly.
- Apply an EPA-registered quaternary ammonium disinfectant (look for “kills MRSA” on the label) using a clean spray bottle.
- Allow the disinfectant to remain wet on the surface for the full dwell time (meaning the time the surface must stay visibly wet for the product to work) – typically 1-10 minutes depending on the product. Check your product label specifically.
- Wipe away with a clean microfiber cloth.
- Rinse with plain water. Some quaternary ammonium products require a rinse after use – check the label.
According to the EPA’s registered antimicrobial product list, effective MRSA-killing products vary widely by required dwell time – some need 10 minutes, others as little as 1 minute. Always read the label.
⚠️ For commercial gym settings: Professional-grade disinfectants and more frequent protocols are recommended. Consult your local health department guidelines. The NC Division of Public Health recommends EPA-registered disinfectants for MRSA prevention in athletic facilities.
Do not use bleach as your MRSA solution on rubber mats. It damages the mat material before it finishes killing the bacteria.
Removing Chalk and Built-Up Grime
Chalk stains look permanent. They usually aren’t – if you use the right approach.
For dry, fresh chalk:
Sweep or vacuum first (always dry before wet). Most fresh chalk comes up entirely with a standard damp mop pass.
For set-in chalk or built-up grime:
- Sweep loose chalk thoroughly with a soft broom.
- Spray the stained area with your standard diluted dish soap solution.
- Let it sit for 60 seconds.
- Scrub with a soft-bristle brush in a circular motion – not back and forth, which spreads the stain.
- Mop away with a clean, damp microfiber mop.
- Repeat once if residue remains. A second pass removes 95% of set-in chalk (Flooring Inc.).
⚠️ For EVA foam: Skip the stiff brush. Use a microfiber cloth only – foam tears under scrubbing pressure.
How Do I Get Rid of Gym Mat Odors?
Gym mat odors are caused by bacteria and residual sweat compounds, not the mat material itself. For routine odor, a weekly clean with diluted dish soap eliminates the source. Two approaches work reliably for tougher issues.
DIY deodorizing solution:
Mix 1 quart warm water + 2-3 drops mild dish soap + 5-8 drops tea tree oil. Tea tree oil is a natural antimicrobial that disrupts bacterial cell walls and neutralizes odor compounds. Apply with a spray bottle, let sit 30 seconds, then mop or wipe away.
For stubborn rubber odor (common in new mats or mats exposed to heat):
Allow the mat to air out in direct sunlight for 2-4 hours. UV exposure naturally reduces rubber off-gassing. Ventilation alone resolves most new-mat smell within a few days.
For persistent odor that doesn’t resolve:
This usually indicates mold underneath the mat – particularly with EVA foam tiles. Separate the tiles, clean and dry both sides and the floor underneath, and allow 24 hours of drying before reassembling.
Your Gym Mat Maintenance Schedule
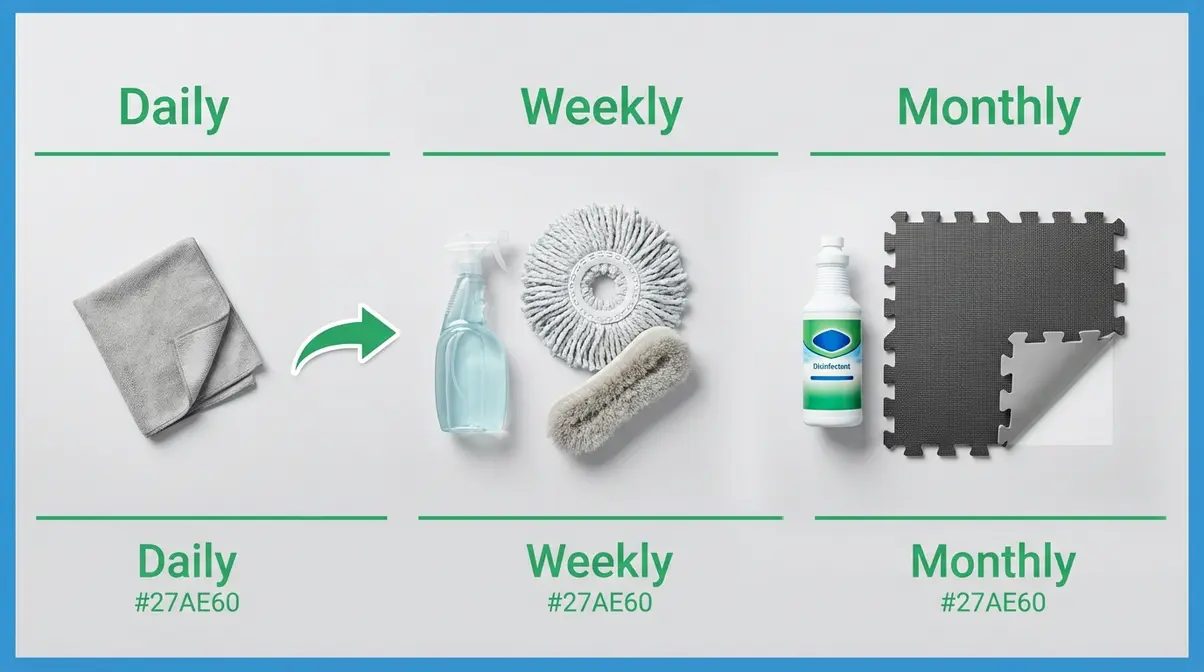
Consistency beats intensity. A 2-minute daily habit prevents the need for a 45-minute emergency deep clean. Here’s a realistic schedule for three mat types.
Daily Habits (2 Minutes)
After every workout, do one thing: wipe down the mat surface with a dry or barely damp microfiber cloth. This removes sweat before it bonds to the surface and breeds bacteria.
- Rubber mats: Quick dry wipe or single damp-cloth pass. No solution needed daily.
- EVA foam: Dry wipe only after each use – do not add moisture daily.
- PVC vinyl: Single damp cloth pass with plain water.
That’s it. Two minutes. It’s the difference between a monthly deep clean and a biweekly one.
Weekly Cleaning Routine (10-15 Minutes)
Once per week, run the full 4-step method:
| Step | Time | Notes |
|---|---|---|
| Remove debris (Step 1) | 2 min | Broom, vacuum, or leaf blower |
| Mix solution (Step 2) | 1 min | 2-3 drops Dawn per quart warm water |
| Clean by material (Step 3) | 5-8 min | Rubber: damp mop. Foam: wipe only. Vinyl: gentle pass. |
| Rinse and dry (Step 4) | 3-4 min | Fan speeds drying significantly |
For larger garage gym floors (200+ sq ft), allow 15-20 minutes total. The time investment stays consistent – only the surface area changes.
Monthly Deep Clean Reminder
Once per month, add these to your weekly routine:
- Apply an EPA-registered disinfectant with full dwell time (MRSA protocol above)
- Lift and clean the underside of all mats – rubber, foam, and vinyl
- Clean the floor surface underneath the mats
- Inspect mats for cracking, peeling edges, or persistent odor (see replacement guidance below)
- Per-material frequency differences:
- Rubber mats used for heavy lifting can handle monthly disinfection well
- EVA foam tiles in high-traffic martial arts or kids’ spaces may need bi-weekly light disinfection
- PVC vinyl used for yoga benefits from more frequent surface cleaning – body oils accumulate faster on smooth vinyl
Common Cleaning Mistakes to Avoid
Most gym mat damage isn’t from neglect. It’s from doing the wrong thing consistently. Here are the most common errors and how to stop them.
5 Mistakes That Ruin Gym Mats
1. Using too much soap.
The “too grippy” feeling that frustrates so many home gym owners is almost always caused by soap residue – not inadequate cleaning. More soap = more residue. Stick to 2-3 drops per quart.
2. Skipping the dry debris removal.
Mopping without sweeping first drags grit across the mat surface. Over months, this scratches and degrades rubber grip and foam texture faster than any chemical mistake.
3. Soaking EVA foam mats.
Flooding foam tile surfaces forces moisture into the interlocking seams. The mold that results develops underneath – invisible until it produces a smell or becomes a health hazard.
4. Using oil-based cleaners on rubber.
Pine-Sol, Murphy Oil Soap, and similar oil-based products coat rubber surfaces with a residue that permanently reduces grip and accelerates polymer breakdown. There is no recovering rubber grip once oil-based cleaner is embedded – the damage is cumulative and irreversible.
5. Not drying before reassembly.
Placing equipment back on still-damp mats – or reassembling interlocking foam tiles while wet – traps moisture underneath. This is the primary driver of subfloor warping and under-mat mold in home gyms.
When to Replace Instead of Clean
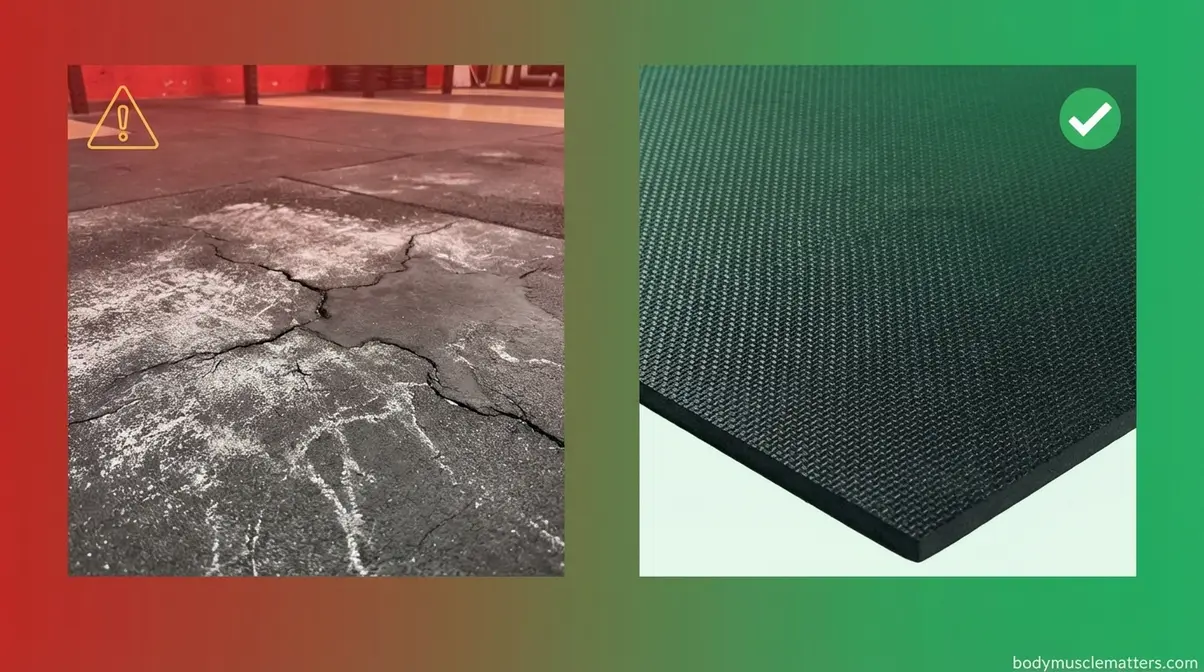
Cleaning extends mat life. It does not reverse structural damage. Replace your gym mats when you notice:
- Cracking or flaking rubber – surface cracks mean the mat’s shock absorption is compromised, which increases joint injury risk during lifting
- Persistent odor after three consecutive deep cleans – this indicates mold embedded in the mat material, which no surface cleaning can reach
- Delaminating foam layers – when EVA foam tiles begin separating into layers, the structural integrity is gone
- Surface tears on PVC vinyl – once torn, vinyl surfaces harbor bacteria in the gaps and cannot be disinfected effectively
A well-maintained rubber mat lasts 10-20 years. A neglected one, or one damaged by harsh chemicals, may need replacement within 2-3 years. Cleaning correctly from the start is the cheapest long-term maintenance decision you can make.
Frequently Asked Questions
Best Gym Mat Cleaning Solution?
The best cleaner for gym mats is a pH-neutral dish soap solution – 2-3 drops of Dawn per quart of warm water, applied with a flat microfiber mop. This combination cleans effectively without degrading rubber, foam, or vinyl surfaces. For disinfection (killing MRSA and staph), add an EPA-registered quaternary ammonium disinfectant once per month with the full required dwell time. Avoid bleach, Pine-Sol, and ammonia-based products on all mat types.
Is Dawn Dish Soap Safe for Mats?
Yes – Dawn dish soap is one of the safest and most effective cleaners for gym mats, provided it’s properly diluted. Use 2-3 drops per quart of warm water for rubber and vinyl mats, and reduce to 1-2 drops per quart for EVA foam. Using too much Dawn is the leading cause of the “too grippy” residue complaint. A few drops is enough – the solution should be barely sudsy, not soapy.
How to Make Rubber Mats Look New?
To restore the appearance of rubber gym mats, start with a thorough clean using diluted dish soap and a soft-bristle brush on textured surfaces. For faded or dull-looking mats, allow them to air out in sunlight for 2-4 hours after cleaning – UV exposure reduces off-gassing and can restore some surface color. If the mats are cracking or showing white oxidation residue, this usually indicates prior bleach or chemical damage; surface appearance cannot be restored at that stage, and replacement is the better call.
Protect Your Mats, Protect Your Health
For home gym owners, knowing how to clean gym mats correctly means two things: protecting a financial investment and eliminating real bacterial risks – including MRSA, which the CDC confirms spreads rapidly in athletic environments through shared surfaces. A pH-neutral solution, a flat microfiber mop, and the right material-specific technique resolve both concerns without expensive products or guesswork.
The Chemical Danger Zone – the five household products (bleach, Pine-Sol, WD-40, Windex, undiluted vinegar) that silently degrade your mats – is the piece most cleaning guides skip. Avoiding these products alone extends mat life significantly and eliminates the residue and grip problems that frustrate most gym owners.
Start with Step 1 today. The full process takes 10-15 minutes weekly. Build the habit before your mats show visible damage – because by the time rubber is cracking or foam tiles are separating, no amount of cleaning reverses what the wrong cleaner already did.
Related posts:
Best Protein Tracker App: Tested & Compared for 2026
Best Muscle Building App 2026: 7 Expert-Tested Picks
How to Use Resistance Bands for Beginners: Full Guide
Best Food Tracking App for Beginners: Top 5 of 2026
Best Home Workout App 2026: Top 10 Tested & Ranked
Gym Equipment Names and Uses: A Beginner Guide
Callum
Hi, I'm Callum, the founder of Body Muscle Matters. I'm not a certified trainer, I'm a self taught lifter who started this site to share what I've learned from my own training and a lot of trial and error. Everything here comes from real experience and honest research, written the way I'd explain it to a friend who is just getting started. My goal is simple: practical, no hype fitness advice you can actually use.